Accton Technology WA410160 Wireless Enterprise Access Point User Manual 9033945
Accton Technology Corp Wireless Enterprise Access Point 9033945
User Manual
1234
Notice
Enterasys Networks reserves the right to make changes in
specifications and other information contained in this document and its
web site without prior notice. The reader should in all cases consult
Enterasys Networks to determine whether any such changes have been
made.
The hardware, firmware, or software described in this document is
subject to change without notice.
IN NO EVENT SHALL ENTERASYS NETWORKS BE LIABLE FOR
ANY INCIDENTAL, INDIRECT, SPECIAL, OR CONSEQUENTIAL
DAMAGES WHATSOEVER (INCLUDING BUT NOT LIMITED TO
LOST PROFITS) ARISING OUT OF OR RELATED TO THIS
DOCUMENT, WEB SITE, OR THE INFORMATION CONTAINED IN
THEM, EVEN IF ENTERASYS NETWORKS HAS BEEN ADVISED OF,
KNEW OF, OR SHOULD HAVE KNOWN OF, THE POSSIBILITY OF
SUCH DAMAGES.
Enterasys Networks, Inc.
50 Minuteman Road
Andover, MA 01810
2004 Enterasys Networks, Inc. All rights reserved.
Part Number: 9033945 February 2004
ENTERASYS, ENTERASYS NETWORKS, NETSIGHT, ROAMABOUT,
and any logos associated therewith, are trademarks or registered
trademarks of Enterasys Networks, Inc. in the United States and other
countries.
All other product names mentioned in this manual may be trademarks
or registered trademarks of their respective companies.
FCC Communication Commission
Interference Statement
This equipment has been tested and found to comply with the limits for
a Class B digital device, pursuant to part 15 of the FCC Rules. These
limits are designed to provide reasonable protection against harmful
interference in a residential installation. This equipment generates, uses
and can radiate radio frequency energy and, if not installed and used in
accordance with the instructions, may cause harmful interference to
radio communications. However, there is no guarantee that
interference will not occur in a particular installation. If this equipment
does cause harmful interference to radio or television reception, which
can be determined by turning the equipment off and on, the user is
encouraged to try to correct the interference by one or more of the
following measures:
• Reorient or relocate the receiving antenna.
• Increase the separation between the equipment and receiver.
• Connect the equipment into an outlet on a circuit different from that to
which the receiver is connected.
• Consult the dealer or an experienced radio/TV technician for help.
This device complies with Part 15 of the FCC Rules. Operation is subject
to the following two conditions: (1) This device may not cause harmful
interference, and (2) this device must accept any interference received,
including interference that may cause undesired operation.
FCC Radiation Exposure Statement
This equipment complies with FCC radiation exposure limits set forth
for an uncontrolled environment. This equipment should be installed
and operated with minimum distance 20cm between the radiator &
your body.
If the RBT3K-AG or RBT3K-AG-G device is going to be operated in
5.15 ~ 5.25GHz frequency range, then it is restricted in indoor
environment only.
This transmitter must not be co-located or operating in conjunction
with any other antenna or transmitter.
Enterasys Networks declares that the RBT3K-1G, RBT3K-AG, and
RBT3K-AG-G (RoamAbout Access Point 3000) are limited in the 2.4
GHz band on channel 1-11 by specified firmware controlled in USA.
Industry Canada (Canada) - Class B
Computing Device:
This Class B digital apparatus complies with Canadian ICES-003.
Cet appareil numérique de la classe B est conforme à la norme
NMB-003 du Canada.
Europe - EC Declaration of Conformity
This device complies with Low Voltage Directive 73/23/EEC and EMC
Directive 89/336/EEC.
VCCI Notice
This is a Class B product based on the standard of the Voluntary
Control Council for Interference from Information Technology
Equipment (VCCI). If this is used near a radio or television receiver in a
domestic environment, it may cause radio interference. Install and use
the equipment according to the instruction manual.
Specifications
For the complete Access Point 3000 (part number RBT3K-1G,
RBT3K-AG, and RBT3K-AG-G) specifications, refer to the RoamAbout
Access Point 3000 Hardware Installation and Configuration Guide.
Physical Size
21.83 x 13.73 x 3.27 cm (8.60 x 5.40 x 1.29 in.)
Weight
0.80 kg (1.76 lbs)
Power Supply
Input: 100-240 AC, 50-60 Hz
Output: 5.1 VDC, 3A
Power consumption: 13.2 watts
802.1af compliant: input voltage 48 VDC, 0.27A, 12.96 watts
Temperature
Operating: 0 to 55 °C (32 to 131 °F)
Storage: 0 to 70 °C (32 to 158 °F)
Humidity
15% to 95% (non-condensing)
EMC Compliance (Class B)
FCC Class B (US)
ICES-003 (Canada)
VCCI (Japan)
RCR STD-33A
EN55024, EN55022
CISPR 22-96
Radio Signal Certification
Safety
CSA/NTRL (CSA 22.2 No. 950 & UL 60950)
EN60950 (TÜV/GS), IEC60950 (CB)
LVD/EN60950
Plenum Rated UL 2043
Standards
IEEE 802.3 10BASE-T, IEEE 802.3u 100BASE-TX, IEEE 802.11a, b, g
Access Point 3000 Overview
The Enterasys Networks Wireless Access Point 3000 is an IEEE
802.11a/b/g (RBT3K-AG & RBT3K-AG-G), or an IEEE 802.11b/g
only (RBT3K-1G), access point that provides transparent,
wireless high-speed data communications between the wired
LAN and fixed, portable or mobile devices equipped with an
802.11a, 802.11b or 802.11g wireless adapter.
This solution offers fast, reliable wireless connectivity with
considerable cost savings over wired LANs (which include
long-term maintenance overhead for cabling). Using 802.11a,
802.11b, and 802.11g technology, this access point can easily
replace a 10 Mbps Ethernet connection and provide seamless
integration into a 10/100 Mbps Ethernet LAN.
In addition, the access point offers full network management
capabilities through an easy to configure web interface, and a
command line interface for initial configuration and
troubleshooting.
Installation
Please read the Regulatory, FCC, and specification information
before you install the RoamAbout Access Point 3000.
To install the RoamAbout Access Point 3000, perform the
following steps:
1. Select a site. Choose a proper place for the access point. The
best location is at the center of your wireless coverage area,
within line of sight of all wireless devices. Try to place the
access point in a position that can best cover its Basic Service
Set. Normally, the higher you place the access point, the
better the performance.
FCC CAUTION: Changes or modifications made to
this device which are not expressly approved by the
party responsible for compliance could void the user’s
authority to operate the equipment.
RBT3K-AG & RBT3K-AG-G
2.4 GHz & 5 GHz
RBT3K-1G
2.4 GHz Only
FCC part 15.247 (2.4 GHz) FCC part 15.247 (2.4 GHz)
FCC part 15 15.407(b)
RSS-210 (Canada) RSS-210 (Canada)
EN 300.328-1 V1.3.1 EN 300.328-1 V1.3.1
EN 300.328-2 V1.2.1 EN 300.328-2 V1.2.1
EN 301 489-01: V.1.3.1
EN 301 489-17: V.1.2.1
EN 301 893: V.1.2.1
MPT RCR std.33 (D33 1~13 Chan-
nel, T66 Channel 14) MPT RCR std.33 (D33 1~13 Channel,
T66 Channel 14)
Electrical Hazard: Only qualified personnel should
perform installation procedures.
Caution: Ensure that you wear the ESD (Electrical Static
Discharge) strap during the installation.
567
2. Mount the access point. The access point can be mounted on
any horizontal surface or wall.
a. Mounting on a horizontal surface.
To keep the access point from sliding on the surface,
attach the four rubber feet provided in the accessory kit to
the embossed circles on the bottom of the access point.
b. Mounting on a wall.
Locate at least two mounting holes/slots on the mounting
bracket that line up with a wall stud. Use two screws to
secure the mounting bracket to the wall stud. Use plastic
anchors, or self-anchoring screws to secure the mounting
bracket to the wallboard. Then, slide the access point
down onto the screws until the screws are secure.
3. Lock the access point in place to prevent unauthorized
removal of the access point. You can use a Kensington Slim
MicroSaver security cable (not included) to attach the access
point to a fixed object.
4. Connect the Ethernet cable. The access point can be wired to
a 10/100 Mbps Ethernet through a network device, such as a
hub or a switch. Connect your network to the RJ-45 port on
the back panel with category 3, 4, or 5 UTP cable. When the
access point and the connected device are powered on, the
Ethernet Link LED should light indicating a valid network
connection.
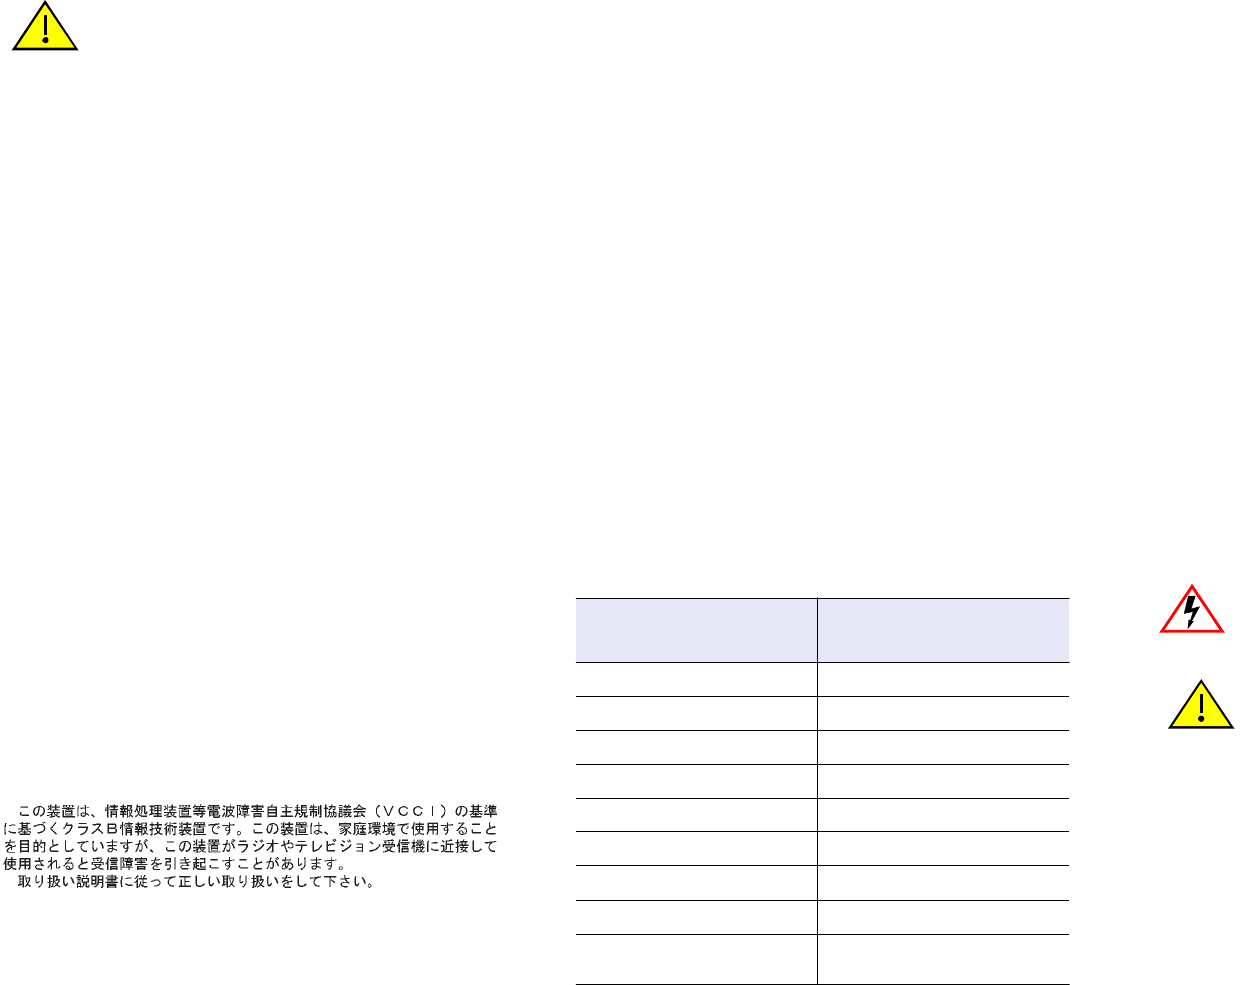
5. Connect the console port. Connect the console cable
(included) to the RS-232 console port to access the
command-line interface.
6. Connect the power adapter to the access point, and the
power cord to an AC power outlet. Otherwise, the access
point can derive its operating power directly from the RJ-45
port when connected to a device that provides IEEE 802.3af
compliant Power over Ethernet (PoE).
7. Observe the self test. When you power on the access point,
verify that the PWR indicator stops flashing and remains on,
and that the other indicators start functioning. If the PWR
LED does not stop flashing, the self test has not completed
correctly. Refer to the RoamAbout Access Point 3000 Hardware
Installation and Configuration Guide for troubleshooting
information.
8. Position the antennas.The antennas emit signals along a
plane perpendicular to the antenna (with the propagation
pattern shaped as a toroidal sphere), and provide more
effective coverage when positioned along different axes. For
example, you might position the antennas 45 to 90 degrees
from each other.
Accessing the Configuration Screens
The Enterasys Networks Access Point 3000 includes a
web-based interface and a direct connection to the console port
for management. You can also manage the Access Point 3000
using Enterasys Networks NetSight.
Refer to the RoamAbout Access Point 3000 Hardware Installation
and Configuration Guide for complete information.
Initial Setup Using the Console Port
To connect to the console port, complete the following steps:
1. Connect the console cable to the serial port on a terminal,
or a PC running terminal emulation software, and tighten
the captive retaining screws on the DB-9 connector.
2. Connect the other end of the cable to the RS-232 serial
port on the access point.
3. Make sure the terminal emulation software is set as
follows:
• Select the appropriate serial port (COM port 1 or 2).
• Set the data rate to 9600 baud.
• Set the data format to 8 data bits, 1 stop bit, and no
parity.
• Set the flow control to none.
• Set the emulation mode to VT100.
• When using HyperTerminal, select Terminal keys, not
Windows keys.
4. Once you have set up the terminal correctly, press the
[Enter] key to initiate the console connection. The console
login screen is displayed.
5. Log in by entering admin for the user name and
password for the password.
Accessing Web Management
To access the Access Point web management, perform the
following steps:
1. Enter the default IP address: http://192.168.1.1 in your
browser window.
2. Enter the username admin and the password password,
and click on LOGIN.
Using NetSight
To use NetSight, refer to the documentation that shipped
with the software.
Configuration Information Location
Configuration information is located in the RoamAbout
Access Point 3000 Hardware Installation and Configuration
Guide, located on the CD-ROM included in the kit, or
available from www.enterasys.com/wireless.
Note: The RJ-45 port on the access point uses an MDI pin
configuration, you must use straight-through cable for
network connections to hubs or switches that only have
MDI-X ports, and crossover cable for network connections
to PCs, servers or other end nodes that only have MDI
ports. However, if the device to which you are connecting
supports auto-MDI/MDI-X operation, you can use either
straight-through or crossover cable.
DC 5V/3A
POE IN
CONSOLE
LOCK
Caution: Use ONLY the power adapter supplied with
this access point. Otherwise, the product may be
damaged.
DC 5V/3A
POE IN
CONSOLE
LOCK
DC 5V/3A
POE IN
CONSOLE
LOCK
Note: When using HyperTerminal with Microsoft®
Windows® 2000, make sure that you have Windows
2000 Service Pack 2 or later installed. Windows 2000
Service Pack 2 fixes the problem of arrow keys not
functioning in HyperTerminal’s VT100 emulation. See
www.microsoft.com for information on Windows 2000
service packs.
Access Point 3000 Quick Start
ENTERASYS.COM
P/N 9033945
ENJOY THE FREEDOM OF WIRELESS NETWORKING
™