Accton Technology WM8920BE 2.5GHz WiMAX PC Card User Manual user guide
Accton Technology Corp 2.5GHz WiMAX PC Card user guide
Users Manual

Mobile WiMAX PCMCIA Card
User Guide


User Guide
Mobile WiMAX PCMCIA Card
IEEE 802.16e 2.5/3.5 GHz WiMAX PCMCIA Card
WM8931BE
WM8921BE
E062007-CS-R01
149xxxxxxxxx

i
Compliances
Federal Communication Commission Interference Statement
This equipment has been tested and found to comply with the limits for a Class B digital
device, pursuant to Part 15 of the FCC Rules. These limits are designed to provide
reasonable protection against harmful interference in a residential installation. This
equipment generates, uses and can radiate radio frequency energy and, if not installed
and used in accordance with the instructions, may cause harmful interference to radio
communications. However, there is no guarantee that interference will not occur in a
particular installation. If this equipment does cause harmful interference to radio or
television reception, which can be determined by turning the equipment off and on, the
user is encouraged to try to correct the interference by one of the following measures:
• Reorient or relocate the receiving antenna
• Increase the separation between the equipment and receiver
• Connect the equipment into an outlet on a circuit different from that to which the receiver
is connected
• Consult the dealer or an experienced radio/TV technician for help
This device complies with Part 15 of the FCC Rules. Operation is subject to the following
two conditions: (1) This device may not cause harmful interference, and (2) this device
must accept any interference received, including interference that may cause undesired
operation.
FCC Caution: Any changes or modifications not expressly approved by the party
responsible for compliance could void the user’s authority to operate this equipment.
IMPORTANT NOTE: FCC Radiation Exposure Statement
This equipment complies with FCC radiation exposure limits set forth for an uncontrolled
environment. End users must follow the specific operating instructions for satisfying RF
exposure compliance. To maintain compliance with FCC RF exposure compliance
requirements, please follow operation instruction as documented in this manual.
This transmitter must not be co-located or operating in conjunction with any other antenna
or transmitter.
SAR compliance has been established in typical laptop computer(s) with CardBus slot,
and product could be used in typical laptop computer with CardBus slot. Other application
like handheld PC or similar device has not been verified and may not compliance with
related RF exposure rule and such use shall be prohibited.
The availability of some specific channels and/or operational frequency bands are country
dependent and are firmware programmed at the factory to match the intended
destination. The firmware setting is not accessible by the end user.

ii
EC Conformance Declaration
Marking by the above symbol indicates compliance with the Essential Requirements of
the R&TTE Directive of the European Union (1999/5/EC). This equipment meets the
following conformance standards:
• EN 60950-1 (IEC 60950-1) - Product Safety
• EN 301 489-1, EN 301 489-4 - EMC requirements for radio equipment
• EN 50392 - Country specific SAR requirements
This device is intended for use in all European Community countries:

iii
About This Guide
Purpose
This guide details the hardware features of the PCMCIA Card, including its physical and
performance-related characteristics, and how to install the device and use its
configuration software.
Audience
This guide is for PC users with a working knowledge of computers. You should be familiar
with Windows operating system concepts.
Conventions
The following conventions are used throughout this guide to show information:
Note: Emphasizes important information or calls your attention to related features or
instructions.
Caution: Alerts you to a potential hazard that could cause loss of data, or damage the
system or equipment.
Warning: Alerts you to a potential hazard that could cause personal injury.
Related Publications
The following publication gives basic information on how to install and use the PCMCIA
Card:
Quick Start Guide
Also, as part of the PCMCIA Card’s software, there is online help that describes all
configuration related features.
Revision History
This section summarizes the changes in each revision of this guide.
June 2007 Revision
This is the first revision of this guide.

iv

v
Contents
Chapter 1: Introduction 1-1
Features 1-1
System Requirements 1-2
Package Checklist 1-2
Hardware Description 1-2
Antennas 1-2
LED Indicators 1-3
Chapter 2: Installation 2-1
Chapter 3: Quick Setup 3-1
Starting the WiMAX Connection Manager 3-1
Setting a Profile 3-2
Connecting to a WiMAX Service 3-4
Chapter 4: Configuration 4-1
Using WinemaCM 4-1
The Config Screen 4-3
Notification Settings 4-4
The Profile Screen 4-5
Profile Settings 4-6
Authentication Settings 4-7
The Status Screen 4-11
Connection Info 4-11
Network Info 4-12
Program Info 4-13
Error Log 4-15
Appendix A: Troubleshooting A-1
Diagnosing LED Indicators A-1
Network Connection Problems A-1
Uninstalling the WinemaCM Software A-2
WinemaCM Error IDs A-3

1-1
Chapter 1: Introduction
The Mobile WiMAX PCMCIA Card is a network adapter that enables a notebook PC
to connect to a service provider’s 2.5 or 3.5 GHz mobile WiMAX network.
The PCMCIA card plugs directly into a compatible card slot and includes its own
driver and configuration software for Windows XP and Windows Vista. The card
includes two folding antennas that can be adjusted for best signal reception. When
connected to a WiMAX base station, the card is capable of providing a maximum
download data rate of 4 Mbps and an upload rate of 1.5 Mbps.
Features
• Provides a maximum download data rate of 4 Mbps and an upload rate of 1.5 Mbps
• Easy installation with a user-friendly interface for configuration
• Working range up to 5 km (3 miles) from base station
• Scaleable Orthoganal Frequency Division Multiple Access (OFDMA) wireless
technology provides a robust, interference-resistant connection
• Driver support for Windows XP with Service Pack 2 (SP2) and
Windows Vista
• Strong network security with PKMv2, EAP-TLS, and EAP-TTLS support
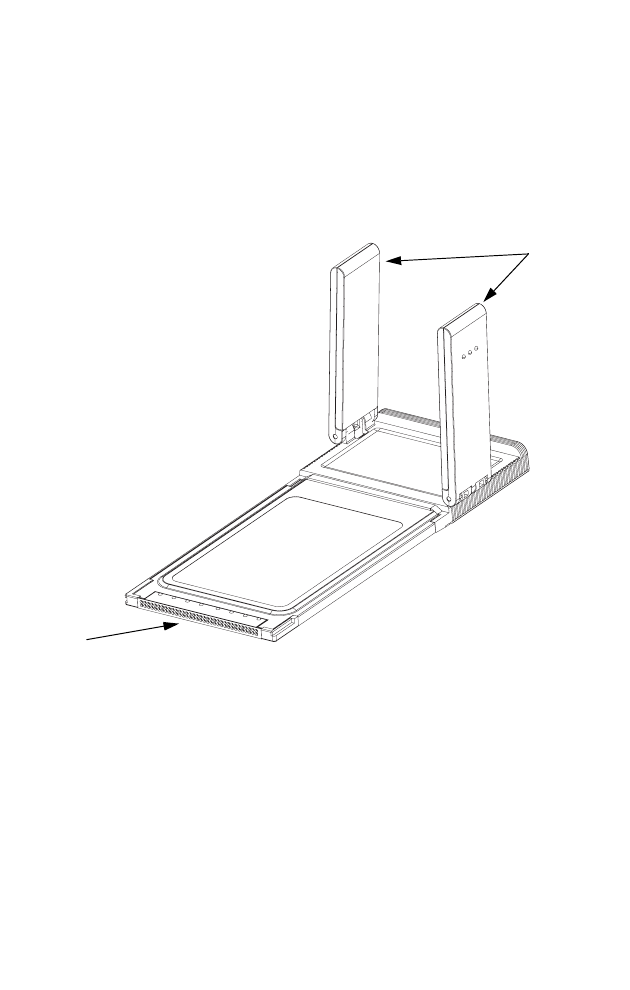
Antennas
PCMCIA Slot
Connector

Introduction
1-2
System Requirements
Before you install the Wireless PC Card, check your system for the following:
• A notebook PC with a PCMCIA Type II slot
• Windows XP with Service Pack 2 or Windows Vista
• An account with a WiMAX (IEEE 802.16e) service provider operating a mobile
service in the licensed 2.5 and 3.5 GHz bands
Package Checklist
The Wireless PC Card package includes:
• Mobile WiMAX PCMCIA Card
• Driver and utility CD (includes this User Guide)
• Quick Start Guide Flyer
• Safety notice
Please inform your dealer if there are any incorrect, missing, or damaged parts. If
possible, retain the carton, including the original packing materials, in case there is a
need to return the product.
Hardware Description
The WiMAX PCMCIA Card is fully compliant with the specifications defined in IEEE
802.16e-2005 WAVE 1. It can be installed in any notebook PC with a Type II
PCMCIA-compatible slot. The notebook PC must be running Windows XP with
Service Pack 2 or Windows Vista.
Antennas
The WiMAX PCMCIA Card includes two fold-out antennas for wireless
communications. The antennas operate in a Maximal-Ratio Combining (MRC) mode
when receiving, helping to avoid multipath fading effects. When transmitting, the
card only uses one antenna.
Hardware Description
1-3
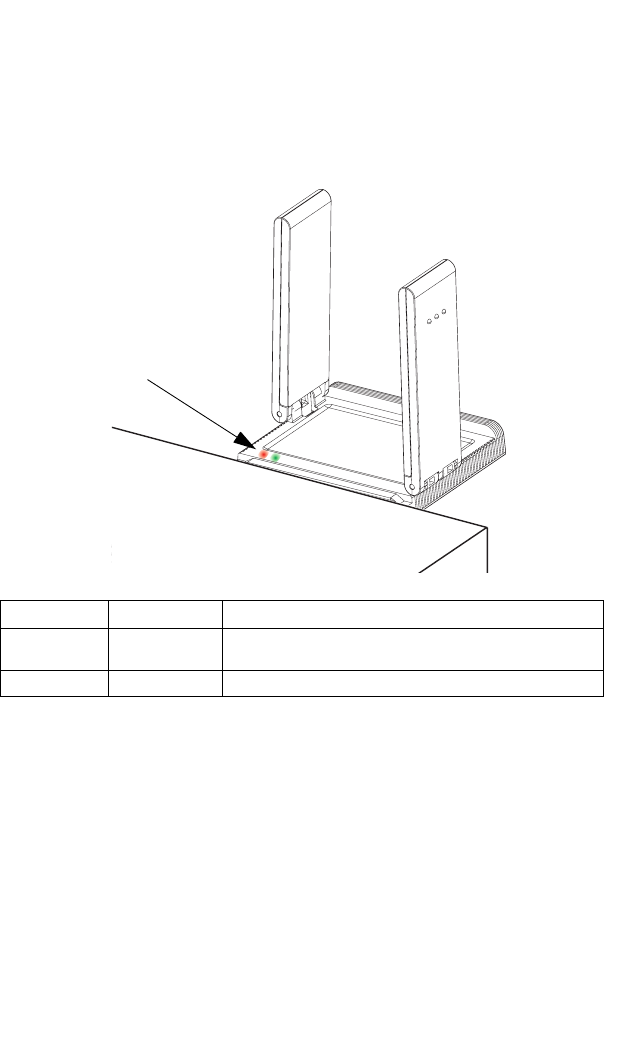
LED Indicators
The WiMAX PCMCIA Card includes two status LED indicators. The indicators are
visible through the card’s black plastic case when it is inserted into a PCMCIA slot.
The LEDs are described in the following figure and table.
LED Status Description
Red On The card is correctly installed in a PCMCIA slot and
is receiving power.
Green On The card has a valid link with a WiMAX base station.
Status LEDs

Introduction
1-4
2-1
Chapter 2: Installation
Warning: Network cards are sensitive to static electricity. To protect the card, always
touch the metal chassis of your computer or the ground to equalize the static
charges, before handling the card.
To install the card’s driver and utilities for Windows XP or WIndows Vista, the card
must be either first inserted in an available PCMCIA slot, or inserted during the
set-up procedure. When you first insert the card in a slot, the Windows “Found New
Hardware” dialog box displays. Just click Cancel.
Note: If you encounter problems installing the PCMCIA card, see “Troubleshooting” on
page A-1.
To set up the card’s Windows driver and utilities, follow these steps:
1. Turn on your notebook and wait until the Windows system has completely
started.
2. Load the driver and utility CD that comes with the package. The install program
should start automatically.
If the install program does not start automatically, open the folder that displays
the CD’s contents and find the file “WinemaCM_Install.exe” in the root directory.
Double click the file to start the install program.
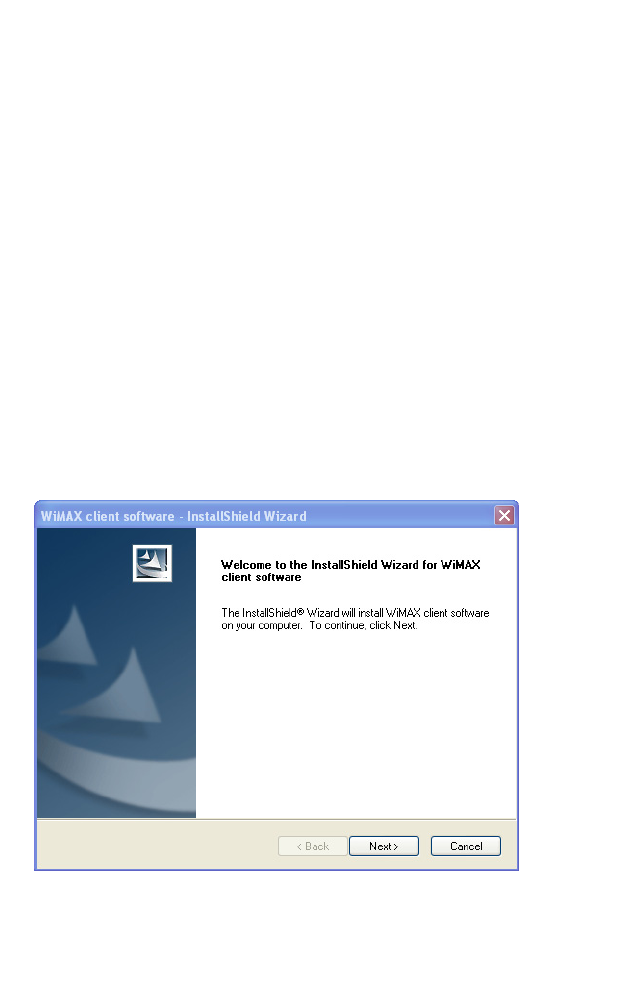
3. Click Next to continue the installation.
Installation
2-2
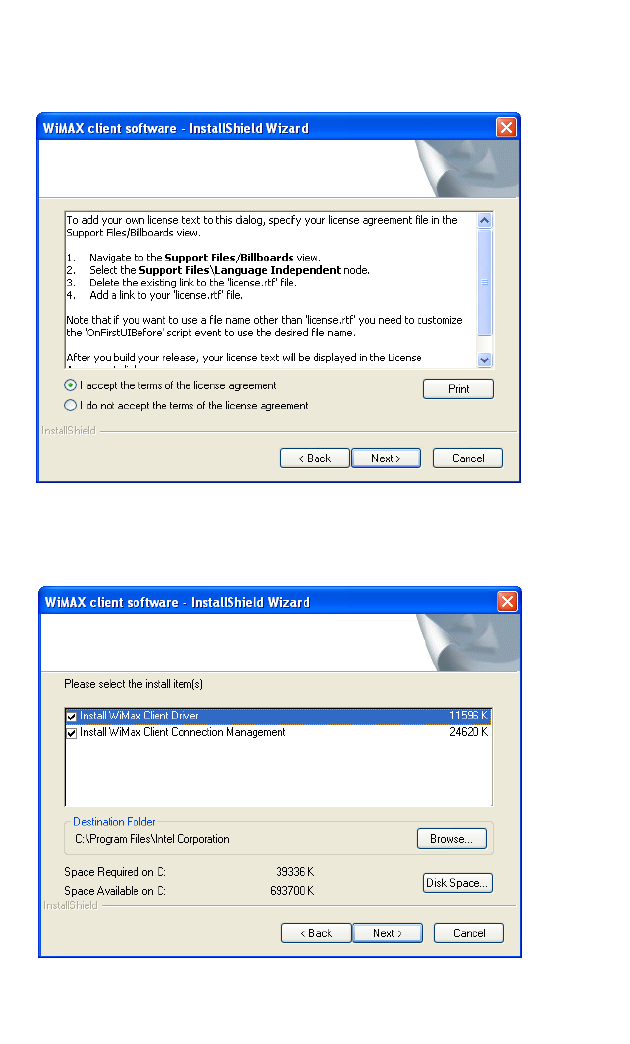
4. Select the “I accept the terms of the license agreement” radio button, then click
Next.
5. Select the software and utilities you want to install. Be sure both the WiMAX
Client Driver and WiMAX Client Connection Management are selected. Confirm
the installation location before clicking Next.
2-3
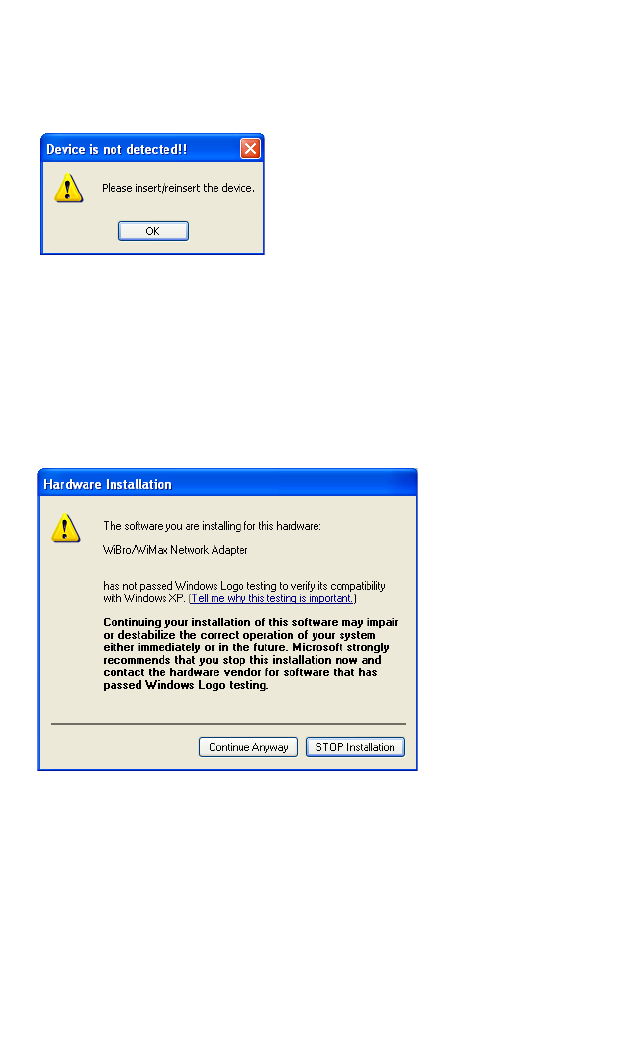
6. If the following message is displayed, you need to insert the WiMAX card in an
available PCMCIA slot on the PC. (Note that this message will not display if you
already inserted the card in a slot before starting this set-up procedure.)
Find an available PCMCIA slot in your notebook and with the card’s 68-pin
connector facing the slot, slide the card completely into the slot. When the card
is inserted correctly, the green LED on the card turns on (see page 1-3).
Click OK to continue the installation.
Note: If the Windows “Found New Hardware” dialog box displays, click Cancel.
7. When the following warning message concerning Windows Logo testing is
displayed, click the “Continue Anyway” button.
Installation
2-4
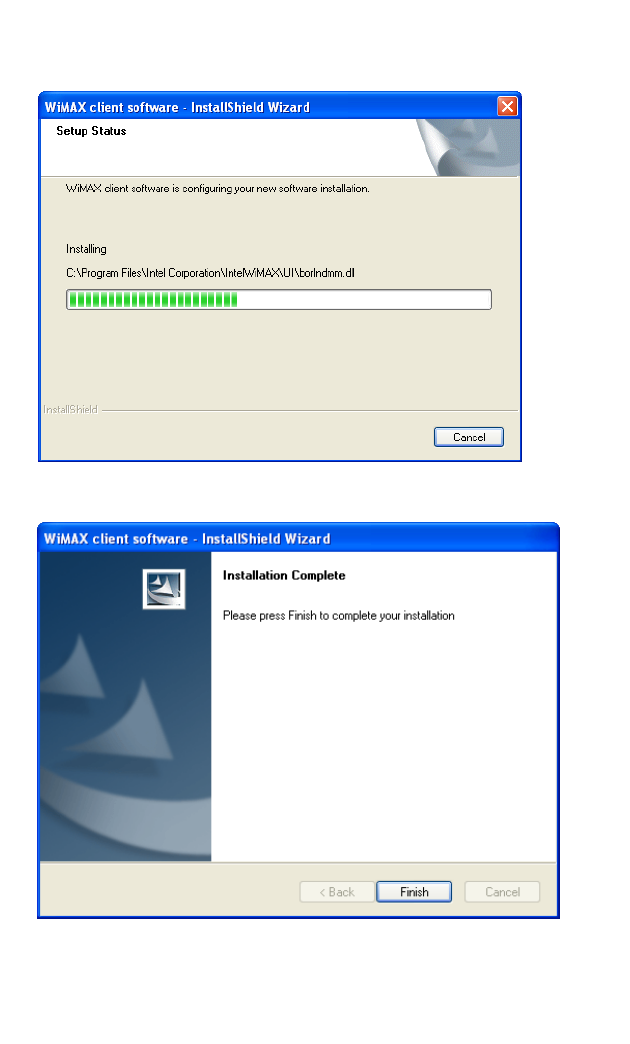
8. Wait for the software installation procedure to complete.
9. When the “Installation Complete” message displays, click Finish.
3-1
Chapter 3: Quick Setup
This section shows how to quickly configure the Mobile WiMAX PCMCIA Card and
connect to your WiMAX service provider.
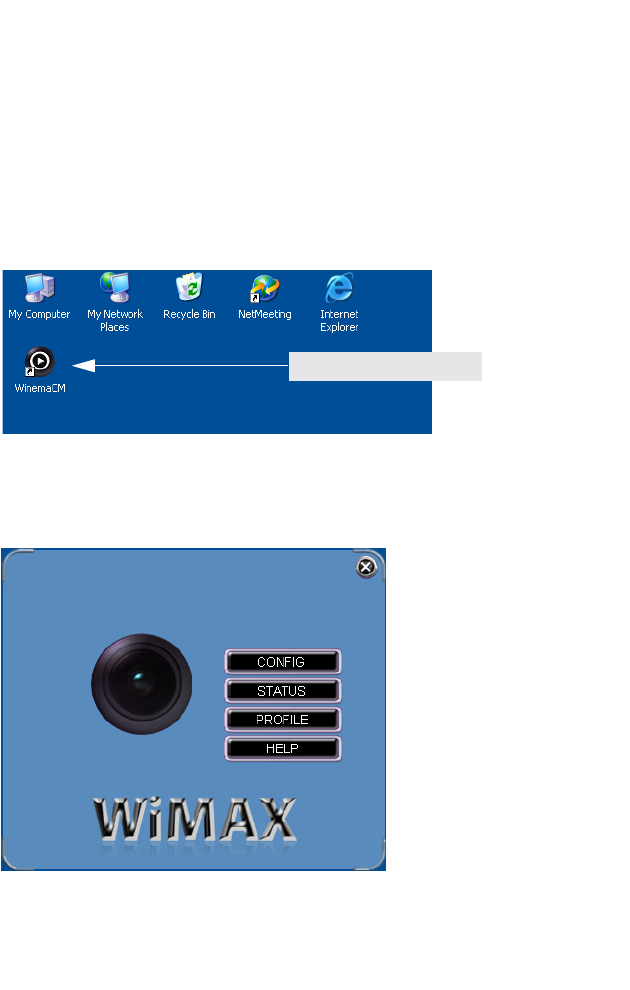
Starting the WiMAX Connection Manager
After the driver and utility software installation, a shortcut icon “WinemaCM” appears
on the WIndows XP or Windows Vista desktop. Double-click on the icon to start the
Winema Connection Manager, or find the WinemaCM entry in the Windows Start
menu.
Alternatively, just insert the PCMCIA Card into a slot and the WinemaCM utility starts
automatically.
The WinemaCM main screen is shown below.
Double click the icon to start the
software.
Quick Setup
3-2
Setting a Profile
Before connecting to your WiMAX service provider, you need to configure a “Profile”
that defines the service providers security settings. There is one default profile
named “TLS” already configured.
Follow these steps:
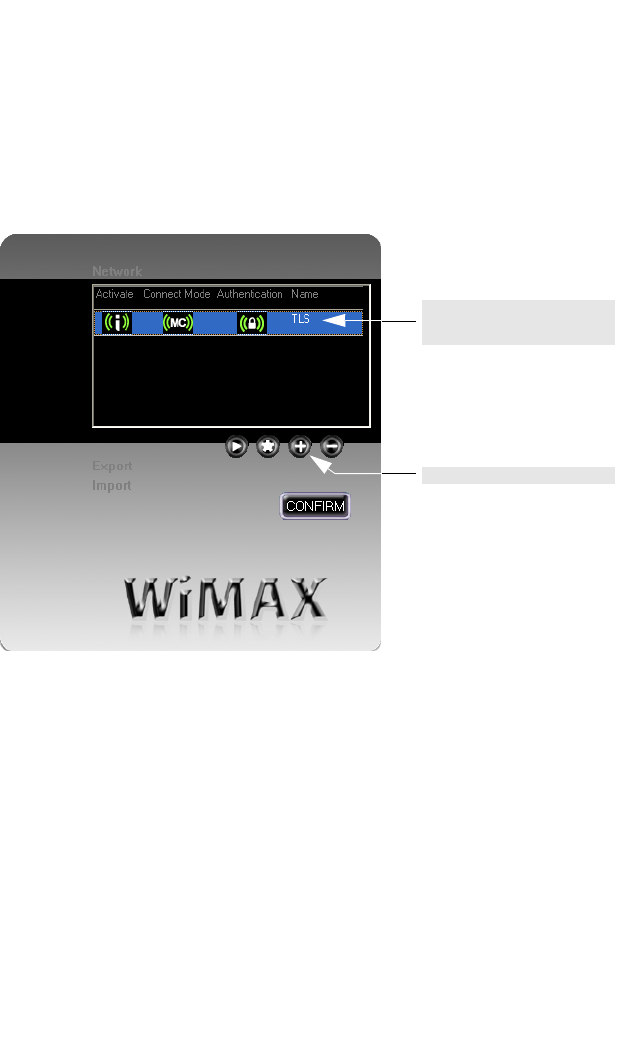
1. From the WinemaCM main screen, click the PROFILE button.
The default profile already
defined. Click the Add button to
define a new profile.
The Add button.
3-3
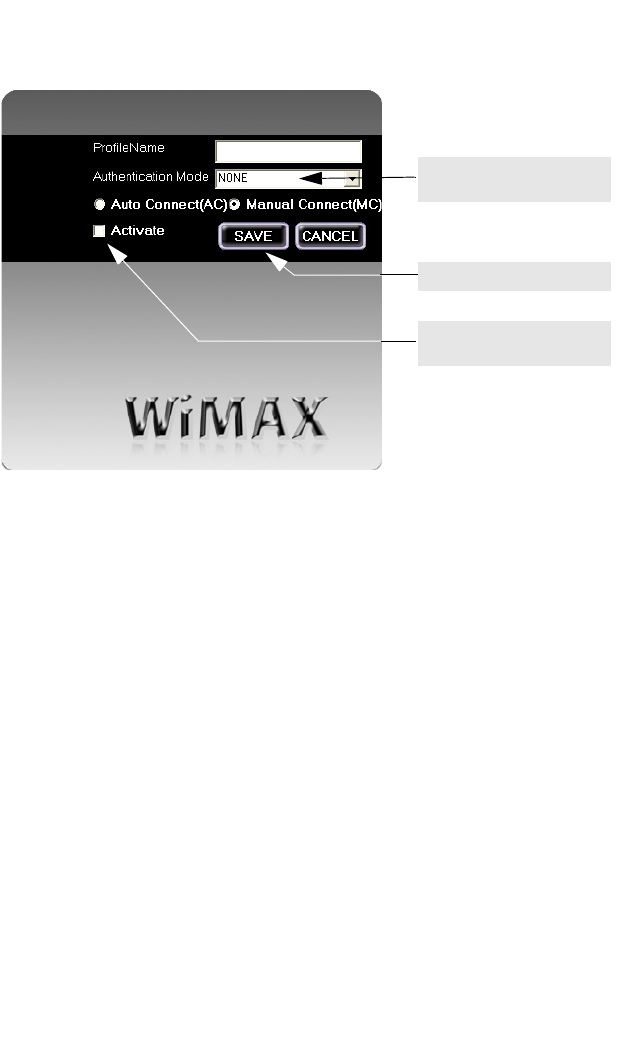
2. From the PROFILE screen, click the Add button.
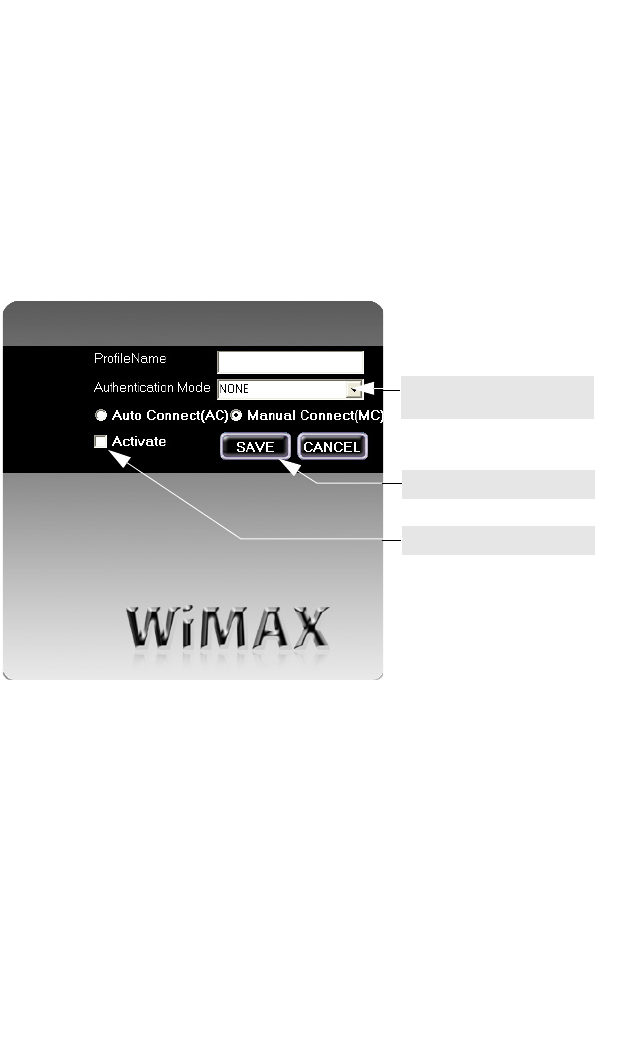
3. In the Add PROFILE screen, define a name to identify the profile, select Auto or
Manual Connect, then set the Authentication Mode specified by the service
provider.
Check the Activate checkbox to use the defined profile, then click the SAVE
button.
Note: Once you save the profile, the Connection Manager will remember the last
configuration.
Activate the profile to use these
settings when connecting to the
service provider.
Select the type of security to
use as specified by the service
provider.
Be sure to click the SAVE
button to save the profile.
Quick Setup
3-4
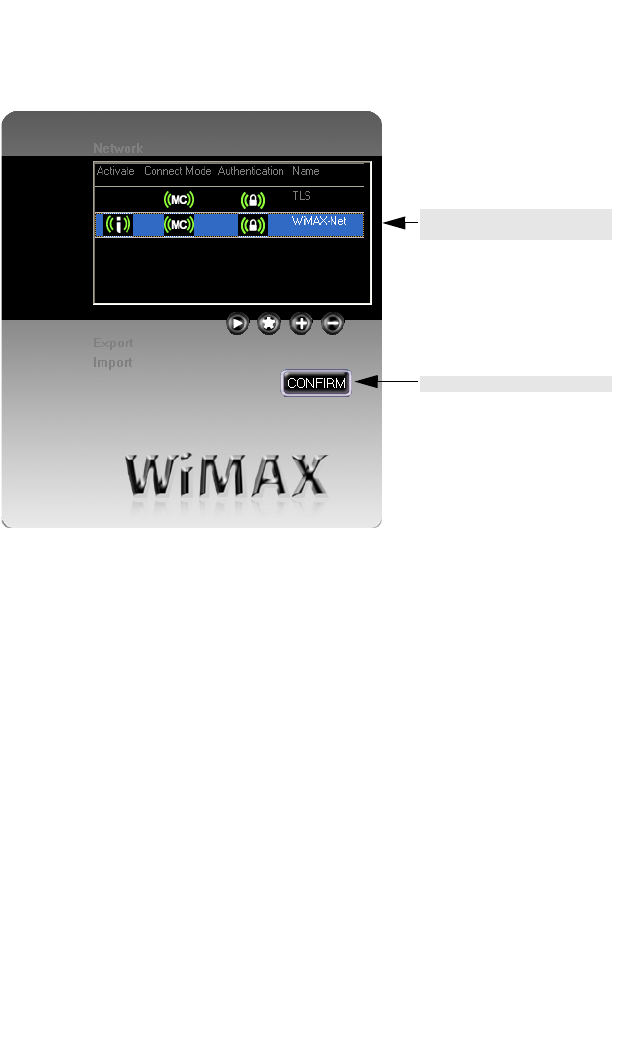
4. The PROFILE screen displays the new profile. Click the Confirm button to close
this Window.
Note: If your service provider supplies a defined profile in a file, use the Import button to
import the file instead of configuring the profile details manually.
Connecting to a WiMAX Service
When you have set up a profile, you are ready to connect to the service provider’s
WiMAX network.
Follow these steps:
1. Insert the PCMCIA card into the PC’s slot. The WinemaCM software starts
automatically.
Note: If WinemaCM does not start automatically, remove the card and reinsert it again.
If the problem continues, reinstall WinemaCM or contact your local service
support center.
2. From the WinemaCM main screen, click the Connect button.
(Note that this step is not necessary if the active proflie is set to Auto Connect.)
The new profile is set as the
active profile.
Click to close the window.
3-5
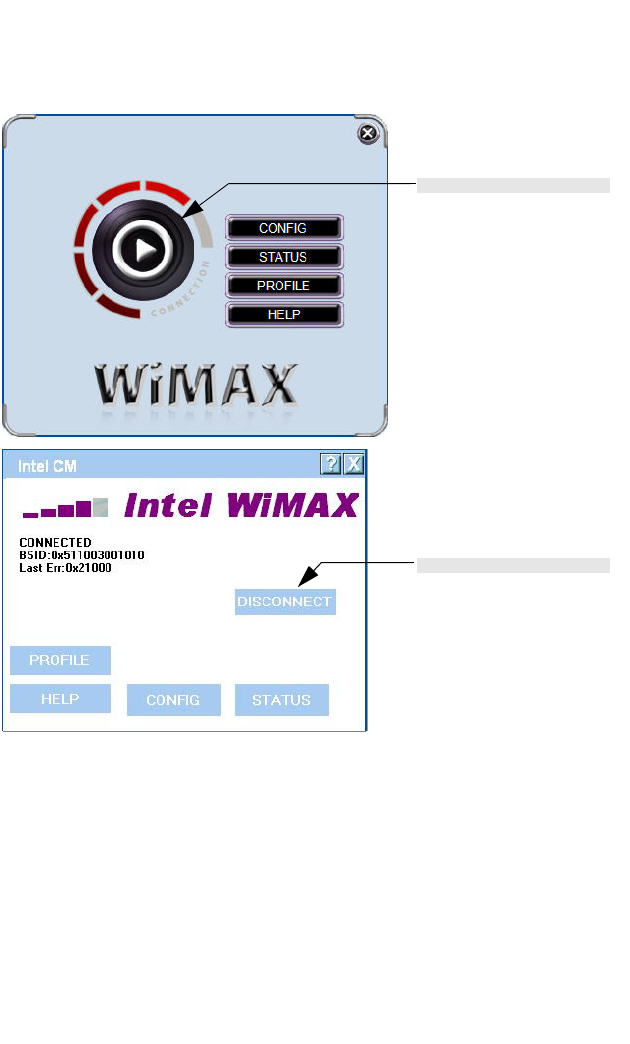
3. Wait for the status to indicate “CONNECTION” in the WinemaCM main screen.
4. When you have finished your WiMAX network session, click the Connect button
to end the session, or just pull the PCMCIA card out of the slot.
Note: If you encounter problems installing the PCMCIA card or connecting to the
WiMAX network, see “Troubleshooting” on page A-1.
Click the Connect button to
start the connection process.
The status indicates a WiMAX
connection and the signal
strength.
Click the Connect button to end
the connection to the WiMAX
service.

Quick Setup
3-6
4-1
Chapter 4: Configuration
The WinemaCM software provides all the tools to manage and monitor your WiMAX
connection. After initial installation, the software starts automatically every time you
insert the Mobile WiMAX PCMCIA Card.
The WinemaCM software has four main components:
•Main Screen — Starts and ends a connection, and displays connection status.
•Software Configuration — Settings for WinemaCM features.
•Profile Configuration — Configures and activates connection profiles.
•Status Information — Current connection details, IP settings, software
information, and software upgrade.
Using WinemaCM
There are several methods of starting the WinemaCM software other than by
inserting the Mobile WiMAX PCMCIA Card.
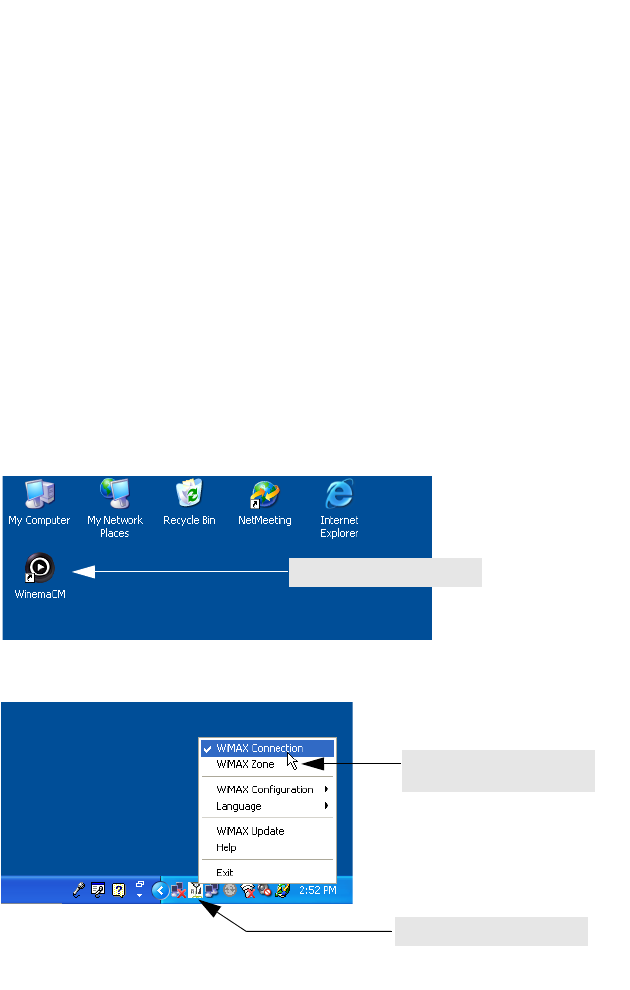
From a shortcut icon on the Windows XP or Windows Vista desktop:
From an icon on the Windows XP Taskbar:
Double click the icon to start the
software.
Double click the icon to open
the application window.
Click the right mouse button to
open a menu of configuration
options.
Configuration
4-2
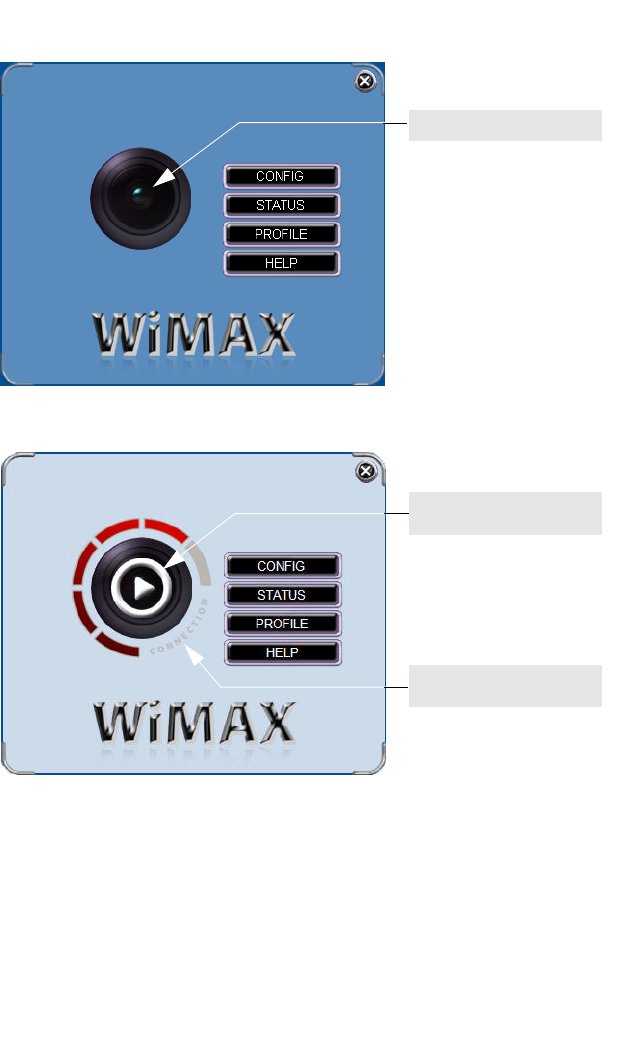
The WinemaCM software has two display options, or “skins,” to choose from. The
main screens for the two skins are shown below.
Other than the display style, there are no function differences between the Default
Skin and the Alternate Skin. You can select the skin type from the Config screen.
This manual describes the WinemaCM software for the Default Skin.
Default Skin
Alternate Skin
Connect/Disconnect button
Connect/Disconnect button
The Config Screen
4-3
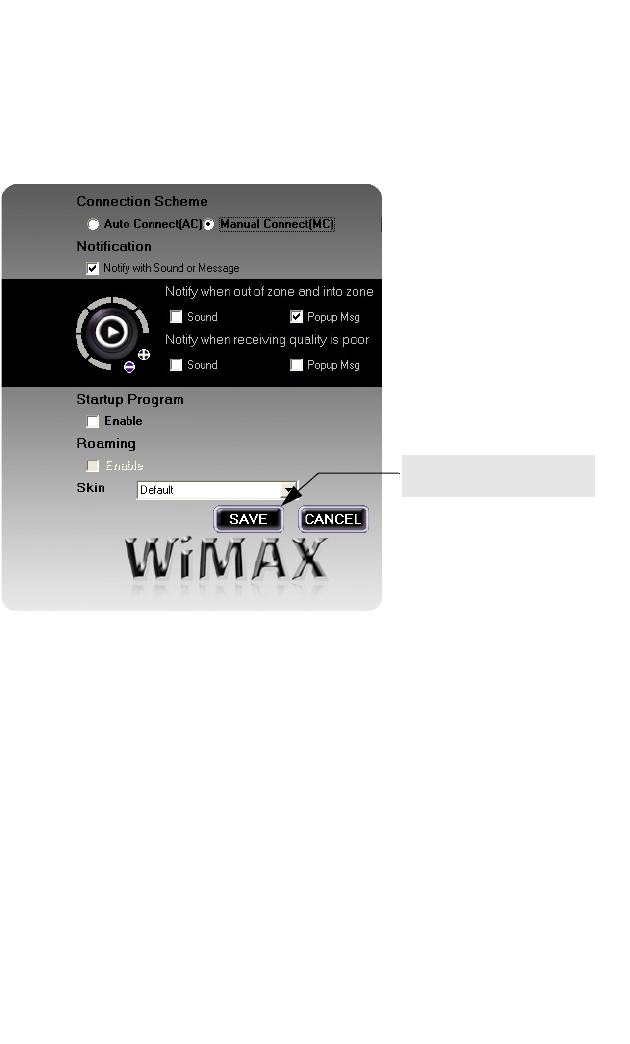
The Config Screen
From the WinemaCM main screen, click the CONFIG button to open the Config
screen. The settings available from this screen control various features of the
software. These settings are described below:
•Connection Scheme — Sets the software to automatically connect to a WiMAX
service or to connect only when the user clicks the Connect button.
Note: The Connection Mode set in a profile has a higher priority and overrides the
Connection Scheme setting on this screen.
•Notification — Enables notifications to tell the user when the receive signal is poor
and if the user moves outside the WiMAX coverage zone.
•Startup Program — Sets the WinemaCM software to start when Windows XP or
WIndows Vista starts.
•Roaming — Roaming is not supported by the current software.
•Skin — Selects the display type for the WinemaCM software.
Note: Be sure to always click the SAVE button to apply your changes.
Be sure to click the SAVE
button to retain any
configuration changes.
Configuration
4-4
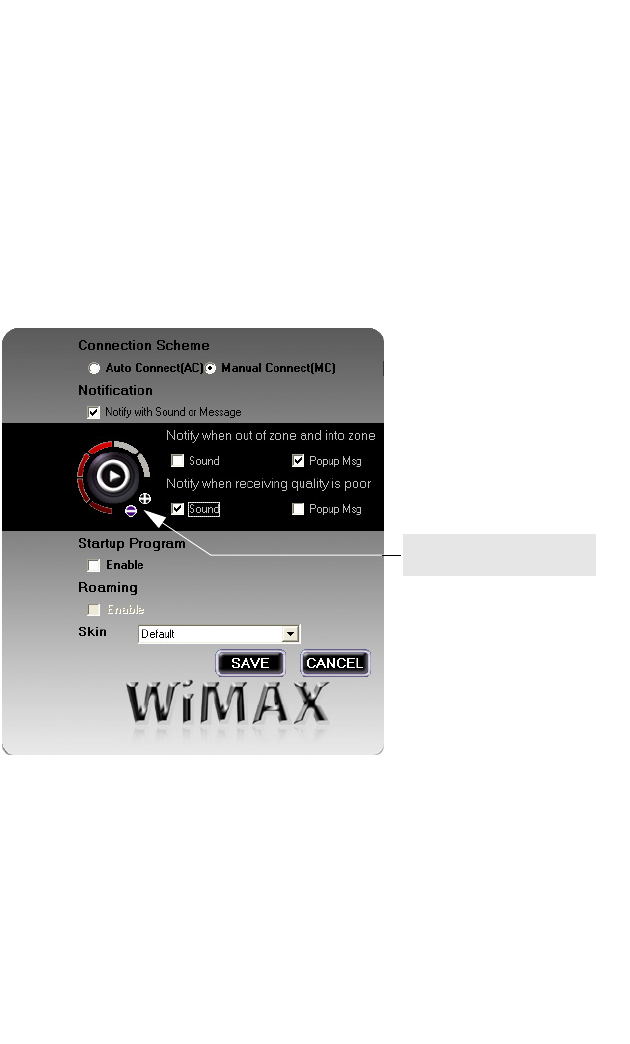
Notification Settings
When Notifications are enabled on the Config screen, the settings for notification
events is displayed.
The zone notification either makes a sound or displays a pop-up message everytime
the user moves into or out of a WiMAX service zone.
The signal quality notification either makes a sound or displays a pop-up message
everytime the WiMAX signal level falls below the defined threshold.
To set the signal quality threshold, click the plus or minus buttons on the Connect
button icon. The signal quality threshold is indicated by red colored segments on the
signal strength display.
Click the plus and minus
buttons to set the signal quality
threshold.
The Profile Screen
4-5
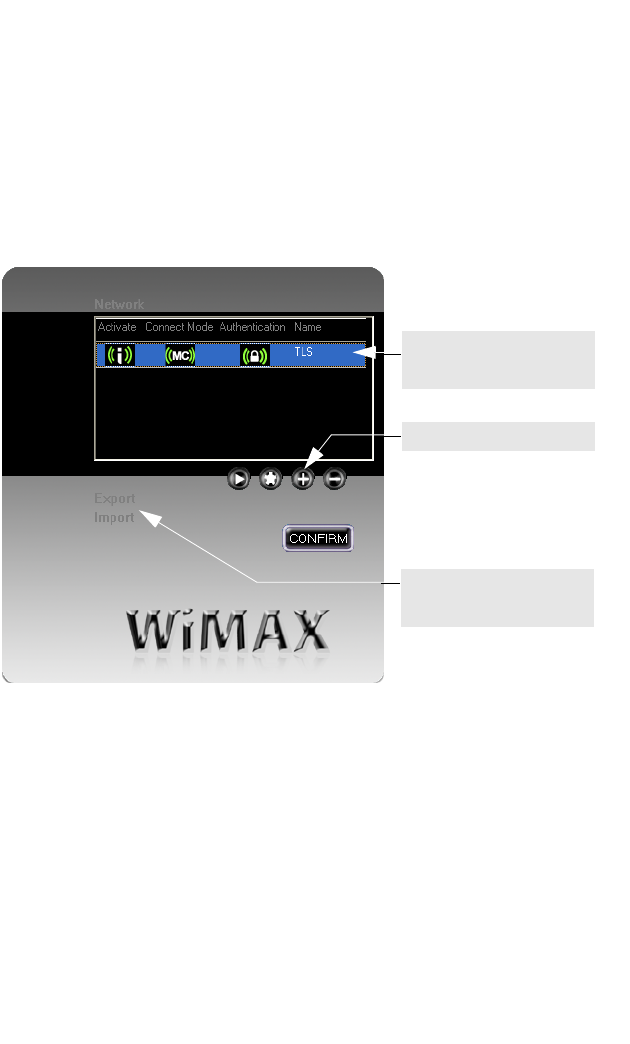
The Profile Screen
From the WinemaCM main screen, click the PROFILE button to open the Profile
screen. This screen enables one or more connection profiles to be configured, one
of which is set as the “active” profile. Each profle can define different security
settings and connection options that can be applied for different service providers.
There is one default profile named “TLS” already configured.
The Profile screen is described below.
•The Profile List — The list of defined profiles. The four columns describe the
following properties of the profile:
•Activate: Indicates if the profile is set as the active profile to be used to connect
to the WiMAX service provider.
•Connect Mode: Indicates if the profile is set to connect automatically.
•Authentication: Indicates if some form of security has been configured for the
profile.
•Name: A descriptive name that identifies the profile in the list.
•Add (+) — Adds a new profile to the list.
•Modify (*) — Changes properties for the selected profile in the list.
•Delete (-) — Removes the selected profile from the list.
Click Add to define a new
profile.
A defined profile set as the
active profile to use for
connection to a WiMAX
service..
The Import and Export options
enable a configured list of
profiles to be imported from or
exported to a local file.
Configuration
4-6
•Activate (>) — Sets the selected profile as the active profile to be used to connect
to the WiMAX service provider.
•Import — Imports a profile list from a file.
•Export — Exports a profile list to a file.
Profile Settings
From the Profile screen, click on the Add button to create a new profile, or click on
the Modify button to change settings for the selected profile. Both the Add and
Modify buttons open the Profile Settings window, which is described below.
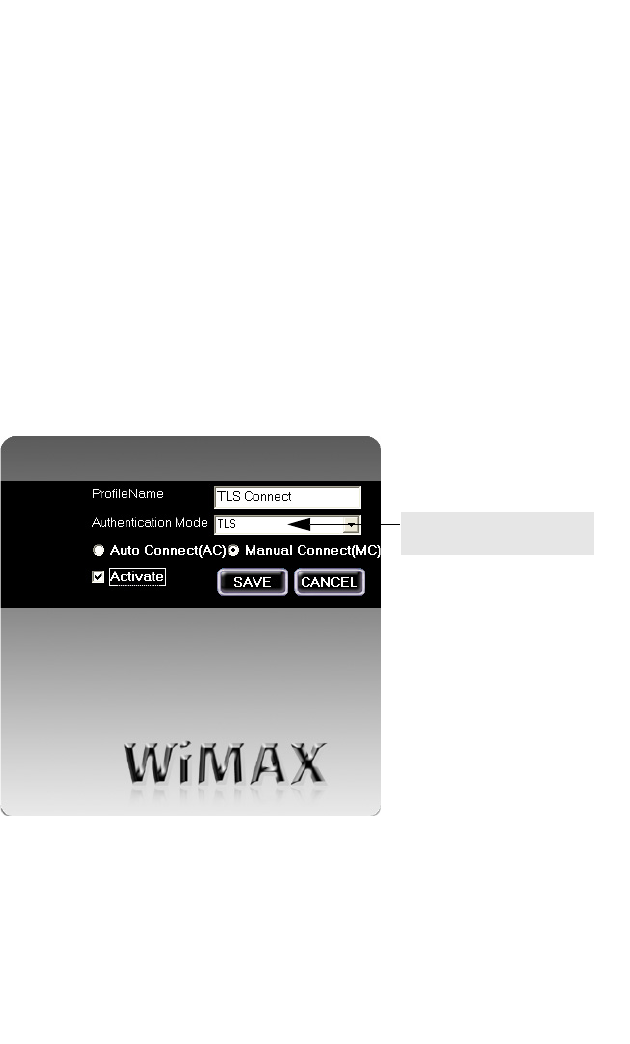
•Profile Name — A descriptive name that identifies the profile in the list.
•Authentication Mode — The type of security used to connect to the WiMAX
service. (See “Authentication Settings” on page 4-7 for more information.)
•NONE: No security is used to connect to the WiMAX network.
•TLS: Transport Layer Security (TLS) uses public key certificates issued by a
trusted certificate authority to provide mutual authentication for the connection.
A certificate file needs to be stored locally on the client.
•TTLS_MSCHAPV2: Tunneled Transport Layer Security (TTLS) with the
Microsoft Challenge-Handshake Authentication Protocol version 2
(MSCHAPv2) uses a public key certificate on the network side to establish a
secure connection, or “tunnel,” to the client. Authentication is then completed
using a user name and password. You must enter the user name and password
as specified by the service provider.
Click Save to confirm the profile
settings.
Make the profile active here or
from the Profile screen list.
Select the Authentication mode
as specified by the WiMAX
service provider.
The Profile Screen
4-7
•Auto Connect — The profile is used to automatically connect to the WiMAX
service.
•Manual Connect — The profile is only used to connect to the WiMAX service when
the Connect button is clicked.
•Activate — Sets the profile as the active profile that is used to connect to the
WiMAX service. Only one profile can be active at one time.
Authentication Settings
There are currently two security options available to authenticate and encrypt a
connection between a client and the WiMAX network. This section provides more
information on setting up these options.
TLS Settings
If your service provider specifies TLS security for your WiMAX connection, a public
key certificate file should be provided for installation on the client.
The certificate file can be stored anywhere on the client PC. However, the location of
the file must be specified by editing the path entry in the Windows registry.
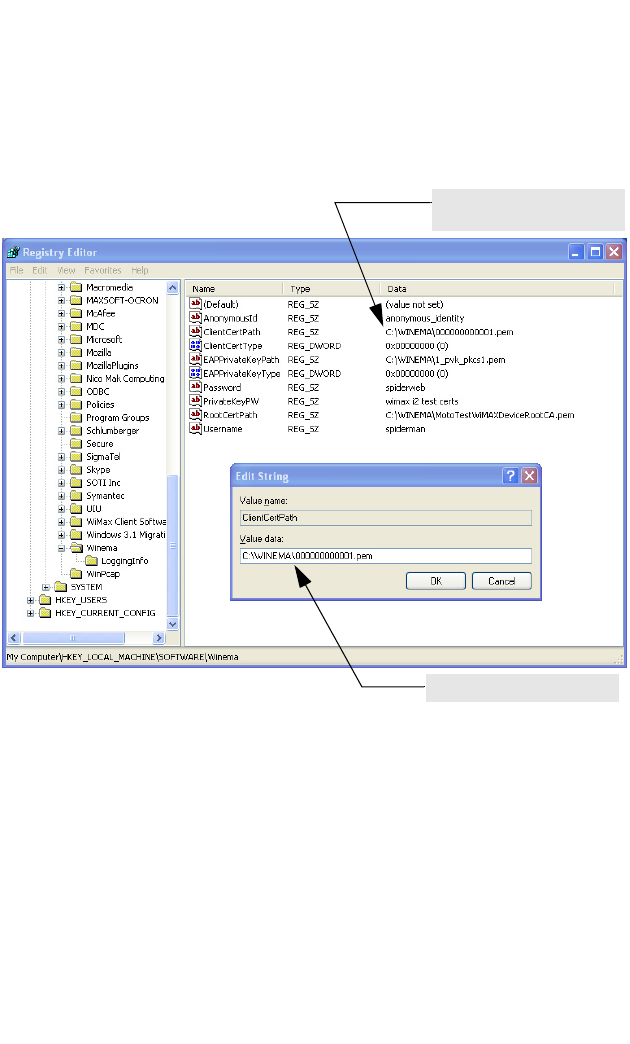
To specify the path in the Windows registry, follow these steps:
1. From the Windows Start menu, select Run, then enter “regedit” to open the
Registry Editor.
2. Find the registry entry “HKEY_LOCAL_MACHINE\SOFTWARE\Winema.”
3. Locate the entries “ClientCertPath,” “EAPPrivateKeyPath,” and “RootCertPath.”
TLS security requires a
certificate file to be stored
locally on the client.
Configuration
4-8
Note: The EAPPrivateKey also needs to be updated. Be sure the EAPrivateKey type
and Client certificate type are set to the correct values and that the RootCertPath
is specified.
4. Press Enter to edit each entry. Specify the full path to each file, including the file
name. Make sure that the files are in the locations specified. Click OK.
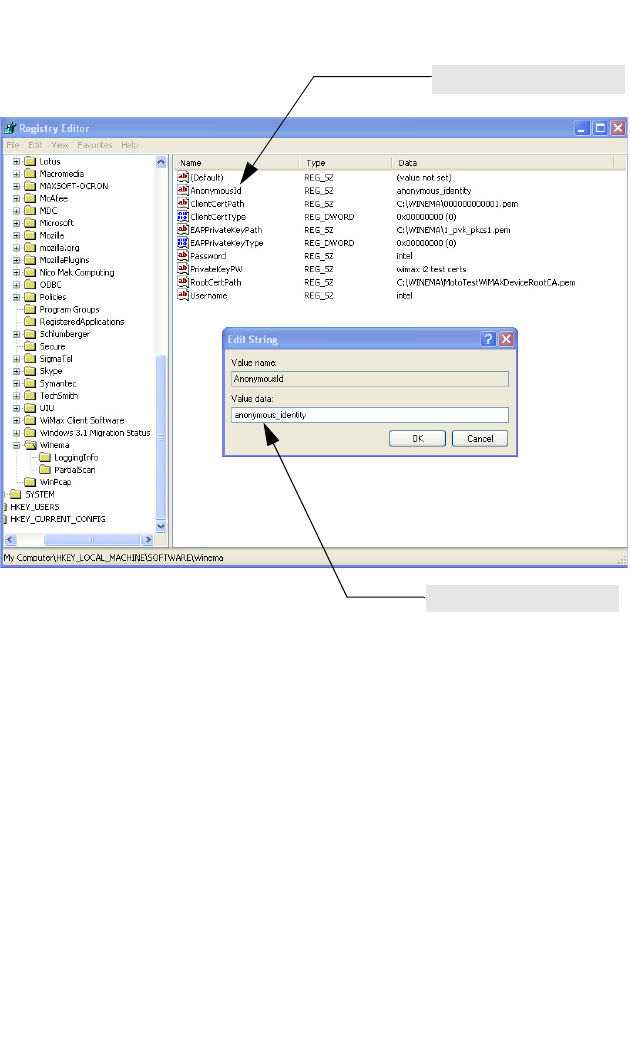
5. Locate the entries “AnonymousId” and “PrivateKeyPW” and specify the values,
then click OK
The entry ClientCertPath
specifies the path to the
certificate file on the local PC.
Select ClientCertPath and
press Enter to edit the path.
The Profile Screen
4-9
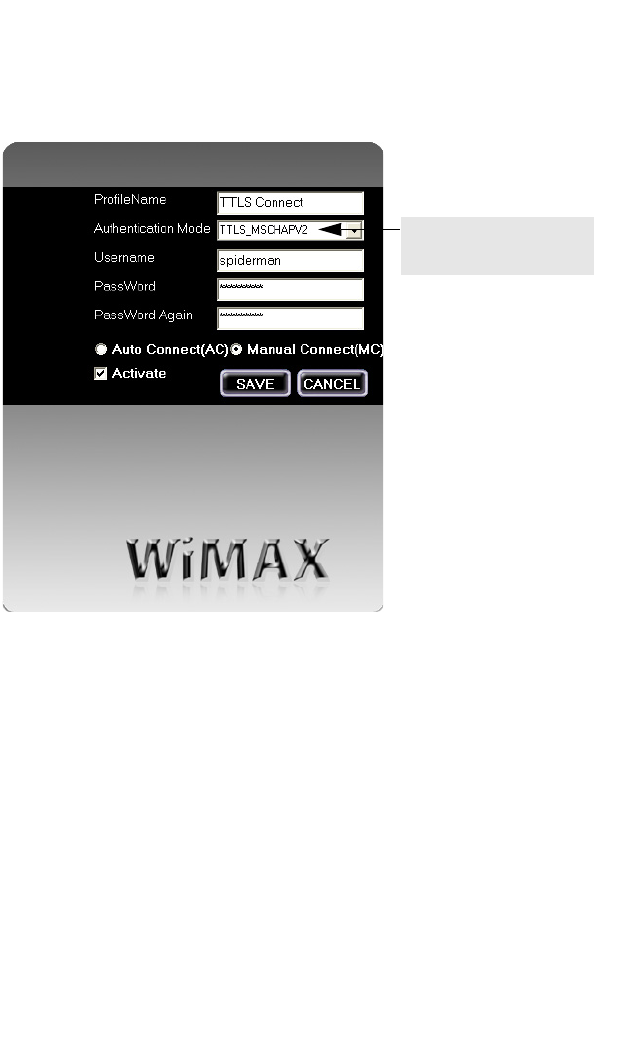
TTLS_MSCHAPV2 Settings
If your service provider specifies TTLS-MSCHAPv2 security for your WiMAX
connection, a user name and password should be provided for entry on the client.
Be sure to enter the user name and password exactly as specified by the service
provider. The password must be confirmed by entering it twice. Then click Save to
save the profile.
The AnonymousId setting in the Windows registry must also be set for the
authentication server.
To specify AnonymousId setting in the Windows registry, follow these steps:
1. From the Windows Start menu, select Run, then enter “regedit” to open the
Registry Editor.
2. Find the registry entry “HKEY_LOCAL_MACHINE\SOFTWARE\Winema.”
3. Locate the entry “AnonymousId.”
4. Press Enter to edit the entry. Click OK.
TTLS_MSCHAPV2 security
requires a user name and
password to be entered locally
on the client.
Configuration
4-10
Note: When the Root Certificate Path (RootCertPath) is specified, the root
certificate authority (RootCA) is verified. Be sure that the RootCA exists at
the specified location. When the RootCertPath is set to “NULL,” verification is
skipped.
Select AnonymousId and press
Enter to edit the value.
Set the value as required for
the authentication server.
The Status Screen
4-11
The Status Screen
The Status screen provides current connection information. The software
information screen also enables updated software to be downloaded.
Connection Info
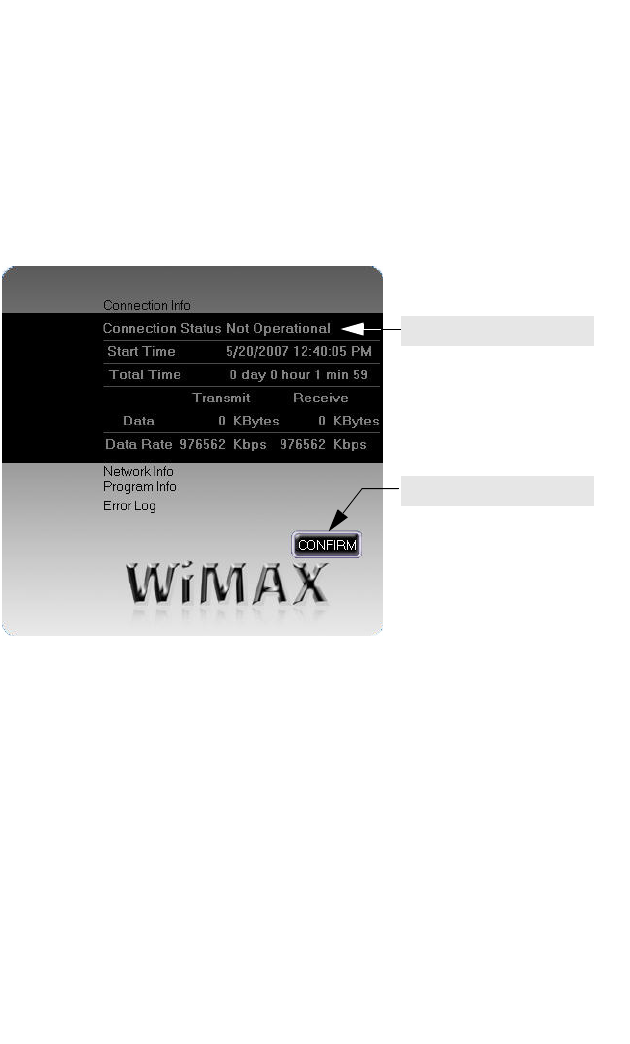
The Connection Info screen displays basic information about the WiMAX
connection. The displayed items are described below:
•Connection Status — Displays “Operational” when the WiMAX connection is valid
and “Not Operational” when there is no connection.
•Start Time — The date and time when the connection was established.
•Total Time — The total time since the connection was established.
•Data — The total amount of data in Kbytes that have been transmitted and
received.
•Data Rate — The current rate in Kbps at which data is being transmitted and
received.
Indicates if the connection is
operational.
Returns to WinemaCM main
screen.
Configuration
4-12
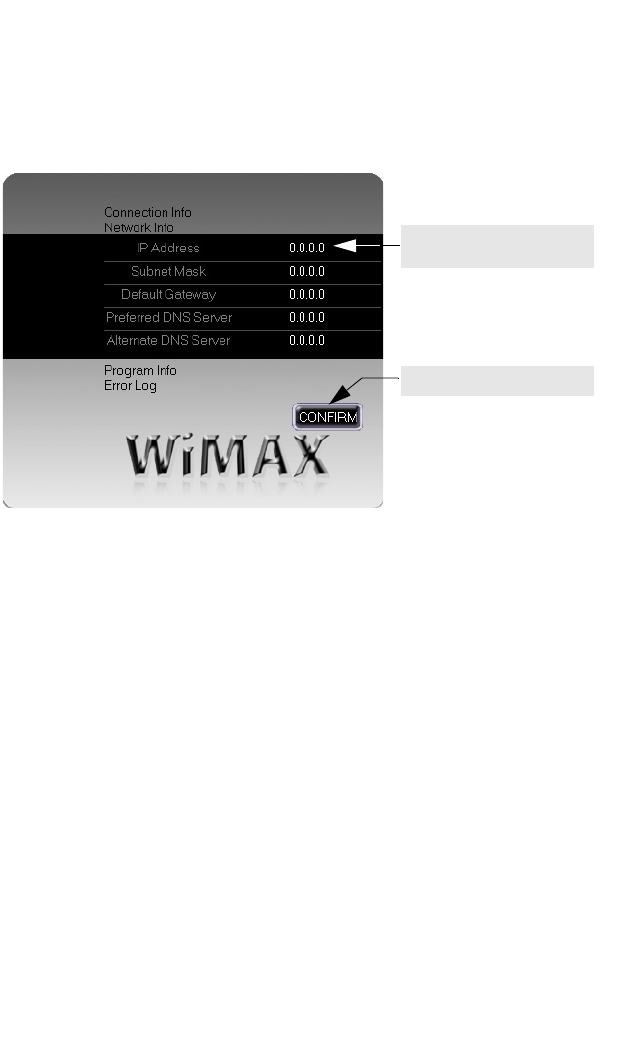
Network Info
The Network Info screen displays the current Internet Protocol (IP) settings as
assigned to the subscriber station by the service provider. The displayed items are
described below:
•IP Address — The IP address assigned to the subscriber station by the service
provider. Valid IP addresses consist of four decimal numbers, 0 to 255, separated
by periods.
•Subnet Mask — The IP subnet mask specified by the service provider. The mask
identifies the host address bits used for routing to other subnets.
•Default Gateway — The gateway router IP address specified by the service
provider. The default gateway is the IP address of the router that is used if the
requested destination address is not within the local subnet.
•Preferred DNS Server — IP address of the primary Domain Name server
specified by the service provider. A DNS server maps numerical IP addresses to
domain names and can be used to identify network hosts by familiar names instead
of IP addresses.
•Alternate DNS Server — IP address of a secondary Domain Name server.
The IP address currently
assigned to the subscriber
station.
Returns to WinemaCM main
screen.
The Status Screen
4-13
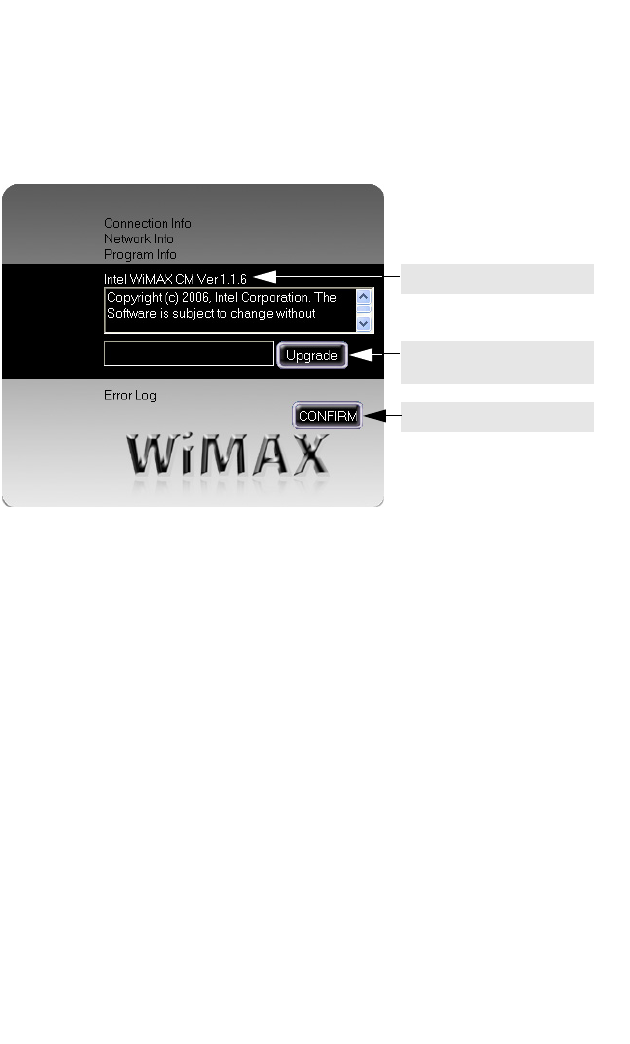
Program Info
The Program Info screen displays information about the WinemaCM software and
provides a facility to download an upgrade software file.
The displayed items are described below:
Software Upgrade
Click the “Upgrade” button to download an installation file that upgrades the
WinemaCM software. If a new version of software is available, the upgrade file will
be downloaded to the PC. The progress of the download is displayed on the screen
next to the Upgrade button.
Once the upgrade installation file is downloaded, run the file to update the
WinemaCM software.
Note: If you need to uninstall the WinemaCM software, see “Uninstalling the
WinemaCM Software” on page A-2.
How to Modify the Upgrade Server Location
The upgrade server location is specified as a web address in the Windows registry.
To change the upgrade server web address in the Windows registry, follow these
steps:
1. From the Windows Start menu, select Run, then enter “regedit” to open the
Registry Editor.
2. Find the registry entry “HKEY_LOCAL_MACHINE\SOFTWARE\Intel
Corporation\WiMAX.”
3. Locate the entry “Upgrade URL” and press Enter to edit the web address.
The current version of the
WinemaCM software.
Returns to WinemaCM main
screen.
Click to download an available
upgrade file to update the
WinemaCM software version.
Configuration
4-14
Select UpgradeURL and press
Enter to edit the web address.
The Status Screen
4-15
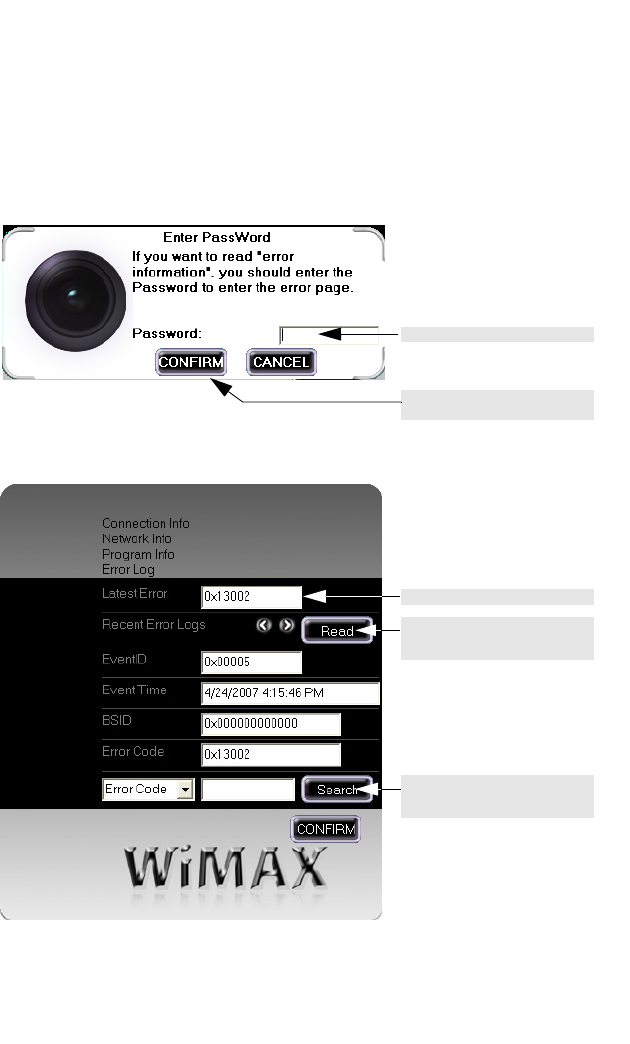
Error Log
The Error Log screen requires a password to access the displayed information. The
error logs can help the service provider troubleshoot problems with the WiMAX
conection.
Enter the password as specified by the servce provider. The default password is
“1234.”
The displayed items are described below:
•Latest Error — The error code number of the latest log entry.
•Recent Error Logs — Click the Read button to display the first log entry, then use
the arrow buttons to browse through other log entries.
•Event ID — The number that identifies the error log entry.
Enter the password here.
Click the Confirm button to
display the Error Log screen.
The log error code number.
Use the Search button to find
logs based on error code, event
ID, event time, or BSID,
Click to display the error logs.
Use the “>” and “<“ arrows to
browse through the logs.
Configuration
4-16
•Event Time — The time the error log entry ocurred.
•BSID — The identifier number of the WiMAX base station with which the subscriber
station is connected.
•Error Code — The error code number of the log entry.
•Search — Enables the user to search for specific log entries based on error code,
event ID, event time, or BSID. Select the search key from the pull-down list, specify
the log detail to search for, then click the Search button.
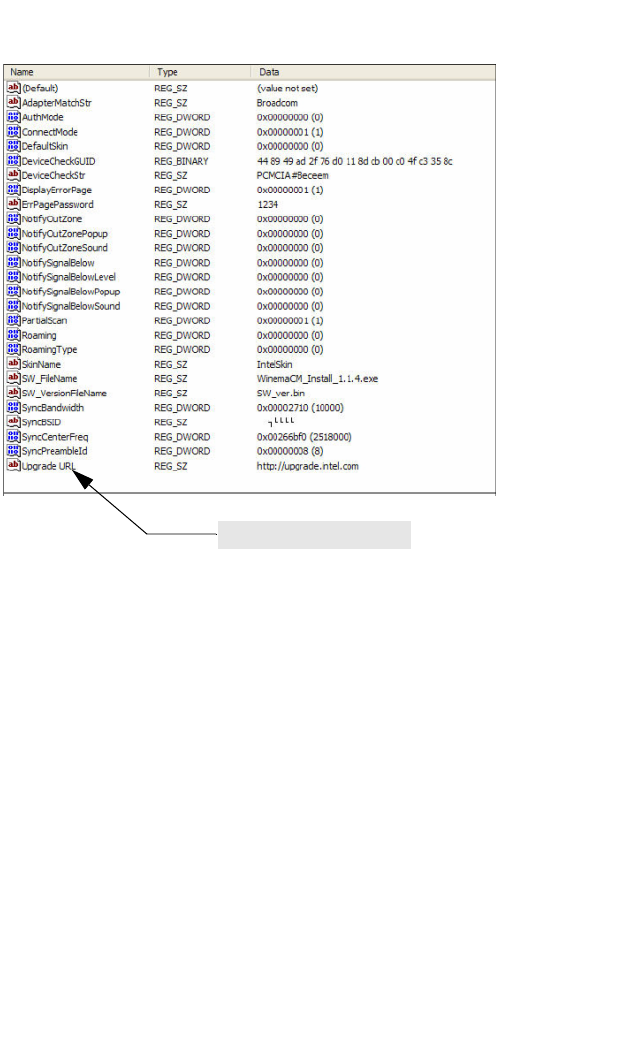
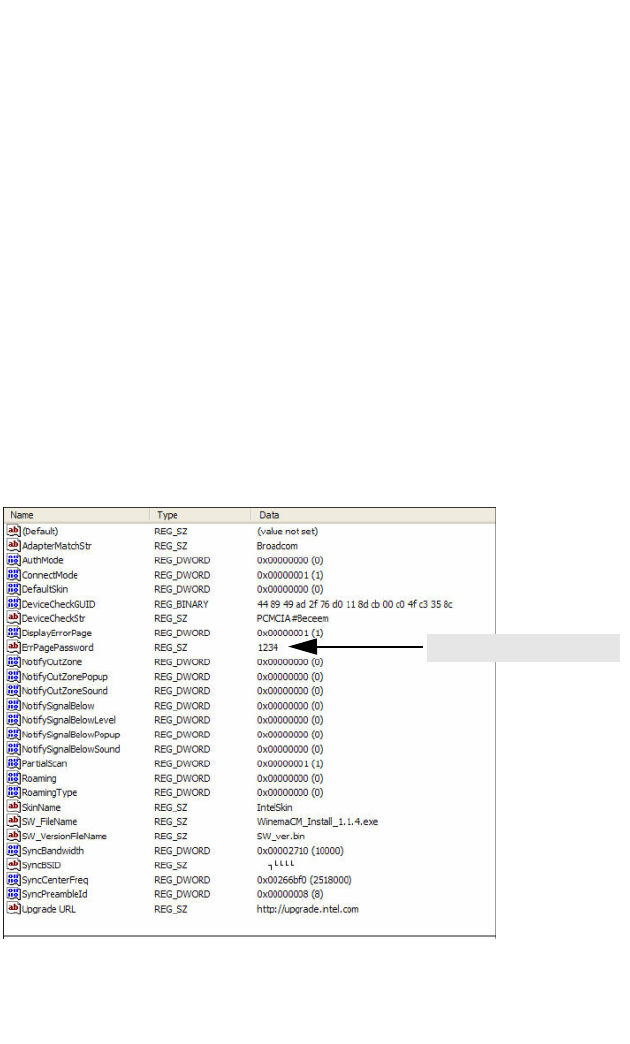
How to Modify the Error Log Password
The Error Log access password is specified in the Windows registry.
To change the Error Log access password in the Windows registry, follow these
steps:
1. From the Windows Start menu, select Run, then enter “regedit” to open the
Registry Editor.
2. Find the registry entry “HKEY_LOCAL_MACHINE\SOFTWARE\Intel
Corporation\WiMAX.”
3. Locate the entry “ErrPagePassword” and press Enter to edit the value.
Select ErrPagePassword and
press Enter to edit the value.

A-1
Appendix A: Troubleshooting
Diagnosing LED Indicators
Network Connection Problems
If you cannot access the Internet from the PC, check the following:
• Make sure the WinemaCM software and driver is correctly installed on your
system. If necessary, try uninstalling and reinstalling the software.
• If you cannot access the Internet, be sure your WIndows system is correctly
configured for TCP/IP. The IP settings should be set to “obtain an IP address
automatically.”
• You may have moved out of the service area of the WiMAX base station. The
WinemaCM main screen should indicate that there is no connection. Call the
service provider for service coverage information.
• The service provider’s profile may not be configured correctly. Check that the
Authentication Mode settings are correct.
•If you cannot resolve the problem, check the error logs from the WinemaCM Status
screen and contact your service provider. See “WinemaCM Error IDs” on page A-3
for more information.
Troubleshooting Chart
LED Status Probable Cause Action
Red LED is Off The PCMCIA card is
not receiving power • Remove the PCMCIA card and reinsert it
in the slot. Be sure the card is securely
seated in the slot.
•Try the card in another PCMCIA slot. If
this also fails, test your PC with another
card that is known to operate correctly.
• Check the PCMCIA card and slot
connectors for any physical damage.
•Try the card in another PC’s slot that is
known to operate correctly.
• If you cannot resolve the problem, contact
your local dealer for assistance.
Green LED is Off The PCMCIA card
cannot detect a
WiMAX base station
• Verify the area covered by your service
provider.
• Move to a location closer to the WiMAX
base station.
Troubleshooting
A-2
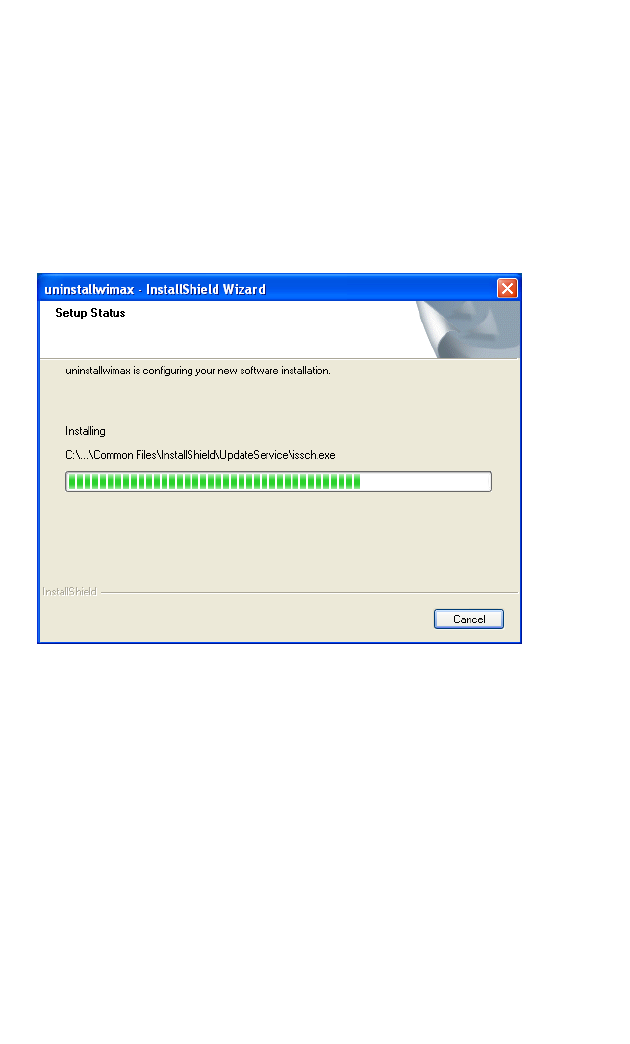
Uninstalling the WinemaCM Software
If you are having problems with the WiMAX PCMCIA card or the WinemaCM
software, you may need to uninstall the card driver and software from the system.
Follow these steps:
1. From the Windows Start menu, find the WinemaCM uninstall option. Click to
start the uninstall process.
The unistall process starts automatically.
WinemaCM Error IDs
A-3
2. When the uninstall is complete, click Finish to exit.
WinemaCM Error IDs
The WinemaCM software records error numbers in a log when certain conditions are
encountered. From the Status screen you can access the Error Logs by entering a
password. The error ID numbers can help the WiMAX service provider troubleshoot
problems.
The WinemaCM error IDs are listed here for reference. Be sure to take note of
displayed error numbers when contacting your service provider for assistance.
WinemaCM Error IDs
Error ID Cause Description
0x11000 Sync failure MS cannot find the BS. Or there are no valid
maps or DCD/UCD from the BS.
0x11001 Ranging failure Ranging procedure with the BS failed.
0x11003 Authentication failure Security authentication failed by supplicant.
0x11004 SBC failure Basic capability negotiation with the BS failed.
0x11005 PKM failure Security authentication failed.
0x11006 Registration failure Registration with the BS failed.
0x13002 Timeout No response from Beceem after timer has timed
out.
0x14000 Signal low The RSSI is smaller than MIN_RSSI_DBM.
0x18000 Wrong password The wrong password has been entered.

Troubleshooting
A-4
0x19000 Open device retry The device cannot be opened.
0x20000 Other failure Other failures that are not listed.
WinemaCM Error IDs
Error ID Cause Description

B-1
Appendix B: Specifications
Host Interface
PCMCIA Type II, 33 MHz, 16-bit interface, 3.3 volt
Antennas
Built-in dual dipole antennas
Transmit: Single antenna
Receive: Two antennas using Maximal-Ratio Combining (MRC)
Gain: 3.03dBi (2.5GHz), 2.47dBi (2.6GHz), 3.60dBi (2.7GHz)
Pattern: Omnidirectional
Impedance: 50 Ohm
LED Indicators
Power, Link/Activity
Power Consumption
Transmit: 3.3 W maximum
Receive: 2.3 W maximum
Physical Size
132 x 57.5 x 13.1 mm (5.2 x 2.26 x 0.52 in.)
Weight
43.5 g (1.5 oz)
Operating Frequency
2.496–2.69 GHz and 3.4–3.6 GHz
Support for Full Scan and Partial Scan
OFDMA Modulation
Scaleable OFDMA employing Time-Division Duplex (TDD) mechanism
Deploys both distributed and adjacent subcarrier permutation scheme
Fast Fourier Transform (FFT) Size: 512 and 1024 points (depending on bandwidth)
Modulation Scheme
PRBS subcarrier randomization
Contains pilot, preamble, and ranging modulation
Modulation and Coding Types
Down Link
QPSK 1/2 CTC & CC
QPSK 3/4 CTC & CC
16 QAM 1/2 CTC & CC
16 QAM 3/4 CTC & CC
64 QAM 1/2 CTC & CC
64 QAM 2/3 CTC & CC
64 QAM 3/4 CTC & CC
64 QAM 5/6 CTC & CC
Up Link
QPSK 1/2 CTC & CC

Specifications
B-2
QPSK 3/4 CTC & CC
16 QAM 1/2 CTC & CC
16 QAM 3/4 CTC & CC
Bandwidth Allocation
System bandwidth: 5 MHz, 7 MHz, or 10 MHz (depending on model)
Frame length: 5 msec
Maximum Throughput
Up link: > 1.5 Mbps
Down link: > 4 Mbps
Transmit Power Level
Maximum Power class less than +23 dBm
Receive Sensitivity
Preamble power on one channel
QPSK 1/2 CTC: -83 dBm
16-QAM 3/4 CTC: -74 dBm
64-QAM 1/2 CTC: -73 dBm
Temperature
Operating: 0 to 60 °C (32 to 140 °F)
Storage: -40 to 70 °C (-40 to 158 °F)
Humidity
20% to 85% (non-condensing)
Emissions Compliance
US:CFR 47 Part 15 Class B
Europe: EN301 489-1/-4, EN 61000-4-2
Radio Signal Certification
US: CFR 47 Part 27, Subpart M, Broadband Radio Service and Educational
Broadband Service in the 2500-2690MHz.
Europe: EN 301 489-1/-4, EN302 326-1/-2/-3
Specific Absorption Rate (SAR)
US: OET Bulletin 65 (Supplement C)
Europe: EN 50392
Safety
IEC 60950-1 (CB)
Standards
IEEE 802.16e-2005 WAVE 1
Software Drivers
Windows XP SP2 and Windows Vista
NDIS 5.0 PnP ETH 802.3 device driver specification
WHQL certified

C-1
Appendix C: Configuration File
The WiMAX PCMCIA card sets some of its initial start-up parameters from a script
text file “FirmwareCfg.txt.” This file can be modified using any text editing tool.
After any modifications to the text file, perform these steps:
1. Run the program “parsecfg.exe” from the directory containing the
FirmwareCfg.txt file. This creates a file named “macxvi.cfg.”
2. You can check the contents of the macxvi.cfg file by running the program
“readcfg.exe.”
The following is a listing of the FirmwareCfg.txt file.
# Configuration File Name: FirmwareCfg.txt
# Wibro Config File
#
# Version 1 - Creation
# Version 2 - Major revision - Created the current structure
# Version 3 - Renaming to HARQ structure to 'General'. HARQ will be
# reintroduced later.
# Version 4 - Added enabling of Tx Power Report from config file
# Version 5 - Added enabling of Random FA selection
# Version 7 - Addded the firmware config option
# version 8 - Added the config option for 8.75/10 MHz bandwidth
# version 9 - Added the config option for ShutDown Timer
# - Removed changes in Version 8
# Version 10 - Merged versions 8 and 9
#
# Version 11 - EncrSupport & NumOfSAId added
# Version 12 - Radio and PHY Parameters added
# version 13 - options for testing cqich, rang etc
# Dont Change this! Version number used
# to manage the usage of config file
Config File Version = 15
# Scanning Parameters
# Make center frequency as x to enable scanning
# Or use (examples): 2336, 2345, 2354, 2367.5, 2385.5
Center Frequency = x
Band A Scan = 0
Band B Scan = 0
Band C Scan = 0
# QoS Params
Rtps Enable = 0
nRtps Enable = 0
eRtps Enable = 0
Ugs Enable = 0
# HO Params
Handoff Enable = 1
HandoffThreshold = 0
HO Reserved1 = 0

Configuration File
C-2
HO Reserved2 = 0
HO Reserved3 = 0
HO Reserved4 = 0
# Power Control
OL Power Control Enable = 1
OffsetSS = 0
UL AMC - Tx Power Report = 1
PC Reserved2 = 0
PC Reserved3 = 0
PC Reserved4 = 0
# Security Parameters
PKMv2 Enable = 1
PKM Reserved1 = 0
PKM Reserved2 = 0
PKM Reserved3 = 0
PKM Reserved4 = 0
# IDLE Mode Parameters
IdleMode Enable = 0
Idle Mode timer = 120 # seconds
IDLE Reserved1 = 0
IDLE Reserved2 = 0
IDLE Reserved3 = 0
IDLE Reserved4 = 0
# ARQ Parameters
ARQ Enable = 1
ArqType = 0 #0, 1, 2, 3
ARQ Reserved1 = 0
ARQ Reserved2 = 0
ARQ Reserved3 = 0
ARQ Reserved4 = 0
# General MAC Parameters
MacParameter = 0 # 1- 0xfeff 0- 0xffff
# 0 => UL PRBS encoded to 0.
# 1 => PRBS based on frame number
UL PRBS = 1
Random FA Select = 0
Harq Enable = 1
Compressed Map Enable = 1
# Debug Parameters
Default DIUC = 2
# (0-15 bits) EEProm offset :512 or (0x200) , (16-31 bits) EEProm Size :
4096(0x1000)
EEPROM Start = 0x10000200
Customize = 0x00000200
FirmwareOptions = 0x00

C-3
# Bit 0 - 1 disable linkdown and skip auth during resync
# Bit 0 - 0 enable linkdown notification and authentication during resync
#Should be in Hz i.e. 8750000, 10000000
Bandwidth = 0
# Shutdown Timer in number of frames (5 ms)
ShutDown Timer Value = 0x7fffffff
EncrSupport = 1
#Number of SAID supported
NumOfSAId = 1
# Radio Parameter
# e.g 0x0000ccba
# cc = [15:8] Board Type
# b = [7:4] Band Select {3->2.5 to 2.7G; 4->3.4 to 3.6G }
# a = [3:0] Set to 4
RadioParameter = 0x00000032
# PHY Parameter
# PhyParameter1 e.g. 0xccccbbaa
# cccc = [31:16] 80 * Value of TTG in us
# bb = [15:8] Number of DL symbols
# aa = [7:0] Number of UL symbols
# Special value of 0xFFFFFFFF indicates use of embedded logic
PhyParameter1 = 0xFFFFFFFF
PhyParameter2 = 0x0
PhyParameter3 = 0x0
#some test options - valid only if eval and test data tranfer are enabled
#in eval mode only; lower 16bits = basic cid for testing;
#then bit 16 is test cqich,bit 17 test init rang; bit 18 test periodic rang
and bit 19 is test harq ack/nack
m_u32TestOptions = 0
# Max MAC Data Per Frame to be sent in REG-REQ
MaxMACDataperDLFrame = 15
MaxMACDataperULFrame = 4

Configuration File
C-4
D-1
Appendix D: Using Partial Scan
The section shows how to set up the WiMAX PCMCIA Card to use partial scan.
Follow these steps:
1. Change the following parameters in the Configuration file:
Center Frequency = 0
PhyParameter2 = 0x1
See Appendix C for details on the Configuration file.
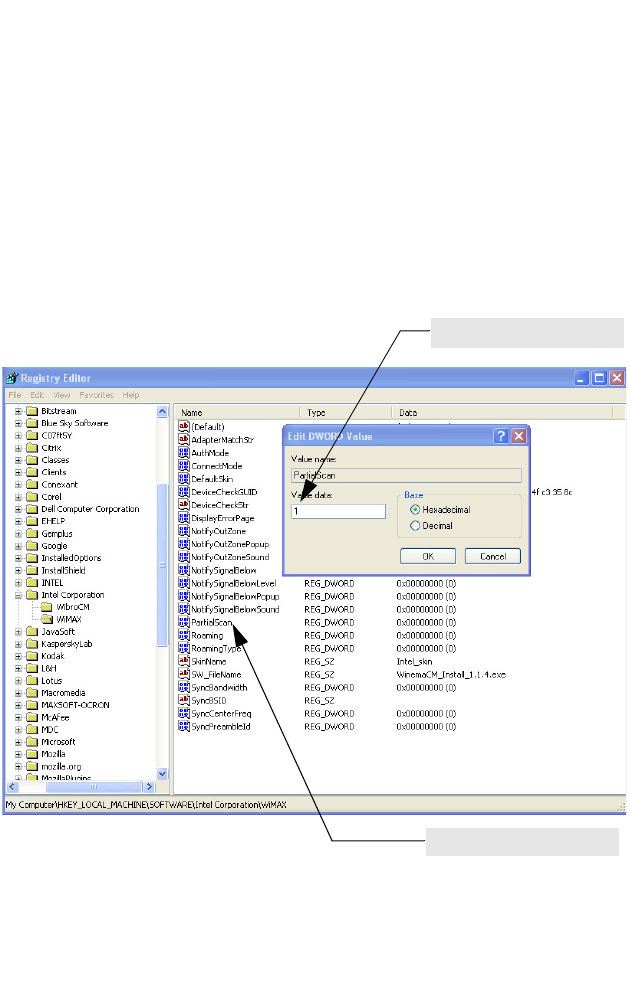
2. Find the registry entry “HKEY_LOCAL_MACHINE\SOFTWARE\Intel
Corporation\WiMAX” and set the PartialScan value to 1. (The value 0 means do
not use partial scan.)
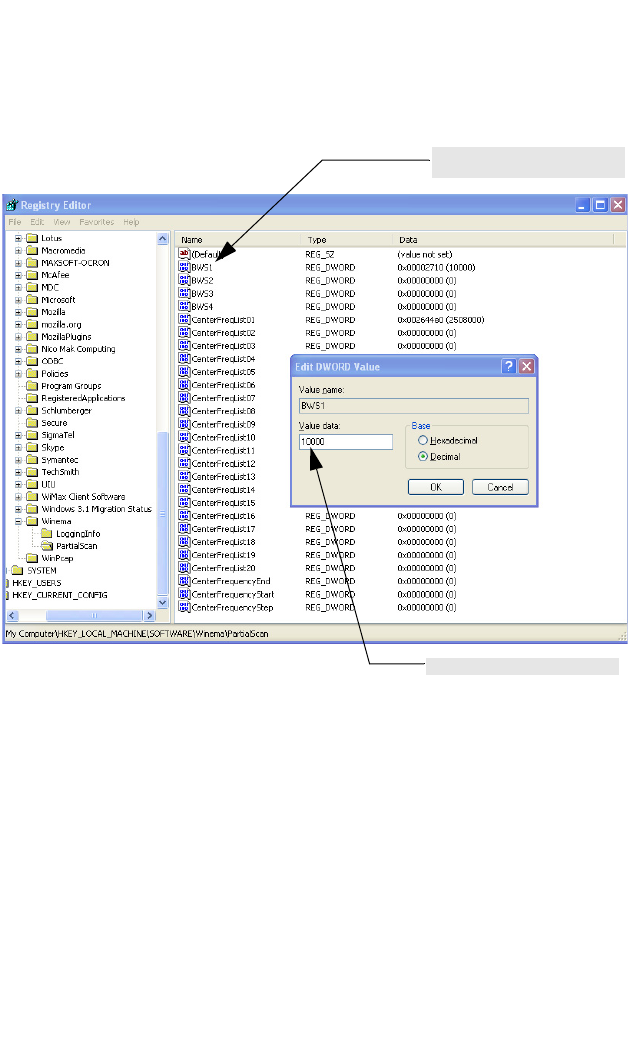
3. Add the Bandwidths you want to scan to the following registry entries:
HKEY_LOCAL_MACHINE\SOFTWARE\Winema\ParticalScan\BWS1
HKEY_LOCAL_MACHINE\SOFTWARE\Winema\ParticalScan\BWS2
HKEY_LOCAL_MACHINE\SOFTWARE\Winema\ParticalScan\BWS3
Set value to 1 to use partial
scan.
Select PartialScan and press
Enter to edit the value.
Using Partial Scan
D-2
HKEY_LOCAL_MACHINE\SOFTWARE\Winema\ParticalScan\BWS4
The maximum number of bandwidths supported is four. If you do not want to
scan a bandwdith, set the value to 0.
4. Add the center frequencies you want to scan to the following registry entries:
HKEY_LOCAL_MACHINE\SOFTWARE\Winema\PartialScan\
CenterFreqList01
HKEY_LOCAL_MACHINE\SOFTWARE\Winema\PartialScan\
CenterFreqList02
….
HKEY_LOCAL_MACHINE\SOFTWARE\Winema\PartialScan\
CenterFreqList20
The maximum number of center frequencies supported is 20. If you do not want
to scan a center frequency, set the value to 0.
Select BWS1 to BWS4 and
press Enter to edit the value.
Sets the bandwidth to scan..

D-3
5. Run WinemaCM.
Select CenterFreqList01 to
CenterFreqList20 and press
Enter to edit the value.
Sets the center frequency to
scan.

Using Partial Scan
D-4

E-1
Appendix E: Registry Settings
This section lists the Windows Registry settings for WinemaCM.
[HKEY_LOCAL_MACHINE\SOFTWARE\Intel Corporation\WiMAX]
Name Type Description
DefaultSkin Dword Whether current skin is default skin. (1:default skin,
0:not default skin)
SkinName String The name of current skin. (default skin:"default",
Otherwise:skin name in skin.dat
ConnectMode DWord 0: auto connectionn, 1: manual connection
NotifyOutZone Dword 0: close, 1:start
NotifyOutZoneSound Dword 0: close, 1:start
NotifyOutZonePopup Dword 0: close, 1:start
NotifySignalBelow Dword 0: close, 1:start
NotifySignalBelowSound Dword 0: close, 1:start
NotifySignalBelowPopup Dword 0: close, 1:start
NotifySignalBelowLevel Dword 0 ~ 6
Roaming Dword Always 0. Because Beceem doesn't support
roaming.
RoamingType Dword Always 0. Because Beceem doesn't support
roaming.
DisplayErrorPage Dword 0: hide, 1: display (In current design, we will always
show error page.)
DeviceCheckStr String "Beceem". The string is used to search the network
adapter.
DeviceCheckGUID Binary Used to check whether the device's broadcase
event are "GUID_NDIS_LAN_CLASS" class
SW_FileName String File name of installation package (for example:
WinemaCM_Install_1.1.4.exe)
SW_VersionFileName String File name of the software verion file (for example:
SW_ver.bin)
Upgrade URL String The URL of upgrade server (for example: http://
upgrade.intel.com)
AdapterMatchStr String "Beceem". The string is used to search the network
adapter.
PartialScan Dword 0: Do not use partial scan, 1: Use partial scan
RoamingFilter String The strings are used to filter BSIDs searched in
partial scan procedure. For example, we want to
filter BSIDs with "0x0102" and "0x020304". The
value of string will be "0x0102;0x020304."

Registry Settings
E-2
SyncCenterFreq Dword The center frequency is used to sync-up when we
use partial scan procedure
SyncBandwidth Dword The bandwidth is used to sync-up when we use
partial scan procedure
SyncPreambleId Dword The preamble ID is used to sync-up when we use
partial scan procedure
SyncBSID String The BSID is used to sync-up when we use partial
scan procedure
[HKEY_LOCAL_MACHINE\SOFTWARE\Winema]
Name Type Description
Username String User name for TTLS MS-ChapV2
Password Strng Password for TTLS MS-ChapV2
ClientCertPath String Client certificate path
ClientCertType Dword Client certificate type. 0:PEM; 1:DER
EAPPrivateKeyPath String Private key path
EAPPrivateKeyType Dword Private key type. 0:PEM; 1:DER
PrivateKeyPW String Private key passward
AnonymousId String Anonymous Identication string
RootCertPath String CA certificate path
[HKEY_LOCAL_MACHINE\SOFTWARE\Winema\PartialScan]
Name Type Description
BWS1 ~ BWS4 DWord Bandwidth specified for partial scan
CenterFreqList01 ~
CenterFreqList20
DWord Center frequency specified for partial scan
[HKEY_LOCAL_MACHINE\SOFTWARE\Winema\LoggingInfo\]
Name Type Description
Software\Winema\
LoggingInfo\
Dword Output debug messages for supplicant.dll.
1: output debug message
0: close debug messages
[HKEY_LOCAL_MACHINE\SOFTWARE\Intel Corporation\WiMAX]
Name Type Description

E-3
[HKEY_LOCAL_MACHINE\SYSTEM\ControlSet002\Services\Tcpip\Parameters]
Name Type Description
TCPWinodwSize Dword Setting for TCP window size

Registry Settings
E-4
WM8931BE
WM8921BE
E062007-CS-R01
149xxxxxxxxx