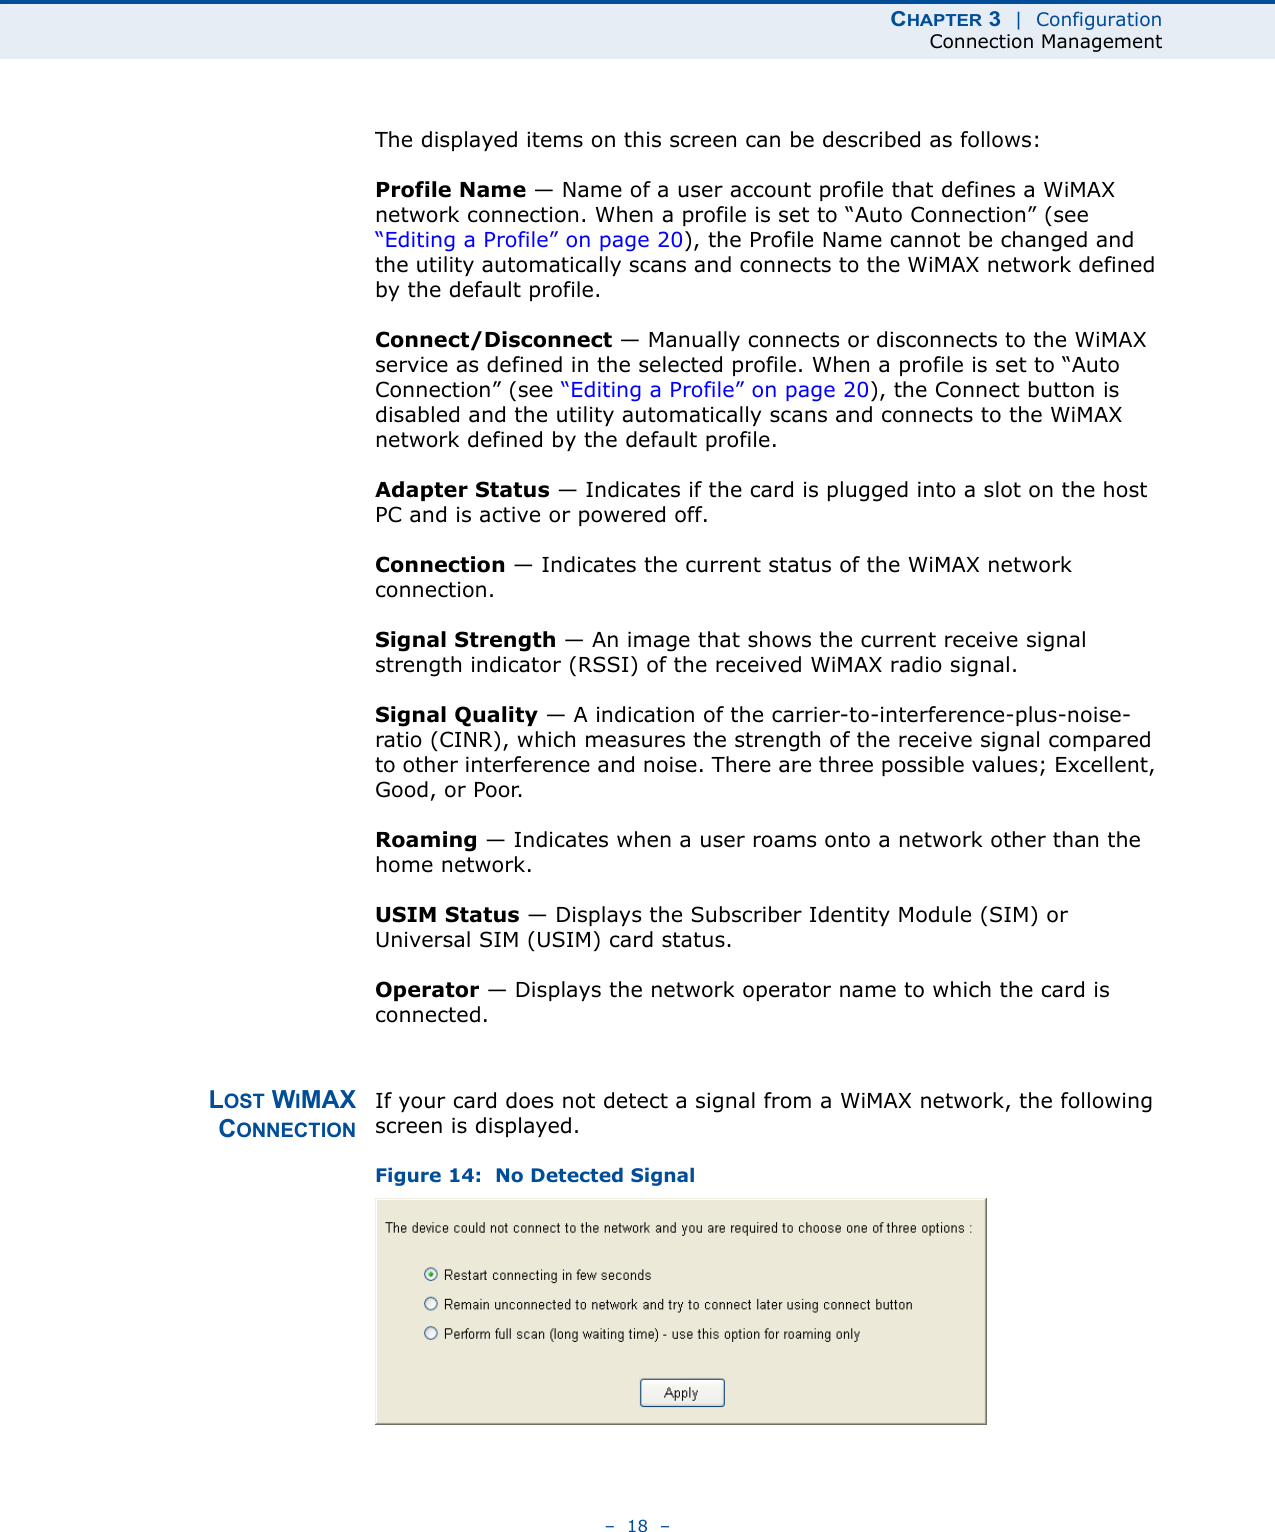
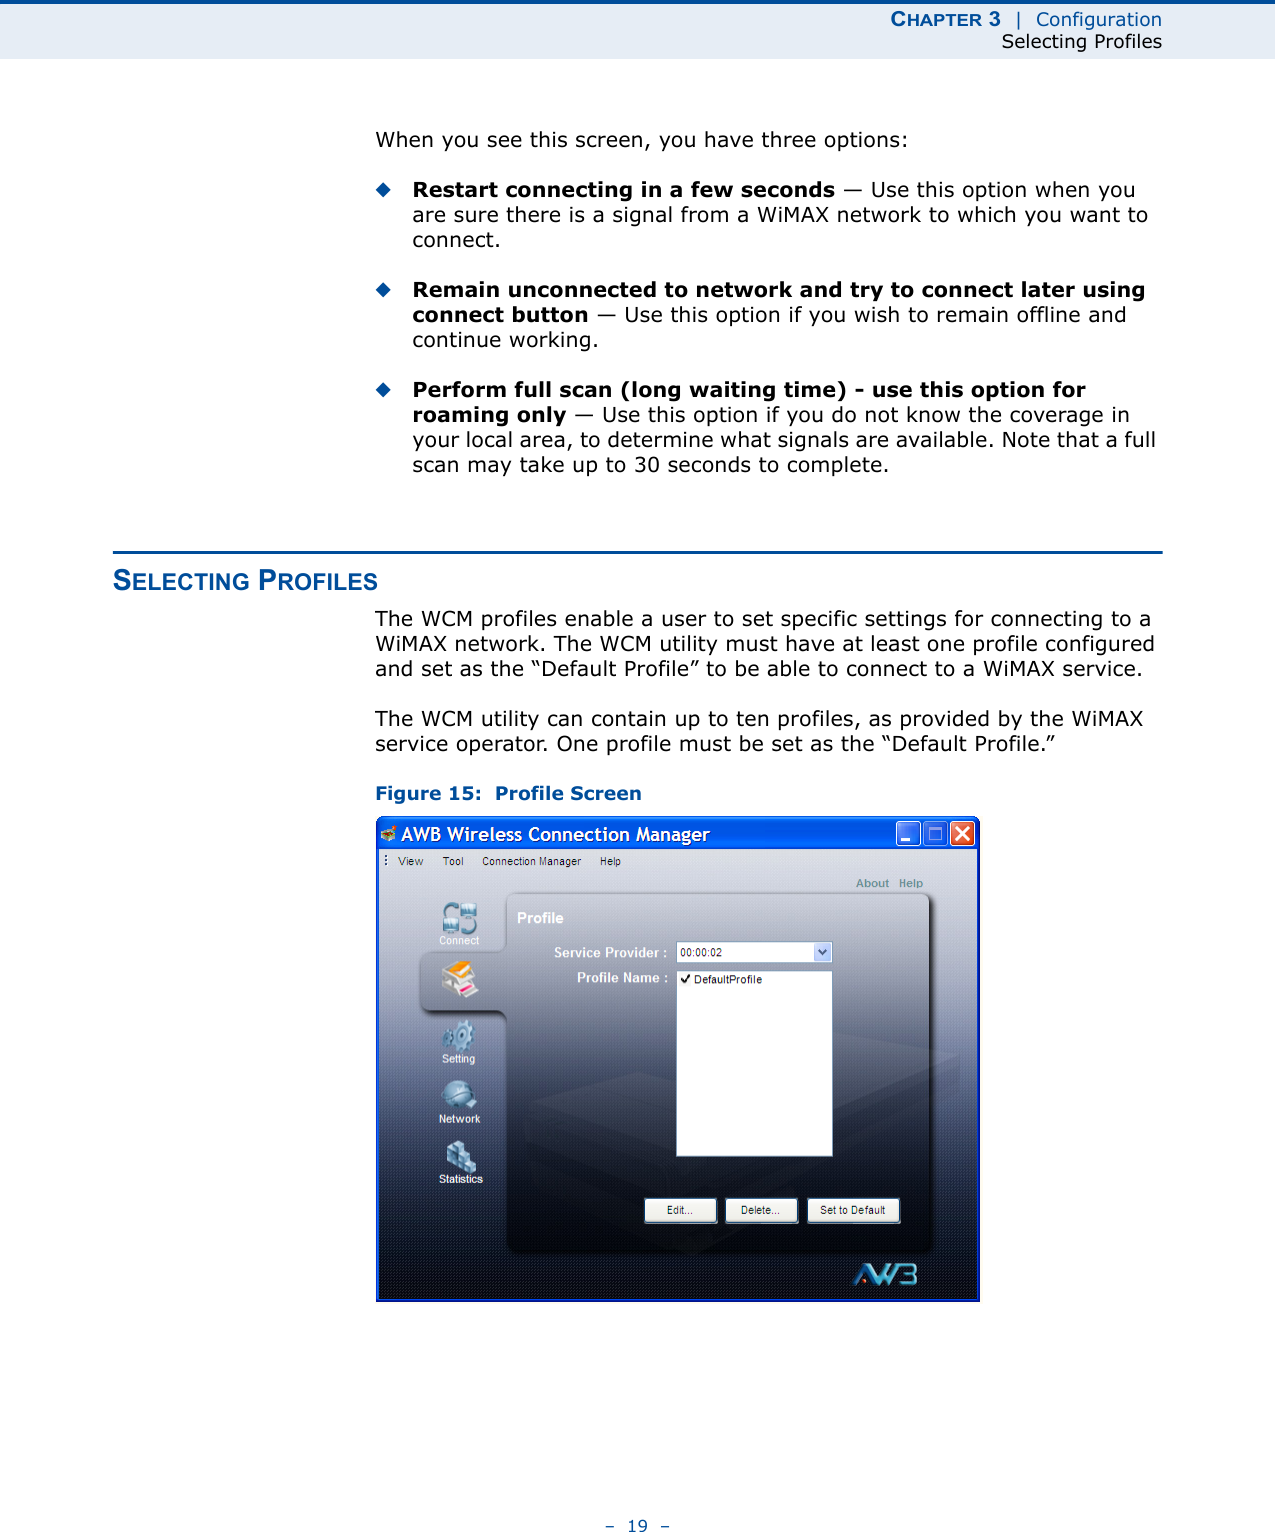
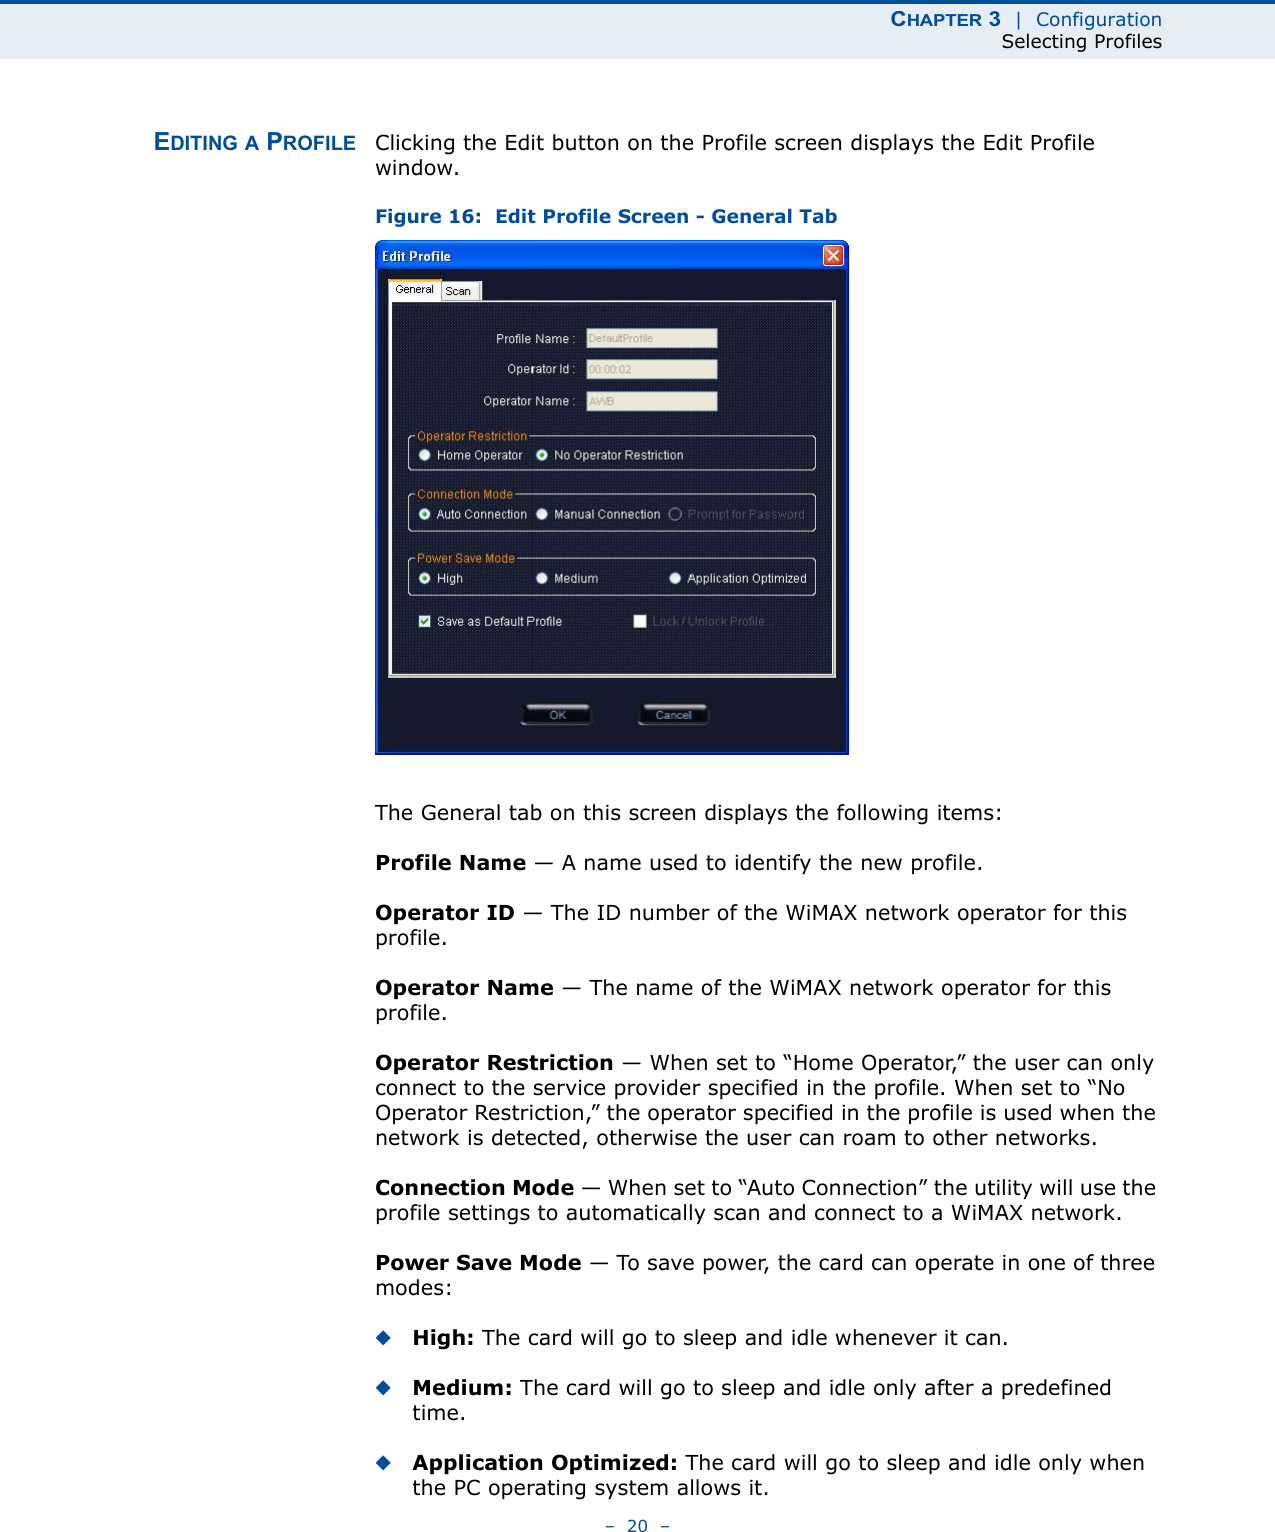
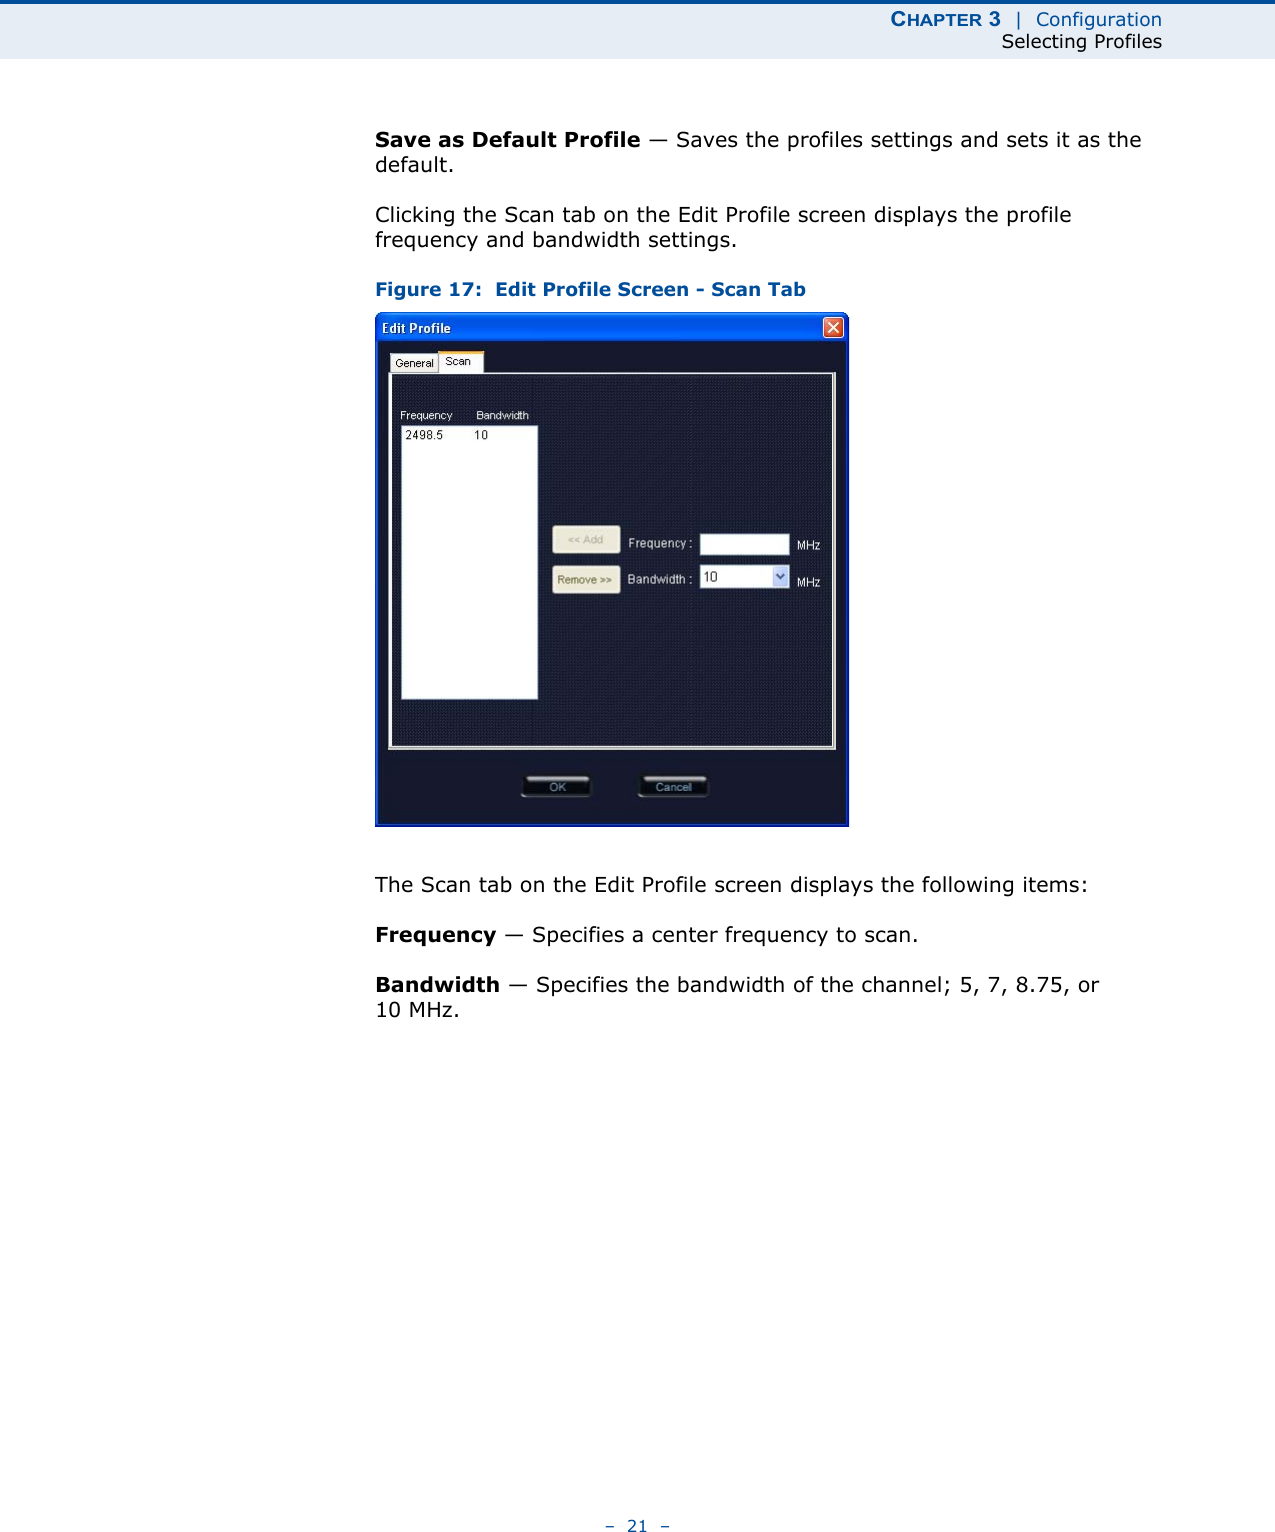
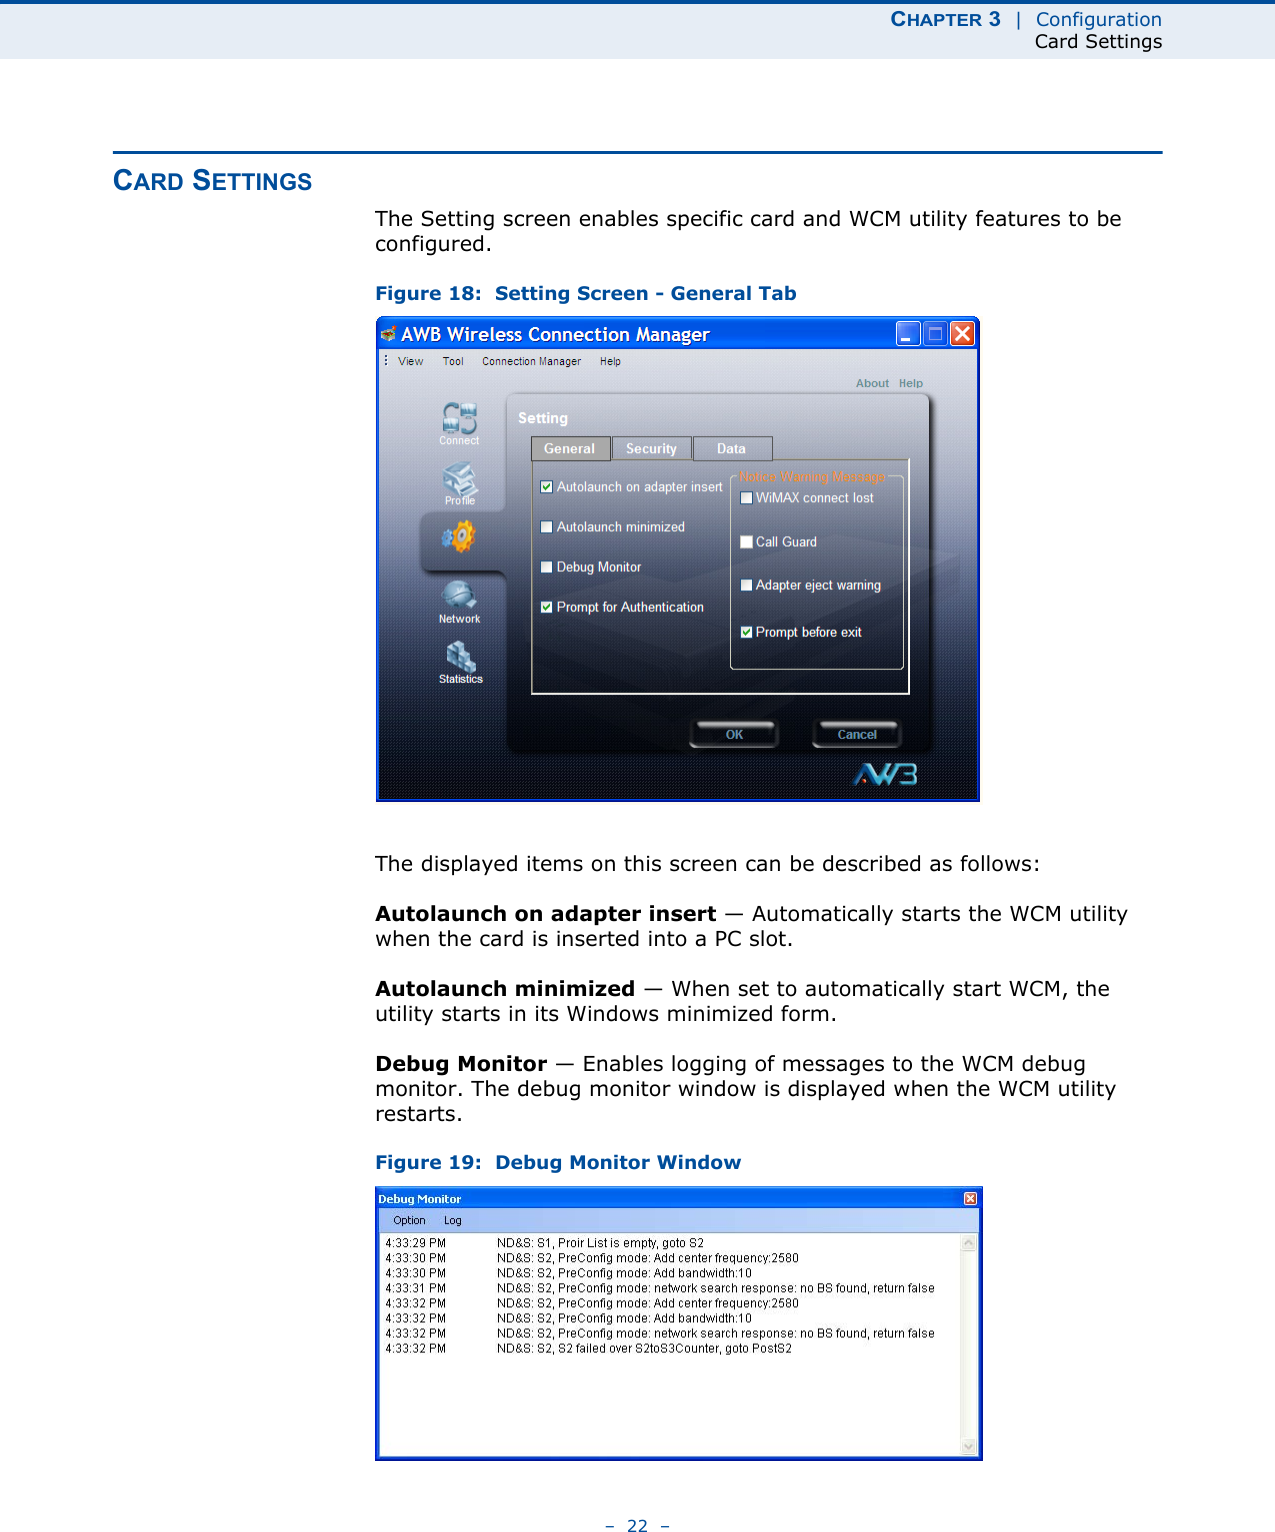
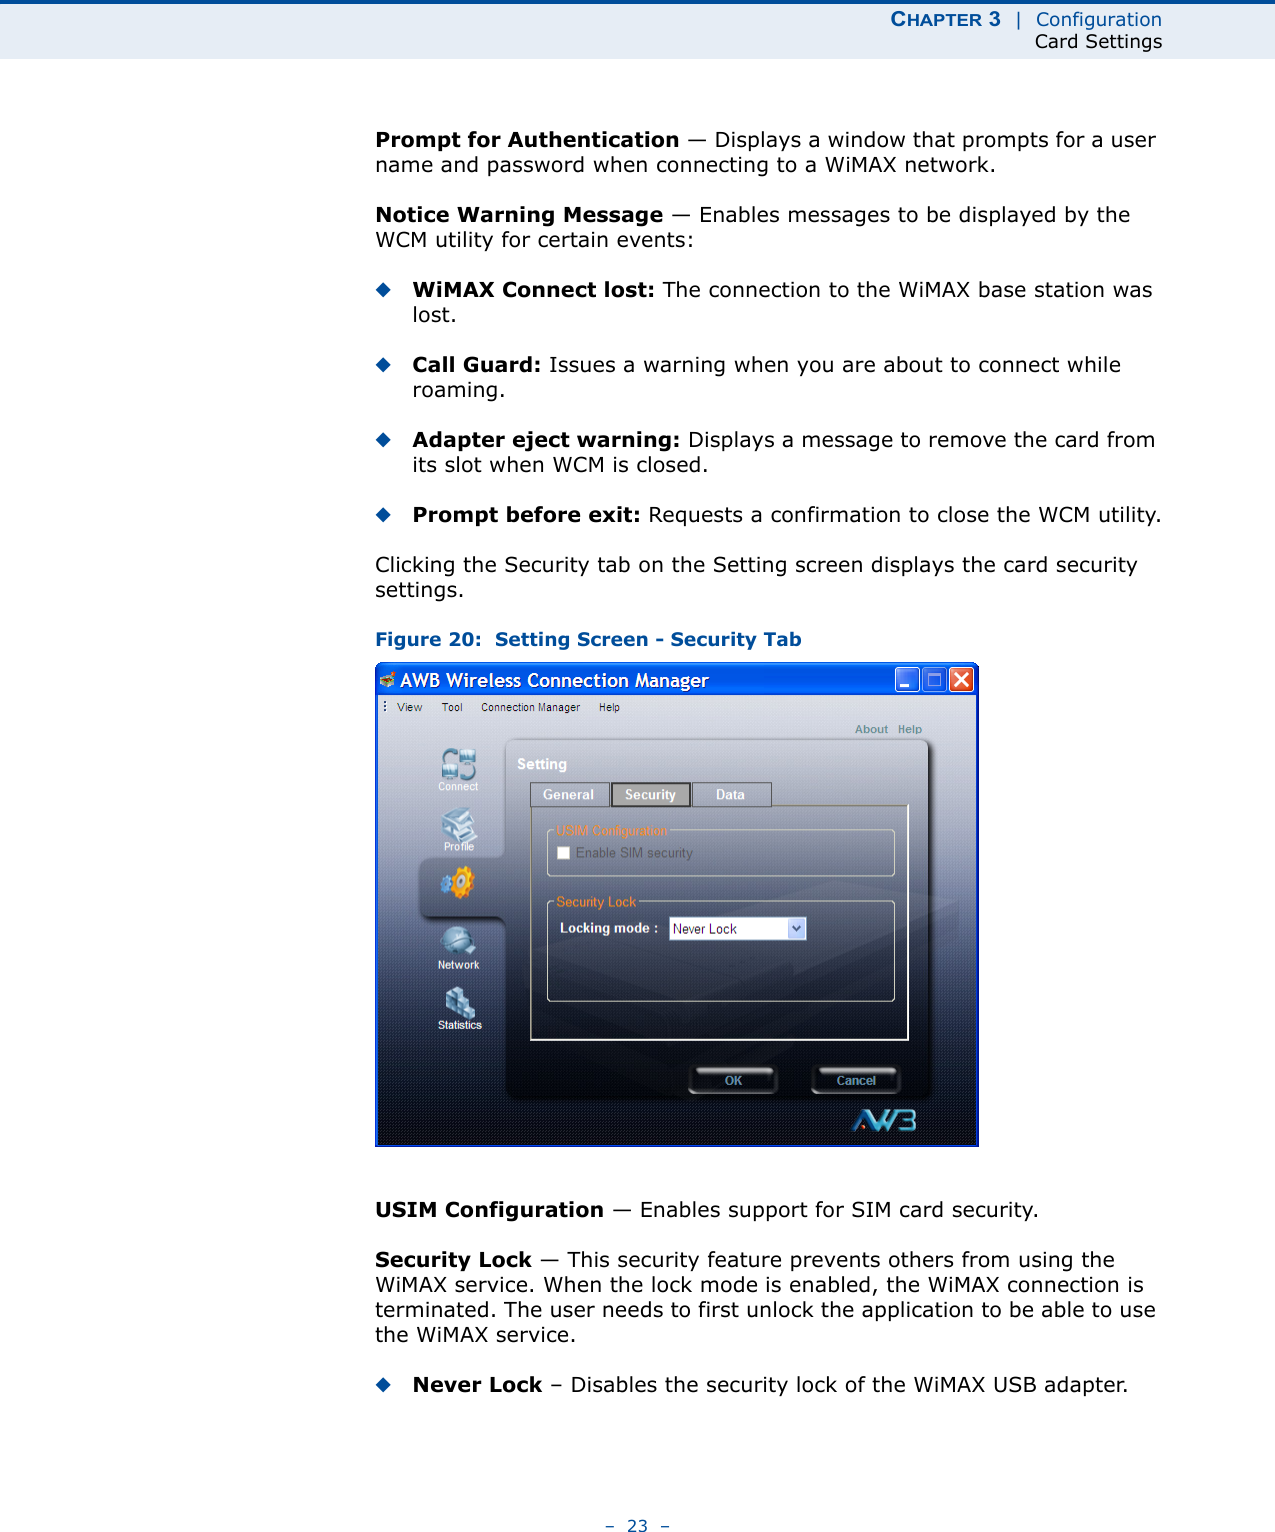
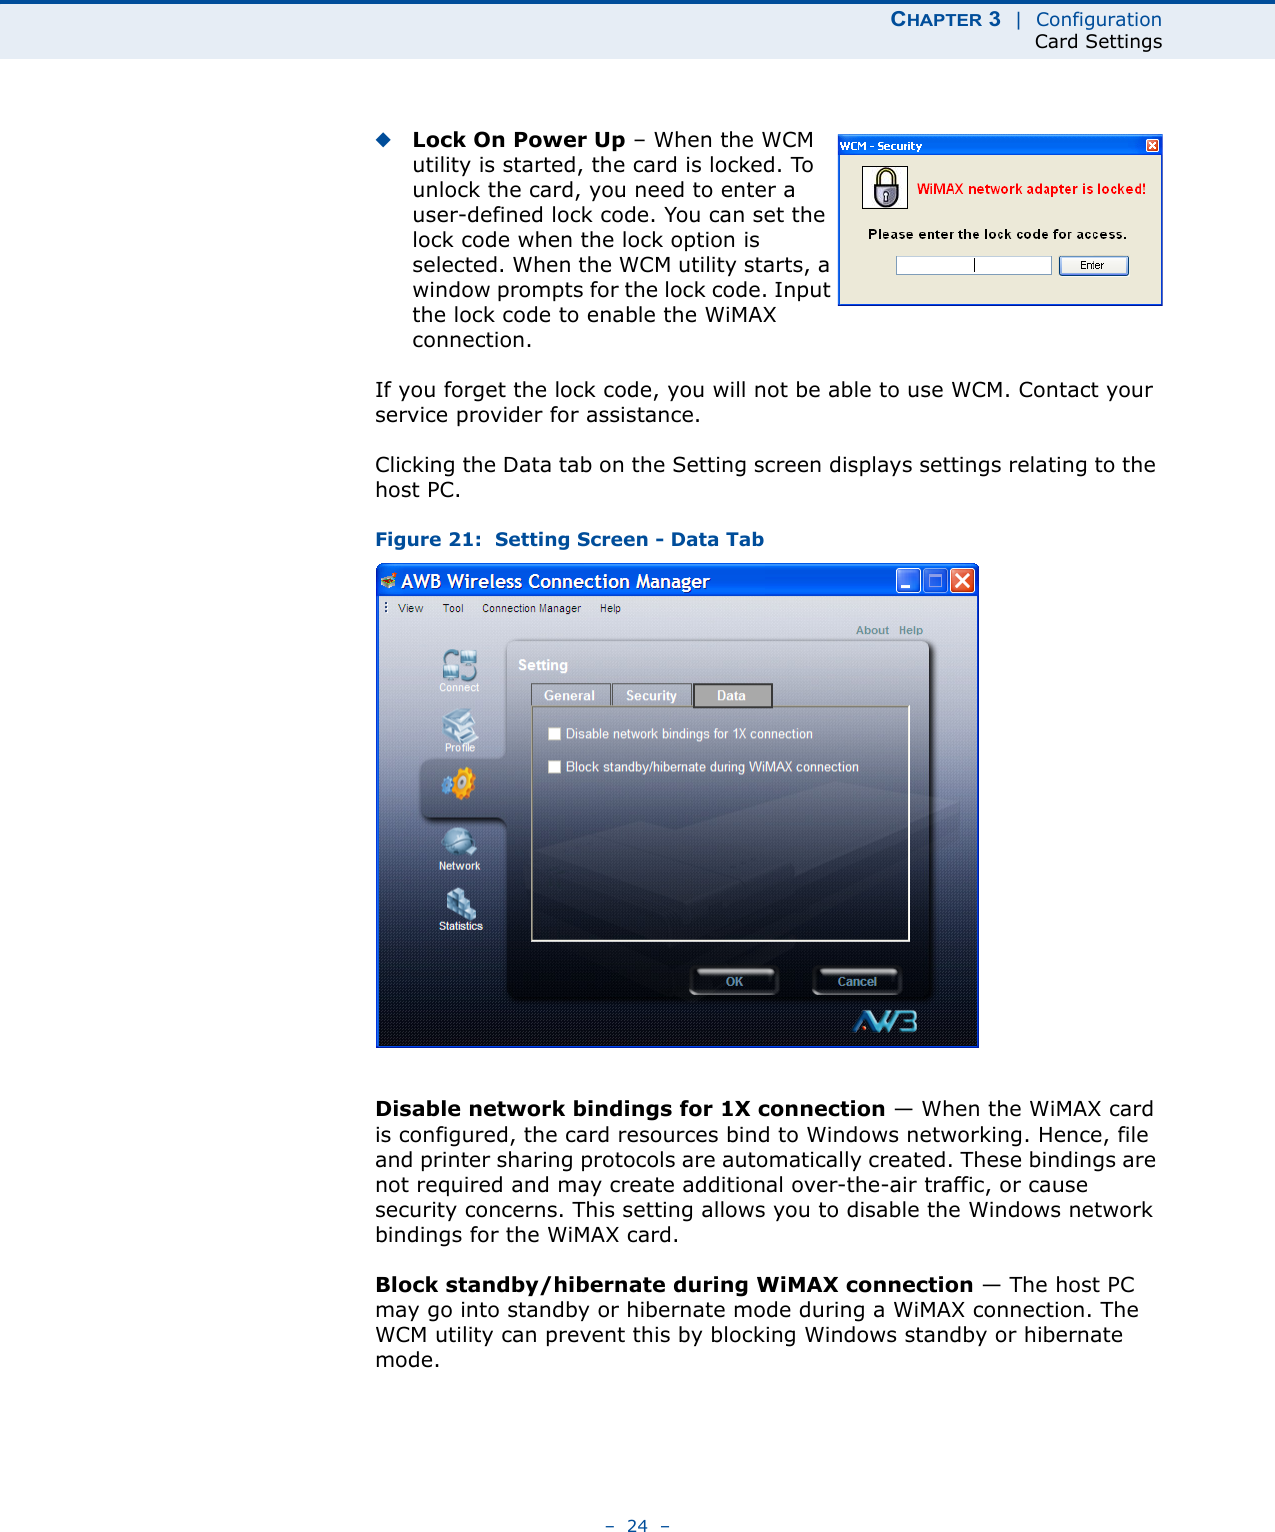
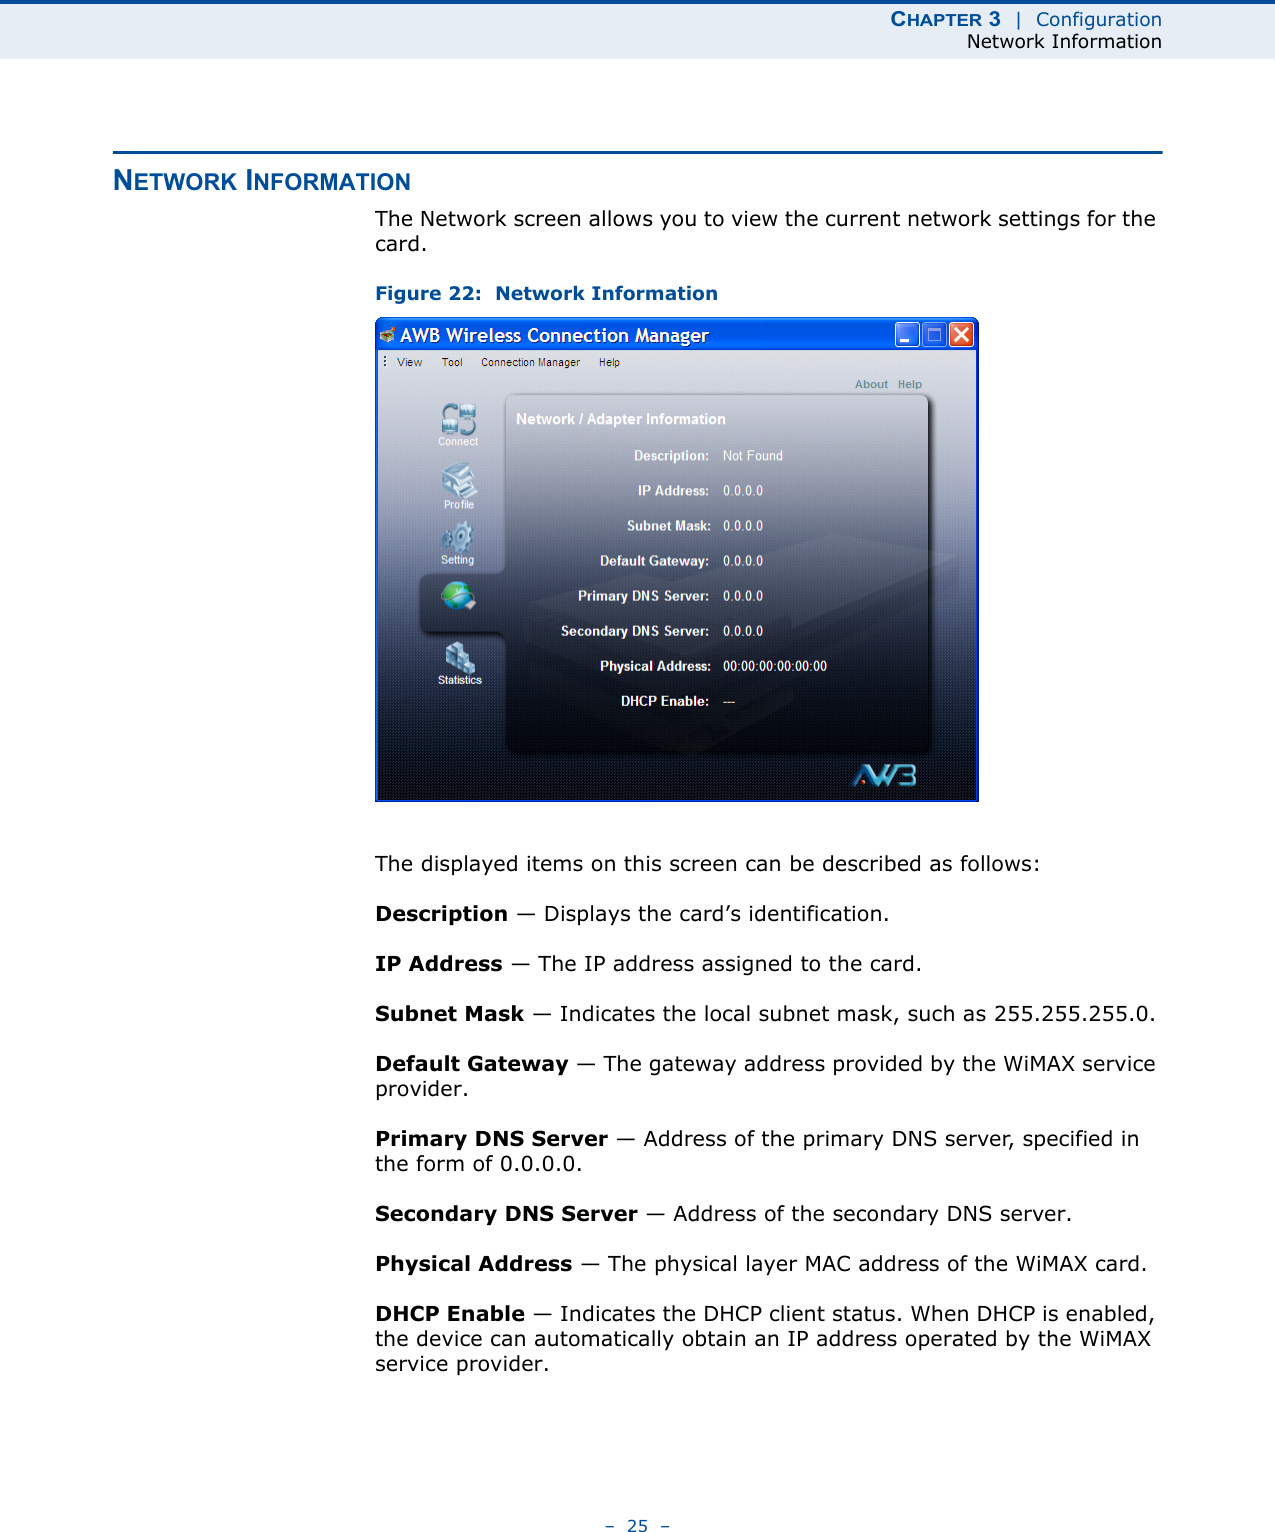
Accton Wireless Broand
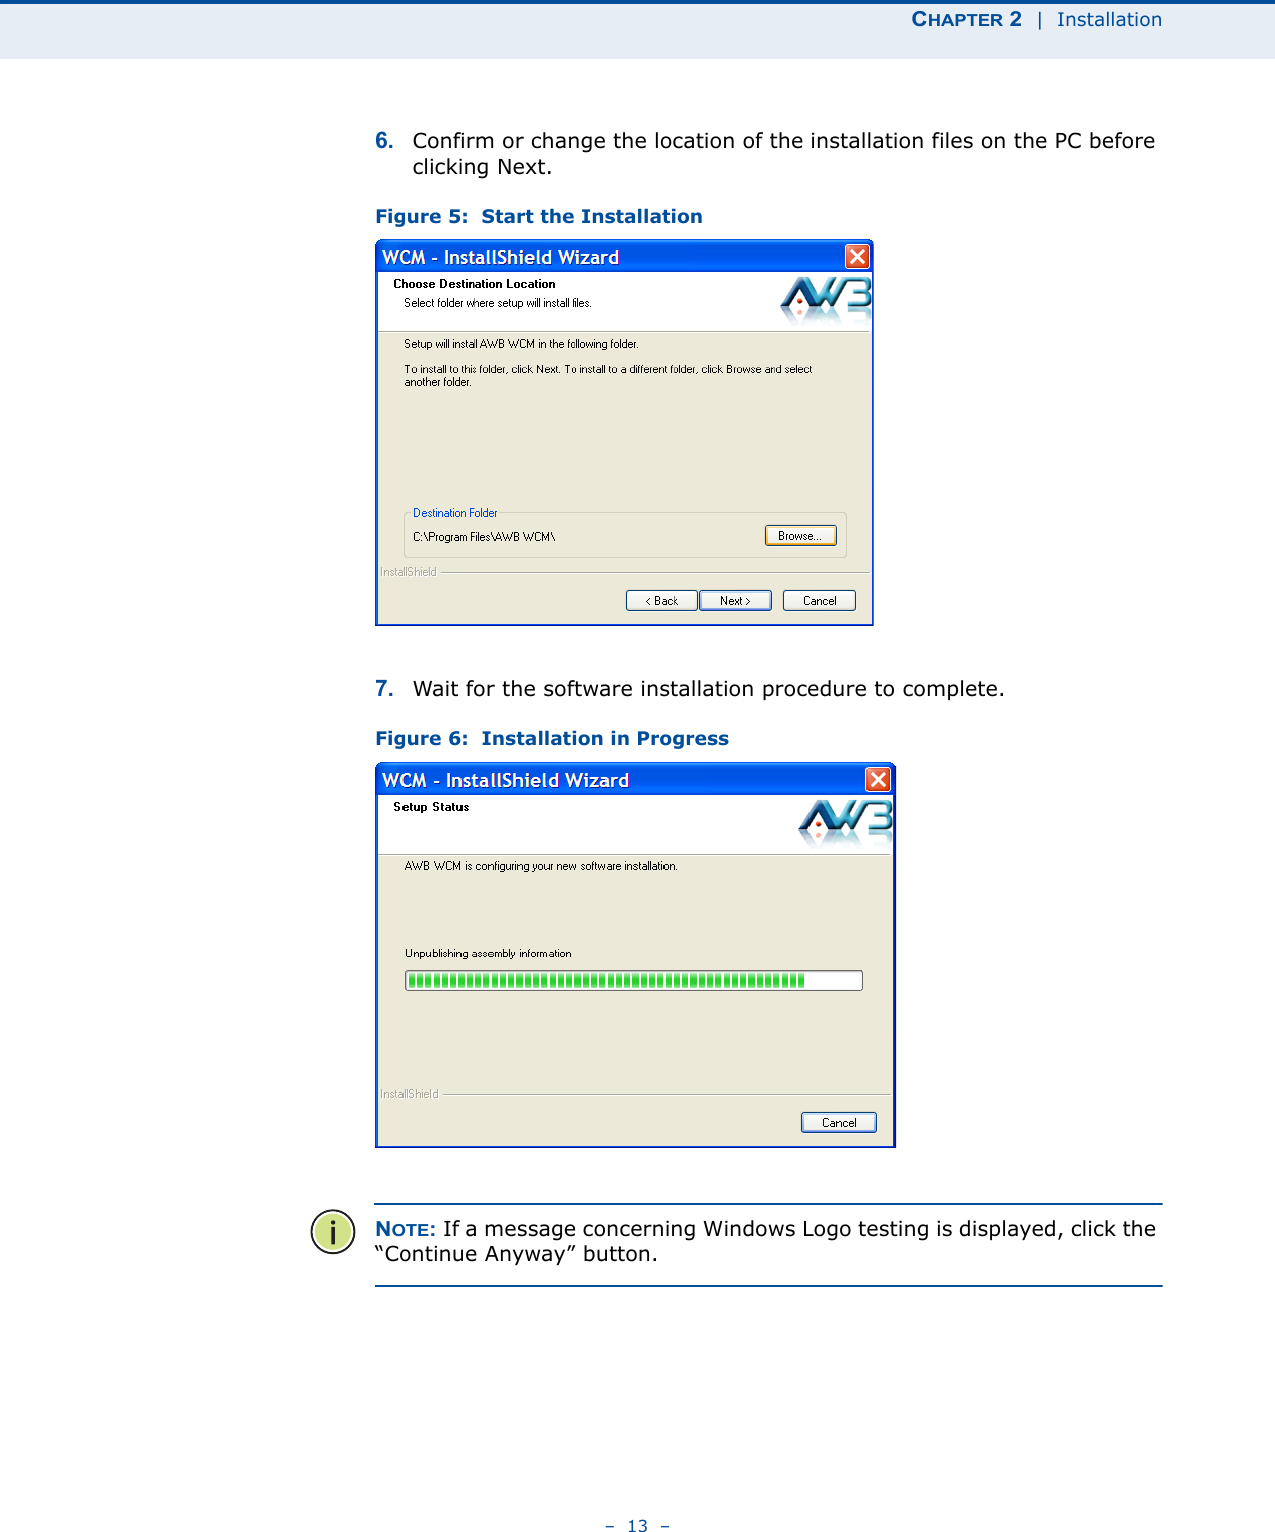
 FWA81US25005W Mobile WiMAX USB Adapter User Manual US211 3 5 81 UG R01

Accton Wireless Broadband Corp. Mobile WiMAX USB Adapter US211 3 5 81 UG R01

Contents

User Manual 1

USER GUIDEMobile WiMAX USB AdapterUS211
USER GUIDEUS211IEEE 802.16e-2005 Mobile WiMAX USB Adapter, with 2.3, 2.5, and 3.5 GHz Frequency Band ModelsUS211E072009-AP-R01149100000031W
–  3  –COMPLIANCESFEDERAL COMMUNICATION COMMISSION INTERFERENCE STATEMENTThis equipment has been tested and found to comply with the limits for a Class B digital device, pursuant to Part 15 of the FCC Rules. These limits are designed to provide reasonable protection against harmful interference in a residential installation. This equipment generates, uses and can radiate radio frequency energy and, if not installed and used in accordance with the instructions, may cause harmful interference to radio communications. However, there is no guarantee that interference will not occur in a particular installation. If this equipment does cause harmful interference to radio or television reception, which can be determined by turning the equipment off and on, the user is encouraged to try to correct the interference by one of the following measures:◆Reorient or relocate the receiving antenna◆Increase the separation between the equipment and receiver◆Connect the equipment into an outlet on a circuit different from that to which the receiver is connected◆Consult the dealer or an experienced radio/TV technician for helpThis device complies with Part 15 of the FCC Rules. Operation is subject to the following two conditions: (1) This device may not cause harmful interference, and (2) this device must accept any interference received, including interference that may cause undesired operation.FCC Caution: Any changes or modifications not expressly approved by the party responsible for compliance could void the user's authority to operate this equipment. IMPORTANT NOTE:FCC RADIATION EXPOSURE STATEMENTThis equipment complies with FCC radiation exposure limits set forth for an uncontrolled environment. End users must follow the specific operating instructions for satisfying RF exposure compliance. To maintain compliance with FCC RF exposure compliance requirements, please follow operation instruction as documented in this manual.This transmitter must not be co-located or operating in conjunction with any other antenna or transmitter. The availability of some specific channels and/or operational frequency bands are country dependent and are firmware programmed at the factory to match the intended destination. The firmware setting is not accessible by the end user.
COMPLIANCES–  4  –Due to the essential high output power nature of WiMAX devices, use of this device with other transmitters at the same time may exceed the FCC RF exposure limit and such usage must be prohibited (unless such co-transmission has been approved by FCC in the future).SAR (SPECIFIC ABSORPTION RATE) COMPLIANCES STATEMENTSAR compliance has been established in typical laptop computer (s) with a USB slot, and the product can be used in typical laptop computers with USB slots. Other applications, such as handheld PCs or similar devices have not been verified and may not be in compliance with related RF exposure rules and such use shall be prohibited. EC CONFORMANCE DECLARATION Marking by the above symbol indicates compliance with the Essential Requirements of the R&TTE Directive of the European Union (1999/5/EC). This device is intended for use in the following European Community countries. NCC 警語『減少電磁波影響請妥適使用』
–  5  –ABOUT THIS GUIDEPURPOSE This guide details the hardware features of the US211 WiMAX USB Adapter, including its physical and performance-related characteristics, and how to install the device and use its configuration software.AUDIENCE This guide is for PC users with a working knowledge of computers. You should be familiar with Windows operating system concepts.CONVENTIONS The following conventions are used throughout this guide to show information:NOTE: Emphasizes important information or calls your attention to related features or instructions.CAUTION: Alerts you to a potential hazard that could cause loss of data, or damage the system or equipment.WARNING: Alerts you to a potential hazard that could cause personal injury.RELATED PUBLICATIONS The following publication gives basic information on how to install and use the WiMAX USB Adapter.Quick Installation GuideAlso, as part of the card’s configuration software, there is online help that describes all management features.REVISION HISTORY This section summarizes the changes in each revision of this guide.JULY 2009 REVISIONThis is the first revision of this guide. This guide is valid for software version 2.0.0.0.
–  6  –CONTENTSCOMPLIANCES 3ABOUT THIS GUIDE 5CONTENTS 61INTRODUCTION 8Features  8System Requirements  9Package Checklist  9USB Connector  9LED Indicators  102INSTALLATION 113CONFIGURATION 15Accessing the WCM Utility  15Display Options  16View Menu Options  17Connection Management  17Lost WiMAX Connection  18Selecting Profiles  19Editing a Profile  20Card Settings  22Network Information  25WiMAX Connection Statistics  26Tool Menu  27Disable Menu Bar  27Turning Power On/Off  27Safely Remove Hardware  27Lock WiMAX Network Adapter Now  28Sounds for Events  28Software Upgrade  29
CONTENTS–  7  –4ADMINISTRATOR MODE 30Accessing Administrator Mode  30Setting Profiles  31Creating a New Profile  32Advanced Configuration  37ATROUBLESHOOTING 39Diagnosing LED Indicators  39Network Connection Problems  39Uninstalling the WCM Software  40BSPECIFICATIONS 42GLOSSARY 45INDEX 49
–  8  –1INTRODUCTIONThe WiMAX USB Adapter is a network adapter that enables a notebook PC to connect to a service provider’s 2.3 GHz, 2.5 GHz or 3.5 GHz mobile WiMAX network.The USB adapter plugs directly into a PC’s compatible USB port and includes its own driver and configuration software for Windows XP and Windows Vista.Figure 1:  WiMAX USB AdapterFEATURES◆Mobile WiMAX IEEE 802.16e-2005 Wave 2 compliant◆Three models for 2.3 GHz, 2.5 GHz or 3.5 GHz mobile WiMAX networks◆Full Non-Line-of-Sight (NLOS) operation◆Two LED indicators for power and link status◆Easy installation with a user-friendly interface for configuration.◆Driver support for Windows XP with Service Pack 2 (SP2) and Windows Vista
CHAPTER 1  |  IntroductionSystem Requirements–  9  –SYSTEM REQUIREMENTSBefore you install the WiMAX USB Adapter, check your system meets the following requirements:◆A notebook or desktop computer with a USB port◆Microsoft Windows XP or Windows Vista◆Microsoft .NET Framework Version 2.0 (or higher) installed on the host computer◆A 1 GHz Pentium CPU or higher with a minimum of 256 MB of RAMPACKAGE CHECKLISTThe WiMAX USB Adapter package includes these items:◆WiMAX USB Adapter (US211)◆Quick Installation GuideInform your dealer if there are any incorrect, missing or damaged items. If possible, retain the carton, including the original packing materials. Use them to repack the product in case there is a need to return it.Hardware DescriptionThe US211 WiMAX USB Adapter enables notebook PC users to connect to a WiMAX Internet access service provider. USB CONNECTOR The USB adapter can be installed in any notebook PC with a USB port. The notebook PC must be running Windows XP with Service Pack 2 or Windows Vista.
CHAPTER 1  |  IntroductionPackage Checklist–  10  –LED INDICATORS The WiMAX USB Adapter includes two status LED indicators, as described in the following figure and table.Figure 2:  LED IndicatorsTable 1: LED IndicatorsLED Status DescriptionPower On Blue The USB adapter is correctly installed in a USB port and is receiving power.Link/Activity On Green The USB adapter is searching for a WiMAX base station.On Orange The USB adapter has an established link with a base station and is transmitting or receiving data.
–  11  –2INSTALLATIONTo install the WiMAX USB Adapter driver and software utility for Windows XP or WIndows Vista, follow these steps:NOTE: Only the installation interface for Windows XP is shown in this guide. However, the utility installation screens are similar for all Microsoft Windows systems.1. Turn on your notebook and wait until the Windows system has completely started.2. Insert the adapter into an available USB port. When the USB adapter is inserted correctly, its blue LED turns on (see page 10).   NOTE: If you encounter problems installing the USB adapter, see “Troubleshooting” on page 39.3. The “InstallShield Wizard” program should start automatically. If the install program does not start automatically, use Windows Explorer to find the USB adapter, which appears as an external USB drive. Open the folder and find the file “Setup.exe” to start the install program.CAUTION: Check if the Microsoft .Net Framework (2.0 or later) is installed on your system. You can check by opening Control Panel and then clicking “Add or Remove Programs.” If you do not have the correct .Net Framework installed, go to the Microsoft web site and download it. (The .NET Framework requires approximately 23 MB of memory and is a free download.)
CHAPTER 2  |  Installation–  12  –4. Click Next to continue the installation.   Figure 3:  InstallShield Wizard Start 5. Select to accept the license agreement terms, then click Next.Figure 4:  Accept License Agreement Terms
CHAPTER 2  |  Installation–  13  –6. Confirm or change the location of the installation files on the PC before clicking Next.Figure 5:  Start the Installation7. Wait for the software installation procedure to complete.Figure 6:  Installation in ProgressNOTE: If a message concerning Windows Logo testing is displayed, click the “Continue Anyway” button.
CHAPTER 2  |  Installation–  14  –8. When the “InstallShield Wizard Complete” message displays, click Finish.Figure 7:  InstallShield Wizard CompleteCAUTION: Safely remove the USB adapter by double-clicking the Safely Remove Hardware icon      in the notification area, click the device and then click stop.
–  15  –3CONFIGURATIONThe Wireless Connection Manager (WCM) software provides all the tools to manage and monitor your WiMAX connection. After initial installation, the software starts automatically every time you insert the WiMAX USB Adapter.ACCESSING THE WCM UTILITYOnce the utility installation is complete, there are several methods of starting the WCM software other than by inserting the WiMAX USB Adapter. The utility screens are similar for all Microsoft Windows systems. The interface for Windows XP is described in this user guide. From the WCM shortcut icon on the Windows XP or Windows Vista desktop:Figure 8:  WCM Desktop IconFrom the WCM icon on the Windows System Tray:Figure 9:  WCM System Tray IconThe System Tray icon also indicates the WiMAX connection status.White: No connection to a WiMAX network.Red: Connected to a network, but no IP address assigned. Lighter color bars indicate the receive signal level.Green: Connected to network with an assigned IP address. Lighter color bars indicate the receive signal level.Double click the icon to start the utilityDouble click the icon to open the application window.Click the right mouse buttonto open a menu of configuration
CHAPTER 3  |  ConfigurationDisplay Options–  16  –DISPLAY OPTIONSThe WCM software has two display options, or “skins,” to choose from. The main screens for the two skins are shown below.Figure 10:  Jet Black SkinFigure 11:  Sky Blue SkinOther than the display style, there are no functional differences between the default Jet Black Skin and the alternate Sky Blue Skin. You can select the skin type from the Tool menu.This guide describes the WCM software for the Jet Black Skin.Connect/Disconnect buttonConnect/Disconnect button
CHAPTER 3  |  ConfigurationConnection Management–  17  –VIEW MENU OPTIONS The WCM utility’s View menu includes three options that apply to the display window:Compact View — Displays the window in compact format that uses minimum screen space. This view displays only the roaming status. Clicking the mouse right button displays a menu where the WCM full view can be restored.Figure 12:  WCM Compact ViewDocking — Forces the display window to “jump” to the nearest screen edge.Always on Top — The display window always remains in front of other windows.CONNECTION MANAGEMENTThe WCM Connect/Disconnect screen displays information about the wireless link to the service provider network.Figure 13:  Connect/Disconnect ScreenIndicates roaming status
CHAPTER 3  |  ConfigurationConnection Management–  18  –The displayed items on this screen can be described as follows:Profile Name — Name of a user account profile that defines a WiMAX network connection. When a profile is set to “Auto Connection” (see “Editing a Profile” on page 20), the Profile Name cannot be changed and the utility automatically scans and connects to the WiMAX network defined by the default profile.Connect/Disconnect — Manually connects or disconnects to the WiMAX service as defined in the selected profile. When a profile is set to “Auto Connection” (see “Editing a Profile” on page 20), the Connect button is disabled and the utility automatically scans and connects to the WiMAX network defined by the default profile. Adapter Status — Indicates if the card is plugged into a slot on the host PC and is active or powered off. Connection — Indicates the current status of the WiMAX network connection.Signal Strength — An image that shows the current receive signal strength indicator (RSSI) of the received WiMAX radio signal.Signal Quality — A indication of the carrier-to-interference-plus-noise-ratio (CINR), which measures the strength of the receive signal compared to other interference and noise. There are three possible values; Excellent, Good, or Poor.Roaming — Indicates when a user roams onto a network other than the home network. USIM Status — Displays the Subscriber Identity Module (SIM) or Universal SIM (USIM) card status.Operator — Displays the network operator name to which the card is connected.LOST WIMAXCONNECTIONIf your card does not detect a signal from a WiMAX network, the following screen is displayed. Figure 14:  No Detected Signal
CHAPTER 3  |  ConfigurationSelecting Profiles–  19  –When you see this screen, you have three options:◆Restart connecting in a few seconds — Use this option when you are sure there is a signal from a WiMAX network to which you want to connect.◆Remain unconnected to network and try to connect later using connect button — Use this option if you wish to remain offline and continue working.◆Perform full scan (long waiting time) - use this option for roaming only — Use this option if you do not know the coverage in your local area, to determine what signals are available. Note that a full scan may take up to 30 seconds to complete.SELECTING PROFILESThe WCM profiles enable a user to set specific settings for connecting to a WiMAX network. The WCM utility must have at least one profile configured and set as the “Default Profile” to be able to connect to a WiMAX service.The WCM utility can contain up to ten profiles, as provided by the WiMAX service operator. One profile must be set as the “Default Profile.” Figure 15:  Profile Screen
CHAPTER 3  |  ConfigurationSelecting Profiles–  20  –EDITING A PROFILE Clicking the Edit button on the Profile screen displays the Edit Profile window. Figure 16:  Edit Profile Screen - General TabThe General tab on this screen displays the following items:Profile Name — A name used to identify the new profile.Operator ID — The ID number of the WiMAX network operator for this profile.Operator Name — The name of the WiMAX network operator for this profile.Operator Restriction — When set to “Home Operator,” the user can only connect to the service provider specified in the profile. When set to “No Operator Restriction,” the operator specified in the profile is used when the network is detected, otherwise the user can roam to other networks.Connection Mode — When set to “Auto Connection” the utility will use the profile settings to automatically scan and connect to a WiMAX network.Power Save Mode — To save power, the card can operate in one of three modes:◆High: The card will go to sleep and idle whenever it can.◆Medium: The card will go to sleep and idle only after a predefined time.◆Application Optimized: The card will go to sleep and idle only when the PC operating system allows it.
CHAPTER 3  |  ConfigurationSelecting Profiles–  21  –Save as Default Profile — Saves the profiles settings and sets it as the default.Clicking the Scan tab on the Edit Profile screen displays the profile frequency and bandwidth settings. Figure 17:  Edit Profile Screen - Scan TabThe Scan tab on the Edit Profile screen displays the following items:Frequency — Specifies a center frequency to scan.Bandwidth — Specifies the bandwidth of the channel; 5, 7, 8.75, or 10 MHz.
CHAPTER 3  |  ConfigurationCard Settings–  22  –CARD SETTINGSThe Setting screen enables specific card and WCM utility features to be configured.Figure 18:  Setting Screen - General TabThe displayed items on this screen can be described as follows:Autolaunch on adapter insert — Automatically starts the WCM utility when the card is inserted into a PC slot.Autolaunch minimized — When set to automatically start WCM, the utility starts in its Windows minimized form.Debug Monitor — Enables logging of messages to the WCM debug monitor. The debug monitor window is displayed when the WCM utility restarts.Figure 19:  Debug Monitor Window
CHAPTER 3  |  ConfigurationCard Settings–  23  –Prompt for Authentication — Displays a window that prompts for a user name and password when connecting to a WiMAX network.Notice Warning Message — Enables messages to be displayed by the WCM utility for certain events:◆WiMAX Connect lost: The connection to the WiMAX base station was lost.◆Call Guard: Issues a warning when you are about to connect while roaming.◆Adapter eject warning: Displays a message to remove the card from its slot when WCM is closed.◆Prompt before exit: Requests a confirmation to close the WCM utility.Clicking the Security tab on the Setting screen displays the card security settings. Figure 20:  Setting Screen - Security TabUSIM Configuration — Enables support for SIM card security.Security Lock — This security feature prevents others from using the WiMAX service. When the lock mode is enabled, the WiMAX connection is terminated. The user needs to first unlock the application to be able to use the WiMAX service.◆Never Lock – Disables the security lock of the WiMAX USB adapter.
CHAPTER 3  |  ConfigurationCard Settings–  24  –◆Lock On Power Up – When the WCM utility is started, the card is locked. To unlock the card, you need to enter a user-defined lock code. You can set the lock code when the lock option is selected. When the WCM utility starts, a window prompts for the lock code. Input the lock code to enable the WiMAX connection.If you forget the lock code, you will not be able to use WCM. Contact your service provider for assistance.Clicking the Data tab on the Setting screen displays settings relating to the host PC.Figure 21:  Setting Screen - Data TabDisable network bindings for 1X connection — When the WiMAX card is configured, the card resources bind to Windows networking. Hence, file and printer sharing protocols are automatically created. These bindings are not required and may create additional over-the-air traffic, or cause security concerns. This setting allows you to disable the Windows network bindings for the WiMAX card.Block standby/hibernate during WiMAX connection — The host PC may go into standby or hibernate mode during a WiMAX connection. The WCM utility can prevent this by blocking Windows standby or hibernate mode.
CHAPTER 3  |  ConfigurationNetwork Information–  25  –NETWORK INFORMATIONThe Network screen allows you to view the current network settings for the card. Figure 22:  Network InformationThe displayed items on this screen can be described as follows:Description — Displays the card’s identification.IP Address — The IP address assigned to the card.Subnet Mask — Indicates the local subnet mask, such as 255.255.255.0.Default Gateway — The gateway address provided by the WiMAX service provider.Primary DNS Server — Address of the primary DNS server, specified in the form of 0.0.0.0.Secondary DNS Server — Address of the secondary DNS server.Physical Address — The physical layer MAC address of the WiMAX card.DHCP Enable — Indicates the DHCP client status. When DHCP is enabled, the device can automatically obtain an IP address operated by the WiMAX service provider.
CHAPTER 3  |  ConfigurationWiMAX Connection Statistics–  26  –WIMAX CONNECTION STATISTICSThe Statistics screen allows you to view information on the WiMAX connection. Figure 23:  Statistics InformationThe displayed items on this screen can be described as follows:DL Data Volume — The downloaded data volume in Kbytes for the current online session.UL Data Volume — The uploaded data volume in Kbytes for the current online session.DL Data Rate — The current download data rate in Mbps.UL Data Rate — The current upload data rate in Mbps.CINR — The current carrier-to-interference-plus-noise ratio of the received WiMAX radio signal.RSSI — The current receive signal strength indicator value of the received WiMAX radio signal.Transmit Power — The current transmit power of the WiMAX radio signal.Online Duration — The time the unit has had a link with the base station for the current session.Total Online Duration — The total accumulated time for all sessions since the unit was powered on.
CHAPTER 3  |  ConfigurationTool Menu–  27  –Reset — Click the button to reset all the counters back to zero.TOOL MENUIn addition to the main configuration screens, the WCM utility has a number of other features that can be accessed from the Tool menu. Figure 24:  Tool MenuDISABLE MENU BAR The Disable Menu Bar option on the Tool menu hides all the top-level menu options on the screen. To enable the menu bar, use the menu from the System Tray icon.Figure 25:  System Tray Icon MenuTURNING POWER ON/OFFThe WiMAX card’s power can be turned off when required. In some restricted environments, such as on an aircraft or in a hospital, it may be necessary to power-off the card. You can also power off the card when not in use just to reduce power consumption form the host PC.The card can be powered on/off from the Tool menu or from the System Tray  icon  menu.SAFELY REMOVEHARDWAREProvides access to the Windows control for powering off and disabling the card so that it can be safely removed from host PC slot.The Safely Remove Hardware option is available from the Tool menu and the System Tray icon menu.Enable/Disable the menu bar
CHAPTER 3  |  ConfigurationTool Menu–  28  –LOCK WIMAXNETWORK ADAPTERNOWThis locks the card and prevents others from using the WiMAX service. For the lock mode to operate, you must first configure a lock mode and code on the Security tab of the Setting screen. See “Card Settings” on page 22.Figure 26:  Lock USB AdapterWhen the lock mode is enabled, the WiMAX connection is terminated. The user needs to first unlock the application to be able to use the WiMAX service.The Lock/Unlock option is available from the Tool menu and the System Tray  icon  menu.SOUNDS FOR EVENTS The WCM utility allows alert sounds to be configured for certain system events. You can configure a sound for WiMAX connection established and connection lost.In the configuration window, use the Browse button to locate a “.wav” sound file. The file may be a Windows system sound file or any other you may want to select.Figure 27:  Sounds for EventsEnter the lock code here
CHAPTER 3  |  ConfigurationSoftware Upgrade–  29  –SOFTWARE UPGRADEThe About page displays information about the software version the WCM utility. The About WCM screen and Check for Update option is also available from the Help menu.Figure 28:  About WCM InformationClick the Upgrade button to check for available WCM software updates. A pop-up window indicates if a new version of software is available. Click the Download button download the software file, then click the Install button to upgrade the WCM utility.Figure 29:  Upgrade File Download

Navigation menu