Acer orporated AR5B93 WLAN Module User Manual Users manual 01
Acer Incorporated WLAN Module Users manual 01
Contents
Users manual-01
Aspire
Series
Generic
User
Guide

Copy
righ
t
©
2009.
Ac
er
Incor
porated.
All
Ri
ghts
Reserved.
Aspire
Ser
i
es
Generic
User
Guid
e
O
r
i
ginal
Is
s
u
e:
07/2009
Changes
may
be
made
pe
r
i
od
ica
l
ly
to
the
i
n
for
m
ati
on
i
n
t
h
is
publ
ication
wit
hout
obl
igati
on
to
noti
f
y
a
n
y
pers
on
o
f
s
u
c
h
revi
sio
n
s
o
r
change
s.
Su
ch
c
h
an
g
e
s
w
ill
b
e
i
n
co
rp
o
r
at
ed
in
n
e
w
editi
ons
of
thi
s
m
a
nual
o
r
s
upplementary
docum
e
n
t
s
and
publ
icatio
ns.
Thi
s
com
p
any
m
akes
no
re
pres
ent
a
t
i
ons
or
warrant
i
es,
ei
ther
exp
r
es
s
e
d
or
imp
li
e
d,
wi
th
r
e
s
p
ect
t
o
the
cont
ents
here
of
and
s
p
eci
f
i
c
a
ll
y
di
s
c
la
im
s
t
h
e
i
m
p
li
e
d
wa
rr
ant
i
e
s
of
me
rc
ha
nt
abi
li
t
y
or
f
i
tn
es
s
f
o
r
a
pa
rti
cul
a
r
pu
rpos
e.
Rec
o
rd
the
model
num
ber,
s
e
r
i
al
num
ber,
pur
c
h
as
e
dat
e
and
pla
ce
of
pur
chas
e
i
n
f
o
r
m
a
ti
on
i
n
t
h
e
spac
e
pr
ovided
below.
T
h
e
s
e
r
i
al
number
and
m
o
del
nu
m
b
er
ar
e
r
ecor
d
ed
on
t
h
e
label
affi
xed
to
you
r
com
puter.
Al
l
cor
r
espond
e
n
c
e
con
c
erning
your
uni
t
s
hould
in
c
l
ude
th
e
seria
l
num
ber,
mod
e
l
number
a
nd
pur
c
h
a
s
e
inf
orm
a
t
ion
.
No
p
a
r
t
o
f
t
h
is
publ
ication
may
be
r
e
pr
oduced,
sto
r
e
d
in
a
ret
r
ieval
sys
t
em,
or
trans
mi
tted,
in
any
for
m
or
by
any
mea
n
s
,
e
l
ec
tr
onic
a
ll
y,
m
echan
icall
y,
by
photocop
y,
rec
o
rdin
g
or
oth
e
rw
ise,
wit
hout
the
pr
ior
wri
tten
permi
ss
ion
of
A
c
er
Incorp
orated.
Aspi
re
Ser
i
es
No
tebook
PC
Model
numb
e
r
:
_
Serial
num
ber:
___
___
Date
of
pur
chas
e:
__
_
Place
of
pu
rchase:
___
Ace
r
and
the
Acer
l
ogo
a
r
e
re
gi
stered
trademarks
of
Ace
r
In
c
o
rporat
e
d
.
O
t
her
compani
e
s
'
prod
uc
t
nam
e
s
or
tr
a
d
e
m
arks
are
used
h
e
r
e
i
n
f
o
r
i
d
entificati
on
pu
rpos
e
s
onl
y
and
belong
to
the
i
r
re
spec
ti
ve
c
o
m
p
a
n
ie
s.
Information
for
your
safety
and
comfort
Safety
instructions
Read
these
in
st
ru
ction
s
c
a
ref
ully.
Keep
this
doc
u
me
nt
for
future
reference.
F
o
llow
a
ll
warnings
and
instruct
ions
mar
k
ed
on
the
product.
T
u
rning
the
produ
ct
off
bef
o
re
clea
ning
Unp
l
ug
this
pro
du
c
t
fro
m
the
wall
ou
tlet
before
c
l
eaning.
Do
no
t
use
liq
uid
clean
ers
o
r
aerosol
cleane
r
s.
U
s
e
a
dam
p
clo
t
h
for
clea
nin
g
.
iii
CAUTION
for
plug
as
d
i
sc
onne
ctin
g
device
O
b
serv
e
the
following
guidelines
when
co
nne
cting
an
d
disco
nn
e
cting
po
wer
to
the
power
supply
unit:
Install
the
powe
r
su
pp
ly
un
it
be
f
o
re
co
nnec
t
i
ng
the
power
cord
to
the
AC
po
wer
outlet.
Unplug
the
power
cor
d
before
remov
i
ng
the
powe
r
supply
unit
from
the
com
pu
t
er
.
If
the
sys
t
em
has
m
u
ltip
le
source
s
o
f
power,
disco
nne
ct
powe
r
from
the
system
by
un
pluggi
ng
a
ll
po
wer
co
rds
from
the
po
wer
supplies.
CAUTION
for
Accessibility
Be
sure
t
h
at
the
power
outlet
y
ou
plug
the
po
wer
co
r
d
into
is
easily
a
ccessible
and
loca
t
e
d
as
clo
s
e
t
o
the
eq
uip
m
en
t
ope
r
a
to
r
as
possib
l
e.
Wh
en
you
need
to
disco
nn
e
ct
po
wer
to
the
eq
uip
m
en
t,
be
sure
to
unplug
the
power
cord
from
t
h
e
electrical
ou
tlet.
CAUTION
for
bundled
dummy
card
s
(only
f
o
r
certain
mo
dels)
Your
c
o
mputer
shipped
with
plastic
dummies
installed
in
the
c
a
rd
slots.
Dummie
s
protect
unused
slots
from
dust,
m
e
ta
l
ob
jects
or
oth
e
r
particles.
S
ave
the
dummies
for
us
e
when
no
c
ards
are
in
t
h
e
slots.
CAUTION
for
Listening
To
p
r
otect
you
r
h
earing
,
follo
w
these
in
s
truc
t
i
ons.
•
Increase
th
e
volum
e
gradually
un
til
you
c
a
n
h
ear
clearly
and
com
f
ortably.
•
Do
no
t
in
crease
the
volu
me
le
vel
a
f
ter
you
r
ears
h
ave
adju
ste
d
.
•
Do
not
listen
t
o
music
at
high
volumes
for
extended
periods.
•
Do
no
t
in
crease
the
volu
me
to
blo
c
k
ou
t
no
isy
surro
und
ing
s
.
•
Decrease
th
e
vo
lum
e
if
yo
u
ca
n't
hea
r
p
e
op
le
speak
ing
near
you
.
iv
Warnings
•
D
o
no
t
us
e
t
h
i
s
p
r
odu
c
t
ne
a
r
wa
te
r.
•
Do
not
p
l
ace
th
is
prod
uct
on
an
un
stab
le
cart,
stand
or
tab
l
e.
If
the
p
r
odu
ct
falls,
it
cou
l
d
b
e
seriously
da
mag
e
d.
•
Slo
ts
and
ope
ning
s
are
pro
v
id
ed
fo
r
vent
ila
t
i
on
to
ensure
reliable
op
e
r
a
t
i
on
of
th
e
pr
od
uc
t
a
nd
to
pr
ote
c
t
i
t
fr
om
ov
e
r
he
a
t
i
n
g.
T
h
e
s
e
op
e
n
i
ng
s
m
u
st
no
t
be
b
l
oc
k
e
d
o
r
c
o
ve
red.
T
h
e
op
e
n
i
n
gs
s
hou
l
d
ne
ve
r
be
blo
c
ked
by
p
l
acin
g
th
e
p
r
odu
c
t
on
a
bed
,
sofa,
rug
or
o
t
her
sim
ilar
su
rface
.
This
p
r
odu
ct
sho
u
ld
n
e
ver
be
p
l
aced
near
or
o
v
er
a
r
a
d
i
ator
o
r
h
eat
register,
or
in
a
bu
ilt-in
installation
un
less
prop
er
ven
t
ilation
is
provided
.
•
Never
pu
s
h
ob
jects
of
an
y
kin
d
in
to
this
product
through
cabi
net
slots
as
they
may
touch
dangerous
volt
a
g
e
po
ints
or
short-out
parts
that
could
result
in
a
f
i
re
o
r
electric
sho
c
k.
Ne
ver
spill
liqu
i
d
of
an
y
kind
onto
or
in
t
o
th
e
pr
od
uc
t.
•
To
avo
i
d
da
mag
e
of
intern
al
com
pon
en
ts
a
nd
to
prevent
b
a
tt
ery
leakag
e,
do
no
t
p
l
ace
th
e
prod
uct
on
a
v
i
bratin
g
surface
.
•
Never
use
it
un
der
sp
orting
,
exe
r
c
i
s
i
ng
,
o
r
any
vibrating
environ
m
en
t
which
will
p
r
ob
ab
ly
c
a
use
un
expected
sho
r
t
cu
rrent
or
d
a
mag
e
rotor
devices,
HDD,
Optical
driv
e,
a
nd
ev
en
ex
posur
e
r
i
sk
from
lithium
battery
pack
.
•
The
bo
ttom
surface,
areas
aro
und
ventilatio
n
openin
gs
an
d
AC
adap
ter
may
get
hot.
To
avoid
in
jury,
en
sure
t
h
ey
do
no
t
c
o
me
i
n
c
o
nt
ac
t
wi
th
yo
ur
skin
o
r
bod
y.
•
You
r
device
an
d
its
en
han
c
emen
ts
may
contain
s
m
all
part
s.
Kee
p
the
m
out
of
the
r
ea
c
h
o
f
s
m
all
ch
ildren
.
Usi
ng
el
ect
r
i
c
al
po
wer
•
This
p
r
odu
ct
sho
u
ld
b
e
op
erated
from
the
type
of
power
indi
cated
on
the
marking
lab
e
l.
If
y
ou
are
not
su
re
of
the
ty
pe
o
f
po
wer
availa
ble,
co
nsul
t
yo
ur
d
ealer
or
lo
cal
po
wer
com
p
an
y.
•
Do
no
t
allo
w
anythin
g
to
r
e
s
t
on
the
powe
r
c
ord.
D
o
no
t
loca
t
e
t
h
is
prod
uc
t
wh
ere
peo
p
le
wi
ll
walk
on
the
co
rd.
•
If
an
extensio
n
co
rd
is
used
with
thi
s
p
r
od
uct,
m
ake
sure
that
th
e
total
ampere
rating
of
the
equipment
plugged
into
t
h
e
extension
cord
does
not
exceed
th
e
exten
s
ion
cord
amp
e
r
e
r
a
t
i
ng.
A
l
so,
ma
ke
sure
that
the
total
rating
of
all
prod
ucts
p
l
ugg
ed
into
th
e
wall
outlet
do
es
no
t
ex
ceed
the
fu
se
rating.
•
Do
not
ov
erload
a
power
outlet,
strip
or
rece
ptacle
by
plugging
in
t
oo
man
y
d
e
vices.
The
overall
system
load
must
no
t
exceed
80%
of
th
e
bran
ch
circuit
rating.
If
power
str
i
p
s
are
used
,
the
lo
ad
sho
u
ld
no
t
exc
eed
80%
of
the
power
strip's
input
rating.
•
This
p
r
odu
ct's
AC
a
dapter
is
eq
uip
p
ed
with
a
three-
wire
gro
und
ed
p
l
ug
.
The
plu
g
on
ly
fits
in
a
g
r
oun
ded
po
wer
ou
tlet.
Make
sure
the
po
wer
ou
tlet
is
prop
erly
grou
nde
d
be
fo
re
inserting
the
AC
ada
p
ter
plu
g
.
Do
no
t
insert
the
p
l
ug
into
a
non
-g
ro
un
ded
po
wer
outlet.
C
on
t
a
c
t
yo
ur
electrician
for
details.

v
W
a
rni
ng
!
The
g
r
ound
in
g
p
i
n
is
a
sa
fet
y
fea
t
u
r
e.
U
s
i
ng
a
po
wer
ou
tlet
th
at
i
s
no
t
p
r
op
erly
g
r
ou
nded
ma
y
re
sult
in
e
l
ectri
c
shock
an
d/o
r
inju
ry.
No
te:
The
gro
und
ing
pin
also
p
r
o
v
i
d
es
good
protectio
n
from
un
exp
e
cted
noise
prod
uced
by
o
t
h
e
r
nea
r
b
y
electrical
d
evice
s
th
at
may
int
e
rfere
with
t
h
e
pe
r
f
or
manc
e
of
this
product.
•
The
system
ca
n
be
powe
r
ed
usin
g
a
wid
e
rang
e
of
voltag
es;
100
to
120
or
220
to
240
V
AC.
T
h
e
po
wer
co
r
d
inc
l
ude
d
with
th
e
system
meets
the
requ
ir
e
m
en
t
s
fo
r
u
s
e
in
th
e
co
untry/r
e
g
ion
where
the
sy
stem
was
pur
c
hased.
Power
cords
for
use
i
n
ot
her
countries/regions
must
meet
the
r
e
qu
i
r
e
m
e
n
ts
f
o
r
th
a
t
c
ountry/region.
For
more
in
f
orm
a
t
i
on
on
powe
r
c
o
r
d requ
ir
e
m
en
t
s
,
c
ontact
an
authoriz
ed
reseller
or
service
provider.
P
r
oduct
s
e
rvicing
Do
not
attempt
to
service
this
p
r
odu
c
t
yourself,
as
opening
o
r
r
e
moving
co
vers
may
exp
o
se
yo
u
to
d
a
ng
erous
vo
ltage
po
ints
or
other
risks.
Refer
a
ll
servicing
to
qu
alified
service
pe
r
s
onn
e
l.
Unplug
thi
s
produc
t
from
the
wall
outlet
and
refer
servicing
to
qualified
serv
ice
person
n
el
wh
en:
•
the
po
wer
co
rd
or
p
l
ug
is
dam
a
ged
,
cut
o
r
fray
ed
•
liqu
i
d
was
sp
illed
in
to
the
p
r
oduct
•
the
pr
oduct
was
exposed
to
rain
or
water
•
th
e
pr
od
uc
t
h
a
s
be
e
n
dro
pp
e
d
or
th
e
c
a
se
ha
s
b
ee
n
d
a
ma
g
e
d
•
th
e
pr
od
uc
t
ex
h
i
b
i
ts
a
di
sti
n
c
t
c
h
a
n
ge
i
n
pe
rf
orm
a
nc
e,
i
nd
i
c
a
ti
ng
a
ne
e
d
for
serv
ice
•
the
p
r
odu
c
t
do
es
not
op
erate
no
rma
lly
after
follo
wing
the
op
erating
instructions
No
te:
Adju
st
on
ly
th
ose
con
t
ro
ls
th
at
are
covered
by
the
operat
i
ng
instructions,
sinc
e
impr
oper
adju
stme
n
t
of
ot
her
controls
ma
y
result
in
d
a
mage
an
d
will
o
ft
e
n
require
ext
e
n
s
ive
work
by
a
qu
alified
tech
nici
an
to
restore
th
e
pro
duc
t
to
norm
al
co
nd
iti
on.

vi
Guidelines
f
o
r
safe
b
a
ttery
u
s
age
This
no
tebook
u
s
es
a
Li
t
h
ium
-
io
n
ba
tt
ery.
Do
not
u
s
e
it
in
a
hu
m
i
d,
wet
o
r
corrosiv
e
e
n
v
i
ro
nm
ent.
Do
not
put,
sto
r
e
or
leav
e
y
our
prod
uct
in
o
r
nea
r
a
h
eat
source
,
in
a
h
i
gh
temperature
lo
cation
,
in
stro
ng
di
rec
t
sunl
ight,
in
a
mic
r
o
w
ave
ov
en
o
r
in
a
p
r
essu
rized
co
ntainer,
a
nd
do
no
t
expo
s
e
it
t
o
temp
eratures
over
60°C
(140°
F).
Fa
ilure
to
fo
llow
the
s
e
guid
e
lin
es
m
ay
cause
th
e
battery
t
o
leak
acid
,
beco
me
ho
t,
explo
d
e
o
r
ign
i
t
e
and
cause
in
jury
and
/
or
da
mag
e.
Do
no
t
pierce,
ope
n
or
d
i
sass
em
ble
t
h
e
battery.
If
the
b
a
tt
ery
leaks
an
d
you
com
e
into
con
t
act
with
the
leaked
flu
i
ds,
rin
s
e
t
h
orou
gh
ly
wi
t
h
water
and
seek
me
dical
attention
immedia
t
el
y.
For
safety
r
e
as
on
s,
an
d
to
prolo
ng
th
e
lifetime
of
the
battery,
ch
arging
will
no
t
occu
r
at
t
e
mpe
r
atu
r
es
be
low
0°C
(32°
F)
o
r
above
40°C
(104°
F).
The
full
performance
of
a
new
battery
i
s
a
c
hieved
only
after
two
or
three
com
p
lete
c
h
arge
and
discha
rg
e
cycles.
The
battery
c
a
n
b
e
charg
e
d
an
d
disch
a
rged
hundred
s
of
times,
bu
t
it
will
eventually
wear
out.
W
h
en
the
op
eration
tim
e
b
e
com
e
s
no
ticeably
sho
rter
than
normal,
buy
a
ne
w
battery
.
Use
on
ly
th
e
app
r
oved
b
a
tter
i
es
,
and
r
e
charg
e
yo
ur
b
a
tt
ery
on
ly
with
the
appro
v
ed
chargers
designated
for
this
device.
Use
the
battery
only
for
its
intended
pur
pose.
Never
use
a
n
y
charger
or
battery
that
is
damaged.
Do
not
short
-
circuit
th
e
battery
.
Accidental
short-circuiting
can
occ
u
r
wh
en
a
metalli
c
ob
ject
su
ch
as
a
co
in,
clip
or
p
e
n
causes
d
i
rect
co
nnection
of
the
positive
(+)
and
neg
a
tive
(-)
t
e
rm
inals
o
f
t
h
e
ba
tt
ery.
(The
se
loo
k
like
metal
strips
on
the
battery
.)
This
might
happen,
f
o
r
exa
m
ple
,
when
y
ou
carry
a spare
b
a
tt
ery
in
yo
ur
po
cket
or
pu
rse
.
Short-circuiting
the
terminals
may
dam
a
ge
th
e
battery
or
the
c
onnecting
ob
ject.
The
c
a
pacity
and
lifetime
of
the
b
a
tt
e
r
y
will
b
e
redu
ced
if
th
e
battery
is
le
ft
in
ho
t
or
cold
pla
c
es,
such
as
in
a
clo
s
ed
c
a
r
i
n
sum
mer
o
r
winter.
Always
tr
y
to
keep
t
h
e
ba
tt
ery
between
15°C
an
d
25°
C
(5
9°F
and
77°F).
A
device
with
a
ho
t
or
cold
battery
m
ay
no
t
wo
rk
t
e
m
po
r
arily,
ev
en
when
the
battery
is
fully
charged.
Battery
perform
ance
is
esp
e
cially
limited
in
temperatu
r
es
wel
l
belo
w
fr
ee
zing
.
Do
not
dispose
of
batteries
in
a
f
i
re
as
th
ey
m
ay
exp
l
od
e.
Batteries
m
ay
also
ex
plod
e
if
dam
a
ge
d.
Disp
ose
of
b
a
tterie
s
a
ccord
ing
to
loca
l
regul
ati
ons.
Ple
a
se
recycle
when
po
ssib
le.
Do
no
t
dispo
s
e
as
ho
useho
l
d
waste.
Wireless
devices
may
be
susceptible
to
interference
f
r
om
the
battery
,
which
c
o
ul
d
a
ffe
c
t
pe
rf
orm
a
nc
e.
Re
placing
the
b
a
tte
ry
p
ack
The
no
tebook
uses
lithiu
m
batteries.
Rep
l
ace
the
battery
with
the
same
t
y
pe
as
that
whi
c
h
came
bundled
with
yo
ur
p
r
odu
c
t.
Use
of
an
othe
r
b
a
ttery
m
ay
presen
t
a
r
i
sk
o
f
fir
e
or
explo
s
io
n.
Warn
in
g!
B
a
tteri
es
m
ay
ex
plo
d
e
if
no
t
han
d
l
e
d
pro
p
e
r
l
y.
Do
no
t
di
sassemble
or
dispose
of
them
in
fire.
Keep
them
a
w
ay
from
ch
ild
ren.
Fo
llow
lo
ca
l
reg
u
la
tion
s
wh
en
disp
o
s
ing
o
f
use
d
ba
tteries.

Caution
for
Optical
Drive
Device
(only
for
certain
models)
vii
CAU
T
ION:
This
ap
plian
c
e
co
ntain
s
a
laser
s
y
stem
an
d
is
cla
s
sified
as
a
"CLASS
1
LA
SER
PRODUC
T."
In
case
of
an
y
tro
uble
with
this
d
evice,
please
c
ontac
t
you
r
nearest
AU
THORIZED
service
station
.
To
prev
ent
direct
exposure
to
the
laser
beam
,
do
no
t
t
r
y
to
op
en
the
en
closu
r
e.
CLASS
1
LASER
PRODUCT
CAU
T
ION:
INVISIBLE
LASER
RA
DIATION
WH
EN
OPEN.
AVOID
EXPOSURE
TO
BEAM.
APPAR
E
IL
A
LASE
R
DE
C
L
A
S
SE
1
PR
OD
UIT
LA
SER
A
TTEN
TION
:
RAD
IATION
DU
FAISCEA
U
LASER
INVISIBLE
EN
C
A
S
D’OUVERTU
R
E.
EVITT
ER
TOUTE
EXPOSITION
AUX
R
A
YON
S
.
LU
OK
AN
1
LA
SER
L
A
I
TE
L
A
SE
R
K
L
ASS
E
1
VOR
S
IC
HT:
UN
SIC
H
TBARE
LASERSTR
AHLUNG,
W
E
NN
AB
DEC
KU
NG
GEÖFFN
ET
NICH
T
DEM
STRAH
LL
AUSSETZEN
PRODUC
TO
LÁ
SER
DE
LA
CLASE
I
ADVER
TENCI
A:
RAD
I
ACIÓN
LÁSER
INVI
SIB
L
E
A
L
SER
A
B
IER
T
O.
EV
I
TE
EXPONERSE
A
LO
S
R
A
YO
S.
ADVAR
SEL:
LASERSTRÅ
L
ING
VEDÅBNING
SE
IKKE
IND
I
STR
Å
LEN.
VARO!
LAVATTAESSA
OLET
A
L
TTI
NA
LASE
RSÅTEILYLLE.
VARN
ING:
LASERSTRÅLNING
NÅR
DENN
A
DEL
ÅR
ÖPPN
AD
ÅLÅ
TUI
J
OTA
SÅ
TEESEENSTIRR
A
EJ
IN
I
STRÅ
LEN
VARN
ING:
LASERSTRÅLNING
NAR
DENN
A
DEL
ÅR
ÖPPNADSTIRR
A
EJ
IN
I
ST
RÅL
E
N
ADVAR
SEL:
LASERSTRÅ
L
ING
NAR
DEKSE
L
ÅP
NESSTIR
R
IKKE
INN
I
ST
RÅLEN
Te
lephone
li
ne
sa
fety
•
Disco
nnec
t
all
telep
hon
e
lin
es
fr
o
m
th
e
equ
i
pm
ent
wh
en
not
in
use
and
/
or
be
f
o
re
se
rv
i
c
i
n
g.
•
To
avoid
the
remote
risk
of
e
l
ectric
sho
c
k
fro
m
li
ghtn
i
ng
,
do
not
co
nn
ect
the
telephone
line
to
this
equipm
ent
during
lightni
ng
or
thunderstorms
.
Warning!
For
safety
rea
s
ons,
do
not
use
non-compliant
parts
when
ad
di
ng
or
c
h
a
ng
i
ng
c
o
m
pon
ents.
Consult
y
o
ur
reselle
r
for
pu
rc
ha
se
opt
io
ns.

viii
Operating
environment
Warning!
For
safety
rea
s
ons,
turn
off
all
wirel
e
ss
or
radio
tra
nsm
i
tti
ng
d
ev
i
ce
s
when
u
s
in
g
yo
ur
l
a
pto
p
un
de
r
the
fol
l
o
wi
ng
co
nd
itio
ns.
The
s
e
d
e
vices
m
ay
in
clu
d
e,
bu
t
a
r
e
no
t
li
mite
d
to
:
wi
re
le
ss
l
a
n
(W
LAN),
Bl
ue
to
oth
a
n
d/
or
3
G
.
Rem
e
mb
er
to
follo
w
any
spec
ial
regu
lation
s
in
force
in
any
area,
an
d
alwa
ys
switch
o
ff
you
r
device
wh
en
its
use
is
p
r
ohib
i
ted
o
r
when
it
may
cau
s
e
interferenc
e
or
dan
g
er.
U
s
e
t
h
e
device
on
ly
in
it
s
norm
al
operat
in
g
position
s.
This
d
evice
meets
R
F
expo
sure
guide
lines
when
used
no
rmally,
and
it
and
its
antenn
a
are
position
ed
at
lea
s
t
1.5
centim
eters
(5/8
in
ches)
away
from
your
bo
dy
(refer
to
the
f
i
gu
re
b
e
low)
.
It
shou
ld
no
t
co
ntain
metal
an
d
you
shou
ld
pos
i
t
i
on
the
device
the
abov
e-st
ated
distance
from
your
bo
dy.
To
successfully
tr
a
n
smit
d
a
ta
files
or
me
ss
ag
es,
this
device
req
u
ires
a
good
qu
ality
con
n
ectio
n
to
the
network.
In
some
cases,
transmissi
on
of
d
a
ta
files
or
m
e
ss
ag
es
may
b
e
delayed
un
t
il
su
ch
a
con
n
ectio
n
is
availa
ble
.
Ensure
that
the
above
separation
distanc
e
instructions
are
followed
until
th
e
tr
ansmission
is
completed.
Parts
of
the
device
are
magnetic.
Metallic
materials
ma
y
be
attracted
to
the
device
,
and
person
s
with
h
earing
aids
sho
u
ld
not
hold
the
dev
i
ce
t
o
the
ea
r
with
the
hearin
g
aid.
Do
no
t
p
l
ace
credit
c
ards
o
r
o
t
h
e
r
m
a
gn
etic
storag
e
m
e
di
a
n
ear
the
dev
i
ce,
b
e
cau
s
e
inform
ation
sto
re
d
on
them
may
be
erase
d
.
Medical
devices
Op
eration
of
any
radio
tran
smitting
equ
i
pm
ent,
in
clud
ing
wirele
ss
phon
es,
may
interfere
with
the
func
t
i
onali
t
y
of
in
adeq
uately
pro
t
ected
m
e
dica
l
dev
i
ces.
Co
nsult
a
ph
y
s
ician
or
the
m
a
nufacturer
of
the
med
i
cal
de
vice
t
o
determine
if
they
are
ade
quately
shie
lded
f
r
o
m
exte
rnal
R
F
e
n
ergy
or
if
you
have
an
y
qu
est
i
on
s.
Switch
o
ff
yo
ur
device
i
n
he
alt
h
care
facilities
wh
en
an
y
r
e
gu
latio
n
s
pos
t
ed
in
these
areas
instruct
you
to
do
so.
H
o
spitals
or
health
c
a
re
facilities
may
be
using
equ
i
pm
ent
that
c
ould
be
sensitiv
e
to
ex
ternal
RF
transmissions.
Pac
ema
kers.
Pacem
aker
m
a
nufac
t
u
rers
recom
m
en
d
t
h
at
a
min
i
mu
m
sep
a
ration
of
15.3
c
e
ntimet
e
r
s
(6
inch
es)
b
e
main
tained
between
wireless
devices
an
d
a
pace
maker
to
avo
i
d
po
tential
i
n
terference
with
the
p
a
cemak
e
r.
These
recommendations
are
consistent
with
the
independent
r
e
sea
r
c
h
by
and
recommendations
of
W
i
r
e
l
e
ss
Te
chnolo
g
y
Research
.
Persons
with
pacem
akers
shou
ld
do
th
e
follo
wing:
•
Always
keep
th
e
device
m
o
re
th
an
15.3
c
e
ntimet
e
r
s
(6
inch
es)
from
the
pace
maker
•
Not
carry
t
h
e
d
e
vi
ce
n
ear
you
r
pace
maker
wh
en
the
device
is
s
w
i
t
c
h
ed
o.
If
y
ou
sus
p
ect
interference,
switch
off
your
device,
and
move
it.
He
aring
a
i
ds.
Some
di
gital
wireless
devices
may
interfere
with
some
hea
r
ing
aids.
If
inter
f
eren
ce
o
ccurs,
co
nsult
you
r
s
e
r
vice
p
r
ovider.
ix
Vehicles
RF
sign
als
may
affect
imp
r
ope
r
l
y
in
s
t
alle
d
or
in
adeq
uately
shiel
d
ed
electroni
c
system
s
in
mo
tor
vehicles
su
ch
as
ele
c
tr
on
ic
fu
el
injection
s
y
stems,
elec
t
r
on
ic
antiskid
(antiloc
k
)
braking
sy
stems,
elec
tronic
speed
control
sy
stems,
and
air
bag
sy
stems
.
For
more
information,
chec
k
with
t
h
e
manufac
t
u
rer,
or
its representative,
o
f
you
r
ve
hicle
o
r
any
equ
i
pm
ent
tha
t
h
a
s
been
add
e
d.
On
ly
qu
alified
p
e
rs
onn
e
l
sho
u
ld
s
e
r
vice
th
e
device,
o
r
install
the
d
evice
in
a
veh
i
cle.
F
a
ulty
installation
or
serv
i
c
e
may
be
dan
gerou
s
and
may
invalid
ate
any
warran
t
y
t
h
at
m
ay
app
l
y
to
th
e
d
evice.
Check
regularly
that
all
wireless
equ
i
pm
ent
in
yo
ur
ve
hicle
is
m
oun
ted
and
opera
tin
g
p
r
ope
rly
.
Do
no
t
sto
r
e
or
c
a
rry
fl
a
m
ma
b
l
e
li
qu
i
ds,
ga
se
s
,
or
ex
p
l
os
iv
e
ma
t
e
rial
s
in
the
same
compartment
as
the
dev
i
c
e,
its
parts,
or
enhanceme
n
ts.
F
o
r
vehicles
equipped
with
an
air
bag,
remem
b
er
t
h
at
air
bag
s
inflate
with
great
fo
r
c
e.
Do
no
t
p
l
ace
ob
jects,
in
clud
ing
installed
or
po
rtable
wireless
eq
uip
m
en
t
in
the
area
over
t
h
e
air
ba
g
or
in
the
air
bag
dep
l
oymen
t
area.
If
in-
v
ehicle
wireless
eq
uip
m
en
t
i
s
impro
p
erly
installed
,
and
the
air
b
a
g
in
f
l
at
e
s
,
s
e
rio
u
s
in
jury
cou
l
d
result.
Usin
g
you
r
device
while
flying
in
a
i
r
c
r
a
ft
is
p
r
oh
ib
ited.
Switch
o
ff
yo
ur
de
vice
before
boarding
a
n
aircraft.
The
use
of
wireless
telede
v
i
ces
in
an
a
i
r
c
r
a
ft
may
be
da
nge
r
o
us
to
the
operation
of
the
aircraft,
di
s
rupt
the
wi
re
l
e
ss
te
l
e
phon
e
ne
two
r
k
,
a
nd
m
ay
be
illega
l.
Potentially
explosive
environments
Switch
off
you
r
d
evice
when
in
an
y
area
with
a
po
ten
t
i
a
lly
exp
l
osive
atmos
p
here
and
obey
all
signs
and
instructions.
Potent
ially
explosive
atmo
s
p
heres
in
clud
e
areas
where
yo
u
wou
l
d
norm
ally
b
e
advised
t
o
turn
o
ff
yo
ur
vehic
l
e
eng
i
ne.
Sparks
in
such
areas
cou
l
d
ca
use
an
exp
l
osion
or
fire
resulting
in
b
odi
ly
inju
r
y
or
even
de
at
h
.
Switch
off
t
h
e
d
evice
at
refuelin
g
poin
ts
such
as
near
gas
pumps
at
service
stati
ons
.
Obs
e
rve
restrictions
on
the
use
of
radio
equipment
in
fue
l
depot
s
,
storage,
and
distribut
i
on
areas
;
chemical
plant
s
;
or
wh
ere
blasting
op
eration
s
a
r
e
in
p
r
og
ress.
Areas
with
a
po
t
e
n
t
ially
exp
l
osive
atmo
s
p
here
are
often
,
but
no
t
always
,
clea
rly
m
a
r
k
ed.
They
in
clud
e
belo
w
d
eck
on
bo
at
s,
c
h
emical
transfer
or
storag
e
facilities,
vehicles
u
s
ing
liqu
e
f
i
e
d
petrole
um
gas
(su
c
h
as
p
r
op
an
e
or
butane
),
an
d
areas
wh
er
e
t
h
e
air
co
ntains
chem
icals
o
r
particles
such
as
grain
,
du
s
t
o
r
metal
po
wd
ers
.
D
o
no
t
switch
th
e
no
te
boo
k
on
when
wireless
ph
one
use
is
pro
h
ib
ite
d
or
wh
en
it
m
ay
cause
interferenc
e
or
danger.
Em
erg
e
n
c
y
calls
Warn
in
g:
You
c
a
nn
ot
make
emerg
e
ncy
calls
thro
ugh
this
d
evice.
To
m
ake
an
emerg
e
ncy
call
yo
u
shall
dial
ou
t
throu
gh
yo
ur
m
obi
le
ph
one
or
oth
e
r
teleph
on
e
call
sys
t
em
.

x
Disposal
instructions
Do
not
throw
this
electronic
dev
i
c
e
into
t
h
e
trash
when
disca
r
ding.
To
m
i
nim
i
ze
pol
lution
and
ensu
re
utmo
st
p
r
otectio
n
of
th
e
glo
b
al
environ
m
en
t,
please
recycle.
For
more
information
on
the
W
aste
fr
o
m
E
l
ectrical
and
Electron
i
cs
Equ
i
pm
ent
(WEEE)
r
e
gula
t
io
ns,
visit
http
://w
ww.acer-g
rou
p
.
c
o
m/p
ub
lic
/Sustain
ab
ility/
sustai
n
abili
ty
01
.ht
m
Mercury
advisory
F
o
r
bu
l
b
-
i
nsi
d
e
pro
j
e
c
tor
s
or
e
l
e
c
tro
ni
c
p
r
odu
c
t
s
c
on
t
a
i
ni
ng
a
n
no
n-
LE
D-b
a
cklit-L
CD/
CRT
mon
i
to
o
r
display
:
L
a
mp
(s)
in
side
th
is
prod
uct
con
t
ain
m
e
rcury
and
mu
st
b
e
recy
cled
or
disp
osed
o
f
acco
rding
to
loca
l,
st
ate
o
r
federal
laws.
For
m
o
re
in
f
o
rmatio
n,
co
ntact
the
Electroni
c
Industries
Alliance
at
www.e
i
ae.
org
.
Fo
r
lamp
-spec
i
f
i
c
dispo
s
al
info
rmation
,
chec
k
www.l
a
mprecyc
l
e.org
.
ENER
GY
STAR
A
c
er's
ENER
GY
STA
R
qu
alified
prod
ucts
save
yo
ur
mone
y
b
y
re
du
c
i
ng
e
n
e
r
g
y
c
o
st
a
nd
pr
ote
c
ting
the
env
i
ronment
without
sac
rifici
ng
features
or
performance
.
Acer
is
proud
t
o
offer
our
c
u
stomers
products
with
the
ENERG
Y
S
T
A
R
mar
k
.
W
h
at
is
ENER
GY
STAR?
P
r
odu
c
ts
t
h
at
are
ENER
GY
ST
AR
qu
alified
use
less
en
ergy
and
prevent
greenh
ou
s
e
g
a
s
em
is
sio
n
s
b
y
me
et
i
ng
str
ic
t
energ
y
efficienc
y
gu
idelin
es
set
by
the
U.S.
Env
i
ronme
n
tal
Protec
t
i
on
Ag
enc
y.
A
c
er
is
committed
to
offer
products
and
services
worldwide
tha
t
he
lp
c
u
stomers
save
money
,
c
onserve
energ
y
an
d
impro
ve
th
e
qu
ality
o
f
our
en
vir
o
nm
ent.
The
mo
re
energ
y
we
c
a
n
save
th
roug
h
h
i
gh
er
energ
y
efficien
cy
,
the
more
we
reduce
gr
ee
nhouse
gases
and
the
risks
of
clim
ate
ch
ang
e.
Mo
re
information
refers
t
o
http://
www.energy
star.gov
or
http:/
/www.energy
star.gov
/
powermangement
Acer
ENE
R
GY
STAR
qua
lif
ie
d
pro
du
c
ts:
•
Prod
uce
less
h
eat
and
reduc
e
coo
ling
load
s,
and
warmer
clim
ates.
•
Auto
maticall
y
go
in
t
o
"disp
l
ay
s
l
ee
p"
an
d
"co
m
pu
ter
sleep
"
mo
de
after
10
and
30
m
i
nute
o
f
inactivity
r
e
sp
ectively.
•
Wake
the
co
mp
uter
fro
m
s
l
eep
mo
de
by
push
i
ng
keyb
o
ard
or
mo
ving
mo
use.
•
Co
mp
uters
will
save
more
th
an
80%
energ
y
at
"slee
p
"
mode.
ENER
GY
ST
AR
an
d
the
ENERG
Y
STA
R
ma
r
k
ar
e
r
e
gistered
U.S.
m
arks
xi
Tips
and
information
for
comfortable
use
Co
mp
uter
u
s
ers
m
ay
co
mp
lain
of
eye
s
train
an
d
hea
d
ach
e
s
after
prolo
ng
e
d
use.
Users
are
also
at
risk
of
ph
ysical
in
jury
aft
e
r
lo
ng
ho
urs
of
workin
g
in
front
o
f
a
computer
.
L
ong
work
periods,
bad
posture,
poor
work
habits
,
stress,
inad
equ
a
te
workin
g
co
nd
it
i
ons,
p
e
rs
on
al
health
and
other
facto
r
s
g
r
eatly
increase
th
e
risk
of
ph
ys
ic
al
inju
ry.
Inco
rrect
com
pu
t
e
r
u
s
age
m
ay
lead
to
carpal
tu
nne
l
syn
drom
e,
tend
on
it
is,
teno
sy
no
v
i
tis
o
r
other
m
u
scu
l
oskeletal
disorders.
The
follo
wi
ng
s
y
mp
to
ms
m
ay
app
ear
in
th
e
han
d
s,
wrists
,
arms,
sho
u
ld
er
s,
n
eck
o
r
back:
•
nu
mb
ness,
or
a
bu
rnin
g
o
r
tingli
ng
sen
s
ation
•
achi
ng,
so
reness
or
ten
d
erness
•
pain
,
swelling
or
thro
bb
ing
•
st
i
f
fness
or
tight
n
ess
•
cold
ness
o
r
we
akness
If
yo
u
h
ave
t
h
ese
sym
p
to
ms,
or
an
y
o
t
her
recurr
ing
or
persistent
discomfor
t
and
/
or
p
a
in
related
t
o
co
mpu
t
er
use,
co
nsult
a
physician
imm
e
diately
an
d
infor
m
your
company's
heal
t
h
and
safety
departme
n
t.
The
fo
llowin
g
sectio
n
p
r
o
v
id
es
tips
for
more
comfortable
computer
use.
Finding
your
comfor
t
zon
e
Fin
d
y
ou
r
com
f
ort
zo
ne
b
y
adju
stin
g
the
viewing
an
gle
o
f
the
m
oni
to
r,
using
a
footrest,
or
raising
your
sitting
he
ight
to
achieve
m
a
xim
u
m
comfort.
Observe
the
fol
l
owing
tips:
•
refr
a
i
n
from
st
aying
too
long
in
one
f
i
xe
d
pos
t
ure
•
av
oid
slo
u
ch
ing
forward
an
d/o
r
leaning
b
a
ckward
•
sta
nd
up
and
walk
around
regularly
to
remove
the
strain
on
your
leg
mu
scles
•
take
short
rests
to
relax
your
neck
and
shoulders
•
av
oid
ten
s
ing
yo
ur
mu
scles
or
sh
ru
gg
ing
yo
ur
sho
u
ld
ers
•
install
the
external
displ
ay,
keyb
oard
a
nd
m
ou
s
e
prop
erly
and
w
i
th
in
comfortable
r
ea
c
h
•
if
y
ou
view
your
monitor
more
than
y
ou
r
do
c
u
m
e
nt
s,
pl
a
c
e
th
e
d
i
sp
l
ay
a
t
the
center
of
your
desk
to
minimiz
e
neck
strain
T
aking
ca
re
of
your
vis
i
on
Lo
ng
viewing
hou
r
s
,
wea
r
in
g
in
correct
g
l
ass
e
s
o
r
con
t
a
c
t
lenses,
gla
r
e,
exce
ss
ive
room
lighting
,
po
orly
f
o
cused
screens,
very
s
m
all
typefaces
and
low-contrast
disp
lays
co
uld
stress
y
ou
r
ey
es.
The
follo
wing
se
ctions
p
r
ov
ide
su
gge
stio
ns
on
how
to
reduce
eyestr
a
i
n.
Eyes
•
Rest
your
ey
es
frequently.
•
Give
yo
ur
eyes
regular
breaks
b
y
lo
okin
g
away
from
the
m
oni
t
o
r
and
focusing
on
a
distant
point.
•
Blin
k
frequ
ently
t
o
keep
yo
ur
eyes
fr
o
m
d
r
ying
ou
t.

xii
Display
•
Keep
you
r
displ
ay
cl
ean.
•
Keep
you
r
head
at
a
hig
h
er
level
tha
n
the
to
p
edge
o
f
t
h
e
disp
lay
s
o
your
eyes
poin
t
do
wnward
wh
en
lo
okin
g
at
th
e
mid
d
le
o
f
t
h
e
di
s
p
lay.
•
Adju
st
th
e
di
sp
lay
brigh
t
ness
and
/
or
contrast
to
a
comfortable
level
for
enh
a
nce
d
text
read
abil
it
y
an
d
g
r
aphic
s
c
l
arit
y.
•
Elimi
n
ate
gla
r
e
and
r
e
flec
t
i
ons
b
y:
•
plac
ing
y
o
ur
disp
lay
in
such
a
way
that
the
side
faces
the
window
or
any
lig
ht
sou
r
c
e
•
min
i
mizing
roo
m
lig
ht
by
usin
g
d
r
apes,
shad
es
or
b
lind
s
•
usin
g
a
task
lig
ht
•
cha
nging
the
displa
y
'
s
viewing
angle
•
usin
g
a
g
l
are-redu
ction
filter
•
usin
g
a
d
i
s
p
lay
viso
r,
s
u
ch
as
a
piece
of
cardb
o
ard
exten
d
ed
fr
o
m
th
e
display
'
s
top
front
e
dge
•
Avoid
adju
s
t
in
g
you
r
display
to
a
n
awkward
viewing
an
gle.
•
Av
oid
look
ing
at
brigh
t
ligh
t
so
urces,
suc
h
as
op
en
wi
ndo
ws,
for
ex
te
nded
periods
of
time.
Develop
i
ng
good
wor
k
habits
Develop
the
foll
owing
work
h
a
bits
to
m
ake
you
r
com
puter
u
s
e
mo
r
e
r
e
laxing
and
prod
uctiv
e:
•
Take
sho
rt
breaks
regularly
and
often.
•
Perform
some
stretching
exercises.
•
Breathe
fr
esh
air
as
often
a
s
possible
.
•
Exer
c
i
se
regula
r
ly
an
d
m
a
intain
a
health
y
bod
y.
Warn
in
g!
W
e
do
no
t
reco
mm
en
d
usin
g
the
com
p
uter
on
a
c
ou
c
h
or
bed
.
If
this
i
s
un
av
oi
dab
l
e,
work
for
only
short
periods,
ta
ke
bre
aks
regularly,
and
do
some
str
e
t
ching
exerc
i
ses.
No
te:
For
more
information,
ple
a
s
e
r
e
f
e
r
to
"
R
eg
ul
a
t
i
ons
a
nd
safety
notic
e
s"
on
page
48.

First
things
first
We
would
like
to
tha
n
k
y
ou
for
mak
i
ng
a
n
Ace
r
no
tebook
yo
ur
ch
oice
fo
r
meeting
you
r
mo
bile
co
mp
uting
need
s.
xiii
Your
guides
To
h
e
lp
you
use
you
r
Acer
no
tebo
ok,
we
h
ave
desig
n
ed
a
set
of
gu
ides:
F
i
rst
off,
the
Just
for
Starters...
poster
he
lps
you
get
star
t
ed
with
setting
up
y
o
ur
com
pu
t
er
.
The
p
r
inted
Aspi
re
Series
Generic
User
G
uide
co
ntain
s
useful
informatio
n
app
l
ying
to
all
mo
dels
in
the
Asp
i
re
prod
uct
series.
It
co
vers
b
a
sic
topi
cs
s
u
ch
a
s
Acer
eR
ecovery
Ma
nage
men
t
,
u
s
ing
the
keyboard,
Au
dio
,
etc.
Please
understand
that
due
to
its
na
t
u
re,
the
Ge
n
e
r
i
c
Us
e
r
G
u
i
d
e
as
well
as
the
Ace
r
System
Use
r
Gu
id
e
men
t
ion
e
d
b
e
low
will
o
ccasio
n
ally
refer
t
o
fun
c
tions
o
r
features
which
are
on
ly
con
t
ained
in
certain
mo
dels
o
f
th
e
series,
bu
t
no
t
nece
ss
arily
in
th
e
mo
del
you
pu
rchased
.
Su
ch
i
n
stances
are
m
a
rked
i
n
the
text
with
langu
a
ge
su
ch
as
"only
for
certain
models".
The
p
r
inted
Quick
Gu
id
e
introduces
you
to
the
basic
featu
r
es
an
d
fu
nctio
n
s
of
y
ou
r
ne
w
c
o
mp
ute
r
.
F
o
r
mo
re
on
ho
w
yo
ur
c
o
mp
u
t
e
r
c
a
n
h
e
l
p
yo
u
t
o
b
e
mo
re
produc
t
i
ve,
please
refer
t
o
the
A
c
erSystem
User
G
u
id
e.
This
guide
con
t
a
i
ns
detailed
info
r
m
ation
on
such
s
u
bjec
t
s
as
system
u
t
il
it
ie
s
,
d
a
ta
recovery,
ex
pansio
n
op
tion
s
and
tro
ub
l
esho
oting
.
In
ad
ditio
n
it
co
ntains
warran
t
y
info
r
m
ation
and
the
g
e
neral
regulations
and
safet
y
no
tices
for
your
notebook.
It
is
avai
lable
in
Portabl
e
Docu
men
t
Fo
rmat
(P
DF)
and
com
e
s
prelo
a
ded
on
yo
ur
not
e
book.
Follow
these
steps
to
a
ccess
it:
1
C
lick
on
St
a
r
t
,
All
Prog
ram
s
,
Ace
r
S
y
stem
.
2
C
lick
on
AcerSystem
User
Gu
ide
.
No
te:
Viewing
the
f
ile
r
e
quires
Adob
e
Rea
d
er.
If
Ad
obe
Read
er
is
no
t
installed
on
yo
ur
co
mp
uter,
clic
king
on
Ace
r
System
Use
r
Gu
id
e
will
run
the
Adob
e
Read
er
setup
prog
r
a
m
first
.
Fo
llow
the
instructions
on
the
screen
to
complete
the
inst
all
a
t
i
on.
For
instructions
on
how
to
us
e
Adobe
Reader,
ac
cess
t
h
e
He
lp
a
nd
Su
pp
ort
men
u
.
Basic
care
and
ti
ps
for
us
ing
your
comput
er
Turning
your
computer
on
and
off
To
turn
on
the
computer,
s
i
mply
press
and
relea
s
e
th
e
powe
r
bu
tt
on
be
l
o
w
th
e
LC
D
screen
beside
t
h
e
easy-lau
n
ch
bu
tt
on
s.
Please
refre
to
"
Q
u
i
ck
Gu
id
e"
for
the
location
of
the
power
button.

xiv
To
tur
n
the
power
of
f,
do
a
n
y
of
th
e
fo
ll
o
w
i
n
g:
•
Use
the
W
i
ndows
shut
down
command
Click
on
S
t
art
then
click
on
Shu
t
Do
wn
.
•
Use
the
power
button
You
can
also
pu
t
th
e
co
mp
uter
in
sleep
mode
by
pressing
the
sleep
hotkey
<Fn>
+
<F4>
.
No
te:
If
you
cann
ot
po
wer
off
the
com
pu
t
er
no
rma
lly,
p
r
ess
and
hold
the
powe
r
button
for
more
th
an
four
seconds
t
o
shut
down
the
comput
er.
If
you
turn
off
th
e
c
o
mp
uter
a
nd
want
to
tu
rn
it
on
again
,
wait
at
least
two
se
conds
before
powering
up.
Taking
care
of
your
computer
You
r
c
o
mp
uter
will
serve
you
we
ll
if
yo
u
take
c
a
r
e
of
it.
•
Do
no
t
exp
o
se
th
e
co
mp
uter
to
direct
sunlight.
Do
no
t
pl
ace
it
n
ear
sou
r
ces
of
h
eat,
such
as
a
radiator.
•
Do
no
t
expo
se
the
co
mp
uter
to
temp
eratures
b
e
low
0
ºC
(32
ºF)
o
r
abo
ve
50
ºC
(122
ºF).
•
Do
not
subject
the
comput
er
to
mag
n
etic
field
s
.
•
Do
not
expose
the
computer
to
rain
or
moisture.
•
Do
not
spi
ll
water
or
any
liquid
on
the
computer.
•
Do
no
t
sub
j
ect
the
com
puter
to
heavy
s
h
ock
or
vi
bration
.
•
Do
not
expose
the
computer
to
dust
or
dir
t
.
•
Neve
r
place
obj
ects
on
to
p
o
f
th
e
com
pu
t
er.
•
Do
not
slam
the
computer
disp
lay
wh
en
yo
u
clo
s
e
it
.
•
Never
place
t
h
e
co
mp
uter
on
un
even
surfaces.
Taking
care
of
yo
ur
AC
adapter
Here
are
some
ways
to
take
care
o
f
yo
ur
AC
adap
ter:
•
Do
not
connect
the
adapter
to
a
n
y
other
dev
i
c
e.
•
Do
not
step
on
the
power
cord
or
plac
e
heav
y
ob
jects
on
to
p
o
f
it.
Carefully
route
the
power
cord
and
any
ca
bles
away
from
f
o
ot
traffic.
•
Whe
n
un
plu
gg
i
ng
t
h
e
po
wer
cord
,
do
no
t
pu
ll
on
th
e
cord
its
e
l
f
bu
t
pu
ll
on
the
p
l
ug.
•
The
to
tal
amp
e
re
rating
s
o
f
the
eq
uip
m
en
t
p
l
ug
ged
in
sh
ould
no
t
exc
eed
the
ampere
rating
of
the
cord
i
f
you
are
u
s
ing
an
extensio
n
cord.
Also
,
the
total
curr
ent
rating
of
a
ll
eq
uipment
p
l
ug
ged
into
a
s
i
ng
le
wall
ou
t
l
et
should
not
exceed
the
fuse
rating.
xv
Taking
care
of
yo
ur
battery
pack
Here
are
some
ways
to
take
care
o
f
yo
ur
b
a
tt
ery
pac
k
:
•
Use
only
batteries
of
the
same
kind
as
repla
c
ements
.
Turn
the
power
off
befor
e
r
e
moving
or
replacing
batteries.
•
Do
not
tamper
with
batteries.
Keep
the
m
away
from
child
ren.
•
Dispo
s
e
of
used
batteries
acco
rdin
g
to
loca
l
regu
lation
s
.
Recycle
if
po
ss
ib
le.
Cleaning
and
servicing
Whe
n
clean
ing
the
co
mp
uter,
follo
w
these
steps:
1
T
urn
off
the
computer
and
remov
e
t
h
e
battery
pack
.
2
D
isco
nnec
t
t
h
e
AC
adap
t
e
r
.
3
U
se
a
soft,
moist
clot
h.
Do
not
u
s
e
liqu
i
d
o
r
ae
rosol
cleaners.
If
either
o
f
th
e
follo
wing
occu
rs
:
•
the
co
mp
uter
has
b
een
d
r
op
ped
or
the
bod
y
h
a
s
been
dam
a
ged
;
•
the
co
mp
uter
do
es
no
t
operate
norm
ally
Please
refer
to
"Freque
n
tly
a
s
ked
questions"
on
page
43
.
xvi
Information
for
your
safety
and
comfort
iii
Saf
e
ty
instr
uctions
iii
Cautio
n
fo
r
Op
ti
cal
Drive
Devi
ce
(on
l
y
fo
r
certai
n
mod
e
ls)
v
ii
Ope
r
ating
envir
onment
v
iii
Medi
cal
devic
e
s
v
iii
Vehic
l
es
ix
Poten
t
iall
y
expl
os
ive
environments
ix
Em
ergency
calls
i
x Disposal
instructions
x
Mercury
a
d
visory
x
EN
ERGY
STA
R
x
Tips
and
informat
i
on
for
com
f
or
table
use
x
i
First
thi
ngs
f
i
rst
xiii
Yo
ur
gu
i
d
es
xi
ii
Basic
care
and
t
i
ps
for
using
yo
ur
co
mputer
xii
i
Turnin
g
your
compu
t
er
on
an
d
o
ff
x
iii
Taki
ng
care
of
yo
ur
co
mputer
x
i
v
Taki
ng
care
of
yo
ur
AC
ad
apter
x
iv
Taki
ng
care
of
yo
ur
battery
pack
xv
Cl
ean
i
ng
and
servi
c
in
g
xv
Touchp
ad
1
Touc
hpad
basic
s
(with
fi
ngerprin
t
reader)
1
Touc
hpad
basic
s
(with
two
-
cli
c
k
bu
tto
n
s)
2
Using
the
keyboard
3
Lock
ke
ys
and
embedded
numer
i
c
k
e
ypa
d
*
3
Windows
k
e
ys
4
Audio
5
Acer
Pure
Zone
(only
f
o
r
cert
ain
models)
5
Tuba
(onl
y
for
c
e
rtain
models)
5
U
s
i
ng
Do
lb
y
H
o
m
e
T
h
ea
t
er
f
o
r
su
rr
ound
/
mu
l
t
i
-ch
anne
l
so
und
(o
nl
y
for
c
e
r
t
ai
n
mo
de
ls)
5
Video
6
16:9
di
sp
lay
6
Using
the
system
utilities
7
Ac
er
B
i
o-Pr
ot
ect
i
on
(o
nl
y
fo
r
c
e
r
t
ai
n
mo
de
ls
)
7
A
c
er
Gri
d
Vista
(du
a
l-di
sp
lay
c
o
mpatib
le)
8
Acer
Backup
Man
a
g
e
r
9
Power
management
10
Acer
eRecovery
Management
11
Bu
rn
bac
k
up
d
i
scs
12
Resto
r
e
13
Resto
r
e
Win
dows
from
b
a
ckup
di
sc
s
14
Acer
A
r
cad
e
Deluxe
16
Ge
ne
ral
c
o
ntr
o
l
s
17
Navi
gation
co
ntrols
17
Player
contro
ls
17
Ci
nema
17
Play
Movie
:
17
V
i
de
os:
18
Playing
a
vid
e
o
file:
18
Recent
Video
s
:
18
Home
Medi
a
19
Advanced
19
Live
Up
dat
e
:
19
Al
bum
s
21
Editing
P
i
ctures
21
Sli
d
eshow
setting
s
21
Mu
si
c
21
On
lin
e
Medi
a
(on
l
y
fo
r
certai
n
mod
e
ls)
22
Y
o
uT
ub
e
22
Flickr
22
Battery
pack
23
Batt
ery
pack
cha
r
acterist
ics
23
Maximizing
the
bat
t
ery's
life
23
Ins
t
alling
and
rem
o
vi
ng
the
bat
t
ery
pack
24
Ch
arging
the
b
a
ttery
25
Che
c
k
i
ng
the
ba
tter
y
level
25
Op
ti
mi
s
i
ng
b
a
tt
e
ry
lif
e
25
Batt
ery-low
warning
26
Taking
your
no
tebook
PC
with
you
27
Disconnecting
from
the
desk
top
27
Mo
ving
aroun
d
27
Pr
eparing
t
h
e
computer
27
What
to
bring
to
me
etings
28
Ta
king
t
h
e
com
p
uter
hom
e
28
Pr
eparing
t
h
e
computer
28
What
to
t
ake
wit
h
you
28
Special
consider
ations
29
Settin
g
up
a
ho
me
offi
ce
29
Tr
aveling
with
t
h
e
com
p
uter
29
Pr
eparing
t
h
e
computer
29
What
to
t
ake
wit
h
you
29
Special
consider
ations
30
Tr
aveling
int
e
rnationally
with
the
computer
30
Pr
eparing
t
h
e
computer
30
What
to
brin
g
with
you
30
Special
consider
ations
30
Securi
ng
your
computer
31
Us
ing
a
com
p
uter
s
e
curity
lock
31
Usi
ng
passwo
rd
s
31
Ente
ring
pass
wor
d
s
32
Settin
g
passwo
rd
s
32
Expanding
th
rough
options
33
Co
nnecti
v
ity
op
tion
s
33
Fax/data
modem
(only
for
ce
rtain
models
)
33
B
u
il
t
-in
ne
twor
k
feat
ure
34
Consumer
Infrar
e
d
(CIR)
(only
for
ce
rtain
models)
34
Universa
l
Serial
Bus
(U
SB)
35
IEEE
1394
port
(only
for
ce
rtain
m
o
dels)
35
H
i
gh
-Defin
itio
n
M
u
lti
m
edi
a
Interface
(only
for
cer
t
ain
mode
ls)
36
ExpressCard
(onl
y
for
c
e
rtain
model
s
)
36
In
sta
lli
ng
m
e
mo
r
y
37
Enjoying
TV
with
Windows
Media
Center
39
Ch
oose
yo
ur
i
npu
t
ty
pe
39
Watc
hin
g
TV
usin
g
th
e
op
ti
onal
DVB-T
(d
ig
ital
TV)
ante
nna
(for
s
e
lect
ed
models
)
39
To
connect
the
digita
l
antenna
39
Wat
c
hing
T
V
with
an
exter
n
al
ant
e
nna
or
cable
s
o
cke
t
40
BI
OS
u
t
ili
ty
41
Bo
ot
sequence
41
Enabl
e
disk-to-di
sk
rec
o
very
41
Pa
ssword
41
Us
ing
s
o
ft
ware
42
Playing
DVD
movies
42
Frequently
asked
questions
43
Reques
ting
service
46
Int
e
rnational
Traveler
s
Wa
rranty
(IT
W
)
46
Before
you
call
46
Troubleshooting
47
Tro
ubl
esh
ooti
ng
ti
ps
47
Er
ror
m
e
ssa
ge
s
47
Regulati
ons
and
safety
no
tices
48
FCC
st
atem
ent
48
Mo
de
m
no
ti
ce
s
(
on
l
y
fo
r
ce
r
t
a
i
n
m
od
e
ls
)
49
LCD
pixel
state
m
ent
52
Radi
o
device
regu
latory
no
tice
52
Ge
ne
ral
52
The
FCC
RF
safe
ty
require
m
ent
53
Canada
—
Low-power
licens
e-exem
pt
ra
dio
co
mmun
ication
de
vices
(RSS-21
0)
54
Exposure
of
hum
a
ns
t
o
RF
fields
(RSS-102)
54
LCD
p
a
n
e
l
ergo
nomi
c
spec
ificatio
ns
54
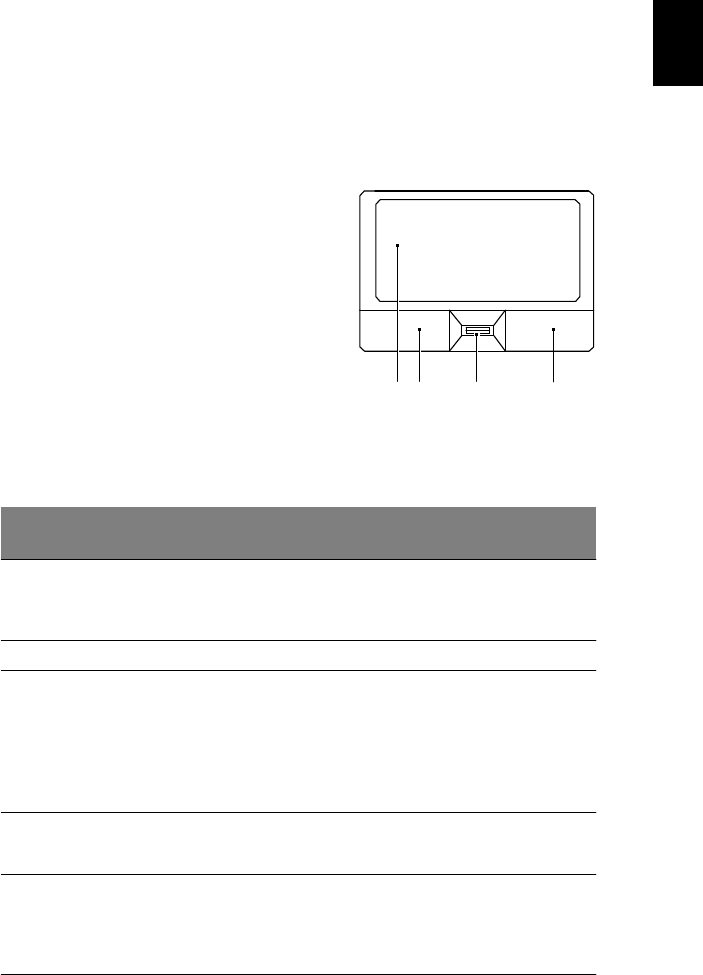
1
Touchpad
The
bu
ilt-
i
n
tou
c
hp
ad
is
a
poin
t
ing
device
that
sen
s
es
movem
e
nt
on
its
surface.
This
means
the
cursor
respon
ds
as
y
ou
move
y
o
ur
finger
across
the
s
u
rf
a
c
e
of
the
tou
c
hp
ad.
The
cen
tral
lo
catio
n
on
the
palm
r
e
s
t
p
r
ovides
op
timu
m
co
mfo
r
t
and
supp
ort.
Touchpad
basics
(with
fingerprint
reader)
The
fo
llowin
g
item
s
s
h
ow
you
ho
w
to
use
th
e
touchp
ad
with
A
c
er
Bio
-
Protec
tio
n
fin
g
erprin
t
reader.
•
Move
y
o
ur
finger
across
the
t
o
uchpad
(1)
to
move
the
curs
or.
•
Press
t
h
e
left
(2)
an
d
righ
t
(4)
bu
ttons
loca
t
e
d
beneath
the
touchpad
to
perform
selection
and
executio
n
fun
c
tion
s
.
These
two
buttons
are
similar
to
the
left
and
righ
t
bu
tton
s
on
a
mo
use.
Tap
pin
g
on
the
1
2
3
4
touchp
ad
is
the
sam
e
as
clicki
ng
th
e
left
bu
tt
on
.
•
Use
Acer
B
i
o-Protection
fing
erprint
reader
(3)
su
pp
or
ti
ng
A
c
e
r
F
i
ng
e
r
Nav
4-way
control
function
(only
for
certain
mo
dels)
to
s
c
roll
up
or
do
wn
and
mo
ve
l
e
ft
o
r
right
a
p
a
ge.
This
fing
erprint
reader
or
bu
tton
mim
i
cs
yo
ur
cursor
press
i
ng
on
the
right
scroll
bar
o
f
W
i
nd
ows
app
licatio
ns.
F
u
nc
tion
Left
button
(2)
Rig
h
t
button
(4)
M
a
in
to
uc
hp
ad
(1)
C
e
nte
r
bu
tton
(3)
Execute
Qui
ckl
y
cl
i
ck
twi
c
e.
Tap
t
w
i
c
e
(a
t
t
h
e
s
a
me
s
p
eed
as
dou
ble-c
l
icking
a
m
ouse
bu
tto
n).
Se
lec
t
Click
once.
Tap
on
c
e.
D
r
ag
Click
and
hold,
the
n
us
e
fi
nger
on
the
t
ouchpad
t
o
dr
a
g
the
cur
s
or
.
Tap
t
w
i
c
e
(a
t
t
h
e
s
a
me
s
p
eed
as
dou
ble-c
l
icking
a
m
ouse
bu
tto
n);
r
e
s
t
yo
ur
f
i
nger
on
the
to
uc
hp
ad
on
the
second
tap
and
drag
th
e
cu
rsor
.
A
cc
e
ss
con
t
ext
men
u
Cl
i
ck
on
c
e.
S
c
r
o
ll
Swi
p
e
up/
down/
left
/
ri
ght
usi
ng
A
c
er
Fi
ngerNav
4-way
cont
rol
functi
on
(Manufactur
ing
opt
ion
).

2
Touchpad
basics
(w
ith
tw
o-click
buttons)
The
fo
llowin
g
item
s
s
h
ow
you
ho
w
to
use
th
e
tou
c
hp
ad
with
t
w
o
-clic
k
bu
tt
on
s.
•
Move
y
o
ur
finger
across
the
t
o
uchpad
to
move
the
cursor.
•
Press
t
h
e
left
and
righ
t
buttons
located
beneath
the
touc
hpa
d
to
perform
selection
an
d
execu
t
ion
fun
c
tions.
Thes
e
two
buttons
are
similar
t
o
the
left
and
righ
t
bu
tton
s
on
a
mo
use.
Tap
pin
g
on
the
to
uch
p
ad
is
t
h
e
same
as
clicking
the
left
button.
F
u
nc
tion
L
e
ft
button
Ri
gh
t
button
Ma
i
n
to
uc
hp
ad
Execute
Q
u
ic
kly
clic
k
t
w
i
ce.
Ta
p
t
w
ice
(a
t
t
h
e
sa
me
s
p
ee
d
as
do
ubl
e-cl
i
cki
ng
a
mous
e
but
ton).
S
e
l
e
ct
C
lic
k
on
ce
.
T
ap
on
c
e.
D
r
ag
Click
and
hol
d,
t
h
en
use
fi
nger
on
t
h
e
touchpad
to
d
r
ag
t
h
e
cur
s
or
.
T
a
p
twi
c
e
(a
t
the
s
a
m
e
sp
ee
d
as
do
ubl
e-cl
i
cki
ng
a
mous
e
but
ton);
rest
your
fi
nger
on
the
t
ouchpad
on
t
h
e
second
t
a
p
and
dr
ag
t
h
e
curs
or
.
A
cc
e
ss
co
nte
x
t
men
u
Click
once.
No
te:
Illu
str
atio
ns
for
referenc
e
on
ly.
T
h
e
exact
co
nfigur
ation
o
f
yo
ur
PC
dep
e
nd
s
on
th
e
mo
del
pu
rch
a
sed.
No
te:
When
u
s
ing
the
touc
hpad,
k
eep
it
—
and
y
ou
r
fing
ers
—
dry
and
clean
.
The
to
uch
p
ad
is
s
e
nsitive
t
o
fing
er
movem
e
nt;
h
e
nce,
the
lighter
t
h
e
to
uch
,
the
better
the
respon
se.
Tap
pin
g
h
a
rder
w
ill
not
increase
the
t
o
uchpad's
responsiv
e
ness.
No
te:
By
default,
vertical
and
horiz
o
ntal
scrol
ling
is
e
nabl
e
d
on
yo
ur
tou
c
hp
ad.
It
c
a
n
b
e
disab
l
ed
u
nde
r
M
o
use
setting
s
in
W
i
ndo
w
s
Co
nt
rol
P
a
n
e
l
.

3
Using
the
keyboard
The
k
e
yb
oard
has
full-sized
keys
a
nd
a
n
em
bed
d
ed
num
eric
keypad
*
,
sepa
r
a
te
cursor,
lo
ck,
W
i
ndo
ws,
func
ti
on
a
nd
sp
ecial
key
s.
Lock
keys
and
embedded
numeric
keypad*
The
k
e
yb
oard
has
three
lo
ck
keys
which
you
c
a
n
tog
g
le
on
an
d
o
ff
.
Lock
key
Descri
ption
Cap
s
Lo
ck
Wh
e
n
C
a
p
s
L
o
ck
is
on
,
al
l
al
ph
a
b
e
ti
c
ch
a
r
ac
te
rs
ty
p
e
d
a
r
e
i
n
u
pper
cas
e.
Num
Lock
<Fn>
+
<F11>*
Sc
r
o
ll
Lock
<Fn>
+
<F12>
Whe
n
N
u
m
Loc
k
is
on,
th
e
e
m
be
dde
d
keyp
ad
is
in
num
e
r
ic
mode
.
T
h
e
k
e
ys
f
u
nc
ti
on
as
a
cal
cula
tor
(compl
et
e
w
i
t
h
t
h
e
ar
it
hmet
i
c
operators
+,
-,
*,
and
/).
Us
e
thi
s
mode
wh
e
n
you
need
to
do
a
lot
of
numeri
c
data
ent
r
y.
A
b
e
tt
er
s
o
lut
i
on
woul
d
be
t
o
conn
e
c
t
a
n
ex
te
rn
a
l
keyp
ad
.
When
S
c
r
o
ll
Lock
i
s
on
,
the
screen
mov
e
s
one
li
ne
up
or
down
when
you
p
r
ess
the
up
or
down
arrow
ke
y
s
r
e
s
p
ec
t
i
vely
.
S
c
r
o
ll
Lock
do
e
s
not
work
wi
th
s
o
m
e
a
p
pli
c
ati
ons.
The
e
m
be
dded
nu
meric
k
e
yp
ad
fu
nction
s
like
a
d
e
sktop
nu
m
e
ric
key
pad
.
It
is
indicated
by
s
m
all
characters
located
on
t
h
e
upper
right
corner
of
the
k
ey
c
a
p
s.
To
sim
p
lify
the
keybo
ard
leg
e
nd
,
curso
r
-
con
t
r
o
l
key
sym
bo
l
s
are
no
t
p
r
inted
on
the
keys.
Desi
red
a
cce
ss
Num
Lo
ck
on
Nu
m
Lo
ck
off
Num
b
er
ke
ys
on
emb
e
dd
ed
keyp
a
d
Cur
s
or-control
keys
on
emb
e
dd
ed
keypa
d
T
y
pe
num
bers
in
a
norm
a
l
ma
nne
r.
Hold
<Shift>
whi
l
e
u
s
ing
c
u
rso
r-
con
trol
k
ey
s.
Hold
<Fn
>
whi
l
e
us
ing
c
u
rso
r-co
ntro
l
k
ey
s.
Main
keybo
ard
keys
Hold
<Fn
>
whi
l
e
t
y
pi
ng
l
e
tters
on
e
mbedded
keypad.
*
on
ly
f
o
r
certain
m
od
e
ls
T
y
p
e
t
h
e
le
tt
er
s
i
n
a
nor
mal
manner.
4
Window
s
keys
The
k
ey
board
has
two
keys
that
perf
orm
Wi
ndows-spec
i
f
i
c
func
t
i
ons.
Key
De
scription
W
i
nd
ows
k
ey
Pr
esse
d
al
one,
t
h
is
k
ey
has
the
s
a
me
e
ff
ect
as
c
li
cki
ng
on
t
h
e
W
i
ndo
ws
S
t
art
butt
on;
it
la
unche
s
the
St
a
rt
me
nu.
I
t
can
als
o
be
used
wi
th
other
ke
y
s
t
o
pr
ovid
e
a
vari
e
t
y
of
f
unction
s:
<
>
:
Open
o
r
cl
o
s
e
t
h
e
St
ar
t
m
e
nu
<
>
+
<D
>:
Displ
ay
t
h
e
de
sk
top
<
>
+
<E>:
O
p
en
W
i
nd
ows
Exp
l
ore
<
>
+
<F
>:
Se
ar
ch
for
a
f
ile
or
f
o
lde
r
<
>
+
<G
>:
Cycle
th
rough
Si
debar
gadget
s
<
>
+
<L
>:
Lock
you
r
comput
er
(i
f
you
a
r
e
connected
t
o
a
netwo
r
k
dom
ain),
or
swit
c
h
us
e
r
s
(if
yo
u're
not
c
onn
ec
t
e
d
to
a
netwo
r
k
dom
ain)
<
>
+
<M>:
Mi
nim
i
zes
all
wind
ows
<
>
+
<R
>:
Open
the
R
un
di
alog
box
<
>
+
<T>:
Cy
c
l
e
thr
ough
prog
rams
on
the
tas
k
bar
<
>
+
<U
>:
Open
E
a
se
of
A
c
cess
Center
<
>
+
<X>:
O
p
en
W
i
ndo
ws
Mob
ili
ty
Center
<
>
+
<B
REAK>:
Dis
p
lay
the
Sy
stem
Propert
ies
dialog
box
<
>
+
<S
HI
F
T
+M>:
Restore
minim
i
ze
d
wind
ows
t
o
t
h
e
deskt
op
<
>
+
<TAB
>:
Cycle
t
hrough
pr
ogram
s
on
th
e
taskbar
b
y
us
ing
Wi
ndows
Fl
ip
3-D
<
>
+
<S
PACEBAR
>
:
Bri
ng
all
gadget
s
t
o
th
e
fro
nt
and
select
W
i
ndo
ws
S
i
debar
<C
T
R
L>
+
<
>
+
<F>:
S
ea
r
ch
for
c
o
mp
ute
rs
(if
you
ar
e
on
a
netwo
r
k)
<C
T
R
L>
+
<
>
+
<TAB
>:
Use
th
e
a
r
row
k
e
ys
to
cycle
th
rough
pr
ogram
s
on
th
e
taskbar
b
y
us
ing
Wi
ndows
Fl
ip
3-D
Ap
plicatio
n
key
No
te:
Dependin
g
on
your
edit
ion
of
Wi
ndows,
s
o
me
s
hort
c
u
ts
may
not
functi
on
as
describ
e
d
.
This
key
h
a
s
t
h
e
s
a
m
e
ef
fec
t
as
cl
ick
i
ng
the
r
i
ght
m
o
us
e
butt
on;
i
t
op
e
n
s
t
h
e
appli
c
at
ion'
s
cont
ex
t
m
e
nu.

5
Audio
The
c
o
m
puter
also
com
e
s
with
32-bit
Hig
h
Defin
i
tion
(HD)
Au
dio,
and
s
t
ereo
speakers.
Acer
PureZone
(only
for
certain
models)
The
sy
stem
p
r
o
vides
y
ou
whole
new
enthusiastic
au
dio
ex
perienc
e
inclu
d
in
g
A
c
e
r
P
u
re
Z
o
ne
wi
th
bu
il
t
-
i
n
st
er
e
o
m
i
cr
opho
ne
s
f
ea
t
uri
ng
b
ea
m
fo
rm
i
ng
a
nd
echo
can
c
ellation
techn
o
lo
gies.
Ac
er
PureZo
ne
tech
nology
sup
po
r
ts
Ac
oustic
Echo
Can
c
ellatio
n
,
B
eam
Form
ing
an
d
Noise
Suppression
for
pure
sound
record
ing.
To
set
up
y
our
m
i
crop
hon
e,
run
the
Ac
er
HD
Au
dio
Ma
nag
e
r
by
do
ubl
e-click
i
ng
th
e
Acer
HD
Aud
i
o
M
a
n
a
ger
ico
n
in
the
sy
stem
tray
o
f
yo
ur
Win
dows
system.
T
h
e
Ac
er
HD
A
udi
o
Mana
ger
d
i
alog
bo
x
w
ill
pop
up
.
C
lick
th
e
M
i
crop
hon
e
tab,
an
d
th
en
clic
k
the
M
i
crop
ho
ne
Effects
tab.
Selec
t
B
eam
Fo
rmin
g
an
d
Aco
u
stic
Ec
ho
C
a
nel
l
ation
to
set
th
e
mi
croph
on
e
effect.
No
te
:
Disable
the
beam
for
m
ing
to
g
e
t
t
h
e
m
u
lti-so
und
sou
r
c
e
inp
u
t.
Tuba
(only
for
certain
models)
The
d
e
dic
a
ted
Tu
ba
C
i
neBa
ss
su
bwo
o
fer
pu
mp
s
ou
t
earth
sh
aking
mo
vie
-
ho
use
a
u
di
o
.
T
h
e
i
nno
va
ti
ve
d
e
si
gn
i
n
te
gra
t
es
t
h
e
subwoof
e
r
with
the
tube-style
hin
g
e.
Using
Dolby
Home
Theater
for
surround/multi-
channel
sound
(only
for
certain
models)
You
r
Acer
no
tebook
com
e
s
with
the
Dolb
y
Hom
e
Th
eater
®
au
dio
en
han
c
emen
t
featuring
Do
lby
Pro
Log
i
c
IIx,
Dolb
y
D
i
gital
Live,
Dolb
y
Headp
hon
e,
Do
lby Natural
Bass
and
Dolby
Sound
S
p
ace
Ex
pa
nder,A
udio
O
p
timiz
a
tio
n
,
Hig
h
Freq
uen
c
y
Enha
ncer
tech
no
logi
es
to
giv
e
y
ou
hig
h
-q
uality
dig
i
tal
surrou
nd
soun
d
fo
r
enjoying
m
o
vies,
gam
e
s
and
mu
s
i
c
in
a
realistic,
m
u
lti-
chan
nel
a
udio
environ
m
en
t.
Dolby
P
r
o
Logic
IIx
Dolb
y
Pro
Logi
c
IIx
creates
a
vivid
5.1-ch
ann
e
l
surrou
nd
s
ound
experien
ce
from
any
stereo
(t
wo
-ch
a
nn
el)
m
o
vie,
m
u
sic,
TV,
o
r
gam
e
aud
i
o
sou
r
ce.
Do
lby
Pro
Lo
gic
IIx
exam
ines
the
s
i
gnal
an
d
uses
th
at
informatio
n
to
exp
a
nd
au
dio
in
to
up
to
5.1
c
h
an
nels
of
h
i
gh
ly
realistic,
n
a
tural
su
rr
ound
sou
nd
.

6
Dolby
Digital
L
i
ve
Dolby
Digital
Live
conv
e
r
ts
any
audio
si
gnal
in
real
time
from
PCs
or
game
con
s
oles
in
t
o
Do
lby
Digital
fo
r
easy
connection
to
home
t
h
eater
sy
stems
through
a
single
digital
cable.
U
s
ers
ca
n
en
joy
PC
o
r
g
a
me
aud
i
o
entertain
men
t
with
exc
i
ting
realism
thro
ugh
hom
e
theater
rece
ive
r
s
or
othe
r
de
vices
equ
i
pp
ed
with
Do
lby
Dig
i
tal
deco
din
g
tech
nology
.
Dolby
He
adph
one
Dolb
y
Headp
hon
e
creates
a
p
e
rsona
l
surroun
d
so
und
experien
ce
usin
g
an
y
set
of
head
ph
ones.
The
p
l
ayb
ack
of
mu
sic
,
m
o
v
i
es,
an
d
gam
e
s
resu
lts
in
sou
nd
tha
t
is
mo
r
e
s
p
acio
us,
op
en,
a
nd
d
r
amatic,
impro
v
in
g
listen
i
ng
com
f
o
rt
and
making
listeners
feel
as
if
the
ac
t
i
on
is
h
a
ppening
all
a
r
ound
them
.
Dolby
Natural
Bass
A
ba
ss
en
han
c
em
ent
system
,
which
pro
v
id
es
up
to
an
o
c
tav
e
of
do
wnward
ext
e
n
s
ion
in
the
bass
respon
se
of
m
o
st
speakers.
Dolby
Sou
nd
Sp
ace
E
x
pa
nde
r
A
sou
nd
stag
e
enh
a
ncer,
wh
ich
pro
du
ces
a
wide
stereo
im
age
an
d
im
prov
es
the
separation
of
instrume
nts
wi
tho
u
t
di
m
i
ni
sh
i
ng
th
e
c
e
n
t
e
r
of
the
m
i
x.
Video
16:9
display
16:9
d
i
s
p
lay
delivers
Fu
ll
HD
m
o
vies
at
ho
me
like
never
befo
re.
Sk
y-
high
col
o
r
saturation
gu
ar
a
n
tees
an
authen
tic
HD
viewing
experien
ce.16:9
qu
ali
t
y
m
eans
tr
ue
home
t
h
eater
v
i
suals
have
final
l
y
arrived
for
notebook
entertainment
enthusiasts.
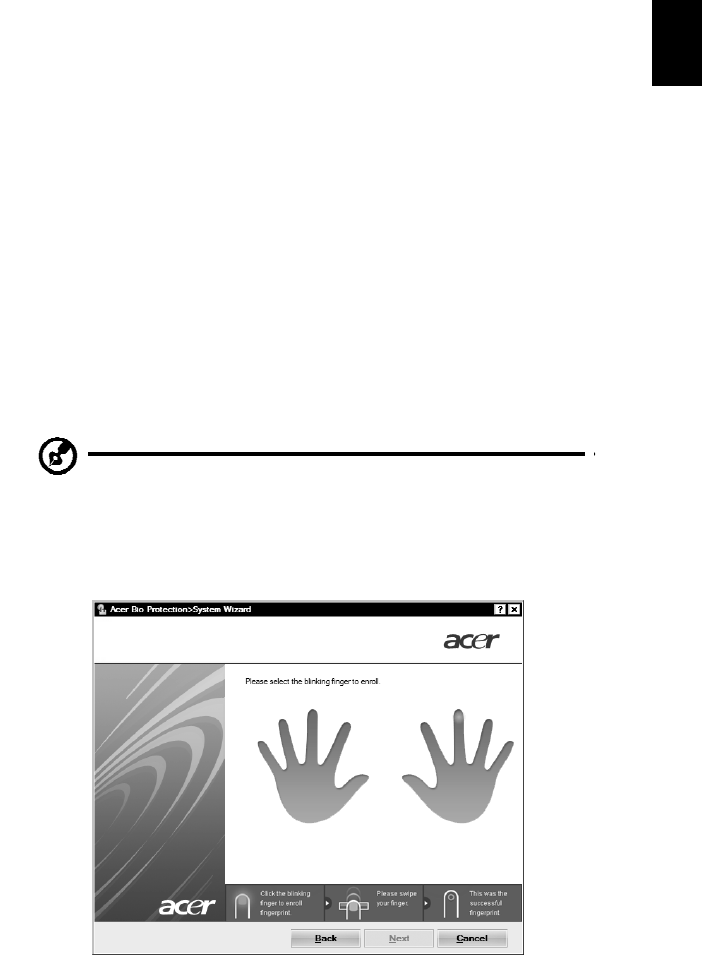
7
Using
the
system
utilities
Acer
Bio-Protection
(o
nly
fo
r
c
e
rtain
mo
dels)
Acer
B
i
o-Protectio
n
Fing
erprin
t
So
lutio
n
is
a
mu
lti-p
u
rpo
s
e
fing
erprint
s
o
ftware
pack
age
integ
r
ated
with
the
Microsoft
Wind
ows
ope
r
a
tin
g
system.
Utilizing
the
un
iqu
e
ness
of
on
e's
fing
erprint,
A
c
er
Bio
-
Protec
tio
n
F
i
ng
erprin
t
S
o
l
u
tion
inco
rpo
r
ates
p
r
otection
aga
i
nst
un
auth
ori
ze
d
a
cc
e
ss
to
yo
ur
c
o
mp
ute
r
wi
t
h
centraliz
ed
password
man
a
gem
e
nt
v
i
a
Password
B
a
nk;
easy
m
u
sic
p
l
aye
r
laun
chin
g
with
Acer
MusicLau
nch
*
;
se
cure
Inter
n
et
favo
rites
v
i
a
A
c
er
MyLaun
ch*;
and
f
a
s
t
ap
plica
t
io
n/web
s
ite
laun
chin
g
an
d
lo
gin
with
Ace
r
Fin
g
erLaun
ch.
Acer
ProfileLaun
ch*
*
can
la
unc
h
up
to
th
r
ee
app
lication
s
/
websites
with
a
s
i
ng
le
fin
g
er
swip
e.
A
c
e
r
Bi
o
-
Pr
ote
c
ti
on
F
i
ng
e
r
pr
i
n
t
S
o
l
u
ti
on
a
l
so
a
ll
o
ws
yo
u
t
o
n
a
vi
ga
t
e
t
h
ro
ugh web
b
r
owsers
and
do
cum
e
nts
usin
g
Ace
r
F
i
ng
erNav
*
.
With
Acer
B
i
o-Pro
t
ection
Fin
g
erp
r
int
Solutio
n
,
you
can
now
e
njoy
an
ex
tra
layer
of
protection
for
your
person
a
l
com
pu
t
er
,
as
well
as
t
h
e
con
v
en
ie
nc
e
of
a
ccessing
your
daily
tasks
with
a
simp
le
swipe
o
f
yo
ur
fing
er!
F
o
r
mor
e
information,
r
e
f
e
r
to
th
e
Ace
r
B
i
o-
Protectio
n
he
lp
files.
No
tes:
*
Acer
Pro
f
ileLau
n
ch
,
MusicLaun
c
h,
MyLaun
ch
an
d
FingerNav
are
on
ly
availab
l
e
on
select
m
odel
s
.
**
In
mod
e
ls
witho
u
t
Acer
Pro
f
ileLau
n
c
h
,
Ace
r
Fin
g
erLaunc
h
can
be
u
s
ed
to
open
app
licatio
ns
in
th
e
Acer
Pro
f
ile
Lau
n
ch
icon
s
area;
a
sing
le
fing
er
s
w
i
p
e
will
laun
ch
on
ly
one
a
ppli
c
ation
at
a
time.
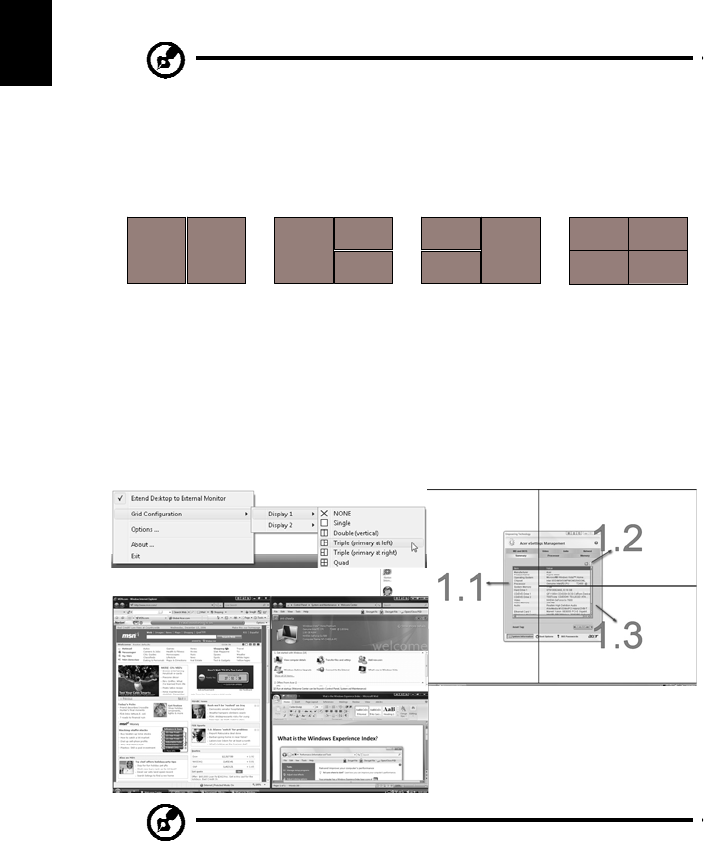
1
3
2
4
8
Acer
GridVista
(dual-
display
compatible)
No
te:
Th
is
f
e
at
u
r
e
is
on
ly
av
ailab
l
e
on
certain
mod
e
ls.
Acer
Grid
Vis
t
a
is
a
hand
y
utility
t
h
at
offers
four
p
r
e-de
f
i
n
e
d
d
i
splay
settings
so
yo
u
ca
n
view
mu
ltiple
win
do
w
s
on
th
e
sa
me
screen.
To
access
this
function,
please
go
to
St
a
r
t
,
All
Prog
ram
s
and
click
on
Ace
r
Gr
i
d
V
i
s
t
a.
You
may
choose
any
on
e
of
th
e
four
d
i
splay
setti
ngs
in
dicated
belo
w:
2
1
1
2
1
3
2
3
Dou
b
le
(ve
r
tica
l),
Trip
le
(prim
a
ry
a
t
l
e
ft
),
Triple
(
p
rim
a
r
y
at
righ
t),
o
r
Quad
Acer
Grid
vista
is
du
al-
d
isplay
co
mp
at
i
b
le,
allo
wing
two
d
i
s
p
lays
t
o
be
partition
ed
in
dep
e
nd
ently
.
Acer
Grid
Vis
t
a
is
sim
p
le
to
set
up
:
1
R
un
A
c
er
Grid
V
i
s
t
a
and
select
you
r
preferred
screen
con
f
iguratio
n
fo
r
each
display
from
the
taskbar.
2
D
rag
a
nd
d
r
op
each
win
do
w
into
th
e
ap
prop
ri
ate
grid.
3
E
n
j
oy
the
c
o
nve
n
i
e
nc
e
o
f
a
wel
l
-
o
r
ga
n
i
ze
d
de
sk
to
p.
No
te:
Please
e
n
sure
that
the
resolu
t
i
on
se
tti
ng
o
f
yo
ur
s
e
c
ond
monitor
is
set
to
the
manufactu
r
e
r
's
reco
mmend
e
d
valu
e.
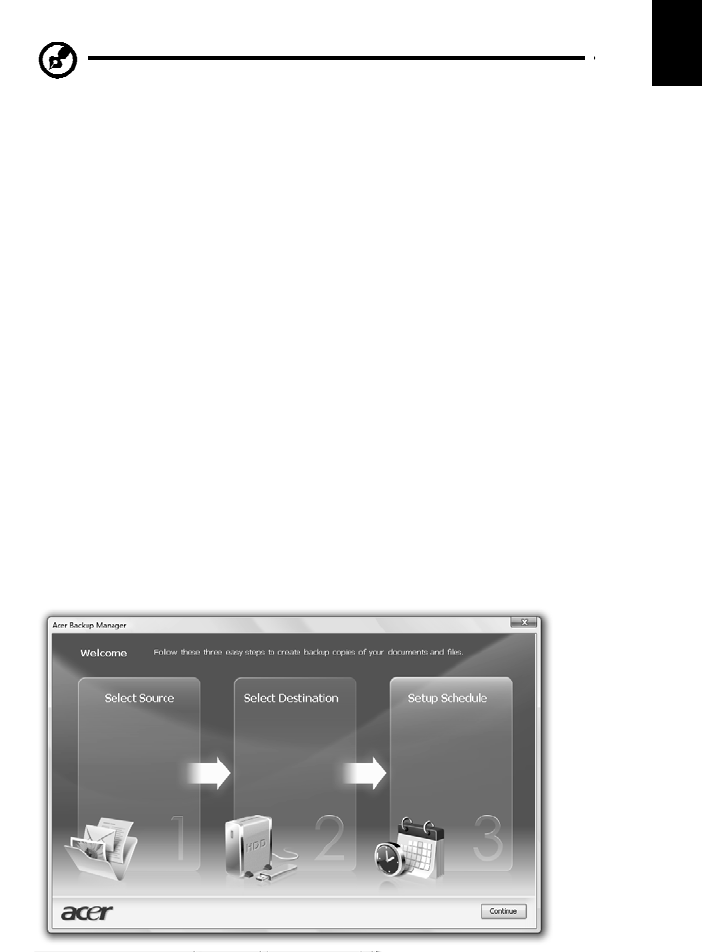
9
Acer
Backup
Manager
No
te:
Th
is
f
e
at
u
r
e
is
on
ly
av
ailab
l
e
on
certain
mod
e
ls.
Acer
B
a
ckup
Manag
e
r
is
a
simp
le
three-step
proc
es
s
th
at
allows
you
t
o
create
back
up
c
opi
es
of
yo
ur
en
tire
sy
stem
o
r
se
lected
files
and
folders
according
to
a
sched
u
le
o
r
as
yo
u
n
eed
to
.
To
start
Acer
B
a
ckup
Manag
e
r,
press
the
A
c
er
Backu
p
Man
a
ger
key
above
the
key
boa
rd
.
Alternativ
ely
,
y
ou
c
a
n
go
to
Start
>
A
ll
Pro
g
r
ams
>
Ace
r
Ba
ck
up
Manag
e
r
>
A
c
e
r
Ba
c
k
up
Ma
nage
r
.
Th
is
will
open
the
Welco
m
e
screen;
f
r
o
m
t
h
is
screen
you
will
be
t
a
ken
thro
ugh
the
th
ree
ste
p
s
to
setup
sched
uled
bac
k
up
s
.
Click
Co
nti
n
ue
to
proce
e
d
to
th
e
fo
llowin
g
sc
r
ee
n
.
Click
the
+
bu
tton
an
d
follow
the
onscreen
instructions:
1
S
e
l
ect
the
co
nten
t
you
want
to
back
up.
T
h
e
less
content
you
select,
the
qu
icker
the
p
r
ocess
will
b
e,
bu
t
it
will
increase
you
r
ris
k
s
o
f
losin
g
da
t
a.
2
S
e
l
ect
where
you
want
the
backu
p
co
pies
to
be
stored
.
You
will
need
to
select
an
externa
l
drive
or
you
r
D:
drive;
Acer
B
a
ckup
Manag
e
r
cann
ot
sto
r
e
a
ba
ckup
on
th
e
sou
r
ce
driv
e.
3
S
e
l
ect
ho
w
often
y
ou
want
Ac
er
Backu
p
M
a
n
a
ger
to
c
r
ea
te
back
up
s.
On
ce
you
have
finish
ed
th
es
e
t
h
ree
steps,
ba
ckup
s
will
be
c
r
ea
t
e
d
acco
rdin
g
to
the
sch
e
du
le.
You
can
also
create
ba
ckup
s
man
u
ally
by
pressing
the
A
c
er
Back
up
M
a
n
a
ger
key
.
If
yo
u
wish
to
ch
ang
e
y
o
ur
se
ttin
gs
at
a
n
y
t
i
me
,
ru
n
Ace
r
B
a
c
k
up
Ma
n
a
ge
r
f
r
om
the
Start
m
e
nu
and
go
th
roug
h
th
e
ste
p
s
ou
tlined
abo
ve.

10
Power
management
This
co
mp
uter
ha
s
a
built-
i
n
po
wer
management
unit
that
monitors
sy
stem
activit
y.
Sy
stem
activit
y
refers
to
any
ac
tivity
involving
on
e
or
m
o
re
of
th
e
follo
wing
dev
i
ces:
key
bo
ard,
m
ouse,
h
a
rd
d
i
sk,
periph
erals
co
nnected
to
th
e
c
o
mp
ute
r
,
a
nd
v
i
de
o
me
m
o
ry
.
I
f
no
a
c
ti
vi
ty
i
s
detected
for
a
period
of
time
(call
e
d
an
inac
t
i
vity
tim
e
ou
t
),
th
e
c
o
m
puter
stops
some
o
r
all
of
these
devices
in
orde
r
to
con
s
erve
energy.
This
computer
employs
a
power
manage
ment
scheme
t
h
at
supports
the
advanc
ed
con
f
igu
r
a
t
io
n
an
d
po
wer
in
terf
ac
e
(
A
CP
I),
which
allows
for
maximum
power
cons
e
r
vation
and
ma
x
i
mum
perfo
rmance
at
the
same
time.
Windows
h
a
nd
l
e
s
a
ll
powe
r-s
av
i
ng
c
h
ores
for
y
ou
r
c
o
m
puter.
Acer
PowerSmart
key
No
te:
Th
is
f
e
at
u
r
e
is
on
ly
av
ailab
l
e
on
certain
mod
e
ls.
The
A
c
er
PowerSmart
key
u
s
es
th
e
power-
savi
ng
featu
r
es
of
y
our
co
mp
uter's
grap
hics
sub
-
sy
stem
to
red
u
ce
o
ve
r
all
powe
r
c
onsu
m
p
t
i
on.
W
h
en
yo
u
p
r
ess
th
e
Acer
Po
werSm
a
rt
key,
th
e
screen
b
r
igh
t
n
e
ss
is
r
e
duced
an
d
the
graph
i
cs
chip
switched
to
a
lo
wer
s
p
eed;
PCI
an
d
WLAN
s
w
itch
to
power-saving
modes.
Press
the
Ac
er
PowerSmart
key
again
to
re
turn
to
your
prev
i
ous
settings.
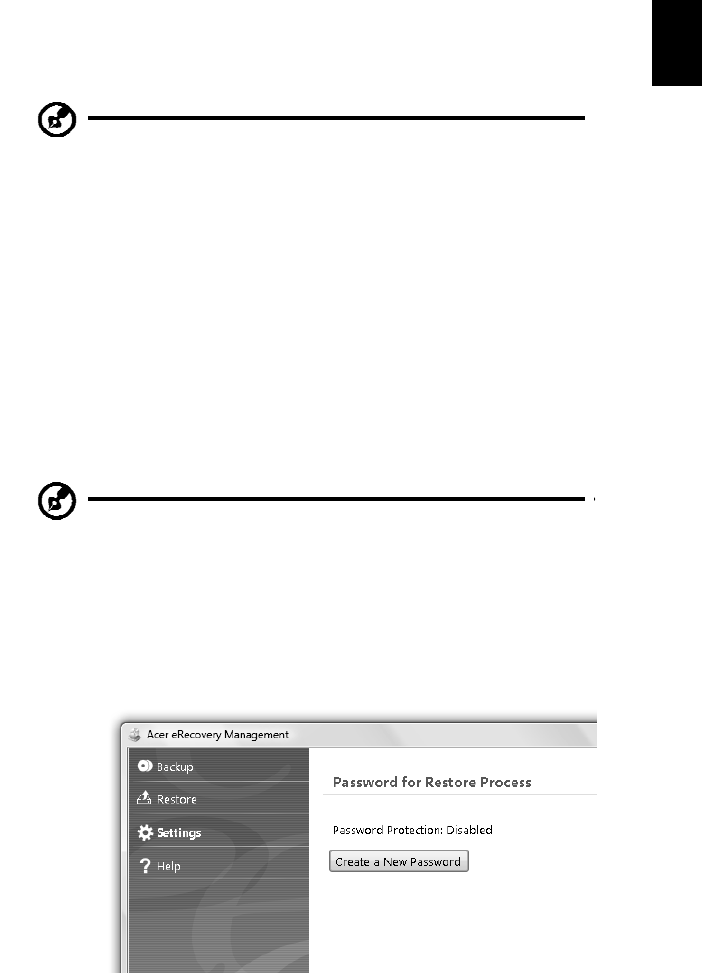
11
Acer
eRecovery
Management
Acer
eR
ecov
ery
Ma
nage
men
t
is
a
to
ol
to
qui
ckly
resto
re
th
e
system
.
You
can
back
up/restore
the
factory
default
image,
and
rein
s
t
all
ap
plicatio
ns
and
d
r
i
v
ers.
No
te:
All
of
the
fo
llowin
g
co
ntent
is
for
general
reference
only
.
Actua
l
prod
uct
sp
ecification
s
may
var
y.
Acer
eRecovery
M
a
nage
ment
c
ons
ists
of
the
f
o
llowing
functions:
1
B
ack
up:
•
Create Factory
Default
Disc
•
Create Drivers
and
App
licatio
ns
Disc
2
R
estore:
•
Completely
Restore
Sy
stem
t
o
F
a
ctory
Defaults
•
Restore
Oper
a
t
ing
Sys
tem
and
Retain
User
Data
•
Reinsta
ll
Drive
r
s
o
r
App
lication
s
This
ch
apter
will
gu
id
e
yo
u
th
r
ough
eac
h
p
r
o
cess.
No
te:
Th
is
f
e
at
u
r
e
is
on
ly
av
ailab
l
e
on
certain
mod
e
ls.
For
system
s
that
do
not
h
ave
a
bu
ilt-
i
n
optical
disc
burner,
p
l
ug
in
an
ex
ternal
optical
disc
burner
before
ente
ring
Acer
eRe
c
ov
ery
M
a
n
a
gem
e
nt
for
optical
dis
c
-related
tasks.
To
u
s
e
the
p
a
ss
word
p
r
o
t
ection
feature
of
A
c
er
eReco
v
er
y
Managem
e
nt,
you
must
first
set
the
pas
s
word.
The
password
is
s
e
t
by
launching
Ac
er
e
R
ecov
ery
Ma
n
a
ge
m
e
nt
a
nd
c
li
c
k
i
ng
Settings
.

12
Burn
backup
discs
F
r
om
th
e
B
a
c
k
up
pa
g
e
of
A
c
e
r
e
R
e
c
o
ve
r
y
M
a
na
g
e
me
n
t
,
yo
u
c
a
n
bu
r
n
th
e
factory
defau
l
t
i
m
ag
e
or
ba
ck
up
driv
ers
a
nd
a
ppli
c
ation
s
.
1
C
lick
on
St
ar
t
>
All
P
r
og
ram
s
>
Acer
>
A
c
er
eRe
c
overy
Man
a
g
e
m
e
nt
.
2
A
cer
eR
ecovery
Ma
nage
men
t
op
en
s
to
the
Ba
ck
up
pag
e.
3
S
e
l
ect
the
type
of
backup
(f
ac
tory
default
or
driver
s
and
applic
at
i
ons)
y
ou
would
like
t
o
burn
to
disc.
4
F
ollow
the
instructions
on
scr
een
to
complete
the
process
.
No
te:
C
r
ea
te
a
factory
defau
l
t
im
age
when
yo
u
wan
t
to
bu
rn
a
bo
otabl
e
disc
tha
t
c
ontain
s
yo
ur
co
mp
uter's
entire
op
erating
sy
stem
as
it
was
delivered
to
y
ou
from
the
factor
y.
If
you
wis
h
to
have
a
d
i
sc
that
will
allo
w
you
to
browse
th
e
con
t
ents
and
install
selected
d
r
ive
r
s
an
d
ap
plica
t
io
ns,
create
a
drive
r
s
an
d
ap
plic
at
i
on
bac
k
up
instead
—
this
disc
w
ill
no
t
b
e
bo
otab
le.
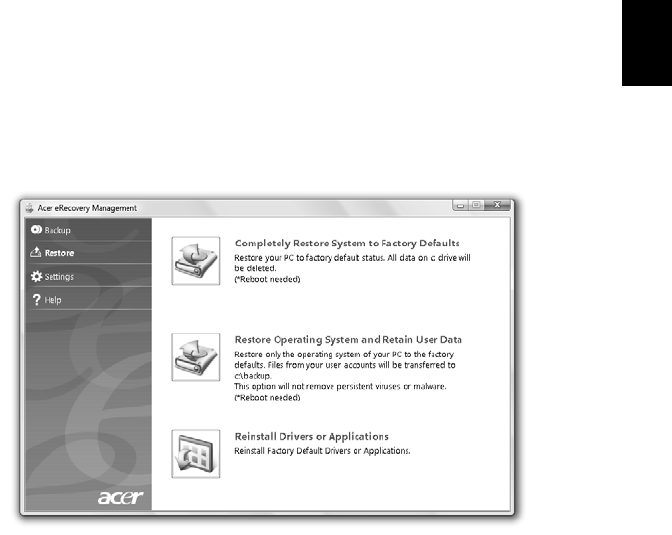
13
Restore
The
restore
fea
t
ure
allows
you
to
restore
or
rec
o
ver
t
h
e
sy
stem
fr
om
a
f
a
c
t
ory
defau
l
t
imag
e
or
from
prev
iou
s
l
y
created
CD
a
nd
DVD
bac
k
ups.
Yo
u
can
also
reinstall
ap
plicatio
ns
an
d
dr
ivers
for
your
A
c
er
sy
stem.
1
C
lick
on
St
a
r
t
,
All
P
r
og
ram
s
,
Ace
r
,
A
c
e
r
e
R
ec
over
y
Man
a
geme
nt
.
2
S
witc
h
to
the
Restore
p
a
ge
b
y
c
licking
Re
store
.
3
Y
ou
can
choose
to
restore
the
s
y
stem
from
a
factory
default
image
or
reinstall
ap
plicatio
ns
an
d
drivers.
4
F
ollow
the
instructions
on
scr
een
to
complete
the
process
.

14
Restore
Windows
from
backup
discs
No
te:
Th
is
f
e
at
u
r
e
is
on
ly
av
ailab
l
e
on
certain
mod
e
ls.
To
rest
o
r
e
W
i
ndo
ws
from
you
r
previo
usly
burned
b
a
ckup
d
i
scs,
you
will
need
to
insert
the
first
back
up
disc
and
enable
the
F
12
Bo
ot
Me
nu
via
the
B
I
OS
Setup
Utility.
1
T
urn
on
y
o
ur
computer
and
insert
the
first
s
y
stem
rec
o
very
disc
into
t
h
e
opt
i
cal
disc
driv
e.
Restart
y
o
ur
computer.
2
D
uring
startup
when
t
h
e
Acer
lo
go
shows,
p
r
ess
th
e
F2
key
to
en
t
e
r
BI
OS
Setu
p
,
whe
r
e
you
can
set
s
y
stem
parameters.
3
U
se
the
le
ft
and
right
arrow
keys
to
select
the
Main
subm
enu
.
4
U
se
the
up
an
d
do
wn
arro
w
keys
t
o
select
F1
2
Boo
t
Me
nu
5
U
se
the
F5
or
F6
key
to
ch
ang
e
F
12
Bo
ot
Me
nu
to
Ena
b
le
d
.
6
P
ress
t
h
e
ESC
key
to
enter
the
Exit
submenu,
press
the
E
N
TER
key
to
Exit
Sa
vi
ng
Ch
a
nge
s
.
Press
t
h
e
EN
TER
key
a
gain
t
o
select
Yes
.
The
sys
t
em
will
rebo
ot.
7
A
fter
rebooting,
when
the
Ac
er
logo
sho
w
s,
press
th
e
F12
key
to
op
en
the
Bo
ot
M
e
nu
.
Here
you
can
s
e
lect
which
device
to
bo
ot
from.
8
U
se
the
arro
w
keys
to
selec
t
t
h
e
ID
E1*
,
t
h
en
press
the
E
N
TER
key
.
W
i
nd
ows
will
be
installed
fro
m
the
r
e
c
o
very
d
i
sc.
9
I
nsert
the
second
recovery
disc
when
pr
om
pte
d
,
th
e
n
fo
llow
the
onscreen
prompts
to
c
omplete
the
restor
e.
10
Remove
the
rec
o
very
dis
c
fr
om
th
e
op
t
i
c
a
l
drive
on
ce
the
r
e
sto
r
e
is
com
plete.
D
o
this
b
e
fore
rebo
otin
g
you
r
c
o
m
puter.

15
If
y
ou
pref
e
r
to
set
t
h
e
boot
pr
iority
fo
r
l
ong-term
u
s
e,
y
ou
sh
ou
ld
select
the
Bo
ot
submenu.
1
T
urn
on
y
o
ur
computer
and
insert
the
first
s
y
stem
rec
o
very
disc
into
t
h
e
opt
i
cal
disc
driv
e.
Restart
y
o
ur
computer.
2
D
uring
startup
when
t
h
e
Acer
lo
go
shows,
p
r
ess
th
e
F2
key
to
en
t
e
r
BI
OS
Setu
p
,
whe
r
e
y
ou
can
set
s
y
stem
parameters.
3
U
se
the
le
ft
and
right
arrow
keys
to
select
the
Bo
ot
submenu.
4
U
se
the
up
an
d
do
wn
arro
w
keys
t
o
select
the
ID
E1*
dev
i
ce.
5
U
se
the
F6
k
ey
to
move
the
ID
E1*
dev
i
ce
to
th
e
hi
ghest
boo
t
priority,
or
u
s
e
the
F5
key
to
move
ot
her
devices
to
a
lo
wer
boot
pr
i
o
rity
.
E
n
sure
tha
t
the
IDE
1
*
de
v
i
ce
is
t
h
e
highest
pr
iority
.
6
P
ress
t
h
e
ESC
key
to
enter
the
Exit
submenu,
press
the
E
N
TER
key
to
Exit
Sa
vi
ng
Ch
a
nge
s
.
Press
t
h
e
EN
TER
key
a
gain
t
o
select
Yes
.
The
sys
t
em
will
rebo
ot.
7
W
he
n
you
r
e
boo
t,
Wind
ows
will
b
e
installed
from
t
h
e
recovery
disc.
8
I
nsert
the
second
recovery
disc
when
pr
om
pte
d
,
th
en
fo
llow
the
onscreen
prompts
to
c
omplete
the
restor
e.
9
R
emove
the
rec
o
very
disc
fr
om
the
op
t
i
c
a
l
drive
on
ce
the
r
e
sto
r
e
is
com
plete.
D
o
this
b
e
fore
rebo
otin
g
you
r
com
puter.
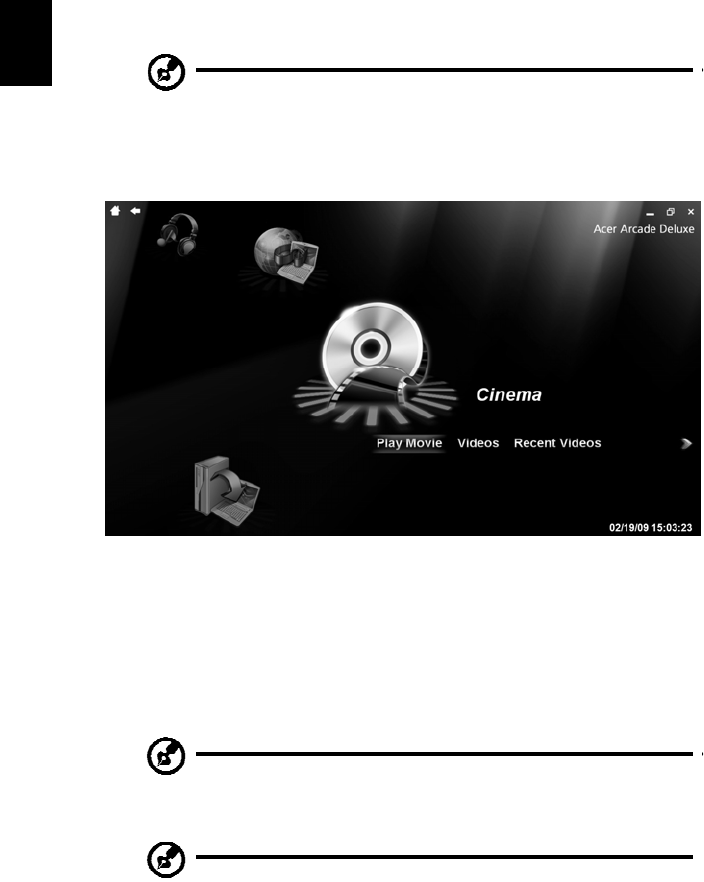
16
Acer
Arcade
Deluxe
No
te:
Th
is
f
e
at
u
r
e
is
on
ly
av
ailab
l
e
on
certain
mod
e
ls.
Acer
Arcad
e
Delu
xe
is
an
in
t
e
grated
p
l
aye
r
fo
r
mu
s
i
c
,
ph
otos,
DVD
movies
an
d
vid
e
os.
Use
t
h
e
Me
diaCo
n
so
le,
to
uch
p
ad
o
r
arrow
keys
to
select
the
media
type
y
ou
wish
to
enjoy.
•
Ci
nem
a
—
watch
DVDs,
VCDs
or
B
l
u-R
ay
mov
i
es,
an
d
v
i
deo
clip
s
•
Home
med
i
a
—
connect
to
other
dev
i
c
e
s
wireless
l
y
to
s
h
are
media
content
•
Ad
va
nc
ed
—
change
settings,
update
your
Arcade
soft
wa
r
e,
v
i
ew
the
help
file
an
d
Abou
t
inform
ation
•
Alb
u
m
s
—
vi
e
w
pho
t
os
s
t
ore
d
on
yo
ur
ha
rd
di
sk
o
r
rem
o
va
b
l
e
me
d
i
a
•
Mu
sic
—
listen
to
music
files
in
a
variety
of
forma
t
s
•
O
n
li
ne
Me
dia
—
bro
w
se
on
line
co
nten
t
fro
m
You
T
ub
e
and
Flickr
No
te
:
Wh
ile
watching
vid
e
os,
optical
d
i
s
c
s
o
r
slidesh
o
ws,
your
screensaver
and
po
wer-saving
f
ea
t
u
r
es
are
un
availa
ble.
No
te
:
For
more
detailed
informatio
n
on
the
featu
r
es
o
f
Acer
Arcad
e,
please
refer
to
th
e
Arcad
e
Help
men
u
.
Th
is
can
b
e
accessed
fro
m
the
Arcade
hom
e
page
b
y
selectin
g
He
l
p
.

17
General
controls
Whe
n
watch
i
ng
vid
e
o
clip
s,
mo
vie
s
o
r
slidesho
ws
usin
g
full-
screen
resolu
tion
,
two
p
op-
up
con
t
ro
l
pan
e
ls
are
sho
w
n
wh
en
y
ou
mo
ve
th
e
po
inter.
They
automatically
disa
ppea
r
a
f
ter
several
se
conds.
The
Navigation
Controls
pane
l
app
ears
at
t
h
e
top
and
the
Player
Co
ntrols
p
a
nel
appe
ar
s
at
th
e
bo
tt
o
m
o
f
t
h
e
screen.
Navigation
controls
To
retu
r
n
to
the
Arcade
ho
m
e
pag
e,
clic
k
the
Ho
m
e
bu
tt
on
in
the
upp
e
r
-
left
corner
of
the
win
do
w
.
To
go
up
on
e
fold
er
level
while
s
ea
r
c
h
ing
for
co
ntent,
click
t
h
e
arrow
.
T
h
e
bu
tton
s
in
t
h
e
u
ppe
r
r
i
ght
(
m
in
imize,
m
a
ximize,
clo
s
e)
h
ave
sta
nda
rd
PC
b
e
hav
i
o
r
s.
To
qu
it
Arcad
e,
clic
k
the
Cl
o
s
e
butto
n
in
th
e
up
per
rig
h
t
corner
of
the
window.
Player
controls
At
the
bo
tt
o
m
o
f
th
e
windo
w,
the
pl
ayer
controls
—
used
for
v
i
deo,
slideshows,
mo
vies
an
d
m
u
sic
—
are
shown
.
They
p
r
ovide
stand
ard
p
l
ayb
ack
co
ntrols
(play,
pau
s
e,
sto
p
,
etc
.)
and
v
o
lu
me
co
ntrols
(
m
ute
a
nd
v
o
l
u
me
up/do
wn
).
No
te
:
Wh
en
p
l
ayi
ng
m
o
vies
from
optic
al
discs
,
the
r
e
a
r
e
add
i
tion
al
con
t
r
o
ls
add
e
d
to
t
h
e
right
of
the
volume
cont
rols.
These
a
r
e
discussed
in
m
o
re
de
t
a
il
in
the
Cine
ma
o
f
t
h
is
gu
ide.
Cinem
a
Play
Movie:
Click
Play
Mo
vi
e
to
watch
a
mo
vie
fr
o
m
you
r
op
t
i
c
a
l
disc
d
r
ive.
De
pen
d
in
g
in
the
type
o
f
optica
l
drive
installed
in
you
r
com
puter,
you
can
play
mo
vie
s
fro
m
Blu
-
Ra
y
d
i
scs,
sta
ndard
DVDs
an
d
v
i
deo
CDs
(V
CDs)
with
the
C
i
nem
a
fun
c
tion
of
Acer
Arcad
e
Delu
xe.
This
p
l
ayer
h
a
s
the
features
an
d
co
ntrols
o
f
a
typ
i
cal
DVD
player.
Whe
n
you
insert
a
disk
into
the
DVD
drive,
the
m
o
vie
b
e
gin
s
p
l
aying
auto
matically.
To
con
t
ro
l
the
m
o
vie,
the
pop
-
up
player
co
ntrol
p
a
nel
ap
pears
at
the
bottom
of
the
window
wh
en
y
ou
move
the
pointer.
If
mo
r
e
t
h
an
on
e
optical
drive
con
t
a
i
ns
a
p
l
ayab
le
disc
,
yo
u
will
b
e
asked
to
select
which
on
e
you
would
like
to
watch
wh
en
you
click
Pl
ay
Mo
vi
e.
A
l
te
rn
a
t
i
ve
l
y,
yo
u
c
a
n
se
l
e
c
t
c
o
nte
n
t
sto
re
d
on
you
r
HDD
by
c
li
c
k
i
ng
Vide
os
and
naviga
t
i
ng
to
t
h
e
video
clip
you
wish
to
view
u
s
ing
a
fold
er
browser.
Whe
n
viewing
DVDs,
the
fo
llowin
g
spe
c
ial
co
ntrols
are
ad
ded
t
o
the
pop
-
up
pan
e
l:
•
DVD
Menu

18
•
Su
btitles
•
La
ngu
age
•
Sn
aps
h
ot
•
Ang
l
e
If
yo
u
m
o
ve
your
m
ou
s
e/
cursor
wh
ile
you’re
watc
hing
a
mo
vie,
a
men
u
b
a
r
will
app
ear
at
the
bo
ttom
of
the
screen
.
Thi
s
c
ontain
s
bu
tt
on
s
to
co
ntrol
t
h
e
movi
e
playba
ck,
select
sub
t
it
le
s
,
adjust
volu
me,
sele
ct
s
oundtrack
langu
a
ge
an
d
set
advanc
ed
features.
No
te:
Fun
c
tion
avail
a
bility
will
dep
e
nd
on
what
the
optica
l
disc
b
e
i
ng
pl
ay
ed
su
pp
or
ts.
Click
i
ng
t
h
e
stop
button
will
stop
the
m
o
vi
e
playba
ck,
and
return
you
to
th
e
Cinema
main
screen.
At
the
bot
t
om
of
th
e
screen
a
r
e
bu
tt
on
s
th
at
allow
yo
u
to
resume
t
h
e
movie
fr
om
the
point
it
was
stopped,
restart
the
movie
from
the
beg
i
nn
ing
or
eject
the
disk.
Vide
os:
Click
Vide
os
to
wa
t
c
h
a
vi
d
e
o
c
li
p
s
t
ore
d
on
yo
ur
ha
rd
dri
ve.
No
te:
The
Video
feature
is
desig
n
ed
to
p
l
ay
b
ack
m
a
ny
different
kinds
of
video
formats.
Refe
r
to
the
Video
help
section
for
a
full
list
of
c
o
mpatible
f
o
rmats.
If
you
want
to
watch
a
DVD
or
V
C
D,
use
Ci
nem
a.
Playin
g
a
vid
e
o
file:
Click
Vide
os
to
open
a
file
br
owser
to
na
v
i
gate
to
the
vid
e
o
clip
yo
u
wan
t
to
vie
w
.
To
p
l
ay
a
vid
e
o
file,
dou
ble-
click
on
it.
The
video
will
play
at
full
screen
.
The
po
p-u
p
c
ontrol
pan
e
l
will
app
ear
at
th
e
bo
ttom
of
the
s
c
r
ee
n
when
you
move
the
mous
e.
To
return
t
o
the
Video
page,
c
lick
Sto
p
.
You
c
a
n
cap
t
u
r
e
a
s
t
ill
o
f
a
scen
e
by
clickin
g
the
Sn
ap
sho
t
bu
tto
n
in
th
e
po
p-u
p
con
t
ro
l
pa
nel.
Recent
Videos:
Sh
ows
video
clip
s
saved
r
e
c
e
ntly.
Dou
b
le-
c
lick
on
a
c
lip
to
wa
t
c
h
it.

19
HomeMedia
Hom
e
M
e
dia
is
a
prog
ram
tha
t
le
ts
y
ou
access
an
d
share
m
e
dia
fil
e
s
and
TV
sign
als
via
y
ou
r
ho
me
n
e
twork.
Ho
meM
e
d
i
a
giv
e
s
y
ou
ac
cess
to
y
our
n
e
twork
computer
s
with
Media
Serv
e
r
a
nd
T
V
Server
installed,
s
o
you
c
a
n
view
shared
mu
sic,
vi
deos,
p
i
ctures
an
d
TV
sign
als.
Click
Ho
meMe
dia
t
o
op
en
th
e
main
pag
e
that
d
i
s
p
lays
a
list
o
f
the
m
e
dia
an
d
TV
servers
availabl
e
on
yo
ur
netwo
r
k.
Hom
e
Media
is
c
o
m
p
atible
wit
h
mo
st
UPn
P
client
d
e
vices.
Click
Refre
sh
at
an
y
tim
e
to
search
f
o
r
newly
shared
med
i
a
servers.
No
te:
You
must
first
i
n
stall
a
nd
setup
Media
S
e
rver
to
sha
r
e
media
files
and
TV
Server
to
sh
ar
e
TV
s
i
gnal
s
.
No
te:
You
will
n
eed
to
have
yo
ur
wireless
ad
aptor
ac
t
i
ve
b
e
fore
yo
u
c
a
n
u
s
e
Hom
e
M
e
dia.
Advanced
This
sectio
n
co
ntain
s
th
e
sett
i
ngs
in
Acer
Arcad
e
Delu
xe
t
h
at
allow
yo
u
to
fin
e-
tune
its
p
e
rforman
ce
to
su
it
yo
ur
m
a
chin
e
and
yo
ur
p
e
rs
on
al
p
r
eferences.
Live
Update:
Click
Live
Up
dat
e
to
conne
ct
t
o
the
Internet
to
ch
eck
fo
r,
and
down
l
oad
,
available
updates
t
o
the
sof
t
ware.
Settings:
Click
S
e
ttings
to
m
ake
various
ad
justm
ents
to
you
r
A
c
er
Arcad
e
Deluxe.
He
r
e,
yo
u
will
be
ab
le
to
m
odify
Disp
lay,
A
udi
o,
Ph
oto,
DVD
and
BD
setting
s
to
g
e
t
th
e
be
st
ou
t
of
y
ou
r
c
o
mp
ute
r
.
Disp
lay:
Use
this
section
to
set
the
displa
y
type
.
Yo
u
can
cho
o
se
th
e
Display
Output
and
Co
lor
Profile
to
suit
your
en
vi
r
o
nm
ent
an
d
p
r
eferen
ces.
Under
Displa
y
Output,
you
c
a
n
select
from
Cinema
V
i
sion,
Letterbox
or
P
a
n
&
Sc
an:
•
The
Letterbox
option
disp
lays
wid
e
screen
m
o
vie
co
nten
t
i
n
its
orig
inal
aspect
ratio
and
add
s
b
l
ack
b
a
rs
at
t
h
e
top
and
bo
tt
o
m
o
f
th
e
screen.
•
Acer
CinemaVision
i
s
a
nonlinea
r
video
stretching
technol
ogy
that
prod
uc
es
m
i
nim
a
l
d
i
sto
r
tio
n
in
the
ce
nter
of
the
picture.
•
Pan
&
Sc
an
d
i
s
p
lays
t
h
e
cen
t
ral
po
rtion
of
DVD
t
i
t
l
e
s
in
wide
s
c
r
ee
n
ratio,

20
and
allows
you
to
d
r
a
g
the
d
i
splay
area
to
view
d
i
ff
e
r
en
t
po
r
t
io
ns
o
f
th
e
vid
e
o.
Au
dio
:
Use
Sp
eake
r
En
viron
m
ent
to
choose
between
He
ad
phon
es
,
SPDIF
,
2
Sp
eak
ers
or
mo
re
speakers
de
pen
d
ing
on
yo
ur
au
dio
equ
i
pm
ent.
Ou
tpu
t
Mod
e
sh
ould
b
e
set
to
Stereo
if
yo
u
a
r
e
usin
g
speakers,
Dolb
y
Surrou
nd,
or
Virtual
S
u
rrou
nd
So
und
if
y
ou
are
using
hea
dphon
es.
You
can
selec
t
fro
m
a
va
r
i
ety
of
Virtual
S
u
rr
ound
Sound
setti
ngs
to
create
the
effects
of
different
ve
nues.
No
te
:
If
your
sp
eakers
are
no
t
capab
l
e
of
ou
tpu
tt
i
ng
lo
w-
fre
que
ncy
sign
als,
it
is
rec
o
mm
en
ded
th
at
yo
u
do
no
t
select
Vi
rtua
l
Su
rroun
d
So
un
d,
in
order
to
avo
i
d
d
a
mag
i
ng
y
o
ur
spe
akers.
Aud
i
o
Ch
anne
l
E
x
pa
nd
e
r
shoul
d
be
used
for
better
4-
or
6-spea
ker
output.
Dy
namic
R
a
ng
e
C
o
m
p
ression
can
compensate
for
different
listening
environ
m
en
ts
fo
r
enh
a
nced
aud
i
o
en
joymen
t.
Ph
oto
:
Use
this
p
a
ge
to
s
e
t
p
r
eferences
for
you
r
slidesho
w
when
viewing
ph
otos.
DVD:
Acer
A
r
c
a
de
De
luxe
has
sev
e
ral
f
e
at
ures
and
technologies
t
o
extend
battery
life
while
wa
t
c
hing
DVD
m
o
vies.
On
this
p
a
ge,
you
can
select
wheth
e
r
yo
u
wish
t
o
turn
the
features
off
or
not.
No
te:
Tu
rning
on
Exten
d
P
l
aybac
k
Ti
me
,
will
result
in
a
s
m
all
lo
ss
o
f
pl
ay
ba
c
k
pe
rf
orm
a
nc
e.

21
Help:
Click
Help
to
view
the
Help
file
fo
r
detailed
inform
ation
on
using
Acer
Arcad
e
Delu
xe.
About:
Click
Abou
t
to
view
the
copyright
a
nd
ve
ndor
informa
t
ion
for
Acer
Arcad
e
Delu
xe.
Albums
Acer
Arcad
e
Delu
xe
lets
yo
u
view
dig
i
tal
ph
otos
in
dividu
ally
or
as
a
slide
s
ho
w,
fr
o
m
a
n
y
avail
a
ble
d
r
ive
on
you
r
com
pu
t
er.
C
lick
Al
bu
m
s
t
o
op
en
th
e
main
pag
e.
Click
P
h
otos
t
o
op
e
n
a
fol
d
e
r
br
owse
r
t
h
a
t
sh
ows
bo
th
i
n
di
v
i
du
a
l
pi
c
t
u
r
e
s
a
nd
folder
s.
C
lic
k
on
a
fold
er
to
op
en
it.
To
view
a
slideshow,
ope
n
the
fo
lder
co
ntain
i
ng
t
h
e
pic
t
u
r
es
yo
u
wish
t
o
view,
select
all
o
r
so
me
of
the
pic
t
u
r
es
an
d
click
Slid
esh
o
w
.
The
slid
esho
w
is
played
at
fullscreen
res
o
lutio
n
.
Use
th
e
po
p-u
p
c
ontrol
panel
to
control
the
s
l
ideshow.
You
can
also
vie
w
a
singl
e
pictu
r
e
by
clickin
g
on
it.
Th
is
op
en
s
the
p
i
cture
at
fullscreen
res
o
lutio
n
.
You
can
then
us
e
t
h
e
onscreen
c
ontrol
s
to
zo
om
in
an
d
ou
t,
an
d
to
p
a
n
in
four
directio
ns.
Editing
Pictures
Ch
oose
Menu
>
Fix
and
yo
u
can
Ro
tate
,
Rem
o
ve
Red
Ey
e,
and
Auto
Fix
(o
ptimize
the
brigh
t
ness
and
contras
t
)
pictu
r
es
to
imp
r
ove
the
ap
pearan
ce
of
yo
ur
im
ages.
Slideshow
settings
To
c
h
ange
slide
s
how
settings
r
e
f
e
r
to
the
Arcade
section
abov
e.
Music
Fo
r
con
v
en
ient
ac
cess
t
o
your
m
u
sic
co
llectio
n,
clic
k
Mu
sic
to
open
the
Music
ho
mep
a
ge.
Se
lect
the
fold
er,
CD
or
categ
o
ry
th
at
con
t
ains
the
m
u
sic
yo
u
wan
t
to
list
e
n
to.
Click
Play
to
listen
to
the
e
n
tire
content
from
the
beginnin
g,
or
selec
t
the
song
that
you
want
to
hear
fr
om
the
list.
The
s
ong
s
in
th
e
fold
er
are
sho
w
n
as
a
list
with
albu
m
info
r
m
ation
at
the
t
op
of
the
page,
while
the
toolbar
at
t
h
e
bo
tt
om
of
th
e
pa
g
e
ha
s
c
o
ntr
o
l
s
fo
r
Pla
y,

22
Shu
ffle,
Rep
eat
All
,
Visu
alize,
Volume
an
d
Menu
.
Visualize
allo
ws
you
t
o
watch
com
pu
t
er-gen
erated
visuals
wh
ile
you
li
s
t
en
to
m
u
sic.
Onli
ne
Me
dia
(only
for
cert
ain
models)
On
line
Med
i
a
gi
ves
y
ou
easy
ac
cess
to
ph
oto
s
a
nd
v
i
d
e
os
upload
ed
to
th
e
po
pul
ar
Flick
r
an
d
YouTu
b
e
web
s
ite
s
.
No
te:
You
need
to
be
co
nnected
to
the
Internet
to
use
the
Onl
i
ne
M
e
dia
fu
nctio
n
.
YouTube
Yo
u
c
a
n
vi
e
w
th
e
30
m
o
s
t
vi
e
w
e
d
vi
d
e
o
c
li
p
s
on
Yo
uT
ub
e
by
se
l
e
c
t
i
ng
YouTube
fr
o
m
th
e
Online
Med
i
a
ho
mepage
.
The
vide
o
clip
s
will
be
d
i
splayed
a
s
thum
bn
ails,
select
a
thu
m
bn
ail
to
vie
w
t
h
e
video
clip’s
title
an
d
nu
m
b
er
of
v
i
ew
s
.
P
r
es
s
<
En
ter
>
o
r
dou
ble-
click
a
th
um
bna
il
to
v
i
ew
the
v
i
deo
.
Alternativ
ely
,
yo
u
ca
n
log
into
yo
ur
You
T
ub
e
acco
un
t
to
vi
ew
yo
ur
favo
rite
vid
e
o
c
lips.
You
need
to
b
e
log
g
ed
in
to
s
ave
a
vid
e
o
clip
to
you
r
f
a
vo
r
i
tes.
Flickr
Se
lect
Fl
ickr
to
view
200
recen
t
ly
upload
ed
pho
t
os
on
Fli
c
kr.
You
can
lo
g
in
to
yo
ur
Flickr
acco
un
t
t
o
view
yo
ur
o
w
n
pho
t
os
tre
a
m
o
r
yo
ur
c
o
nt
a
c
t
s
'
ph
oto
s
.
Yo
u
ca
n
a
l
so
se
a
r
c
h
f
o
r
ph
oto
s
fr
om
yo
ur
own
stream,
contacts'
str
ea
ms
or
all
of
Fli
c
kr
.

23
Battery
pack
The
computer
uses
a
batt
ery
pac
k
th
at
gi
ves
yo
u
lo
ng
use
b
e
twee
n
ch
arg
e
s.
Battery
pack
characteristics
The
bat
t
ery
pack
has
the
following
c
h
a
r
ac
ter
i
s
t
ic
s:
•
E
mploys
curre
nt
batte
ry
technology
s
t
anda
rds.
•
D
elive
rs
a
ba
tter
y
-low
warning.
The
bat
t
ery
is
rec
h
ar
ge
d
whenever
you
connect
the
com
p
uter
to
t
h
e
AC
adapter.
Yo
ur
c
o
mp
uter
su
pp
orts
ch
arg
e
-i
n-u
s
e,
enabl
i
ng
yo
u
to
recha
r
ge
t
h
e
batte
ry
while
you
co
nt
inue
to
operat
e
the
c
o
m
p
uter
.
Howev
e
r,
recharging
wi
th
the
compute
r
tur
n
ed
off
r
e
su
lt
s
in
a
si
gn
if
ic
an
tl
y
f
a
s
t
e
r
ch
ar
ge
ti
me
.
The
bat
t
ery
will
c
o
m
e
in
handy
when
yo
u
tr
avel
o
r
du
ri
ng
a
powe
r
failu
re.
It
i
s
advi
sable
to
h
ave
an
extra
fu
ll
y
c
h
arg
e
d
b
a
ttery
pac
k
avai
l
a
bl
e a
s
b
ack
up
.
Co
nta
c
t
you
r
d
eal
er
for
de
tai
l
s
on
o
r
de
ri
ng
a
sp
ar
e
ba
tter
y
pack.
Maximizing
the
battery's
life
Li
ke
al
l
o
t
h
e
r
batteries,
yo
ur
c
o
mp
uter'
s
battery
w
ill
deg
r
ad
e
over
time.
T
h
is
mea
n
s
that
the
ba
tter
y
's
performa
nce
will
diminish
with
time
and
us
e. To
maximize
your
batte
ry's
life,
you
ar
e advise
d
to
adher
e
to
the
recom
m
endat
i
ons
se
t
out
below.
Con
ditioning
a
new
b
a
ttery
pack
Be
for
e
you
use
a
ba
tter
y
pack
for
t
h
e
first
t
i
me
,
there
is
a
"co
nd
i
tio
n
i
ng
"
proc
ess
that
yo
u
sh
ou
ld
fol
l
ow
:
1 I
nse
rt
the
new
bat
t
er
y
withou
t
tu
r
n
in
g
th
e
c
o
m
pu
t
e
r
on
.
2
C
on
ne
ct
t
h
e
A
C
a
d
ap
te
r
a
nd
f
u
ll
y
ch
ar
g
e
th
e
ba
tt
e
r
y.
3 D
isconnec
t
the
A
C
adapt
e
r.
4
T
urn
on
the
comp
uter
and
op
erate
usin
g
battery
power.
5
F
ully
deplet
e
the
batt
ery
until
the
bat
t
er
y-low
warning
appears
.
6
R
e
c
onnect
t
h
e
AC
a
d
a
p
te
r
and
fully
char
ge
the
ba
tte
ry
a
g
ain.

24
Fol
l
o
w
t
h
e
s
e ste
ps
ag
ai
n
un
ti
l
th
e
ba
tte
ry
h
a
s
b
een
c
h
a
r
ge
d
an
d
discha
rge
d
three
times
.
Use
th
is
co
nd
itio
nin
g
p
r
ocess
fo
r
al
l
new
b
a
tteri
es,
or
if
a
b
a
tt
e
r
y
ha
sn
't
b
e
en
used
fo
r
a
lo
ng
time.
If
the
compute
r
is
to
be
store
d
for
m
o
re
than
two
wee
k
s,
you
ar
e
advised
to
re
move
the
ba
tte
ry
pack
from
t
h
e
un
it
.
Warning:
D
o
not
expose
batte
ry
p
a
cks
to
te
mp
eratu
r
es
belo
w
0°
C
(3
2°F)
or
a
bo
ve
45
°C
(113
°F).
Extrem
e
temperatu
r
es
m
ay
ad
versely
affec
t
the
batte
ry
pac
k
.
By
fo
ll
owi
ng
the
b
a
tt
ery
co
nd
it
ioni
ng
pr
oc
ess
yo
u
co
nd
it
io
n
you
r
ba
tter
y
t
o
accept
the
m
a
xim
u
m
poss
ib
l
e
ch
arg
e. Fail
ure
to
fo
llo
w
th
is
pr
oc
edu
r
e
wi
ll
pre
ve
n
t
yo
u
fro
m
obtaining
the
maximum
batte
ry
c
h
arge,
an
d
will
also
shorten
th
e e
ffective
lifes
p
a
n
of
the
ba
tte
ry.
In
addition,
the
use
f
ul
life
spa
n
of
t
h
e
batte
ry
is
advers
ely
af
fec
t
ed
by
the
following
usage
pa
tter
n
s:
•
U
sing
the
computer
on
cons
ta
nt
AC
power
with
the
battery
i
n
serted.
I
f
yo
u
want
to
use
con
s
ta
nt
AC
power,
you
a
r
e a
d
vised
to
rem
o
ve
the
bat
t
er
y
pack
a
fter
it
is
fu
lly
ch
arg
e
d.
•
N
o
t
disc
harging
an
d
rec
harging
t
h
e
batte
ry
t
o
its
extre
mes,
as
d
e
sc
ri
bed
ab
ove.
•
F
reque
n
t
use;
the
mor
e
you
use
t
h
e
batt
ery,
the
fast
er
it
will
r
each
the
end
of
its
effe
ct
ive
life.
A
s
t
andar
d
c
o
m
p
uter
bat
t
ery
has
a
lif
e
span
of
a
b
out
300
charges.
Installing
and
removing
the
battery
pack
Important!
Before
removing
the
batt
ery
from
t
h
e
un
it,
con
n
ec
t
the
AC
ada
p
ter
if
yo
u
wan
t
to
co
ntinu
e
usin
g
you
r
c
o
m
puter.
O
t
herwise,
turn
off
t
h
e
computer
fir
st.
To
in
stall
a
battery
p
ack:
1
A
lign
the
bat
t
er
y
with
the
open
batt
ery
bay;
make
s
u
re
t
h
at
t
h
e
end
with
the
contacts
will
ent
e
r
first
,
and
that
th
e
top
sur
f
ac
e
of
the
bat
t
ery
is
fac
i
ng
up.
2
S
lide
t
h
e
batt
ery
into
t
h
e
ba
tte
ry
b
ay
an
d
ge
ntl
y
pu
sh
un
ti
l
t
h
e
ba
tter
y locks
in
place.

25
To
r
e
move
a
batt
ery
pa
ck:
1
S
lide
t
h
e
batt
ery
release
la
tch
t
o
relea
s
e
the
bat
t
er
y.
2
P
ull
the
batt
ery
from
the
batt
ery
ba
y.
Charging
the
battery
To
charge
the
ba
tte
ry,
fir
st
make
sure
th
at
it
is
co
rrectly
in
stall
e
d
in
th
e
ba
tter
y
bay.
P
l
ug
the
AC
adapter
in
to
the
com
p
uter,
and
connect
to
a
main
s
po
wer
ou
tlet.
Yo
u
can
co
ntin
ue
to
opera
t
e
your
computer
on
AC
po
wer
whi
l
e
yo
ur
b
a
tt
ery
is
c
h
a
r
gi
ng
.
However,
c
harging
th
e
battery
with
the
com
p
uter
turned
off
res
u
l
ts
in
a
signif
ican
tly
fa
ster
cha
r
ge
time.
No
te
:
You
are
advised
t
o
cha
r
ge
the
batter
y
before
retiring
f
o
r
the
d
ay.
C
h
arg
i
ng
t
h
e
ba
tt
ery
overnigh
t
be
f
o
re
travelin
g
en
able
s
y
ou
to
st
art
the
next
day
with
a
fully
c
h
arged
battery.
Checking
the
battery
level
The
Windows
power
m
e
ter
indicate
s
t
h
e
curre
nt
ba
tte
ry
level.
Re
st
the
cursor
ove
r
t
h
e
batt
ery/
powe
r
icon
on
the
tas
k
ba
r
to
se
e
the
batt
ery's
pr
esent
charge
level.
Optim
i
sing
battery
life
Optimizing
ba
tter
y
life
he
lps
yo
u
get
the
mos
t
out
of
batte
ry
op
era
t
i
on
,
pr
ol
on
gi
ng
th
e
ch
arg
e/
r
ec
har
g
e
c
ycle
an
d
imp
r
o
v
in
g
rec
h
a
r
ging
eff
i
c
i
e
n
c
y.
You
are
advi
s
e
d
to
follow
the
s
u
gges
tions
set
ou
t
be
lo
w:
•
P
urchase
a
n
extr
a
bat
t
ery
pack
.
•
U
se
AC
powe
r
whenever
poss
ible
,
re
serving
bat
t
er
y
for
on-the-go
us
e.
•
E
ject
a
PC
C
a
rd
if
i
t
is
no
t
b
e
i
ng
u
s
ed
,
as
it
w
ill
c
on
t
i
nu
e
to
d
r
aw
power
(for
sele
ct
ed
mo
de
l).
•
S
to
re
th
e
battery
p
a
c
k
in
a
c
o
ol,
dry
plac
e.
T
h
e
re
commende
d
tem
p
er
ature
is
10
°C
(50°
F)
to
30
°C
(86°F).
H
i
ghe
r
tempera
t
ur
es
ca
use
t
h
e
batte
ry
to
se
lf-dis
charge
fas
t
er.
•
E
xce
ssive
recha
r
ging
de
crea
se
s
t
h
e
batt
ery
life.
•
L
ook
aft
e
r
your
AC
adapter
and
batte
ry.

26
B
a
tt
ery
-
lo
w
wa
rni
ng
When
usi
ng
ba
tter
y
po
wer
p
ay
atte
nti
on
to
t
h
e
Windo
w
s
po
wer
met
e
r.
Warning:
Connect
the
A
C
ada
p
te
r
as
soon
as
possible
after
the
ba
ttery-lo
w
warn
in
g
a
pp
ears.
Data
will
b
e
l
o
st
if
the
battery
to
be
com
e
fu
lly
d
e
p
l
eted
an
d
the
c
o
m
p
uter
sh
u
t
s
do
wn.
When
the
batt
ery-low
wa
rning
appe
a
rs,
the
r
e
commended
course
of
ac
tio
n
d
e
p
e
nd
s
on
yo
ur
s
i
t
u
at
io
n:
Situ
atio
n
Re
com
m
e
nd
ed
Ac
tion
The
A
C
ad
apter
and
a
po
wer
ou
t
l
et
ar
e
available.
1.
Plu
g
the
A
C
ad
apter
in
t
o
the
co
mp
uter,
an
d
then
connect
to
the
ma
in
s
power
su
ppl
y.
2.
Save
all
nece
ss
ary
files.
3.
Re
s
u
me
wo
rk.
Turn
off
the
computer
if
you
wa
nt
to
rec
h
arge
the
ba
ttery
rapi
dly.
An
ex
tra
fully
c
h
a
r
ge
d
ba
tte
r
y
pack
is
availa
ble.
1.
Save
all
nece
ss
ary
files.
2.
Cl
ose
all
ap
plicatio
ns.
3.
Shu
t
do
wn
the
op
eratin
g
sy
stem
t
o
turn
off
t
h
e
co
mp
uter.
4.
Re
place
th
e
battery
pack.
5.
Tu
r
n
on
the
co
mp
uter
and
resum
e
work.
The
AC
ad
apter
o
r
a
po
wer
ou
tl
et
is
un
avai
lable.
Yo
u
have
no
spare
battery
pack.
1.
Save
all
nece
ss
ary
files.
2.
Cl
ose
all
ap
plicatio
ns.
3.
Shu
t
do
wn
the
op
eratin
g
sy
stem
t
o
turn
off
t
h
e
co
mp
uter.

27
Taking
your
notebook
PC
with
you
This
sectio
n
g
i
ves
y
ou
tips
and
hin
ts
to
con
s
ider
wh
en
m
o
v
i
ng
around
o
r
tra
v
elin
g
with
yo
ur
co
mp
uter.
Disconnecting
from
the
desktop
F
o
llow
these
ste
p
s
to
dis
c
onnect
your
c
o
mputer
from
ext
e
rnal
accessor
i
e
s
:
1
S
ave
an
y
open
files.
2
R
emove
an
y
m
e
dia,
flo
pp
y
d
i
sks
or
compac
t
disks
from
the
drive(s).
3
S
hu
t
do
wn
t
h
e
c
o
m
p
ute
r
.
4
C
lose
the
dis
p
lay
cover.
5
D
isco
nnec
t
t
h
e
co
r
d
from
th
e
AC
adap
t
e
r
.
6
D
isco
nnec
t
th
e
key
bo
ard,
po
intin
g
d
ev
i
c
e,
printer,
external
monitor
and
othe
r
ex
terna
l
dev
i
ces.
7
D
isco
nnec
t
t
h
e
Kensin
gton
lock
if
yo
u
are
u
s
in
g
on
e
to
s
e
cure
the
com
pu
t
er
.
Moving
a
r
ound
Whe
n
you
are
just
mo
ving
within
short
distance
s
,
for
ex
am
ple,
f
r
o
m
you
r
office
desk
to
a
meeting
room.
Preparing
the
computer
Befo
r
e
moving
the
c
o
m
puter,
clo
s
e
and
la
tch
the
display
c
o
ver
to
pla
c
e
it
in
Sle
e
p
mode
.
You
c
a
n
no
w
safely
take
the
co
mp
uter
an
ywh
e
re
yo
u
go
within
the
bu
ild
ing.
To
b
r
in
g
th
e
com
pu
t
er
ou
t
o
f
Sleep
mo
de,
op
en
the
d
i
splay;
then
press
and
release
the
power
button.
If
yo
u
are
takin
g
th
e
com
pu
t
e
r
to
a
clien
t
's
o
ffice
or
a
d
i
fferent
bu
ildin
g,
you
may
choose
to
shut
do
wn
the
co
mp
uter:
Click
on
S
t
art
then
click
on
Shu
t
Do
wn
.
Or
:
You
can
pu
t
the
c
o
m
puter
in
Sle
e
p
mode
by
pressing
<F
n>
+
<F
4
>
.
Then
clo
s
e
and
latch
the
display
.
Whe
n
you
are
ready
to
u
s
e
t
h
e
co
mpu
t
er
again
,
un
latch
an
d
op
en
the
d
i
s
p
lay;
then
press
and
rel
ease
the
po
wer
bu
tton
.

28
No
te:
If
the
Sleep
ind
i
cator
is
o
f
f,
the
computer
has
entered
Hib
e
r
n
ation
mo
de
an
d
is
turn
ed
o
ff
.
If
th
e
po
wer
ind
i
cator
is
off
bu
t
t
h
e
Sleep
in
dica
t
o
r
is
on,
t
h
e
co
mpu
t
er
has
en
t
e
r
e
d
Sleep
mode.
In
both
cases,
pr
e
ss
and
release
the
power
button
to
tur
n
the
co
mp
uter
bac
k
on
.
Note
th
at
t
h
e
co
mp
uter
may
en
t
e
r
Hib
e
rnation
mo
de
after
being
in
S
l
ee
p
mo
de
fo
r
a
p
e
r
i
od
of
ti
m
e.
What
to
bring
to
meetings
If
yo
ur
m
eeting
is
rela
t
i
vely
sho
r
t,
you
pro
b
ab
ly
do
no
t
nee
d
to
b
r
ing
anything
with
you
other
th
an
you
r
com
puter.
If
you
r
meeting
will
b
e
lon
g
er,
o
r
if
yo
ur
battery
is
not
f
u
lly
c
h
arged,
y
ou
ma
y
want
to
bring
the
A
C
adapter
wi
t
h
y
ou
to
plu
g
in
yo
ur
co
mp
uter
in
th
e
meeting
roo
m
.
If
th
e
meeting
room
do
es
no
t
have
an
electrical
ou
tlet,
reduc
e
t
h
e
drain
on
the
battery
by
pu
tt
in
g
the
com
pu
t
er
in
Sl
eep
m
od
e.
Press
<F
n>
+
<F
4>
or
clo
s
e
th
e
disp
lay
c
o
ver
when
ever
you
are
no
t
activel
y
u
s
i
ng
th
e
com
pu
t
er.
To
resum
e,
op
en
the
display
(
i
f
c
l
osed)
,
then
press
and
release
the
power
button.
Taking
the
computer
home
Whe
n
you
are
mo
ving
from
yo
ur
o
f
fice
t
o
your
ho
m
e
or
vice
vers
a.
Preparing
the
computer
After
disconne
cting
the
computer
f
r
om
your
desktop,
follow
these
steps
to
prep
are
t
h
e
co
mp
uter
for
the
trip
hom
e:
•
Ch
eck
that
you
have
rem
o
ved
all
m
e
dia
and
com
p
act
d
i
sks
f
r
o
m
the
drive(s).
Failu
re
to
remo
ve
the
m
e
dia
ca
n
da
mag
e
the
d
r
ive
h
ead.
•
Pack
the
c
o
mp
uter
in
a
p
r
otective
case
that
can
p
r
eve
n
t
the
co
mpu
t
er
f
r
o
m
slidin
g
around
and
cush
ion
it
if
i
t
sh
ou
ld
fall.
Ca
utio
n:
Av
oid
p
a
ckin
g
item
s
nex
t
to
the
to
p
co
ver
o
f
th
e
com
pu
t
er.
Pres
su
re
again
s
t
t
h
e
top
cover
can
dam
a
ge
th
e
screen.
What
to
take
with
you
Unle
ss
you
have
some
items
at
ho
m
e,
take
the
fo
llowin
g
item
s
wit
h
you:
•
AC
a
d
apt
e
r
and
power
cord
•
The
p
r
inted
Quick
Gu
ide

29
Special
considerations
Fo
llow
th
ese
gu
idelin
es
to
pro
t
ect
yo
ur
co
mp
uter
while
travelin
g
to
an
d
fr
om
work:
•
Minim
i
ze
th
e
effects
of
temperature
ch
ang
e
s
by
keepin
g
th
e
com
pu
t
e
r
with
you.
•
If
y
ou
need
to
st
op
for
a
n
extende
d
p
e
r
i
od
of
ti
m
e
a
nd
c
a
nn
ot
c
a
rry
th
e
com
pu
t
er
wit
h
you,
l
eave
t
h
e
co
mpu
t
er
in
the
t
r
un
k
o
f
t
h
e
car
to
av
o
i
d
exposin
g
the
com
puter
to
exc
e
ss
ive
h
eat.
•
Ch
ang
e
s
in
temperature
an
d
hu
m
i
dity
can
ca
use
co
ndensation
.
Allow
th
e
computer
t
o
return
to
room
temperature,
an
d
in
s
p
ect
the
screen
for
con
d
en
sation
b
e
fore
tu
r
n
ing
on
t
h
e
co
mp
uter.
If
the
temperature
ch
ang
e
is
greater
than
10
°C
(18
°
F
),
allo
w
t
h
e
co
mpu
t
er
to
co
me
to
r
o
om
temperature
slowly.
If
po
ss
i
b
le,
leave
the
com
pu
t
er
fo
r
30
min
u
tes
in
a
n
environ
m
en
t
wit
h
a
temperature
b
e
tween
ou
tside
an
d
ro
om
t
e
mpe
r
atu
r
e.
Setting
up
a
home
office
If
y
ou
fre
que
ntly
work
on
yo
ur
co
mp
uter
at
hom
e,
y
ou
m
ay
want
to
pu
rchase
a
second
AC
ada
p
ter
for
use
at
home.
With
a
s
e
con
d
AC
adap
ter,
yo
u
can
avoid
carry
ing
the
ex
tra
weig
ht
to
a
nd
fro
m
ho
me
.
If
yo
u
use
y
ou
r
co
mp
uter
at
hom
e
for
sign
if
i
c
ant
periods
of
time,
you
might
also
want
to
add
an
external
keyboard,
m
on
i
tor
or
m
ou
s
e.
Traveling
with
the
computer
Whe
n
you
are
mo
ving
withi
n
a
larg
er
di
stance,
f
o
r
instanc
e,
fr
om
your
office
bu
ildin
g
to
a
client's
o
f
fice
buil
d
ing
or
traveling
local
l
y.
Preparing
the
computer
Prepare
t
h
e
co
mp
uter
as
if
yo
u
we
r
e
taki
ng
it
ho
me
.
Make
su
r
e
that
th
e
battery
in
the
comput
e
r
i
s
c
h
arged.
Airport
s
e
cu
rity
may
require
y
ou
to
t
u
rn
on
your
com
pu
t
er
when
carr
ying
it
into
the
g
a
te
area.
What
to
take
with
you
Take
the
f
o
llowin
g
item
s
with
you
:
•
AC
a
d
ap
t
e
r
•
S
p
are,
fully-c
harged
battery
pack(s)
•
Add
i
tion
al
prin
t
e
r
d
r
iver
files
if
you
plan
to
u
s
e
a
noth
e
r
printer

30
Special
considerations
In
ad
ditio
n
to
th
e
gu
idelin
es
for
taking
the
co
mp
uter
ho
me,
f
o
llow
th
ese
gu
idelin
es
to
pro
t
ect
yo
ur
co
mp
uter
while
travelin
g:
•
Always
take
the
co
mp
uter
as
carry-on
lug
g
ag
e.
•
If
po
ss
ib
le,
have
th
e
com
pu
t
e
r
in
spected
by
han
d
.
A
i
rport
secu
r
i
t
y
X-ray
mac
hine
s
a
r
e
safe,
but
do
not
put
t
h
e
c
o
m
p
ute
r
th
ro
ugh
a
m
e
ta
l
de
te
c
t
o
r
.
•
Av
oid
exp
o
sing
flop
py
disks
to
h
a
nd
-h
eld
m
e
tal
detecto
r
s.
Traveling
internationally
with
the
computer
Whe
n
you
are
mo
ving
fro
m
country
t
o
country.
Preparing
the
computer
Prepare
th
e
com
pu
t
e
r
a
s
yo
u
wou
l
d
norm
ally
p
r
epare
it
for
traveling
.
What
to
bring
with
you
Brin
g
the
fo
llowin
g
item
s
w
i
t
h
you:
•
AC
a
d
ap
t
e
r
•
Power
co
rds
that
are
ap
pro
p
riat
e
for
the
country
to
which
y
ou
are
travelin
g
•
S
p
are,
fully-c
harged
battery
packs
•
Add
i
tion
al
prin
t
e
r
d
r
iver
files
if
you
plan
to
u
s
e
a
noth
e
r
printer
•
Proo
f
o
f
pu
r
c
hase,
in
case
you
need
t
o
sho
w
it
t
o
custo
ms
officials
•
Interna
t
ional
T
r
avelers
Warranty
pass
port
Special
considerations
Fo
llow
the
same
special
co
nsideratio
ns
as
when
traveling
with
the
com
pu
t
er
.
In
add
i
tion
,
t
h
ese
tips
are
u
s
ef
u
l
when
travel
i
ng
i
n
ternatio
nally:
•
Whe
n
traveling
in
ano
t
her
c
oun
try,
check
that
th
e
lo
cal
AC
voltag
e
an
d
th
e
AC
a
d
ap
t
e
r
po
wer
co
rd
spec
ification
s
a
r
e
com
p
atible
.
If
not,
pu
rch
a
se
a
po
wer
cord
t
h
at
is
com
p
atib
le
with
the
local
A
C
voltag
e.
Do
no
t
u
s
e
conv
e
r
ter
kits
sold
for
applia
nces
to
power
the
computer.
•
If
yo
u
are
u
s
ing
t
h
e
mo
dem
,
ch
eck
if
the
m
od
e
m
an
d
co
nn
ector
is
com
p
atib
le
with
th
e
telecomm
unicatio
ns
sys
t
em
of
the
cou
n
try
you
are
tr
av
elin
g
in
.

31
Securing
your
computer
You
r
c
o
mp
uter
is
a
valua
b
le
in
vestm
ent
that
you
need
to
take
ca
r
e
of.
Learn
ho
w
to
pro
t
ect
and
take
care
o
f
you
r
com
pu
t
er
.
S
e
curity
f
ea
t
ures
include
hardware
and
software
locks
—
a
security
notch
and
password
s
.
Using
a
computer
security
lock
T
h
e
no
te
bo
ok
c
o
me
s
wi
th
a
Ke
ns
in
g
t
on
-
c
o
m
patible
s
e
c
u
rity
slot
for
a
secur
i
ty
lock
.
Wrap
a
com
pu
t
er
secu
rity
lo
ck
cab
l
e
around
an
im
mo
vab
l
e
ob
ject
such
as
a
table
o
r
han
d
le
o
f
a
locke
d
drawer.
In
sert
t
h
e
loc
k
into
t
h
e
notch
an
d
tu
r
n
the
key
to
secu
r
e
th
e
loc
k
.
So
me
k
e
yless
mode
ls
a
r
e
also
available
.
Using
passwords
Passwords
p
r
otect
y
our
co
mp
uter
fro
m
unauthoriz
ed
access.
Setting
these
passwords
creates
s
eve
ral
diff
e
r
ent
leve
ls
of
pro
t
e
c
tion
fo
r
yo
ur
co
mp
uter
and
data:
•
Su
pervisor
Password
prevents
un
auth
or
ized
en
t
r
y
into
the
B
I
OS
utility.
On
ce
set,
you
mu
s
t
en
ter
t
h
is
password
to
ga
in
acc
e
ss
to
the
B
I
OS
utility.
Se
e
"B
IOS
utili
ty"
on
p
a
ge
41.
•
User
Password
sec
u
res
yo
ur
co
mp
uter
aga
i
nst
un
autho
r
ized
use.
C
o
m
b
in
e
th
e
us
e
o
f
th
i
s
pa
ss
word
wi
th
pa
sswo
r
d
ch
e
c
k
po
i
nts
on
bo
ot
-u
p
a
nd
resume
f
r
om
Hi
bernation
for
maximum
secur
i
ty.
•
Password
on
Boot
sec
u
res
y
o
ur
comp
uter
aga
i
nst
un
autho
r
ized
use.
Co
mb
ine
the
use
of
th
is
password
wi
th
password
chec
kpo
i
nts
on
bo
ot-u
p
and
resume
f
r
om
Hi
bernat
ion
for
maximum
secur
i
ty.
Important!
Do
not
forget
y
o
ur
Supervis
or
Password!
If
y
ou
forget
yo
ur
p
a
sswo
rd,
p
l
ease
get
in
touch
with
y
o
ur
dealer
o
r
an
authorized
service
cent
e
r
.

32
Entering
passwords
Whe
n
a
pass
word
is
set,
a
pas
s
word
prompt
appe
ar
s
in
the
ce
nter
of
the
display
screen.
•
Whe
n
the
Supervis
or
Password
is
set,
a
p
r
omp
t
app
ears
when
yo
u
p
r
e
ss
<
F2
>
to
en
t
e
r
th
e
BIOS
utility
at
boo
t-up
.
•
Ty
pe
the
Su
perv
iso
r
Password
an
d
p
r
ess
<
En
t
e
r
>
to
access
the
BIOS
ut
i
lit
y.
If
yo
u
en
ter
t
h
e
pa
ss
wo
r
d
inc
o
rrectly,
a
warnin
g
m
e
ss
ag
e
app
ears.
Try
again
and
press
<
En
ter
>.
•
Whe
n
the
U
s
er
Pass
w
o
r
d
is
set
and
th
e
pass
w
o
rd
on
boot
parameter
is
enab
led,
a
prom
pt
ap
pears
at
bo
ot-u
p.
•
Type
the
User
Pass
w
o
r
d
an
d
p
r
e
ss
<
En
ter
>
to
u
s
e
the
co
mp
uter.
If
you
enter
the
password
incor
r
ec
t
l
y,
a
warn
ing
message
appe
ar
s.
T
r
y
ag
ain
an
d
press
<
En
ter
>.
Important!
Y
ou
hav
e
three
chances
to
enter
a
password.
If
you
fail
to
ent
e
r
the
passwor
d
correctly
afte
r
three
tries,
the
syst
em
ha
lt
s.
Press
and
hold
the
powe
r
button
f
o
r
four
seconds
t
o
shut
down
the
co
mp
uter.
Th
en
turn
on
t
h
e
co
mpu
t
er
again
,
and
try
ag
ain.
Setting
passwords
You
can
set
p
a
ss
wo
rds
usin
g
the
BIOS
u
t
ility.
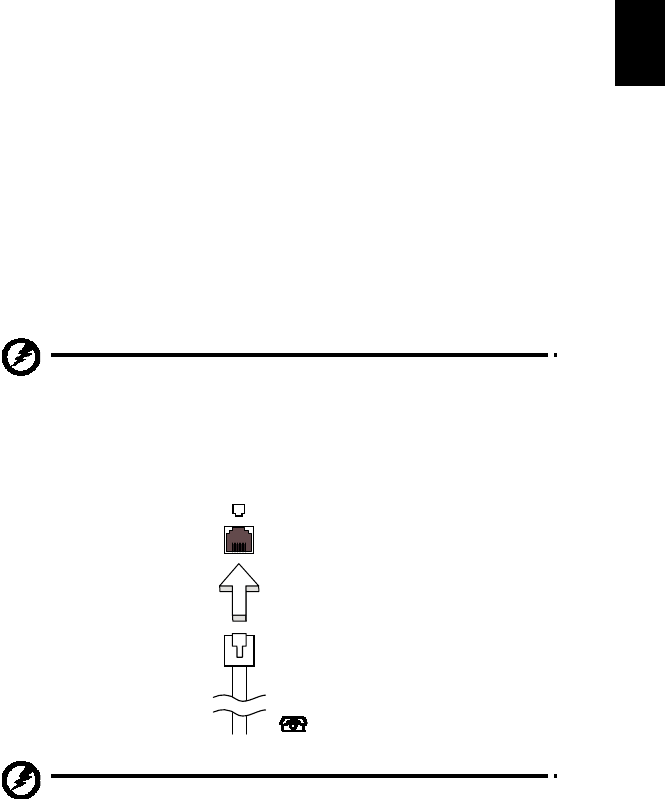
33
Expanding
through
options
Yo
ur
no
te
boo
k
PC
of
fe
rs
yo
u
a
c
o
mp
l
e
te
mo
bi
l
e
c
o
m
p
uti
ng
ex
pe
ri
e
n
ce
.
Connectivity
options
Ports
allow
y
ou
to
c
onnect
pe
r
i
pheral
de
vices
to
your
c
o
mputer
as
you
would
with
a
desktop
PC.
F
o
r
instru
ctions
on
how
to
connec
t
different
external
devices
to
the
com
puter,
read
the
fol
l
owing
section.
Fax/data
modem
(only
for
certain
models)
You
r
c
o
mp
uter
h
a
s
a
bu
ilt-in
V.92
56
Kbp
s
fax/da
t
a
mod
e
m.
(only
for
certain
models)
Warn
in
g!
T
h
is
mo
de
m
po
rt
is
no
t
co
m
p
ati
b
le
with
dig
i
tal
phon
e
lin
es.
P
l
ug
gi
ng
thi
s
mo
de
m
i
n
to
a
d
i
g
i
tal
phon
e
lin
e
w
ill
d
a
m
a
ge
the
mo
de
m.
To
use
the
fax/data
modem
port,
conn
ec
t
a
phone
c
a
ble
from
the
modem
port
to
a
telep
hon
e
jack
.
Warn
in
g!
P
l
ease
ma
ke
su
re
th
at
th
e
cab
l
e
yo
u
use
is
ap
pro
p
ri
ate
for
t
h
e
c
o
untry
i
n
wh
i
c
h
yo
u
a
r
e
work
i
n
g.
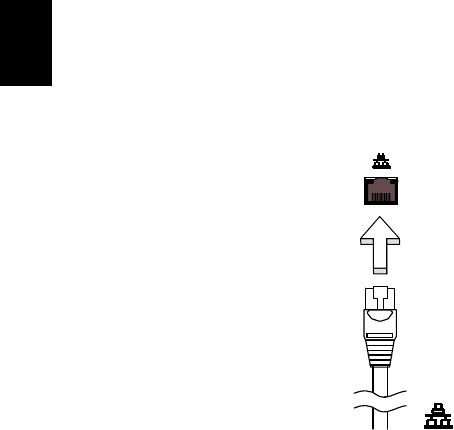
34
Built-in
network
feature
The
bu
ilt-in
n
e
t
w
ork
feature
allo
ws
yo
u
to
con
n
ect
you
r
com
puter
to
an
Ethern
et
-based
netwo
r
k.
To
u
s
e
the
n
e
twork
feature,
co
nn
ect
an
E
t
h
e
rnet
cab
l
e
from
the
Ethe
r
n
et
(RJ
-45)
port
on
the
chassis
of
the
c
o
mp
uter
to
a
network
jac
k
or
hub
on
yo
ur
n
e
twork.
Consumer
Infrared
(CIR)
(o
nly
for
certain
models)
The
c
o
m
puter’s
C
onsu
mer
In
f
r
ared
(C
IR)
po
rt
is
used
to
receive
signals
from
y
o
ur
remo
t
e
con
t
ro
l,
or
o
t
h
e
r
devices
with
CIR
capab
ility.
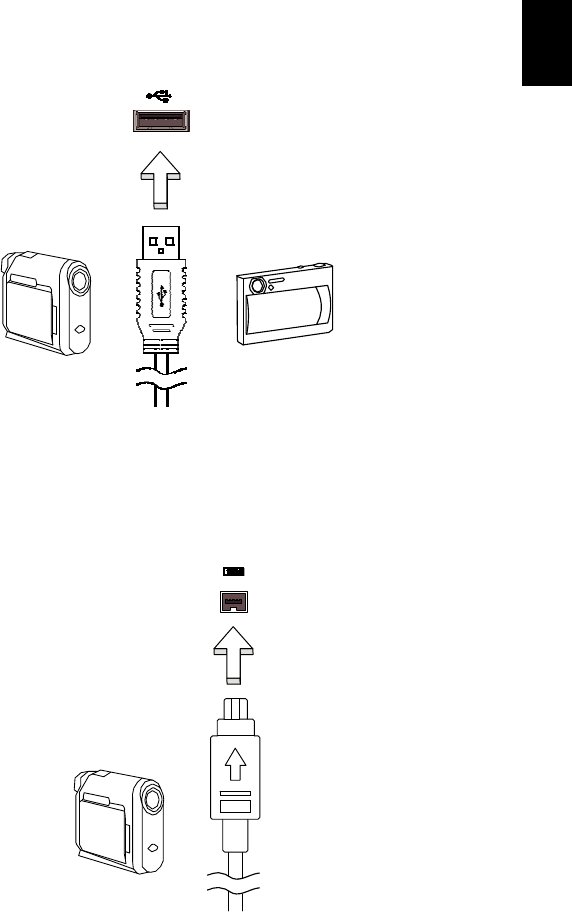
35
Universal
Serial
Bus
(USB)
The
U
S
B
2.0
po
rt
is
a
hig
h
-sp
eed
serial
bu
s
wh
ich
allo
ws
yo
u
to
con
n
ect
USB
peripherals
without
taking
up
preci
ous
syst
e
m
resources.
IEEE
1394
port
(only
for
cert
ain
models)
The
c
o
m
puter's
IEEE
1394
po
rt
a
llows
you
t
o
con
n
ec
t
to
an
IEE
E
1394-
com
p
atib
le
device
lik
e
a
video
camera
o
r
dig
i
t
a
l
camera.
See
you
r
vid
e
o
o
r
dig
i
tal
came
r
a
's
do
cu
men
t
ation
f
o
r
details.
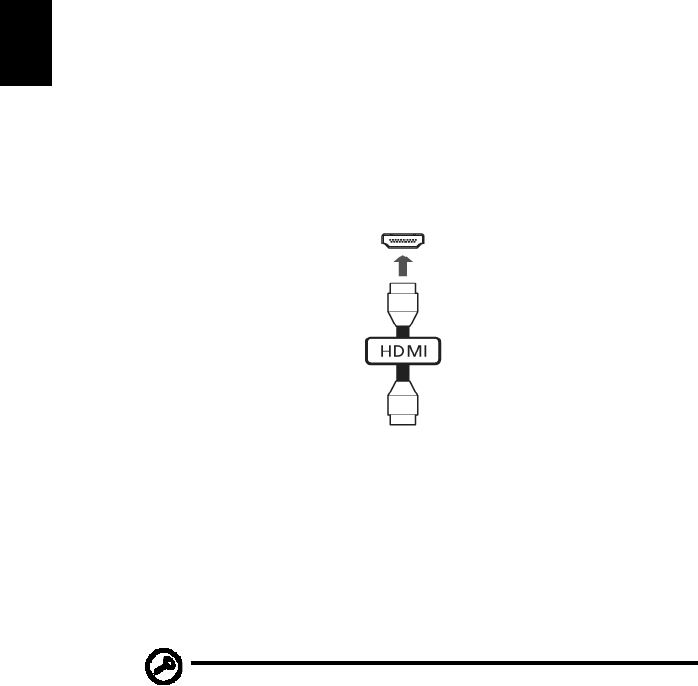
36
High-Definition
Multimedia
Interface
(only
for
certain
models)
HDMI
(H
igh
-
Defin
i
tion
Mu
ltimed
ia
Interface)
is
an
in
du
s
try-sup
po
r
t
ed
,
un
com
p
ressed,
al
l-dig
i
tal
aud
i
o/vide
o
in
t
e
rface
.
HDMI
pro
v
id
es
an
in
terf
ac
e
between
any
co
mp
at
i
b
le
d
i
gital
au
dio
/
vid
e
o
source,
suc
h
as
a
set-top
box,
DVD
player,
an
d
A/V
receiver
an
d
a
co
mp
atible
d
i
gital
au
dio
and
/
or
video
mo
nitor,
such
as
a
dig
i
tal
televis
i
on
(D
TV),
o
ve
r
a
s
i
ng
le
cable.
Use
th
e
HD
M
I
po
rt
on
y
our
com
pu
t
er
to
co
nnec
t
with
hig
h
-e
nd
au
dio
an
d
vid
e
o
equ
i
pm
ent.
Sing
le
cab
l
e
imp
l
emen
tation
a
llows
tidy
setup
and
fas
t
c
onnection.
ExpressCard
(only
for
certain
models)
The
E
x
pr
e
s
sCard
is
the
newest
ve
rsion
of
th
e
PC
C
a
rd.
It
is
a
sm
aller
and
faster
interface
th
at
f
u
rt
h
e
r
enh
a
nc
es
t
h
e
usab
ility
an
d
exp
a
nda
bility
of
your
com
pu
t
er
.
ExpressCards
sup
po
r
t
a
vast
nu
mb
er
of
expan
s
ion
optio
ns,
in
clud
ing
f
l
as
h
mem
o
ry
card
adapters,
TV-tu
n
ers,
Bl
uetoo
t
h
co
nne
ctivity
and
IEEE
1394
B
adapters
.
Exp
r
es
sC
ards
sup
po
r
t
USB
2.0
and
PCI
E
x
p
r
e
ss
ap
plic
atio
ns.
Im
po
rtant
!
Th
ere
are
two
types,
ExpressCa
r
d
/54
an
d
ExpressCard
/
34
(5
4mm
and
34mm
),
eac
h
with
d
i
fferent
fun
c
tion
s
.
N
o
t
all
ExpressCard
slots
wi
ll
support
both
types.
Please
refer
to
your
card's
m
a
nu
al
for
de
t
ails
on
ho
w
to
install
an
d
use
th
e
card,
a
nd
its
f
u
nctions.
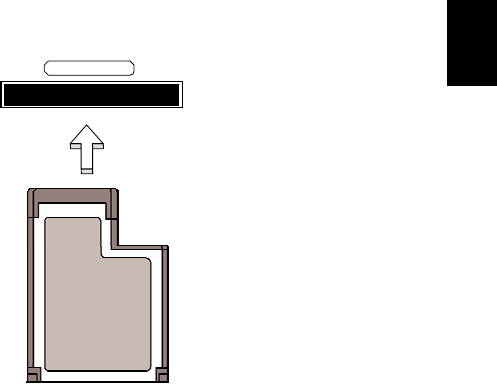
37
Inserting
an
Exp
r
essC
ard
Insert
the
c
a
r
d
into
the
slot
an
d
pu
sh
g
e
ntly
un
til
it
clicks
in
t
o
position.
EXPRESS
CARD
E
j
e
c
ti
ng
an
Expr
essC
ard
Befo
r
e
ejecting
an
ExpressC
ar
d
:
1
E
xit
th
e
app
lication
usin
g
the
card.
2
L
e
f
t-click
on
the
remove
har
d
ware
ic
on
on
the
taskbar
and
st
op
the
card
operation.
3
P
ush
t
h
e
card
gen
t
ly
in
t
o
the
slo
t
and
r
e
l
ease
to
pop
ou
t
the
c
a
rd.
Th
en
pull
the
card
fr
ee
fr
om
the
slot.
In
stal
li
ng
me
mory
F
o
llow
these
ste
p
s
to
ins
t
all
memory:
1
T
urn
off
the
co
mp
uter,
un
plu
g
the
AC
ad
apter
(if
c
onn
ected
)
an
d
remo
ve
the
batt
e
r
y
pa
ck.
The
n
turn
t
h
e
computer
over
to
acc
e
ss
its
bas
e.
2
R
emove
the
screws
from
the
memory
co
ver
;
t
h
en
lift
up
and
remove
the
memory
cover.
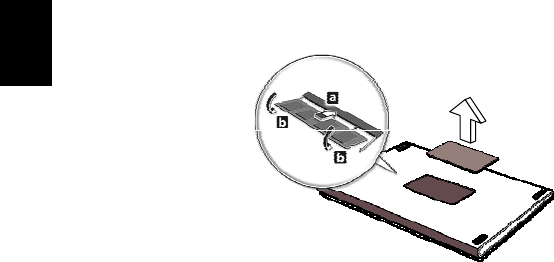
38
3
(a)
Insert
the
me
mory
module
diag
onall
y
into
t
h
e
slot,
then
(b
)
g
e
ntl
y
pr
e
ss
it
do
wn
un
til
it
clicks
in
to
pl
ace.
4
R
eplace
the
memory
cover
an
d
secure
it
with
t
h
e
screw.
5
R
ein
s
t
a
ll
the
b
a
tt
ery
pac
k
,
and
recon
n
ect
th
e
AC
a
dapter.
6
T
urn
on
th
e
co
mpu
t
er.
The
c
o
m
puter
au
toma
t
i
c
a
lly
d
e
tects
and
reconfigur
es
the
total
memor
y
size.
Please
co
nsult
a
qu
ali
f
ied
techn
i
cian
or
co
ntact
you
r
l
o
cal
A
c
er
dealer.

39
Enjoying
TV
with
Window
s
Media
Center
No
te:
Th
is
f
e
at
u
r
e
is
on
ly
av
ailab
l
e
on
certain
mod
e
ls.
Co
mp
uters
th
at
inc
l
ude
Wind
ows
M
e
dia
Cen
t
er
Ed
ition
or
Instan
t
On
Arcade
may
be
used
to
watch
TV
an
d
to
access
v
i
deo
con
t
e
n
t
(v
ia
an
aud
i
o/v
i
deo
con
n
ec
t
i
on
to
an
external
d
evice,
such
as
a
video
camera).
Choos
e
your
input
type
The
avdio
/
video
c
onnection
may
be
eith
er
a
DV
B
-
T
d
i
gital
antenn
a
(f
o
r
s
e
l
e
cted
mo
dels)
or
a
PAL/SECAM
o
r
NTSC
co
nnec
t
o
r
.
Please
refer
to
the
app
r
op
riate
section:
Watching
TV
using
the
optional
DVB-T
(digital
TV)
antenna
(f
or
selecte
d
models)
DVB-
T
dig
i
tal
TV
is
an
in
ternation
a
l
stand
ard
that
is
used
to
trans
mit
terr
e
s
trial
televis
i
on
services
in
d
i
gital
fo
rmat.
It
is
gradually
repla
c
ing
analo
g
b
r
o
a
dc
ast
s
in
m
a
ny
cou
n
tries.
The
DV
B
-
T
d
i
gital
an
t
e
nn
a
c
a
n
be
u
s
ed
with
W
i
ndo
ws
Me
dia
C
e
nte
r
t
o
wa
tc
h
lo
c
a
l
DV
B-
T
di
g
i
ta
l
T
V
bro
a
dc
a
sts
on
yo
ur
no
t
e
bo
ok
PC
.
To
connect
the
digital
antenna
1
P
lug
the
an
tenn
a
cable
into
th
e
RF
jack
o
f
yo
ur
co
mp
uter.
Notebook
RF

40
Not
e:
Do
no
t
t
w
is
t
or
l
oop
t
h
e
ante
nn
a
ca
b
l
e.
Exte
nd
i
ng
t
h
e
ante
nn
a
ca
b
l
e
up
to
20
cm
to
im
prov
e
sig
n
al
qu
a
l
it
y.
Watching
TV
with
an
external
antenna
or
cable
socket
You
may
u
s
e
con
v
en
tion
al
TV
cab
l
es
(co
nn
e
cted
t
o
an
external
antenn
a
or
cab
l
e
socket)
to
watch
TV
on
yo
ur
com
pu
t
er.
Co
nnec
t
in
g
ante
nna
ca
bles
To
c
onn
ect
y
our
ca
bles:
1
P
lug
the
an
tenn
a
con
n
ec
to
r
into
th
e
RF
jack
o
f
yo
ur
co
mp
uter.
2
C
onn
e
c
t
t
h
e
o
t
he
r
e
nd
to
yo
ur
TV
ca
b
l
e,
usi
ng
t
h
e
c
a
bl
e
c
o
nve
r
te
r
i
f
nece
ssary
.
Important!
Please
ensu
r
e
you
u
s
e
the
co
rr
ect
cab
l
e
syst
em
fo
r
you
r
region
bef
o
re
attempting
to
con
n
ect
th
e
antenn
a
cab
l
e.

41
BIOS
utility
The
B
I
OS
u
t
ility
is
a
h
a
rdware
co
nfig
uration
prog
ram
bu
ilt
in
t
o
yo
ur
c
o
mp
ute
r
's
BI
OS
.
Yo
ur
co
m
pu
t
e
r
i
s
a
l
re
a
d
y
pro
p
e
r
l
y
c
on
f
i
g
ure
d
a
nd
op
ti
mi
ze
d,
a
nd
y
ou
do
no
t
need
to
run
th
is
utility.
H
o
wever,
if
yo
u
enco
un
t
e
r
co
nfigur
at
i
on
pro
b
lem
s
,
you
may
need
to
run
it.
To
activat
e
the
BIOS
utility,
p
r
e
ss
<
F2
>
du
ring
the
POST;
while
the
noteb
oo
k
PC
log
o
is
b
e
ing
displayed
.
Boot
sequence
To
s
e
t
the
boo
t
sequence
in
th
e
B
I
OS
u
t
il
it
y,
a
c
tivate
t
h
e
B
I
OS
u
t
ility,
t
h
en
s
e
lect
Bo
ot
from
the
categor
i
e
s
li
s
t
ed
at
the
top
of
th
e
s
c
r
e
en.
Enable
disk-to-disk
recovery
To
en
able
disk-to
-
disk
rec
o
very
(
h
ard
d
i
sk
recovery),
activate
the
B
I
OS
u
t
ilit
y,
then
s
e
lect
Main
fr
om
the
categories
list
e
d
at
the
top
of
the
screen.
Find
D2D
Re
cov
e
ry
at
the
bottom
of
th
e
screen
and
u
s
e
the
<F5>
and
<F6>
keys
to
set
this
va
lue
t
o
En
a
b
l
e
d
.
Password
To
set
a
p
a
ssword
on
b
oot,
ac
t
i
vate
th
e
BIOS
u
t
ility,
th
en
selec
t
Sec
u
rity
from
the
categories
listed
a
t
the
top
of
the
screen.
Find
P
a
sswo
r
d
on
bo
ot:
a
nd
u
s
e
the
<F5>
a
nd
<F
6>
keys
to
enab
le
this
feature.
42
Using
so
ftware
Playing
DVD
movies
No
te:
Th
is
f
e
at
u
r
e
is
on
ly
av
ailab
l
e
on
certain
mod
e
ls.
Whe
n
the
DVD
drive
mo
du
le
is
installed
in
the
optic
al
driv
e
bay
,
y
ou
can
p
l
ay
DVD
m
o
vies
on
yo
ur
co
mpu
t
er.
1
E
ject
the
DVD
disk.
Im
po
rtant!
Whe
n
you
launch
the
DVD
pl
ayer
for
the
f
i
rst
time,
the
program
asks
you
to
enter
the
re
gi
on
c
od
e.
DVD
di
sk
s
a
r
e
di
vi
d
e
d
into
6
region
s.
Once
you
r
DVD
d
r
ive
is
set
to
a
reg
i
on
cod
e,
it
will
play
DVD
d
i
sks
of
that
reg
i
on
onl
y.
Yo
u
can
set
th
e
region
co
de
a
maximum
of
fiv
e
times
(including
the
first
t
i
me),
a
f
ter
which
the
last
region
co
de
set
will
rem
a
in
p
e
rman
ent.
Re
covering
yo
ur
ha
r
d
disk
does
not
reset
the
number
of
time
s
th
e
re
gion
cod
e
has
been
set.
Refer
to
the
table
below
fo
r
DVD
mo
vie
re
gion
co
de
info
r
m
ation
.
2
T
he
DVD
mo
vie
will
auto
matically
pl
ay
after
a
few
seco
nd
s
.
Re
gio
n
cod
e
Co
un
try
or
re
gi
on
1
U
SA
,
Ca
n
a
da
2
E
u
r
ope
,
Mid
d
le
E
ast,
S
o
uth
Africa,
Ja
pan
3
S
outheast
Asia,
Taiwa
n,
Sout
h
Korea
4
L
atin
A
m
erica,
Au
str
a
lia,
New
Zea
land
5
F
ormer
US
SR,
parts
of
Africa,
India
6
Peo
ple's
R
e
pu
blic
o
f
Ch
ina
No
te:
To
chan
ge
th
e
region
co
de,
in
sert
a
DVD
mo
vie
of
a
different
region
into
the
DVD
dr
i
ve.
P
l
ea
s
e
re
fe
r
t
o
t
h
e
on
li
n
e
help
for
more
infor
m
ation.

43
Frequently
asked
questions
The
fo
llowin
g
is
a
list
o
f
po
ssible
s
i
tu
ation
s
th
at
may
arise
du
ring
t
h
e
use
o
f
yo
ur
co
mp
uter.
Easy
solution
s
are
p
r
o
v
id
ed
fo
r
each
on
e.
I
turned
on
the
po
wer
,
but
th
e
comput
er
does
not
start
or
bo
ot
up.
L
o
ok
a
t
the
power
indicator:
•
If
it
is
not
lit,
no
po
wer
is
be
ing
s
upp
lied
to
t
h
e
co
mp
uter.
Ch
eck
the
follo
wing:
•
If
yo
u
are
u
s
ing
on
th
e
battery,
it
may
be
low
an
d
un
able
t
o
po
wer the
co
mp
uter.
Co
nn
ect
the
AC
ada
p
te
r
to
recharge
the
battery
pack.
•
Make
sure
that
the
AC
adap
t
e
r
is
pro
p
erly
plug
ged
into
the
c
o
m
puter
and
to
the
power
ou
tlet.
•
If
it
is
lit,
chec
k
t
h
e
follo
wing
:
•
Is
a
no
n-
boo
table
(
non
-sy
stem)
disk
in
th
e
ex
tern
al
US
B
flo
pp
y
d
r
i
v
e?
Remove
or
replace
it
with
a
s
y
stem
disk
and
press
<Ctrl>
+
<A
lt>
+
<Del
>
to
restart
t
h
e
sy
stem.
Noth
ing
appears
on
th
e
screen.
The
c
o
m
puter's
po
wer
manage
men
t
sy
stem
au
toma
t
i
c
a
lly
b
l
ank
s
th
e
screen
to
sav
e
power.
Press
any
ke
y
to
t
u
rn
the
display
back
on.
If
pressing
a
key
do
es
not
tu
rn
the
d
i
splay
bac
k
on
,
th
ree
thin
gs
m
i
ght
b
e
the
cau
s
e:
•
The
b
r
igh
t
n
e
ss
leve
l
mig
h
t
be
t
oo
lo
w.
Press
<F
n>
+
<
>
(increase)
t
o
adju
st
t
h
e
brig
htness
level.
•
The
display
de
v
i
ce
might
be
set
to
an
external
m
on
i
t
or.
Press
t
h
e
disp
lay
togg
le
hotkey
<Fn>
+
<F
5
>
to
toggle
the
display
b
ack
to
t
h
e
co
mp
uter.
•
If
the
Sleep
in
dic
a
tor
is
lit,
the
co
mp
uter
is
in
Sleep
mo
de.
Press
and
release
the
power
button
to
resume
.
No
aud
i
o
is
hea
r
d
fro
m
th
e
compute
r
.
Ch
eck
the
fo
llowin
g
:
•
The
vo
lume
may
be
m
u
ted
.
In
W
i
ndo
ws,
loo
k
at
the
volu
me
c
ontro
l
(spe
aker)
ico
n
on
the
t
askba
r.
If
it
is
crossed-ou
t
,
c
lick
on
the
ic
on
a
nd
deselec
t
the
Mu
te
all
op
ti
on
.
•
The
vo
lume
level
may
be
to
o
lo
w.
In
W
i
ndo
ws,
loo
k
at
the
volu
me
c
ontrol
icon
on
the
taskbar.
You
can
also
us
e
the
v
o
lume
contro
l
butt
ons
to
adjust
the
volume.

44
•
If
head
ph
one
s
,
earpho
nes
o
r
externa
l
s
p
eakers
are
co
nn
ected
to
t
h
e
line
-
ou
t
port
on
the
c
o
mp
uter,
the
internal
sp
eakers
auto
matically
turn
off.
I
want
t
o
e
j
e
c
t
the
optical
d
r
ive
t
r
ay
w
i
t
hout
tu
rning
on
the
power.
There
is
a
m
e
ch
anical
eject
ho
le
on
the
optical
d
r
ive.
Sim
p
ly
insert
the
tip
of
a
pen
or
p
a
perclip
into
t
h
e
ho
le
and
push
to
e
j
ect
the
tray.
T
h
e
keyb
oard
do
es
not
r
e
spo
nd.
Try
attach
ing
an
external
keyb
o
ard
t
o
a
USB
po
rt
on
the
com
pu
t
er.
If
it
works,
con
t
act
yo
ur
d
ealer
or
an
autho
r
ize
d
servic
e
center
as
th
e
internal
keyb
o
ard
cabl
e
may
be
l
oose.
The
printer
does
no
t
work.
Ch
eck
the
fo
llowin
g
:
•
Make
sure
tha
t
th
e
prin
t
e
r
is
c
onn
ected
to
a
po
wer
ou
t
l
et
a
nd
th
at
it
is
turned
on.
•
Make
sure
tha
t
th
e
prin
t
e
r
c
a
ble
is
co
nn
ected
secu
rely
t
o
the
co
mp
uter's
parallel
port
o
r
a
USB
po
rt
a
nd
th
e
corresponding
por
t
on
the
printer.

45
I
want
t
o
r
e
sto
re
my
comp
uter
to
its
or
iginal
settings
witho
u
t
recovery
CDs.
No
te:
If
you
r
system
is
the
mul
t
ili
ngu
al
vers
io
n,
th
e
op
erating
sy
stem
and
language
y
ou
choos
e
when
y
ou
first
t
u
rn
on
the
system
will
be
th
e
on
ly
op
tio
n
for
futu
re
r
e
covery
op
eratio
ns.
This
recov
e
r
y
process
helps
y
ou
restore
th
e
C:
d
r
ive
with
t
h
e
orig
inal
so
ft
ware
con
t
ent
that
is
in
st
al
led
wh
en
you
pu
r
c
hase
your
notebook
.
F
o
llow
the
ste
p
s
belo
w
to
reb
u
ild
yo
ur
C:
d
r
ive.
(You
r
C:
drive
will
b
e
reforma
t
ted
and
all
da
t
a
will
be
er
a
s
e
d
.)
It
is
im
po
rt
an
t
to
ba
ck
up
all
da
t
a
f
ile
s
b
e
fore
u
s
ing
th
is
op
t
i
on
.
Befor
e
performing
a
r
e
s
t
or
e
ope
r
a
tion,
please
check
the
BIOS
settings.
1
C
heck
to
see
i
f
A
c
er
disk-to-di
sk
rec
o
very
is
enab
led
o
r
no
t
.
2
M
ake
sure
the
D2D
Rec
o
very
setting
in
Main
is
En
ab
led
.
3
E
xit
th
e
BIOS
utility
and
s
ave
c
h
ang
e
s.
The
s
y
stem
will
r
e
boo
t
.
No
te:
To
activat
e
t
h
e
BIOS
utility,
press
<F2>
du
ri
ng
P
O
S
T
.
To
start
the
recov
e
r
y
process:
1
R
estart
the
syst
em.
2
W
hi
le
the
Ac
er
logo
is
sho
w
ing,
press
<Alt>
+
<F10>
at
the
s
a
me
time
t
o
enter
the
r
e
c
o
very
process.
3
R
efer
to
the
onscreen
inst
ruct
ions
to
perform
sy
stem
r
e
c
o
very
.
Im
po
rtant!
T
h
is
feature
o
ccup
i
es
15
GB
in
a
h
i
dd
en
p
a
rtit
i
on
on
yo
ur
h
a
rd
di
sk

46
Requesting
service
International
Travelers
Warranty
(ITW)
You
r
c
o
mp
uter
is
b
a
cked
b
y
an
In
t
e
r
n
ation
a
l
Trave
l
ers
W
a
rr
a
n
ty
(ITW)
that
gives
you
sec
u
rity
and
peace
of
mind
when
trave
ling.
Ou
r
worldwid
e
netwo
r
k
of
service
cen
t
ers
are
th
ere
t
o
give
you
a
help
ing
han
d
.
An
ITW
passpo
r
t
co
mes
with
y
o
ur
com
pu
t
e
r
.
Th
is
passpo
r
t
c
ontain
s
all
yo
u
need
to
know
abo
u
t
t
h
e
IT
W
p
r
ogram
.
A
list
o
f
available,
au
t
horized
ser
vice
cen
t
e
r
s
is
in
th
is
hand
y
boo
klet.
Re
ad
this
p
a
ssport
thor
oughly
.
Always
have
your
ITW
passpo
rt
on
h
a
nd
,
espec
i
ally
w
h
en
yo
u
trave
l,
to
receive
the
benefits
from
our
support
c
e
nters.
Plac
e
yo
ur
pro
o
f-o
f
-pu
r
c
h
ase
in
the
flap
loca
t
e
d
inside
the
front
cover
of
the
ITW
pas
s
port.
If
the
co
un
try
y
ou
are
travel
i
ng
in
do
es
no
t
ha
ve
a
n
Ace
r
-a
ut
ho
ri
ze
d
I
T
W
se
rv
i
c
e
site,
yo
u
ca
n
still
get
in
con
t
act
with
ou
r
offices
wo
r
l
dwide
.
Please
co
nsult
http
://g
lo
bal
.
ace
r
.co
m
.
Before
you
call
Please
h
ave
th
e
follo
wing
inform
ation
av
aila
ble
wh
en
you
call
Ace
r
fo
r
onli
n
e
service
,
and
please
b
e
at
yo
ur
co
mp
uter
when
you
c
a
ll.
With
yo
ur
sup
port,
we
can
r
e
du
ce
t
h
e
am
oun
t
of
time
a
call
takes
an
d
h
e
lp
solve
you
r
prob
lems
efficiently.
If
there
are
error
message
s
or
be
e
p
s
re
po
rte
d
by
y
ou
r
c
o
m
p
ute
r
,
write
th
em
do
wn
as
they
app
ear
on
the
screen
(or
the
nu
mb
er
and
seq
u
en
ce
in
the
case
of
beeps).
You
are
r
e
quired
to
p
r
o
v
ide
the
f
o
llowin
g
informatio
n:
Name:
__________________________________________________________________
Ad
dress
:
_________________________________________________________________
Teleph
on
e
nu
m
b
er:
______________________________________________________
Mach
ine
an
d
m
od
e
l
typ
e:
_________________________________________________
S
e
r
i
al
nu
m
b
e
r:
___________________________________________________________
Date
of
pu
rchase:
________________________________________________________

47
Troubleshooting
This
chapter
shows
y
ou
how
to
deal
with
com
m
on
sys
t
em
pro
b
lem
s
.
Read
it
befo
r
e
calling
a
technician
if
a
pro
b
lem
occu
rs.
So
lution
s
to
m
o
re
serious
p
r
obl
ems
require
opening
up
the
c
o
mp
uter.
Do
no
t
attempt
to
ope
n
the
computer
yourself;
co
ntact
you
r
dealer
o
r
autho
r
ized
service
center
for
assist
a
n
ce.
T
r
oubl
eshooting
t
i
ps
This
no
tebook
PC
inc
o
rpo
r
ates
an
advan
c
ed
design
that
d
e
livers
on
screen
er
ro
r
message
reports
to
help
you
solve
problems.
If
the
sys
t
em
report
s
an
error
message
or
an
erro
r
sy
mptom
oc
curs,
see
"Error
messag
e
s
"
belo
w.
If
the
p
r
ob
lem
can
not
b
e
resolved,
c
ontact
you
r
deale
r
.
See
"R
equ
e
stin
g
service"
on
p
a
ge
46.
Error
messages
If
yo
u
recei
ve
an
error
me
ss
ag
e,
no
te
the
m
e
ss
ag
e
an
d
take
the
corrective
action
.
The
f
o
llowin
g
tab
l
e
lists
t
h
e
error
me
ss
ag
es
in
alph
ab
etical
o
r
d
e
r
toge
t
h
er
with
the
r
e
commended
cour
se
of
action.
Error
messages
Correc
t
ive
ac
tion
CMOS
b
a
tt
er
y
bad
C
on
t
a
c
t
yo
ur
d
e
ale
r
or
an
aut
h
or
i
ze
d
s
e
r
v
i
c
e
ce
n
t
er
.
CMOS
checks
um
er
r
o
r
C
on
t
a
c
t
yo
ur
d
e
ale
r
or
an
aut
h
or
i
ze
d
s
e
r
v
i
c
e
ce
n
t
er
.
Di
sk
boo
t
f
a
il
ur
e
I
nsert
a
sy
stem
(bootabl
e)
dis
k
int
o
th
e
flo
ppy
driv
e
(A:),
th
en
pre
ss
<
Enter
>
t
o
rebo
ot.
Equi
pment
confi
gurati
on
er
ror
Pr
es
s
<F
2>
(du
r
ing
P
O
ST
)
t
o
en
te
r
the
BIO
S
ut
ili
ty,
t
h
e
n
pre
ss
Exit
in
the
B
IO
S
ut
ili
ty
to
reboot
.
Ha
rd
dis
k
0
e
rro
r
C
on
ta
ct
yo
ur
d
ea
l
er
or
a
n
a
u
th
oriz
ed
se
rv
ice
c
e
n
t
e
r
.
Ha
rd
di
sk
0
ex
te
nd
ed
t
y
pe
er
ror
Co
nt
ac
t
yo
ur
d
e
ale
r
or
an
aut
h
or
i
ze
d
s
e
r
v
i
c
e
ce
n
t
er
.
I/O
pa
ri
ty
e
r
ror
C
on
ta
ct
yo
ur
d
ea
l
er
or
a
n
a
u
th
oriz
ed
se
rv
ice
c
e
n
t
e
r
.
Keyboard
error
or
no
keyboar
d
connected
Co
nt
ac
t
yo
ur
d
e
ale
r
or
an
aut
h
or
i
ze
d
s
e
r
v
i
c
e
ce
n
t
er
.
Keyboar
d
i
n
te
rf
ace
e
rr
o
r
C
on
t
a
c
t
yo
ur
d
e
ale
r
or
an
aut
h
or
i
ze
d
s
e
r
v
i
c
e
ce
n
t
er
.
M
e
m
o
r
y
size
mi
sma
tc
h
P
re
ss
<F
2>
(du
r
ing
P
O
ST
)
t
o
en
te
r
the
BIO
S
ut
ili
ty,
t
h
e
n
pre
ss
Exit
in
the
B
IO
S
ut
ili
ty
to
reboot
.
If
y
ou
sti
ll
encount
e
r
probl
e
m
s
aft
e
r
go
ing
t
h
r
ough
t
h
e
c
o
rr
ective
m
e
asu
r
es,
pl
ea
se
contact
your
dealer
or
an
aut
hori
z
ed
s
e
r
vice
cent
e
r
for
a
ssi
sta
nc
e.
Som
e
prob
le
ms
ma
y
be
so
lve
d
usi
ng
t
h
e
BI
OS
uti
lit
y.

48
Regulations
and
safety
notices
FCC
statement
This
d
evice
has
b
een
tested
a
nd
fo
und
to
c
o
mply
wit
h
the
limits
for
a
Cla
ss
B
digital
device
pursuant
t
o
Part
15
of
the
FCC
ru
les.
These
lim
its
are
desig
n
ed
t
o
provid
e
reasona
ble
p
r
o
t
ection
again
st
harmful
interference
in
a
residential
installatio
n
.
This
device
gen
e
rates
,
u
s
es
,
and
can
radiate
radio
freq
u
enc
y
energ
y
and
,
if
no
t
installed
a
nd
u
s
ed
in
acco
r
d
anc
e
with
the
instru
c
tion
s,
may
cau
s
e
harmf
u
l
interference
to
radio
communic
a
tions.
Howe
ver,
the
r
e
is
no
gu
aran
tee
that
interferen
c
e
will
no
t
occ
u
r
in
a
particula
r
installatio
n
.
If
th
is
d
evice
do
es
cause
ha
r
m
ful
interferenc
e
to
radio
or
televis
i
on
receptio
n,
wh
ich
c
a
n
b
e
determin
ed
b
y
tu
rnin
g
the
d
ev
i
ce
off
an
d
on
,
the
user
is
enc
o
ur
aged
to
tr
y
to
c
orrect
th
e
in
terf
eren
ce
b
y
on
e
o
r
more
o
f
the
follo
wing
measures:
•
Reo
r
ient
or
relo
cate
the
rece
ivin
g
an
tenn
a.
•
Increase
th
e
separatio
n
be
t
w
ee
n
the
d
evice
an
d
receiver.
•
Co
nne
ct
th
e
de
vice
into
an
ou
tlet
on
a
circuit
diff
erent
fr
om
that
t
o
which
the
receiver
is
co
nnected.
•
Co
nsult
th
e
dealer
o
r
an
ex
perien
ced
ra
dio/tele
visio
n
technician
for
he
lp.
Notice:
Shielded
cables
All
c
onnection
s
to
o
t
her
c
o
mp
utin
g
d
e
vi
ces
mu
st
be
mad
e
usin
g
sh
ielded
cab
l
es
to
m
a
intain
com
p
lian
c
e
with
FCC
regu
lation
s
.
Notice:
Peripheral
devices
On
ly
periph
erals
(inpu
t
/o
utp
u
t
dev
i
ces,
terminals,
printers
,
et
c
.)
certified
t
o
comply
with
the
Class
B
limits
may
be
at
t
a
ched
to
this
eq
uip
m
en
t.
Op
eration
with
non-certified
peripher
a
l
s
i
s
li
kely
to
result
in
interfer
e
nce
to
r
a
dio
a
nd
T
V
receptio
n.
Caution
Ch
ang
e
s
or
mo
dificatio
n
s
no
t
exp
r
essly
ap
prov
ed
by
the
m
a
nu
fa
cturer
cou
l
d
vo
id
th
e
user's
auth
ority,
which
is
granted
by
the
Fed
e
r
a
l
Com
mu
nica
t
i
on
s
Co
mm
is
sio
n
,
to
ope
r
a
t
e
th
is
com
pu
t
e
r
.
Notice:
Canadian
users
This
C
l
ass
B
dig
i
tal
apparatus
co
mp
lies
with
Ca
nad
i
an
IC
ES-003.

49
Remarque
à
l'intention
des
utilisateurs
canadiens
Cet
ap
pareil
nu
m
é
rique
de
la
c
l
ass
e
B
est
con
f
orme
a
la
no
rme
NMB
-003
du
Can
a
da.
Compliant
with
Russian
regulatory
certification
Modem
notices
(only
for
certain
models)
Notice
for
USA
This
eq
uipment
co
mp
lies
wi
t
h
Part
68
o
f
the
F
CC
rules.
Located
on
the
modem
is
a
lab
e
l
that
co
ntains,
am
ong
o
t
h
e
r
info
r
m
ation,
the
FCC
Regist
ration
Number
and
Rin
g
er
Eq
uivalenc
e
Num
b
er
(REN)
for
this
eq
uip
m
en
t
.
U
pon
requ
est,
yo
u
mu
st
p
r
ovide
th
is
inform
ation
to
yo
ur
telep
hon
e
co
mp
any.
If
yo
ur
telep
hon
e
eq
uipment
ca
uses
harm
to
the
tele
pho
ne
n
e
twork,
the
teleph
on
e
com
p
an
y
m
ay
disco
n
tinu
e
y
our
service
temporarily.
If
po
ss
ib
le,
they
will
no
tify
you
in
ad
va
nce.
B
u
t,
if
advan
c
e
no
tice
is
no
t
practical
,
yo
u
will
b
e
no
t
i
f
i
e
d
as
soo
n
as
po
ssible.
Yo
u
will
also
be
in
forme
d
of
you
r
right
to
f
i
le
a
complaint
with
the
F
C
C.
You
r
telep
hon
e
c
o
mp
any
m
ay
m
ake
ch
ang
e
s
in
its
facilities,
eq
uip
m
ent,
op
erations,
o
r
proc
edures
th
at
cou
l
d
a
ffect
the
p
r
op
er
fu
nctio
n
in
g
of
y
ou
r
equ
i
pm
ent.
If
they
do
,
you
will
be
no
tified
in
advan
c
e
to
g
i
ve
yo
u
an
opportunity
t
o
mai
n
tain
unin
terr
upted
t
e
lephone
s
e
rvice.
If
this
equ
i
pm
ent
sho
u
ld
fail
to
op
erate
p
r
op
erly,
disco
nn
e
ct
the
eq
uip
m
en
t
fr
o
m
th
e
phon
e
line
to
determin
e
if
it
is
cau
s
in
g
th
e
prob
lem.
If
th
e
pro
b
lem
is
with
the
equ
i
pme
n
t,
disco
n
tin
u
e
u
s
e
and
con
t
ac
t
yo
ur
dea
l
er
or
ve
ndor.
Ca
utio
n:
To
red
u
ce
th
e
ris
k
of
fire,
use
on
ly
No.
26
AWG
or
larger
U
L
L
i
ste
d
o
r
C
S
A
Ce
rt
if
i
e
d
T
e
l
e
c
ommu
ni
c
a
ti
on
L
i
ne
C
o
rd
.

50
TBR
21
This
eq
uip
m
en
t
has
bee
n
ap
proved
[Co
un
c
il
Decisio
n
98/48
2/EC
-
"TBR
21"]
f
o
r
sing
le
ter
m
ina
l
con
n
ectio
n
to
th
e
Pub
lic
Switched
Telep
hon
e
Netwo
r
k
(PSTN).
Howe
ve
r,
due
to
diff
erences
between
the
in
dividu
al
PSTNs
pro
v
id
ed
in
differen
t
cou
n
tries,
the
ap
pro
v
al
do
es
no
t,
of
itself,
g
i
ve
a
n
un
con
d
itio
nal
assuran
c
e
o
f
successful
operation
on
every
PSTN
termination
point.
In
t
h
e
event
of
probl
ems,
yo
u
sh
ould
co
ntact
y
our
eq
uip
m
en
t
su
pp
lier
in
the
fir
st
inst
ance.
For
more
info
r
m
ation
abo
u
t
ap
plicab
le
cou
n
tries,
p
l
ease
refer
t
o
Re
gulations
and
safe
t
y
no
tice
s
on
p
a
ge
48.
Notice
for
Australia
F
o
r
safet
y
reasons,
only
c
onnect
hea
d
sets
with
a
telecommunications
com
p
lian
c
e
lab
e
l.
Th
is
i
n
clu
d
es
cu
s
t
o
mer
eq
uip
m
en
t
p
r
evio
usly
labe
lled
permitt
e
d
or
certified.

51
Notice
for
New
Zealand
1
T
he
g
r
ant
o
f
a
Teleperm
i
t
for
any
item
of
termin
al
equ
i
pm
ent
in
dicates
on
ly
th
at
Teleco
m
h
a
s
a
ccepted
that
the
it
em
co
mp
lies
wit
h
min
i
mu
m
con
d
itio
ns
for
co
nnection
to
its
network.
I
t
in
dic
a
te
s
no
en
do
rse
m
en
t
o
f
th
e
pr
od
uc
t
b
y
T
e
l
e
c
om
,
no
r
do
e
s
i
t
p
r
ov
i
d
e
a
n
y
so
rt
o
f
warra
nty
.
Abo
ve
all,
it
provid
es
no
assuran
c
e
that
any
item
will
wo
rk
correctly
in
all
respects
with
an
other
item
of
Tele
p
ermitted
equ
i
pm
ent
of
a
d
i
fferent
mak
e
or
mo
del,
no
r
do
es
it
imp
l
y
t
h
at
any
pro
du
c
t
is
com
p
atible
with
all
o
f
Teleco
m
's
n
e
twork
servic
es
.
2
T
his
eq
uip
m
en
t
is
no
t
ca
pable
,
un
der
all
op
erating
con
d
itio
ns,
of
c
orrect
op
eration
at
the
hig
h
er
sp
eeds
fo
r
which
it
is
designed.
Teleco
m
wil
l
accep
t
no
res
pon
sibility
shou
ld
d
i
fficulties
arise
in
s
u
ch
c
i
rcum
s
t
an
ces.
3
S
ome
parame
t
e
rs
required
for
comp
lian
c
e
with
Te
lecom
'
s
Telepe
r
m
i
t
requ
ir
e
m
en
t
s
are
d
e
pen
d
en
t
on
t
h
e
eq
uipment
(PC)
ass
o
ciated
wit
h
this
device.
The
associa
t
ed
equ
i
pm
ent
sh
all
be
set
to
op
erate
with
in
the
follo
wing
limits
for
co
mp
liance
wi
t
h
Teleco
m
's
Spec
if
ic
ations:
a
T
here
shall
be
no
more
than
10
c
a
ll
attempt
s
to
t
h
e
same
number
within
any
30
m
i
nute
p
e
riod
for
any
sing
le
m
a
nua
l
call
in
it
ia
t
i
on
,
a
nd
b
T
he
e
quip
m
en
t
shall
go
on
-h
oo
k
for
a
p
e
ri
od
o
f
no
t
l
e
ss
th
an
30
secon
d
s
b
e
twe
e
n
the
end
of
on
e
attemp
t
a
nd
th
e
beg
i
nn
ing
of
the
next
call
attempt.
4
S
ome
parame
t
e
rs
required
for
comp
lian
c
e
with
Te
lecom
'
s
Telepe
r
m
i
t
requ
ir
e
m
en
t
s
are
d
e
pen
d
en
t
on
t
h
e
eq
uipment
(PC)
ass
o
ciated
wit
h
this
device.
I
n
or
der
to
operate
within
th
e
limits
fo
r
com
p
lian
c
e
with
Telecom
's
specifica
t
ions,
the
ass
o
ciated
equi
pme
n
t
shall
be
set
to
ens
u
re
that
automatic
ca
lls
t
o
different
numbers
are
spac
ed
suc
h
that
ther
e
is
not
less
than
5
seconds
be
t
w
ee
n
the
e
nd
of
one
call
attempt
and
the
beginning
of
an
other.
5
T
his
eq
uip
m
en
t
s
h
all
no
t
be
set
up
to
m
ake
au
toma
t
i
c
calls
to
Tele
c
om
's
111
Em
ergen
c
y
Service.
6
T
his
d
evice
is
equ
i
pp
ed
with
pu
lse
d
i
aling
while
t
h
e
Telec
om
stan
d
ard
is
DTMF
t
o
ne
d
i
alin
g.
Th
ere
is
no
gu
aran
tee
that
Telec
om
lines
will
alwa
ys
c
o
nti
n
ue
to
su
pp
or
t
pu
l
s
e
di
a
li
n
g.
7
U
se
of
pu
lse
dialing,
wh
en
th
is
e
quip
m
en
t
is
con
n
ected
t
o
the
same
line
as
othe
r
e
quip
m
en
t,
may
giv
e
rise
to
b
e
ll
tinkle
or
no
ise
and
may
also
ca
use
a
false
answer
co
nd
iti
on.
S
h
ould
such
prob
lem
s
o
ccu
r,
th
e
user
sho
u
ld
NO
T
contact
the
telecom
Fault
S
e
rvice.
8
T
his
eq
uip
m
en
t
may
no
t
provide
fo
r
th
e
effective
han
d
-over
of
a
call
to
another
de
v
i
ce
connected
t
o
the
same
line
.
9
U
nd
er
po
wer
failure
co
nd
iti
ons
th
is
a
ppli
a
nce
m
ay
not
op
erate.
Plea
se
ensur
e
t
h
at
a
separate
telephone,
no
t
d
e
p
e
nd
e
n
t
on
l
o
c
a
l
power,
i
s
available
fo
r
emerg
e
ncy
use.

52
LCD
pixel
statement
The
L
C
D
un
it
is
p
r
od
uced
with
h
i
gh-
precisio
n
m
a
nu
fa
cturing
techn
i
qu
es.
Nevertheless,
some
pixels
ma
y
occasion
ally
misfire
or
ap
pear
as
b
l
ack
o
r
red
dots.
This
has
no
eff
e
c
t
on
the
record
ed
im
age
an
d
do
es
not
constitute
a
mal
f
un
ctio
n.
Radio
device
regulatory
notice
No
te
:
Be
low
regu
latory
info
r
m
ation
is
for
mo
dels
with
wir
e
less
LAN
and
/
or
B
l
ueto
oth
on
ly
.
General
This
product
complie
s
with
the
radio
fre
quency
and
safety
standards
of
any
cou
n
try
or
region
i
n
wh
ich
it
h
a
s
been
ap
prov
ed
fo
r
wireless
use.
De
pen
d
ing
on
c
o
nfi
g
ur
a
t
i
on
s
,
t
h
i
s
pr
od
uc
t
ma
y
o
r
ma
y
no
t
c
on
t
a
i
n
wi
re
l
e
ss
ra
di
o
d
e
vi
c
e
s
(su
c
h
as
wireless
LAN
and
/
or
Bl
uetoo
t
h
m
odu
le
s).
Below
information
is
for
products
with
suc
h
de
v
i
ce
s
.
Declaration
of
Confor
mity
for
EU
countries
Hereby,
Ac
er,
declares
th
at
t
h
is
no
t
e
boo
k
PC
series
is
in
com
p
lian
c
e
with
t
h
e
essential
req
u
ireme
n
ts
and
other
relevan
t
p
r
ovision
s
o
f
Directive
1999/5/EC
.
List
of
applicable
countries
EU
m
e
mb
er
s
t
ates
as
o
f
Ju
ly
2009
are:
Be
lgiu
m,
Den
mark,
G
e
rman
y,
G
r
ee
ce,
S
p
ain,
F
r
ance,
Ireland,
Italy,
L
u
xe
mb
ourg,
t
h
e
Netherlands
,
Au
stria,
Portugal,
Fin
l
and
,
Sweden
,
United
Kingdom
,
Eston
i
a,
Latvia,
Lithu
a
nia,
Polan
d
,
Hu
ng
ary,
Czech
Rep
ublic
,
Slo
va
k
Rep
ub
lic,
Slovenia,
C
y
p
r
us,
Malta,
Bu
lgaria
a
nd
Ro
man
i
a.
Usag
e
allowed
in
the
c
oun
tries
of
Eu
r
o
pea
n
Un
ion
,
as
well
a
s
Norway,
Switzerland
,
Icelan
d
an
d
Liech
t
enstein.
Th
is
device
m
u
st
be
used
in
str
ic
t
accor
d
anc
e
with
the
r
e
gulations
and
co
nstraints
in
the
country
of
use.
For
further
inform
ation
,
p
l
ease
c
ontac
t
loc
a
l
o
ff
i
c
e
in
th
e
co
un
tr
y
of
use.
Please
see
http://e
c.europa.eu/enterprise/rtte/
im
plem.htm
for
t
h
e
latest
country
list
.
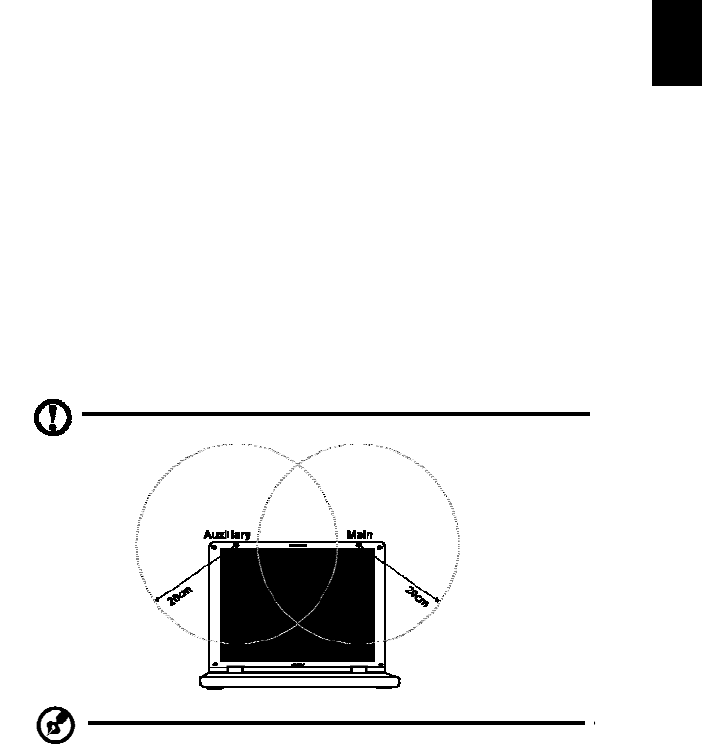
53
The
FC
C
RF
safety
req
u
irem
en
t
The
rad
iated
ou
tpu
t
po
wer
of
the
wirele
ss
LAN
Min
i
PCI
C
ard
an
d
B
luetoo
t
h
card
is
far
below
the
F
CC
radio
frequen
cy
expos
u
re
limits.
Neve
rthel
es
s,
the
no
t
e
boo
k
PC
series
shal
l
be
used
in
s
u
ch
a
manner
that
th
e
po
tential
fo
r
hu
man
con
t
act
du
ri
ng
norm
al
op
eration
i
s
m
i
nim
i
ze
d
as
follo
ws:
FCC RF Radiation Exposure Statement:
1. This Transmitter must not be co-located or operating in conjunction with
any other antenna or transmitter.
2. This equipment complies with FCC RF radiation exposure limits set forth
for an uncontrolled environment.
This device was tested for typical lap held operations with the device
contacted directly to the human body to the back side of the notebook
computer. To maintain compliance with FCC RF exposure compliance
requirements, avoid direct contact to the transmitting antenna during
transmitting.
1
U
sers
are
reques
ted
to
fol
l
ow
the
RF
s
a
f
e
ty
instruc
t
ions
on
wireless
option
devices
tha
t
a
r
e
i
n
clu
d
ed
in
the
user's
man
u
al
o
f
each
R
F
optio
n
d
evice.
No
te:
The
wireless
Mi
ni
PC
I
adap
ter
impl
emen
t
s
a
t
r
an
smission
diversity
function.
The
f
u
nction
do
es
no
t
emit
rad
io
frequ
enc
ies
simu
lt
a
n
eo
usly
f
r
o
m
bo
th
an
tenn
as.
On
e
of
the
antenn
as
is
selected
a
u
tom
atically
or
m
anua
lly
(by
users)
to
ensure
good
qu
a
li
t
y
ra
di
o
c
ommu
ni
c
a
ti
on
.
2
An
i
m
pro
p
er
in
s
t
alla
t
io
n
o
r
un
autho
r
ized
use
m
ay
c
a
use
h
a
rmful
interferenc
e
to
radio
communica
t
ions.
Al
s
o
any
tampering
of
the
i
n
ternal
antenn
a
will
vo
id
the
FCC
certification
and
your
warran
t
y.

54
Canada
—
Low
-
power
license-exempt
radio
communication
devi
ces
(RSS-210)
Exposure
of
humans
to
RF
fields
(RSS-102)
The
noteb
oo
k
PC
series
em
plo
y
s
lo
w
gain
integ
r
al
antenn
as
tha
t
do
no
t
em
it
RF
field
in
exc
e
ss
o
f
Health
C
a
nada
lim
its
for
t
h
e
general
population;
cons
ult
S
a
f
e
ty
Code
6,
obtainable
from
Health
Cana
da's
website
at
www.hc-sc.gc.c
a/rpb.
LCD
pane
l
er
gonomi
c
specificati
o
ns
De
si
gn
vi
e
w
i
ng
d
i
sta
nc
e
500
mm
Desig
n
in
clinatio
n
an
gle
0.0°
Desig
n
azimu
t
h
an
gle
90.0°
Viewing
d
i
r
e
ction
ran
g
e
c
l
ass
C
lass
IV
Screen
tilt
an
gle
85.0°
Desig
n
screen
illum
i
nan
c
e
•
Ill
umin
anc
e
level:
[250
+
(2
50cos
α
)]
lx
wh
ere
α
=
85°
•
C
o
lo
r:
So
urce
D65
R
e
fl
ection
class
of
L
C
D
p
a
nel
(
positiv
e
an
d
neg
a
tive
po
larity)
•
Ordinary
LCD
:
Class
I
•
Pro
t
ective
LC
D:
Class
III
Image
polarity
Both
R
e
fe
re
nc
e
w
h
i
t
e:
Pre-s
e
ttin
g
o
f
lu
min
a
nc
e
and
co
lor
temperature
@
6500K
(
t
ested
un
der
BM
7)
•
Yn
•
u'
n
•
v'n
Pixel
fault
c
l
ass
C
lass
II