Acer orporated CWX1428 DLP Projector User Manual Acer K138ST A UM English
Acer Incorporated DLP Projector Acer K138ST A UM English
UserManual.wiki
>
Acer orporated
>
CWX1428 User Manual
User Manual.pdf
Navigation menu
Upload a User Manual
Namespaces
Wiki Guide
HTML
PDF
Info
Views
User Manual
Discussion / Help
Navigation


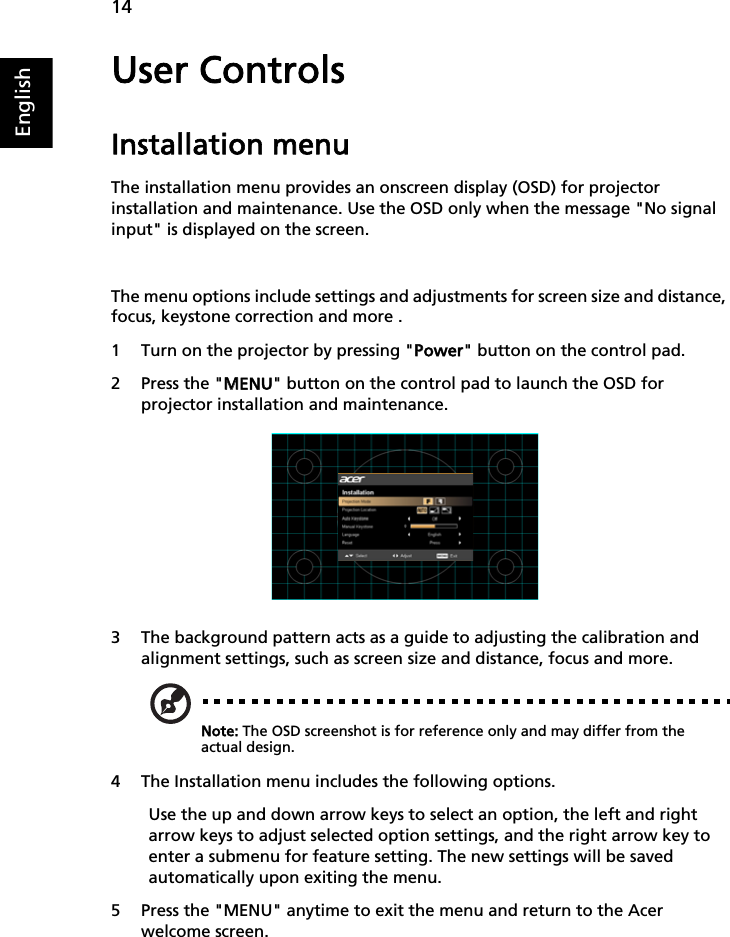

![22English3 Partial, scrolling or incorrectly displayed image (for notebooks)•For an incorrectly displayed image:•Follow the steps for item 2 (above) to adjust the resolution of your computer.•Press the toggle output settings. Example: [Fn]+[F4], Compaq [Fn]+[F4], Dell [Fn]+[F8], Gateway [Fn]+[F4], IBM [Fn]+[F7], HP [Fn]+[F4], NEC [Fn]+[F3], Toshiba [Fn]+[F5]•If you experience difficulty changing resolutions or your monitor freezes, restart all equipment including the projector.4 The screen of the notebook computer is not displaying your presentation•If you are using a Microsoft® Windows® based notebook: Some notebook PCs may deactivate their own screens when a second display device is in use. Each has a different way to be reactivated. Refer to your computer's manual for detailed information.•If you are using an Apple® Mac® OS based notebook: In System Preferences, open Display and select Video Mirroring "On".5 Image is unstable or flickering•Adjust the "Tracking" to correct it. Refer to the "Image" section for more information.•Change the display color depth settings on your computer.6 Image has vertical flickering bar•Use "Frequency" to make an adjustment. Refer to the "Image" section for more information.•Check and reconfigure the display mode of your graphics card to make it compatible with the projector.7 Image is out of focus•Adjust the focus ring on the projector lens.•Make sure the projection screen is within the required distance of 1.8~10.6 feet (0.6~3.2 meters) from the projector. Refer to the "How to Get a Preferred Image Size by Adjusting Distance and Zoom" section for more information.8 Image is stretched when displaying a "widescreen" DVD titleWhen you play a DVD encoded in anamorphic or 16:9 aspect ratio you may need to adjust the following settings:•If you play a 4:3 format DVD title, please change the format to 4:3 in the projector OSD.•If the image is still stretched, you will also need to adjust the aspect ratio. Set up the display format to 16:9 (wide) aspect ratio on your DVD player.•If you play an Letterbox(LBX) format DVD title, please change the format to Letterbox(LBX) in the projector OSD.](https://usermanual.wiki/Acer-orporated/CWX1428/User-Guide-2604682-Page-32.png)
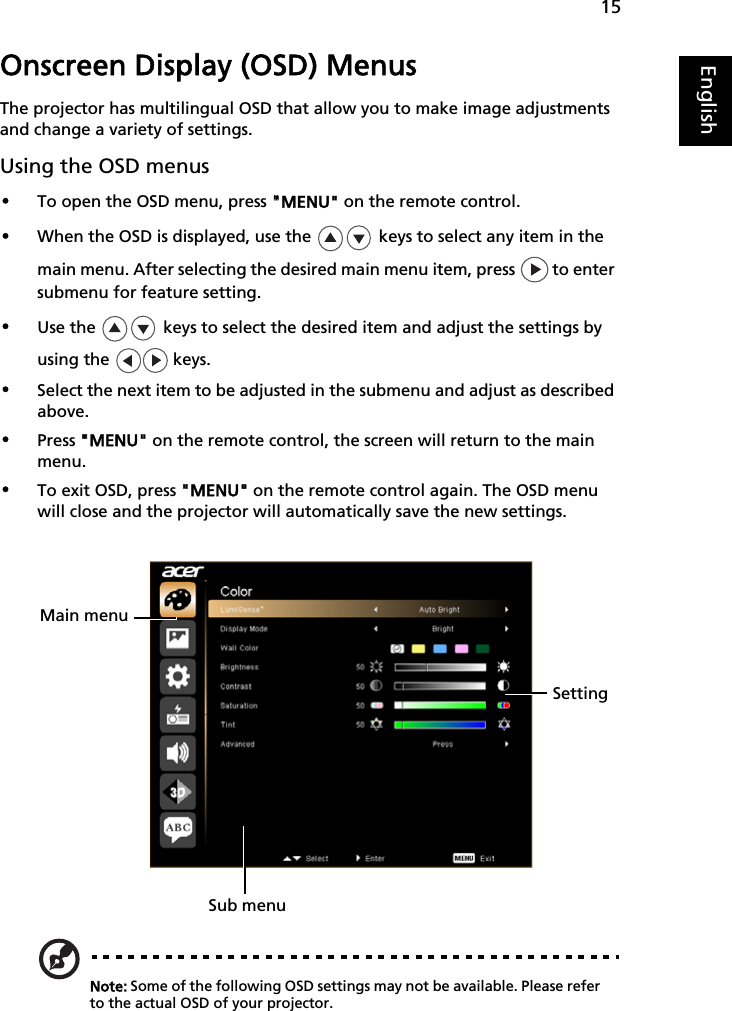
![27EnglishCompatibility modesA. VGA Analog 1 VGA Analog - PC SignalModes Resolution V.Frequency [Hz] H.Frequency [KHz]VGA 640x480 60 31.5640x480 75 37.5SVGA 800x600 56 35.1800x600 60 37.9800x600 75 46.9800x600 120 77.4XGA 1024x768 60 48.41024x768 70 56.51024x768 75 60.01024x768 120 99.0SXGA 1152x864 75 67.51280x1024 60 64.01280x1024 75 80.0QuadVGA 1280x960 60 60.01280x960 75 75.2SXGA+ 1400x1050 60 65.3PowerBook G4 640x480 60 31.4PowerBook G4 640x480 66.6 (67) 34.9PowerBook G4 800x600 60 37.9PowerBook G4 1024x768 60 48.4PowerBook G4 1152x870 75 68.7PowerBook G4 1280x960 75 75.0i Mac DV (G3) 1024x768 75 60.0](https://usermanual.wiki/Acer-orporated/CWX1428/User-Guide-2604682-Page-37.png)
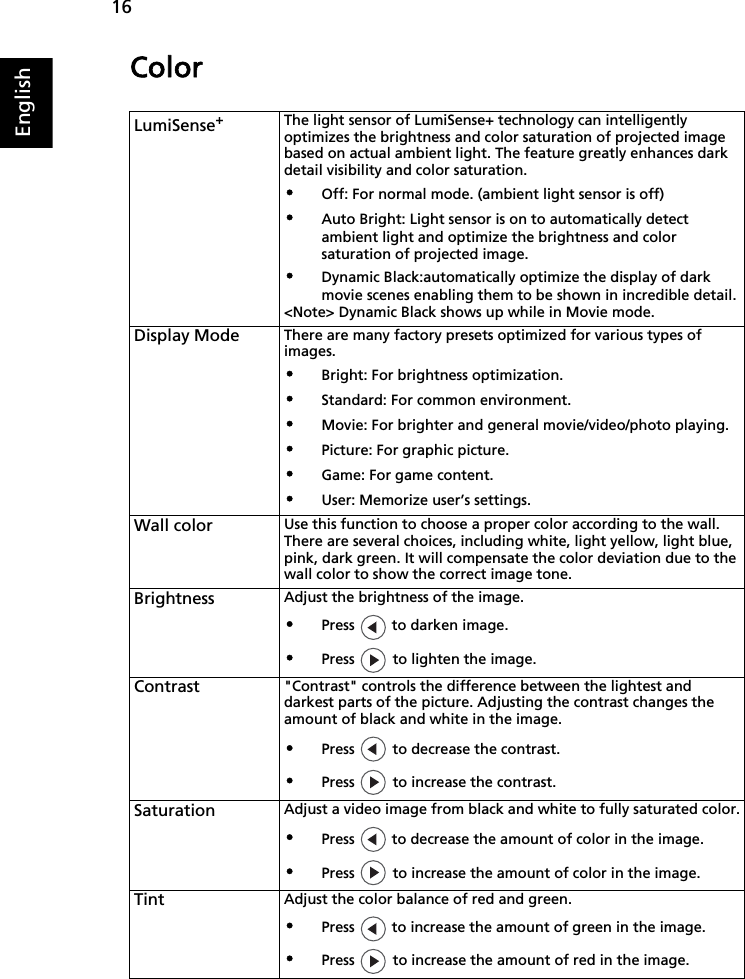
![28English2 VGA Analog - Extended Wide timing3 VGA Analog - Component SignalB. HDMI Digital 1 HDMI - PC SignalModes Resolution V.Frequency [Hz] H.Frequency [KHz]WXGA 1280x768 60 47.81280x768 75 60.31280x720 60 44.81280x800 60 49.61280x800 120 101.51440x900 60 59.9WSXGA+ 1680x1050 60 65.31920x1080 (Reduced Blanking Timing) 60 66.61366x768 60 47.7Modes Resolution V.Frequency [Hz] H.Frequency [KHz]480i 720x480 59.94(29.97) 15.7576i 720x576 50(25) 15.6480p 720x480 59.94 31.5576p 720x576 50 31.3720p 1280x720 60 45.0720p 1280x720 50 37.51080i 1920x1080 60 (30) 33.81080i 1920x1080 50 (25) 28.11080p 1920x1080 23.97/24 27.01080p 1920x1080 60 67.51080p 1920x1080 50 56.3Modes Resolution V.Frequency [Hz] H.Frequency [KHz]VGA 640x480 60 31.5640x480 75 37.5SVGA 800x600 56 35.1800x600 60 37.9800x600 75 46.9800x600 120 77.4XGA 1024x768 60 48.41024x768 70 56.51024x768 75 60.0](https://usermanual.wiki/Acer-orporated/CWX1428/User-Guide-2604682-Page-38.png)
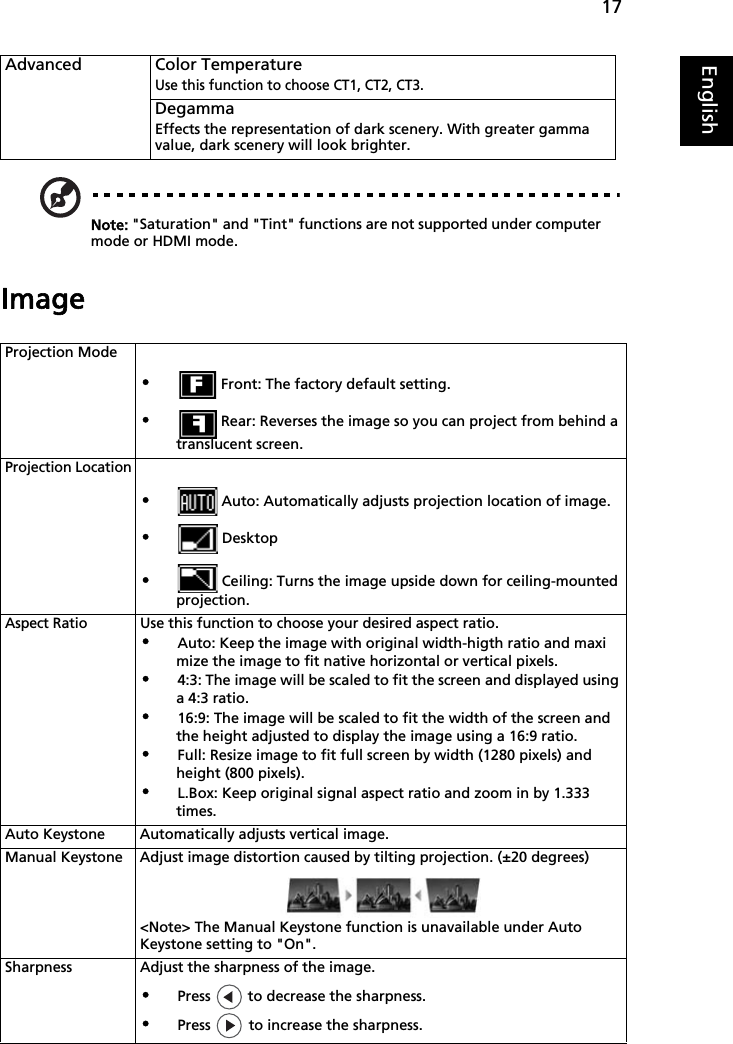
![29English2 HDMI - Extended Wide timing1024x768 120 99.0SXGA 1152x864 70 63.81152x864 75 67.51280x1024 60 64.01280x1024 75 80.0QuadVGA 1280x960 60 60.0SXGA+ 1400x1050 60 65.3PowerBook G4 640x480 60 31.4PowerBook G4 640x480 66.6 (67) 34.9PowerBook G4 800x600 60 37.9PowerBook G4 1024x768 60 48.4PowerBook G4 1152x870 75 68.7i Mac DV (G3) 1024x768 75 60.0Modes Resolution V.Frequency [Hz] H.Frequency [KHz]WXGA 1280x768 60 47.81280x768 75 60.31280x720 60 44.81280x800 60 49.61280x800 120 101.51440x900 60 59.9WSXGA+ 1680x1050 60 65.31920x1080 (Reduced Blanking Timing) 60 66.61366x768 60 47.7](https://usermanual.wiki/Acer-orporated/CWX1428/User-Guide-2604682-Page-39.png)
![30English3 HDMI - Video SignalModes Resolution V.Frequency [Hz] H.Frequency [KHz]480i 720x480(1440x480) 59.94 (29.97) 15.7576i 720x576(1440x576) 50 (25) 15.6480p 720x480 59.94 31.5576p 720x576 50 31.3720p 1280x720 60 45.0720p 1280x720 50 37.51080i 1920x1080 60 (30) 33.81080i 1920x1080 50 (25) 28.11080p 1920x1080 23.97/24 27.01080p 1920x1080 60 67.51080p 1920x1080 50 56.3Graphic source monitor range limitsHorizontal scan rate: 30k~102kHzVertical scan rate: 50~120HzMax. pixel rate 150MHz](https://usermanual.wiki/Acer-orporated/CWX1428/User-Guide-2604682-Page-40.png)