Acer orporated JMS300 Smart HandHeld User Manual Acer S300 UM EN
Acer Incorporated Smart HandHeld Acer S300 UM EN
Contents
- 1. Users Manual-1
- 2. Users Manual-2
- 3. Users Manual
Users Manual-1

1
Acer ICONIA SMART
User Guide

2
© 2011 All Rights Reserved
Acer ICONIA SMART User Guide
Model: S300
Original issue: 4/2011
Acer ICONIA SMART
Model number: __________________________________
Serial number: ___________________________________
Date of purchase: ________________________________
Place of purchase: ________________________________

3
Table of Contents
End User License Agreement
Features and functions . . . . . . . . . . . . . . . . . . . . . . . . . . . . . . . . . . . . . . . . . . .8
Product registration . . . . . . . . . . . . . . . . . . . . . . . . . . . . . . . . . . . . . . . . . . . . .8
Setting Up
Unpacking your smartphone . . . . . . . . . . . . . . . . . . . . . . . . . . . . . . . . . . . . . . 9
Getting to know your smartphone . . . . . . . . . . . . . . . . . . . . . . . . . . . . . . . . .9
Installing a SIM and optional microSD Card . . . . . . . . . . . . . . . . . . . . . . . . . 11
Installing or removing the battery . . . . . . . . . . . . . . . . . . . . . . . . . . . . . . . . . 12
Using your Smartphone
Turning on for the first time . . . . . . . . . . . . . . . . . . . . . . . . . . . . . . . . . . . . . 13
Locking your smartphone . . . . . . . . . . . . . . . . . . . . . . . . . . . . . . . . . . . . . . . . 13
Using the touchscreen . . . . . . . . . . . . . . . . . . . . . . . . . . . . . . . . . . . . . . . . . .14
The Lock screen . . . . . . . . . . . . . . . . . . . . . . . . . . . . . . . . . . . . . . . . . . . . . . . .16
The Home screen . . . . . . . . . . . . . . . . . . . . . . . . . . . . . . . . . . . . . . . . . . . . . . .17
Managing contacts
Managing your contacts . . . . . . . . . . . . . . . . . . . . . . . . . . . . . . . . . . . . . . . . .23
Making Calls
Before making a call . . . . . . . . . . . . . . . . . . . . . . . . . . . . . . . . . . . . . . . . . . . . 25
Making a call . . . . . . . . . . . . . . . . . . . . . . . . . . . . . . . . . . . . . . . . . . . . . . . . . .25
The voice call screen . . . . . . . . . . . . . . . . . . . . . . . . . . . . . . . . . . . . . . . . . . . . 27
Internet Calling
Adding an Internet calling account . . . . . . . . . . . . . . . . . . . . . . . . . . . . . . . . 29
Editing or removing an Internet calling account . . . . . . . . . . . . . . . . . . . . . 29
Using Internet calling . . . . . . . . . . . . . . . . . . . . . . . . . . . . . . . . . . . . . . . . . . .29
Receiving Internet calls . . . . . . . . . . . . . . . . . . . . . . . . . . . . . . . . . . . . . . . . . .29
Calling a contact’s Internet calling address . . . . . . . . . . . . . . . . . . . . . . . . . .29
Calling a phone number using Internet calling . . . . . . . . . . . . . . . . . . . . . .29
Messaging
Creating a new message . . . . . . . . . . . . . . . . . . . . . . . . . . . . . . . . . . . . . . . . . 30
Replying to a message . . . . . . . . . . . . . . . . . . . . . . . . . . . . . . . . . . . . . . . . . . 31
MMS messages . . . . . . . . . . . . . . . . . . . . . . . . . . . . . . . . . . . . . . . . . . . . . . . .31
Social messages . . . . . . . . . . . . . . . . . . . . . . . . . . . . . . . . . . . . . . . . . . . . . . . .32

4
Social events . . . . . . . . . . . . . . . . . . . . . . . . . . . . . . . . . . . . . . . . . . . . . . . . . .32
Going online
Browsing the Internet . . . . . . . . . . . . . . . . . . . . . . . . . . . . . . . . . . . . . . . . . . .33
Setting up your Google email . . . . . . . . . . . . . . . . . . . . . . . . . . . . . . . . . . . .34
Composing an email . . . . . . . . . . . . . . . . . . . . . . . . . . . . . . . . . . . . . . . . . . . .34
Setting up Email . . . . . . . . . . . . . . . . . . . . . . . . . . . . . . . . . . . . . . . . . . . . . . .35
Acer SocialJogger . . . . . . . . . . . . . . . . . . . . . . . . . . . . . . . . . . . . . . . . . . . . . .36
Maps, Navigation, Places and Latitude . . . . . . . . . . . . . . . . . . . . . . . . . . . . .36
urFooz . . . . . . . . . . . . . . . . . . . . . . . . . . . . . . . . . . . . . . . . . . . . . . . . . . . . . . .37
Spinlets . . . . . . . . . . . . . . . . . . . . . . . . . . . . . . . . . . . . . . . . . . . . . . . . . . . . . . .38
Using the Camera
Camera icons and indicators . . . . . . . . . . . . . . . . . . . . . . . . . . . . . . . . . . . . . . 41
Taking a photo . . . . . . . . . . . . . . . . . . . . . . . . . . . . . . . . . . . . . . . . . . . . . . . .42
Shooting a video . . . . . . . . . . . . . . . . . . . . . . . . . . . . . . . . . . . . . . . . . . . . . . .43
Viewing photos and videos . . . . . . . . . . . . . . . . . . . . . . . . . . . . . . . . . . . . . .43
Geotagging . . . . . . . . . . . . . . . . . . . . . . . . . . . . . . . . . . . . . . . . . . . . . . . . . . . 44
Advanced Settings
Acer Settings . . . . . . . . . . . . . . . . . . . . . . . . . . . . . . . . . . . . . . . . . . . . . . . . . .45
Putting your smartphone in Airplane mode . . . . . . . . . . . . . . . . . . . . . . . . . 45
Adjusting settings . . . . . . . . . . . . . . . . . . . . . . . . . . . . . . . . . . . . . . . . . . . . . .45
Connecting to a PC . . . . . . . . . . . . . . . . . . . . . . . . . . . . . . . . . . . . . . . . . . . . . 49
FM radio . . . . . . . . . . . . . . . . . . . . . . . . . . . . . . . . . . . . . . . . . . . . . . . . . . . . . .50
Multimedia playback . . . . . . . . . . . . . . . . . . . . . . . . . . . . . . . . . . . . . . . . . . .50
Restoring to factory settings . . . . . . . . . . . . . . . . . . . . . . . . . . . . . . . . . . . . .54
Accessories and Tips
Using the headset . . . . . . . . . . . . . . . . . . . . . . . . . . . . . . . . . . . . . . . . . . . . . .55
Using a Bluetooth headset . . . . . . . . . . . . . . . . . . . . . . . . . . . . . . . . . . . . . . .55
HDMI and 720P output . . . . . . . . . . . . . . . . . . . . . . . . . . . . . . . . . . . . . . . . . . 55
Inserting a microSD Card . . . . . . . . . . . . . . . . . . . . . . . . . . . . . . . . . . . . . . . .56
Appendix
FAQ and troubleshooting . . . . . . . . . . . . . . . . . . . . . . . . . . . . . . . . . . . . . . . . 57
Other sources of help . . . . . . . . . . . . . . . . . . . . . . . . . . . . . . . . . . . . . . . . . . . 58
Warnings and precautions . . . . . . . . . . . . . . . . . . . . . . . . . . . . . . . . . . . . . . .58
Emergency calls . . . . . . . . . . . . . . . . . . . . . . . . . . . . . . . . . . . . . . . . . . . . . . . .61
Disposal and recycling information . . . . . . . . . . . . . . . . . . . . . . . . . . . . . . . . 61

5
Taking care of your smartphone . . . . . . . . . . . . . . . . . . . . . . . . . . . . . . . . . .62
Specifications . . . . . . . . . . . . . . . . . . . . . . . . . . . . . . . . . . . . . . . . . . . . . . . . . . 63
Regulatory information . . . . . . . . . . . . . . . . . . . . . . . . . . . . . . . . . . . . . . . . .65

6
End User License Agreement
IMPORTANT-READ CAREFULLY: THIS END USER LICENSE AGREEMENT ("AGREEMENT") IS A LEGAL AGREEMENT BETWEEN
YOU (EITHER AN INDIVIDUAL OR A SINGLE ENTITY), AND ACER INC. INCLUDING ITS SUBSIDIARIES ("ACER") FOR THE
SOFTWARE (WHETHER PROVIDED BY ACER OR BY ACER'S LICENSORS OR SUPPLIERS) THAT ACCOMPANIES THIS
AGREEMENT, INCLUDING ANY ASSOCIATED MEDIA, PRINTED MATERIALS AND RELATED USER ELECTRONIC
DOCUMENTATION WHICH MAY BE BRANDED "ACER" ("SOFTWARE"). AGREEMENTS RELATING TO ANY OTHER PRODUCT
OR TOPIC ARE NEITHER INTENDED NOR SHOULD THEY BE IMPLIED. BY INSTALLING THE ACCOMPANYING SOFTWARE OR
ANY PORTION THEREOF, YOU AGREE TO BE BOUND BY THE TERMS AND CONDITIONS OF THIS AGREEMENT. IF YOU DO
NOT AGREE TO ALL OF THE TERMS AND CONDITIONS OF THIS AGREEMENT, DO NOT CONTINUE THE INSTALLATION
PROCESS AND IMMEDIATELY DELETE ALL INSTALLED FILES, IF ANY, OF THE ACCOMPANYING SOFTWARE FROM YOUR
PHONE.
IF YOU DO NOT HAVE A VALIDLY-LICENSED COPY OF THE APPLICABLE SOFTWARE, YOU ARE NOT AUTHORIZED TO
INSTALL, COPY OR OTHERWISE USE THE SOFTWARE, AND HAVE NO RIGHTS UNDER THIS AGREEMENT.
The Software is protected by U.S. and international copyright laws and conventions as well as other intellectual property
laws and treaties. The Software is licensed, not sold.
GRANT OF LICENSE
Acer grants to you the following non-exclusive and non-transferable rights with respect to the Software. Under this
Agreement, you may:
1. Install and use the Software only on a single designated phone. A separate license is required for each phone on
which the Software will be used;
2. Make one copy of the Software solely for backup or archival purposes;
3. Make one hardcopy of any electronic documents included in the Software, provided that you receive the
documents electronically.
RESTRICTIONS
You may NOT:
1. Use or copy the Software except as provided in this Agreement;
2. Rent or lease the Software to any third party;
3. Modify, adapt, or translate the Software in whole or in part;
4. Reverse engineer, decompile, or disassemble the Software or create derivative works based upon the Software;
5. Merge the Software with any other program or modify the Software, except for your personal use; and
6. Sublicense or otherwise make the Software available to third parties, except that you may, after prior written
notification to Acer, transfer the Software as a whole to a third party so long as you do not retain any copies of the
Software and such third party accepts the terms of this Agreement.
7. Transfer your rights under this Agreement to any third parties.
8. Export the Software in contravention of applicable export laws and regulations, or (i) sell, export, re-export,
transfer, divert, disclose technical data, or dispose of, any Software to any prohibited person, entity, or destination
including, without limitation, Cuba, Iran, North Korea, Sudan and Syria; or (ii) use any Software for any use
prohibited by the laws or regulations of the United States.
SUPPORT SERVICES
Acer is not obligated to provide technical or other support for the Software.
ACER LIVE UPDATE
Certain of the software contains elements that enable the use of the Acer Live Update service, which allows for updates
for such software to be automatically downloaded and installed on your phone. By installing the software, you hereby
agree and consent that Acer (or its licensors) may automatically check the version of such software that you are using on
your phone and may provide upgrades to such software that may be automatically downloaded on to your phone.
OWNERSHIP AND COPYRIGHT
Title, ownership rights and intellectual property rights in and to the Software and all copies thereof shall remain with Acer
or Acer's licensors or suppliers (as applicable). You do not have or shall not gain any proprietary interest in the Software
(including any modifications or copies made by or for you) or any related intellectual property rights. Title and related
rights in the content accessed through the Software is the property of the applicable content owner and may be protected
by applicable law. This license gives you no rights to such contents. You hereby agree
1. Not to remove any copyright or other proprietary notices from the Software;
2. To reproduce all such notices on any authorized copies you make; and
3. To use best efforts to prevent any unauthorized copying of the Software.
TRADEMARKS
This Agreement does not grant to you any rights in connection with any trademarks or service marks of Acer or of Acer's
licensors or suppliers.
DISCLAIMER OF WARRANTIES
TO THE MAXIMUM EXTENT PERMITTED BY APPLICABLE LAW, ACER, ITS SUPPLIERS, AND ITS LICENSORS, PROVIDE THE
SOFTWARE "AS IS" AND WITH ALL FAULTS, AND HEREBY DISCLAIM ALL OTHER WARRANTIES AND CONDITIONS, EITHER
EXPRESS, IMPLIED OR STATUTORY, INCLUDING, BUT NOT LIMITED TO, ANY IMPLIED WARRANTIES, DUTIES OR
CONDITIONS OF MERCHANTABILITY, OF FITNESS FOR A PARTICULAR PURPOSE, OF ACCURACY OR COMPLETENESS OF
RESPONSES, OF RESULTS, OF WORKMANLIKE EFFORT, OF LACK OF VIRUSES, AND OF LACK OF NEGLIGENCE, ALL WITH
REGARD TO THE SOFTWARE AND THE PROVISION OF OR FAILURE TO PROVIDE SUPPORT SERVICES. ALSO, THERE IS NO

7
WARRANTY OR CONDITION OF TITLE, QUIET ENJOYMENT, QUIET POSSESSION, CORRESPONDENCE TO DESCRIPTION OR
NON-INFRINGEMENT WITH REGARD TO THE SOFTWARE.
EXCLUSION OF INCIDENTAL, CONSEQUENTIAL AND CERTAIN OTHER DAMAGES
TO THE MAXIMUM EXTENT PERMITTED BY APPLICABLE LAW, IN NO EVENT SHALL ACER, ACER'S SUPPLIERS, OR ACER'S
LICENSORS, BE LIABLE FOR ANY SPECIAL, INCIDENTAL, INDIRECT, PUNITIVE, OR CONSEQUENTIAL DAMAGES
WHATSOEVER (INCLUDING, BUT NOT LIMITED TO, DAMAGES FOR LOSS OF PROFITS OR CONFIDENTIAL OR OTHER
INFORMATION, FOR BUSINESS INTERRUPTION, FOR PERSONAL INJURY, FOR LOSS OF PRIVACY, FOR FAILURE TO MEET ANY
DUTY INCLUDING OF GOOD FAITH OR OF REASONABLE CARE, FOR NEGLIGENCE, AND FOR ANY OTHER PECUNIARY OR
OTHER LOSS WHATSOEVER) ARISING OUT OF OR IN ANY WAY RELATED TO THE USE OF OR INABILITY TO USE THE
SOFTWARE, THE PROVISION OF OR FAILURE TO PROVIDE SUPPORT SERVICES, OR OTHERWISE UNDER OR IN CONNECTION
WITH ANY PROVISION OF THIS AGREEMENT, EVEN IN THE EVENT OF THE FAULT, TORT (INCLUDING NEGLIGENCE), STRICT
LIABILITY, BREACH OF CONTRACT OR BREACH OF WARRANTY OF ACER OR ITS SUPPLIERS OR LICENSORS, AND EVEN IF
ACER AND ITS SUPPLIERS AND LICENSORS HAVE BEEN ADVISED OF THE POSSIBILITY OF SUCH DAMAGES.
LIMITATION OF LIABILITY AND REMEDIES
NOTWITHSTANDING ANY DAMAGES THAT YOU MIGHT INCUR FOR ANY REASON WHATSOEVER (INCLUDING, WITHOUT
LIMITATION, ALL DAMAGES REFERENCED ABOVE AND ALL DIRECT OR GENERAL DAMAGES), THE ENTIRE LIABILITY OF
ACER, ITS SUPPLIERS, AND ITS LICENSORS, UNDER ANY PROVISION OF THIS AGREEMENT, AND YOUR EXCLUSIVE REMEDY
FOR ALL OF THE FOREGOING, SHALL BE LIMITED TO THE AGGREGATE AMOUNT PAID BY YOU FOR THE SOFTWARE. THE
FOREGOING LIMITATIONS, EXCLUSIONS AND DISCLAIMERS (INCLUDING DISCLAIMER OF WARRANTIES AND EXCLUSION OF
INCIDENTAL, CONSEQUENTIAL AND CERTAIN OTHER DAMAGES ABOVE) SHALL APPLY TO THE MAXIMUM EXTENT
PERMITTED BY APPLICABLE LAW, EVEN IF ANY REMEDY FAILS ITS ESSENTIAL PURPOSE; PROVIDED, HOWEVER, THAT
BECAUSE SOME JURISDICTIONS DO NOT ALLOW THE EXCLUSION OR LIMITATION OR LIABILITY FOR CONSEQUENTIAL OR
INCIDENTAL DAMAGES, THE ABOVE LIMITATION MAY NOT APPLY TO YOU.
TERMINATION
Without prejudice to any other rights, Acer may immediately terminate this Agreement without notice if you fail to
comply with any terms and conditions of this Agreement.
In such event, you must:
1. Cease all use of the Software;
2. Destroy or return to Acer the original and all copies of the Software; and
3. Delete the Software from all phones on which it was resident.
All disclaimers of warranties and limitation of liability set forth in this Agreement shall survive termination of this
Agreement.
GENERAL
This Agreement represents the complete agreement between you and Acer relating to this license for the Software and
supersedes all prior agreements, communications, proposals and representations between the parties and prevails over
any conflicting or additional terms of any quote, order, acknowledgement or similar communication. This Agreement may
only be modified by a written document signed by both parties. If any provision of this Agreement is held by a court of
competent jurisdiction to be contrary to law that provision will be enforced to the maximum extent permissible and the
remaining provisions of this Agreement will remain in full force and effect.
ADDITIONAL PROVISIONS APPLICABLE TO THIRD PARTY SOFTWARE AND SERVICES
Software provided hereunder by Acer's licensors or suppliers ("Third Party Software") is made available to you for your
personal, non-commercial use only. You may not use the Third Party Software in any manner that could damage, disable,
overburden, or impair the services provided by Acer's licensors or suppliers hereunder ("Third Party Services").
Furthermore, you may not use the Third Party Software in any manner that could interfere with any other party's use and
enjoyment of the Third Party Services, or the services and products of Acer's licensors' or suppliers' third party licensors.
Your use of the Third Party Software and Third Party Services is also subject to additional terms and conditions and policies
which can be accessed through our global website.
Privacy policy
During registration you will be asked to submit some information to Acer. Please refer to Acer’s privacy policy at
www.acer.com or your local Acer website.

8
Getting to know your smartphone
Features and functions
Your new smartphone offers leading, easy-to-access multimedia and
entertainment features. You can:
• Access your email while on the move.
• Connect to the Internet at high speed, via HSDPA (14.4 Mbps) or Wi-Fi.
• Keep in touch with your friends via your Contacts and social networking
applications.
• Listen to rich, full-impact audio via Dolby Mobile.
• Record 720p video.
• Playback 720p video with HDMI output to your TV.
Product registration
When using your product for the first time, it is recommended that you
immediately register it. This will give you access to some useful benefits, such
as:
• Faster service from our trained representatives.
• Membership in the Acer community: receive promotions and participate
in customer surveys.
• The latest news from Acer.
Hurry and register, as other advantages await you!
How to register
To register your Acer product, please visit http://mobile.acer.com. Click Product
Registration and follow the simple instructions.
You can also register directly from your smartphone by tapping the Acer
Registration icon.
After we receive your product registration, you will be sent a confirmation
email with important data that you should keep in a safe place.
9Unpacking your smartphone
Chapter 1: Setting Up
Unpacking your smartphone
Your new smartphone comes packed in a protective box. Carefully unpack the
box and remove the contents. If any of the following items is missing or
damaged, contact your dealer immediately:
•Acer ICONIA SMART
• Battery
• Quick Guide
• USB cable
• AC adapter
• Headset
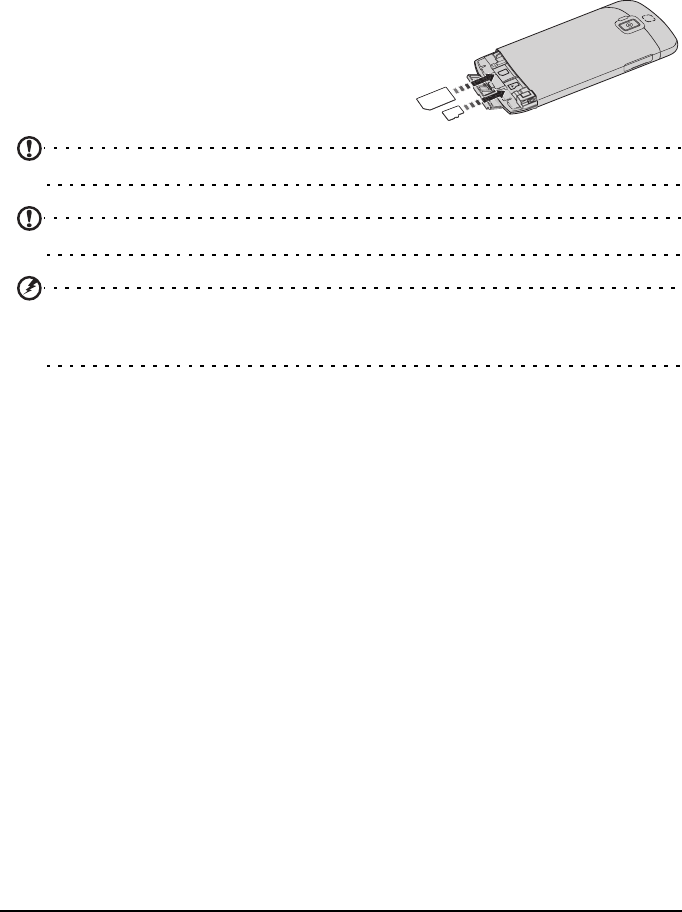
Getting to know your smartphone
Views
2
3
4
5
6
7
89
10 11
12
13
14 15
16
17
18
19
20
1
No. Item Description
1 Power button Press to turn the screen on/off or enter sleep mode;
press and hold to turn the smartphone off.
2 2nd microphone For active noise cancellation
3 Front-facing camera 2-megapixel front-facing camera for taking
self-portrait pictures.

10
LED indicators
4 Phone speaker Emits audio from your smartphone; suitable for
holding to your ear.
5 Micro HDMI (type D)
connector
Connect to HDMI-compatible displays.
6 Micro USB connector Connect to a USB cable/charger.
7 Touchscreen 4.8-inch, 1024 x 480 pixel capacitive touchscreen to
display data, phone content and enter information.
8 Home button Return to the Home screen; press and hold to view
recently-used applications, tap an icon to open the
associated program.
9 Search button Open the Google search function.
10 Back button Go back one menu step; close the onscreen keyboard.
11 Menu button Open the option menu; press and hold to display the
keyboard.
12 3.5 mm headset jack Connect to stereo headset.
13 LED indicator Indicates battery level and event status.
14 Proximity and light sensor Determines the ambient brightness, detects the
presence of an object nearby and whether the object
is moving closer or further away.
15 Handsfree speaker Emits audio from your smartphone; suitable for
handsfree use.
16 Rear camera An 8-megapixel camera for taking high-resolution
images.
17 Flash Built-in camera flash.
18 Volume up / down button Increase or decrease the phone volume.
19
Camera button Activate the camera or take a picture.
20 Microphone Internal microphone.
LED color State Description
Off No incoming or missed calls.
Red Flashing Battery is critically low and needs to be charged.
White Flashing Missed call, voicemail, or new message.
Orange Steady Device is plugged in: Battery is charging.
Green Steady Device is plugged in: Battery is fully charged.
No. Item Description
11Installing a SIM and optional microSD Card
Installing a SIM and optional microSD Card
To take full advantage of your smartphone’s telephony capabilities, you must
install a SIM card. The SIM card holder is located at the bottom of the battery
bay.
Additionally, you may wish to increase your smartphone’s storage by inserting a
microSD Card (optional) into the slot provided. This is next to the SIM card slot.
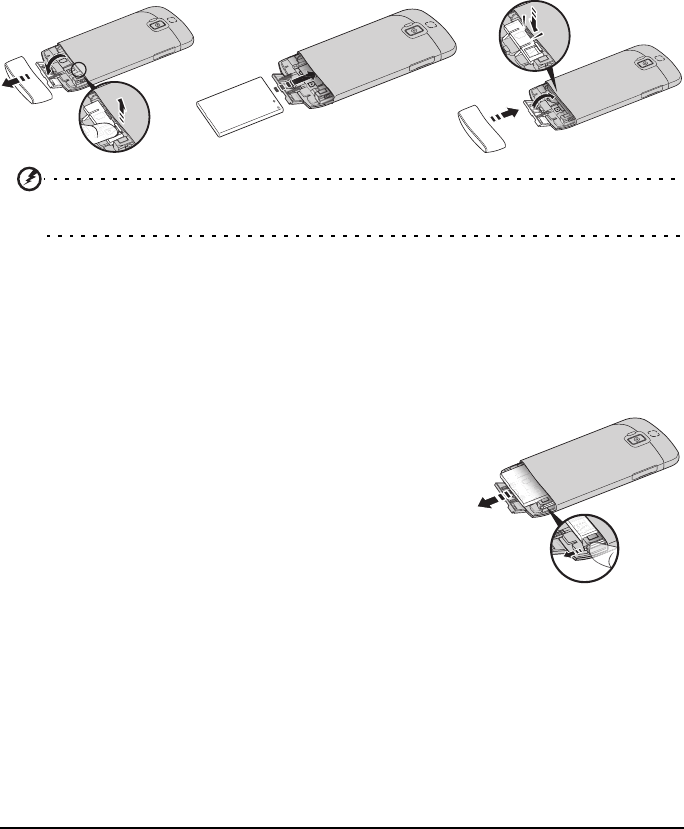
1. Turn off the phone by pressing and holding
the power button.
2. Open the cover and remove the battery.
3. Insert the SIM and microSD Card as shown.
4. Replace the battery and battery cover.
Note: You need to insert the SIM and microSD Card before inserting the battery.
Note: Ensure that the microSD Card is inserted all the way into the card slot.
Caution: Turn off your smartphone and remove the battery before installing or
removing the SIM or microSD card. You may damage the card or your smartphone if
the battery is still installed.
SIM card lock
Your smartphone may come with a SIM card lock, i.e., you will only be able to
use the SIM card provided by your network operator.
To cancel the SIM lock, contact your network provider.
12
Installing or removing the battery
Your smartphone uses a replaceable battery to provide power. It is packed
separately from your smartphone and needs to be inserted and charged before
you can use the smartphone.
Installing the battery
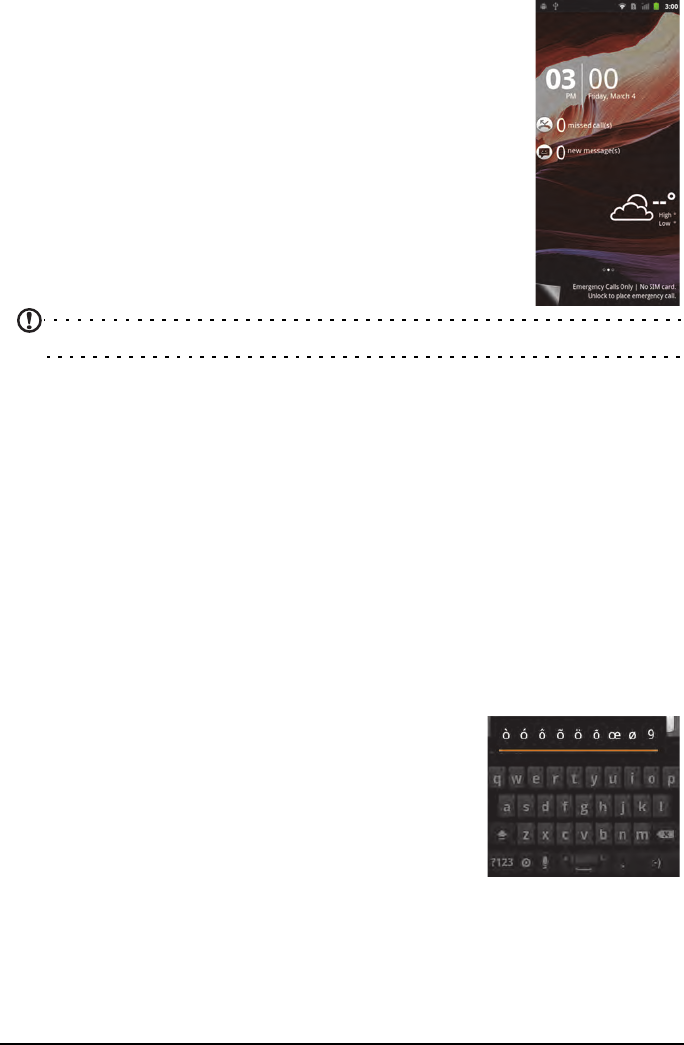
Remove the battery cover. Lay the smartphone. Unclip the battery lock.
Place the battery into the battery compartment, lining up the battery
connectors with those at the right side of the compartment. Lock the battery in
place.
1-1 1-2
1-3
4-1
4-2
4-3
CAUTION: RISK OF EXPLOSION IF BATTERY IS REPLACED BY AN INCORRECT TYPE.
DISPOSE OF USED BATTERIES ACCORDING TO THE INSTRUCTIONS.
Charging the battery
For initial use, you need to charge your smartphone for eight hours. After that
you can recharge the battery as needed.
Connect the AC adapter cord to the micro USB connector on your smartphone.
You can also charge your smartphone from a USB port on your PC.
Removing the battery
Remove the battery cover. Unlock the battery and
pull the release latch.

13Turning on for the first time
Chapter 2: Using your Smartphone
Turning on for the first time
To turn on your smartphone for the first time, press and hold the power button
until the screen turns on. You will then be asked to configure some settings
before you can use your smartphone.
Follow the onscreen instructions to complete setup.
Sign in to or create a Google account
If you have Internet access, your smartphone allows you to synchronize
information with a google account.
During the start-up process, you may create or sign in to your account, which
will be used to synchronize your contact list, email, calendar and other
information. If you do not yet have Internet access, or do not want to use this
feature, then tap Skip.
Creating multiple Google accounts
You can create and easily access multiple Google accounts. Tap Settings >
Accounts & sync > Add account.
Entering your PIN
When you install a SIM card for the first time, you may need to enter a PIN
using the onscreen number pad.
Important: Depending on your settings, you may be required to enter your PIN each
time you switch on the phone function.
Activating a new SIM card
If you are using your SIM card for the first time, it may require activation.
Contact your network operator for details on how to do this.
Locking your smartphone
If you will not use your smartphone for a while, briefly press the power button
to lock access. This saves power and ensures your smartphone does not
unintentionally use any services. Your smartphone will lock automatically if it is
not used for one minute.
14
Waking your smartphone
If the screen is off and the smartphone does not react to any
taps on the screen or front panel button, then it has been
locked and is in sleep mode.
To wake your smartphone, press the power button. Your
smartphone will display the widgets screen. Unlock your
smartphone by dragging the peel up or to the right.
For additional security, you may set an unlock pattern, a set
of dots that must be tapped in the correct order to access
the phone. Tap Settings > Location & security > Set up screen
lock.
Note: If you forget your unlock pattern, please refer to “Unlock pattern“ on page 57.
Using the touchscreen
Your smartphone uses a touchscreen for selecting items and entering
information. Use your finger to tap the screen.
Tap: Touch the screen once to open items and select options.
Drag: Hold your finger on the screen and drag across the screen to select text
and images.
Tap and hold: Tap and hold an item to see a list of actions available for that
item. On the pop-up menu that appears, tap the action you want to perform.
Scroll: To scroll up or down the screen, simply drag your finger up or down the
screen in the direction that you want to scroll.
Android keyboard
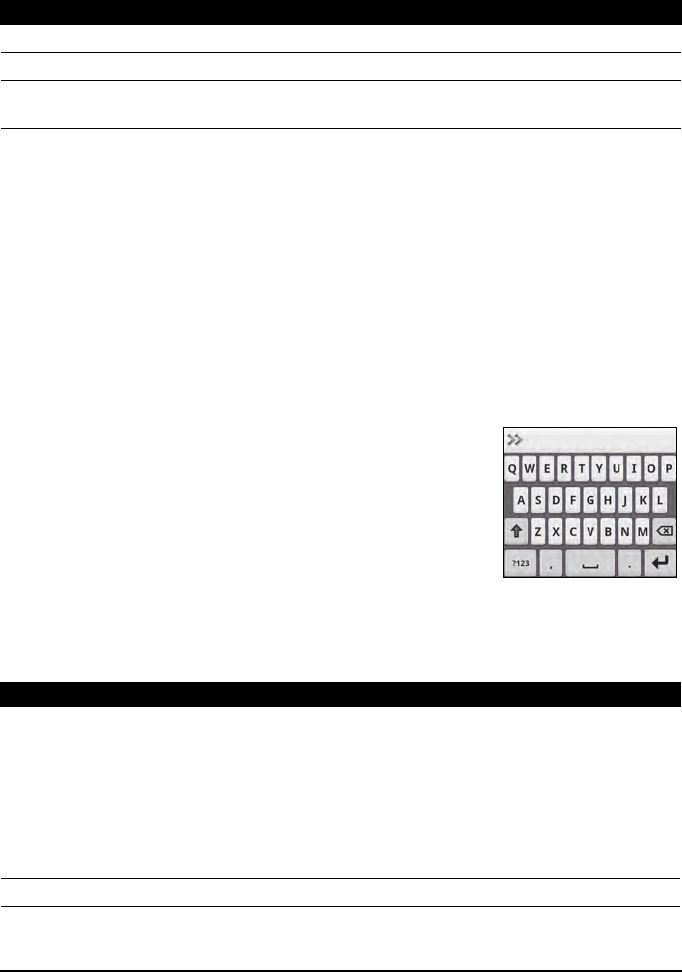
This is a standard onscreen QWERTY keyboard that
allows you to enter text. Tap and hold a key with
numbers at the top to select alternative characters,
such as letters with accents.
Tap the ?123 button to see numbers and special
characters, and then tap the ALT key to see even more.
You can switch between multiple input languages by
swiping across the space bar. The keyboard layout will
change accordingly. To select your preferred languages, tap Menu > Settings >
Language & keyboard > Android keyboard > Input languages.
15Using the touchscreen
Text assistance
The Android keyboard has various features that assist you to enter correct text.
Tap Menu > Settings > Language & keyboard > Android keyboard. From here
you can enable or disable the following:
Changing the text input method
To change the input method, tap and hold a text box. Tap Input method, and
then select your prefered input method.
Predictive text
Both XT9 Text Input and Android keyboard provide predictive text input. As
you tap the letters of a word, a selection of words are displayed above the
keyboard that continue the sequence of letters tapped, or are a close match
allowing for errors. The word list changes after every key press. If the word you
need is displayed, you can tap on it to insert it into your text.
XT9 Text Input
Tap the ?123 button to see numbers and special
characters, and then tap the ALTkey to see even more.
Additional keys vary depending on the type of text you
enter, e.g. a key to add a smiley is available when typing
a text message. Like other keys, tap and hold for
additional options.
Text assistance
The standard XT9 keyboard has various features that assist you to enter correct
text. Tap Settings > Language & keyboard > XT9 Text Input. From here you can
enable or disable the following:
Function Description
Quick fixes Corrects commonly typed mistakes.
Show suggestions Shows suggested words while you are typing.
Auto-complete Inserts the suggested word whenever you tap space or a
punctuation mark.
Function Description
Languages and
settings
Set the languages that will be available.
Select the keyboard layout you prefer. There are three layouts available:
• Keyboard: A full QWERTY keyboard.
• Reduced keyboard: Two letters are available on each key. Tap and
hold the key to select a letter, including special characters.
• Phone keypad: Three letters are available on each key. Tap and
hold the key to select a letter, including special characters.
Preferences Change your text input preferences.
16
The Lock screen
When you start your smartphone, or wake it from power
saving, it will display the Lock screen. This screen protects
your smartphone from accidental access and gives you quick
access to information and simple controls with widgets.
These display information such as the time or weather, or
provide additional controls. Some have been pre-installed
on your smartphone, while others may be downloaded from
the Android Market.
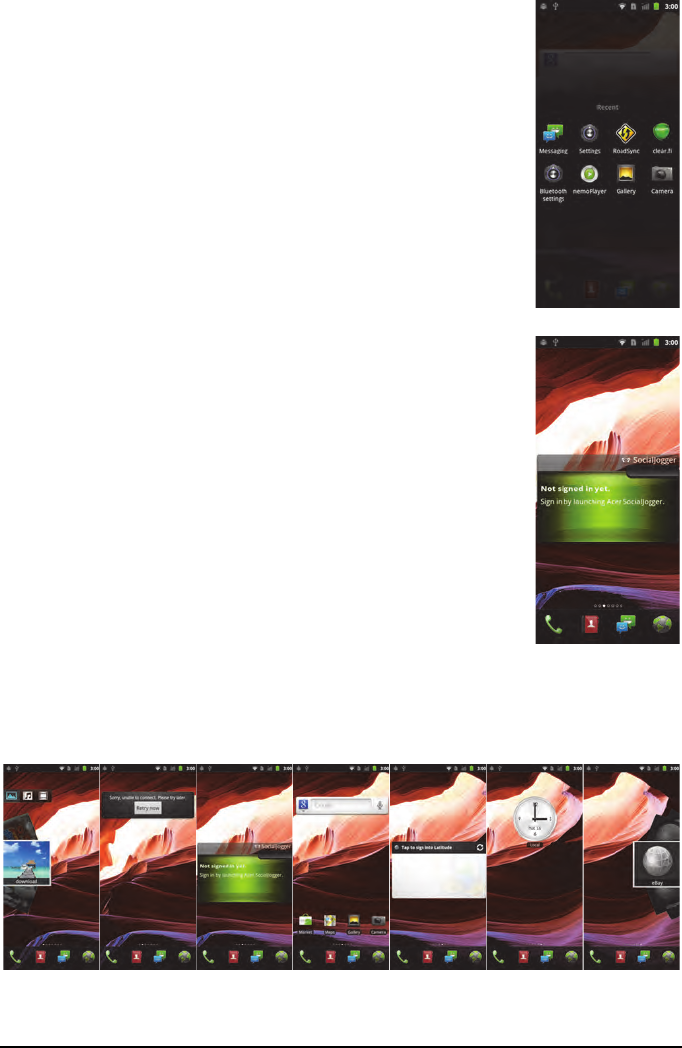
Adding or removing widgets
To add widgets, tap Home Decor from the applications menu, and select Lock
Screen. Tap and hold on the screen to open a list of available widgets.
To reposition a widget, tap and hold the widget. You may then drag the
widget to any point on the grid.
A red background indicates that the widget may not be placed in the chosen
position, usually because widgets may not overlap. A green background
indicates the position can be used.
Drag the widget to the left or right edge of the screen to add it to either
extended screen. Drag it to the trash icon to remove it from the screen.
17The Home screen
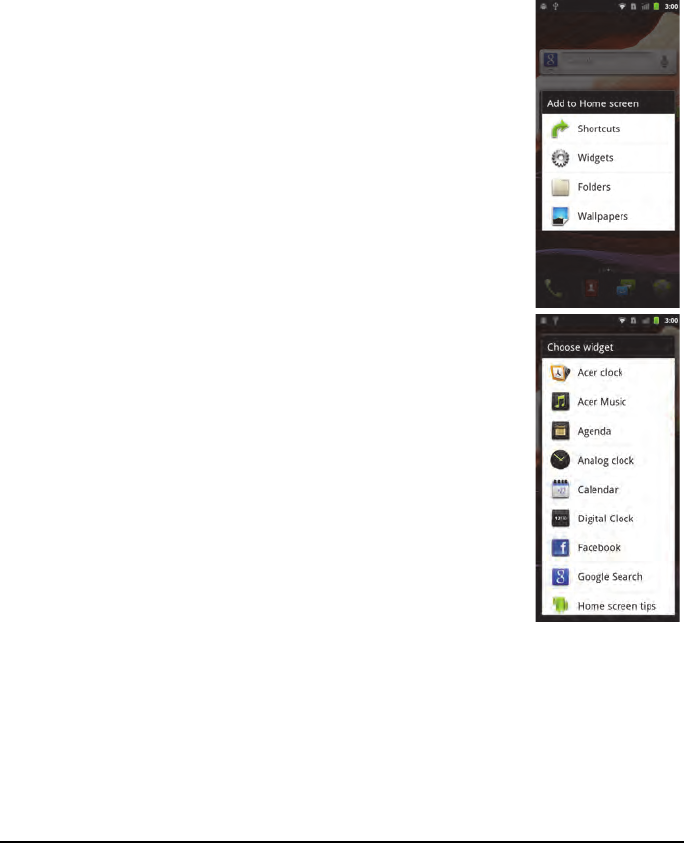
Recent apps
To access recently opened apps while working on another
process, press and hold the home button.
The Home screen
After rebooting, your smartphone will display the home
screen. This screen gives you quick, icon-based access to
many of the frequently used features of your smartphone.
At the bottom of the screen is the application dock which
displays default applications. Tap an icon to open the
application. Drag the application dock towards the top of
the screen to see the applications menu. To change
applications, see “Changing application dock icons“ on page
22.
The extended Home screen
The Home screen extends to either side of the screen, giving you more room to
add icons, widgets or features. To view the extended screen, slide your finger to
the left or right.
18
Adding or removing icons
You can set icons for installed applications on the Home screen. Tap and hold
an icon in the Applications menu to copy it to the Home screen. To remove an
icon from the Home screen, tap and drag the icon from the Home screen to the
trash tab that appears at the bottom of the screen.
Adding or removing shortcuts or widgets
To add shortcuts or widgets, press the menu button while in the Home screen,
and tap Add, or tap and hold anywhere on the Home screen to open the Add to
Home screen menu.
Tap Shortcuts to open a list of quick links to applications and
settings you can add to the Home screen.
Tap Widgets to open a list of small applications that you can
add to your Home screen. Widgets are handy applications
that you can add to your Home screen to display various
information.
19The Home screen
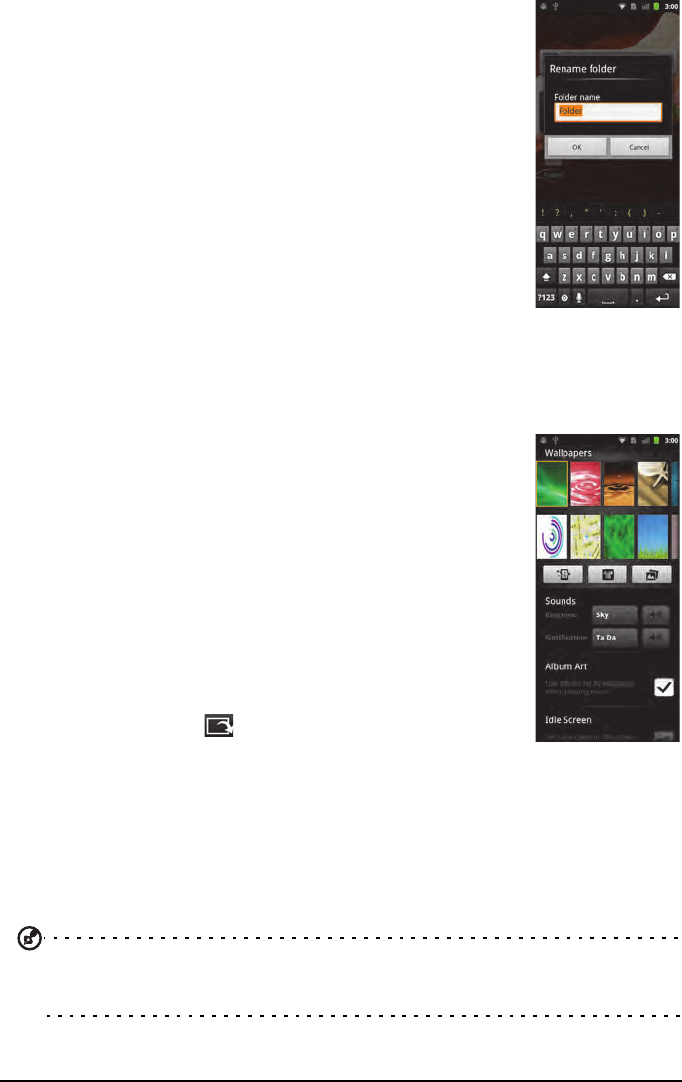
You can also add folders to your Home screen. There are
some pre-defined folders available or you can add a New
folder. This will be placed on your Home screen and named
Folder. To change the name of the folder, tap to open it.
Tap and hold the name bar at the top of the folder window
to open a dialog box that will allow you to rename the
folder.
Tap Wallpapers to change the current wallpaper. You can choose from images
stored in the Gallery, or Live wallpapers featuring animated or interactive
backgrounds, or standard wallpapers.
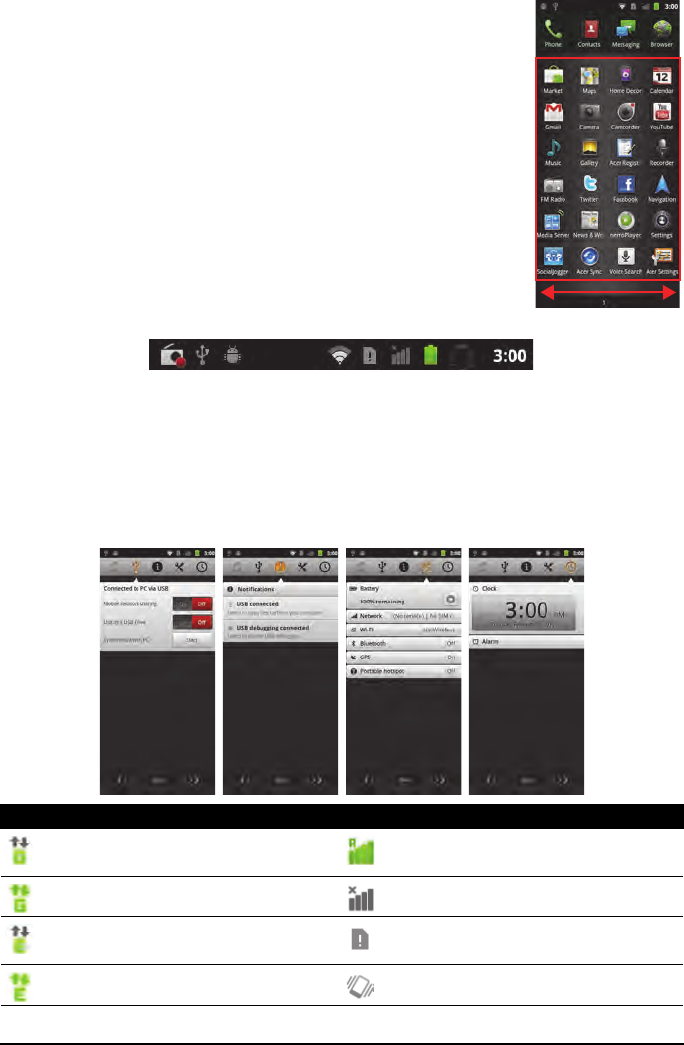
Home Decor
You can change the wallpaper, configure sound alerts, and
personalize your Idle screen by tapping Home Decor from
the applications menu. Or press the menu button while in
the Home screen, and tap Home Decor.
Select a wallpaper from the first row, or open your own
pictures from the second row. Tap the image you wish to use
as your smartphone’s wallpaper. If you choose an image that
is not the correct size, you will be asked to crop the image to
the correct size. Tap and drag the box until you have
selected the part of the image you want.
To set the wallpaper from the camera, follow the
instructions on “Taking a photo“ on page 42. In the picture
review screen, tap the icon and set picture as Wallpaper.
Multitasking
You can have multiple applications open at the same time. To open a new
application, press the Home button to return to the Home screen, then start the
new application.
To view your active applications, press and hold the Home button. Then tap an
icon to go to the application.
Tip: To prolong battery life, it is better to close an application when you’ve finished
using it. Do this by either pressing the Back key or the Menu button and selecting Exit
(if available).
20
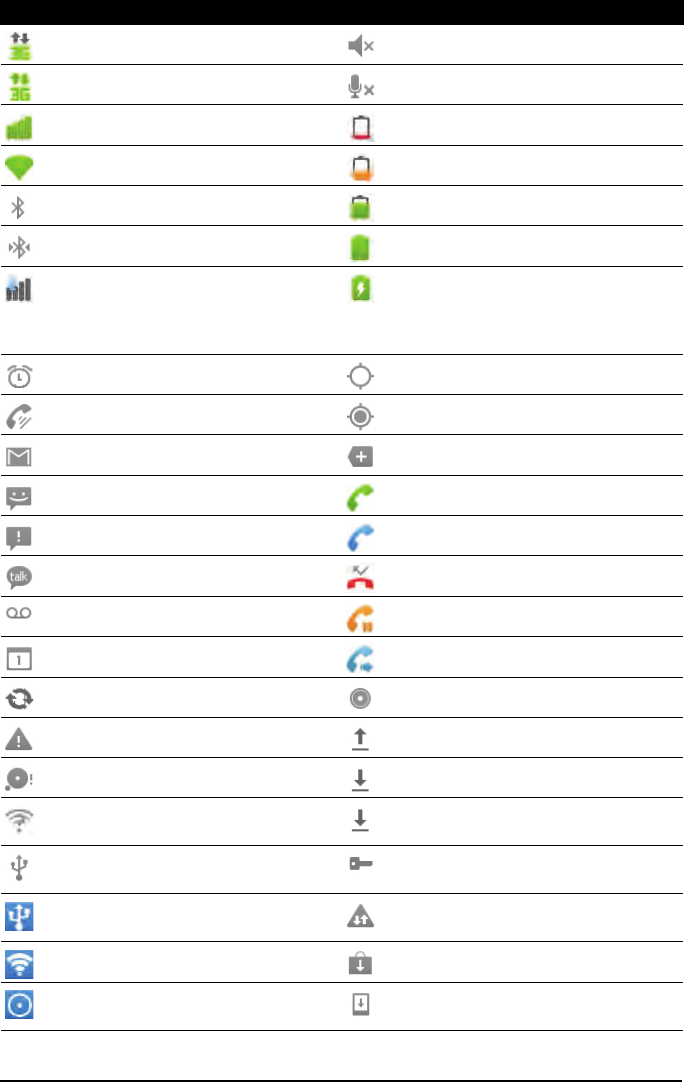
The applications menu
The applications menu displays groups of applications in a
series of pages.
The number of pages is displayed at the bottom of the
screen. Drag the menu to the left or right to switch pages.
Tap and hold an icon to move or delete it; you may change
the order of icons or reorganize the pages to suit your
needs. Drag an icon to the edge of the screen, or one of the
page numbers, to change the page.
Notification area
The Notification area is at the top of the screen.
This area contains a variety of icons to inform you of your phone’s status. The
left side of the Notification area displays event icons that indicate a new event
(such as a new message). The icons on the right side indicate signal strength,
connection, battery status and the time.
Drag the Notification area down the screen, or tap the area, to view more
information about new events. You can also use the slide bar to switch
between pages.
Icon Description Icon Description
Connected to GPRS mobile
network
Roaming
GPRS in use No signal
Connected to EDGE mobile
network
SIM card is invalid or not installed
EDGE in use Vibrate mode
21The Home screen
Connected to 3G mobile network Ringer is silenced
3G in use Phone microphone is off
Cellular signal strength Battery is very low
Connected to a wireless network Battery is low
Bluetooth is on Battery is partially drained
Connected to a Bluetooth device Battery is full
Airplane mode (Wireless
connectivity disconnected. Please
disable airplane mode before
trying to make a call.)
Battery is charging
Alarm is set GPS is on
Speakerphone is on Receiving location data from GPS
New Gmail message More notifications
New/unread SMS/MMS Call in progress
Problem with sending SMS/MMS Call in progress using Bluetooth
New Google Talk message Missed call
New voicemail Call on hold
Upcoming event Call forwarding is activated
Syncing data Song is playing
Problem with sign-in or sync Uploading data
SD card or USB storage is full Downloading data
An open wireless network is
available
Download finished
Phone is connected to PC via USB Connected to or disconnected
from virtual private network (VPN)
USB tethering is activated Carrier data use threshold
exceeded
Wireless tethering is activated Application update available
USB and wireless tethering are
activated
System update available
Icon Description Icon Description

22
Changing application dock icons
You can set icons for installed applications in the application dock. Open the
applications menu and find the application you want to add. Tap and hold the
icon, then drag it to a position in the dock, it will be added in place of the
existing application.
To remove an icon from the dock, open the applications menu, then tap and
hold an icon to select it. Either drag the icon to a different page in the
applications menu, or to the trash icon that appears at the bottom left corner
of the screen.
23Managing your contacts
Chapter 3: Managing contacts
Managing your contacts
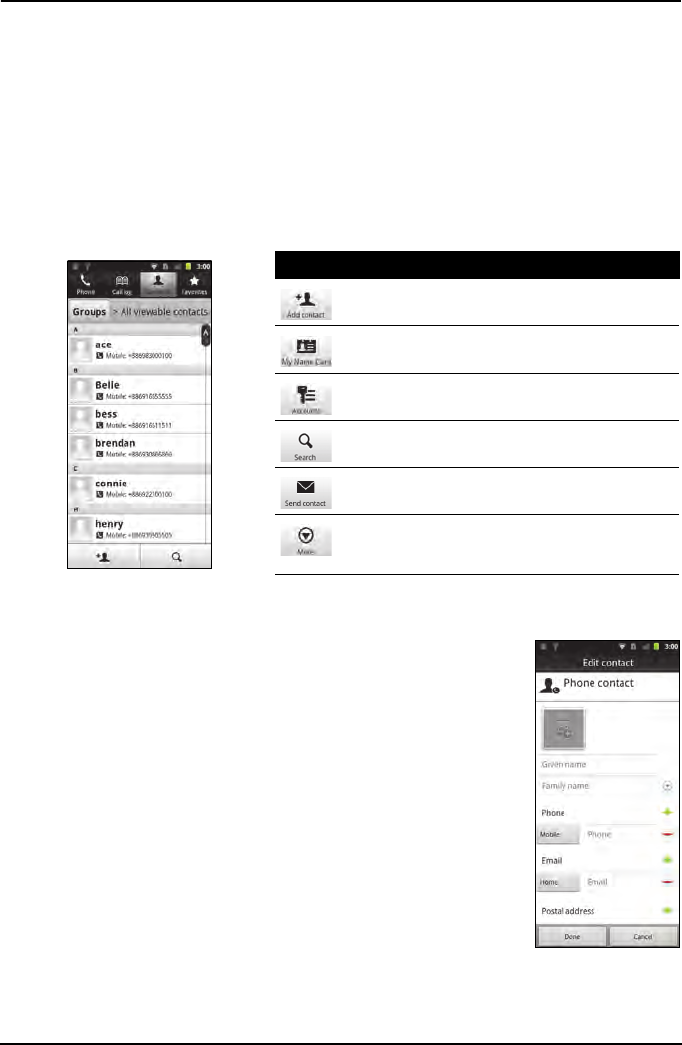
Your smartphone features an address book that allows you to save contacts to
either the internal memory or onto your SIM card.
Tap Contacts from the Home screen or the Contacts tab from the Dialer to view
your contacts.
If you don’t have any contacts stored on your phone, you can import your
Google account contacts, add a new contact or import contacts from your SIM
or SD card. Press the Menu button to open the menu.
Adding a contact
Tap New contact to add a new contact. You may also scan a
person’s profile barcode to add the person to your contact
list or group.
You will be asked if you want to create a SIM, Phone, or
Google contact.
To create a contact, you will be asked to enter the contact’s:
• Given and Family name.
• Phone numbers.
• Email addresses.
•IM addresses.
• Postal addresses.
You may also:
• Enter information such as organizations the contact
belongs to.
• Add any personal notes about the contact.
Icon Description
Add a new contact.
Add your personal details.
Open contact lists from different accounts.
Search for a contact.
Send contact card via Email, MMS or Bluetooth.
Delete contacts.

24
• Enter a nickname.
• Link a website.
• Add an Internet call account
• Assign the contact to a group
• Assign a ringtone
• Divert calls from the contact to voicemail
To assign an image to your contact, tap the silhouette and select whether to
take a photo or select an image from your smartphone’s picture gallery.
Tip: You may also create a contact from an already dialed or received number, see
“Saving a dialed number to contacts“ on page 28.
25Before making a call
Chapter 4: Making Calls
This chapter shows you how to make phone calls, and the various options
available to you during your call.
Before making a call
Check that the phone function is on before you make a call. You can confirm
the phone status from the icon on the right-hand side of the Notification area.
Making a call
Note: The phone function needs to be enabled before the call can be connected.
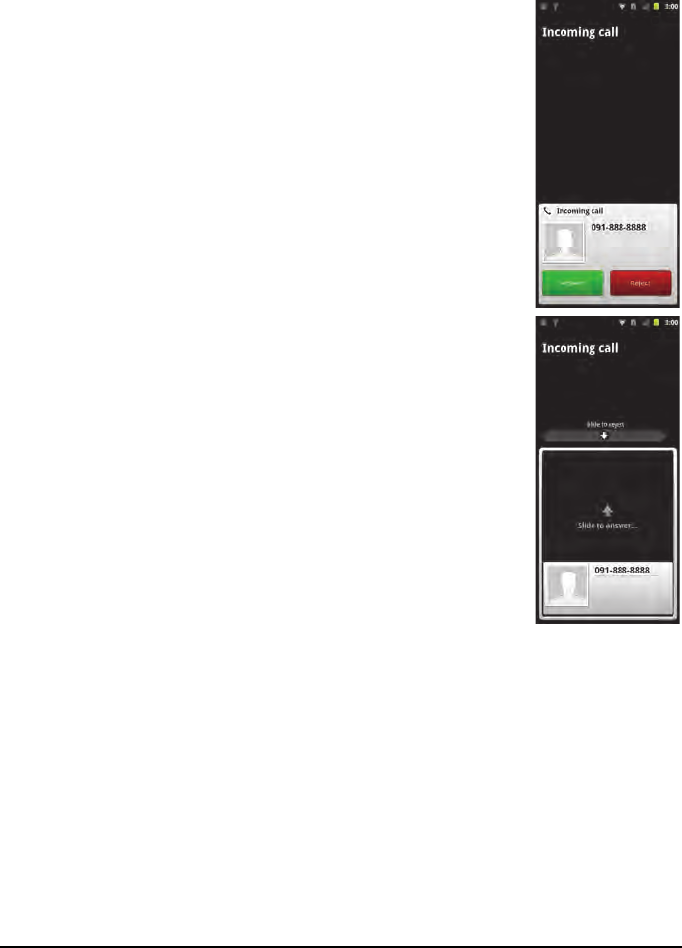
1. From the Home screen tap Dialer or open Dialer from the
menu.
2. Enter the number you wish to dial.
3. Tap to make the call.
4. To end the call, tap End Call.
Smart search
Smart search allows you to quickly find a contact from the phone keypad. As
you enter a number, if it is already known, it will find appropriate contacts and
display them in the list above the keypad. Also, instead of typing a phone
number, you may enter the contact name using the predictive text letters (2 for
‘a’, ‘b’ or ‘c’; 3 or ‘d’, ‘e’ or ‘f’; etc.). If the letter combinations match a contact
name, it will be displayed.
If the contact you need is displayed, simply tap the contact name to make a call.
Icon Description
Connected: You may make a call.
Airplane mode: Wireless connectivity disconnected. Please disable airplane mode
before trying to make a call.

26
Viewing missed calls
Missed calls will be displayed by the call indicator in the Notification area with
the icon.
1. Open the notification list by tapping the Notification area to display the
details of the missed calls.
2. Select the call from the list and tap Return call to return the missed call.
You can save phone numbers to your contacts list from the Call Log. Please
refer to “Adding a contact“ on page 23 for further details.
Dialing a number from the call log
Tap the Dialer to view your call history. It displays recent received, dialed, and
missed calls.
Tap the number to redial. You may also tap and hold the number to open a
menu with other options: Call <the number>; View contact; Edit number before
call; Send text message; Add to contacts or Remove from call log.
Making a call to one of your contacts
1. Tap the Contacts tab in the dialer or Contacts from the Home screen to view
your contacts.
2. Tap a contact. A dialog will open, asking if you want to Call the contact or
send the contact an SMS.
Dialing an international number
When dialing international numbers, there is no need to enter the
international direct dialing prefix (‘00’ etc.) before the country code. Simply tap
and hold 0+ on the onscreen number pad until + appears onscreen.
Warning: International call rates can vary greatly depending on the country you are
calling and your network provider. We suggest you check all call rates with your
network provider, to avoid excessive phone bills. If you are using your smartphone
abroad, roaming charges will apply. Consult your network provider for roaming rates
specific to the country you are visiting before you leave.
Speed Dial
You may add a contact to a Speed Dial number on the phone keypad. Open the
Phone tab, then tap and hold any number from 2 through 9 (1 is reserved for
the voicemail service).
Select OK, then select a contact from the list. If the contact has more than one
phone number, select the number to use.
If a key has a speed dial contact defined, it will show a small contact image as a
reminder. Tap and hold the key to call the speed dial number.
If you want to remove or change a speed dial number, tap Menu and select
Speed dial. Tap an entry to remove or change the assigned telephone number.
27The voice call screen
The voice call screen
Once you have dialed your number the voice call screen appears, which displays
the number/contact you are talking to, the call duration and the dialpad tab.
Answering or declining a call
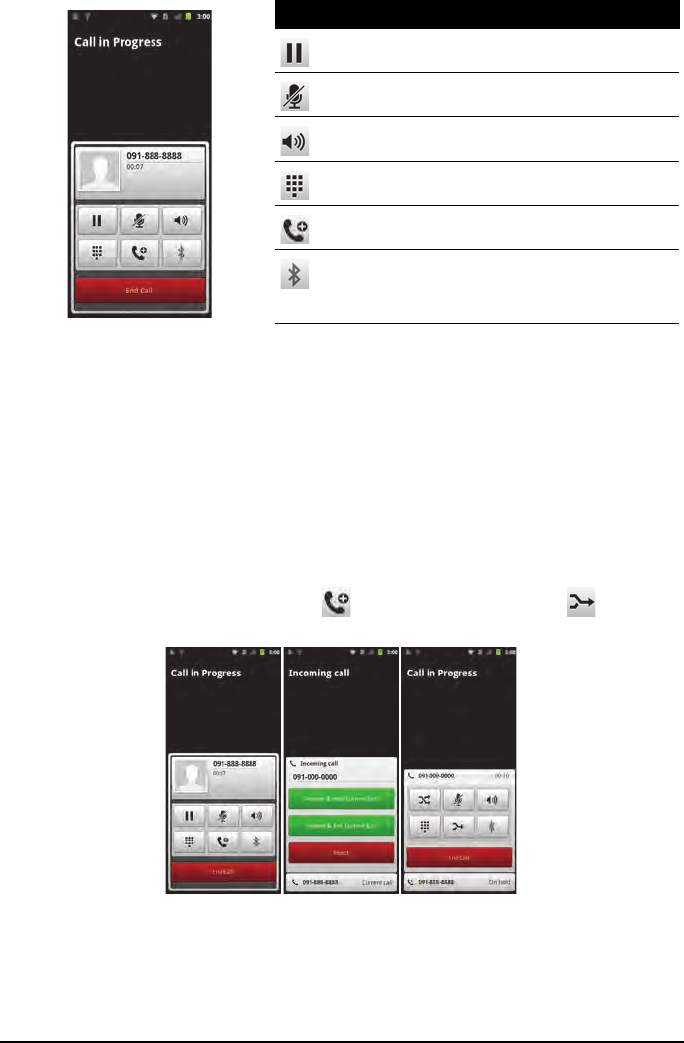
When you have an incoming call, the number will be shown
on the screen. To accept or decline the call, tap the
appropriate button.
If you are answering a call from a locked state, slide the bar
to answer the call. To reject a call from a locked state, press
the power button.
Ending a call
To end a call, press End Call from the voice call screen.
28
Voice call options
Saving a dialed number to contacts
You can save a number you have dialed to your contacts for future use.
1. Select the number from the Call log tab, and tap Add to contacts.
2. Tap Create new contact and select how to complete the action. Please refer
to “Adding a contact“ on page 23.
Conference calls
If you have one call on hold and another on line, you can combine both calls to
create a conference call.
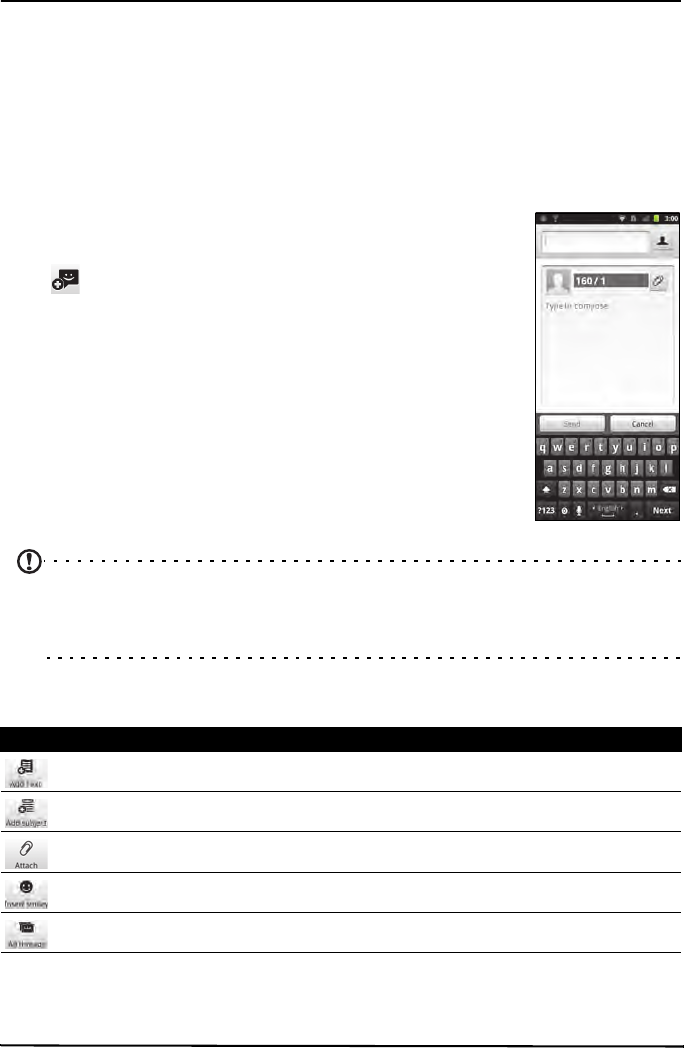
After the first call is established, tap to add a second call. Tap to start
the conference call.
Icon Description
Place the call on hold.
Mute a call.
Speakerphone.
Access the keypad while a call is in progress.
Add a second call.
Bluetooth headset.

29Adding an Internet calling account
Chapter 5: Internet Calling
You can place and receive Internet calls over wireless network.
Adding an Internet calling account
Tap Settings > Call settings > Accounts. Tap Add account, and input the
Username, Password, and Server accounts. You can also configure optional
settings such as Display name, Outbound proxy address, Port number, Transport
type, and Send keep-alive.
Editing or removing an Internet calling account
Open an existing Internet calling account and make the edits you want on the
SIP account details. Press the Menu button and tap Save to save your changes,
or Discard. Or tap Remove account to delete the existing account.
Using Internet calling
You can configure your phone to use Internet calling (when you’re connected
to Wi-Fi) for all calls, only for Internet calls, or to ask each time you place a call.
Receiving Internet calls
You can configure your phone to receive Internet calls made to an Internet
calling account you added to your phone. To receive Internet calls, tap Settings
> Call settings > Accounts. Make sure the Receive incoming calls box is checked.
Calling a contact’s Internet calling address
You must add an Internet calling address to a contact to be able to place an
Internet call to them.
To make an Internet call, open your contact list and tap the contact icon, then
tap the SIP icon .
Calling a phone number using Internet calling
If you have configured your phone to place all calls using Internet calling or to
ask for each call, you may also call a phone number using Internet call,
whenever you are connected to a wireless network.
Dial the number and tap , or select the contact you wish to place a call to,
then tap the Internet call account you want to use to make the call.
Important: Calling a phone number using Internet calling requires that your service
provider supports it, and may incur additional charges. Please contact your service
provider if you have any questions.
30
Chapter 6: Messaging
This chapter shows you how to set up and use the Phone messages, Social
messages and Social events functions of your smartphone.
All SMS and MMS messages are accessed via Messaging. Messaging
automatically arranges received and sent messages into threads.
To access Messaging tap Messaging on the Home screen.
Creating a new message
You can use your phone to compose Phone (SMS and MMS)
messages.
Tap to compose a new message.
Enter the recipient’s phone number or name in the To field.
Suggested contacts will be displayed in a drop-down list
below the text field. To select a suggested contact, tap the
contact’s name.
Once you have entered the recipient, enter your message in
the text box labeled Type to compose.
Note: SMS messages may be up to 160 characters long. If your message is longer than
160 characters, it will be sent as multiple linked messages. Most phones will
automatically join the linked messages to present the recipient with a single long
message, however, some older phones do not have this ability.
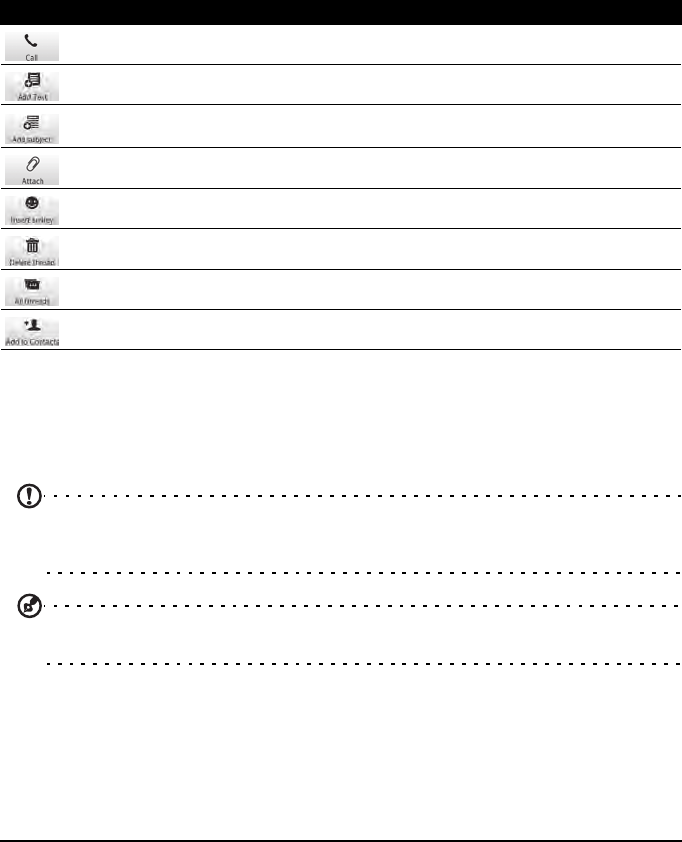
Press the Menu button to see what options are available when creating a new
message.The options change depending on the status of the message.
Icon Description
Insert contact information or calendar information in the message.
Convert the SMS to an MMS, allowing you to add a subject to the message.
Convert the SMS to an MMS, allowing you to attach a file to the message.
Insert a smiley/emoticon into your message text.
View all the threads currently on your phone.
31Replying to a message
Replying to a message
When a new text message arrives a message icon appears in the Notification
area and the message icon on the top of the phone lights up.
Tap Messaging on the Home screen to view the message list or expand the
Notification area to see a summary of the message. Tap the summary to open
the message list.
To reply to an SMS or MMS message, open the message from the message list.
Enter your text in the text box labeled Type to compose. Press the Menu button
to see available options.
MMS messages
MMS messages are similar to text messages but also allow you to attach
multimedia files such as pictures, audio or video clips. Each MMS message can
be up to 300 kB in size.
Note: You need to set up an MMS profile before you can send MMS messages.
Normally, your smartphone will set up the profile for you based on information
retrieved from your provider.
Tip: Ask your network provider for the necessary information if you need to manually
set up the MMS profile.
Receiving MMS messages
When a new MMS message arrives, a message icon appears at the top of the
screen and a notification message is displayed.
1. Open Messaging to view a summary of the message.
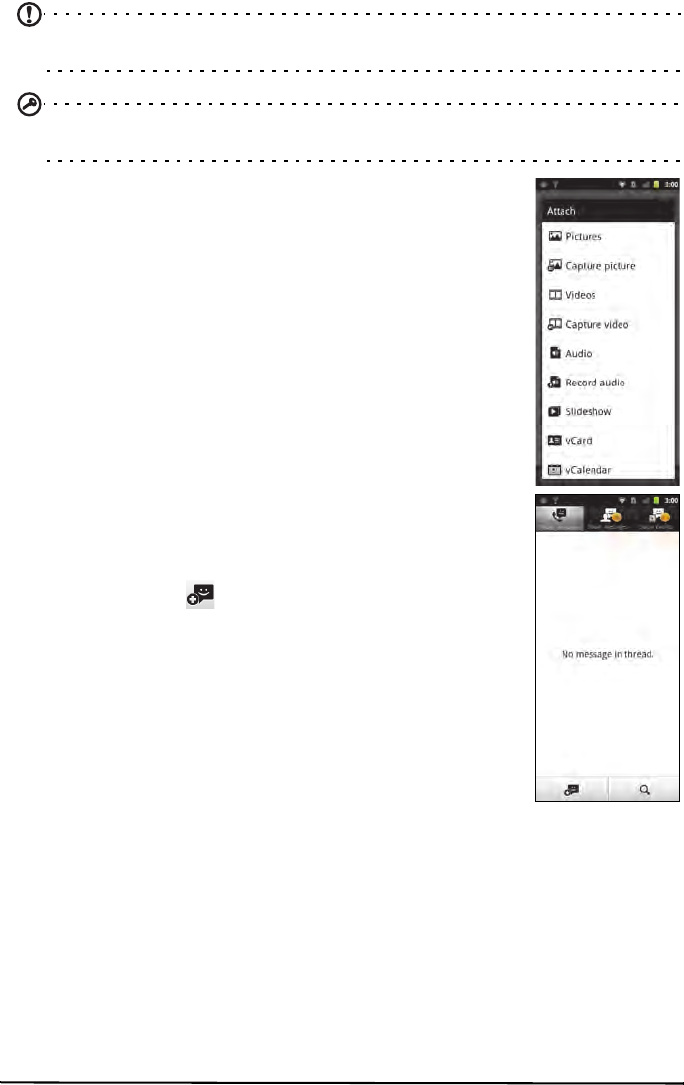
2. Tap Download to download the message content.
Icon Description
Open the Dialer to call the recipient.
Insert contact information or calendar information in the message.
Convert the SMS to an MMS, allowing you to add a subject to the message.
Convert the SMS to an MMS, allowing you to attach a file to the message.
Insert a smiley/emoticon into your message text.
Delete the thread.
View all the threads currently on your phone.
Add the recipient to your contact list.
32
Note: Downloads can take a long time, depending on your connection quality. If you
reply or open another application, the download will be stopped.
Important: You may be charged to download message content, especially if you are
roaming. Please contact your provider if you have any questions.
3. Tap the message to view the content.
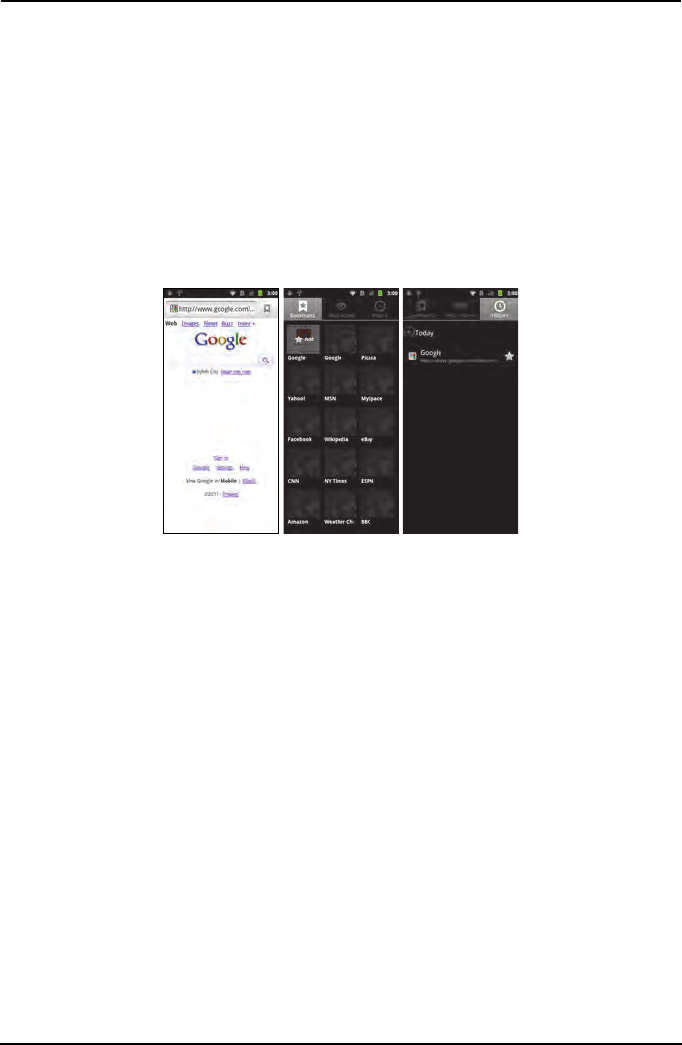
4. To reply to the message, enter your text in the text box
labeled Type to compose and tap Send. Simple text
replies will be sent as SMS messages. If you wish to attach
a file, press the Menu button and tap Attach. You will be
presented with a menu of options.
5. When you have finished composing the message, press
the Menu button and tap Send.
Social messages
You can send social messages to your contacts in Facebook
using the Social messages function. Tap the Social messages
icon on top and tap to compose a new message.
Social events
Tap the Social events icon on top to view social event
invitations and respond through your smartphone.
33Browsing the Internet
Chapter 7: Going online
Browsing the Internet
In order to browse the Internet with your smartphone, you must be connected
to a data or wireless network.
Using the browser
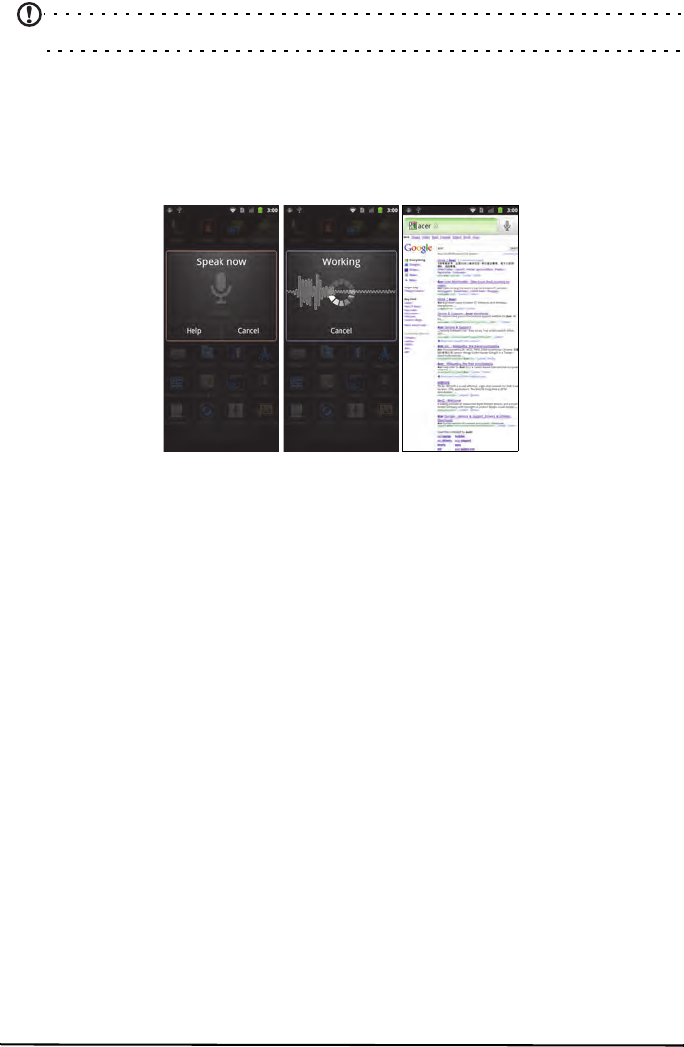
Tap Browser on the Home screen to start browsing. To open a new website, tap
the address box at the top of the page. Enter the address using the keyboard
and tap Go.
To view your browsing history, bookmarks or frequently visited sites, open the
browser then press and hold the back button.
You may open multiple pages. When a page is open, press the Menu button
and tap New window from the menu that opens. Tap Windows to view all the
windows that are open.
You can zoom in or out of pages using the zoom bar that appears when you
tap the screen. Tap and hold an item on a page to open a contextual menu.
34
Voice Search
Note: Voice search is available only in some regions.
With voice actions, you can send text messages, place calls, send emails, find
directions of establishments, automatically call establishments, search the
Internet and even send a note to yourself using your voice. Open Voice Search
from the Applications menu, or press and hold the Search button. Press and
hold the Search button again to display the “Speak now” prompt, and state
your command.
Setting up your Google email
1. Make sure your smartphone is connected to a data or Wi-Fi connection.
2. From the Applications menu tap Gmail.
If you did not enter your Gmail account address and password when you first
started your phone, follow the on screen instructions.
Composing an email
1. Make sure your smartphone is connected to a data or Wi-Fi connection.
2. From the Home screen tap Gmail.
3. Press the Menu button and then tap Compose.
4. Enter the recipient's email address, the subject and message.
5. When you are finished composing your message, tap Send.
35Setting up Email
Setting up Email
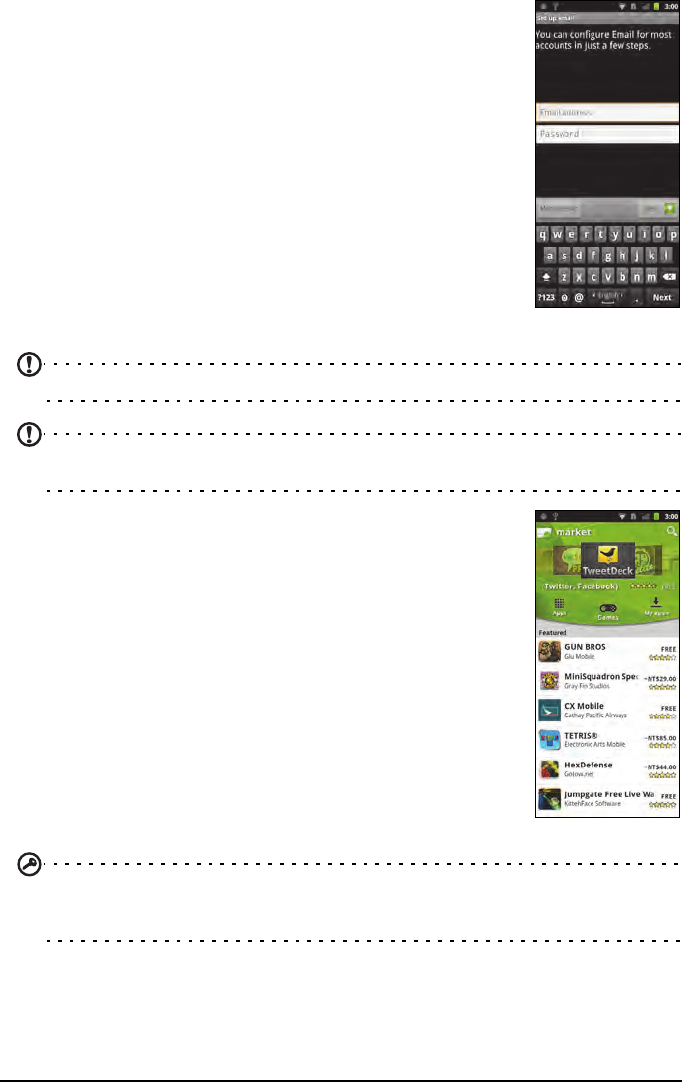
Your smartphone enables you to access your email. Most
popular ISPs can be set up in two steps. Tap Email to start
setting up your email account.
If necessary, enter your email address and tap Manual setup
to enter the parameters manually. Tap Next to finish the
setup process.
Android market
Note: The Android Market may not be available in all countries and regions.
Note: You need to have a Google account set up and active on your phone before you
can use the Android Market.
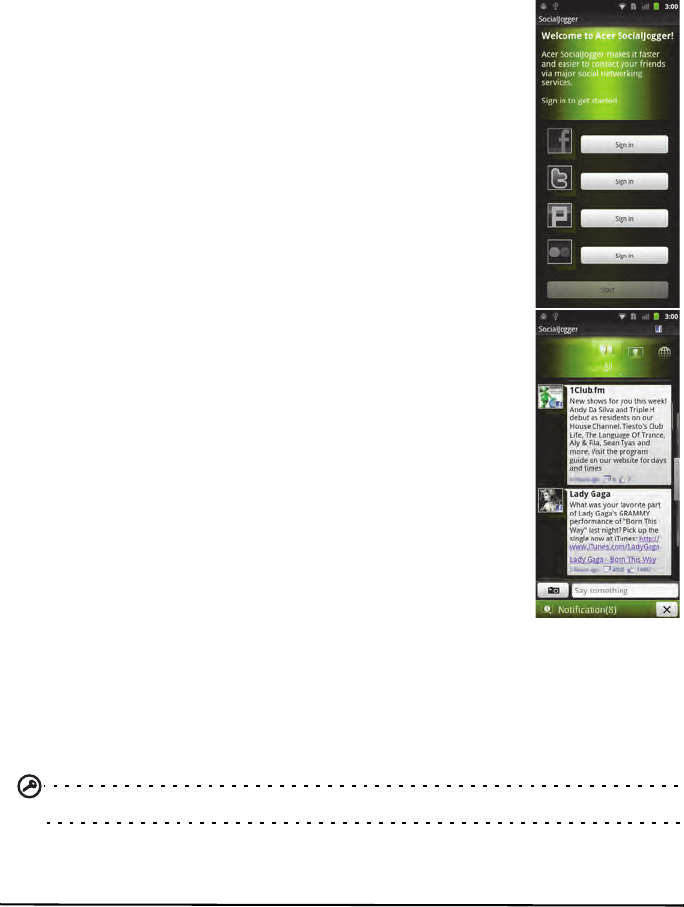
Tap Market from the Applications menu to open the
Android Market. Here you can obtain a variety of add-on
programs and applications to enhance the functionality of
your smartphone. The first time you access the Android
Market, you will need to read and accept the Terms of
Service.
You can browse the market by category or tap the search
icon to search for a specific application.
Once you have selected an application, tap the Install button
to download and install the application. You will be told
which services on your phone that the application has access
to. Tap OK to proceed with the installation.
You may keep track of the download progress from the
Notification Area.
Important: Some applications may require payment before you can download them.
You will need to have a Google Checkout account in order to pay for these
applications.
36
Uninstalling downloaded applications
Once you’ve downloaded and installed an application, you may uninstall the
application by tapping Settings from the Applications menu. Select Applications
> Manage applications. Tap the application you wish to uninstall, tap Uninstall
and confirm the uninstall.
Acer SocialJogger
Acer SocialJogger combines your social network updates in
one location, allowing you to quickly follow what your
friends are doing across several platforms.
From the applications menu, tap Acer SocialJogger to launch
the program.
Select Sign in to enter your account information. When you
are finished press Start.
Cycle through the notification updates using the slider on
the right.
Tap on a notification to view more details and make a
comment.
You can tap the icons on the top to view All, My Page, Link,
Photos, and Notifications, or drag the page to the left or
right to switch pages.
Tap the Menu button to refresh the page, access account
settings, add pages, auto play, view your friends list and
photo albums.
Maps, Navigation, Places and Latitude
Get easy-to-follow directions using Google Maps, view real-time traffic
condition and navigate by using spoken, turn-by-turn driving instructions with
Navigation, view where your friends are and places of interest and local
businesses on Google Maps using Places and Latitude.
Important: Maps does not have information about every location.