Acer orporated TMDMA100 TABLET COMPUTER User Manual Acer VanGogh UM EN
Acer Incorporated TABLET COMPUTER Acer VanGogh UM EN
Contents
- 1. Users Manual
- 2. Users Manual 1
- 3. Users Manual 2
Users Manual 1

2
© 2011 All Rights Reserved
Acer ICONIA TAB User Guide
Model: A100
First issue: 05/2011
Acer ICONIA TAB
Model number: __________________________________
Serial number: ___________________________________
Date of purchase: ________________________________
Place of purchase: ________________________________

3
Table of Contents
End User License Agreement
Getting to know your tablet
Features and functions . . . . . . . . . . . . . . . . . . . . . . . . . . . . . . . . . . . . . . . . . . .7
Product registration . . . . . . . . . . . . . . . . . . . . . . . . . . . . . . . . . . . . . . . . . . . . .7
Setting Up
Unpacking your tablet . . . . . . . . . . . . . . . . . . . . . . . . . . . . . . . . . . . . . . . . . . . 8
Getting to know your tablet . . . . . . . . . . . . . . . . . . . . . . . . . . . . . . . . . . . . . .9
Charging your tablet . . . . . . . . . . . . . . . . . . . . . . . . . . . . . . . . . . . . . . . . . . . .12
Using Your Tablet
Turning on for the first time . . . . . . . . . . . . . . . . . . . . . . . . . . . . . . . . . . . . . 13
Locking your tablet . . . . . . . . . . . . . . . . . . . . . . . . . . . . . . . . . . . . . . . . . . . . . 14
Using the touchscreen . . . . . . . . . . . . . . . . . . . . . . . . . . . . . . . . . . . . . . . . . .14
The Home screen . . . . . . . . . . . . . . . . . . . . . . . . . . . . . . . . . . . . . . . . . . . . . . .15
The onscreen keyboard . . . . . . . . . . . . . . . . . . . . . . . . . . . . . . . . . . . . . . . . . .21
Editing text . . . . . . . . . . . . . . . . . . . . . . . . . . . . . . . . . . . . . . . . . . . . . . . . . . .23
Connecting devices to your tablet
Connecting to AC power . . . . . . . . . . . . . . . . . . . . . . . . . . . . . . . . . . . . . . . .25
Inserting a micro SD card (optional) . . . . . . . . . . . . . . . . . . . . . . . . . . . . . . . 25
Connecting to a PC as a USB storage device . . . . . . . . . . . . . . . . . . . . . . . . .25
Connecting a Bluetooth device . . . . . . . . . . . . . . . . . . . . . . . . . . . . . . . . . . .26
Connecting to a television with HDMI . . . . . . . . . . . . . . . . . . . . . . . . . . . . . .26
Connecting to the dock (optional) . . . . . . . . . . . . . . . . . . . . . . . . . . . . . . . . . 27
Going Online
Managing Wi-Fi Connections . . . . . . . . . . . . . . . . . . . . . . . . . . . . . . . . . . . . . 28
Browsing the Internet . . . . . . . . . . . . . . . . . . . . . . . . . . . . . . . . . . . . . . . . . . .28
Setting up Gmail (Google mail) . . . . . . . . . . . . . . . . . . . . . . . . . . . . . . . . . . .29
Composing an email . . . . . . . . . . . . . . . . . . . . . . . . . . . . . . . . . . . . . . . . . . . .29
Setting up the Email application . . . . . . . . . . . . . . . . . . . . . . . . . . . . . . . . . .30
Online applications . . . . . . . . . . . . . . . . . . . . . . . . . . . . . . . . . . . . . . . . . . . . .30
Acer content folders
Playing music and video
Multimedia playback . . . . . . . . . . . . . . . . . . . . . . . . . . . . . . . . . . . . . . . . . . .36

4
Media server . . . . . . . . . . . . . . . . . . . . . . . . . . . . . . . . . . . . . . . . . . . . . . . . . . 39
Dolby Mobile . . . . . . . . . . . . . . . . . . . . . . . . . . . . . . . . . . . . . . . . . . . . . . . . . . 39
Managing Contacts
Using the Camera
Camera icons and indicators . . . . . . . . . . . . . . . . . . . . . . . . . . . . . . . . . . . . . . 43
Taking a photo . . . . . . . . . . . . . . . . . . . . . . . . . . . . . . . . . . . . . . . . . . . . . . . . 44
Shooting a video . . . . . . . . . . . . . . . . . . . . . . . . . . . . . . . . . . . . . . . . . . . . . . .45
Reading an eBook
LumiRead . . . . . . . . . . . . . . . . . . . . . . . . . . . . . . . . . . . . . . . . . . . . . . . . . . . . .47
Advanced Settings
Sound . . . . . . . . . . . . . . . . . . . . . . . . . . . . . . . . . . . . . . . . . . . . . . . . . . . . . . . .51
Screen . . . . . . . . . . . . . . . . . . . . . . . . . . . . . . . . . . . . . . . . . . . . . . . . . . . . . . . .51
Putting your tablet in Airplane mode . . . . . . . . . . . . . . . . . . . . . . . . . . . . . . 52
Activating or deactivating connections . . . . . . . . . . . . . . . . . . . . . . . . . . . . .52
Adjusting Bluetooth settings . . . . . . . . . . . . . . . . . . . . . . . . . . . . . . . . . . . . . 52
Connecting to a PC . . . . . . . . . . . . . . . . . . . . . . . . . . . . . . . . . . . . . . . . . . . . .53
Synchronization . . . . . . . . . . . . . . . . . . . . . . . . . . . . . . . . . . . . . . . . . . . . . . . .53
Setting the date and time . . . . . . . . . . . . . . . . . . . . . . . . . . . . . . . . . . . . . . . 54
Setting alarms . . . . . . . . . . . . . . . . . . . . . . . . . . . . . . . . . . . . . . . . . . . . . . . . . 54
Changing language and text options . . . . . . . . . . . . . . . . . . . . . . . . . . . . . . 54
Managing applications . . . . . . . . . . . . . . . . . . . . . . . . . . . . . . . . . . . . . . . . . .54
Updating your tablet’s operating system . . . . . . . . . . . . . . . . . . . . . . . . . . .55
Resetting your tablet . . . . . . . . . . . . . . . . . . . . . . . . . . . . . . . . . . . . . . . . . . .55
Appendix
FAQ and troubleshooting . . . . . . . . . . . . . . . . . . . . . . . . . . . . . . . . . . . . . . . . 57
Other sources of help . . . . . . . . . . . . . . . . . . . . . . . . . . . . . . . . . . . . . . . . . . . 58
Specifications . . . . . . . . . . . . . . . . . . . . . . . . . . . . . . . . . . . . . . . . . . . . . . . . . . 59
Safety . . . . . . . . . . . . . . . . . . . . . . . . . . . . . . . . . . . . . . . . . . . . . . . . . . . . . . . . 61

5
End User License Agreement
IMPORTANT - READ CAREFULLY: THIS END USER LICENSE AGREEMENT ("AGREEMENT") IS A LEGAL AGREEMENT BETWEEN
YOU (EITHER AN INDIVIDUAL OR A SINGLE ENTITY), AND ACER INC. INCLUDING ITS SUBSIDIARIES ("ACER") FOR THE
SOFTWARE (WHETHER PROVIDED BY ACER OR BY ACER'S LICENSORS OR SUPPLIERS) THAT ACCOMPANIES THIS
AGREEMENT, INCLUDING ANY ASSOCIATED MEDIA, PRINTED MATERIALS AND RELATED USER ELECTRONIC
DOCUMENTATION WHICH MAY BE BRANDED "ACER" ("SOFTWARE"). AGREEMENTS RELATING TO ANY OTHER PRODUCT
OR TOPIC ARE NEITHER INTENDED NOR SHOULD THEY BE IMPLIED. BY INSTALLING THE ACCOMPANYING SOFTWARE OR
ANY PORTION THEREOF, YOU AGREE TO BE BOUND BY THE TERMS AND CONDITIONS OF THIS AGREEMENT. IF YOU DO
NOT AGREE TO ALL OF THE TERMS AND CONDITIONS OF THIS AGREEMENT, DO NOT CONTINUE THE INSTALLATION
PROCESS AND IMMEDIATELY DELETE ALL INSTALLED FILES, IF ANY, OF THE ACCOMPANYING SOFTWARE FROM YOUR
DEVICE.
IF YOU DO NOT HAVE A VALIDLY-LICENSED COPY OF THE APPLICABLE SOFTWARE, YOU ARE NOT AUTHORIZED TO
INSTALL, COPY OR OTHERWISE USE THE SOFTWARE, AND HAVE NO RIGHTS UNDER THIS AGREEMENT.
The Software is protected by U.S. and international copyright laws and conventions as well as other intellectual property
laws and treaties. The Software is licensed, not sold.
GRANT OF LICENSE
Acer grants to you the following non-exclusive and non-transferable rights with respect to the Software. Under this
Agreement, you may:
1. Install and use the Software only on a single designated device. A separate license is required for each device on
which the Software will be used;
2. Make one copy of the Software solely for backup or archival purposes;
3. Make one hardcopy of any electronic documents included in the Software, provided that you receive the
documents electronically.
RESTRICTIONS
You may NOT:
1. Use or copy the Software except as provided in this Agreement;
2. Rent or lease the Software to any third party;
3. Modify, adapt, or translate the Software in whole or in part;
4. Reverse engineer, decompile, or disassemble the Software or create derivative works based upon the Software;
5. Merge the Software with any other program or modify the Software, except for your personal use; and
6. Sublicense or otherwise make the Software available to third parties, except that you may, after prior written
notification to Acer, transfer the Software as a whole to a third party so long as you do not retain any copies of the
Software and such third party accepts the terms of this Agreement.
7. Transfer your rights under this Agreement to any third parties.
8. Export the Software in contravention of applicable export laws and regulations, or (i) sell, export, re-export,
transfer, divert, disclose technical data, or dispose of, any Software to any prohibited person, entity, or destination
including, without limitation, Cuba, Iran, North Korea, Sudan and Syria; or (ii) use any Software for any use
prohibited by the laws or regulations of the United States.
SUPPORT SERVICES
Acer is not obligated to provide technical or other support for the Software.
ACER LIVE UPDATE
Certain of the software contains elements that enable the use of the Acer Live Update service, which allows for updates
for such software to be automatically downloaded and installed on your device. By installing the software, you hereby
agree and consent that Acer (or its licensors) may automatically check the version of such software that you are using on
your device and may provide upgrades to such software that may be automatically downloaded on to your device.
OWNERSHIP AND COPYRIGHT
Title, ownership rights and intellectual property rights in and to the Software and all copies thereof shall remain with Acer
or Acer's licensors or suppliers (as applicable). You do not have or shall not gain any proprietary interest in the Software
(including any modifications or copies made by or for you) or any related intellectual property rights. Title and related
rights in the content accessed through the Software is the property of the applicable content owner and may be protected
by applicable law. This license gives you no rights to such contents. You hereby agree
1. Not to remove any copyright or other proprietary notices from the Software;
2. To reproduce all such notices on any authorized copies you make; and
3. To use best efforts to prevent any unauthorized copying of the Software.
TRADEMARKS
This Agreement does not grant to you any rights in connection with any trademarks or service marks of Acer or of Acer's
licensors or suppliers.
DISCLAIMER OF WARRANTIES
TO THE MAXIMUM EXTENT PERMITTED BY APPLICABLE LAW, ACER, ITS SUPPLIERS, AND ITS LICENSORS, PROVIDE THE
SOFTWARE "AS IS" AND WITH ALL FAULTS, AND HEREBY DISCLAIM ALL OTHER WARRANTIES AND CONDITIONS, EITHER
EXPRESS, IMPLIED OR STATUTORY, INCLUDING, BUT NOT LIMITED TO, ANY IMPLIED WARRANTIES, DUTIES OR
CONDITIONS OF MERCHANTABILITY, OF FITNESS FOR A PARTICULAR PURPOSE, OF ACCURACY OR COMPLETENESS OF
RESPONSES, OF RESULTS, OF WORKMANLIKE EFFORT, OF LACK OF VIRUSES, AND OF LACK OF NEGLIGENCE, ALL WITH
REGARD TO THE SOFTWARE AND THE PROVISION OF OR FAILURE TO PROVIDE SUPPORT SERVICES. ALSO, THERE IS NO

6
WARRANTY OR CONDITION OF TITLE, QUIET ENJOYMENT, QUIET POSSESSION, CORRESPONDENCE TO DESCRIPTION OR
NON-INFRINGEMENT WITH REGARD TO THE SOFTWARE.
EXCLUSION OF INCIDENTAL, CONSEQUENTIAL AND CERTAIN OTHER DAMAGES
TO THE MAXIMUM EXTENT PERMITTED BY APPLICABLE LAW, IN NO EVENT SHALL ACER, ACER'S SUPPLIERS, OR ACER'S
LICENSORS, BE LIABLE FOR ANY SPECIAL, INCIDENTAL, INDIRECT, PUNITIVE, OR CONSEQUENTIAL DAMAGES
WHATSOEVER (INCLUDING, BUT NOT LIMITED TO, DAMAGES FOR LOSS OF PROFITS OR CONFIDENTIAL OR OTHER
INFORMATION, FOR BUSINESS INTERRUPTION, FOR PERSONAL INJURY, FOR LOSS OF PRIVACY, FOR FAILURE TO MEET ANY
DUTY INCLUDING OF GOOD FAITH OR OF REASONABLE CARE, FOR NEGLIGENCE, AND FOR ANY OTHER PECUNIARY OR
OTHER LOSS WHATSOEVER) ARISING OUT OF OR IN ANY WAY RELATED TO THE USE OF OR INABILITY TO USE THE
SOFTWARE, THE PROVISION OF OR FAILURE TO PROVIDE SUPPORT SERVICES, OR OTHERWISE UNDER OR IN CONNECTION
WITH ANY PROVISION OF THIS AGREEMENT, EVEN IN THE EVENT OF THE FAULT, TORT (INCLUDING NEGLIGENCE), STRICT
LIABILITY, BREACH OF CONTRACT OR BREACH OF WARRANTY OF ACER OR ITS SUPPLIERS OR LICENSORS, AND EVEN IF
ACER AND ITS SUPPLIERS AND LICENSORS HAVE BEEN ADVISED OF THE POSSIBILITY OF SUCH DAMAGES.
LIMITATION OF LIABILITY AND REMEDIES
NOTWITHSTANDING ANY DAMAGES THAT YOU MIGHT INCUR FOR ANY REASON WHATSOEVER (INCLUDING, WITHOUT
LIMITATION, ALL DAMAGES REFERENCED ABOVE AND ALL DIRECT OR GENERAL DAMAGES), THE ENTIRE LIABILITY OF
ACER, ITS SUPPLIERS, AND ITS LICENSORS, UNDER ANY PROVISION OF THIS AGREEMENT, AND YOUR EXCLUSIVE REMEDY
FOR ALL OF THE FOREGOING, SHALL BE LIMITED TO THE AGGREGATE AMOUNT PAID BY YOU FOR THE SOFTWARE. THE
FOREGOING LIMITATIONS, EXCLUSIONS AND DISCLAIMERS (INCLUDING DISCLAIMER OF WARRANTIES AND EXCLUSION OF
INCIDENTAL, CONSEQUENTIAL AND CERTAIN OTHER DAMAGES ABOVE) SHALL APPLY TO THE MAXIMUM EXTENT
PERMITTED BY APPLICABLE LAW, EVEN IF ANY REMEDY FAILS ITS ESSENTIAL PURPOSE; PROVIDED, HOWEVER, THAT
BECAUSE SOME JURISDICTIONS DO NOT ALLOW THE EXCLUSION OR LIMITATION OR LIABILITY FOR CONSEQUENTIAL OR
INCIDENTAL DAMAGES, THE ABOVE LIMITATION MAY NOT APPLY TO YOU.
TERMINATION
Without prejudice to any other rights, Acer may immediately terminate this Agreement without notice if you fail to
comply with any terms and conditions of this Agreement.
In such event, you must:
1. Cease all use of the Software;
2. Destroy or return to Acer the original and all copies of the Software; and
3. Delete the Software from all devices on which it was resident.
All disclaimers of warranties and limitation of liability set forth in this Agreement shall survive termination of this
Agreement.
GENERAL
This Agreement represents the complete agreement between you and Acer relating to this license for the Software and
supersedes all prior agreements, communications, proposals and representations between the parties and prevails over
any conflicting or additional terms of any quote, order, acknowledgement or similar communication. This Agreement may
only be modified by a written document signed by both parties. If any provision of this Agreement is held by a court of
competent jurisdiction to be contrary to law that provision will be enforced to the maximum extent permissible and the
remaining provisions of this Agreement will remain in full force and effect.
ADDITIONAL PROVISIONS APPLICABLE TO THIRD PARTY SOFTWARE AND SERVICES
Software provided hereunder by Acer's licensors or suppliers ("Third Party Software") is made available to you for your
personal, non-commercial use only. You may not use the Third Party Software in any manner that could damage, disable,
overburden, or impair the services provided by Acer's licensors or suppliers hereunder ("Third Party Services").
Furthermore, you may not use the Third Party Software in any manner that could interfere with any other party's use and
enjoyment of the Third Party Services, or the services and products of Acer's licensors' or suppliers' third party licensors.
Your use of the Third Party Software and Third Party Services is also subject to additional terms and conditions and policies
which can be accessed through our global website.
Privacy policy
During registration you will be asked to submit some information to Acer. Please refer to Acer’s privacy policy at http://
www.acer.com or your local Acer website.
Music recognition technology and related data are provided by Gracenote®. Gracenote®,
Gracenote logo and logotype, and the "Powered by Gracenote" logo are either a
registered trademark or a trademark of Gracenote, Inc. in the United States and/or other
countries.
XT9 and XT9 logo are registered trademarks of Nuance Communications, Inc. or its
subsidiaries in the United States of America and/or other countries.

7Features and functions
Getting to know your tablet
Features and functions
Your new tablet offers leading, easy-to-access multimedia and entertainment
features. You can:
• Connect to the Internet.
• Access your email while on the move.
• Keep in touch with your friends via your Contacts and social networking
applications.
• Listen to rich, full-impact audio via Dolby Mobile.
Product registration
When using your product for the first time, it is recommended that you
immediately register it. This will give you access to useful benefits, such as:
• Faster service from our trained representatives.
• Membership in the Acer community: receive promotions and participate
in customer surveys.
• The latest news from Acer.
Hurry and register, as other advantages await you!
How to register
To register your Acer product, please visit mobile.acer.com. Click Product
Registration and follow the simple instructions.
You can also register directly from your tablet by tapping the Acer Registration
icon.
After we receive your product registration, you will be sent a confirmation
email with important data that you should keep in a safe place.

9Getting to know your tablet
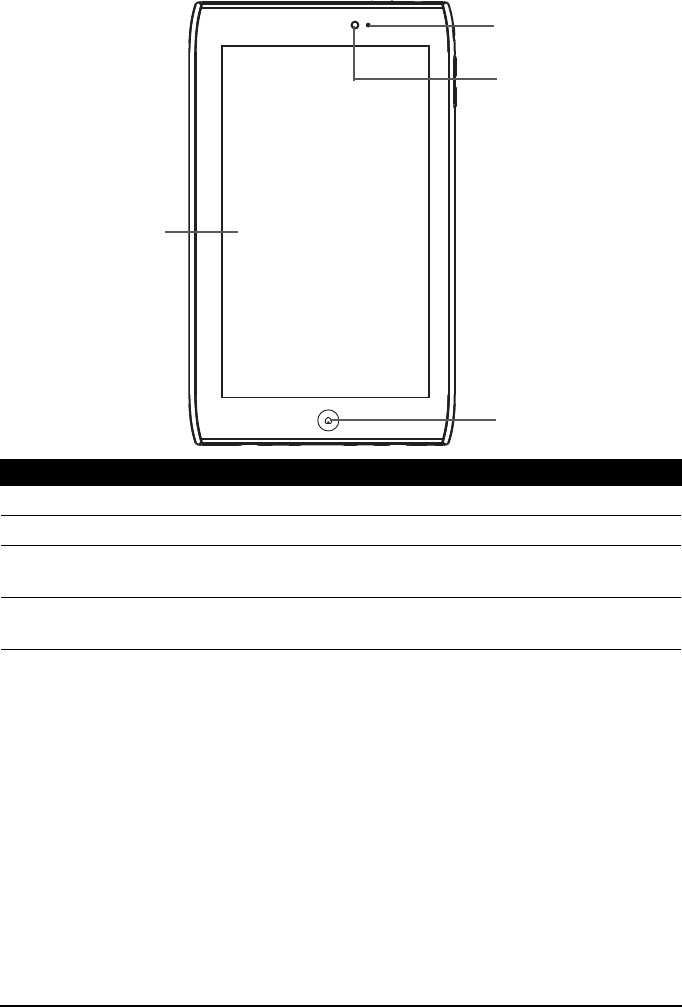
Getting to know your tablet
Front
1
2
3
4
view
No. Item Description
1 Touchscreen 7-inch, 1024 x 600 pixel capacitive touchscreen.
2 Home button Unknown
3 Front-facing camera A 2-megapixel camera for video chatting and
self-portrait images.
4 Light sensor Detects ambient light and automatically adjusts
the screen brightness.
10
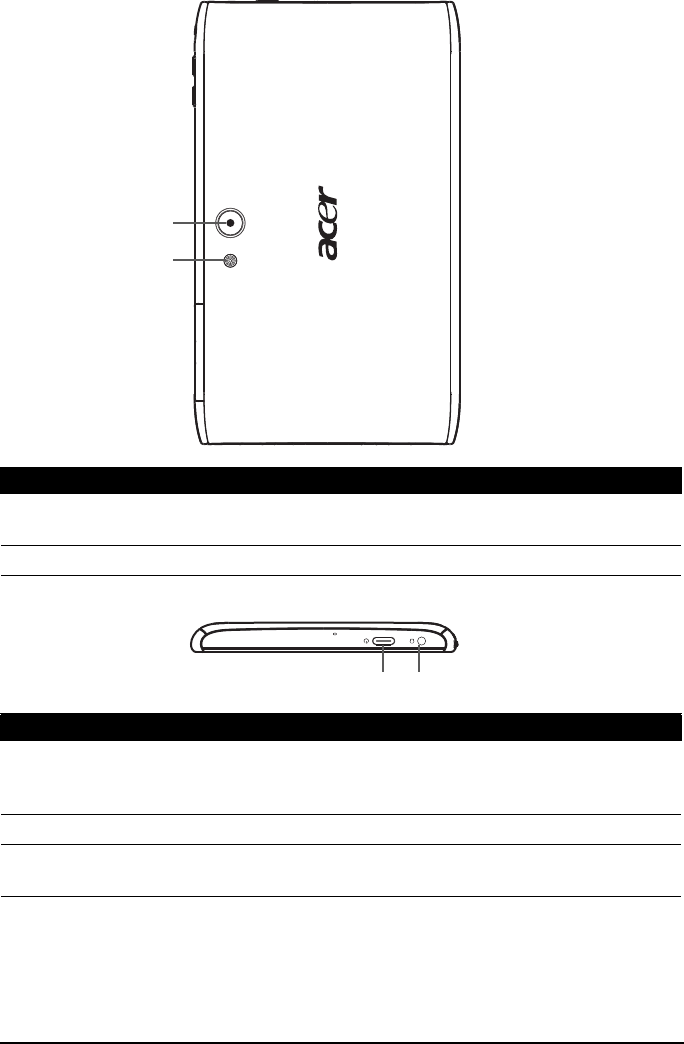
Back
1
2
view
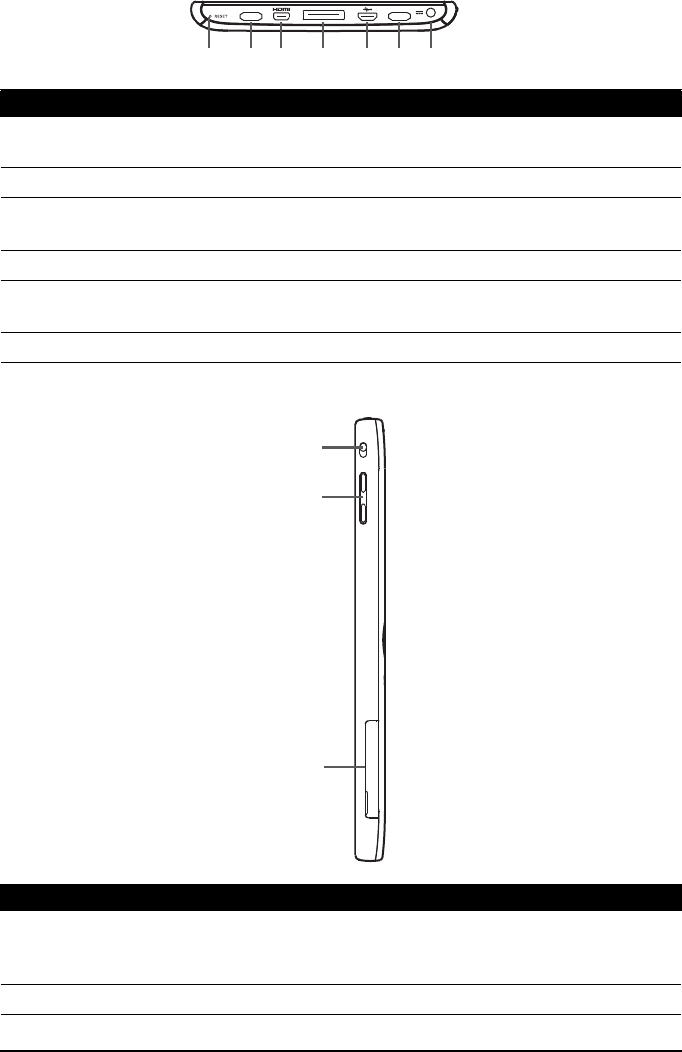
Top
12
view
No. Item Description
1 5 MP camera A 5-megapixel camera for taking high-
resolution images.
2 LED flash Lights to illuminate images.
No. Item Description
1 Power button Long press to turn the tablet on, press briefly to
turn the screen on/off or enter sleep mode;
press and hold to turn the tablet off.
2 3.5 mm headphone jack Connect to stereo headphones.
3 Micro HDMI (Type D)
connector
Connects to an HDMI cable with a Type D
connector.
11Getting to know your tablet
Bottom
123 624 5
view
Side
1
2
3
view
No. Item Description
1 Reset button Insert a small thin object (such as a paperclip) to
reset power to the tablet.
2 Speakers Emits stereo audio
3 Micro HDMI (Type D)
connector
Connects to an HDMI cable with a Type D
connector.
4 Docking port Connect your tablet to the dock accessory.
5 Micro USB connector
(Slave)
Connects to a computer with a USB cable.
6 DC-in jack Connects to the DC power supply.
No. Item Description
1 Screen rotation lock
switch
Use this switch to lock the screen rotation or
allow the screen to match the tablet’s
orientation.
2 Volume control key Increase and decrease the tablet volume.
12
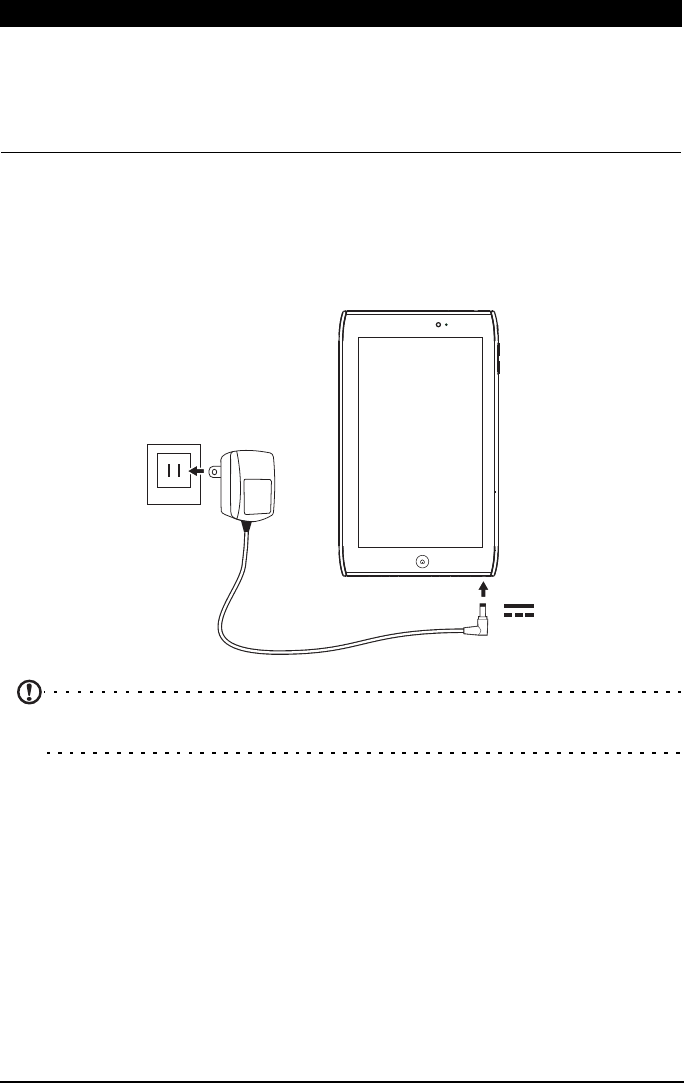
Charging your tablet
For first-time use, you need to charge your tablet for four hours. After that you
can recharge the battery as needed.
Connect the DC-in jack to your tablet and plug the AC adapter into any AC
outlet.
Note: It is normal for the tablet surface to become warm during charging or
long periods of use.
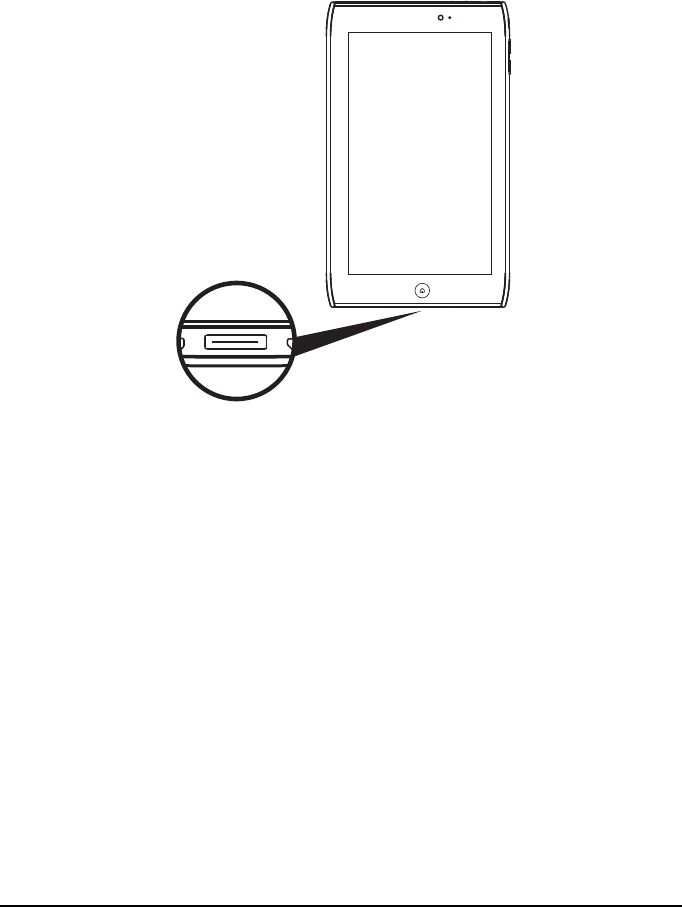
3 Card slot cover Insert a micro SD card into the slot under this
cover.
See “Inserting a micro SD card (optional)” on
page 25.
No. Item Description

13Turning on for the first time
Using Your Tablet
Turning on for the first time
To turn on your tablet, press and hold the power button for two seconds. You
will then be asked some questions before you can use your tablet.
To start, tap to select your language, then tap Start. Follow the rest of the
instructions as they are displayed.
Sign in to or create a Google account
If you have Internet access, your tablet allows you to synchronize information
with a Google account.
During the start-up process, you may create or sign in to an account, which will
be used to synchronize your contact list, email, calendar and other information.
If you do not yet have Internet access, or do not want to use this feature, then
tap Skip.
Important: You must sign into a Google Account to use Gmail, Google Talk,
Google Calendar, and other Google Apps; to download applications from
Android Market; to back up your settings to Google servers; and to take
advantage of other Google services on your tablet.
If you want to restore existing settings from another device with Android
2.0 (or later) installed, you must sign into your Google account during setup.
If you wait until after setup is complete, your settings will not be restored.
If you have multiple Google accounts, such as separate accounts for personal
and business contacts, you can access and synchonize them from the
Accounts settings section. See “Multiple Google accounts” on page 54.
14
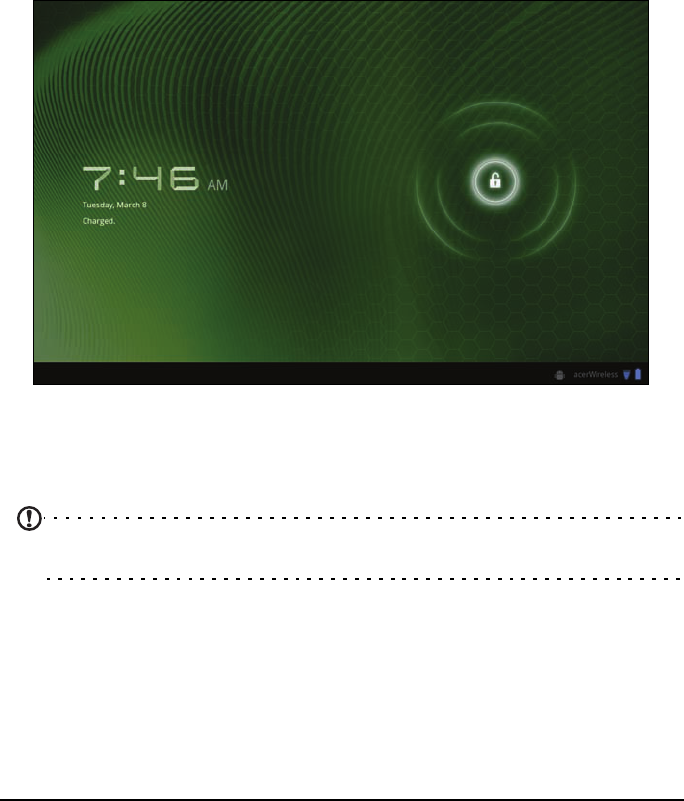
Locking your tablet
If you will not use your tablet for a while, briefly press the power button to lock
access. This saves power and ensures your tablet does not unintentionally use
any services. Your tablet will lock automatically if it is not used after a while. To
change the delay, tap Apps > Settings > Screen > Timeout.
Waking your tablet
If the screen is off and the tablet does not react to any taps on the screen, then
it has been locked and is in sleep mode.
To wake your tablet, press the power button. Your tablet will display the Lock
screen. Drag the lock symbol to the edge of the circle to unlock the tablet.
For additional security, you may set a code or number that must be entered to
access the tablet, such as an unlock pattern (a set of dots that must be tapped in
the correct order). Open the Home screen and tap Apps > Settings > Location &
security > Configure lock screen.
Note: If you forget an unlock pattern or PIN, please refer to “Unlock
pattern“ on page 58.
Using the touchscreen
Your tablet uses a touchscreen for selecting items and entering information.
Use your finger to tap the screen.
Tap: Touch the screen once to open items and select options.
Drag: Hold your finger on the screen and drag across the screen to select text
and images.
15The Home screen
Tap and hold: Tap and hold an item to see a list of actions available for that
item. On the pop-up menu that appears, tap the action you want to perform.
Scroll: To scroll up or down the screen, simply drag your finger up or down the
screen in the direction that you want to scroll.
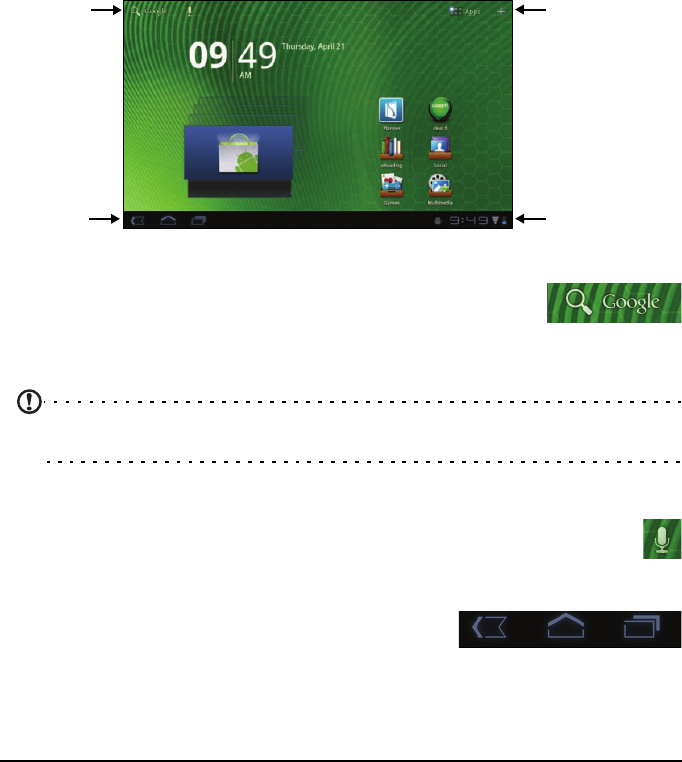
The Home screen
When you start your tablet, or wake it from power saving, it will display the
Home screen. This screen gives you quick access to information and simple
controls with widgets or shortcuts. These display information such as the time
and favorite bookmarks, or provide additional controls and direct access to
applications. Some have been pre-installed on your tablet, while others may be
downloaded from the Android Market.
The Home screen already features some useful controls and information.
Search
Navigation
Application menu
Customize screen
Time and
Status
and
Search
To search for applications, files or for information on the
Internet, tap the Google / Search icon in the top-left corner.
Simply enter the text you want to find. Tap the arrow or Enter key to search the
Internet, or tap one of the suggestions, applications or files shown in the list.
Note: In order to search or browse the Internet, you must be connected to a
wireless network. See “Going Online” on page 28.
Voice search
If voice search is available, tap the microphone and speak your search
request. See “Voice Search” on page 29.
Navigation
Back Home Recent
To navigate through menus and options, three (or
more) icons are shown in the bottom-left corner.
16
Back
Tap this icon to go to the previous page, or to go up one level in a
menu. This icon may be replaced with the
hide
icon in certain cases
(such as if the keyboard or list of recent applications is shown).
Hide
Home
Tap this icon to go directly to the Home screen.
Recent
Tap this icon to see recently opened applications. Tap an application to open it,
or tap anywhere on the screen to return to the Home screen.
Settings
This icon is displayed in some applications. Tap this icon to open a list
of options.
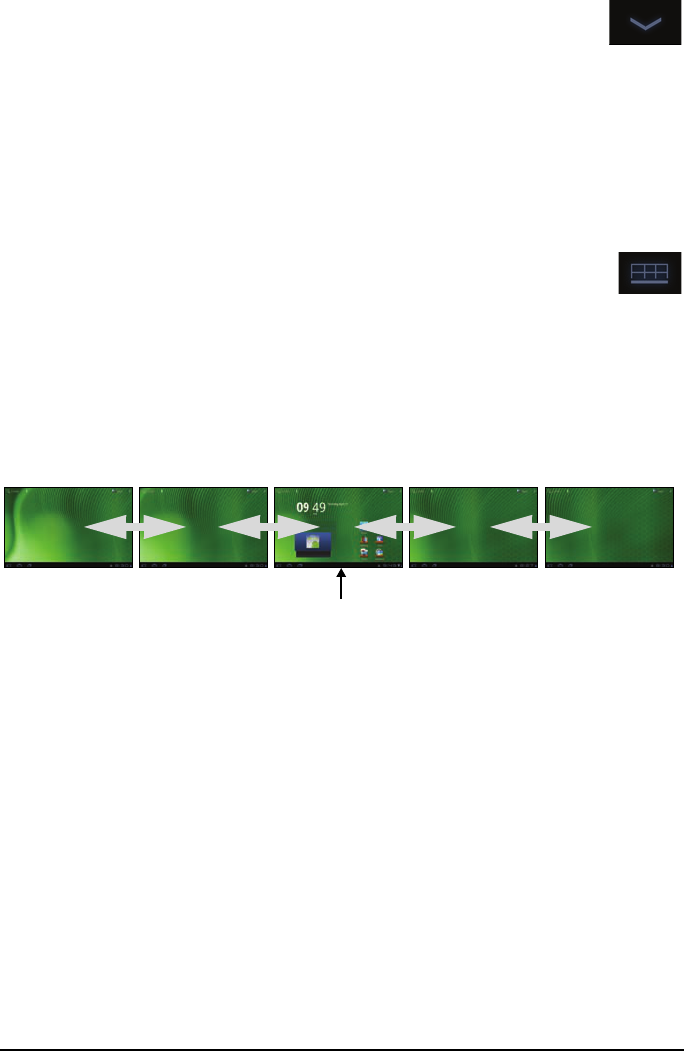
The extended Home screen
The Home screen extends to either side of the initial Home screen, giving you
more room to add widgets or organize shortcuts. To view the extended Home
screen, swipe your finger to the left or right.
A total of five pages are available, two to the left and two to the right. To
change or add widgets on any of the screens see “Personalizing the Home
screen“ on page 20.
Home screen
17The Home screen
The application menu
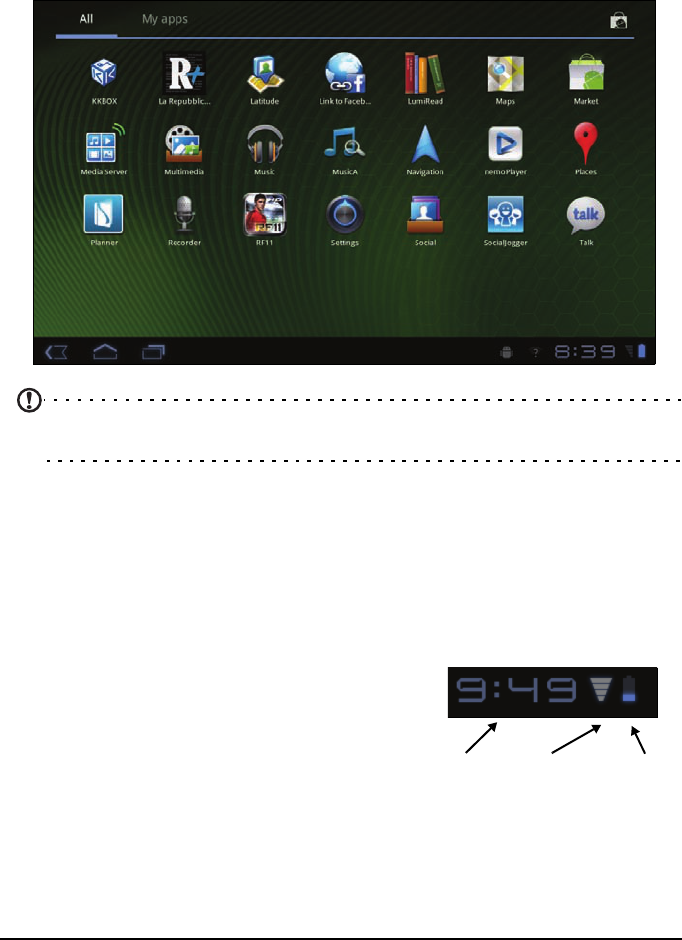
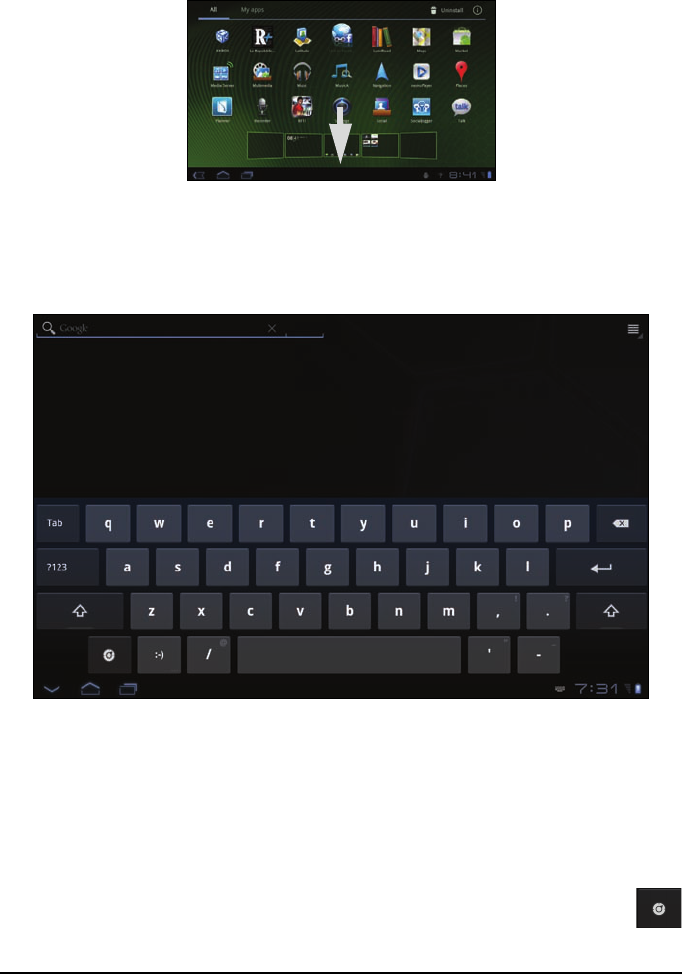
The application menu displays applications installed on your tablet.
Two categories are available All and My apps. All displays all applications that
are installed on your tablet; My apps displays applications that you have
installed from the Android Market.
Note: All images are for reference only. The applications installed on your
tablet can be different to the applications shown in illustrations.
Applications are displayed in alphabetical order. If more applications are
available, an outline of the second page will be shown on the side of the
screen. Swipe the outline towards the center of the screen to switch pages.
Tap and hold an icon to add a shortcut to one of your Home screens. While a
shortcut is selected, thumbnails of the Home screens are shown below the list of
applications, simply drag the shortcut to a screen.
Status and notification area
Status and notification icons are shown in the
bottom-right corner of the screen.
Time Wireless Battery
charge
reception
status
This area contains a variety of icons to inform you
of your tablet’s status. The icons on the right side
of the clock indicate connectivity and battery
status. The left side of the clock displays the event
notification icons.
18
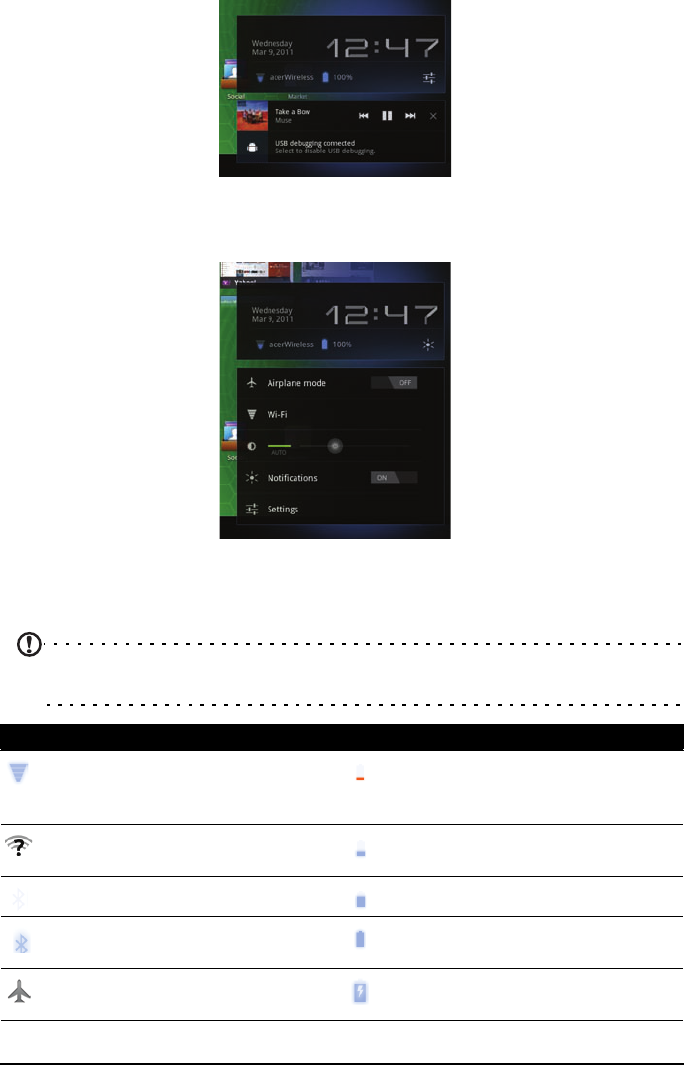
Tap the status icons to view more status information and a summary of events.
Tap the status area again to view more controls. While viewing a notification,
tap the summary to see more information, if available. Some event summaries
include controls, such as media controls if music is playing.
Status and notification icons
Connection and batterystatus icons
Note: Network connection icons are blue if you have an active Google
account.
Icon Description Icon Description
Connected to a wireless
network (waves indicate
connection strength)
Battery is very low
An open wireless network is
available
Battery is low
Bluetooth is on Battery is partially drained
Connected to a Bluetooth
device
Battery is full
Airplane mode (wireless
connectivity disconnected)
Battery is charging
19The Home screen
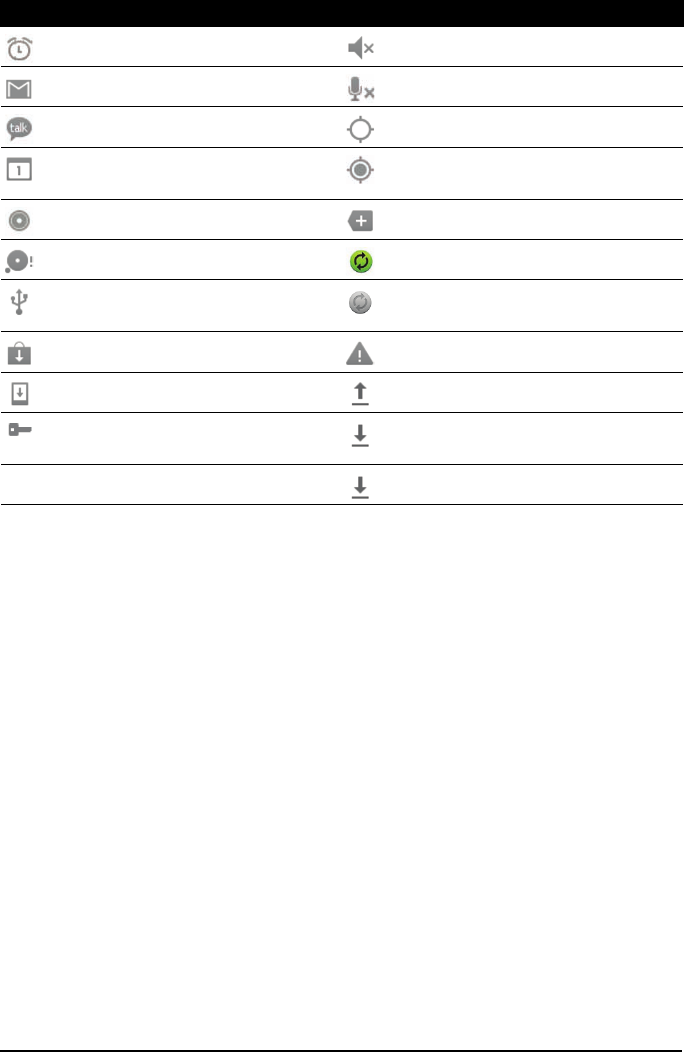
Notification icons
Icon Description Icon Description
Alarm is set Speaker is silenced
New Gmail message Tablet microphone is off
New Google Talk message GPS is on
Upcoming event Receiving location data from
GPS
Song is playing More status notifications
SD card or USB storage is full Syncing data
Tablet is connected to PC via
USB
Sync is on
Application update available Problem with sign-in or sync
System update available Uploading data
Virtual private network (VPN)
status
Downloading data
Download finished
20
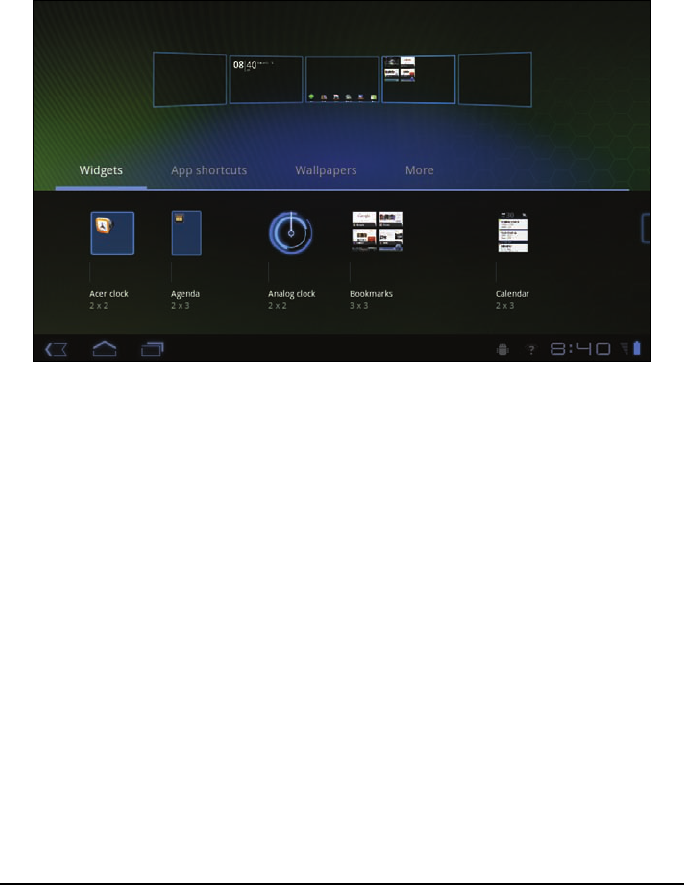
Personalizing the Home screen
You may personalize your Home screen by adding or removing application
shortcuts or widgets, and by changing the wallpaper.
Adding or removing shortcuts or widgets
To add shortcuts or widgets open the Add to Home screen: tap the plus sign
next to Apps in the top-right corner of the Home screen. Alternatively, tap and
hold anywhere on the Home screen.
Tap Widgets to see small applications that you can add to a Home screen.
Widgets are small applications display constantly-updated information or quick
shortcuts to applications or special functions.
Tap Applications to open a list of shortcuts to applications and settings you can
drag to a Home screen.
Tap Wallpapers to change the current wallpaper. You can choose from a set of
pre-formatted wallpapers, images stored in the Gallery, or Live wallpapers
featuring animated or interactive backgrounds.
Tap More to add icons, shortcuts, ‘groups’ of contacts or links to specific
settings.
To move any item on the Home screen, tap and hold the item until it is selected.
You may drag the item to any free area on the screen. To move the item to a
different home screen, drag it to the side of the screen, the Home screen will
switch to the screen in that direction. Release the item when it is positioned
correctly.
To remove an item from the Home screen, tap and hold the item until the trash
icon appears in the top-right corner of the screen. Simply drag the item to the
trash icon.
21The onscreen keyboard
Adding shortcuts from the Application menu
You can add shortcuts to the Home screen directly from the application menu.
Open the Application menu then tap and hold an icon until an image of the
Home screens appears. Drag the icon to a Home screen to create a shortcut.
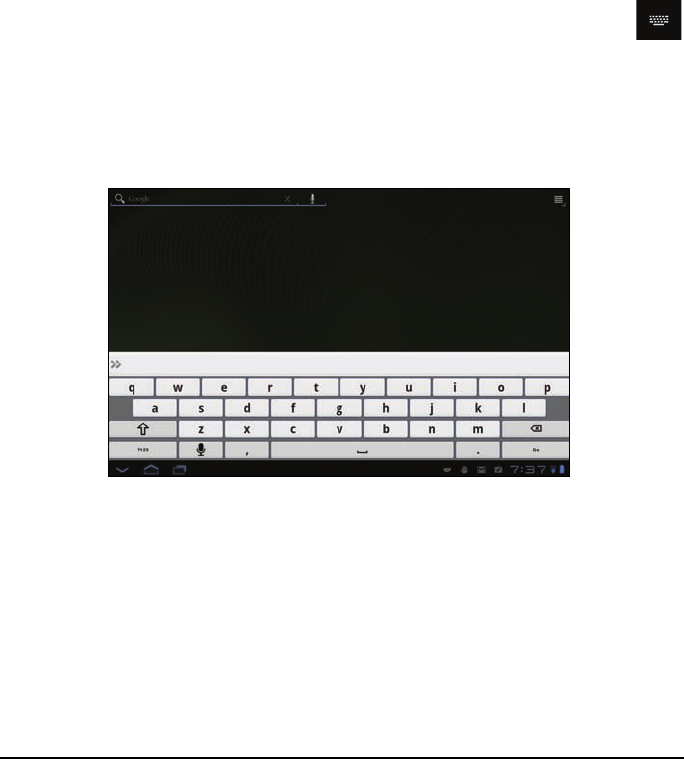
The onscreen keyboard
When you tap a text box to enter text, an onscreen keyboard will appear.
Simply tap on keys to enter text.
Tap the ?123 button to see numbers and special characters, and then tap the
More key to see more options. Tap and hold a key to select alternative
characters (if available), such as letters with accents.
The layout of the keyboard varies slightly, depending on the application and
information that is required.
Changing Android keyboard settings
To use a different keyboard language or change settings, tap the Input
options key, then select either Input languages or Android keyboard
22
settings. These settings include Auto-correction and keyboard sounds and
vibration.
Predictive text or auto correction
The Android keyboard can provide predictive text input. As you tap the letters
of a word, a selection of words are displayed that continue the sequence of
letters tapped, or are a close match allowing for errors. The word list changes
after every key press. If the word you need is displayed, you can tap on it to
insert it into your text.
To turn predictive text on or off with the Android keyboard, tap the Input
options key, and then Android keyboard settings. Tap Auto correction or Show
correction suggestions and select one of the options.
Changing the keyboard
To use a different keyboard type, tap the Keyboard status icon; this will
open a menu listing the text input methods available on your tablet. Tap
your preferred input method.
Typically three options are available: two types of Android Keyboard (keyboard
and voice) and XT9 Text Input.
XT9 Text Input
The XT9 keyboard provides an alternative to the standard Android keyboard.
Tap the ?123 button to see numbers and special characters, and then tap the
ALT key to see more options. Tap and hold a key to select alternative characters
(if available), such as letters with accents.
Additional keys vary depending on the type of text you enter. E.g. a key to add
a smiley is available when typing a text message. Like other keys, tap and hold
to see if additional options are available.
Text assistance
The standard XT9 keyboard has various features that assist you to enter correct
text. To use these features, tap the Keyboard status icon; this will open a menu
23Editing text
listing the text input methods available on your tablet. Tap the settings icon
next to the XT9 Text Input entry.
Editing text
You can select and edit text in certain applications, such as text you have
entered in a text fields. Selected text can be cut or copied and later pasted
within the same application, or to a differentor across apps.
Note: Certain applications may not support text selection, or only support it
in certain areas. Others applications offer specialized commands to select
text that are only available in that application.
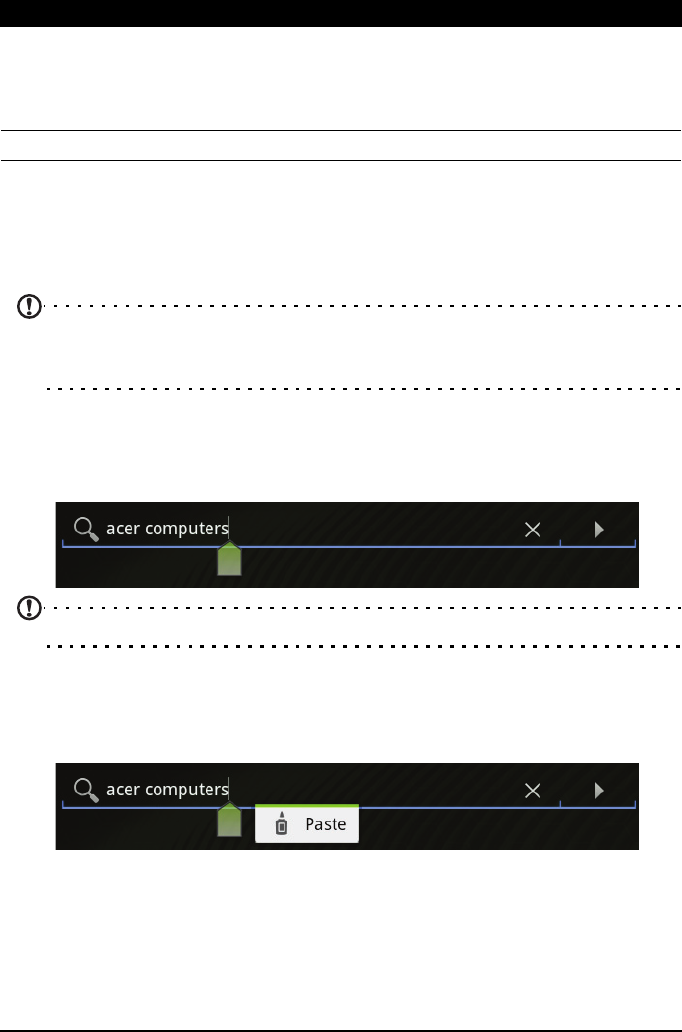
Inserting text
1. Tap the text you want to select. If you can select this text, a cursor is inserted
below the text.
Note: The cursor indicates where text you type or paste will be inserted.
2. If the cusor is not in the desired position, simply drag it to the correct
position
If you previously copied (see below) text, a
Paste
button appears briefly
above the cursor. Tap the button to paste the text.
3. Modify the text: Type, paste or delete text.
4. Tap Enter on the keyboard, or tap the Close Keyboard button.
Selecting text
To select text that you want to cut, copy, delete or replace:
1. Tap and hold the text or word you want to select.
Function Description
Languages and
settings
Set the languages that will be available.
If you have selected more than one keyboard language,
tap the globe in the text prediction bar to cycle through
the languages.
Preferences Change your text input preferences.

24
The selected text is highlighted, with a tab at each end of the selection.
2. Drag either tab to expand or reduce the amount of selected text, or tap
Select all.
3. To cut or copy the text, tap the Cut or Copy button.
25Connecting to AC power
Connecting devices to your tablet
Connecting to AC power
See “Charging your tablet” on page 12.
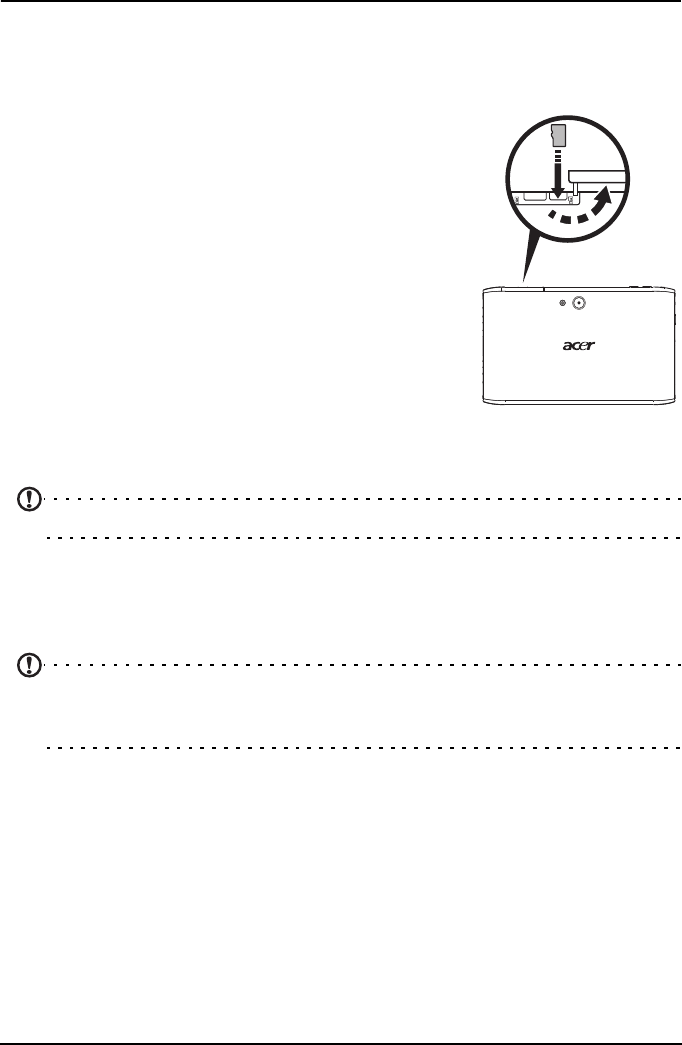
Inserting a micro SD card
(optional)
microSD
You may install a micro SD card to expand your device's
storage space.
Note: Your tablet only supports microSD cards that use
the FAT or FAT32 file system.
1. Open the card slot cover.
2. Insert the micro SD card as shown.
3. Replace the card slot cover.
Check card capacity in the External SD card section of
Apps > Settings > Storage.
Note: Ensure that the micro SD card is inserted all the way into the card slot.
Transferring files from a microSD card to your PC
Remove the card from the tablet and use a card reader or USB adapter to access
the card as an external storage device.
Note: Check your tablet is not using the microSD card before removing it
from the tablet.
Take care when removing the card, the slot is spring-loaded.
Connecting to a PC as a USB storage device
Download and install the latest USB driver on your computer before connecting
your tablet to the computer. Visit www.acer.com/worldwide/support/
download.htm for the latest driver.
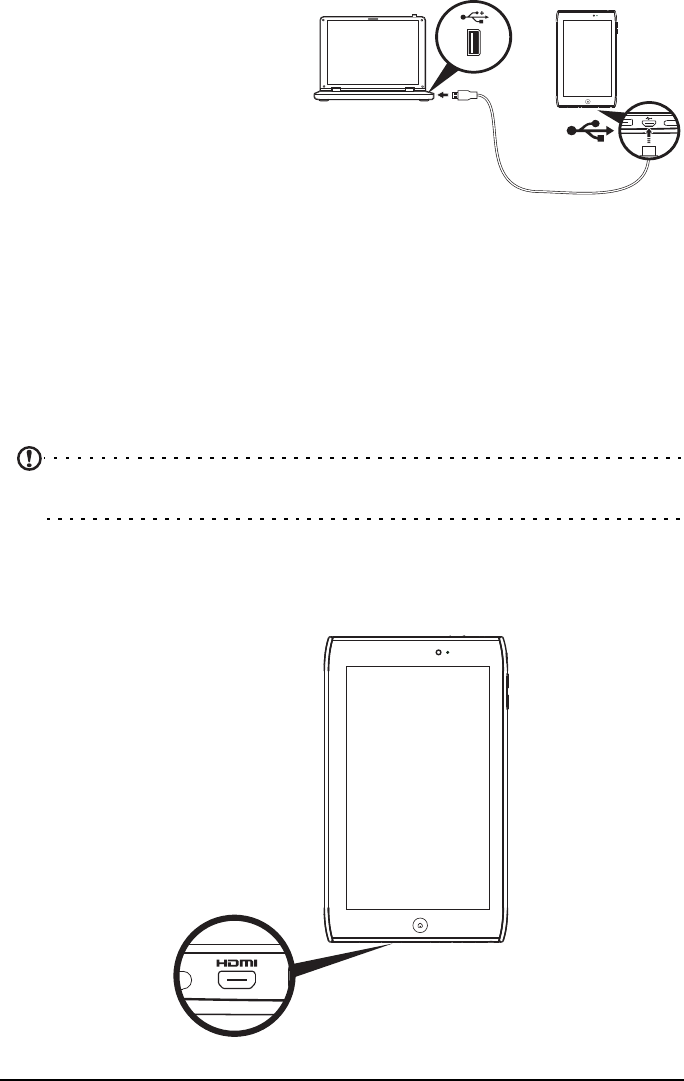
26
This allows you to transfer your
personal data to, or from, your
PC, using your PC’s file explorer.
Plug the micro USB connector to
your tablet, and plug the other
end of the USB cable into a USB
port on your PC.
After a short delay, your tablet's
internal memory will be visible as
an external drive in your PC’s file explorer.
Connecting a Bluetooth device
Only A2DP stereo headsets (without microphone) are supported. Please check
for updates to the tablet's software which may add support for additional
Bluetooth devices.
For Bluetooth settings, tap Apps > Settings > Wireless & networks > Bluetooth
settings.
Tap Find nearby devices to scan for available devices.
Note: Please check for updates to the tablet's software that may add
support for additional Bluetooth devices. Visit www.acer.com/support.
Connecting to a television with HDMI
Connect a micro HDMI (Type D) cable to your tablet then plug the other end of
the HDMI cable into a TV or monitor with an HDMI port.
27Connecting to the dock (optional)
Connecting to the dock (optional)
The optional dock holds your tablet and allows you to easily charge the battery
with a single connection.
The dock provides extra connectors that replace your tablet's built-in
connectors while it is docked. Please check the dock’s specifications for the
exact features provided.
28
Going Online
Managing Wi-Fi Connections
If you did not connect to a Wi-Fi network when you first started your tablet, or
want to connect to a new network, tap Apps > Settings > Wireless & networks
to manage your connection settings. Alternatively, tap the Wi-Fi status icon in
the bottom-right corner of the screen.
If Wi-Fi is not on, tap Turn on Wi-Fi, and wait for your tablet to detect nearby
networks. Tap the name of your network and enter a security password, if
needed.
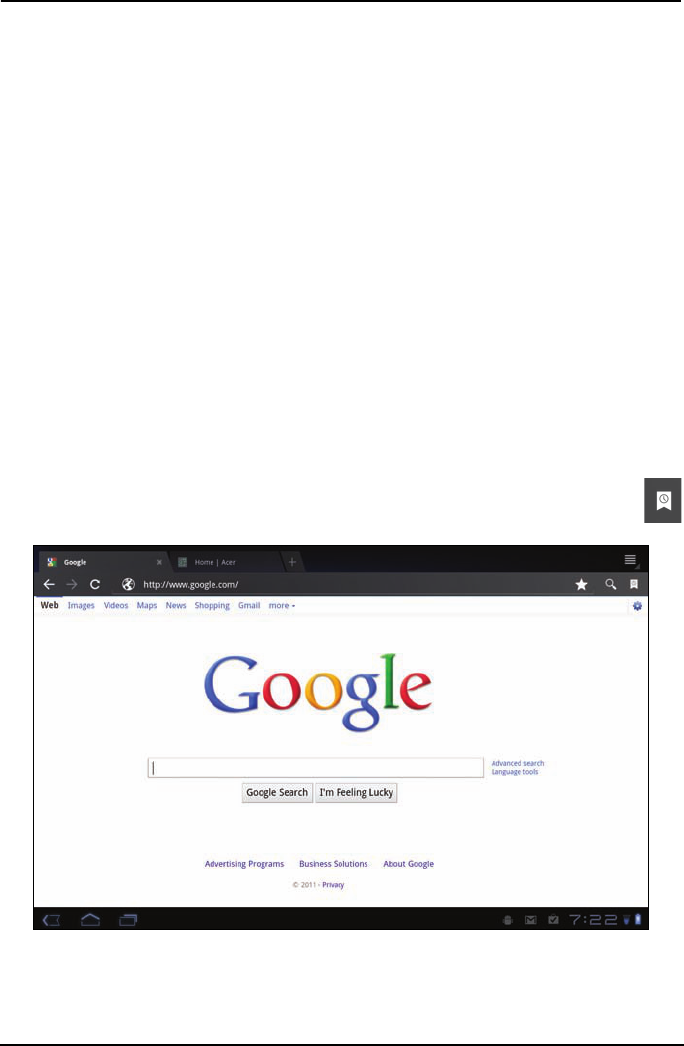
Browsing the Internet
In order to browse the Internet with your tablet, you must be connected to a
the Internet.
Using the browser
To start browsing, tap a bookmark from the bookmark widget on the Home
screen, or open the Application menu and select Browser. To enter a website
address, tap the address box at the top of the page. Enter the address using the
keyboard and tap Enter or the Go arrow.
To view your browsing history, bookmarks or frequently visited sites,
open the browser then tap the bookmark icon in the top-right corner.
29Setting up Gmail (Google mail)
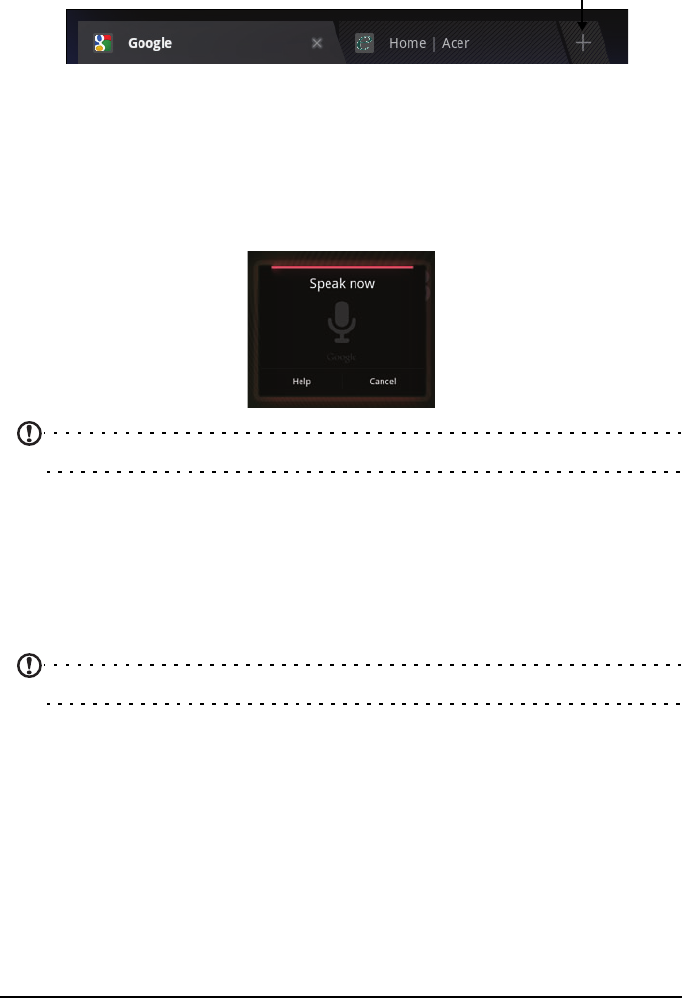
You may open multiple tabs. When a page is open, press the small tab with a
plus sign. Simply tap one of the tabs across the top of the screen to switch
pages.
New tab
Pinch to zoom in or out of pages. Tap and hold an item on a page to open a
contextual menu.
Voice Search
With voice actions, you can send emails, find directions to locations, search the
Internet and even send a note to yourself using your voice. Tap the microphone
on the Home screen or open Voice Search from the applications tab. When the
Speak now prompt is displayed, state your command or query.
Note: Voice search is available only in some regions.
Setting up Gmail (Google mail)
1. Make sure your tablet is connected to the Internet.
2. From the Applications menu tap Gmail.
If you did not enter an Gmail account address and password when you first
started your tablet, follow the on screen instructions.
Note: You need to activate a Google account before you can use Gmail.
Composing an email
1. Make sure your tablet is connected to the Internet.
2. Open the application menu and tap Gmail.
3. Press the Menu button and then tap Compose.
4. Enter the recipient's email address, the subject and message.
5. When you are finished composing your message, tap Send.

30
Setting up the Email application
The Email application enables you to access email from most popular email
providers. Most accounts can be set up in two steps. Open the application menu
and then tap Email to start setting up your email access.
If necessary, enter your email address and tap Manual setup to enter the
parameters manually. Tap Next to finish the setup process.
The combined inbox feature of your tablet allows you to view emails from
multiple accounts in a single inbox.
Online applications
Your tablet provides a variety of preinstalled applications. Many of these
require some form of Internet access.
These applications may include:
•Acer Sync: Sync your data between your tablet, your computer and the
Google servers.
•SocialJogger: View updates to your social networks in one location.
•Maps: Get easy-to-follow directions using Google Maps.
•Talk*: Chat with your friends, with text, sound and video.
•Navigation*: Turn-by-turn navigation with live traffic, multiple visible
layers and text-to-speech take you where you want to go.
• Latitude: View where your friends are on Google Maps.
•Places: View places of interest and local businesses on Google Maps.
•YouTube*: View the Most viewed and Most discussed video clips on
YouTube.
•LumiRead: Download books from featured bookstores, and setup
convenient links to your favorite ebook sites.
•MusicA: Let your tablet listen to music and access the MusicA database
to find the track name and artist.
* Note: Applications installed may vary according to your region.
31Online applications
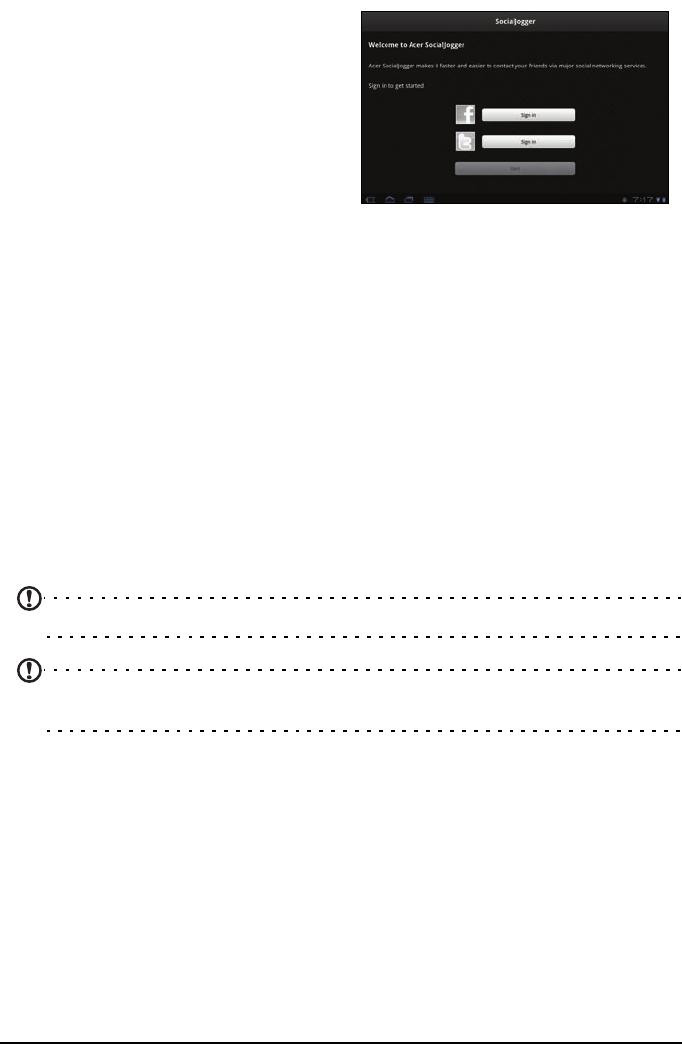
Acer SocialJogger
Acer SocialJogger combines your
social network updates in one
location, allowing you to quickly
follow what your friends are doing
across several platforms.
From the application menu, tap Acer
SocialJogger to launch the program.
Select Sign in to enter your account
information. When you are finished
press Start.
Slide the disc, located on the right, up and down to cycle through the status
updates.
Tap on a status to view more details and make a comment.
Tap the left and right arrows, located on the top, to cycle between the
categories: My Page, Photos, Link and any added pages.
Tap the Menu button to access account settings, refresh the page, auto play,
and add or remove custom pages.
Adobe Flash Player
Adobe Flash Player is not installed on your tablet. If you want to use Flash
content on in your browser, you can visit the Android Market (see below) to
easily download and install Adobe Flash Player.
Android Market
Note: The Android Market may not be available in all countries and regions.
Note: You need to activate a Google account before you can use the
Android Market.
Tap Market from the home screen or application menu to open the
Android
Market
. Here you can obtain a variety of add-on programs and applications to
enhance the functionality of your tablet.
You may also browse for books that you may read with LumiRead or another
reader application.
The first time you access the Android Market, you must read and accept the
Terms of Service.

32
You can browse the market by category or tap the search icon to search for a
specific application.
Once you have selected an application, tap the DOWNLOAD button to
download and install the application. You will be told which services (contact
information, wireless access, GPS, etc.) the application requires access in order
to function correctly. If none of these services seem unusual, tap OK to proceed
with the installation.
You may keep track of the download progress from the status area.
Important: Some applications may require payment before you can
download them. You will need to have a Google Checkout account in order
to pay for these applications.
33Online applications
Using downloaded applications
Once you’ve downloaded and installed an application, you may find it in the
My apps or All sections of the Application menu.
Certain applications also provide widgets, or only provide a widget (with no
application icon). Widgets can be found in the Widget section when
personalizing your Home screen. See “Personalizing the Home screen” on
page 20.
Uninstalling downloaded applications
Once you’ve downloaded and installed an application, you may uninstall the
application by pressing and holding the application icon and dragging it to the
trash can located on the top-right corner of the screen.
Alternatively, you can go to Settings from the application menu and select
Applications > Manage applications. Tap the application you wish to uninstall,
tap Uninstall and confirm the uninstall.
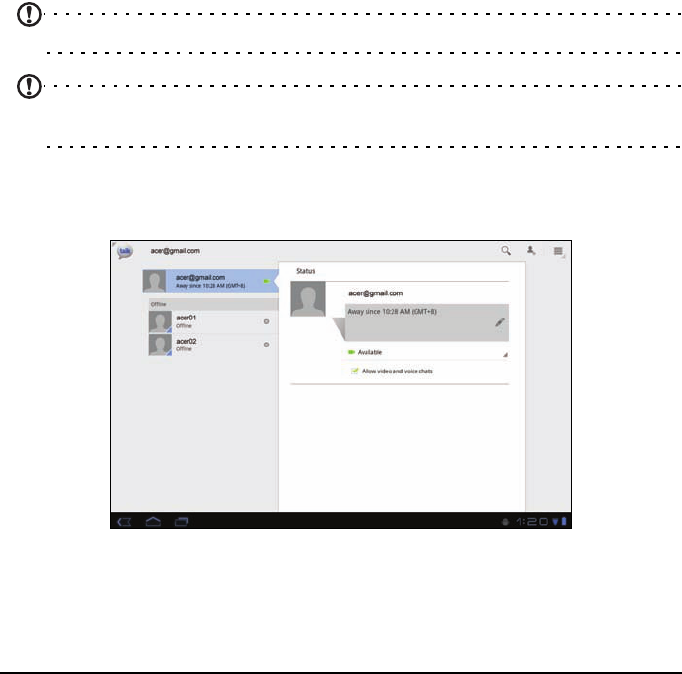
Google Talk
Note: Google Talk may not be available in all countries and regions.
Note: You need to activate a Google account before you can use Google
Talk.
Tap Talk from application menu to open Google Talk. Here you can see a list of
your contacts connected to Google Talk services. Tap on a contact to open a
chat session. After you have connected, you can open a video chat session.
Use the front-facing camera so the person you call can see you while you can
see them on the screen; hold your tablet in portrait mode to improve the
camera position.
34
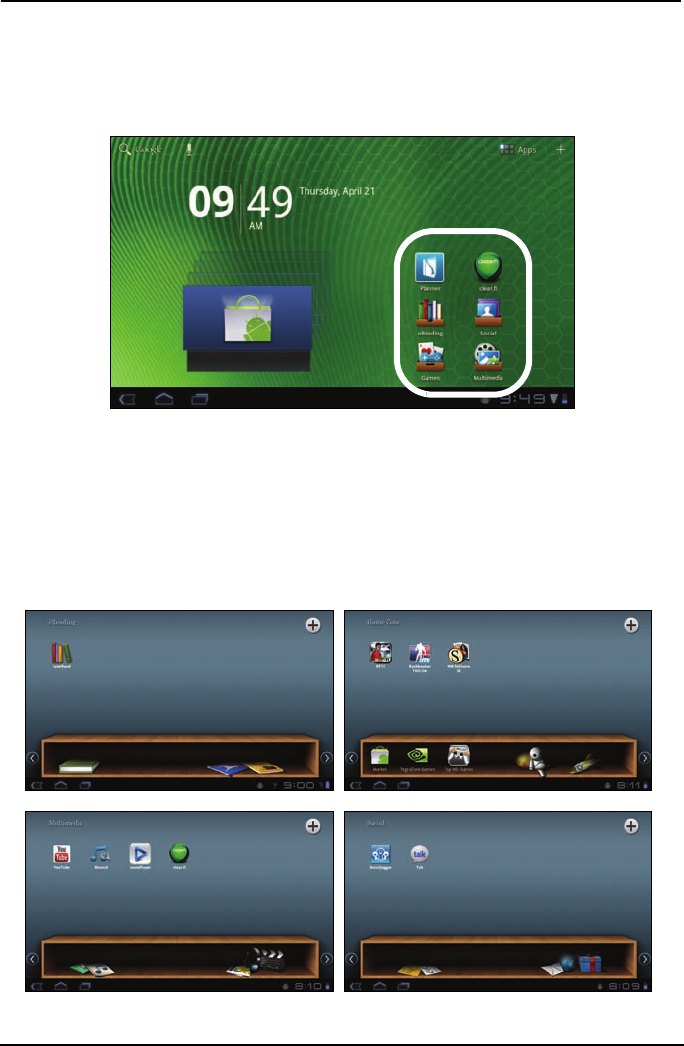
Acer content folders
Your tablet includes content folders that allow you to easily organize and
access your favorite applications.
Choose one of the four categories on the Home screen or application menu:
eReading, Games, Multimedia or Social.
Tap the shortcut to open a screen containing applications from that category.
Using the content folders
Each category already contains shortcuts to essential applications. Simply tap a
shortcut to open the application. The shelves along the bottom of the screen
may contain links to portals that allow you to download related applications
from trustworthy publishers.
35
Selecting a content folder
The folder shortcuts on the home screen or Application menu give you direct
access to any of the four categories. If you have opened a category, you can
easily change category by swiping the screen to the left or right.
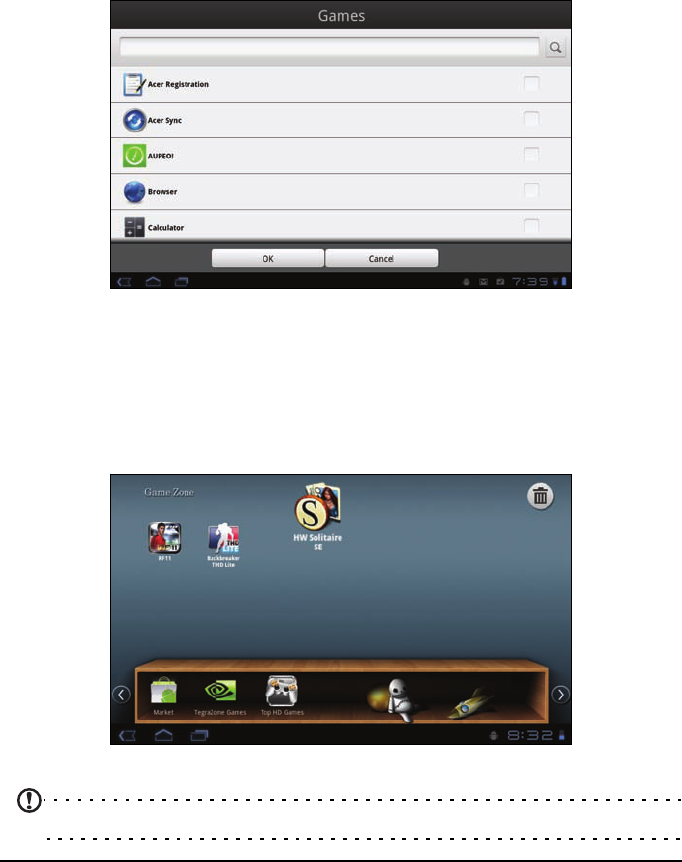
Adding
You can add applications to any content folder. Tap the Plus sign in the top
right corner and select one or more applications from the list. Tap OK to add
shortcuts for the selected applications.
You may view up to twenty shortcuts on a single screen. If you add more than
twenty shortcuts, swipe the screen up to see additional shortcuts.
Moving or removing
Tap and hold an item to select it. Drag it to an new position to change the
order, or to the trash can in the top right corner to remove the shortcut from
the screen.
Note: Certain pre-loaded applications may not be removed.
36
Playing music and video
Multimedia playback
Your tablet comes supplied with a variety of programs that you can use to
enjoy multimedia content.
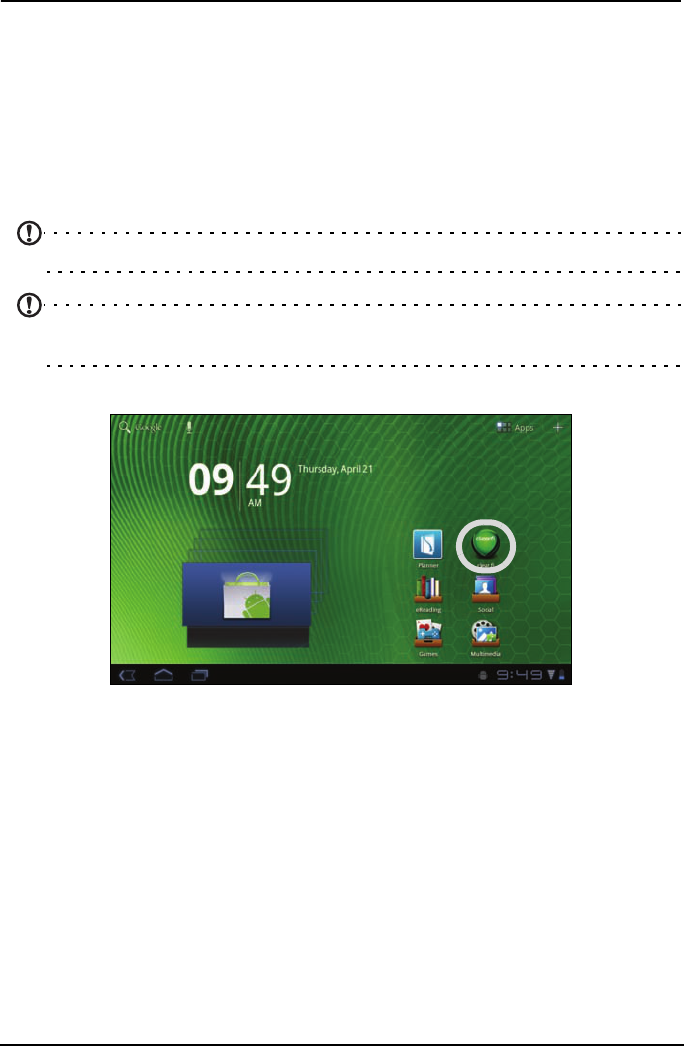
Acer clear.fi
With Acer clear.fi, you can browse and stream remote multimedia content from
connected devices on your tablet.
Note: You must be connected to a wireless network.
Note: When using an external USB storage device to access media files, the
device may not be recognized for a few minutes.
Tap clear.fi.
Acer clear.fi
will automatically detect devices that are connected to a wireless
network and display them at the bottom of the screen, with your tablet as the
default device on the leftmost corner. Tap any of the connected devices and
then tap Photo, Video, or Music to browse media files on that connected
device.

37Multimedia playback
Drag the bar on left side for more viewing options.
clear.fi photos
Tap the photo album to view the thumbnails. Tap and hold an album or photo
thumbnail to view the menu panel.
You can view photos found on any of the connected devices and save them.
Tap and hold a photo thumbnail, then tap and hold any of the connected
device showing an arrow. Select Play or Save.
To upload a photo to Facebook, or Flickr via Acer Photo Uploader, or to paired
devices using Bluetooth, tap and hold a photo thumbnail, then tap Share.
clear.fi videos
Tap a folder under Collection to view the thumbnails. Tap and hold a folder or
video thumbnail to view the menu panel.
You can play videos found on any of the connected devices and save them. Tap
and hold a video thumbnail, then tap and hold any of the connected device
showing an arrow. Select Play or Save.