Acoustic Arc AAI-DH1080-00 Wireless Headphone System User Manual
Acoustic Arc International Ltd. Wireless Headphone System
User Manual
DH1080 2.4GHz Digit
al
Wireless/Wired Headphone
with Noise Cancelling
Instruction Manual
(Read carefully the instructions before using this system)

2
1. WELCOME
Thank you for purchasing this system! This 2.4GHz stereo digital headphone
system offers you advances in wireless transmission technology with built-in
noise cancelling feature in which you can listen to ultra stereo sound from your
audio components. The universal transmitter dongle is compatible to any
audio sources, say DVD player, CD player, i-pod, i-phone, MP3, TV set, VCR,
Hi-Fi system or radio. Line-In Jack on headset can also work as a wired
headset.
2. FEATURES
•2.4GHz FHSS Digital technology
•High quality stereo sound that is virtually interference-free
•Transmission is not restricted solely to line of sight
•Noise Cancelling Feature on Headphone
•Digital Pairing System on Headphone & Transmitter
•Electronic Volume Control on Headphone
•Built-in Rechargeable Lithium Battery pack in Dongle and Headphone
•Auto Shut-off on Headphone
•Auto On/Off RF function on transmitter
•3.5mm Line in feature for corded headphone application
•Operating distance up to 15 feet
•Airplane audio adapter
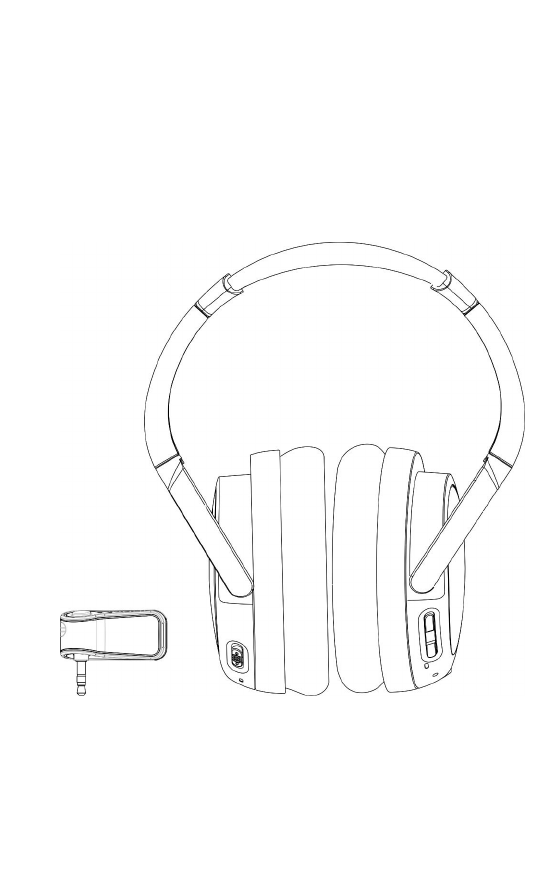
3. PACKAGING
•RF receiver headphone
•RF dongle transmitter
•Power adapter with
•USB charging cable with 2x charging ports
•3.5mm to 3.5mm audio cable
•Airplane audio adapter
•Travel Case
•Instruction manual
3
4. INSTALLATION
DONGLE TRANSMITTER
•Press the Power button on dongle for 3 seconds until Blue LED lights up.
•Plug in the 3.5mm audio plug to your audios Source.
•Turn on your audio source and the LED will flash.
HEADPHONE RECEIVER
•Press the Power button for 3 seconds on the Right side to turn on wireless
feature and Green LED will light up.
•The headphone is now linked up with dongle and LED will turn to Blue.
•Turn on Noise Cancelling feature by tuning the On/Off switch on Left side
to On.
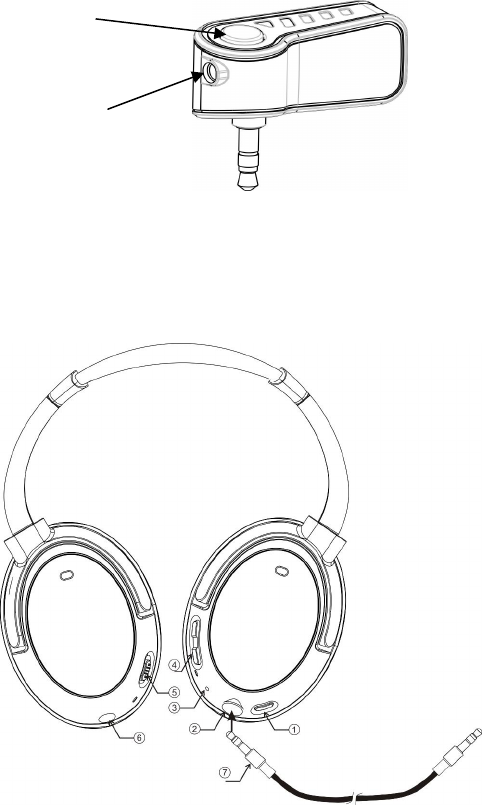
1. 2.4GHz On/Off
2. 3.5mm audio jack
3. PAIR
4. VOL+, VOL-
5. ANC ON/OFF
6. 2.5mm DC jack
7. 3.5mm audio wire
Power
button
2.5mm DC jack
4
5. OPERATIONS
To start up this system and enjoy the music, please take following steps:
•Turn on the audio source, plug in the 3.5mm plug of the dongle
with audio source
•Turn on the dongle by pressing the Power buttons for 3 seconds.
Blue LED will light up.
•Turn on the headphone receiver by pressing Power button for 3
seconds, LED will be Green.
•When the audio link is established between dongle and
headphone, Blue LED on dongle flashes and headphone
become solid.
•Turn on Noise Cancelling feature on headphone by moving the
On/Off switch on the left side to On.
•When listening is ended, turn OFF the dongle and headphone by
pressing Power button for 3 seconds. Turn off Noise Cancelling
feature on headphone by moving the On/Off switch on the left
side to Off.
Pairing:
If the headphone remains not working after following the operation processes
above, start Pairing process by pressing the Power button for 12 seconds In the
dongle in shutdown state. After that, pressing the headphone pair button until
the blue LEDs flash. The LEDs will change to solid blue when pairing process is
finished.
NOTE:
In order to protect the dongle and save power, the dongle will automatically
switch to stand-by mode (LED will turn off) after approximately 2 minutes if there
is no audio signal, or the signal that it receives from the audio source is too
weak for proper reception. If however the signal returns to an acceptable level,
then the transmitter will automatically switch back on. The dongle will
automatically shut off if stand-by mode last for more than 15 minutes.
The headphone receiver will automatically shut off if getting no signal from
transmitter in 15 minutes.
5
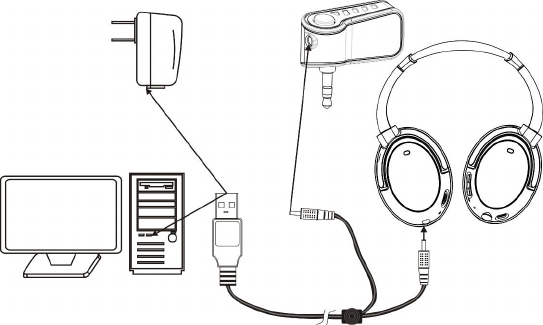
CHARGING THE BATTERIES
•Switch OFF both the dongle and headphone.
•Apply the charging cable one end with 2 charging ports and the other
with USB.
•Charging can be processed by connecting with PC or with power
adapter.
•Charging dongle and headphone can be processed simultaneously.
•Be sure to charge new batteries for 5 hours before using them for the
first time in the dongle and headphone. The red indicator light (LED)
will be on continuously during battery charging.
•When charging is finished, the dongle LED will be green and
headphone red LED will be off.
Corded Headphone Application
The headphone can be applied in corded mode. Simply connect the headphone
and the audio source by the supplied 1.5 meters audio cable. You will then enjoy
the audio in wired mode.
WARNINGS:
** The battery pack must be fully charged before first use. An initial 5 hours
charge is required to guarantee an acceptable service life for the rechargeable
batteries. Always ensure that the dongle and the headphones are switched to
the Off position while the batteries are charging.
6
FCC statements
This device complies with Part 15 of the FCC Rules. Operation is subject to
the following two conditions: (1) this device may not cause harmful
interference, and (2) this device must accept any interference received,
including interference that may cause undesired operation.
Warning: Changes or modifications to this unit not expressly approved by the
party responsible for compliance could void the user's authority to operate the
equipment.
NOTE: This equipment has been tested and found to comply with the limits for a
Class B digital device, pursuant to Part 15 of the FCC Rules. These limits are
designed to provide reasonable protection against harmful interference in a
residential installation. This equipment generates, uses and can radiate radio
frequency energy and, if not installed and used in accordance with the instructions,
may cause harmful interference to radio communications.
However, there is no guarantee that interference will not occur in a particular
installation. If this equipment does cause harmful interference to radio or
television reception, which can be determined by turning the equipment off and on,
the user is encouraged to try to correct the interference by one or more of the
following measures:
-Reorient or relocate the receiving antenna.
- Increase the separation between the equipment and receiver.
- Connect the equipment into an outlet on a circuit different from that to
which the receiver is connected.
- Consult the dealer or an experienced radio/TV technician for help.

7
6. TECHNICAL SPECIFICATIONS
Transmission mode : 2.4GHz FHSS digital stereo
Carrier frequency : 2.4GHz
Operating voltage : Transmitter 3.7V
Receiver 3.7V
(Lithium Rechargeable battery pack included)
Frequency response : 90 Hz – 20 KHz (electrical)
Distortion : 0.5 %
Signal-to-noise ratio : 70dB
Channel separation : 40 dB
Range : Up to 15 feet (open area)
Noise Cancelling : 17dB
8
7. TROUBLE SHOOTING
NO SOUND
•Ensure that the dongle is On and connect properly with your
audio source
•Ensure that the headphone is on.
•The headphone/dongle battery charge level may be too low.
Recharge the battery pack again.
•Ensure that your DVD, TV set, Hi-Fi system or audio
component is switched on and set to a channel that broadcasts
an audio signal.
•Use the headphones volume control to increase the sound level
(only when use as a wireless headphone).
•The audio signal input level is too low. Increase the volume
from the audio source of Hi-Fi, CD, or TV, etc.
•The connected audio/video equipment may not be in playback
mode. Start playback on by the equipment.
•The headphone output level is set too low. Adjust the volume to
a suitable level.
DISTORTION
•Restart the Pairing process. Pressing the Power button for 12
seconds In the dongle shutdown state. After that, pressing the
headphone pair until the blue LEDs flash. The LEDs will change
to solid blue when pairing process is finished.
•The headphone/dongle battery pack charge level may be too
low. Recharge the battery pack.
•Ensure that the volume knob setting is correct.
•The headphones may be too far away from the transmitter.
Move closer to it.
•The audio signal input level is too low. Increase the volume from
the audio source of Hi-Fi, CD, or TV, etc.