Acoustic Arc AR0810 Radarbox System User Manual AirNav RadarBox 2007 Manualx
Acoustic Arc International Ltd. Radarbox System AirNav RadarBox 2007 Manualx
Users Manual

AirNav
®
Systems LLC
www.airnavsystems.com
AirNav RadarBox™ 2007
Manual
© Copyright AirNav Systems LLC 2007. All rights reserved.
The information contained in this document is subject to change without prior notice and shall not constitute a
commitment on the part of AirNav Systems. The Product(s) and/or services described in this document shall be
furnished pursuant to the signing of a license, non-disclosure or service agreement and shall be used or copied in
accordance with the terms thereof.
User Manual

AirNav® Systems – World Leader in Flight Tracking and Monitoring
www.airnavsystems.com
AirNav RadarBox 2007 Manual
Page 1
1. Welcome
AirNav RadarBox
Welcome to the most Advanced Real-Time Radar Decoder
AirNav RadarBox is the closest you can be to real world aviation without leaving your chair thanks to next generation
Radar decoding.
By decoding ADB-S (Automatic Dependent Surveillance Broadcast) radar signals, you will be able to see on your
computer what real Air Traffic Controllers see on their screens in Real-Time.
Flight number, aircraft type, altitude, heading, speed are all updated each second.
Included is the award winning software interface developed by the world's leader in flight tracking and monitoring
solutions, AirNav Systems.
AirNav RadarBox is equipped to be used in any location all over the world.
3D multi-window maps with worldwide coverage contain more than 200 thousand geographic points included.
Airports, runways, VOR, NDB, FIX, cities, roads, airways and elevation data.
How it works?
1. Install the software from the CD
2. Connect the AirNav RadarBox to your computer using the USB cable provided
3. Start Tracking flights in real-time!
RadarBox Network
AirNav RadarBox Network is an unique feature that enables to view data other RadarBox users are receiving all over
the world.
It is the first worldwide flight data network ever developed. You are experimenting new technology never used
before.
Receive, decode and show real-time flights on your computer.
Share and view data with users all over the world.
AirNav® Systems – World Leader in Flight Tracking and Monitoring
www.airnavsystems.com
AirNav RadarBox 2007 Manual
Page 2
1.1. Main Features
AirNav RadarBox - Main Features
Hardware:
• Real-Time Radar ADS-B decoder
• Superior receiver sensitivity
• No need for an external power supply
• Plug-and-play USB connection
• Light weight easy to carry aluminum box
Software:
• Track flights in real-time
• Second by second updates on flight number, aircraft registration, altitude, speed, heading and vertical speed
• Real-Time retrieval of aircraft details including registration, company, aircraft type
• Based on the award winning AirNav Systems 3D multi-window map interface
• Easy plug and play USB connection - no complex time consuming setup
• ACARS Decoder interface
• 5 minute delayed flight data sharing on port 7879
• Automatically Imports Outline Files (.out)
• Real-Time photos of all tracked aircraft
• Real-Time weather information
• Export data and generate reports
• Share screen shots or send logs automatically to your friends
• MyLog feature: log all and share with your friends all the aircraft you receive
• Alert generation for specific aircraft or in-range flights
• Radar player to review airspace recordings
• Editable callsign database included: know the origin and destination of each flight
• 160 thousand flight number database included

AirNav® Systems – World Leader in Flight Tracking and Monitoring
www.airnavsystems.com
AirNav RadarBox 2007 Manual
Page 3
Maps:
• High definition worldwide map layer
• Worldwide aviation data included (Airports, Runways, VOR, NDB, FIX, airways and ATC boundaries)
• More than 1 million map locations including detailed shore lines, country boundaries and cities
• Quick locate feature
• Worldwide elevation data
Requirements:
• Microsoft Windows
• PC with 400 Mhz processor (higher recommended)
• 128 MB RAM
• One Available USB Connection
• 50 MB Hard Disk Space Available for Installation
• CD-ROM Drive
Package Contents:
• RadarBox Hardware Unit
• USB Cable
• Antenna
• Quick Installation guide
• Setup Wizard CD with RadarBox Software
1.2. ADS-B Background
ADS-B Background
Putting it in a simple form, AirNav RadarBox consists of an hardware that decodes ADS-B data and sends its to your
computer where a software processes it and shows it on 3D interface.
Received data may be shared between users using the AirNav Systems RadarBox network. This way you will be able
to see data received from users all over the world.
What is ADS-B?
Automatic Dependent Surveillance-Broadcast (also called ADS-B) is a system by which airplanes constantly broadcast
their current position and altitude, category of aircraft, airspeed, identification, and whether the aircraft is turning,
climbing or descending over a dedicated radio datalink. This functionality is known as "ADS-B out" and is the basic
level of ADS-B functionality.
The current ADS-B system was developed in the 1990s though its lineage dates back to the 1960s. It relies on data
from the Global Positioning System, or any navigation system that provides an equivalent or better service. The
maximum range of the system is line-of-sight, typically less than 200 nautical miles (370 km).
The ADS-B transmissions are received by air traffic control stations, and all other ADS-B equipped aircraft within
reception range. Reception by aircraft of ADS-B data is known as "ADS-B in".
The initial use of ADS-B is expected to be by air traffic control and for surveillance purposes and for enhancing pilot
situational awareness. ADS-B is lower cost than conventional radar and permits higher quality surveillance of airborne
and surface movements. ADS-B is effective in remote areas or in mountainous terrain where there is no radar
coverage, or where radar coverage is limited. The outback of Australia is one such area where ADS-B will provide
surveillance where previously none existed. ADS-B also enhances surveillance on the airport surface, so it can also be
used to monitor traffic on the taxiways and runways of an airport.
ADS-B equipped aircraft may also have a display unit in the cockpit picturing surrounding air traffic from ADS-B data
(ADS-B in) and TIS-B (Traffic Information Service-Broadcast) data derived from air traffic radar. Both Pilots and air

AirNav® Systems – World Leader in Flight Tracking and Monitoring
www.airnavsystems.com
AirNav RadarBox 2007 Manual
Page 4
traffic controllers will then be able to "see" the positions of air traffic in the vicinity of the aircraft, and this may be
used to provide an ASAS (Airborne Separation Assurance System).
Airborne Collision Avoidance Systems may in the future also make use of "ADS-B in", supplementing the existing TCAS
collision avoidance system by what is called 'hybrid surveillance'.
Airbus and Boeing are expected to include ADS-B out (i.e. the transmitter of information) as standard on new-build
aircraft from 2005 onwards.
AirNav® Systems – World Leader in Flight Tracking and Monitoring
www.airnavsystems.com
AirNav RadarBox 2007 Manual
Page 5
2. Getting Started
2.1. Installation
AirNav RadarBox 2007 - Installation
The AirNav RadarBox system is made up of two distinct parts. The hardware and the software.
You will need to install the software first and only after that hardware setup will be performed.
Follow the below steps to properly install the system and start tracking real world flights in real-time on your
computer.
DO NOT CONNECT THE HARDWARE USB CABLE TO YOUR COMPUTER BEFORE INSTALLING THE
SOFTWARE
If you need any help during the installation process visit AirNav Systems Support Page
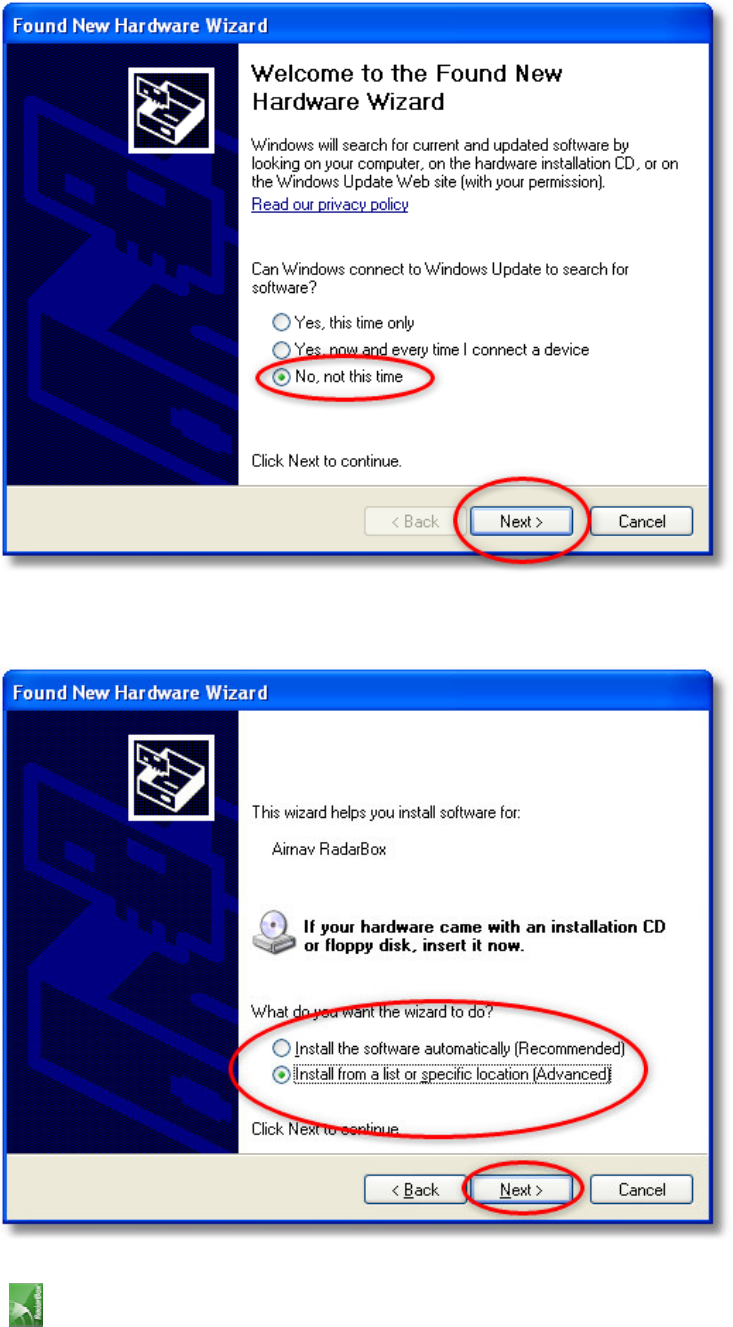
1. Run the setup.exe file located on the root folder of the provided CD. Follow registration instructions paying
special attention to the User Agreement.
2. After the software is installed connect the USB cable from the hardware to your computer. Windows will
detect that AirNav RadarBox is connected.
3. When the below windows appears, under "Can Windows connect to Windows Update for software?" select the
AirNav® Systems – World Leader in Flight Tracking and Monitoring
www.airnavsystems.com
AirNav RadarBox 2007 Manual
Page 6
"No, not at this time". Click "Next".
4. Under "What do you want the wizard to do?" select "Install from a list or specific location (Advanced)".
Click "Next".
AirNav® Systems – World Leader in Flight Tracking and Monitoring
www.airnavsystems.com
AirNav RadarBox 2007 Manual
Page 7
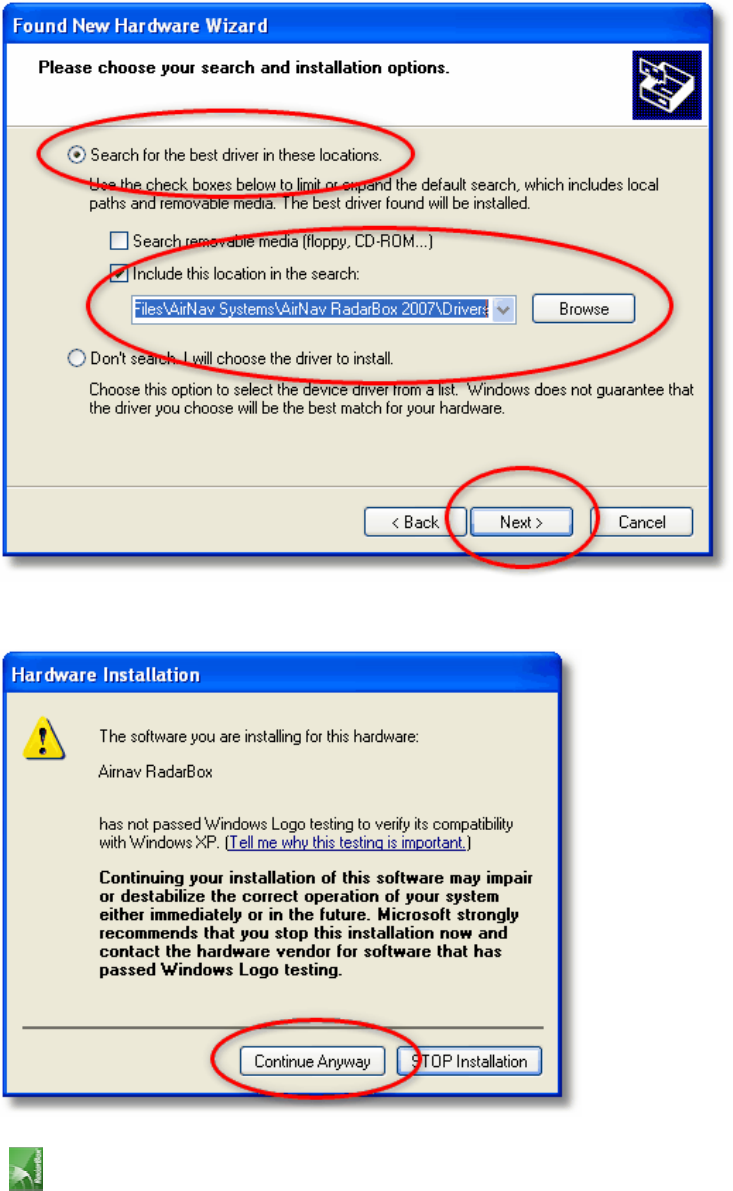
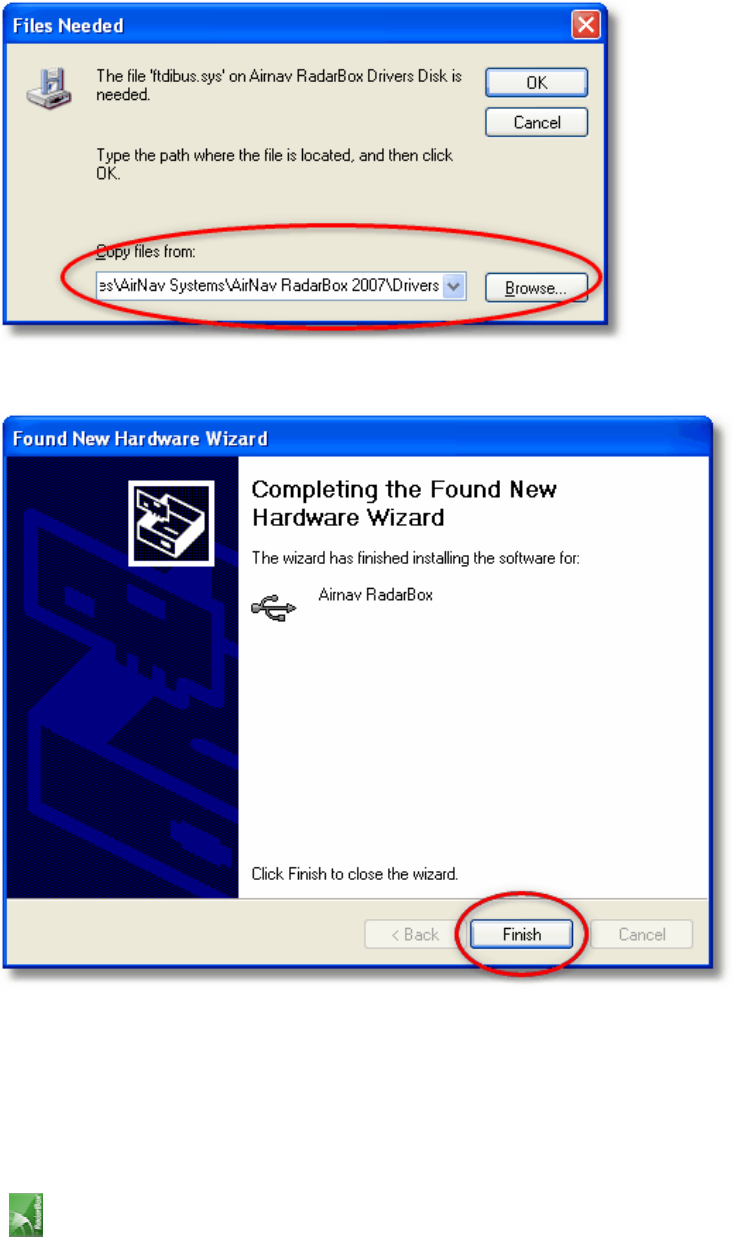
5. Select "Search for the best driver in these locations" and then select "Include this location in the
search". Browse for the folder that contains RadarBox drivers. It is located on a folder named "drivers" that is inside
the folder where AirNav RadarBox software has been installed.
The typical location of drivers would be "C:\Program Files\AirNav Systems\AirNav RadarBox 2007\Drivers".
Click "Next".
5. Driver installation will start. If the window below appears click "Continue Anyway".
AirNav® Systems – World Leader in Flight Tracking and Monitoring
www.airnavsystems.com
AirNav RadarBox 2007 Manual
Page 8
6. If the window below appears select again the RadarBox driver folder, usually located at:
"C:\Program Files\AirNav Systems\AirNav RadarBox 2007\Drivers". Click "OK".
7. That's it! The hardware has been installed successfully. Click the "Finish" button.
2.2. Tutorial
AirNav RadarBox 2007 - Tutorial
AirNav® Systems – World Leader in Flight Tracking and Monitoring
www.airnavsystems.com
AirNav RadarBox 2007 Manual
Page 9
AirNav RadarBox 2007 tutorial is a group of step by step instructions that will guide you through the most important
application features.
Note: information between [...] means that the command mentioned can be found in AirNav RadarBox 2007 Menus.
Example: [Tools|Internet|Download Updated Data Now] points you to click on Tools menu, Internet topic, Download
Updated Data Now subtopic.
Step by Step Tutorial
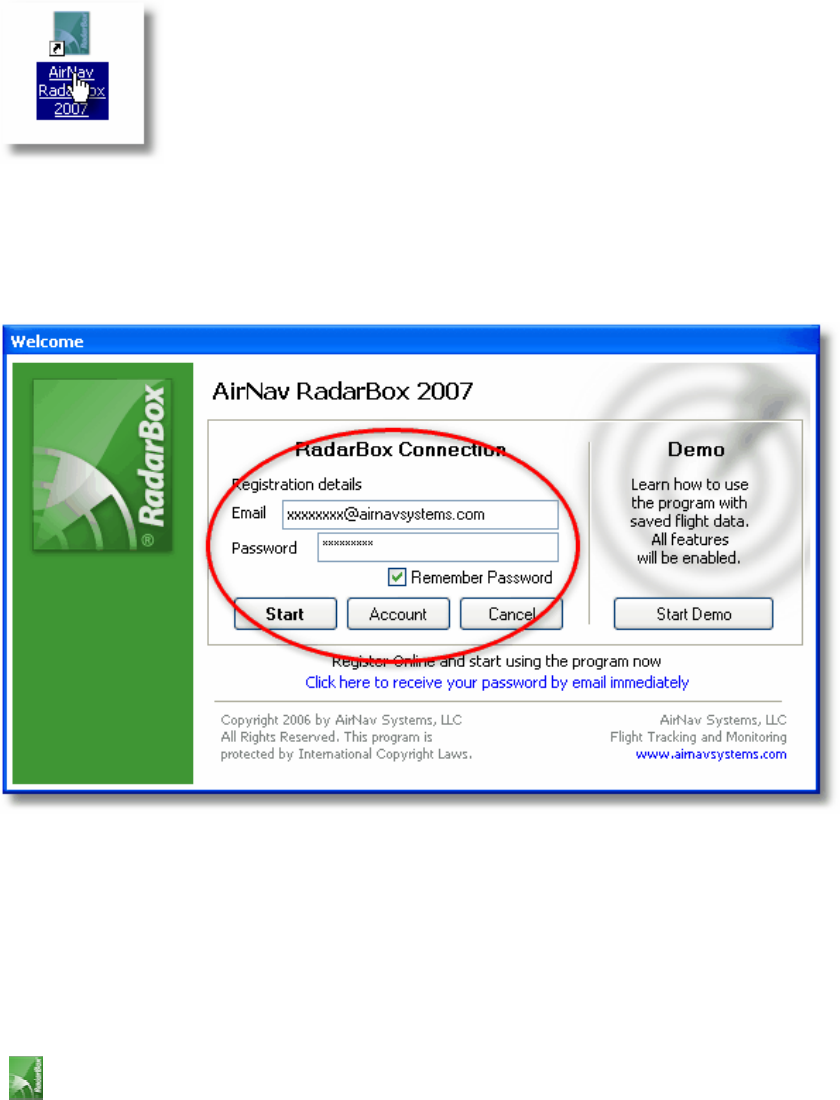
1- Start the software using the windows Shortcut created on your Start Menu or Desktop.
2. The Welcome Window will be shown. Enter your Email/Username and Password. Click the "Start" button
after this. You can check the Remember password checkbox in case you do not want to type your personal details
every time you start the software.
The connection to the Hardware will be started and if you are a subscriber of AirNav RadarBox Network feature, the
software will try to download network data.
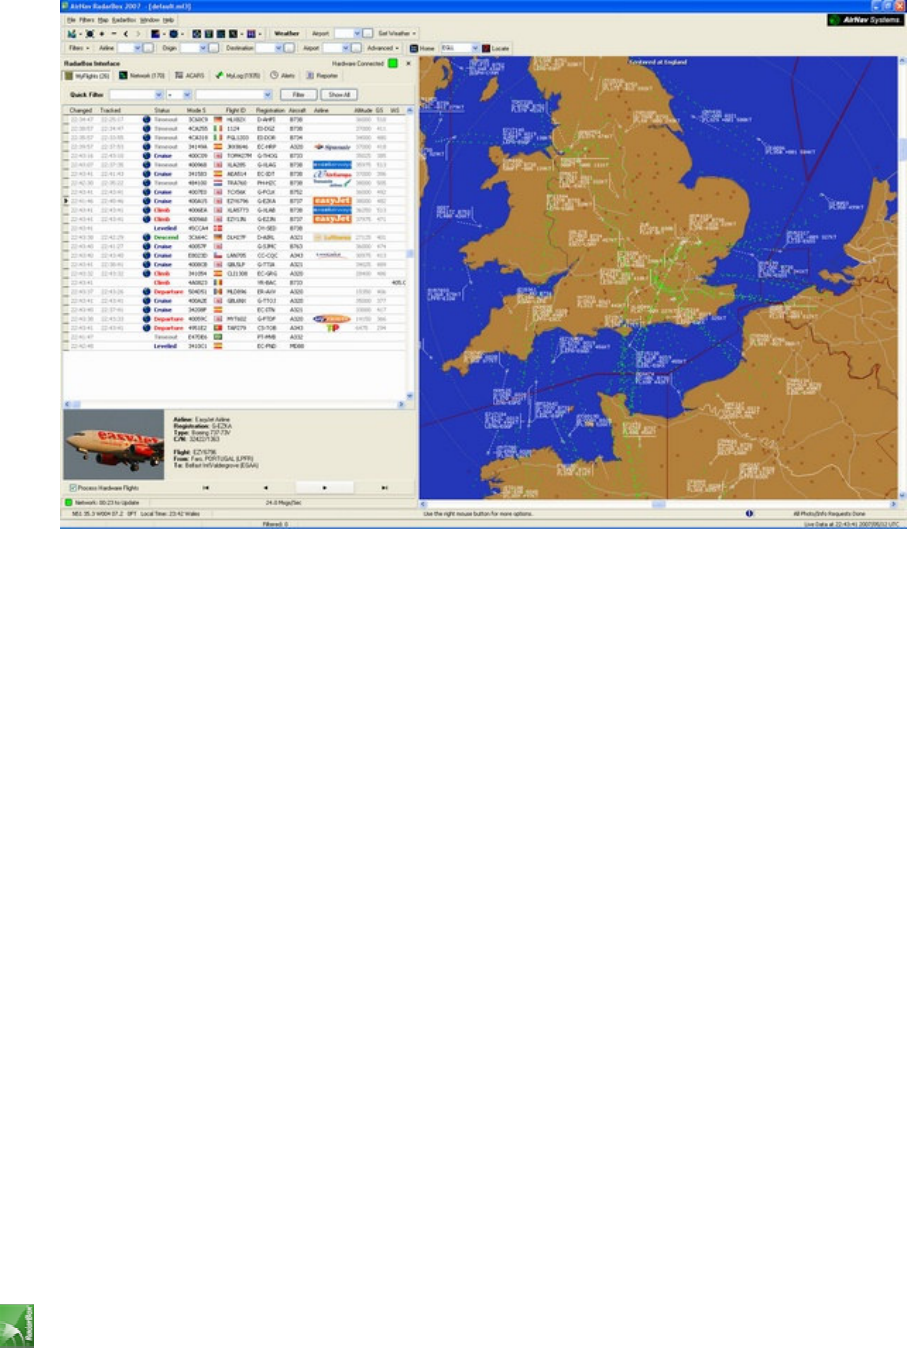
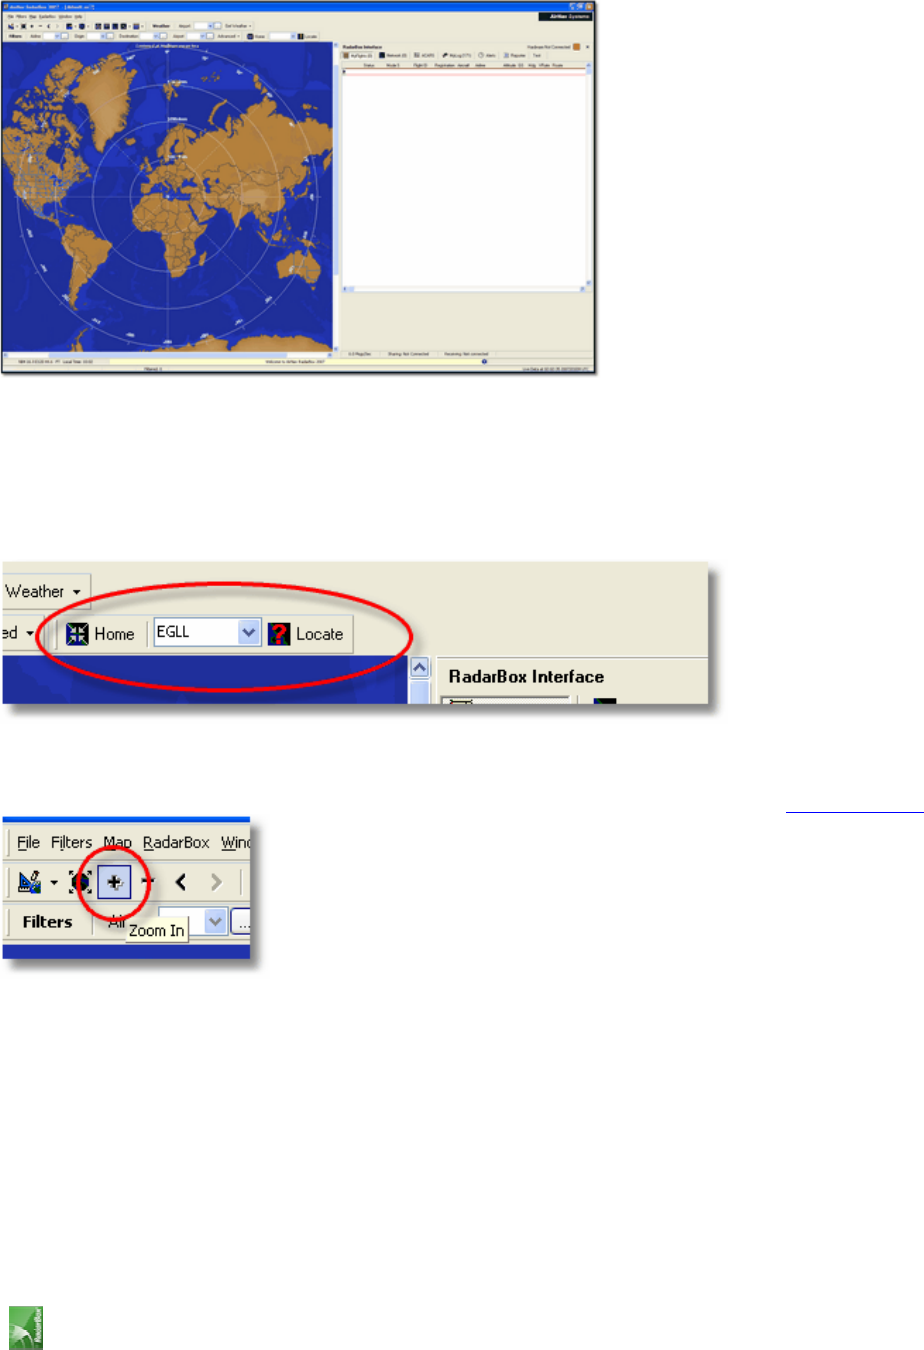
3- The main software window with a world map will be shown as illustrated below.
Dynamic 3D maps are one of AirNav RadarBox 2007 most important features. You are now going to explore some of
the capabilities.
AirNav® Systems – World Leader in Flight Tracking and Monitoring
www.airnavsystems.com
AirNav RadarBox 2007 Manual
Page 10
4- First task: you will center the map at your home location, zoom in and save it as your default map.
To center the map at any location let's use the "Locate" feature. It easily centers the map on any airport, city or
navigation facility all over the world.
Imagine you are located near London Heathrow Airport. Enter "EGLL" on the locate box.
This box it at the top of the main screen as on the screen shot below. After this click the Locate button. The map
will now be panned so that London appears on the center.
5- Now Zoom in a more detailed view of the London area is shown. You can do this by clicking the zoom in button
on the map toolbar. The easiest way to pan/zoom your maps is by using your mouse buttons. Learn more here.
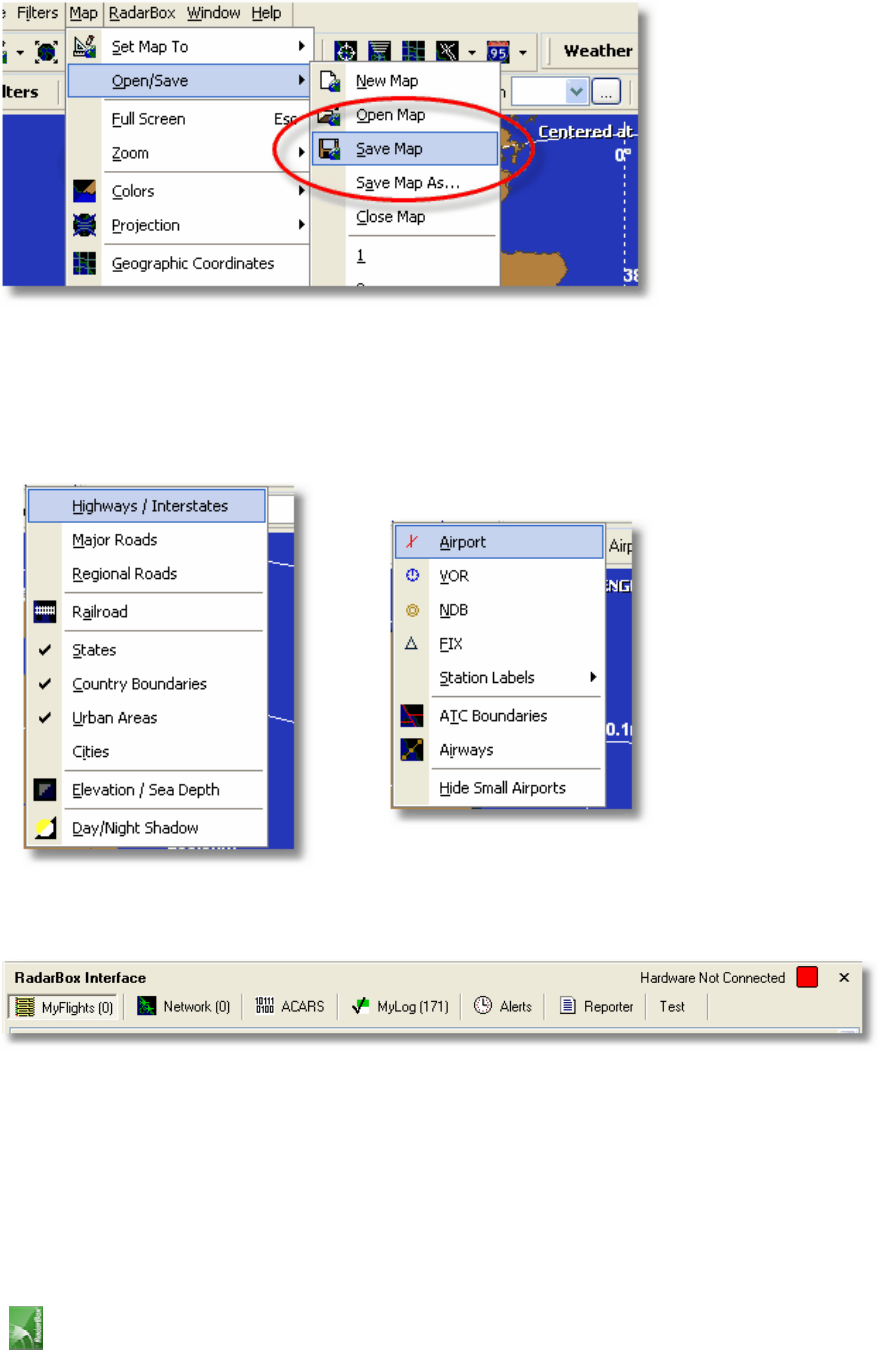
6- Save your map by going to [Map |Open/Save | Save Map]. Answer Yes to the "Are you sure you want to
overwrite your default map file?". This map will be the one that will be always shown after the application is started.
AirNav® Systems – World Leader in Flight Tracking and Monitoring
www.airnavsystems.com
AirNav RadarBox 2007 Manual
Page 11
7- All map functions are located on the map menu or on the map toolbar on the top of the main window. You can
also right mouse click over any map to access map functions in a faster way, including setting you home location. On
these menus there are several map layers that you can choose to be hidden or visible. This includes aviation related
layers (airports, runways, NDBs, VORs, FIXes as well as airways and ATC boundaries). There are also general interest
layers like roads, geographic coordinates, cities and elevations.
General Map Layers Aviation Map Layers
8- Now let's have a look at the RadarBox Interface panel. This is where all the action will take place. It is divided into
6 tabs.
MyFlights: where all the flights received using your hardware will be shown. A grid will show as many flight details
as possible, from aircraft registration to flight route. Photos and aircraft details will appear on the bottom of this tab.
Network: all AirNav RadarBox Network flights (received from other RadarBox users) will be shown on this tab.
ACARS: flights received from AirNav ACARS Decoder interface will be shown here.
MyLog: a collection of all flights received on your hardware will appear on this tab. Details include
Reporter: an easy interface for you to share your reports with other mode-s users.
Alerts: you could receive an email each time a specific registration is received by your decoder. Other types of alerts
are available.

AirNav® Systems – World Leader in Flight Tracking and Monitoring
www.airnavsystems.com
AirNav RadarBox 2007 Manual
Page 12
9- On the top right of the RadarBox interface notice the hardware connection status. You can monitor here if the
hardware is properly connected to your computer.
falar sobre radarbox network com link para a network
falar de acaars decoder com link para acaras decoder sempre com explicacao simples e depois to learn more balh
blah
Let see the entires on mylog and now create a report
tb ha possibilidade de alertas explicada em alertas
ha mtas preferencias vaialable em preferences menu com link
falar nos filtros
falar no weather
10-
3- If you cannot see the map in good conditions (too dark) you may click on the map tool button, the 'Dark/Light'
button which will change the map colors to allow the map to be easily seen in bright locations.
10- Now let's talk about filters. One of AirNav RadarBox 2007 most useful features is the ability to filter what you can
see. To do this you have the

AirNav® Systems – World Leader in Flight Tracking and Monitoring
www.airnavsystems.com
AirNav RadarBox 2007 Manual
Page 13
3. Hardware
3.1. Hardware Lights
Hardware Lights
In this section you will find the meaning of the three hardware lights (LED) that your RadarBox hardware contains.
Normal conditions:
In normal conditions (hardware connected to your computer, drivers correctly installed and software running) the
green light will be always on, the blue line will be on each time there is data being transfered from the hardware to
your computer and the white light will be on each time there is data being received from aircraft.
Green LED:
This is the most important light. When on it means that hardware is properly powered.
AirNav RadarBox hardware uses power from your USB connection. There is no need for external power or batteries.
In normal conditions this light should always be on. If it is not on a problem in your USB cable may exist.
Blue LED:
This LED indicates the status of the USB connection. For example it may show if the hardware is properly connected
to your computer and if the USB connection is valid. Status condition below.
Note that in normal conditions (hardware on, drivers installed and software working) the blue light will blink anytime
the is data being transfered by USB from the hardware to your computer on in the reverse way.
• Blinking at a one time per second rate:
It will be on half a second and off half a second. Means that the hardware is being powered by the computer but
there is no valid connection between them. may happen because your computer's USB controller is not properly
installed or because there is a problem in your USB cable. If none of these conditions apply then the AirNav
RadarBox driver is not properly installed. For more information on how to properly install the drivers please go to
the Installation section
• Fast blinking (approximately five times per second)
The hardware is properly connected to your computer (USB controller working) but the AirNav RadarBox Driver not
installed or not working. For more information on how to properly install the drivers please go to the Installation
section
• Blue light Off
If the light is permanently off (and the green light is permanently on) then the hardware is ready to start working
and the AirNav RadarBox software is not yet started / receiving data from the hardware.
• Blinking one time per second
Hardware properly connected to your computer and AirNav RadarBox software is working but no flights being
received. By default the light will always blink at a one time per second rate

AirNav® Systems – World Leader in Flight Tracking and Monitoring
www.airnavsystems.com
AirNav RadarBox 2007 Manual
Page 14
White LED:
Blinks anytime there a mode-S signal is received from an aircraft and decoded with success. The more this LED blinks
the more information is received from aircraft.
In highly congested airspace areas this lights will be on 95% of the time! During the test period the development
team has received more than 50 mode-s messages per second.
AirNav® Systems – World Leader in Flight Tracking and Monitoring
www.airnavsystems.com
AirNav RadarBox 2007 Manual
Page 15
4. Tasks
4.1. Connecting to AirNav RadarBox Network
Connecting to AirNav RadarBox Network
Introduction
AirNav RadarBox Network is a unique feature that enables to view data other RadarBox users are receiving all over
the world.
It is the first worldwide flight radar flight data ever developed. You are experimenting new technology never used
before.
How it works? Each AirNav RadarBox user can share its data to other users. Data received will be processed and after
passing some validation algorithms it is then stores on a queue for server upload. Data is then uploaded 5 minutes
after it has been received. On our server we have a powerful application called "AirNav Network Server" which
processes up to 10000 flight messages per second in peak periods. Data is then organized and properly processed (to
add to each flight and aircraft has many details as possible - aircraft type, registration flight routing, photos) and an
output file is created. Each connected client will then be able to download the updated list of network flights. This list
often has more than 500 flights worldwide. Of course the list is growing daily as soon the application gets more
popular.
You will be able to track flights over Europe, North America, Asia, South America and more: in other words you will be
able to see flights wherever a RadarBox user is.
Please note that due to security reasons data you receive from the RadarBox network is has an artificial delay of 5
minutes. So what you see on the screen is always delayed 5 minutes.
This does not apply to the data received directly from your RadarBox hardware decoder. This is real-time without any
kind of delay.
If you receive a flight on your RadarBox hardware and this flight information is also available on the data download
from the network then your flight information will prevail and the network data will be ignored.
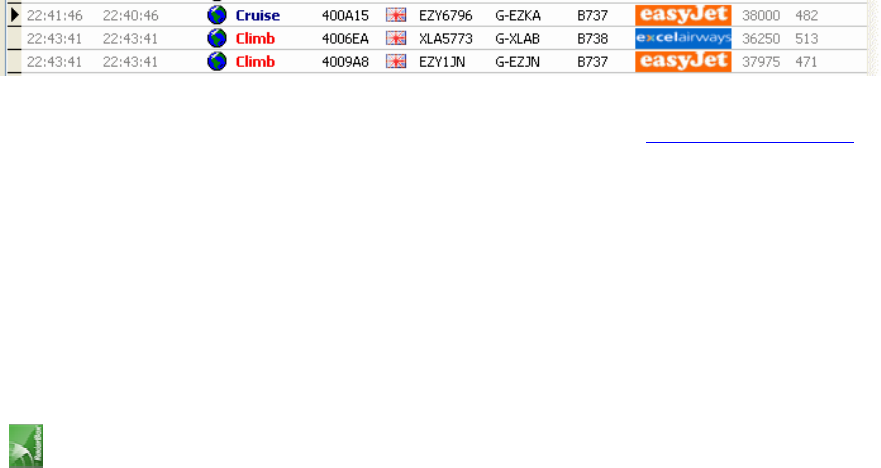
What details will I see for each flight?
For each flight you will see:
• ACARS sign meaning if the flight has any ACARS messages (for more go to ACARS Decoder interface)
• Globe sign: when shown position information is available so the flight is being tracked on the maps
• Status: flight status information
• Mode S: the mode S code for this aircraft
• Country flag: the flag of the country where the aircraft is registered
• Flight ID: the flight number / callsign for this flight
• Registration: tail number of the aircraft
• Aircraft: type of aircraft in ICAO (4 character) code
• Airline logo: the logo of the airline that operates this flight
• Altitude: altitude in feet
• GS: ground speed for the flight in Knots
• Hdg: presents heading of the aircraft from 0 to 359 degrees (0=North, 90=East, 180=South, 270=West)
• VRate: vertical rate in feet per minute

AirNav® Systems – World Leader in Flight Tracking and Monitoring
www.airnavsystems.com
AirNav RadarBox 2007 Manual
Page 16
• Route: origin and destination airports and sometimes stops
Connecting to the Network
To connect to AirNav RadarBox network you need to have your RadarBox hardware connected to your computer.
After this open the RadarBox Interface if it not already open, go to the Network tab and check the "Get flights from
RadarBox Network" check box.
Watch on the bottom of the RadarBox Interface panel, the connection status. Data is downloaded each 30 seconds.
Note that you will have to be a registered user of the software and have an active AirNav RadarBox account to be
able to receive network flights.
You can do this at the main menu [RadarBox | Network Account Information]
To subscribe to AirNav RadarBox Network please visit AirNav RadarBox Order page
New users have free access to the network during the first year.
4.2. Connecting to AirNav ACARS Decoder
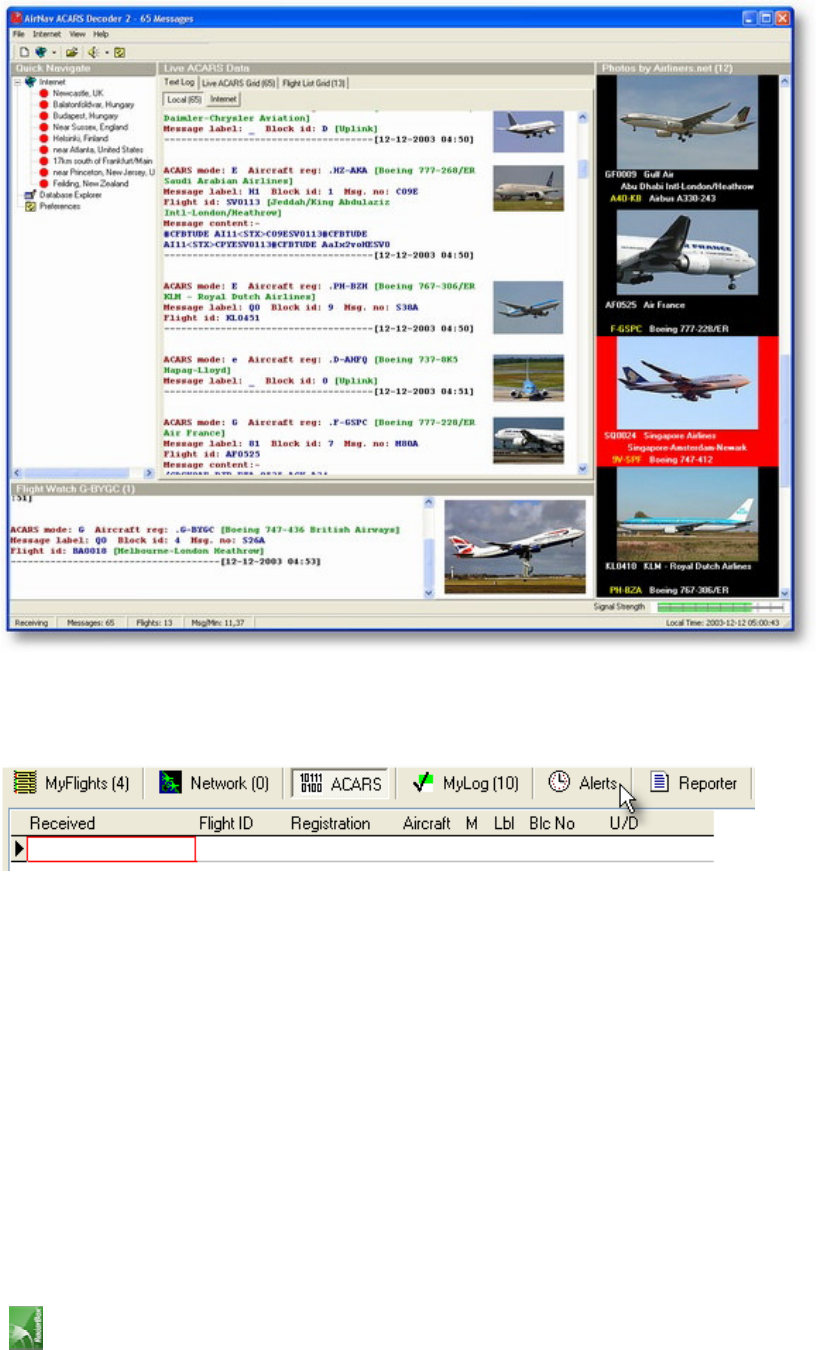
Connecting to AirNav ACARS Decoder
Introduction
AirNav RadarBox can work in conjunction with AirNav decoder. This way you will be able see ACARS messages for the
flight you are tracking.
This way AirNav RadarBox is the first radar decoder application ever to have an ACARS interface included.
Data is passed from AirNav ACARS Decoder to AirNav RadarBox using a simple Windows DDE (Dynamic Data
Exchange) interface.
All is done in a transparent way so all the user does not need to do anything.
For more information on ACARS please read the bottom of this topic.
Connecting to AirNav ACARS Decoder
When you start AirNav RadarBox it will detect if AirNav ACARS Decoder is running and if that is the case, connect to it
automatically.
Anyway you can manually force a connection to AirNav ACARS Decoder using AirNav RadarBox menu at [File | AirNav
ACARS Decoder Connection On/Off]
Screen Shot of AirNav ACARS Decoder 2. For more information visit AirNav Systems Homepage.
AirNav® Systems – World Leader in Flight Tracking and Monitoring
www.airnavsystems.com
AirNav RadarBox 2007 Manual
Page 17
What details will I see for each flight?
All the flight details received from AirNav ACARS Decoder will be shown on the RadarBox Interface, ACARS Tab.
For each flight you will see:
• Received: time of message reception
• Flight ID: the flight number / callsign for this flight
• Registration: tail number of the aircraft
• Aircraft: type of aircraft in ICAO (4 character) code
• M: ACARS Mode
• Lbl: message Label
• Mode S: the mode S code for this aircraft
• Blc, No: block ID, and message number
• U/D: if the message is an uplink or downlink
What is ACARS?
ACARS ([A]ircraft [C]ommunication [A]ddressing and [R]eporting [S]ystem) is a digital data link system transmitted
via VHF radio which allows airline flight operations departments to communicate with the various aircraft in their fleet.

AirNav® Systems – World Leader in Flight Tracking and Monitoring
www.airnavsystems.com
AirNav RadarBox 2007 Manual
Page 18
This VHF digital transmission system, used by many civilian aircraft and business jets, can be likened to "email for
airplanes," as the registration of each aircraft is it's unique address in the system developed by aeronautical radio
giant ARINC (Aeronautical Radio, Inc.). Traffic is routed via ARINC computers to the proper company, relieving some
of the necessity for routine voice communication with the company. With ACARS, such routine items as departure
reports, arrival reports, passenger loads, fuel data, engine performance data, and much more,can be requested by
the company and retrieved from the aircraft at automatic intervals. Before the advent of ACARS, flight crews had to
use VHF to relay this data to their operations on the ground.
The ACARS system is comprised of the following elements:
1- The Airborne Subsystem, onboard the aircraft, which consists of the:
Management Unit Receives ground-to-air messages via the VHF radio transceiver, and also controls the replies.
Control Unit is the air crew interface with the ACARS system, consisting of a display screen and printer.
2- The ARINC Ground System, which consists of all the ARINC ACARS remote transmitting/receiving stations, and the
ARINC computer and switching systems.
3- The Air Carrier C2 (Command and Control) and Management Subsystem, which is basically all the ground based
airline operations such as operations control, maintenance, crew scheduling and the like, linked up with the ACARS
system.
Messages can be categorized in two ways: "Downlinks" which are those ACARS transmissions which originate in the
aircraft, and "uplinks" are those messages sent from the ground station to the aircraft.
A typical series of ACARS transmissions will look something like this example of United 767-300ERs departing from
Washington Dulles International (IAD):
ACARS mode: 2 Aircraft reg: .N651UA
Message label: QF Block id: 1 Msg. no: M82A
Flight id: UA0978
Message content:-
IAD2241FRA
-----------------------------------------------------------[05/08/1997 22:41]
The message label QF refers to an ACARS OFF report/message. The nose gear struts are now retracting, and the
ACARS system duly notes this event as the off time. Departure airport and destination station are noted to the left
and right of the OFF time respectively.
ACARS mode: 2 Aircraft reg: .N651UA
Message label: SA Block id: 2 Msg. no: S82A
Flight id: UA0978
Message content:-
0LS224151V
-----------------------------------------------------------[05/08/1997 22:41]
In this example, we see a downlink response to an uplinked weather report,sent by crew request or automatically by
the flight operations.
ACARS mode: 2 Aircraft reg: .N651UA
Message label: H1 Block id: 3 Msg. no: D89A
Flight id: UA0978
Message content:-
#DFBE13C24651'''''''''''' 8 5972240TO
132202 294 25103269 220
1440 947 520 97418600250107179 5341565144173014923812143 262528 11
0201
-----------------------------------------------------------[05/08/1997 22:42]

AirNav® Systems – World Leader in Flight Tracking and Monitoring
www.airnavsystems.com
AirNav RadarBox 2007 Manual
Page 19
ACARS mode: 2 Aircraft reg: .N651UA
Message label: H1 Block id: 4 Msg. no: D89B
Flight id: UA0978
Message content:-
#DFB89 0 0 0 661 147 47
A6F003980000080000D2A0000000000000000000002A3
B4F4039C8000080000D2A0000000000000000000002A3
1440 950 536
-----------------------------------------------------------[05/08/1997 22:42]
In this series of two messages, we see a takeoff (TO) engine performance report.
ACARS mode: 2 Aircraft reg: .N651UA
Message label: H1 Block id: 5 Msg. no: D89C
Flight id: UA0978
Message content:-
#DFB97418853250111173 5541565144173614933782162 261527 15
0201 89 -2 0 0 671 146 27
A6F4039C8000080000D32000000000000000000000423
-----------------------------------------------------------[05/08/1997 22:42]
ACARS mode: 2 Aircraft reg: .N651UA
Message label: H1 Block id: 6 Msg. no: D89D
Flight id: UA0978
Message content:-
#DFB
B4F083980000080000D32000000000000000000000423
-----------------------------------------------------------[05/08/1997 22:42]
The engine performance data continues to be downlinked in the above three transmissions.
ACARS mode: 2 Aircraft reg: .N651UA
Message label: 5Z Block id: 7 Msg. no: M83A
Flight id: UA0978
Message content:-
/R3 IADFRA 0978-05 IAD
-----------------------------------------------------------[05/08/1997 22:44]
This is a downlink response to an uplinked HOWGOZIT report (shown below), which is a United Airlines flight data
report format:
ACARS mode: 2 Aircraft reg: .N658UA
Message label: RA Block id: J Msg. no: QUHD
Flight id: QWDUA~
Message content:-
10978-23 HOWGOZIT
UA978 IADFRA
IAD 2214/2249 887A
SWANN 2259 37 849
BROSS 2301 37 839
OOD 2307 37 815
RBV 2312 37 801
ACK 2337 37 757
WHALE 2354 37 728
BANCS 0108 37
-----------------------------------------------------------[23/07/1997 22:51]

AirNav® Systems – World Leader in Flight Tracking and Monitoring
www.airnavsystems.com
AirNav RadarBox 2007 Manual
Page 20
Waypoints are shown in the lefhand column, just below the OUT and OFF times from IAD. OUT refers to doors closing
on the aircraft at the gate,
and OFF refers to time of departure as outlined above. ETAs at the waypoints along the route are shown in the
middle column, requested/expected flight level next
and fuel remaining figures are shown in the right hand column.
ACARS mode: 2 Aircraft reg: .N651UA
Message label: _ Block id: 0 Msg. no: S87A
Flight id: UA0978
-----------------------------------------------------------[05/08/1997 22:44]
This is a frequent vistor to the ACARS screen, a signal that the aircraft is in the process of receiving uplinked
messages.
ACARS mode: 2 Aircraft reg: .N651UA
Message label: H1 Block id: 4 Msg. no: D90A
Flight id: UA0978
Message content:-
#DFB/PIREPUA.E22C246510978KIADEDDF 8 5972250CL
122 DATA NOT AVAILABLE
38.9850 -77.46532241 1757 18.0324 14
39.0942 -77.51132243 6802
-----------------------------------------------------------[05/08/1997 22:50]
ACARS mode: 2 Aircraft reg: .N651UA
Message label: H1 Block id: 5 Msg. no: D90B
Flight id: UA0978
Message content:-
#DFB 7.5332 13
39.1518 -77.22502247 11805 -4.3307 17
-----------------------------------------------------------[05/08/1997 22:50]
These two messages are position and weather data downlinked from the aircraft automatically to the ground station.
ACARS mode: 2 Aircraft reg: .N642UA
Message label: H1 Block id: 9 Msg. no: F39A
Flight id: UA0970
Message content:-
#M1BPOSN39092W076136,SWANN,215516,230,GOLDA,215624,BROSS,M21,28214,958/TS2155
16,100897B166
-----------------------------------------------------------[10/08/1997 21:55]
This is a good example of a position report along the aircraft's flight route. In this case, United flight 970 is a North
latitude 39.09.2 and West longitude 76.13.6, which happens to be the waypoint named SWANN, and they were over
SWANN at 2155.16 UTC, at FL230 (Flight Level 230 or 23,000 feet),
and they are estimating next waypoint GOLDA at 2156.24, next position BROSS. Outside air temperature is a minus
21, wind 282/14.
Note: you may find ACARS detailed information at the world's best ACARS information source, ACARS Link Page
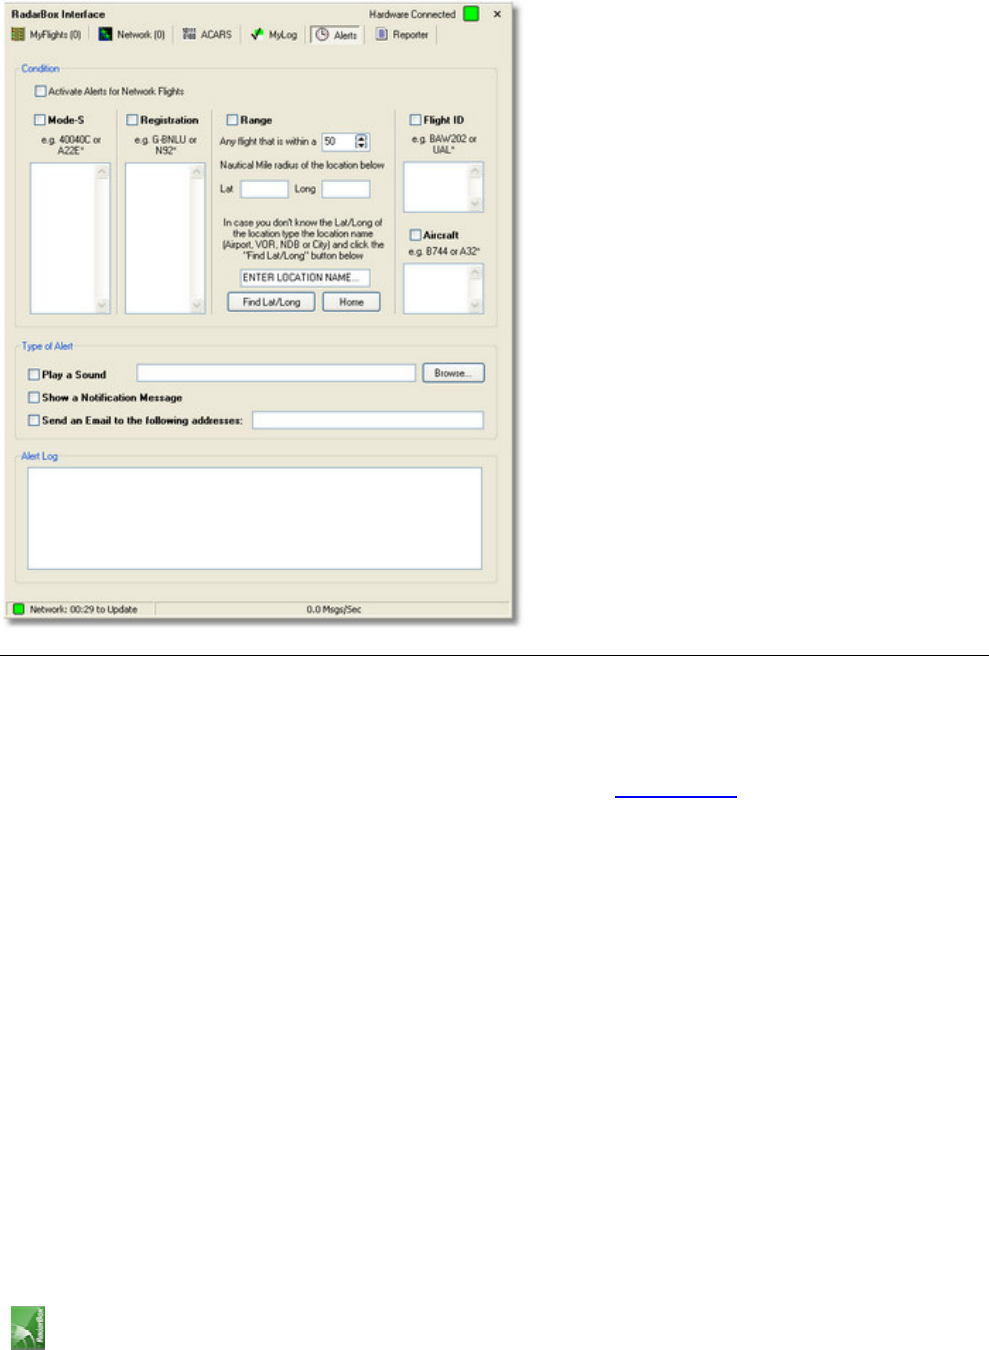
4.3. Creating Alerts
Creating Alerts
AirNav® Systems – World Leader in Flight Tracking and Monitoring
www.airnavsystems.com
AirNav RadarBox 2007 Manual
Page 21
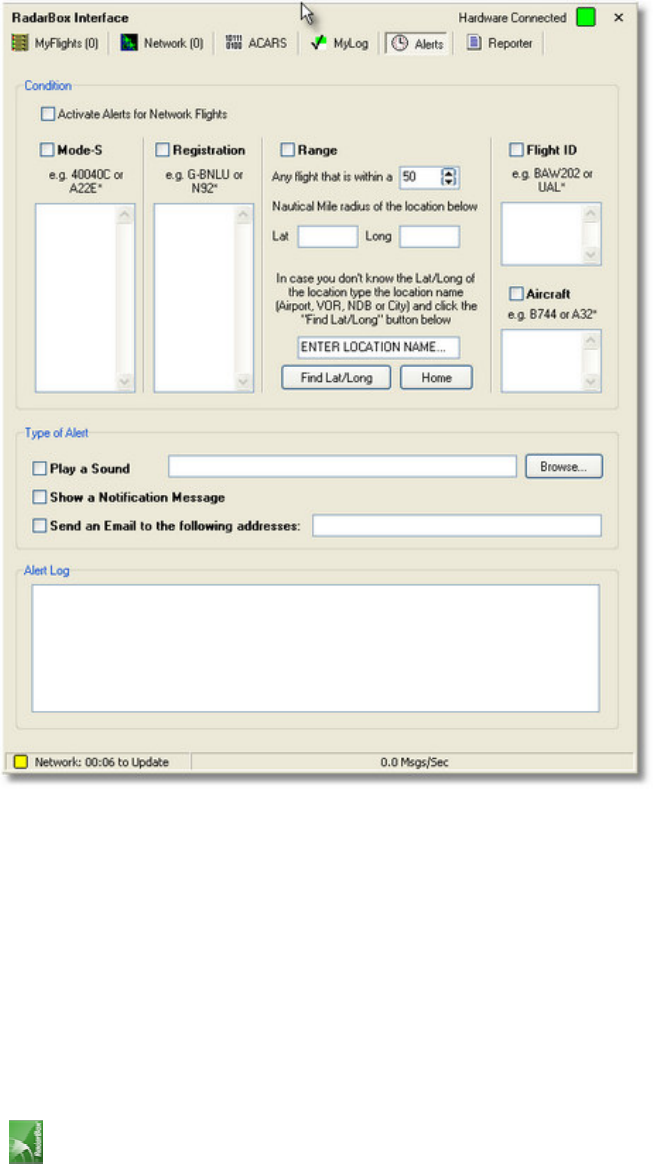
One of the most important features of AirNav RadarBox is that you can program the software to trigger alerts for
certain circumstances.
For example, you can have the program to automatically send an email message when British Airways flight 272 is
received.
The Alert feature can be accessed on the RadarBox Interface. If it not shown open it at the program's menu
[RadarBox | Interface | Show/Hide].
How it works?
The alert feature is divided in two parts:
• Conditions that will trigger an alert
• Type of Alert
There are five types of conditions to trigger an alert:
• Mode-S: when an aircraft with a specific mode-s has been received an alert is triggered
• Registration: when a specific registration is received
• Range: when a flight is less that a defined number of miles from a specified location
• Flight ID: to trigger an alert when a defined flight number is received
• Aircraft: when an aircraft type appears on the system

AirNav® Systems – World Leader in Flight Tracking and Monitoring
www.airnavsystems.com
AirNav RadarBox 2007 Manual
Page 22
There are three types of alerts
• Play a Sound: a sound is played when an alert is triggered. The sound file can be specified using the browse key
• Show a notification message: a windows notification window opens on the bottom right corner of the screen
• Send an email: an email is sent to a specific email address
Note that you can use wildcards to specify conditions. For example if you want your computer to play a sound
whenever a british registered aircraft has been received enter on the registration condition box 'G-*' (all the british
registered aircraft registrations start with a 'G-').
On the bottom of the Alert tab you will also see the alert log box. It will keep a log of the alerts sent for you to check.
Example of an Alert
Let's imagine we want an email message to be sent to "johnsmith@email.com" whenever British Airways flight 272 is
received.
1- Check the Flight ID check box to activate this type of alert condition
2- Type 'BAW272' on the aircraft alert box
3- Check the "Send an Email to the following addresses:" option
4- Type the email address on the email address box
5- That's it. When flight BAW272 is first received by the system an email address will be sent to the specified email
address.
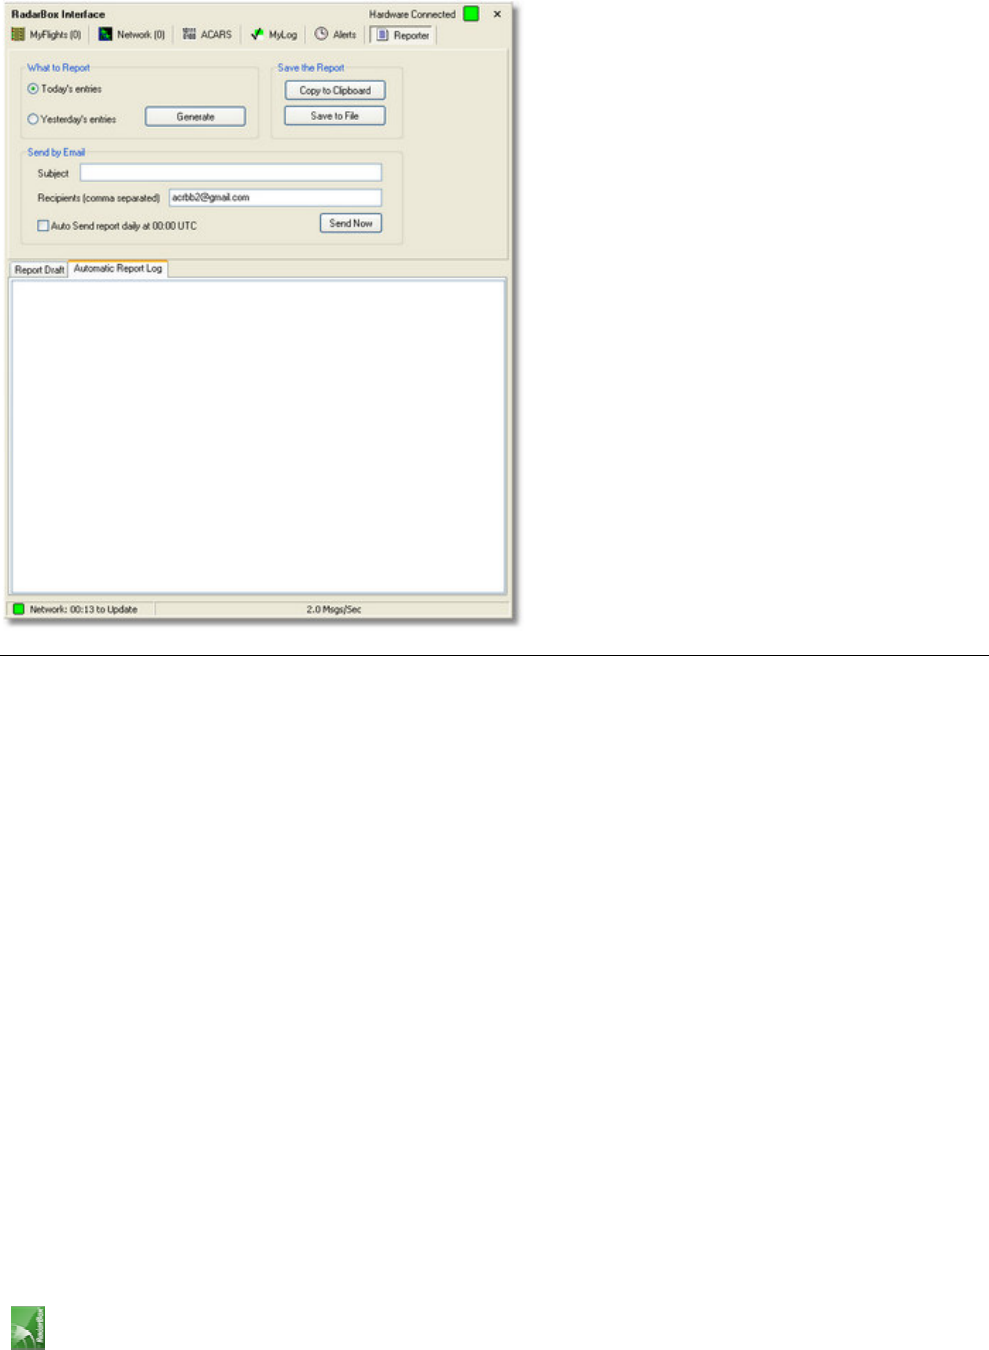
4.4. Creating Reports
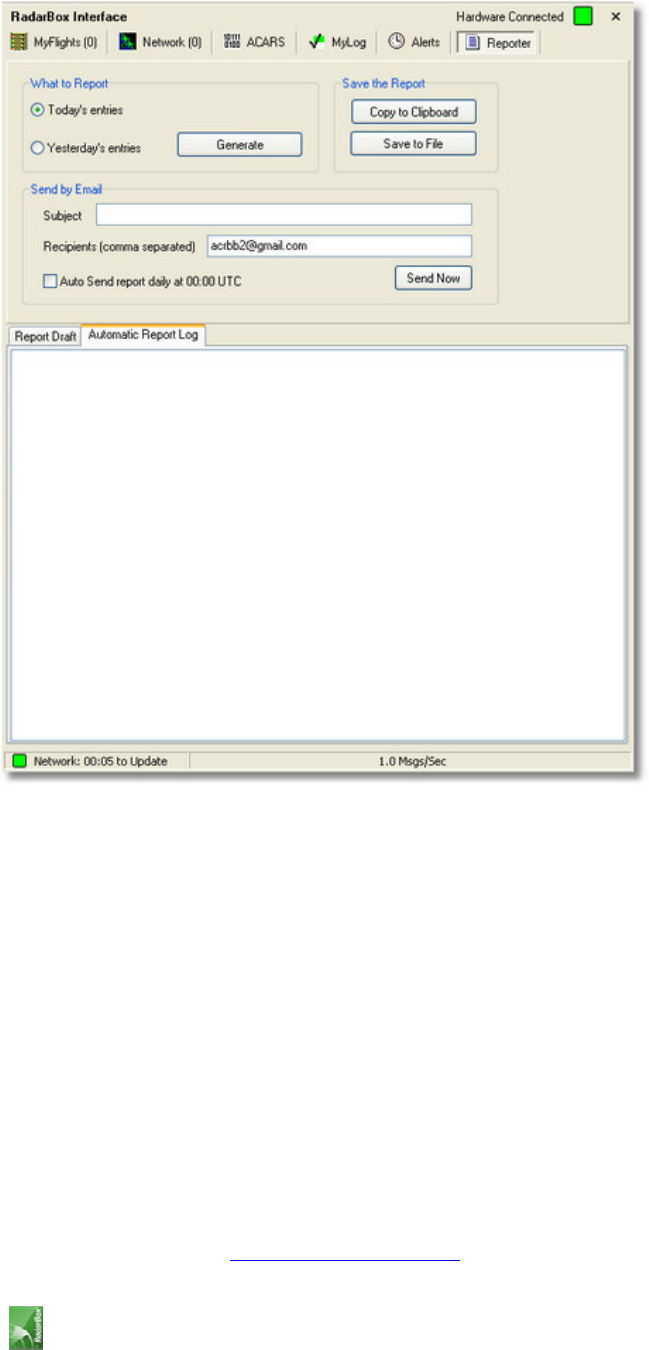
Creating Reports
AirNav RadarBox has an embedded report feature.
This makes it easier to you send reports of received flights to your friends or to an internet mailing list.
To access this feature go to the RadarBox Interface, Reporter Tab.
AirNav® Systems – World Leader in Flight Tracking and Monitoring
www.airnavsystems.com
AirNav RadarBox 2007 Manual
Page 23
How to send a report
1- Select Data to include in the report
First you need to specify the data range for the report. Do this by selecting the date range for the report.
Check the "Only new entries" check box if you want the report to have only aircraft received for the first time.
2- Generate the Report
Click the generate report button.
Once the report is generated you will need to specify what you want to do with it.
3- What to do with the report
You can save it to a file or send it by email.
Note
There is a very popular internet mailing list where mode-s users change experiences and logs at Yahoo Groups.
It is called the "Mode_S" groups.
You can send log reports to do this email to show other users what you have been received.
To do so send an email to "Mode_S@yahoogroups.com" (you need to be subscribed to the group for your message to
be accepted)
AirNav® Systems – World Leader in Flight Tracking and Monitoring
www.airnavsystems.com
AirNav RadarBox 2007 Manual
Page 24
You can subscribe at http://groups.yahoo.com/
4.5. Using Filters
Using Filters
You can choose what to see on the maps. This is done using the filters utility.
It can be accessed on the filter toolbar that appears on the top of the application main screen.
Advanced filters are also available by clicking the "Advanced" filter tool button.
To specify a filter type the filter condition on the white filter boxes and click the filter tool button just left of it so that
it is in the down (checked) condition. This means that the filter is active.
There are four type of filters available:
• Airline: show only flight of a specific airline (ICAO - 3 letter - code of the airline)
• Origin: show only flights from a specific airport (ICAO or IATA - 4 or 3 letter - code of the airport)
• Destination: show only flights to a specific airport (ICAO or IATA - 4 or 3 letter - code of the airport)
• Airport: show only flights that arrive or depart from a specific airport (ICAO or IATA - 4 or 3 letter - code of the
airport)
There are three types of advanced filters available:
• Altitude: show only flights which altitude is between the values specified
• Range: show flights that are below a specified range of a specifc location
• Aircraft: show only flights operated by a certain aircraft type
You can specify negative filters. Negative filters are those that show all aircraft not including the ones that match your
negative filter. See the example below.
Note that if you do not know the airline, airport or aircraft codes to specify on filters you can always click the "..."
button.
Filters Examples
• Example 1 - show only Lufthansa flights:
Type 'DLH' on the airline filter white box and click the 'Airline' button. 'DLH' is the ICAO code for Lufthansa.
• Example 2 - show only flights from Los Angeles airport:

AirNav® Systems – World Leader in Flight Tracking and Monitoring
www.airnavsystems.com
AirNav RadarBox 2007 Manual
Page 25
Type 'LAX' on the origin filter white box and click the 'Origin' button. 'LAX' is the airport code for Los Angeles.
• Example 3 - show only activity for London Heathrow:
Type 'EGLL' or 'LHR' on the airport filter white box and click the 'Airport' button.
4.6. Monitor Airport Movements
Monitor Airport Movements
It is now very simple to monitor all arrivals and departures from or to a specified airport.
1- On the Filters toolbar (shown below) enter the code of the airport you want to monitor in the Airport box.
If you do not know the code, click the '...' button to specify the airport by name.
2- Click on the "Airport" button. It will now remain checked.
Flights to the selected Airport will show green. Flights from the selected airport will show red.
3- If at anytime you want to monitor all the airspace again, click the "Airport" button to uncheck it.
4.7. Flight Data Recorder/Playback
Flight Data Recorder / Playback
The flight data recorder feature enables you to record and playback flight movement files.
This feature is accessible on the File menu.
Flight data files contain a Mode-S message on each line. Their extension is .rbl.
Data on each line is in comma-separated format and has the following fields:
• $PTA: Always present and identifies a mode-s message
• Date/Time in format yyyymmddhhnnss
• Mode S HEX Code
• Callsign
• Altitude in feet
• Groundspeed
• Track
• Vertical Rate in feet per minute
• Airspeed
• Latitude
• Longitude
Examples:
$PTA,20070516163432224,40056E,TOM287Q,,,,,,,,,,,,,
$PTA,20070516163432739,C076F0,,39000,,,,,38.9736,-8.3035,A,,,,,
$PTA,20070516163420739,C076F0,FCA923C,,,,,,,,,,,,,
$PTA,20070516163420802,495288,,,231.5,328.8,-2432,,,,,,,,,

AirNav® Systems – World Leader in Flight Tracking and Monitoring
www.airnavsystems.com
AirNav RadarBox 2007 Manual
Page 26
5. Menus, Windows and Toolbars
5.1. Working with Maps
Working with maps
AirNav RadarBox 2007 new graphical approach gives you the chance to use one of the most sophisticated map
interface currently available in any flight tracking application.
Map functions are available through the map toolbar, or by using your right mouse button over a map.
You may zoom, resize, and change the projection type, fit to screen and hide/show map layers using the map toolbar.
The easiest way to edit a map is using your mouse buttons.
Pan and Rotate
1- Hold down your left mouse button
2- Move your mouse until you rotate the globe to the desired location
Resize
1- Hold down your right mouse button
2- Move your move to resize the map as desired
Change aircraft label position manually
To do this manually you must resize and change direction of an aircraft label:
1- Move the mouse cursor to an area over the label you want to resize.
2- Hold the Shift Key down and at the same time move the mouse. The label must be brought to where the mouse
cursor is.
3- Release the Shift key. The label will remain with its current direction and size.
5.2. Avoid Label Overlap
Avoid Label Overlap
You can avoid aircraft labels being overlapped.
This can be done automatically or manually.
Automatically:
Click Track menu, Avoid Label Overlap or F9.
All calculations, label rotation and resizing will be made in order to find the best way each label should be displayed.
Manually:
To do this manually you must resize and change direction of an aircraft label:
1- Move the mouse cursor to an area over the label you want to resize.
2- Hold down the Shift Key and at the same time move the mouse. The label must be brought to where the mouse
cursor is.
3- Release the Shift key. The label will remain with its current direction and size.
VOR/NDB/FIX/Airport Label overlap avoidance:
Just press F10.
AirNav® Systems – World Leader in Flight Tracking and Monitoring
www.airnavsystems.com
AirNav RadarBox 2007 Manual
Page 27
Overlapped labels will be moved or sized for label overlap avoidance.
5.3. Shortcuts
Shortcut Keys
AirNav RadarBox 2007 use can be easier by using shortcut keys.
F1 – Opens help file in the appropriate topic
F9 – Automatically avoids Flight Label Overlap
F10 – Automatically avoids VOR/NDB/FIX/Airport Label Overlap
ESC – Opens Full Screen Mode
5.4. Toolbars
5.4.1. Map Toolbar
Maps Toolbar
This Toolbar provides methods of editing the current map view.
Icons (from the left to the right):
• Set map to
• Resize map to full window extents
• Zoom in
• Zoom out
• Zoom Back
• Zoom Forward
• Pre-defined Map Colors (you can define them in the preferences window)
• Map projections
• Radar Rings
• Mode-S Signal Maximum Range
• Geographic Coordinates Grid
• Airport/VOR/NDB/FIX and other navigation facilities
• General map labels (routes, railroad, elevation)
Please note that you can access other map features by clicking your right mouse button over the map.
To understand how to do so, go to the Working with maps section.
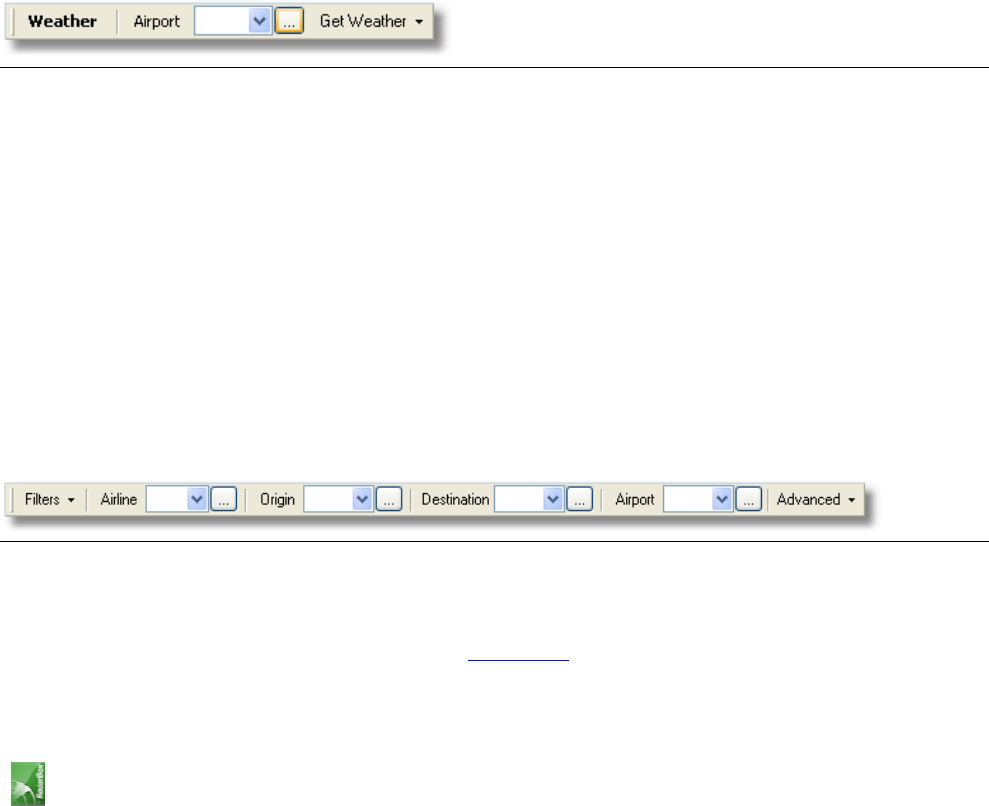
5.4.2. Location Toolbar
Locate Toolbar
It is now easy to locate anything on a map.
AirNav® Systems – World Leader in Flight Tracking and Monitoring
www.airnavsystems.com
AirNav RadarBox 2007 Manual
Page 28
Items to locate include:
• Airport
• VOR
• NDB
• FIX
• City
To locate an item type the item name on the locate white box and then click the Locate button.
If more than one item matches the a drop down window will appear for you to select the correct item.
• Example 1: locate the city of Dubai on the Map:
Type Dubai on the locate white box and click Locate
• Example 2: locate Miami airport on the Map:
Type KMIA (airport ICAO code for Miami) on the locate white box and click Locate
5.4.3. Weather Toolbar
Weather Toolbar
This feature enables you to quickly be informed on airport weather conditions.
Information is retrieved in real-time from NOAA (the US National Oceanic and Atmospheric Organization).
Information will be given in the following three formats:
• METAR
• TAF
• Decoded METAR
You just need to type the airport ICAO code (4 letter) in the white box and select the type of report you want from
the drop down "Get Weather" tool button.
If you do not know the airport code click the '...' button and type the airport/city name.
5.4.4. Filters Toolbar
Filters Toolbar
The filters toolbar allow you to select what flights are shown on the map.
By default all the flights will be shown.
For more information on how to use filters please go to Using Filters section.
AirNav® Systems – World Leader in Flight Tracking and Monitoring
www.airnavsystems.com
AirNav RadarBox 2007 Manual
Page 29
5.5. Windows and Panels
5.5.1. RadarBox Interface
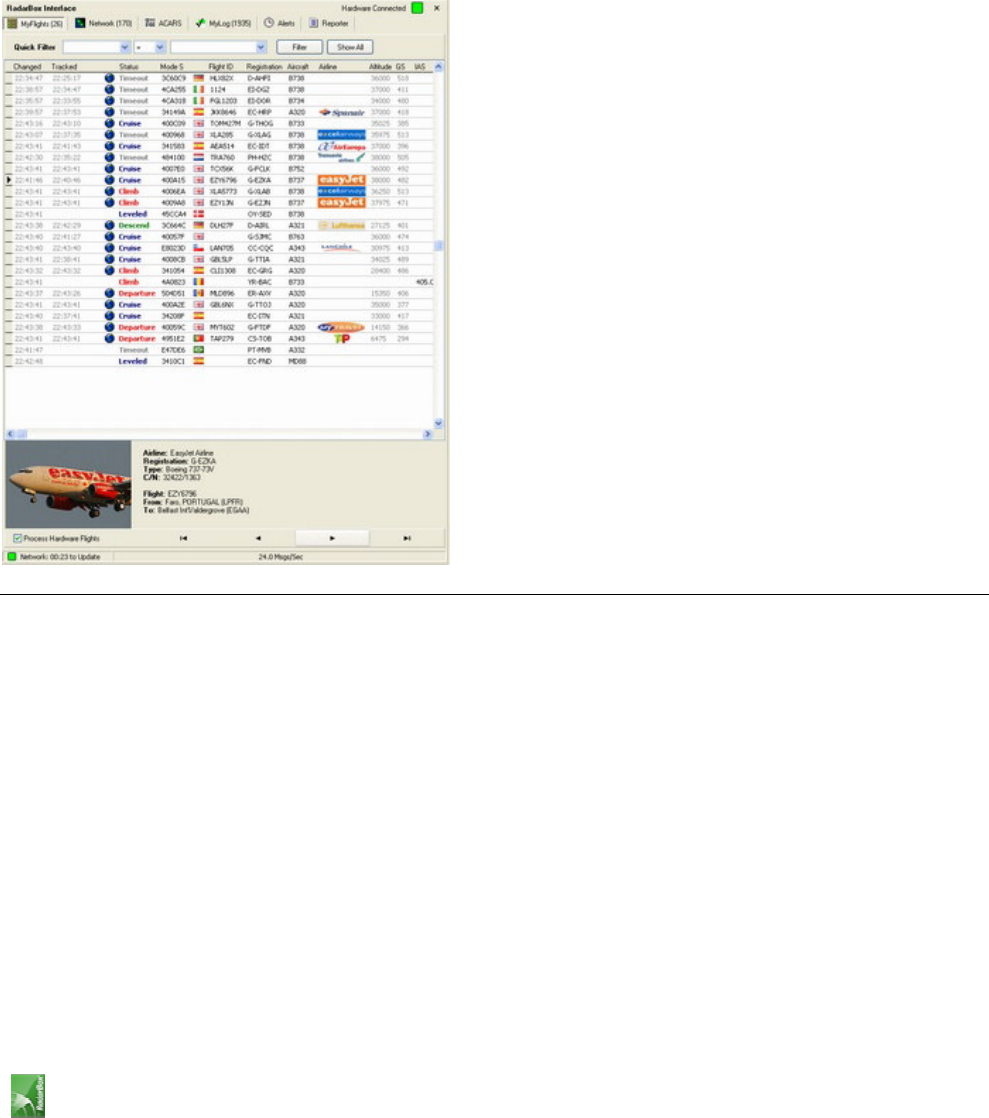
5.5.1.1. MyFlights
MyFlights and Network Tabs
This is probably the most important place of the software.
On this tab you will view detailed information on each flight being received.
The MyFlights Tab shows local flights received by your hardware.
The Network Tab shows flights received worldwide by other users hardware
On the top you have a Quick Filter function. By default the filter is turned off and all flights are shown.
The following data for each flight appear on each column:
• Changed: Last Time (UTC) the flight was changed
• Tracked: Last Time (UTC) tracking information was received
• ACARS Icon: shown if the aircraft is also being received on ACARS
• Globe Icon: shown if the flight is being shown on the map
• Status: status of the flight (NA means not available)
• Mode S: Aircraft Mode-s HEX Code
• Flag: Country flag of the aircraft registration
• Flight ID: Flight Callsign
• Registration: Registration (tail number) for the aircraft
• Aircaft: Aircraft type in four letter format
• Airline Logo: Logo of the Airline

AirNav® Systems – World Leader in Flight Tracking and Monitoring
www.airnavsystems.com
AirNav RadarBox 2007 Manual
Page 30
• Altitude: Altitude in feet
• GS: Ground Speed in Knots
• IAS: Indicated Airspeed in Knots (rarely available)
• Hdg: Heading
• VRate: Vertical rate in feet/minute
• Company: Airline Name
• Route: Origin/Via/Destination in ICAO (4 letter) code
• Flying Over: Region the flight is overflying
• Latitude
• Longitude
You may choose which columns are seen on the grid on the Preferences panel.
You may order data by clicking on the title of each column.
On the bottom of the grid you will see detailed aircraft and flight information.
If your computer is connected to the internet a photo of the received aircraft is shown.
This feature is a result of a partnership between AirNav Systems and Airliners.net, the world's biggest databank of
Airline photos.
as the picture search is done by registration, the picture you see is exactly of the aircraft being received.
5.5.1.2. ACARS
ACARS Tab
AirNav RadarBox is capable of receiving ACARS Data from AirNav ACARS Decoder.
On this tab ACARS Information received using the DDE connection is shown.
Note that on the MyFlight and Network Grids a small ACARS Symbol will appear on a flight if ACARS information is
being received for that flight.
The Grid columns are organized into:
• Received: Date and Time the message was received
• Flight ID: Callsign of the flight
• Registration: Registration (tail-number) of the aircraft
• Aircraft: Aircraft Type
• M: ACARS Mode
• Lbl: Message Label
• Blc: Block ID
• No: Message Number
• U/D: Uplink or Downlink
Note: AirNav ACARS Decoder is available at AirNav Systems homepage and enables you to decode in real-time ACARS
messages
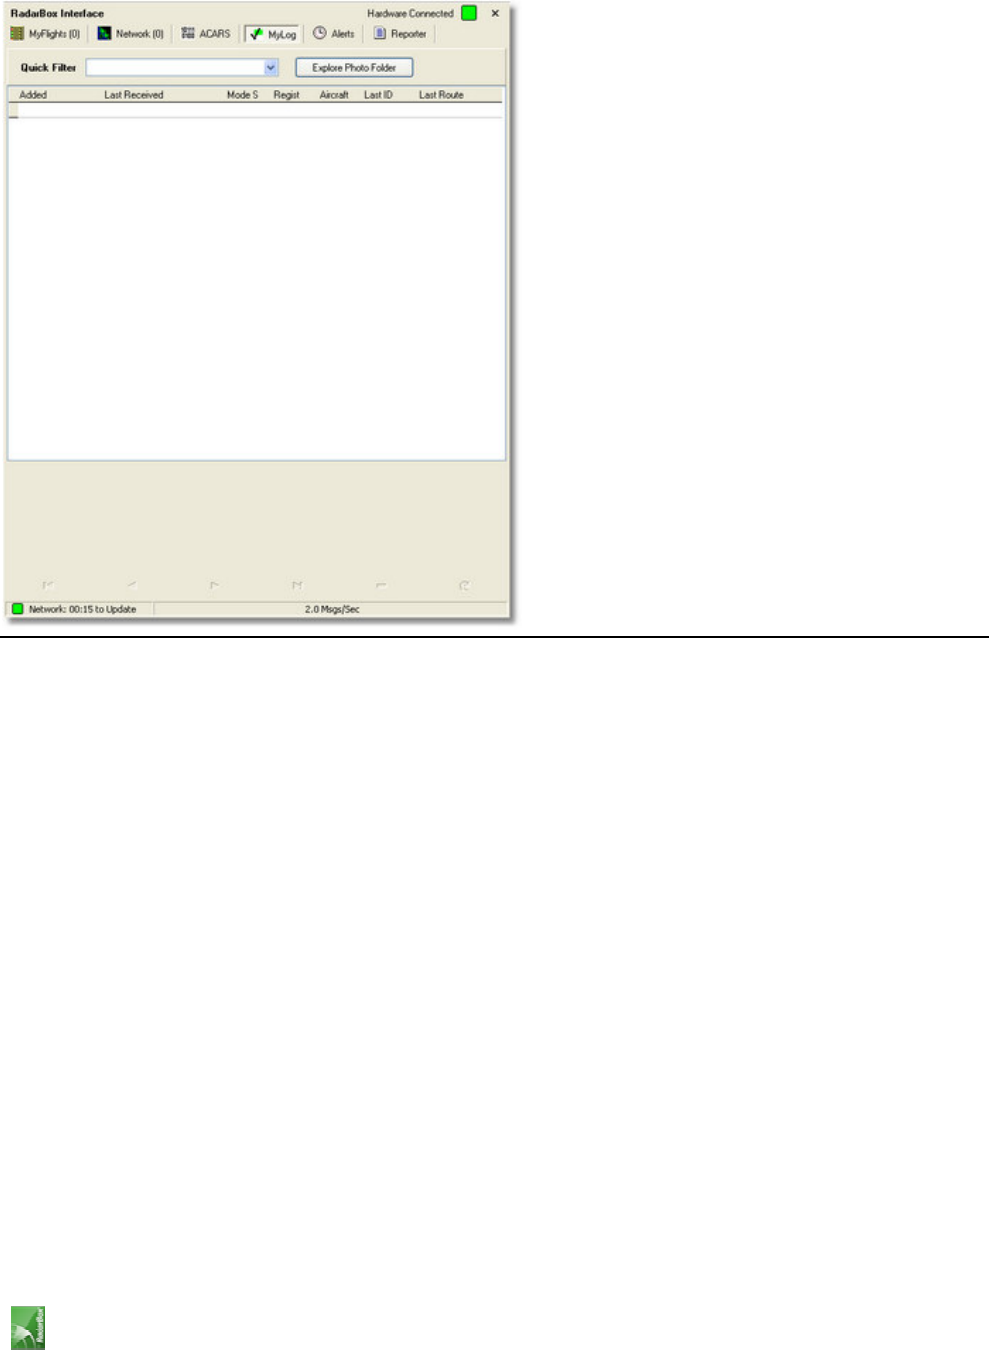
5.5.1.3. MyLog
MyLog Tab
AirNav® Systems – World Leader in Flight Tracking and Monitoring
www.airnavsystems.com
AirNav RadarBox 2007 Manual
Page 31
MyLog is a unique feature where you can maintain a list of all received aircraft.
In other words it's your received aircraft collection.
On the top you can use any of the quick filters available to easily look at data.
The Explore Photo Folder button opens the folder where aircraft photos are stores in Windows Explorer.
The Grid columns are organized into:
• Added: Date and Time the aircraft was received for the first time
• Last Received: Date and Time
• Flag: Registration (tail-number) of the aircraft
• Mode S: Aircraft Type
• Registration: ACARS Mode
• Aircraft: Message Label
• Last ID: Block ID
• Last Route: Message Number
If you click on the grid detailed aircraft information including a photo is shown on the lower panel.
5.5.1.4. Alerts
Alerts Tab
AirNav® Systems – World Leader in Flight Tracking and Monitoring
www.airnavsystems.com
AirNav RadarBox 2007 Manual
Page 32
One of the most useful features of AirNav RadarBox is the possibility of receive an email message, a Windows note or
playing a sound each time a specific aircraft, flight id, airline, etc is received.
This is accomplished in the Alerts Tab.
Detailed information on how to setup your custom Alerts can be found at Creating Alerts
5.5.1.5. Reporter
Reporter Tab
AirNav® Systems – World Leader in Flight Tracking and Monitoring
www.airnavsystems.com
AirNav RadarBox 2007 Manual
Page 33
Using the Reported feature you can share with your friends details on which aircraft you are receiving with AirNav
RadarBox.
To properly use this feature you have to generate a report. Do this by selecting which date range you want (Today's
entries or Yesterday's entries) and then click the Generate button.
Then you can opt to save your report (by copying it to the Windows clipboard or by saving it to a file).
A Draft of the generated report is shown on the "Report Draft" tab. You can change this tab by editing directly inside
the software.
After entering the subject and recipient email for the report, click the Send Now button to send it to your friends.
There is also the option to automatically send the report at midnight daily.
You can check which reports have been automatically sent in the "Automatic Report Log" tab.
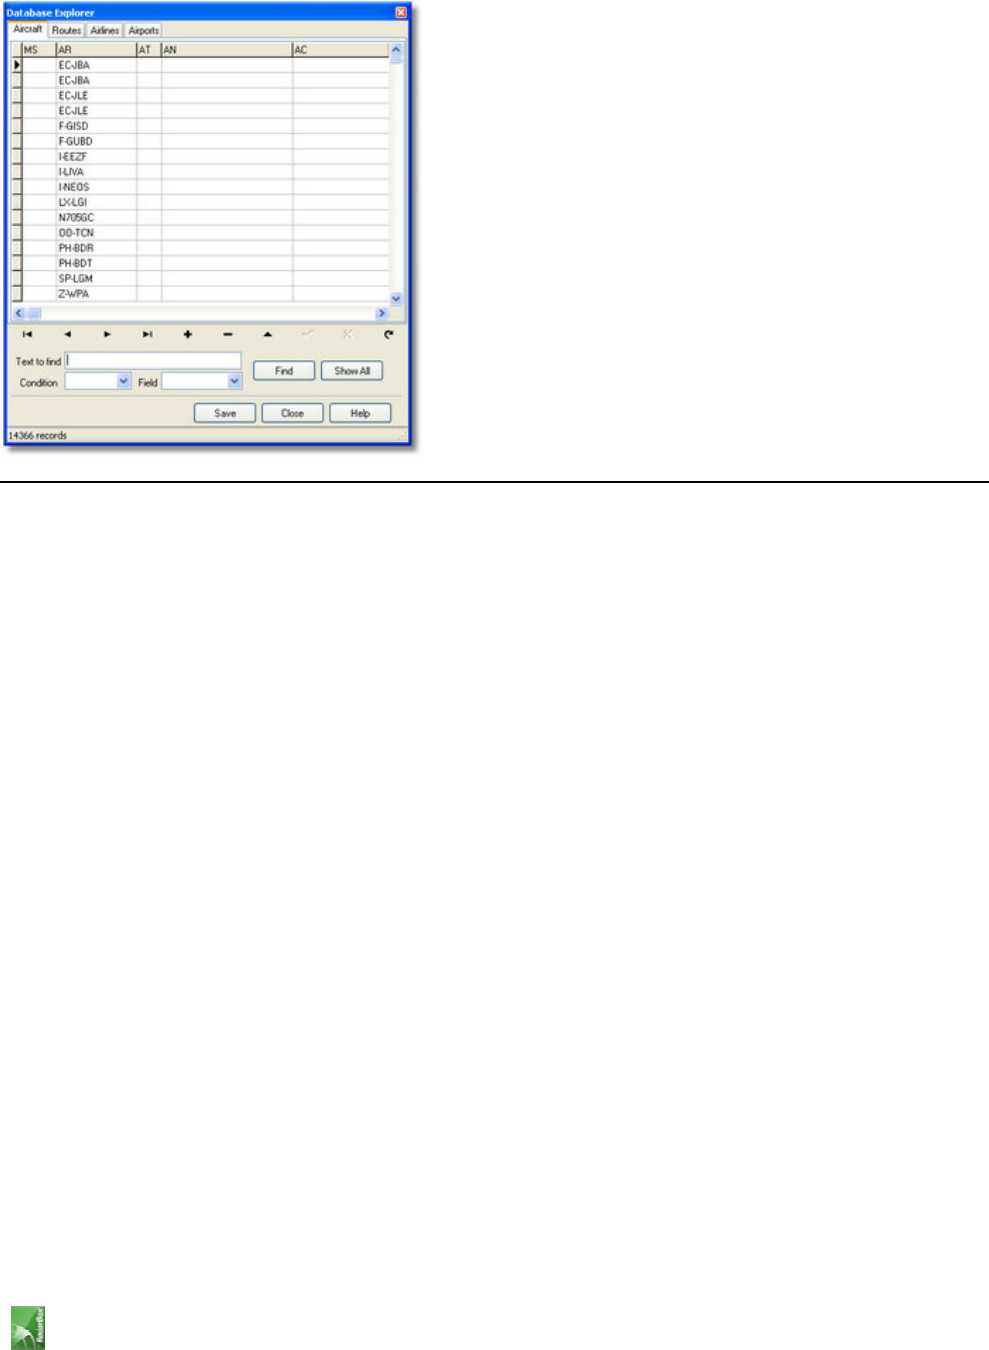
5.6. Database Explorer
Database Explorer
AirNav® Systems – World Leader in Flight Tracking and Monitoring
www.airnavsystems.com
AirNav RadarBox 2007 Manual
Page 34
AirNav RadarBox comes with 4 accurate aviation tables.
• Aircraft
• Routes
• Airlines
• Airports
You can browse, search and edit database settings using this Window.
On the bottom left of the Database Explorer Window the total number of records on the current active table is shown.
5.7. Preferences
Preferences
AirNav® Systems – World Leader in Flight Tracking and Monitoring
www.airnavsystems.com
AirNav RadarBox 2007 Manual
Page 35
You can customize the way you want the application to work.
This is done in the Preferences Windows accessible thought the File menu.
This window is organized into 4 tabs:
• General
• Set Time and Date: opens Windows Time/Date properties box
• Clear History: deletes all entries in the software's drop down boxes
• Aircraft Symbol: choose what kind of drawing you want to appear representing the aircraft in the map
• Error Report: "ANRB.elf" file located on your software's main folder contains a log of all program problems.
Check the "Auto send application error reports to AirNav Systems" if you want to use your error data to
continue to improve the software performance
• Internet Proxy Settings
• RadarBox
• Share Flight data on RadarBox Network: check if you want other users to see which flights you are receiving
• Transition Altitude: Set this so above this altitude Flight Levels are shown (instead of 9000ft FL90 is shown)
• Photo Options: several options so you customize the way they are downloaded from the internet
• General: empty the MyLog table or Refresh its contents in case changes were done to the aircraft table
• Grid Visible Columns: choose which columns are visible in the MyFlights and Network grids
• Timeout: timeout flights will be shown in a different color
• Home Station Data
• Home Location: so when you click the Go to Home button on the main window this is properly centered
• Station Data: some details on your station to be included on the Report / Exported Log features.
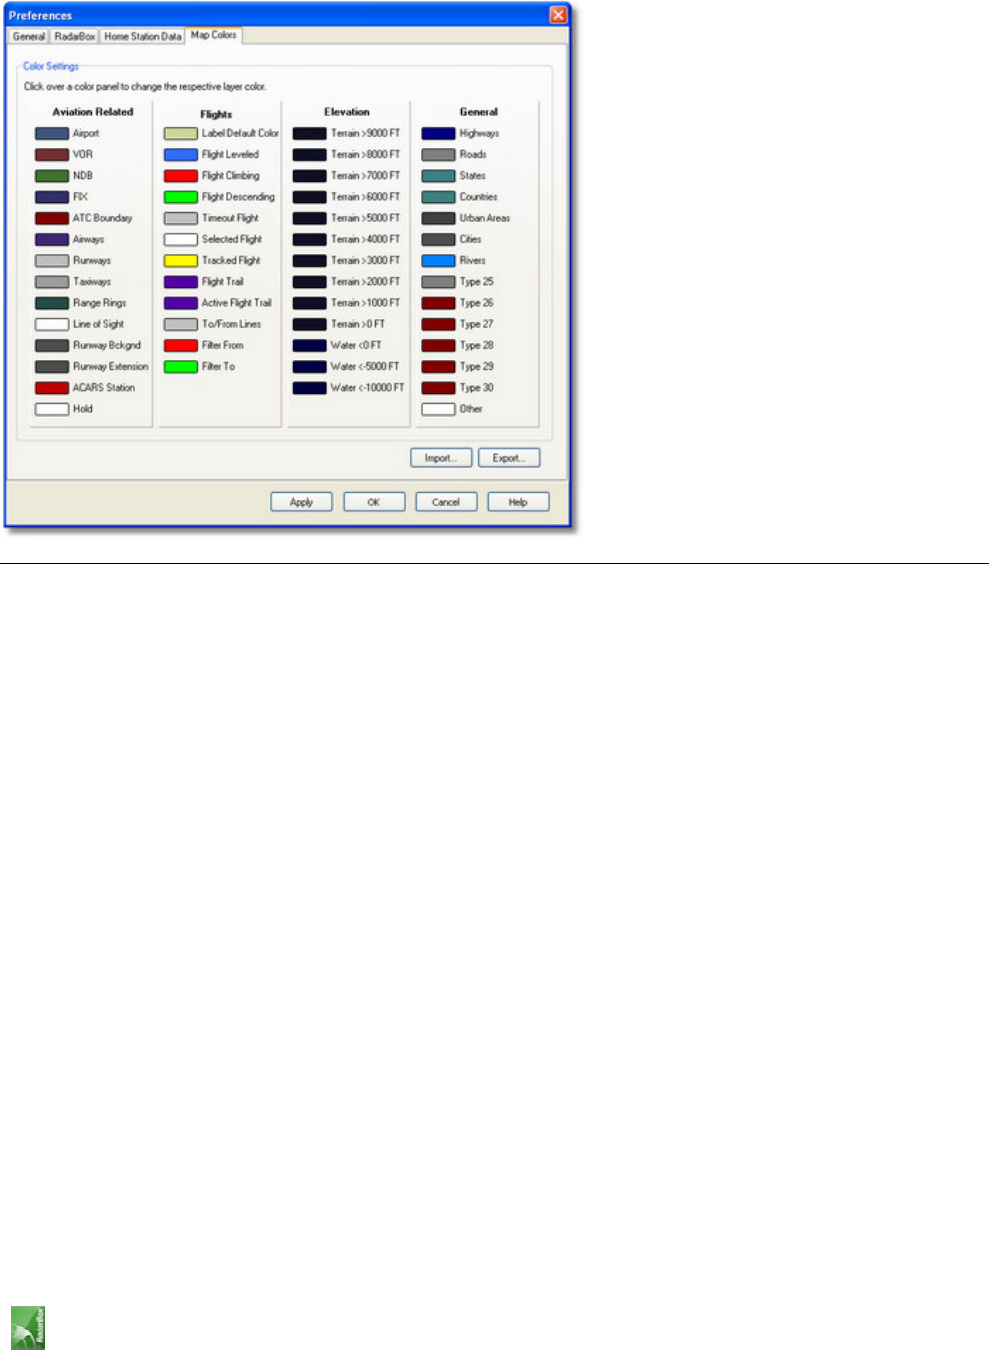
• Map Colors
• Customize the way maps are drawn. Note that you can always export your settings for later use or to share
with a friend.
AirNav® Systems – World Leader in Flight Tracking and Monitoring
www.airnavsystems.com
AirNav RadarBox 2007 Manual
Page 36
5.8. Menus
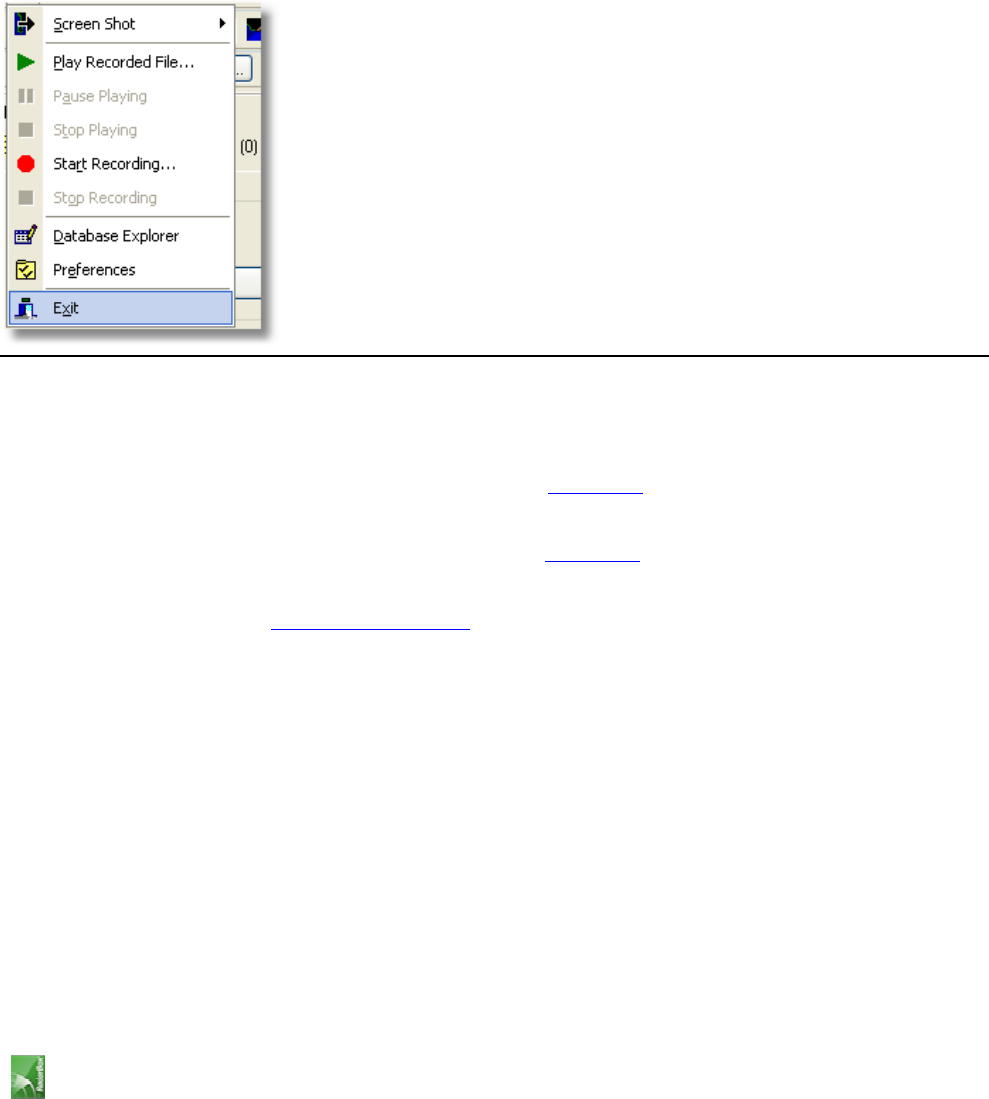
5.8.1. File
File Menu
Screen Shot:
Create, Save, Share and Explore Screen Shots.
Recorder:
Reads a Filter file saved in a file and loads it into the active view. Learn more
Database:
Saves the current Filter file to disk using the current Filter name. Learn more
Preferences:
Opens the preferences window. Click here to learn more
Exit:
Closes AirNav RadarBox 2007
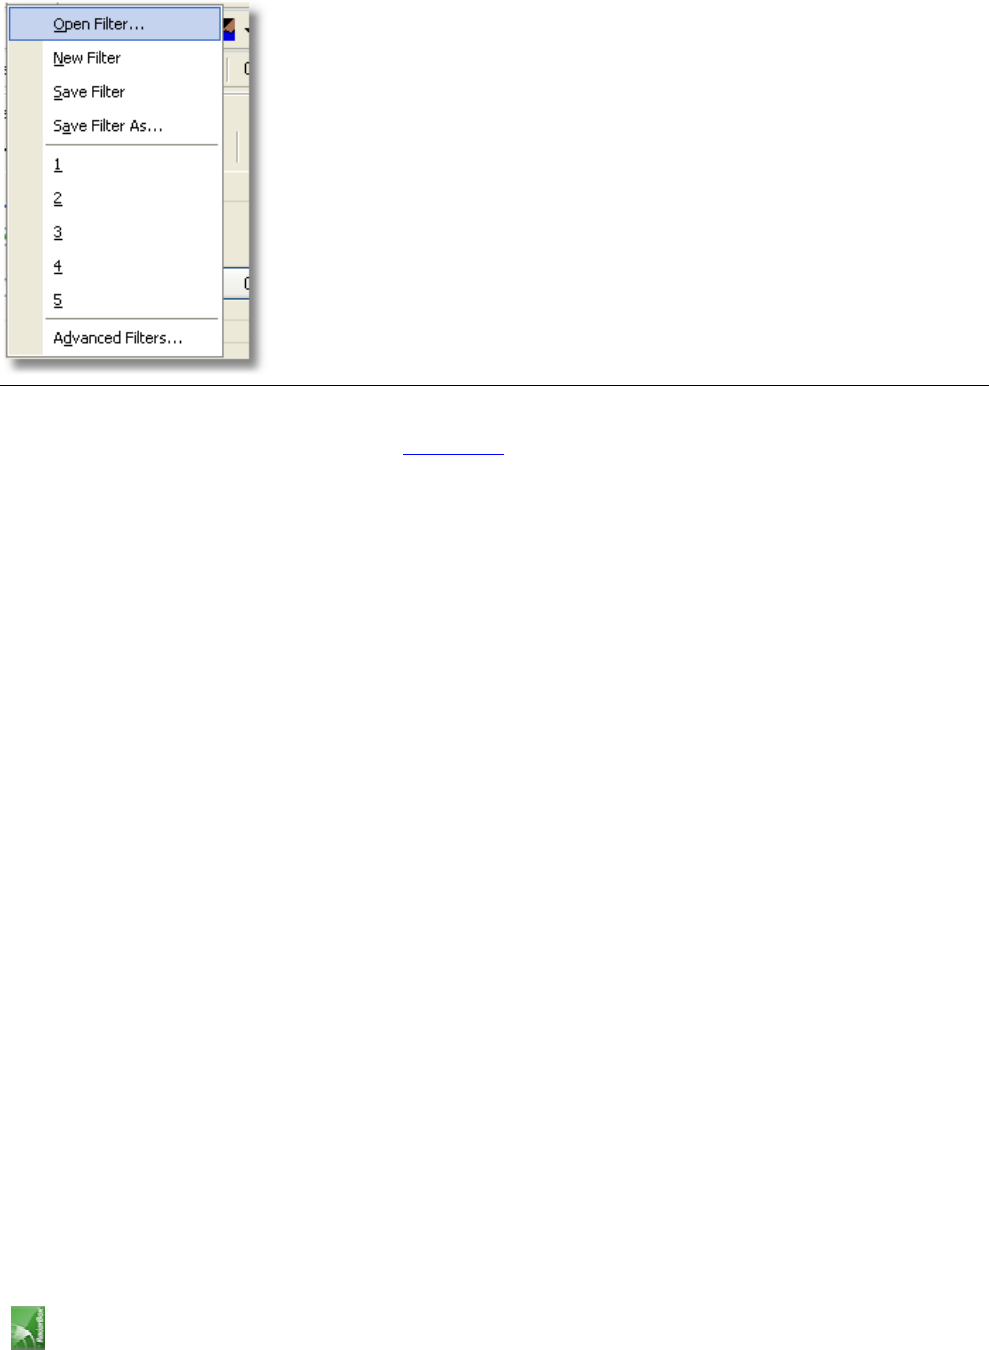
5.8.2. Filters
File Menu
AirNav® Systems – World Leader in Flight Tracking and Monitoring
www.airnavsystems.com
AirNav RadarBox 2007 Manual
Page 37
You can select which data you want to be seen on the map.
For more information on filters, please read the Using Filters section.
New Filter:
Clears the filter being used and creates a new one.
Open Filter:
Reads a Filter file saved in a file and loads it into the active view.
Save Filter:
Saves the current Filter file to disk using the current Filter name.
Save Filter As:
Saves a filter in a specified file.
Advanced Filters:
Opens the Advanced Filters Window
5.8.3. Map
Maps Menu
AirNav® Systems – World Leader in Flight Tracking and Monitoring
www.airnavsystems.com
AirNav RadarBox 2007 Manual
Page 38
Everything
Set Map To:
Quickly pans and zooms the active map to a desired location.
Open/Save:
New, Open and Saving map functions.
All other map functions are self explanatory.
More than 500 thousand map features are available, aviation and non-aviation related.
For more information on AirNav RadarBox 2007 maps please go to Working with maps.
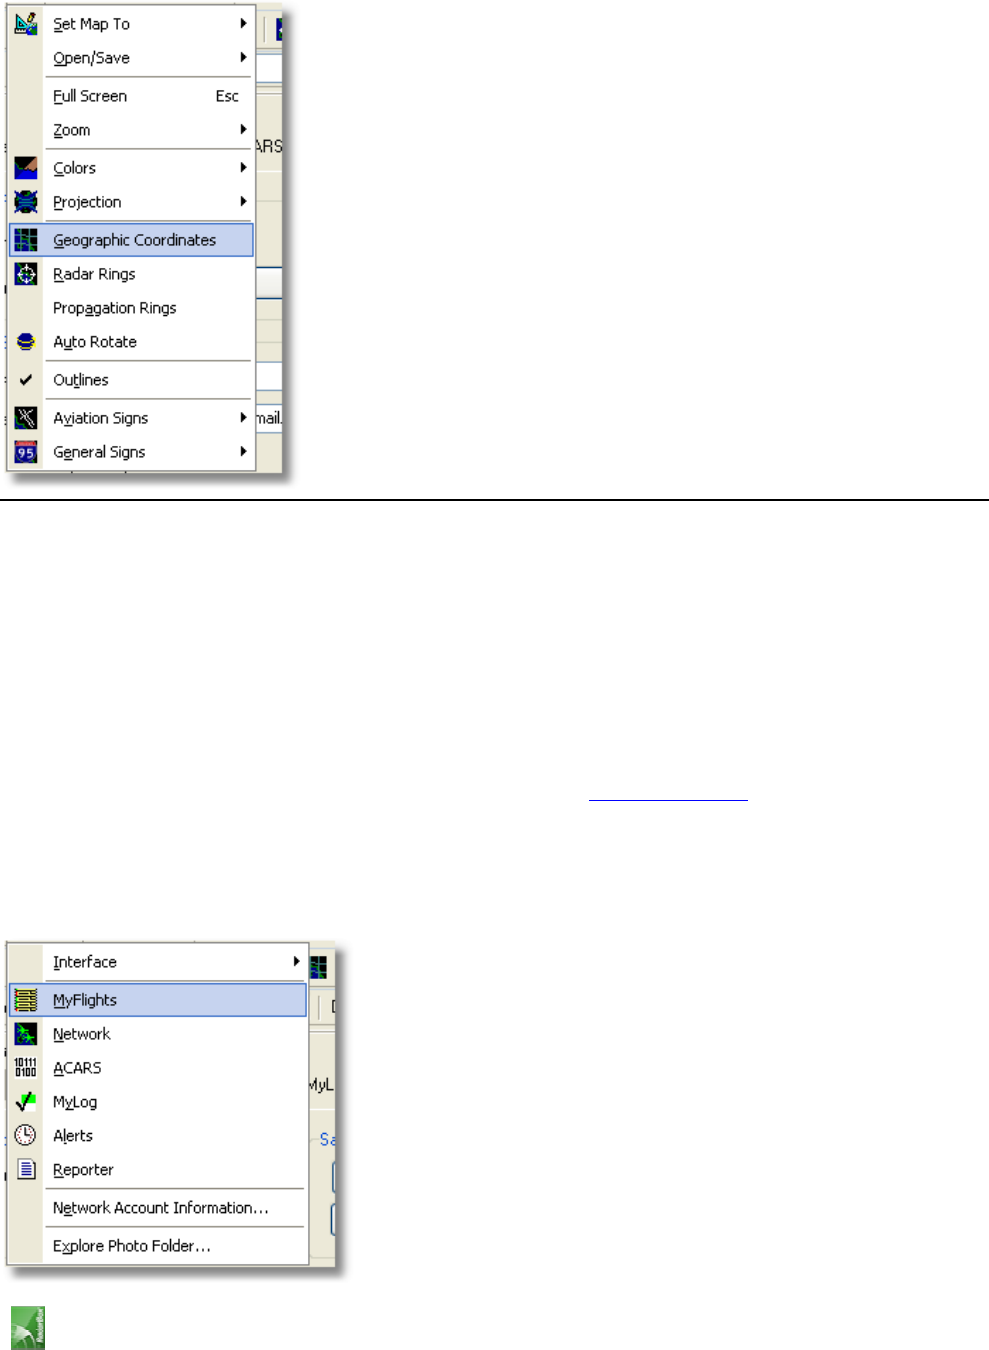
5.8.4. RadarBox
RadarBox Menu
AirNav® Systems – World Leader in Flight Tracking and Monitoring
www.airnavsystems.com
AirNav RadarBox 2007 Manual
Page 39
In this menu you can access the most important AirNav RadarBox 2007 features.
Interface:
Choose to wether the RadarBox Interface should be visible and where on the screen it you want it to be placed.
Visible Tab:
Quick access to RadarBox Interface tabs.
Network Account Information:
Information on your account usage. An Internet connection is required.
Explore Photo Folder:
Browse your photos in Windows Explorer.
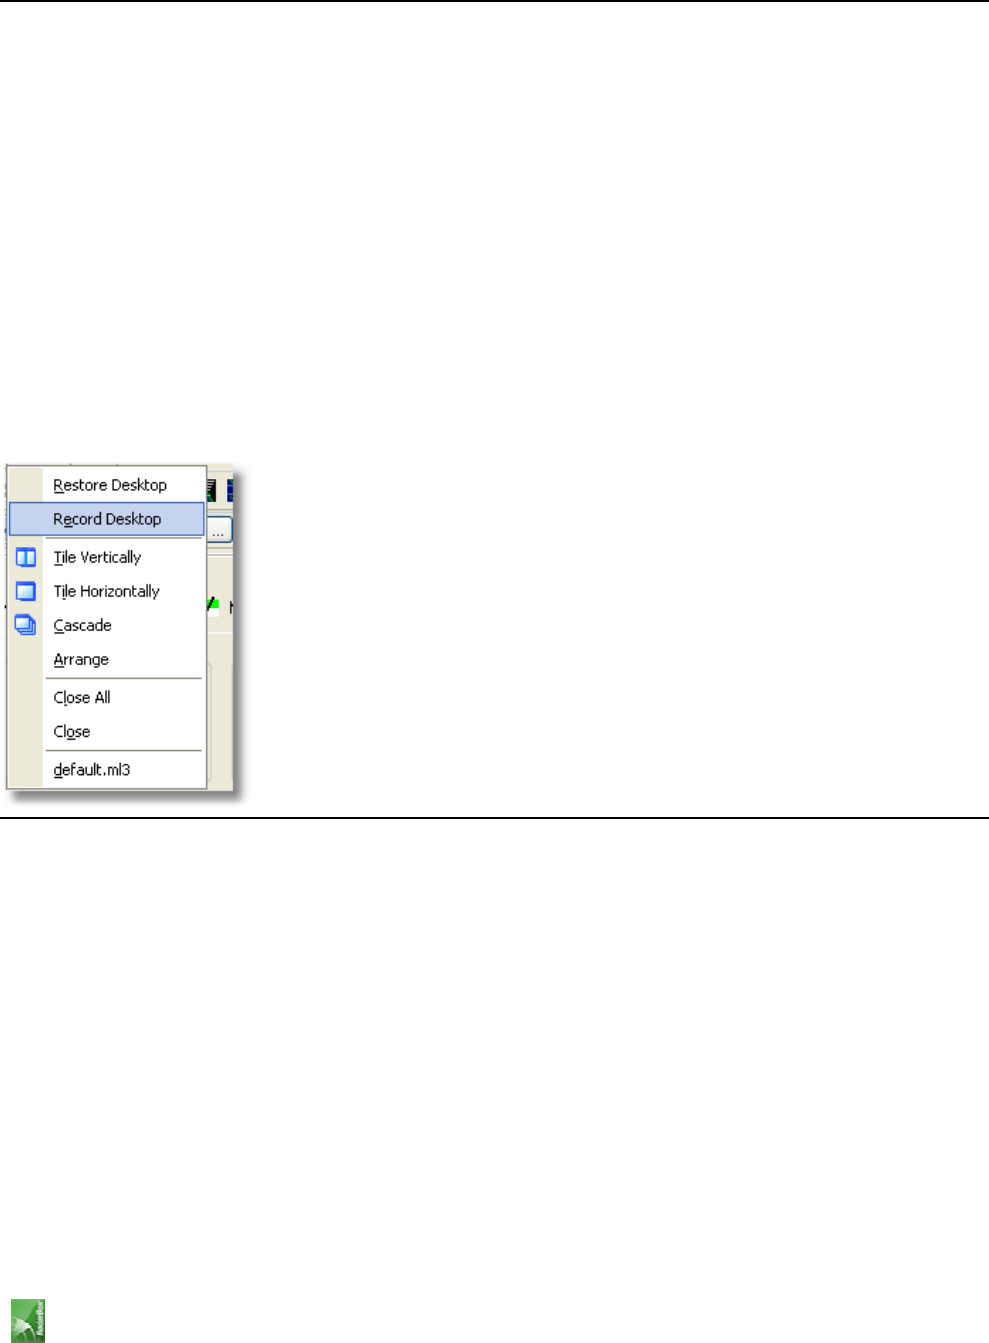
5.8.5. Window
Window Menu
Tile Horizontally/Vertically:
Puts all the open windows tiled horizontally/vertically (map or vertical tracking windows).
Cascade:
Rearranges all opened windows (map and vertical tracking) in AirNav RadarBox 2007 so they overlap.
Arrange Icons:
Arranges the icons of minimized forms so that they are evenly spaced and don't overlap.
Close All:
Closes all map and Vertical Tracking opened windows.
Opened Windows:
A list of all currently opened maps.
5.8.6. Help
Help Menu

AirNav® Systems – World Leader in Flight Tracking and Monitoring
www.airnavsystems.com
AirNav RadarBox 2007 Manual
Page 40
Contents:
Opens Help File Contents.
Online Support:
Get support in less than 24 hours using our online support ticketing system.
AirNav Systems Online:
Check for program updates and news.
Check for Updates:
If you are connected to the Internet, click here to download program patches/updates.
Welcome:
Opens the AirNav RadarBox 2007 Welcome Window.
About:
Opens the program about box with author information.
AirNav® Systems – World Leader in Flight Tracking and Monitoring
www.airnavsystems.com
AirNav RadarBox 2007 Manual
Page 41
6. Registration and Logon
6.1. How to Order
How to Order
To buy AirNav RadarBox 2007 please visit AirNav Systems web site at http://www.airnavsystems.com and click on
the "Buy Now" link on the top.
There are several ways to order from Online Order with a credit card, to phone and FAX.
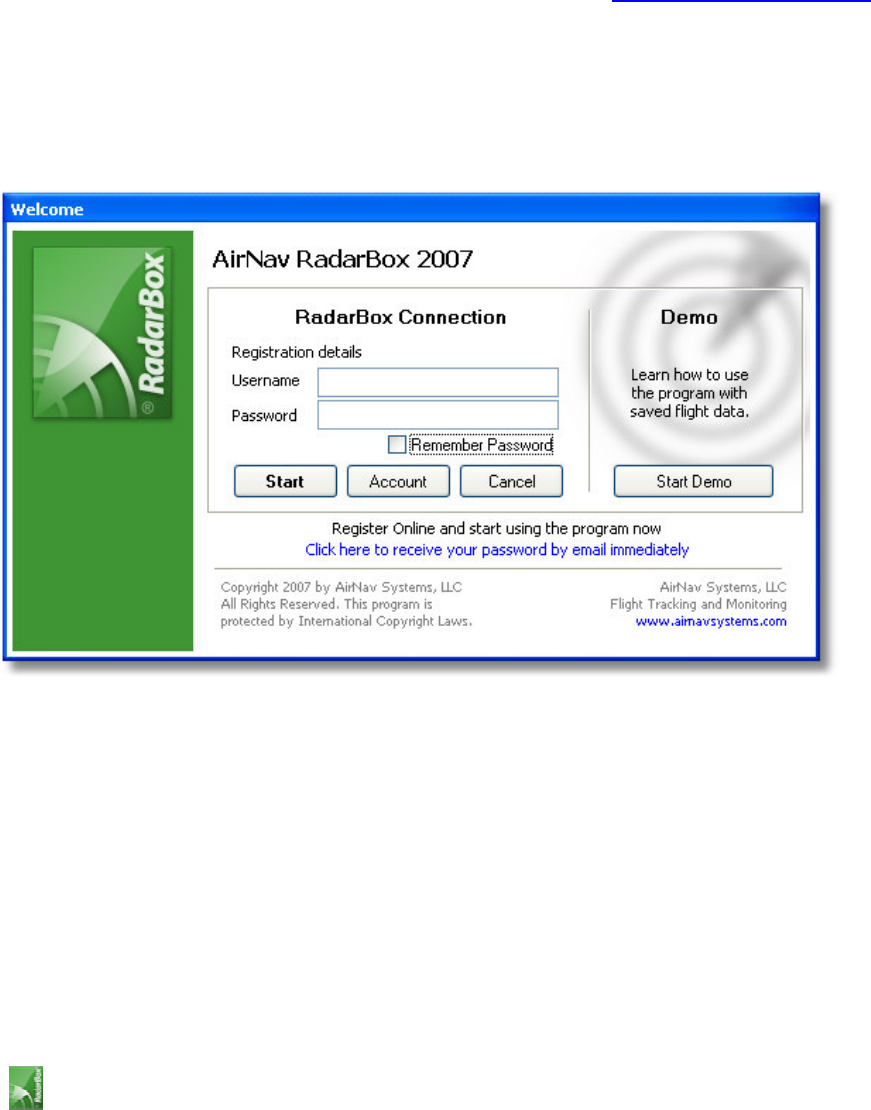
6.2. Logon Window
Logon Window
When you start AirNav RadarBox 2007 you will be presented with a Logon Window.
If you are a registered user, you will need enter your registration details - available on the sticker present on CD
Cover shipped with the product.
If you are not a registered user you will be able to see a Demonstration of the program capabilities by clicking the
"Start Demo" button.
For information on how to order AirNav RadarBox 2007 please visit www.airnavsystems.com
FCC Statement
This device complies with Part 15 of the FCC Rules. Operation is subject to the following two
conditions:
(1) This device may not cause harmful interference, and
(2) This device must accept any interference received, including interference that may cause
undesired operation.
Note: The manufacturer is not responsible for ANY interference, for example RADIO or TV
interference, caused by unauthorized modifications to this equipment.
Such modifications could void the user’s authority to operate the equipment.
NOTE 2: This equipment has been tested and found to comply with the limits for a Class B digital device,
pursuant to part 15 of the FCC Rules. These limits are designed to provide reasonable protection against
harmful interference in a residential installation. This equipment generates, uses and can radiate radio
frequency energy and, if not installed and used in accordance with the instructions, may cause harmful
interference to radio communications. However, there is no guarantee that interference will not occur in
a particular installation. If this equipment does cause harmful interference to radio or television reception,
which can be determined by turning the equipment off and on, the user is encouraged to try to correct the
interference by one or more of the following measures:
- Reorient or relocate the receiving antenna.
- Increase the separation between the equipment and receiver.
-Connect the equipment into an outlet on a circuit different from that to which the receiver is connected.
-Consult the dealer or an experienced radio/TV technician for help.