Acrox Technologies KB08 Wireless USB Keyboard User Manual DX WLC1401 12 1183 QSG V1 EN ai
Acrox Technologies Co., Ltd. Wireless USB Keyboard DX WLC1401 12 1183 QSG V1 EN ai
Users Manual
)
0
&
7
^
6
%
5
$
4
#
3
@
2
!
1
`
AltAlt
Ctrl
Shift
Enter
Caps
Lock
O
U
]
1
6
Pg Up
98
/
Tab }
Enter
Del
Pg Dn
End
Home
Num
Lock
Backspace
~
{
[
(
Shift
Ctrl
DX-WLC1401
Wireless Keyboard and Mouse Combo
Package contents
• Wireless keyboard
• Wireless mouse and nano receiver
• Quick Setup Guide
System requirements
• Windows® 8, Windows® 7, Windows Vista®, or Windows® XP
• One available USB port
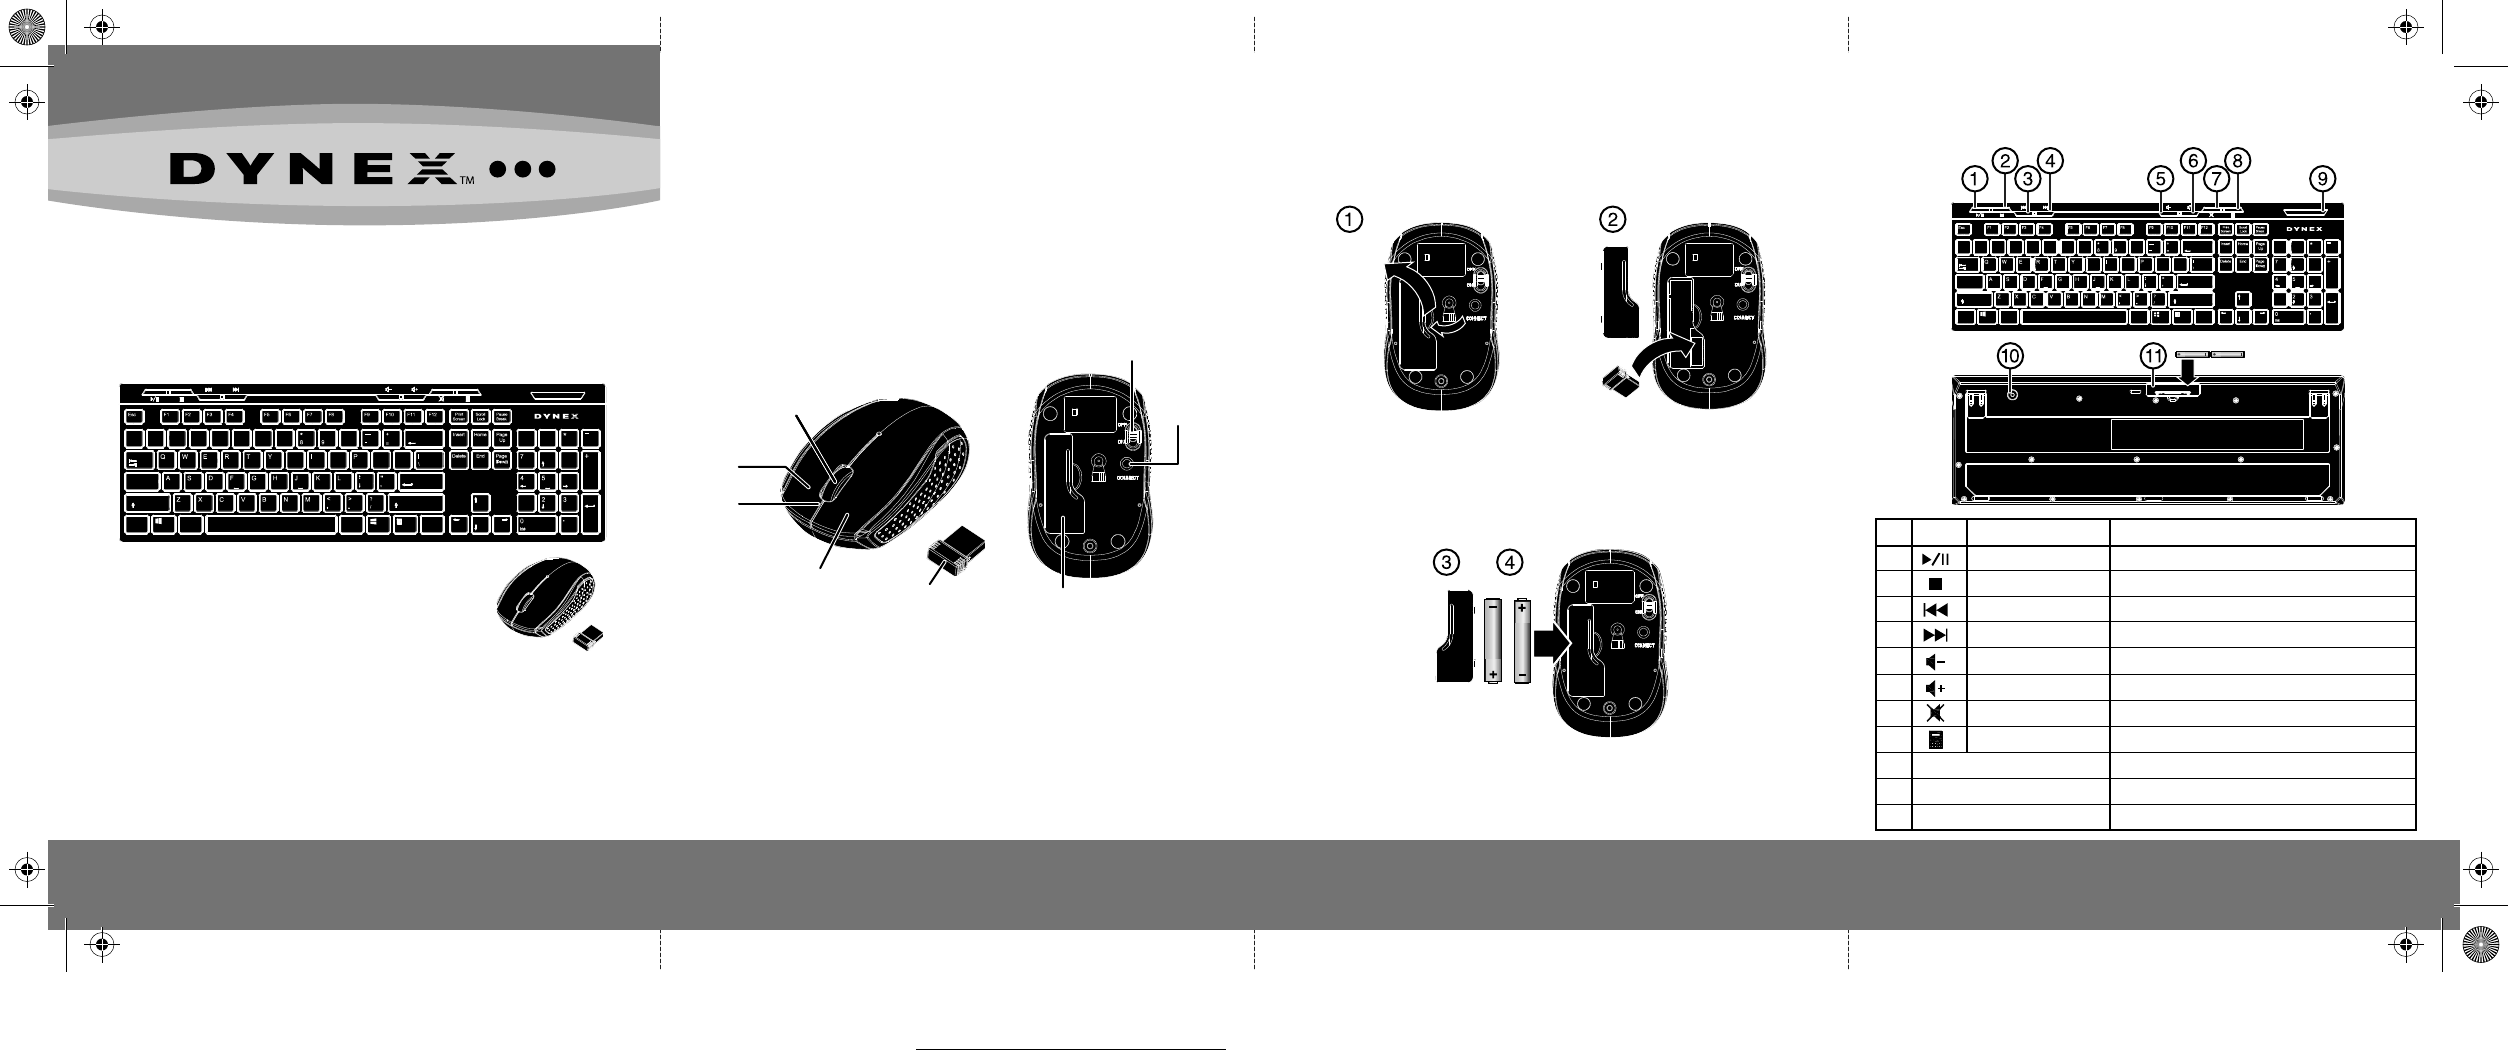
Features
QUICK SETUP GUIDE
Installing the keyboard batteries
1 Take the batter
y
cover o.
Troubleshooting
• Make sure that
y
our computer meets the s
y
stem requirements.
Installing the mouse batteries and removing the
nano receiver
1 Take the battery cover o.
2 Remove the nano receiver.
3 Insert the batteries as shown inside the battery compartment.
4 Replace the cover.
Caution: Insert the battery with the correct orientation, according to
the instruction label on the mouse.
AAA battery × 2
Keyboard buttons
Media player hot keys
radioélectrique subi, même si le brouillage est susceptible d’en compromettre le fonctionnement.”
This equipment complies with IC radiation exposure limits set forth for an uncontrolled
environment.
Connect
button
ON/OFF switch
Battery cover
Nano receiver
Left button
Right
button
Scroll
wheel
LED
indicator
Mouse indicator
Before using your new product, please read these instructions to prevent any damage.
AAA batteries
and
Pull
LED indicator
# Icon Function
1 Play/Pause
2 Stop (Media)
3 Previous
4 Next
5 Volume down (Voice-)
6 Volume up (Voice+)
7 Mute
8 Calculator
9 LED indicator
10 Connect button
11 Battery cover
Description
Switch between playing and pausing media.
Stop playing the media in the media player.
Switch to the previous media track.
Switch to the next media track.
Decrease the computer’s sound volume.
Increase the computer’s sound volume.
Mute (turns o) the computer’s sound.
Start Microsoft calculator.
Low battery and pairing indicator.
Press to initiate pairing with your computer.
Remove to install or replace the batteries.
)
0
&
7
^
6
%
5
$
4
#
3
@
2
!
1
`
AltAlt
Ctrl
Shift
Enter
Caps
Lock
O
U
]
1
6
Pg Up
98
/
Tab }
Enter
Del
Pg Dn
End
Home
Num
Lock
Backspace
~
{
[
(
Shift
Ctrl
DX-WLC1401_12-1183_QSG_V1_EN.ai 1 1/9/2013 5:46:10 PMDX-WLC1401_12-1183_QSG_V1_EN.ai 1 1/9/2013 5:46:10 PM
V1
FINAL
FOR PRINT
QUICK SETUP GUIDE
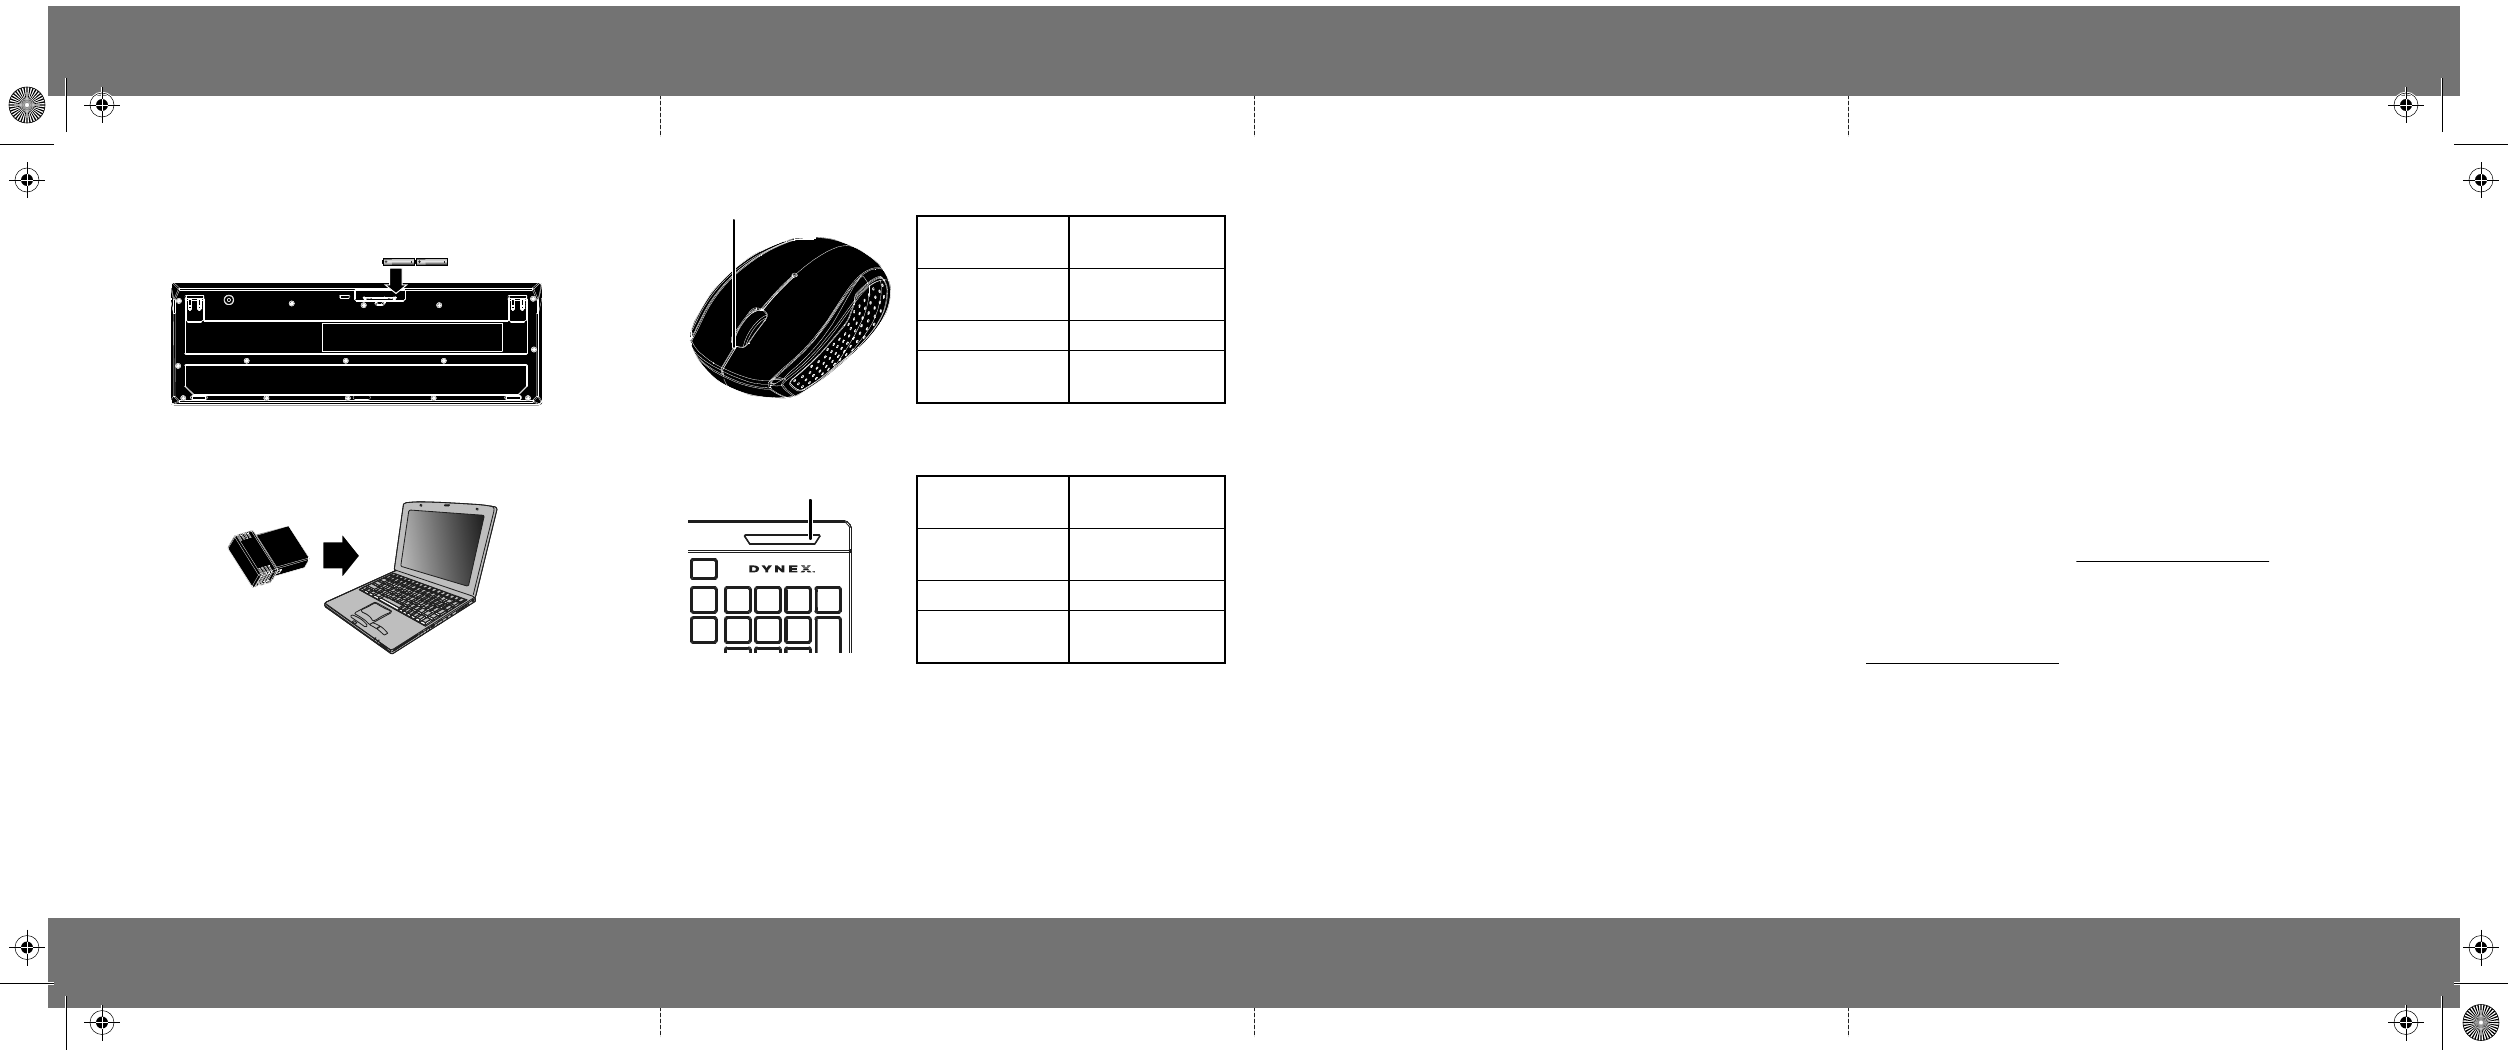
Installing the keyboard batteries
1 Take the battery cover o.
2 Insert the batteries as shown inside the battery compartment.
3 Replace the cover.
Setting up the connection between the nano
receiver, mouse and keyboard
1 Plug the nano receiver into the USB port on your computer.
2 If the mouse or keyboard does not work, do the following:
Re-plug the nano receiver into the USB port on your computer, then
press the connect button on the mouse and keyboard. If the mouse or
keyboard does not work after 10 seconds, pair them again by pressing
the connect button on the mouse or keyboard. (The receiver has
auto-pairing function).
3 The LED indicator on the mouse and keyboard ashes steadily when it is
in pairing mode and stops blinking when it is successfully paired with
the receiver.
4 When the battery gets low, the battery indicator on the mouse or
keyboard will start to blink.
Troubleshooting
• Make sure that your computer meets the system requirements.
• Only use the mouse on a clean, at, non-slippery surface to ensure
smooth and accurate cursor action.
• Avoid using your mouse on reective, transparent, or metallic surfaces.
• If your mouse or keyboard stops working:
• Make sure your mouse or keyboard and nano receiver are paired
by pressing the connect button on the mouse or keyboard.
• Replace the mouse or keyboard batteries.
Legal notices
FCC Statement
This device complies with Part 15 of the FCC Rules. Operation is subject to the following two
conditions: (1) this device may not cause harmful interference, and (2) this device must accept
any interference received, including interference that may cause undesired operation.
This equipment has been tested and found to comply with the limits for a Class B digital device,
pursuant to Part 15 of the FCC Rules. These limits are designed to provide reasonable protection
against harmful interference in a residential installation. This equipment generates, uses and can
radiate radio frequency energy and, if not installed and used in accordance with the instructions,
may cause harmful interference to radio communications. However, there is no guarantee that
interference will not occur in a particular installation. If this equipment does cause harmful
interference to radio or television reception, which can be determined by turning the equipment
o and on, the user is encouraged to try to correct the interference by one or more of the
following measures:
• Reorient or relocate the receiving antenna.
• Increase the separation between the equipment and receiver.
• Connect the equipment into an outlet on a circuit dierent from that to which the receiver is
connected.
• Consult the dealer or an experienced radio/TV technician for help.
Warning: Changes or modifications not expressly approved by the party responsible for
compliance could void the user’s authority to operate the equipment.
IC Statement
This device complies with Industry Canada licence-exempt RSS standard(s).
Operation is subject to the following two conditions: (1) this device may not cause interference,
and (2) this device must accept any interference, including interference that may cause undesired
operation of the device.
“Le présent appareil est conforme aux CNR d’Industrie Canada applicables aux appareils radio
exempts de licence. L’exploitation est autorisée aux deux conditions suivantes : (1) l’appareil ne
doit pas produire de brouillage, et (2) l’utilisateur de l’appareil doit accepter tout brouillage
V1 ENGLISH 12-1183
LED indicator
Power ON
Low battery
warning
Pairing
When paired or
failed after 10 sec.
Red LED is on for
10 sec.
Red LED blinks for
10 sec.
Red LED blinks.
LED is o.
Power ON
Low battery
warning
Pairing
When paired or
failed after 10 sec.
Red LED is on for
10 sec.
Red LED blinks for
10 sec.
Red LED blinks.
LED is o.
radioélectrique subi, même si le brouillage est susceptible d’en compromettre le fonctionnement.”
This equipment complies with IC radiation exposure limits set forth for an uncontrolled
environment.
“Cet équipement est conforme à l’exposition aux rayonnements IC limites établies pour un
environnement non contrôlé.”
RSS-Gen and RSS-210 statement
This device complies with Industry Canada license-exempt RSS standard(s).
Operation is subject to the following two conditions: (1) this device may not cause interference,
and (2) this device must accept any interference, including interference that may cause undesired
operation of the device.
Le présent appareil est conforme aux CNR d'Industrie Canada applicables aux appareils radio
exempts de licence. L'exploitation est autorisée aux deux conditions suivantes : (1) l'appareil ne doit
pas produire de brouillage, et (2) l'utilisateur de l'appareil doit accepter tout brouillage
radioélectrique subi, même si le brouillage est susceptible d'en compromettre le fonctionnement.
RSS-102 statement
This equipment complies with Industry Canada radiation exposure limits set forth for an
uncontrolled environment.
Cet équipement est conforme à l'exposition aux rayonnements Industry Canada limites établies
pour un environnement non contrôlé.
One-year limited warranty
For complete warranty, visit www.dynexproducts.com.
Contact Dynex
For customer service call 1-800-305-2204
www.dynexproducts.com
DYNEX is a registered trademark of BBY Solutions, Inc. Registered in some countries.
Distributed by Best Buy Purchasing, LLC, 7601 Penn Ave South, Richeld, MN 55423 U.S.A.
©2013 BBY Solutions, Inc. All Rights Reserved.
Mouse indicator
Keyboard indicator
Cleaning your mouse and keyboard
• Wipe the mouse and keyboard with a damp, lint-free cloth.
LED indicator
AAA battery × 2
DX-WLC1401_12-1183_QSG_V1_EN.ai 2 1/9/2013 5:46:31 PMDX-WLC1401_12-1183_QSG_V1_EN.ai 2 1/9/2013 5:46:31 PM