Acrox Technologies LABTNAMU01 BT LASER MOUSE User Manual Manual
Acrox Technologies Co., Ltd. BT LASER MOUSE Manual
Manual
Bluetooth Tilt Wheel Laser Mouse
USER'S GUIDE
Ver.:1.00
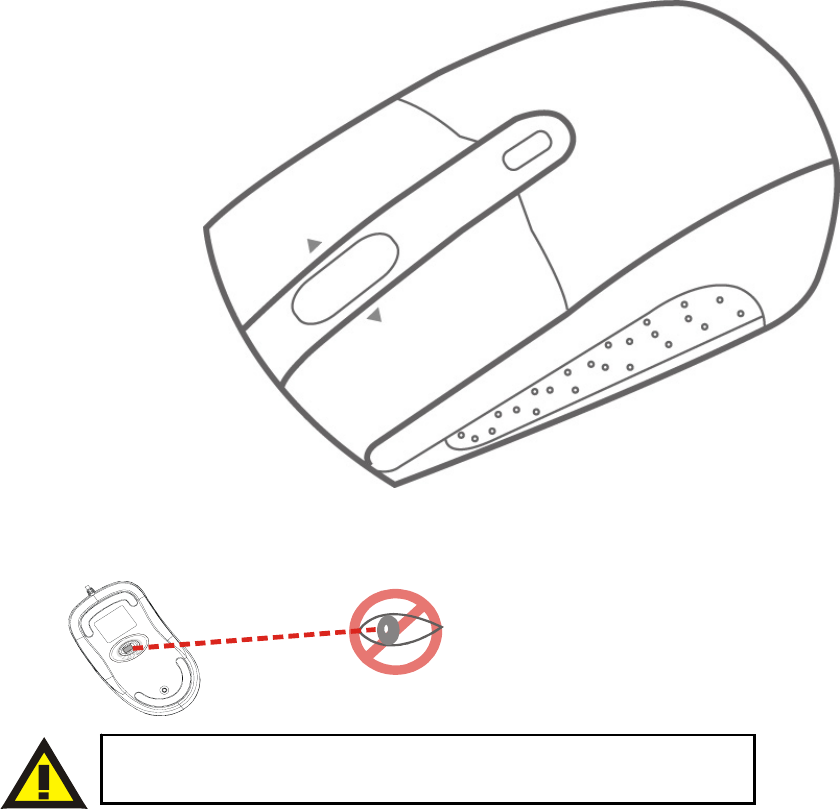
Please DO NOT direct the laser beam at anyone’s eye.
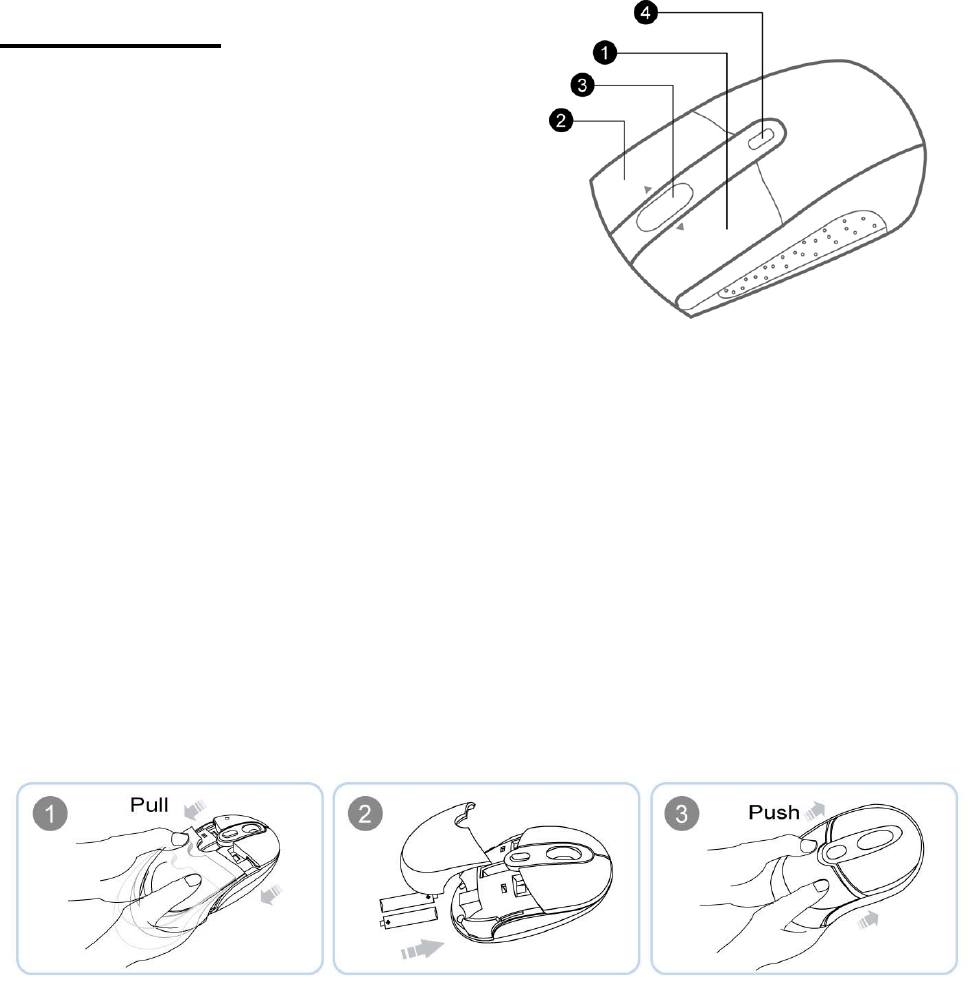
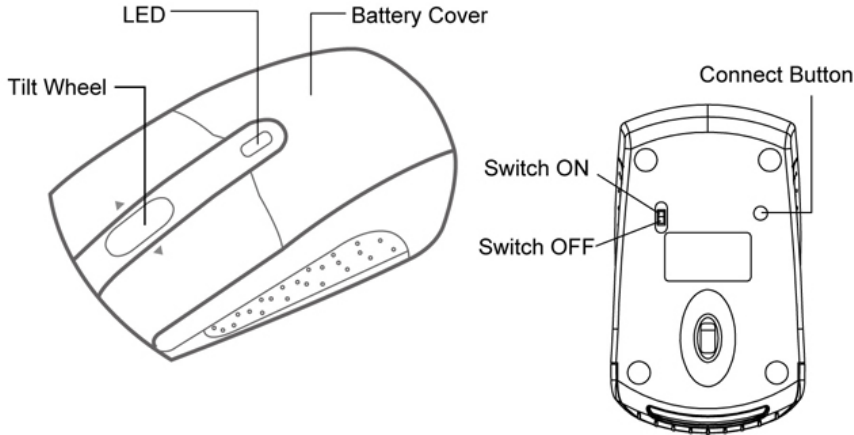
Mouse Buttons
1. Left button
2. Right button
3. Tilt wheel
4. DPI switch + LED indicator
DPI Switch
The brightness of Green LED indicator
on the scrolling wheel indicates the DPI setting in use. There are three
different settings:
z Bright: 1600 DPI
z Dim: 1200 DPI
z No light: 800 DPI
The default setting is 1600 DPI. You can easily switch between DPI
settings. In order to save power, the LED display will only last for 10
seconds.
Batteries Installation
For Extra usage hours, use two AA batteries instead of two AAA Batteries.
Functional Introduction:
Power indicator lights:

Power saving features:
To conserve the battery power, the mouse offers power management
functions as below:
1. The mouse goes into “Saving Mode” after 10 seconds of inactivity
2. The mouse powers down to “Sleep Mode” after 5 minutes of inactivity
Press one of the mouse buttons to wake it up while in Saving or Sleep
Mode. There may be a slight delay while the mouse re-establishes
Bluetooth connection from power saving or sleep mode.
In Use Saving Mode Sleep Mode
Power
Consumption 14.96mA@3V up
on tracking
sensitivity
1.78mA@3V 0.27mA@3V
Establishing a Bluetooth Connection
The Bluetooth mouse can work in any Bluetooth working environment.
Before connecting your Bluetooth mouse with your computer, make sure
your computer has a working Bluetooth configuration that meets
Bluetooth Specification v1.1 or higher with Human Interface Device (HID)
profile. If your computer does not support Bluetooth, you need to obtain
and install a commercially available Bluetooth adapter which converts
your computer to a Bluetooth environment.
Paring your Bluetooth mouse with your computer
Before paring your Bluetooth mouse with your computer, you should
read through the instructions that came with your Bluetooth hardware
and software for detail how to pair a device to your specific Bluetooth
configuration. Follow below steps to paring your Bluetooth mouse under
Windows XP/SP2 system.
1. Attach or turn on the Bluetooth radio adaptor for your Windows XP
computer.
2. Turn on the switch on the bottom of the mouse.
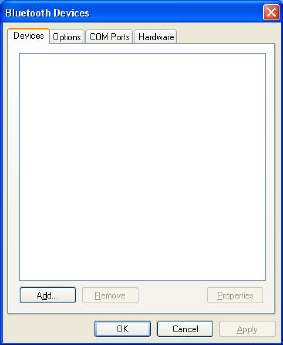
3. Click Start menu, click Control Panel and double click “Bluetooth
Devices”.
4. On the “Devices” tab, click “Add”.

5. Select the “My device is set up and ready to be found” check box,
and then click “Next”.
6. Press the connection button of the mouse and it starts paring with
your PC/notebook. The Red LED light will blink when connecting.
Click the icon that represents the Bluetooth mouse, and then click
“Next”.
7. Click “Don’t use a passkey”, and then click “Next”. Check the
documentation for the mouse for any passkey instructions.
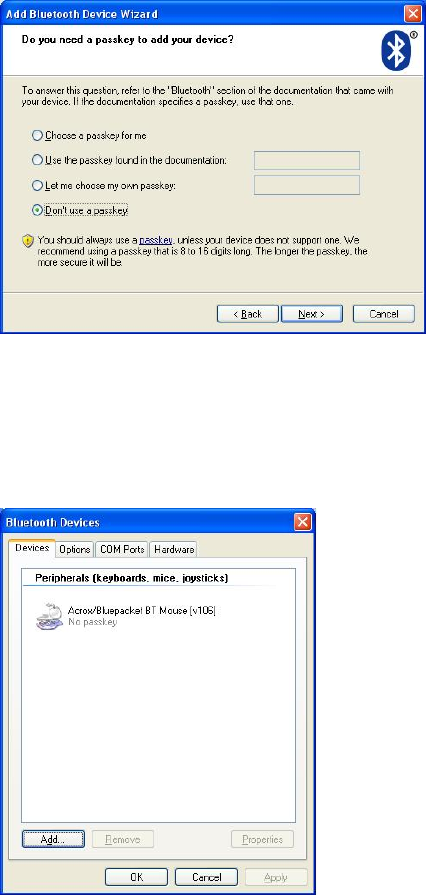
8. You can find the Bluetooth mouse in the “Devices” tab when it
connected. The Red LED will turn off automatically when the paring is
successfully done.
Note : Once the Bluetooth mouse is installed, you can either disconnect the wired
mouse or leave it connected. (If you leave both mice connected, they will
both work.)
Disconnecting Bluetooth mouse from your computer
If you would like to disconnect your Bluetooth mouse, just open the
Bluetooth devices control panel and delete the pairing for the mouse.
Federal Communication Commission Interference Statement
This equipment has been tested and found to comply with the limits for a
Class B digital device, pursuant to Part 15 of the FCC Rules. These
limits are designed to provide reasonable protection against harmful
interference in a residential installation. This equipment generates, uses
and can radiate radio frequency energy and, if not installed and used in
accordance with the instructions, may cause harmful interference to
radio communications. However, there is no guarantee that
interference will not occur in a particular installation. If this equipment
does cause harmful interference to radio or television reception, which
can be determined by turning the equipment off and on, the user is
encouraged to try to correct the interference by one of the following
measures:
- Reorient or relocate the receiving antenna.
- Increase the separation between the equipment and receiver.
- Connect the equipment into an outlet on a circuit different from
that
to which the receiver is connected.
- Consult the dealer or an experienced radio/TV technician for help.
FCC Caution: Any changes or modifications not expressly approved by
the party responsible for compliance could void the user's authority to
operate this equipment.
This device complies with Part 15 of the FCC Rules. Operation is subject
to the following two conditions: (1) This device may not cause harmful
interference, and (2) this device must accept any interference received,
including interference that may cause undesired operation.