Acrox Technologies MTM0060425 Bluetooth Laser Mouse User Manual AMB03US
Acrox Technologies Co., Ltd. Bluetooth Laser Mouse AMB03US
users manual

2
TABLE OF CONTENTS
System requirements...........................................3
Installing the Batteries.........................................3
Using the Enhanced Resolution feature...............5
Bluetooth Software: WIDCOMM...........................5
Bluetooth Software: TOSHIBA............................10
Bluetooth Software: MICROSOFT......................15
Bluetooth Software: Mac OS X...........................19
Technical Support..............................................25
3
TARGUS BLUETOOTH®
LASER
RECHARGEABLE
NOTEBOOK MOUSE
Introduction
Congratulations on your purchase of the Targus Bluetooth®
Laser Rechargeable Notebook Mouse. This mouse has a
special EDR (Enhanced Data Rate) technology that provides
faster data transmission rate and allows multiple Bluetooth
devices running without conflict.
System Requirements
Hardware - Bluetooth-enabled notebook or desktop PC
Operating System - Windows® 98SE / 2000 / ME / XP
Mac OS X (10.x or greater)
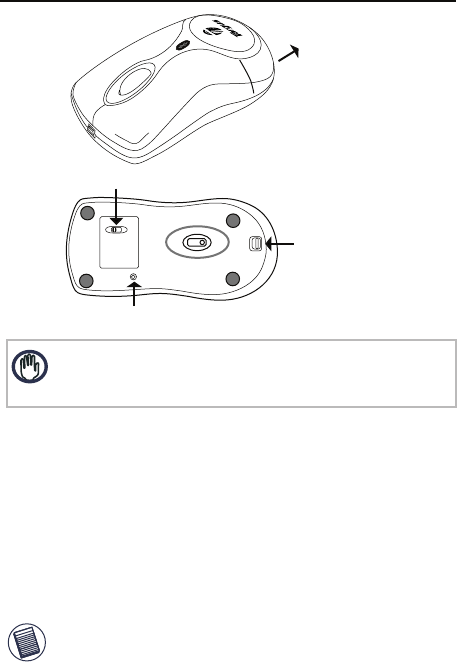
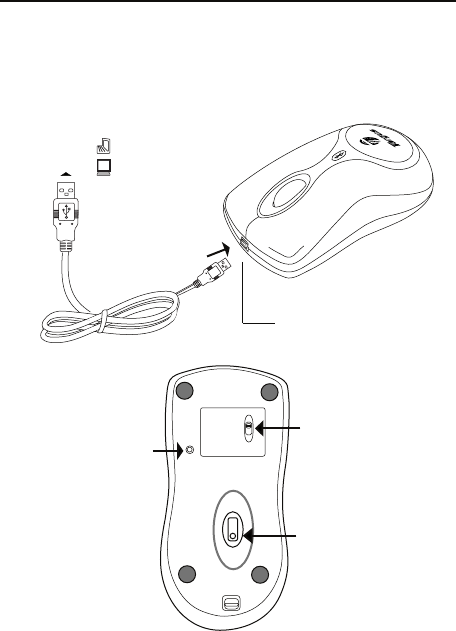
Installing the Batteries (Supplied)
Use the two AAA-size rechargeable NIMH batteries
(supplied)
Remove the battery cover from the back of the mouse by
sliding off the cover while pressing the release button at the
bottom of the mouse.
Insert the batteries, making sure that the positive (+) and
negative (-) ends of each battery match the polarity
indicators inside the battery housing
•
•
•
4
OPEN
ID
on
off
connect
button
Battery cover
release button
slide the battery
cover in this direction
On/Off switch
TARGUS BLUETOOTH® LASER RECHARGEABLE NOTEBOOK MOUSE
WARNINGS: WHEN REPLACING THE BATTERIES, ALWAYS REPLACE WITH
NiMH BATTERIES OR OTHER RECHARGEABLE BATTERIES. NEVER USE ALKALINE
BATTERIES IN THIS DEVICE. AVOID MIXING NEW AND USED BATTERIES IN A
DEVICE
Snap the battery cover back into position
Turn on the mouse by sliding on/off switch on the bottom
to the “on” position.
•
•
Charge the mouse for 8 hours before using. Plug in the
USB charge cable to the mouse and connect the other
end to the computer.
•
NOTE: TO CONTINUOUSLY CHARGE THE BATTERIES VIA THE USB
CHARGE CABLE, YOUR COMPUTER MUST BE ON AND AWAKE . FOR
BEST RESULTS , TURN OFF YOUR COMPUTER ’S POWER MANAGE-
MENT / SLEEP MODE FEATURE WHILE CHARGING THE MOUSE.
Charging the Batteries

5
TARGUS BLUETOOTH® LASER RECHARGEABLE NOTEBOOK MOUSE
Initial Configuration
Before you can begin using Bluetooth connectivity on your
computer and other Bluetooth devices, you must perform
some initial setup tasks.
The Targus Bluetooth Laser Rechargeable notebook mouse is
designed to work with the three major software stack
(protocol) standards: WIDCOMM, Toshiba, Microsoft and Mac
OS X. Please check your computer’s documentation to see
which software stack your computer has. Please contact your
system vendor if your system does not support one of the
following Bluetooth software standards.
Using the enhanced Resolution feature
This bluetooth laser mouse has a special enhanced
resolution feature. By activating this feature, the laser
mouse will increase its tracking sensitivity from 800 CPI to
1600 CPI. This will improve the precision of the mouse
pointer for fine details with increased speed. Press both the
scroll and right key when the mouse is on , the red LED in
the scroll wheel will light up around 3 secs to proceed
resolution switching. When the LED is off, it indicates the
resolution switching is successful.
Bluetooth Software: WIDCOMM
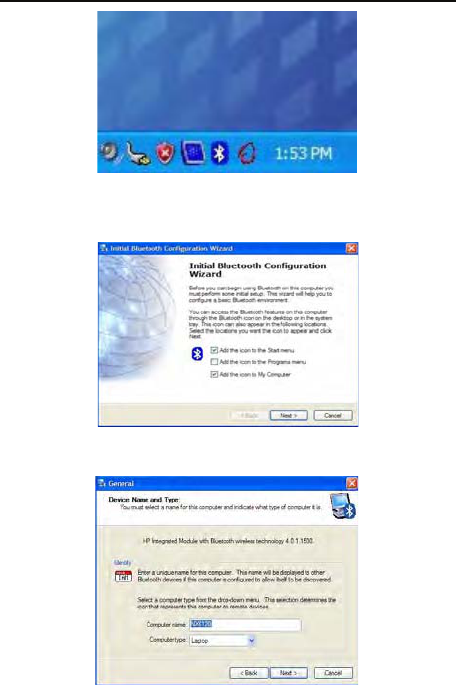
1. Go to the Bluetooth Places icon located on your desktop
or in the system tray and double click, then click Bluetooth
setup wizard.
6
TARGUS BLUETOOTH® LASER RECHARGEABLE NOTEBOOK MOUSE
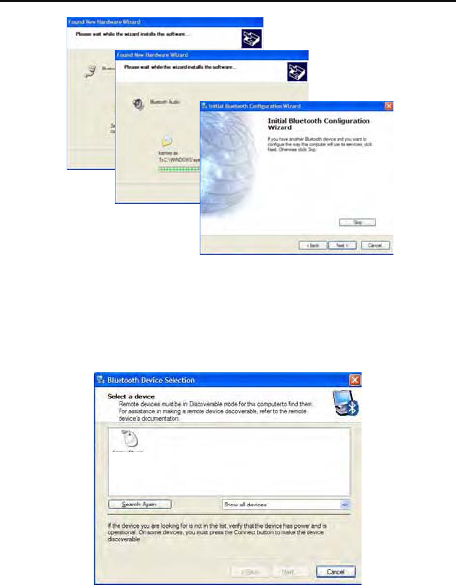
2. The Bluetooth configuration screen will prompt. Please
follow the onscreen instructions. Click Next to continue.
3. Continue to setup your bluetooth device profile.
7
TARGUS BLUETOOTH® LASER RECHARGEABLE NOTEBOOK MOUSE
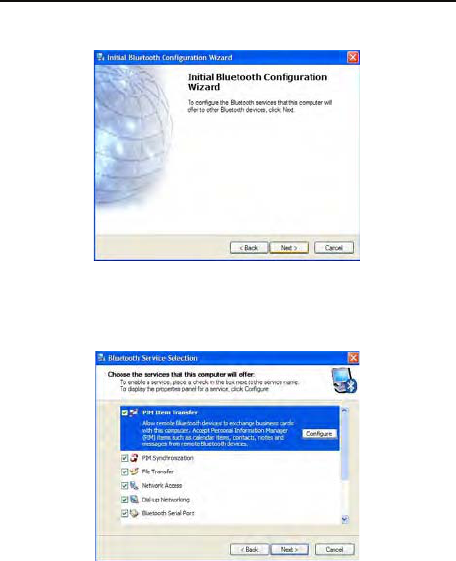
4. Click Next to continue setup.
5. Please select the service which the bluetooth device
offers. (Default setting allows the most coverage. It is
recommend to keep as default). Click Next.
6. Installation will perform setup and click Next when setup is
completed.
8
TARGUS BLUETOOTH® LASER RECHARGEABLE NOTEBOOK MOUSE
7. Please turn on the mouse and press the connection ID
button located at the bottom of the mouse until the light in
the middle scrollwheel blinks red light (discoverable mode).
Click Next to continue pairing.
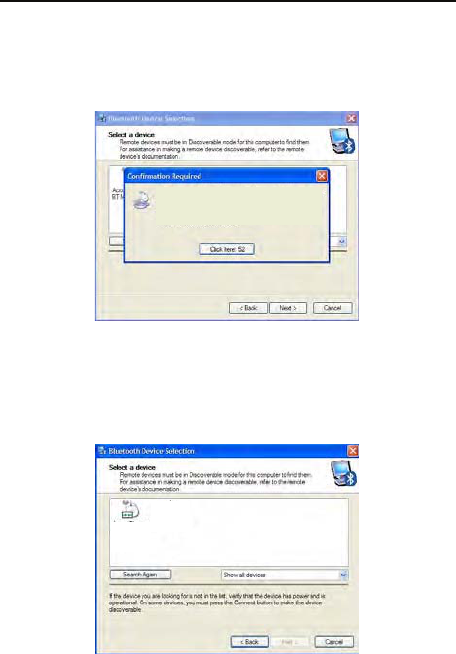
8. The confirmation window will appear as the system installs
the drivers. Click OK. When this is done, the mouse should
be functioning. The bluetooth mouse has been successfully
installed.
Targus BT
Laser
Notebook
Mouse
9
TARGUS BLUETOOTH® LASER RECHARGEABLE NOTEBOOK MOUSE
(There may be one or more different bluetooth device
detected.) If the mouse is not detected, please make sure
the power is on and in discoverable mode. Press Search
Again to re-pair the device.
9. Once the pairing search is complete, the bluetooth mouse
icon should appear on the screen as shown. Setup is
complete. You may choose to close the window, or continue
pairing other bluetooth devices.
connection with Targus BT laser notebook mouse has been
established successfully.
To confirm that the correct mouse is being connected
please use it to click the button below.
Targus BT
Laser
Notebook
Mouse
10
TARGUS BLUETOOTH® LASER RECHARGEABLE NOTEBOOK MOUSE
Bluetooth Software: TOSHIBA
How to check your version of the Toshiba Bluetooth Stack
1. Launch the Bluetooth Manager.
2. Select the Help menu.
3. Select About.
NOTE: TO ENSURE OPTIMAL PERFORMANCE OF YOUR BLUETOOTH PRODUCT YOU
NEED TOSHIBA BLUETOOTH STACK V3.20.00 OR HIGHER. IF YOU HAVE A DIFFERENT
VERSION PLEASE UPDATE IT FROM WWW.SUPPORT.TOSHIBA.COM
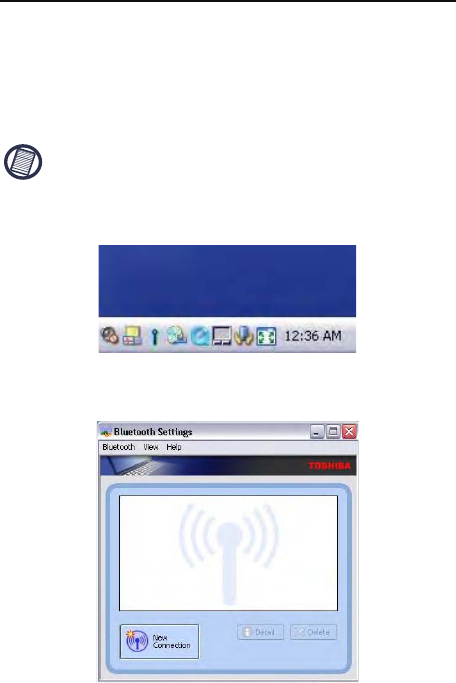
1. Double click on the Bluetooth Manager icon in the system
tray, and then click “New Connection.”
2. When follow window appears, click “New Connection” to
begin setup.
11
TARGUS BLUETOOTH® LASER RECHARGEABLE NOTEBOOK MOUSE
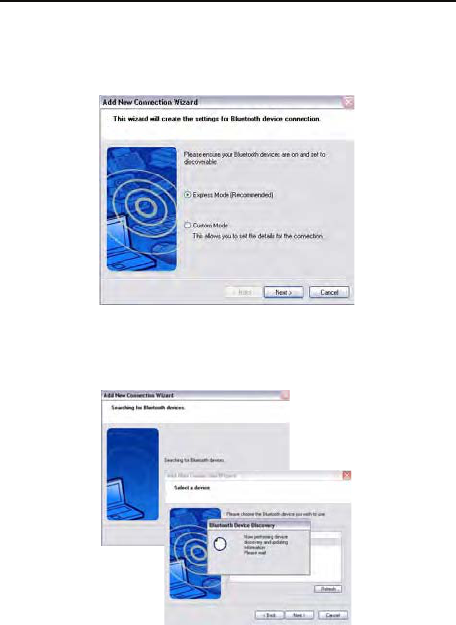
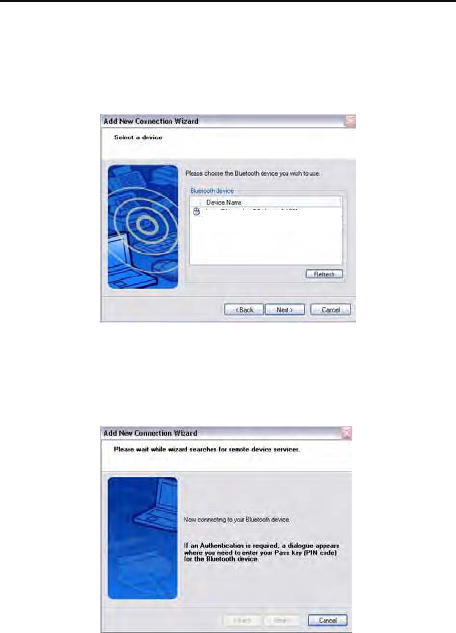
3. Please turn on the mouse and press the connection ID
button located at the bottom of the mouse until the light in
the middle scroller wheel blinks red light (discoverable
mode). Click Next to continue pairing.
4. The computer will now search for the bluetooth mouse and
other bluetooth devices. Please wait until the search is
completed.
12
TARGUS BLUETOOTH® LASER RECHARGEABLE NOTEBOOK MOUSE
5. Please choose the device you wish to connect. There
maybe more then one bluetooth device detected. Select
Targus bluetooth mouse and click Next to continue. If the
mouse is not detected, please make sure the mouse is in
discoverable mode and click Refresh.
6. The computer will begin connecting with the mouse. If an
authentication is required, a dialogue will appear. The mouse
does not require a passkey (PIN code).
Targus BT Laser Notebook Mouse
13
TARGUS BLUETOOTH® LASER RECHARGEABLE NOTEBOOK MOUSE
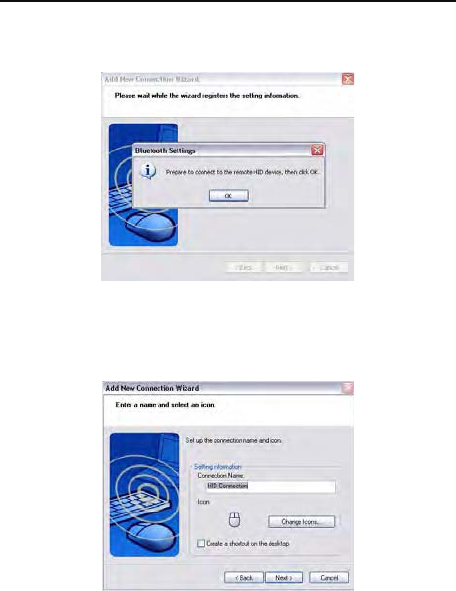
7. Please follow the on-screen instructions to continue
setting up your bluetooth mouse. Click OK.
8. You may want to create a connection name or change icon
for the device. Once completed, press Next to finalize setup.
14
TARGUS BLUETOOTH® LASER RECHARGEABLE NOTEBOOK MOUSE
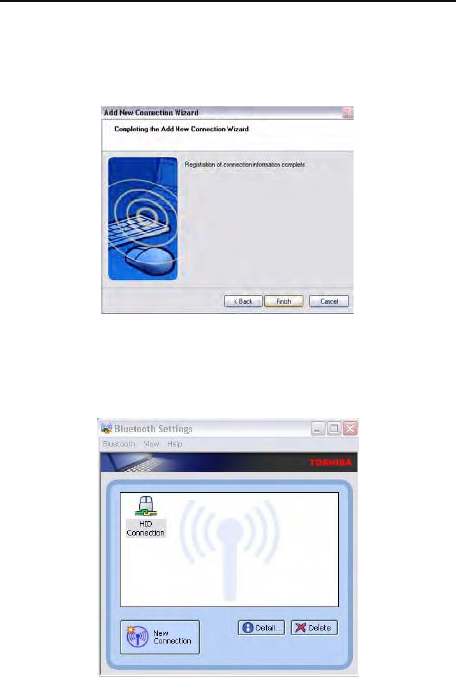
9. The connection is established and setup is complete. The
mouse is ready to use. If the connection is not successful,
please click Back and search the device again. Click Finish
to exit setup.
10. The following screen should show the newly added
mouse connection. You may want to continue to add other
bluetooth device or close the window.
15
TARGUS BLUETOOTH® LASER RECHARGEABLE NOTEBOOK MOUSE
Bluetooth Software: MICROSOFT
Make sure the Bluetooth radio is turned on. If necessary,
check your computer’s manual to determine if the radio is
activated. To add the Targus mouse, proceed with the
following steps:
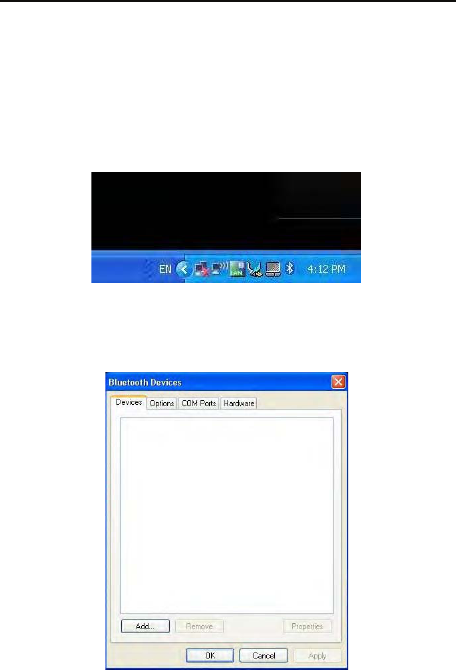
1. Double click on the Bluetooth Manager icon in the system
tray.
2. This window should appear. Click Add to launch the
bluetooth device wizard.
16
TARGUS BLUETOOTH® LASER RECHARGEABLE NOTEBOOK MOUSE
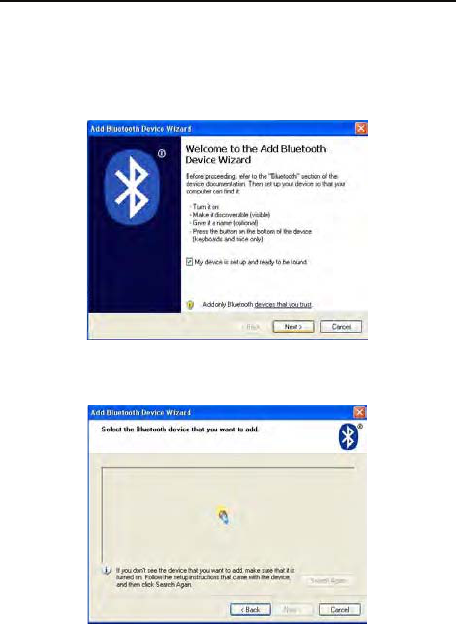
3. Please turn on the mouse and press the connection ID
button located at the bottom of the mouse until the light in
the middle scroller wheel blinks red light (discoverable
mode). Check the box “my device is set up and ready to be
found” then click Next to continue.
4. The computer will now search for the bluetooth mouse.
17
TARGUS BLUETOOTH® LASER RECHARGEABLE NOTEBOOK MOUSE
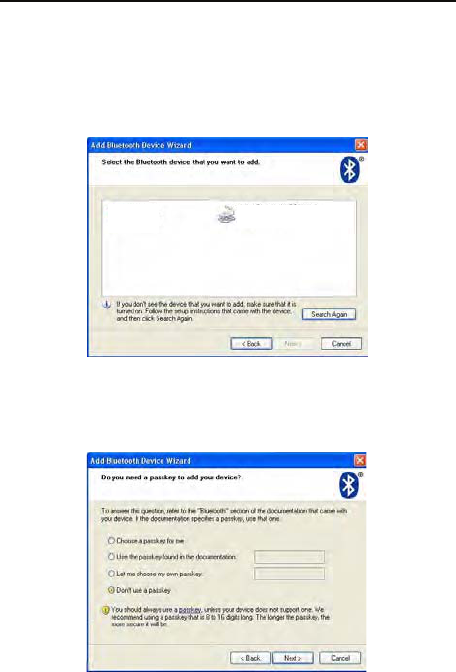
5. Please choose the device you wish to connect. There
maybe more then one bluetooth device detected. Select
Targus bluetooth mouse and click Next to continue. If the
mouse is not detected, please make sure the mouse is in
discoverable mode and click search again.
6. The mouse does not require a passkey (PIN code). Please
check the “don’t use a passkey” circle and click Next to
continue.
Targus BT Laser Notebook Mouse
New device
18
TARGUS BLUETOOTH® LASER RECHARGEABLE NOTEBOOK MOUSE
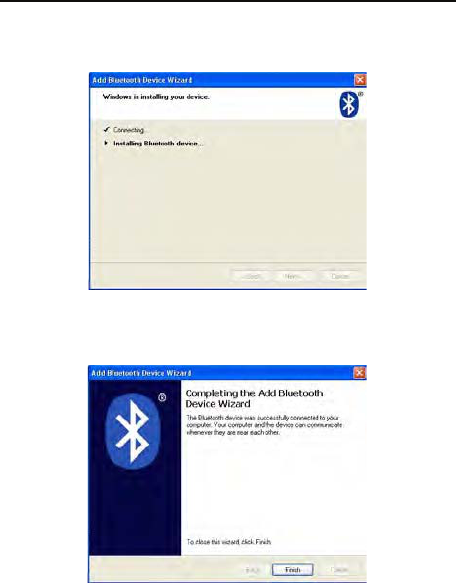
7. Windows will begin connecting with the bluetooth mouse.
Please wait until this process is complete.
8. The setup is complete. Click Finish to exit setup.
19
TARGUS BLUETOOTH® LASER RECHARGEABLE NOTEBOOK MOUSE
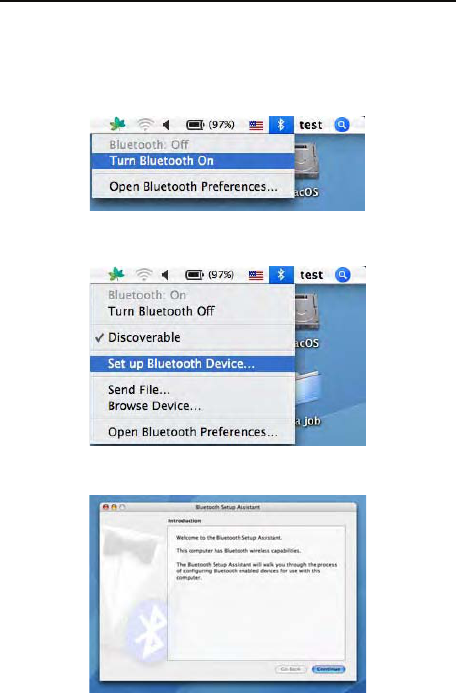
Bluetooth Software: Mac
1. Go to the Bluetooth icon located on your desktop or in the
system bar and click the icon to begin setup. Select “Turn
Bluetooth On” to enable the device.
2. Scroll down the list to “Set up Bluetooth Device...” and
select the option.
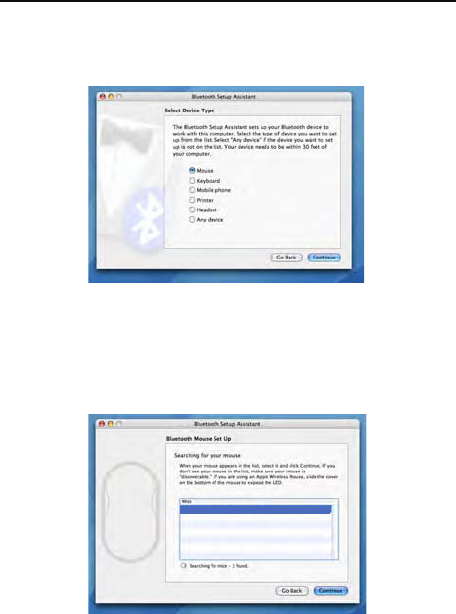
3. Bluetooth Setup Assistant will begin. Please follow the
on-screen instructions.
20
TARGUS BLUETOOTH® LASER RECHARGEABLE NOTEBOOK MOUSE
4. Please select “mouse” and click “continue” to proceed with
setup. Please make sure your mouse is in “discoverable”
mode.
Targus BT Laser Notebook Mouse
5. Your computer will begin to search for the mouse. Once
the mouse is found, it will show up in the list. Highlight the
mouse in the list you wish to connect and press “continue” to
proceed with setup.
21
TARGUS BLUETOOTH® LASER RECHARGEABLE NOTEBOOK MOUSE
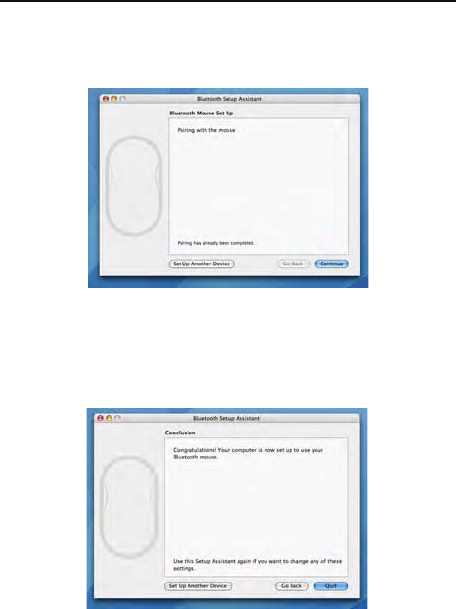
6. The bluetooth mouse will now begin pairing. Click
“continue” to proceed.
7. Congratulations. Your bluetooth mouse is setup and is
ready to use. You can choose to setup another device or click
“Quit” to exit setup.

22
TARGUS BLUETOOTH® LASER RECHARGEABLE NOTEBOOK MOUSE
Operating Hints
• Avoid using the mouse on a metal surface. Metals, such as
iron, aluminum or copper, shield the radio frequency
transmission and may slow down the mouse response time
or cause the mouse to fail temporarily.
• The mouse will enter a suspend mode at the same time
your computer does. To activate the mouse, press any
mouse button, or simply move the mouse. Please note that
it will take about 2 seconds to wake up.
• If your computer has a metal case that contains aluminum
or magnesium, use the mouse to the side. The display panel
may interfere with the radio frequency signal if you use the
mouse directly in front of the display.
Mouse Power Management
• To power the mouse on and off, slide the on/off switch at
the bottom of the mouse to the desired position.
• During the operation, the Power Saving feature allows the
mouse to go into “sleep mode” after 5 minutes of inactivity.
Click any mouse button or move the mouse for about 2
seconds to re-activate the mouse.
• To save battery power, turn off the mouse while traveling or
while not in use.
23
TARGUS BLUETOOTH® LASER RECHARGEABLE NOTEBOOK MOUSE
• Scroller Wheel will glow when the power is low. To recharge
the mouse, plug in the USB Recharging Cable to the mouse,
and plug the USB tip to the computer. The mouse is opera-
tional while charging.
mini USB
Notebook
Desktop
connect to
USB plug
For USB recharing Cable
(Power Use ONLY)
OPEN
ID
on
off
connect
button
On/Off swtich
Laser sensor

24
TARGUS BLUETOOTH® LASER RECHARGEABLE NOTEBOOK MOUSE
Troubleshooting
The mouse is not working.
• Make sure that the polarity of the batteries is correct. The positive (+)
and negative (-) ends of each battery must match the positive (+)
and negative (-) connections in the battery housing.
• Make sure the batteries are charged.
• Verify that the computer is Bluetooth enabled.
• Verify that the device drivers are installed:
1. Click Start/ Settings/ Control Panel/ System/ Hardware/ Device
Manager
2. Check under “Bluetooth Devices” that a “Targus Bluetooth Laser
Notebook Mouse” is installed
• Paired devices are always displayed in My Bluetooth Places, even if
the mouse is out of range or not powered up.
• Verify that the remote member of the pair is within range, and
powered up, and then attempt the connection again.
• Verify that batteries are properly installed. Recharge / Replace if
necessary.
Safety Measures
• To avoid possible eye damage, never point the
mouse’s laser at people, especially their faces, or
look directly into the mouse’s laser beam.
• Avoid pointing the mouse’s laser beam at a mirror or
other highly reflective surface.
• Keep the presenter away from young children.
• Never view the mouse’s laser beam using telescopic
devices, such as a microscope or binoculars.
• Any attempt to disassemble, adjust or repair the
presenter may result in exposure to laser light or other
safety hazards.
• This is a Class l Laser Product.

TARGUS BLUETOOTH® LASER RECHARGEABLE NOTEBOOK MOUSE
Technical Support
For technical questions, please visit:
Internet: http://www.targus.com/support.asp
Product Registration
Targus recommends that you register your Targus accessory shortly after purchasing it. To
register your Targus accessory, go to: http://www.targus.com/registration.asp
You will need to provide your full name, email address, phone number, and company information
(if applicable).
Warranty
Targus warrants this product to be free from defects in materials and workmanship for one years.
If your Targus accessory is found to be defective within that time, we will promptly repair or
replace it. This warranty does not cover accidental damage, wear and tear, or consequential or
incidental loss. Under no conditions is Targus liable for loss of, or damage to a computer; nor
loss of, or damage to, programs, records, or data; nor any consequential or incidental damages,
even if Targus has been informed of their possibility. This warranty doe s not affect your statutory
rights.
Regulatory Compliance
This device complies with Part 15 of the FCC Rules. Operation is subject to the following two
conditions: (1) This device may not cause harmful interference, and (2) This device must accept
any interference received, including interference that may cause undesired operation.
FCC Statement Tested to Comply
This equipment has been tested and found to comply with the limits for a class B digital device,
pursuant to part 15 of the FCC Rules. These limits are designed to provide reasonable
protection against harmful interference in a residential installation.
This equipment generates, uses and can radiate radio frequency energy and, if not installed and
used in accordance with the instructions, may cause harmful interference to radio
communications. However, there is no guarantee that interference will not occur in a particular
installation. If this equipment does cause harmful interference to radio or television reception,
which can be determined by turning the equipment off and on, the user is encouraged to try to
correct the interference by one or more of the following measures:
---Reorient or relocate the receiving antenna.
---Increase the separation between the equipment and receiver.
---Connect the equipment into an outlet on a circuit different from that to which the receiver is
connected.
---Consult the dealer or an experienced radio/TV technician for help.
Any changes or modifications not expressly approved by the party responsible for compliance
could void the user’s authority to operate the equipment.
Declaration of Conformity
Hereby, Targus Group International, declares that this Bluetooth Media Notebook Mouse is in
compliance with essential requirements and other relevant provisions of Directive 1999/5/EC
Features and specifications are subject to change without notice. All trademarks and registered
trademarks are the property of their respective owners. © 2006, Targus Group International, Inc. and
Targus, Inc. WIDCOMM and the WIDCOMM logo are trademarks of WIDCOMM, Inc. Bluetooth and
the Bluetooth logo are trademarks owned by Bluetooth SIG, Inc., U.S.A. and licensed to WIDCOMM,
Inc. Microsoft, Windows, and Outlook are registered trademarks of Microsoft Corporation. All other
trademarks and registered trademarks are the property of their respective owners.
25