Acrox Technologies RX01 Nano Receiver User Manual
Acrox Technologies Co., Ltd. Nano Receiver
User Manual
@
onfl
Wireless
KeYboard
with
Nano
Receiver
Model:
LKS5OOR
PRODUCT
CUIDE
CAUTION:
To use
this product
properly'
please
read
the usefs guide
before
installation
Federal
Communication Gommission lnterference Statement
This
equipment
has
been
tested
and
found
to comply
with
the limits
for a
Class
B digital
device,
putt*nito Part
15
of the FCC Rules' These
il,rii.'"-r" o""risneo
to'proviie'ieasonaore
protection
against
harmful
il#;;#aiesiai:ntiat installation'
This
equipment senerates'
uses
and
can
radiate
radio
freq";;il;;;;gt and'
if not.installed
and
used
in
accordance
with
the lnttruJtion't'
maituus" harmful
interference
to radio
communications. no*"u"i,-in-"r" ii no
iuarantee that interference
will
;;i;clufi ; p;rticular
installation'
lf
this
equipment
does
cause
#;i;ii;HJ;t;e to radio
or television
receptio.n'
which
can be
determined
by
turning
tn" "lqJip-"ni "tr 99 o1,,tnq
-u,ser
is encouraged
t" il il;;;t;'Jine in-t"'retenc"
bv
one
of the
following
measures:
- Reorient
or relocate
the receiving
antenna'
- lncrease
tne
separation
between
the.equipment
and
receiver'
- Connect
tne
equrpment
into
an outlet
on a circuit
different
from
that
to which
the receiver
is connected' .. - . .
- Consult
ttte
Oearer
olan eiperienceC
radio/TV
technician
for
help'
FCC
Caution:
Any
changes
or modifications
nol expressly
approved
by
ii;*t iJsp"nJinr" toi"ornpiiance coutd
void
the user's
authoritv
to
operate
this
equiPment'
This
device
complies
with
Part
15
of
the
FCC
Rules'
Operation
is
subject
to
the
following
two
conoitiois:
iilinit device
maYnot
cause
harmful
interference,
and
(2) this
iuui" t"t accept
any
interference
received'
i;;l;'Jin; ;k"rence that
may
cause
undesired
operation'
ww \
ffi
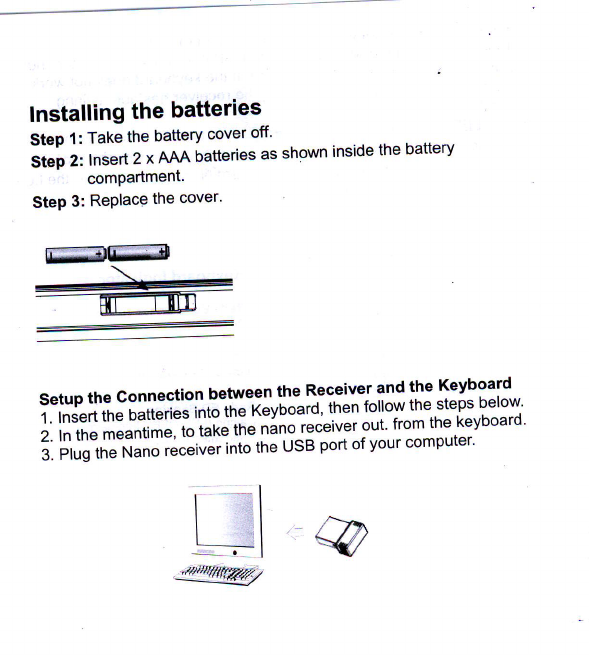
lnstalling
the
batteries
Step
1:
Take
the
battery
cover
off'
Si"i r, Insert
2
x AJAA
batteries
as
shown
inside
the
battery
compartmenl'
Step
3: Replace
the
cover'
Setup
the Connection
between
the
Receiver
1nd:I" Keyboard
1. lnsert
the
batteries
into
tire
feyoourd'
lhen
lo.l"yi" steps
below'
2.
In
the
meantime,
to
taxe
iie nlno
receiver
out'
from
the
keyboard'
6.
iii,ld"tr.lJnlio
ii."iu"|.
into
the
usB
port
of
your computer.
@
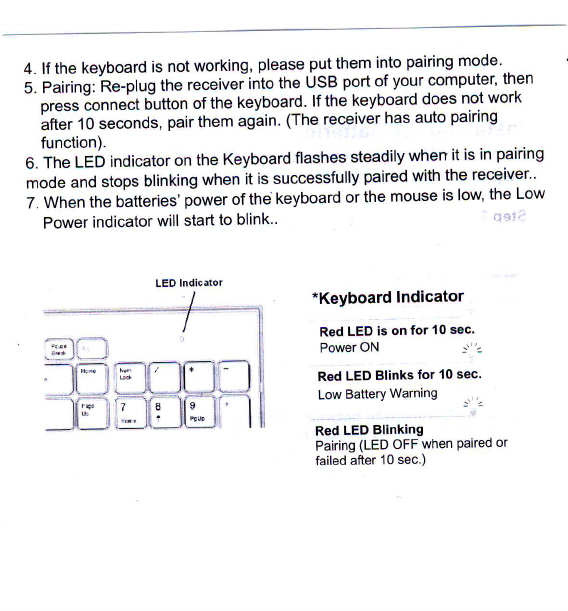
4. lf the
keyboard
is
not
working'
please
put
them
into
pairing
mode .
5. Pairing:
Re-plug
the
receiver
into
the
USB
port
of
your
computer'
then
- or""i ionn"'"t Ulutton
of the keyboard'
lf the keyboard
does not
work
Ittlir o seconds,
pair
them
ag'ain
lTne
receiver
has
auto
pairing
function).
6.
The
LED
indicator
on
the
Keyboard
flashes
steadily
when
it
is in
pairing
mode
and
stops
blinking
when
it
is successfully
paired
with the
receiver"
7.
When
the
batteries'
power
of the
keyboard
or
the
mouse
is low'
the
Low
Power
indicator
will
start
to blink.. " ';
*Keyboard lndicator
Red
LED
is on
for 10
sec'
Power
ON -r'2
Red
LED
Blinks
for 1O sec.
Low
Battery
Warning _r 2
Red
LED
Blinking
Pairing
(LED oFF
when
Paired
or
failed
after
10
sec.)