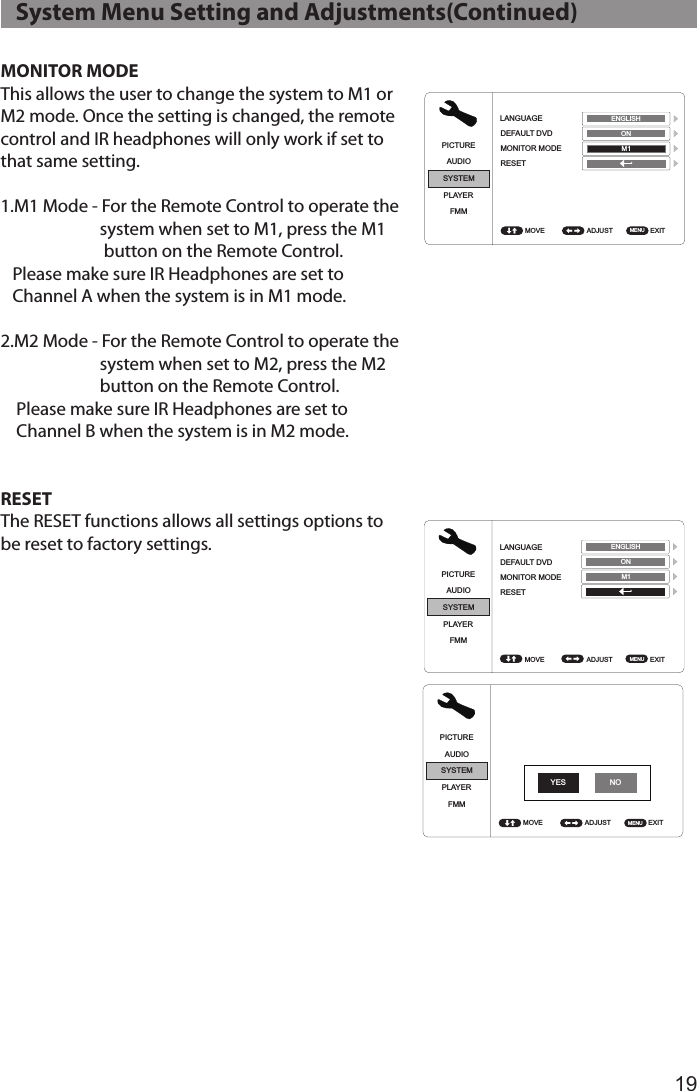
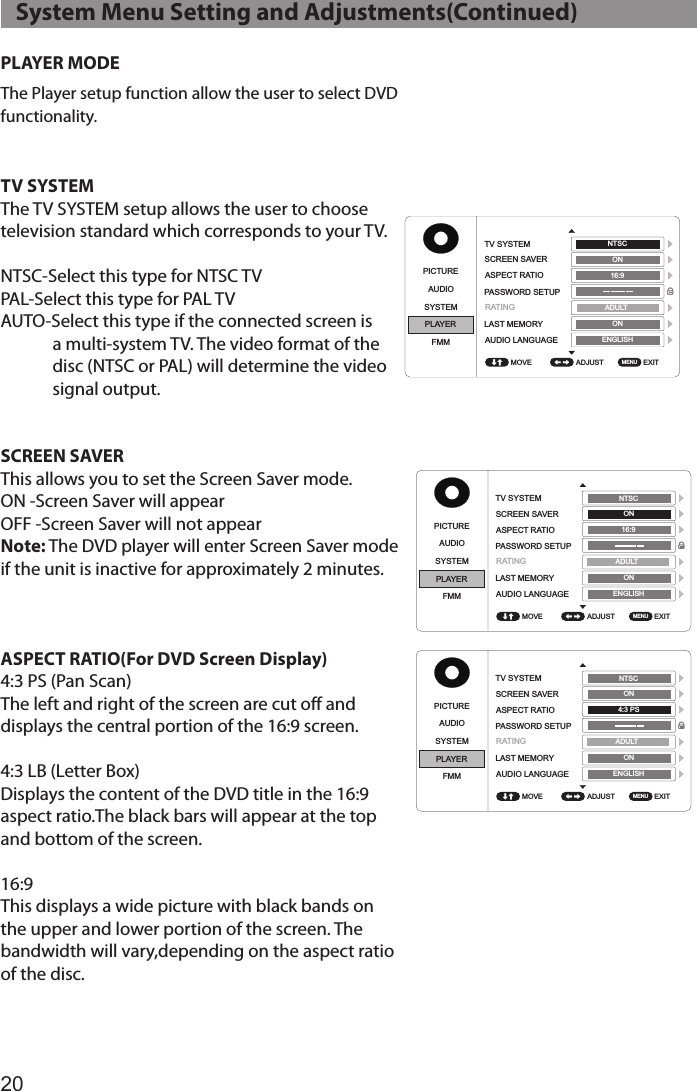
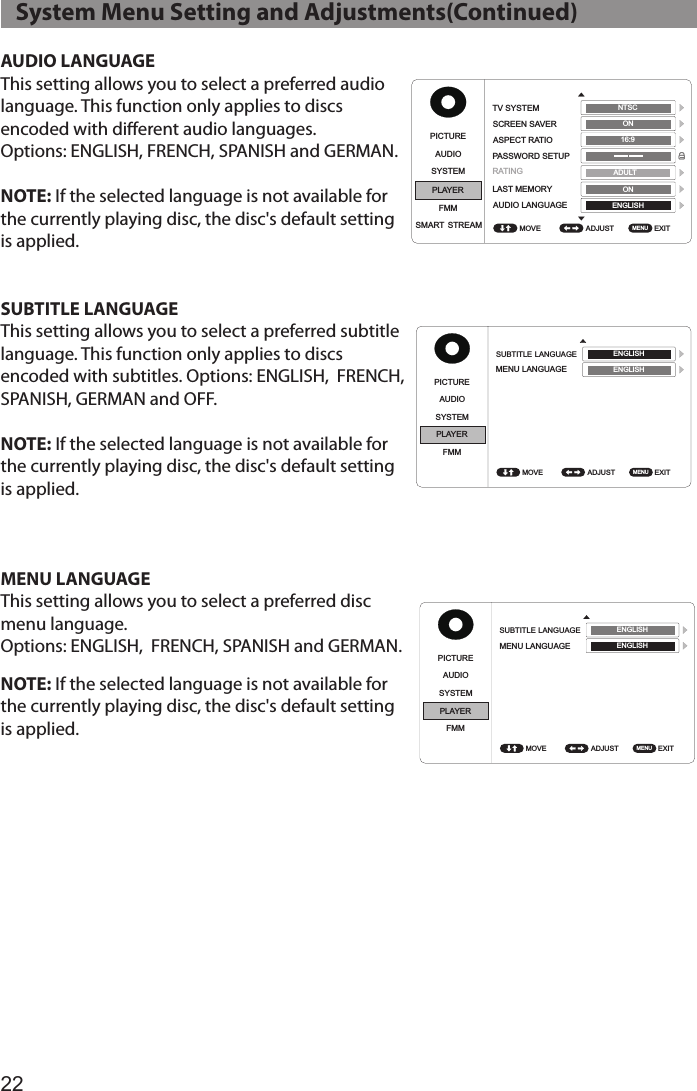
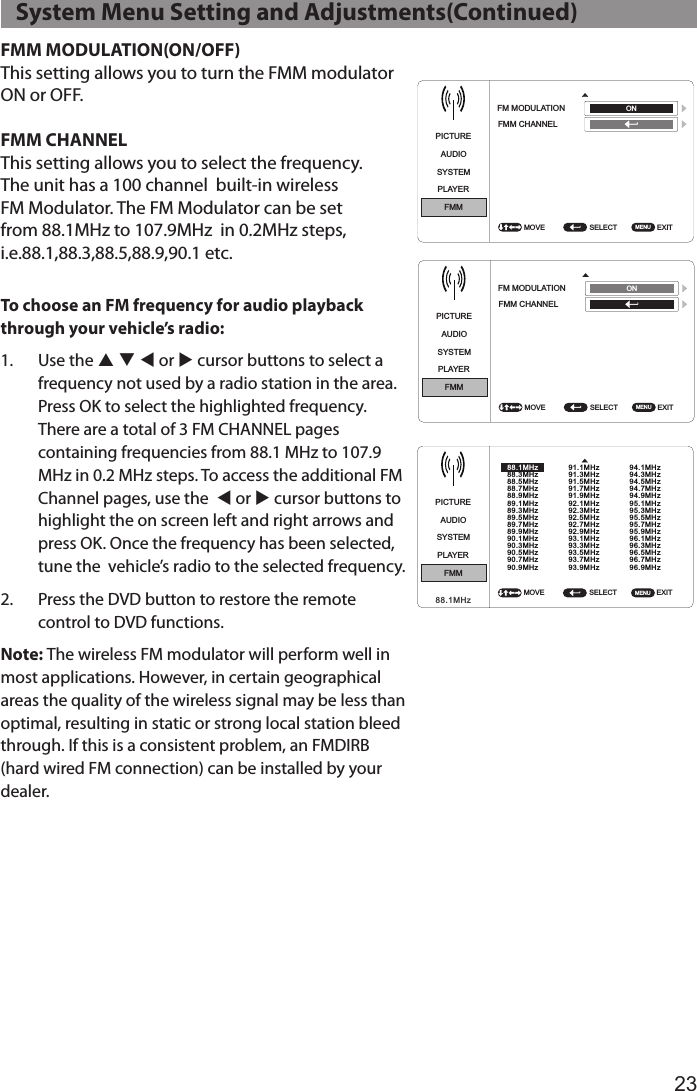
Action Electronics 9R3SBD61011 10.1 Inch LCD Monitor With Built In DVD Player User Manual

Action Electronics Co.,Ltd. 10.1 Inch LCD Monitor With Built In DVD Player

User Manual

AVX10USB10.1 Inch LCD Monitor  WithBuilt In DVD Player For Rear Seat EntertainmentInstallation And Operation Manual
CongratulationsWarningsSafety PrecautionCongratulations on your purchase of this Mobile Video Rear Seat Entertainment System! The SBD61011 has been designed to provide passengers with unlimited content options delivering smiles for many miles. Please read the directions that follow to familiarize yourself with the product to ensure that you obtain the best results from your equipment.For safety reasons, when changing video media, it is recommended that the vehicle is not in motion, and that you do not allow children to unfasten seat belts to change video media or make any adjustments to the system. System adjustments can be accomplished using the remote control, while seat belts remain fastened. Enjoy your  entertainment system but remember the safety of all  passengers remains the number one priority.Do not use any solvents or cleaning materials when cleaning the video monitor.Do not use any abrasive cleaners, they may scratch the screen.Use only a lightly dampened lint free cloth to wipe the screen if it is dirty.Before putting on headphones always adjust the volume setting to the lowest position.Do not put pressure on the screen.Caution children to avoid touching or scratching the screen, as it may become dirty or damaged.
   Table of ContentsFeatures .............................................................................................................5Materials to use in this package ................................................................ 6Docking bracket installation ......................................................................8Wiring diagram ............................................................................................... 7Control and indicators diagram ................................................................ 9Remote Control Operation .......................................................................11Remote Control functions ......................................................................... 12Source menu ..................................................................................................16System Menu Setting and Adjustments ..............................................18Playing DVDs and Audio Discs ................................................................24Playing USB Devices ....................................................................................24Playing MP3 Discs ........................................................................................25DVD Basics ......................................................................................................26Troubleshooting ...........................................................................................27
5• 10.1” Digital Thin Film Transistor (TFT) Active Matrix Liquid Crystal Display             LED Backlit Monitor• Built-in DVD Player• Last position memory for DVD Player• Six Audio / Video Source Inputs      DVD, USB, CARD, AV, AUX and HDMI.• USB 2.0 Port (User Accessible with Media Playback)• HD Input  (User Accessible with MHL support)• On Screen Display (OSD) for control of picture quality and functions• Full function remote control• Plays DVD, CD and MP3 discs• 100 Channel Wireless FM Modulator• Dual Channel IR Transmitter • M1/M2 Operation (for when 2 systems are installed in 1 Vehicle so that IR    Headphone Audio and Remote Control operation is independent)   FeaturesTypeResolutionPixelsOperation TemperatureStorage TemperatureBacklit lifeVideo Display System Video OutputPower SourceDimension (L x W x H)TFT Active Matrix LCD1024 (RGB) (X3) x 6001,843,20032 ~ 113º F (0 ~ 45º C)-4 ~ 149º F (-10 ~ 65º C)20,000 HoursNTSC / PAL / AUTO1.0Vp-p @ 75 ohms12VDC255mm x 175mm x 42.5mm10.0in x 6.9in x 1.7in   Specications
6   Materials To Use In This Package 156782341. AVX10USB system unit             -(1PC)2. MTB60001 docking bracket          -(1PC)3. Rubber pole adaptor x 7 pairs      Ø9.5mm,Ø11.5mm, Ø12.0mm, Ø12.2mm, Ø13.3mm, Ø13.95mm and Ø15.95mm     Note: This rubber pole adaptor is use to t the MTB60001 docking      bracket on the pillow pole.4. Remote Control  W/ Battery          -(1PC)5. 8P Din Power + AV out RCA cable harness        -(1PC)6. 8P Din M1 + M2 Connector harness          -(1PC)7. 8P Din + 8P Connector AV harness          -(1PC)8. 8P Din + 9P Connector Power harness        -(1PC)
7   Docking Bracket Installation 1.  Choose a correct rubber pole adaptor and put it on the pillow metal pole before install the docking bracket.2.  Install the docking bracket to the pillow metal pole and tighten with the screw know.3.  Plug in the harness cable on the monitor before dock on the docking bracket. Harness wire need to install properly..
8   Wiring Diagram  NOTE:Please DO NOT use incorrect wrong cable harness on the monitor system because user will  loos some function if install incorrectly.               For single monitor please use the 8P Din + AV Connector Harness( built              with AV input connector).               For Dual monitor please use the 8P Din M1 + M2 Connector Harness. Master Monitor Satellite MonitorHeadrest CableBlue8P Din + AV Connector HarnessGreenGreenBlueGreenGroundHeadrest CableBlueHeadrest CableGreenHeadrest CableGreenVideo In YellowAudio In Left WhiteAudio In Right RedOr 8P Din M1+M2 Connector HarnessDC 12V In+12V(ACC)GroundDC 12V In+12V(ACC)
9   Controls And Indicators Diagram121 22151617181920234568147911 1012131. Power Indicator     Red light indicator ( Bright = Standby Mode, Dim = Power On2. Power/ Source (      )       To turn system On/ Off  and to select the source.3. Infrared Transmitter       To broadcast audio signal to IR headphone.4. Left/ Next(        )     Short press for Left cursor and level increase on System Menu pages.    Long press for next chapter, track during play the DVD.5. Up(       )     Up cursor onSystem Menu pages and track selection during play the media file.6. Down(      )    Down cursor on System Menu pages and track selection during play the media files.7. Remote Sensor     To receive the signal from remote control.8. Right/ Previous(        )    Short press for Right cursor on System Menu pages and level decrease.    Long press for previous chapter, track during play the DVD.9. Home/ Enter(         )     Short press for Enterand.     Long press to call up or exit  the Main Menu.10. Infrared Transmitter       To broadcast audio signal to IR headphone.
10   Controls And Indicators Diagram(Continued)11. Stop(       )        Press once for pre-stop,  press twice for totally stop the DVD/ Media information.12. Infrared Transmitter       To broadcast audio signal to IR headphone.13. Play/ Pause(         )       To start playback or pause the DVD/Media.14. Open Knob       To open the DVD player cover to install or remove the disc.15. HDMI Input       For connection of device with HDMI/ MHL output.16. TF Card Input       For connection of TF Card memory device to playback media contents.17. USB  Input       For connection of USB memory device to playback media contents.18. AUX Input       For connection of external audio and video device.19. Earphone Jack       To produce audio signal output usingØ3.5mm plug wire headphone.20. DC Input       To allow DC 12V supply in using Ø3.0mm DC plug input.21. Power + AV Input       9 Pin harness cable with power and AV source input.22. AV Output       8 Pin harness cable with AV source output.
11   Remote control operationBattery Replacement1.  Remove the battery cover.2.   Insert two AAA batteries into the battery holder. Be sure to observe the correct polarity.3.    Reinstall the battery cover into the battery holder until the holder is click .
12   Remote Control functions
13   Remote Control functions(Continued)*     Function control is available on the unit and the Remote Control.**   Function not available in this model.1.   POWER* Press this button to turn the unit ON and OFF.2.   SOURCE* Press to display the Source OSD for DVD, USB, CARD, AV,AUX and HDMI1.3.   DVD  Source**       No function on this model.4.   DVD Mode Select Button       Switches certain function keys on the remote control for DVD function.5.     NUMBERS Allows the user to enter the numbers 0-9 for selection of the tracks, titles, chapters or password setting.6.     SYSTEM  MENU Allows the user to access the system menu. Press the por q cursor buttons to select PICTURE, AUDIO, SYSTEM, PLAYER, FMM .7.     CURSOR (pqt u) Use the cursor buttons to access menu selections on the screen.8.     OK Used to execute a selected setting or menu option.9.   DISC  MENU In DVD mode, press once to access the Root Menu and then press again to resume to previous screen.  10.  DISPLAY Press once to display current disc information of Title, Chapter & Time. Press again to display Subtitle, Audio & Angle while the disc is playing.  11.  PL AY (u)* Press to activate the play mode while a disc is loaded into the disc compartment.12.  PAUSE  (II)* Press to pause playback.OFF                                   OFF                       OFF....DVD  TT    0/12      CH  0/25                         00:00:00
14   Remote Control functions(Continued)13.  SCAN  BACKWARD (   ) Press to search in a backward direction. Press repeatedly to change the search speed from 2, 4, 8, 20 times and normal speed.14.  SCAN  FORWARD (   ) Press to search in a forward direction. Press repeatedly to change the search speed from 2, 4, 8, 20 times and normal speed.15.  PREVIOUS (   ) Press to return to the previous chapter or track.16.  NEXT  (   ) Press to skip to the next chapter or track.17.    REPEAT  Allows the user to repeat a selected chapter, title or all track.18.    A-B  REPEAT Allows user to repeat the playback from point A to point B. Press A-B button    On-Screen Display     DVD player Once         Repeat A       Mark the beginning of the                                                                                                      section to repeat (Set point A) Twice                A-B                  Mark the end of the section to repeat                                                                                                       (Set point B) 3 times               AB O                Cancel the A-B repeat function19.    SUBTITLE Press to display and select the subtitle language in DVD mode. Each time this button is pressed, the subtitle language changes.Pressing the button will also turn the subtitles off. Note: The type and number of subtitle languages vary from disc to disc. 20.    ZOOM Press this button to enlarge or decrease the picture size when playing a DVD disc.  Press ZOOM button                                                        DVD Player performs          1 Time                                                                                  Enlarges the picture 2X         2 Times                                                                                Enlarges the picture 3X         3 Times                                                                                Enlarges the picture 4X         4 Times                                                                                Reduces the picture 1/2         5 Times                                                                                Reduces the picture 1/3         6 Times                                                                                Reduces the picture 1/4         7 Times                                                                                Picture is returned to original size21.     IRT ON/OFF  Turns the Infrared Transmitter on/o for IR wireless headphones.22.    FM MODULATOR CHANNEL SELECT (C)** No function on this model.  User may use the system menu to select the FM Modulator.
1523.    FMM  ON/OFF Turns the FM Modulator power on/o.24.    AUDIO Press to display and select  audio language in DVD mode. Each time this button is pressed, the language changes.25.    PIX ( Picture Select ) This button is used to make picture adjustments. Use the UP or DOWN direction buttons to select BRIGHTNESS, CONTRAST,COLOR, TINT, or RESET. Use the UP or DOW buttons to adjust the setting. The OSD will automatically disappear if no adjustments are made within 6 seconds.26.    VOLUME DOWN (-) or UP (+) Press to select the increase or decrease the volume for the wired headphones. 27.    STOP  (n)* Press to stop playback. (Playback will resume from the point it is stopped). Press twice to stop playback fully. (Playback will resume from the beginning of the disc). Note: For MP3 or photo mode, press twice to return to Audio/Photo/Video option menu.28.    SETUP** No function on this model.  User can use the system to select the function may need. 29.    MUTE Press this button to mute the audio for the wireless FM Modulator, IR headphones and audio output. Pressing the button again restores the audio to the previously set level.30.    TV Mode Select Switches certain function keys on the remote control for monitor functions.31.  MONITOR SELECT         M1 Button  –  Set the remote control code to allow control of the unit in M1 mode.         M2 Button  –  Set the remote control code to allow control of the unit in M2 mode. Note: M1/M2 operation is only for when 2 systems are installed in the same vehicle. This         allows independent Remote Control and independent playback of audio for each system.32.    EJECT  ( )* Press this button to eject the disc.   Remote Control functions(Continued)
16The System is capable of accessing six source inputs.  To select or change a source, press the source      button on the front panel or the Source button on the remote control. The source OSD will appear on the screen as shown in the figure below.  Use the  + or - cursor buttons on the front panel or the p or q cursor buttons on the remote control to highlight a source. Press the Source       button on the front panel or the OK button on the remote control to select the desired source.DVDThe DVD source input is used to play DVDs, Audio CDs and MP3 discs.USBThe USB source input is used to play MP3 les, JPEG les (Photos) and MPEG I, II files. CARDThe CARD source input is used to play MP3 les, JPEG les (Photos) and MPEG I, II files. AVAn external video source such as a video game system, or other audio/video devices can be connected to the AV input. This AV input connection is performed when the unit is installed. Turn the video source component on with its power button or remote control and it is now ready to play the audio and video signals from the source connected to the AV input.   Souce menuSOURCEAVAUXHDMIMOVEDVDUSBCARD
17AUXAn external video source such as a video game system or other audio/video devices may be connected to the system via the AUX input. Connect your peripheral device to the supplied Aux Adapter harness and plug the harness into the AUX Input on the side of the system. Turn the external source component on with its power button or remote control and it is now ready to play the audio and video signal from the source connected to AUX.HDMI These Source inputs allow the user to enjoy high-denition digital images and high-quality sound by connecting a HD device such as a Blue-ray player or smartphone with an HDMI output to the system. The HDMI inputs also allow the user to connect with a Mobile High-Denition Link (MHL) mobile phone. Connect your HDMI/MHL device with an optional HDMI cable. Smartphones and Tablet require the appropriate adapter for your smart device. You can also use this input to connect a Smart Stick such as a ROKU, Amazon FireTV and Chromecast device (these devices may require Wi-Fi Hotspot access to stream content which is not included with this system). Notes: •  This source requires an HDMI/MHL enabled device and a special HDMI/MHL adapter. Contact your HDMI/MHL device supplier for the adapter.•  Phone functionality (phone calls, texting, etc.) may be limited while using the adapter.•  HDMI content is copy protected and is not available on the AV output of the System.    Source menu(Continued)
18PICTURE CONTROL The PICTURE setup functions allows the user to select and set the picture control function.BRIGHTNESS, CONTRAST, COLOR  adjustments range from 0 to 32.TINT adjustments range from -16 to 16.AUDIO MODEThe AUDIO setup functions allows the user to select and set the IRT Headpone transmitter "ON" or "OFF"IRTThe IR transmitter can be set to ON or OFF.The IR Transmitter must be set to "ON" for the wireless headphone to be operational.LANGUAGEThe LANGUAGE setup allows the user to selectENGLISH,SPANISH, FRENCH, GERMAN for the on-screen language display.DEFAULT DVDThe DEFAULT DVD allows the user to set the system default source to DVD ON or OFF. If souce default is set to ON, every time the unit is turned off the on, the unit will power up and automatically switch the source to DVD. If source default is set to OFF and the system is turned off then on, the unit will power up in the source that was last selected.    System Menu Setting and AdjustmentsPICTUREAUDIOSYSTEMPLAYERFMMADJUST  EXIT BRIGHTNESSCONTRASTCOLORTINTMOVE 16160MENU 16PICTUREAUDIOSYSTEMPLAYERFMMADJUST  EXIT BRIGHTNESSCONTRASTCOLORTINTMOVE 160MENU 1616PICTUREAUDIOSYSTEMPLAYERFMMADJUST  EXIT BRIGHTNESSCONTRASTCOLORTINTMOVE 0MENU 161616PICTUREAUDIOSYSTEMPLAYERFMMADJUST  EXIT BRIGHTNESSCONTRASTCOLORTINTMOVE  MENU 1616160PICTUREAUDIOSYSTEMPLAYERFMMADJUST  EXIT LANGUAGEDEFAULT DVDMONITOR MODERESETMOVE  MENU PICTUREAUDIOSYSTEMPLAYERFMMADJUST  EXIT IRTMOVE  MENU ON VOLUME 16 ENGLISH ON M1 PICTUREPICTUREPICTUREAUDIOAUDIOAUDIOSYSTEMSYSTEMSYSTEMPLAYERPLAYERPLAYERFMMFMMFMMADJUST ADJUST ADJUST EXIT EXIT EXIT BRIGHTNESSLANGUAGETV SYSTEMCONTRASTDEFAULT DVDSCREEN SAVERCOLORMONITOR MODEASPECT RATIOPASSWORD SETUPTINTRESETRATINGLAST MEMORYAUDIO LANGUAGEMOVE MOVE MOVE 1616160MENU MENU MENU ENGLISH NTSC 6 ADULT ON ON ON M1 16:9 ENGLISH PICTUREAUDIOSYSTEMPLAYERFMMADJUST  EXIT LANGUAGEDEFAULT DVDMONITOR MODERESETMOVE  MENU ENGLISH ON M1 PICTUREAUDIOSYSTEMPLAYERFMMADJUST  EXIT LANGUAGEDEFAULT DVDMONITOR MODERESETMOVE  MENU ENGLISH ON M1  PICTUREAUDIOSYSTEMPLAYERFMMADJUST  EXIT LANGUAGEDEFAULT DVDMONITOR MODERESETMOVE  MENU ENGLISH ON M1 PICTUREAUDIOSYSTEMPLAYERFMMSELECT  EXIT FM FMM CHANNELMOVE  MENU ONPICTUREAUDIOSYSTEMPLAYERFMMSELECT  EXIT MOVE  MENU 88.1MHz88.3MHz88.5MHz88.7MHz88.9MHz89.1MHz89.3MHz89.5MHz89.7MHz89.9MHz90.1MHz90.3MHz90.5MHz90.7MHz90.9MHz91.1MHz91.3MHz91.5MHz91.7MHz91.9MHz92.1MHz92.3MHz92.5MHz92.7MHz92.9MHz93.1MHz93.3MHz93.5MHz93.7MHz93.9MHz94.1MHz94.3MHz94.5MHz94.7MHz94.9MHz95.1MHz95.3MHz95.5MHz95.7MHz95.9MHz96.1MHz96.3MHz96.5MHz96.7MHz96.9MHzPICTUREPICTUREPICTUREAUDIOAUDIOAUDIOSYSTEMSYSTEMSYSTEMPLAYERPLAYERPLAYERFMMFMMFMMADJUST ADJUST ADJUST EXIT EXIT EXIT BRIGHTNESSLANGUAGETV SYSTEMCONTRASTDEFAULT DVDSCREEN SAVERCOLORMONITOR MODEASPECT RATIOPASSWORD SETUPTINTRESETRATINGLAST MEMORYAUDIO LANGUAGEMOVE MOVE MOVE 1616160MENU MENU MENU ENGLISH NTSC 6 ADULT ON ON ON M1 16:9 ENGLISH PICTUREAUDIOSYSTEMPLAYERFMMADJUST  EXIT LANGUAGEDEFAULT DVDMONITOR MODERESETMOVE  MENU ENGLISH ON M1 PICTUREAUDIOSYSTEMPLAYERFMMADJUST  EXIT LANGUAGEDEFAULT DVDMONITOR MODERESETMOVE  MENU ENGLISH ON M1  PICTUREAUDIOSYSTEMPLAYERFMMADJUST  EXIT LANGUAGEDEFAULT DVDMONITOR MODERESETMOVE  MENU ENGLISH ON M1 PICTUREAUDIOSYSTEMPLAYERFMMSELECT  EXIT FM FMM CHANNELMOVE  MENU ONPICTUREAUDIOSYSTEMPLAYERFMMSELECT  EXIT MOVE  MENU 88.1MHz88.3MHz88.5MHz88.7MHz88.9MHz89.1MHz89.3MHz89.5MHz89.7MHz89.9MHz90.1MHz90.3MHz90.5MHz90.7MHz90.9MHz91.1MHz91.3MHz91.5MHz91.7MHz91.9MHz92.1MHz92.3MHz92.5MHz92.7MHz92.9MHz93.1MHz93.3MHz93.5MHz93.7MHz93.9MHz94.1MHz94.3MHz94.5MHz94.7MHz94.9MHz95.1MHz95.3MHz95.5MHz95.7MHz95.9MHz96.1MHz96.3MHz96.5MHz96.7MHz96.9MHz
19MONITOR MODEThis allows the user to change the system to M1 or M2 mode. Once the setting is changed, the remote control and IR headphones will only work if set to that same setting.1.M1 Mode - For the Remote Control to operate the                           system when set to M1, press the M1                            button on the Remote Control.    Please make sure IR Headphones are set to     Channel A when the system is in M1 mode.2.M2 Mode - For the Remote Control to operate the                           system when set to M2, press the M2                           button on the Remote Control.     Please make sure IR Headphones are set to      Channel B when the system is in M2 mode.RESETThe RESET functions allows all settings options to be reset to factory settings.   System Menu Setting and Adjustments(Continued)PICTUREPICTUREPICTUREAUDIOAUDIOAUDIOSYSTEMSYSTEMSYSTEMPLAYERPLAYERPLAYERFMMFMMFMMADJUST ADJUST ADJUST EXIT EXIT EXIT BRIGHTNESSLANGUAGETV SYSTEMCONTRASTDEFAULT DVDSCREEN SAVERCOLORMONITOR MODEASPECT RATIOPASSWORD SETUPTINTRESETRATINGLAST MEMORYAUDIO LANGUAGEMOVE MOVE MOVE 1616160MENU MENU MENU ENGLISH NTSC 6 ADULT ON ON ON M1 16:9 ENGLISH PICTUREAUDIOSYSTEMPLAYERFMMADJUST  EXIT LANGUAGEDEFAULT DVDMONITOR MODERESETMOVE  MENU ENGLISH ON M1 PICTUREAUDIOSYSTEMPLAYERFMMADJUST  EXIT LANGUAGEDEFAULT DVDMONITOR MODERESETMOVE  MENU ENGLISH ON M1 PICTUREAUDIOSYSTEMPLAYERFMMADJUST  EXIT LANGUAGEDEFAULT DVDMONITOR MODERESETMOVE  MENU ENGLISH ON M1 PICTUREAUDIOSYSTEMPLAYERFMMSELECT  EXIT FM FMM CHANNELMOVE  MENU ONPICTUREAUDIOSYSTEMPLAYERFMMSELECT  EXIT MOVE  MENU 88.1MHz88.3MHz88.5MHz88.7MHz88.9MHz89.1MHz89.3MHz89.5MHz89.7MHz89.9MHz90.1MHz90.3MHz90.5MHz90.7MHz90.9MHz91.1MHz91.3MHz91.5MHz91.7MHz91.9MHz92.1MHz92.3MHz92.5MHz92.7MHz92.9MHz93.1MHz93.3MHz93.5MHz93.7MHz93.9MHz94.1MHz94.3MHz94.5MHz94.7MHz94.9MHz95.1MHz95.3MHz95.5MHz95.7MHz95.9MHz96.1MHz96.3MHz96.5MHz96.7MHz96.9MHzPICTUREAUDIOSYSTEMPLAYERFMMADJUST  EXIT LANGUAGEDEFAULT DVDMONITOR MODERESETMOVE  MENU PICTUREAUDIOSYSTEMPLAYERFMMADJUST  EXIT IRTMOVE  MENU ON VOLUME 16 ENGLISH ON M1 PICTUREAUDIOSYSTEMPLAYERFMMADJUST  EXIT MOVE  MENU YES NO
20PLAYER MODEThe Player setup function allow the user to select DVD functionality.TV SYSTEMThe TV SYSTEM setup allows the user to choose television standard which corresponds to your TV.NTSC-Select this type for NTSC TVPAL-Select this type for PAL TVAUTO-Select this type if the connected screen is a multi-system TV. The video format of the disc (NTSC or PAL) will determine the video signal output.SCREEN SAVER This allows you to set the Screen Saver mode. ON -Screen Saver will appearOFF -Screen Saver will not appearNote: The DVD player will enter Screen Saver mode  if the unit is inactive for approximately 2 minutes.ASPECT RATIO(For DVD Screen Display)4:3 PS (Pan Scan)The left and right of the screen are cut off and displays the central portion of the 16:9 screen.4:3 LB (Letter Box)Displays the content of the DVD title in the 16:9 aspect ratio.The black bars will appear at the top and bottom of the screen.16:9This displays a wide picture with black bands on the upper and lower portion of the screen. The bandwidth will vary,depending on the aspect ratio of the disc.PICTUREPICTUREPICTUREPICTUREPICTUREPICTUREPICTURE PICTUREAUDIOAUDIOAUDIOAUDIOAUDIOAUDIOAUDIO AUDIOSYSTEMSYSTEMSYSTEMSYSTEMSYSTEMSYSTEMSYSTEM SYSTEMPLAYERPLAYERPLAYERPLAYERPLAYERPLAYERPLAYER PLAYERFMMFMMFMMFMMFMMFMMFMM FMMADJUST ADJUST ADJUST ADJUST ADJUST ADJUST ADJUST  ADJUST EXIT EXIT EXIT EXIT EXIT EXIT EXIT  EXIT TV SYSTEMTV SYSTEMTV SYSTEMTV SYSTEMSUBTITLEGLANGUAGESUBTITLEGLANGUAGETV SYSTEM TV SYSTEMSCREEN SAVERSCREEN SAVERSCREEN SAVERSCREEN SAVERMENU LANGUAGEMENU LANGUAGESCREEN SAVER SCREEN SAVERASPECT RATIOASPECT RATIOASPECT RATIOASPECT RATIOASPECT RATIO ASPECT RATIOPASSWORD SETUPPASSWORD SETUPPASSWORD SETUPPASSWORD SETUPPASSWORD SETUPPASSWORD SETUPLAST MEMORYLAST MEMORYLAST MEMORYLAST MEMORYLAST MEMORY LAST MEMORYAUDIO LANGUAGEAUDIO LANGUAGEAUDIO LANGUAGEAUDIO LANGUAGEAUDIO LANGUAGE AUDIO LANGUAGEMOVE MOVE MOVE MOVE MOVE MOVE MOVE  MOVE MENU MENU MENU MENU MENU MENU MENU  MENU NTSC NTSC NTSC NTSC ENGLISH ENGLISH ENGLISH ENGLISH NTSC  NTSC  ADULT  ADULT ADULT ADULT ADULT  ADULT ON ON ON ON ON  ON ON ON ON ON ON  ON 16:9 16:9 16:9 4:3 PS 16:9 16:9ENGLISH ENGLISH ENGLISH ENGLISH ENGLISH  ENGLISH RATINGRATINGRATINGRATING RATINGRATINGPICTUREPICTUREPICTUREPICTUREPICTUREPICTUREPICTURE PICTUREAUDIOAUDIOAUDIOAUDIOAUDIOAUDIOAUDIO AUDIOSYSTEMSYSTEMSYSTEMSYSTEMSYSTEMSYSTEMSYSTEM SYSTEMPLAYERPLAYERPLAYERPLAYERPLAYERPLAYERPLAYER PLAYERFMMFMMFMMFMMFMMFMMFMM FMMADJUST ADJUST ADJUST ADJUST ADJUST ADJUST ADJUST  ADJUST EXIT EXIT EXIT EXIT EXIT EXIT EXIT  EXIT TV SYSTEMTV SYSTEMTV SYSTEMTV SYSTEMSUBTITLEGLANGUAGESUBTITLEGLANGUAGETV SYSTEM TV SYSTEMSCREEN SAVERSCREEN SAVERSCREEN SAVERSCREEN SAVERMENU LANGUAGEMENU LANGUAGESCREEN SAVER SCREEN SAVERASPECT RATIOASPECT RATIOASPECT RATIOASPECT RATIOASPECT RATIO ASPECT RATIOPASSWORD SETUPPASSWORD SETUPPASSWORD SETUPPASSWORD SETUPPASSWORD SETUPPASSWORD SETUPLAST MEMORYLAST MEMORYLAST MEMORYLAST MEMORYLAST MEMORY LAST MEMORYAUDIO LANGUAGEAUDIO LANGUAGEAUDIO LANGUAGEAUDIO LANGUAGEAUDIO LANGUAGE AUDIO LANGUAGEMOVE MOVE MOVE MOVE MOVE MOVE MOVE  MOVE MENU MENU MENU MENU MENU MENU MENU  MENU NTSC NTSC NTSC NTSC ENGLISH ENGLISH ENGLISH ENGLISH NTSC  NTSC  ADULT ADULT ADULT ADULT ADULT  ADULT ON ON ON ON ON  ON ON ON ON ON ON  ON 16:9 16:9 16:9 4:3 PS 16:9 16:9ENGLISH ENGLISH ENGLISH ENGLISH ENGLISH  ENGLISH RATINGRATINGRATINGRATINGRATINGRATING   System Menu Setting and Adjustments(Continued)
21PICTUREPICTUREPICTUREPICTUREPICTUREPICTUREPICTUREPICTUREAUDIOAUDIOAUDIOAUDIOAUDIOAUDIOAUDIOAUDIOSYSTEMSYSTEMSYSTEMSYSTEMSYSTEMSYSTEMSYSTEMSYSTEMPLAYERPLAYERPLAYERPLAYERPLAYERPLAYERPLAYERPLAYERFMMFMMFMMFMMFMMFMMFMMFMMADJUST ADJUST ADJUST ADJUST ADJUST ADJUST ADJUST ADJUST EXIT EXIT EXIT EXIT EXIT EXIT EXIT EXIT TV SYSTEMTV SYSTEMTV SYSTEMTV SYSTEMSUBTITLEGLANGUAGESUBTITLEGLANGUAGETV SYSTEMTV SYSTEMSCREEN SAVERSCREEN SAVERSCREEN SAVERSCREEN SAVERMENU LANGUAGEMENU LANGUAGESCREEN SAVERSCREEN SAVERASPECT RATIOASPECT RATIOASPECT RATIOASPECT RATIOASPECT RATIOASPECT RATIOPASSWORD SETUPPASSWORD SETUPPASSWORD SETUPPASSWORD SETUPPASSWORD SETUPPASSWORD SETUPLAST MEMORYLAST MEMORYLAST MEMORYLAST MEMORYLAST MEMORYLAST MEMORYAUDIO LANGUAGEAUDIO LANGUAGEAUDIO LANGUAGEAUDIO LANGUAGEAUDIO LANGUAGEAUDIO LANGUAGEMOVE MOVE MOVE MOVE MOVE MOVE MOVE MOVE MENU MENU MENU MENU MENU MENU MENU MENU NTSC NTSC NTSC NTSC ENGLISH ENGLISH ENGLISH ENGLISH NTSC NTSC  ADULT  ADULT ADULT ADULT ADULT ADULT ON ON ON ON ON ON ON ON ON ON ON ON 16:9 16:9 16:9 4:3 PS 16:916:9ENGLISH ENGLISH ENGLISH ENGLISH ENGLISH ENGLISH RATINGRATINGRATINGRATING RATINGRATINGPASSWORD SETUPThe default password is 3308.  To change the rating of the DVD player press 3308 to access the RATING setting.NOTE: 3308 must be pressed to set a new password. •  Press 3308•  Enter the new 4 digit password•  Press SETUP 2 times to exit the setup mode.NOTE: The 3308 password is always accepted in the setup menu even after a new password has been entered. To avoid the possibility of others using the default password to set the parental level and change the password, record this default password in another area and delete it from this manual. The restriction of viewing disc content by younger users may be available on some discs, but not on others. NOTE: When the password is set to a new password, that password must be used to play movies that have content rated above the setting in the setup menu.  The user will be prompted to put the password in before the movie can play.  After the password is entered press the ENTER button on the remote control.LAST MEMORYThe last memory function allows DVD playback to begin from the point when playback was last stopped. The last memory feature allows the user to turn the last memory feature function on or off.PICTUREPICTUREPICTUREPICTUREPICTUREPICTUREPICTUREPICTUREAUDIOAUDIOAUDIOAUDIOAUDIOAUDIOAUDIOAUDIOSYSTEMSYSTEMSYSTEMSYSTEMSYSTEMSYSTEMSYSTEMSYSTEMPLAYERPLAYERPLAYERPLAYERPLAYERPLAYERPLAYERPLAYERFMMFMMFMMFMMFMMFMMFMMFMMADJUST ADJUST ADJUST ADJUST ADJUST ADJUST ADJUST ADJUST EXIT EXIT EXIT EXIT EXIT EXIT EXIT EXIT TV SYSTEMTV SYSTEMTV SYSTEMTV SYSTEMSUBTITLEGLANGUAGESUBTITLEGLANGUAGETV SYSTEMTV SYSTEMSCREEN SAVERSCREEN SAVERSCREEN SAVERSCREEN SAVERMENU LANGUAGEMENU LANGUAGESCREEN SAVERSCREEN SAVERASPECT RATIOASPECT RATIOASPECT RATIOASPECT RATIOASPECT RATIOASPECT RATIOPASSWORD SETUPPASSWORD SETUPPASSWORD SETUPPASSWORD SETUPPASSWORD SETUPPASSWORD SETUPLAST MEMORYLAST MEMORYLAST MEMORYLAST MEMORYLAST MEMORYLAST MEMORYAUDIO LANGUAGEAUDIO LANGUAGEAUDIO LANGUAGEAUDIO LANGUAGEAUDIO LANGUAGEAUDIO LANGUAGEMOVE MOVE MOVE MOVE MOVE MOVE MOVE MOVE MENU MENU MENU MENU MENU MENU MENU MENU NTSC NTSC NTSC NTSC ENGLISH ENGLISH ENGLISH ENGLISH NTSC NTSC  ADULT  ADULT ADULT ADULT ADULT ADULT ON ON ON ON ON ON ON ON ON ON ON ON 16:9 16:9 16:9 4:3 PS 16:916:9ENGLISH ENGLISH ENGLISH ENGLISH ENGLISH ENGLISH RATINGRATINGRATINGRATING RATINGRATING   System Menu Setting and Adjustments(Continued)PICTUREPICTUREPICTUREPICTUREPICTUREPICTUREPICTURE PICTUREAUDIOAUDIOAUDIOAUDIOAUDIOAUDIOAUDIO AUDIOSYSTEMSYSTEMSYSTEMSYSTEMSYSTEMSYSTEMSYSTEM SYSTEMPLAYERPLAYERPLAYERPLAYERPLAYERPLAYERPLAYER PLAYERFMMFMMFMMFMMFMMFMMFMM FMMADJUST ADJUST ADJUST ADJUST ADJUST ADJUST ADJUST  ADJUST EXIT EXIT EXIT EXIT EXIT EXIT EXIT  EXIT TV SYSTEMTV SYSTEMTV SYSTEMTV SYSTEMSUBTITLEGLANGUAGESUBTITLEGLANGUAGETV SYSTEM TV SYSTEMSCREEN SAVERSCREEN SAVERSCREEN SAVERSCREEN SAVERMENU LANGUAGEMENU LANGUAGESCREEN SAVER SCREEN SAVERASPECT RATIOASPECT RATIOASPECT RATIOASPECT RATIOASPECT RATIO ASPECT RATIOPASSWORD SETUPPASSWORD SETUPPASSWORD SETUPPASSWORD SETUPPASSWORD SETUPPASSWORD SETUPLAST MEMORYLAST MEMORYLAST MEMORYLAST MEMORYLAST MEMORY LAST MEMORYAUDIO LANGUAGEAUDIO LANGUAGEAUDIO LANGUAGEAUDIO LANGUAGEAUDIO LANGUAGE AUDIO LANGUAGEMOVE MOVE MOVE MOVE MOVE MOVE MOVE  MOVE MENU MENU MENU MENU MENU MENU MENU  MENU NTSC NTSC NTSC NTSC ENGLISH ENGLISH ENGLISH ENGLISH NTSC  NTSC  ADULT ADULT ADULT ADULT ADULT  ADULT ON ON ON ON ON  ON ON ON ON ON ON  ON 16:9 16:9 16:9 4:3 PS 16:9 16:9ENGLISH ENGLISH ENGLISH ENGLISH ENGLISH  ENGLISH RATINGRATINGRATINGRATINGRATINGRATING
22AUDIO LANGUAGEThis setting allows you to select a preferred audio language. This function only applies to discs  encoded with different audio languages. Options: ENGLISH, FRENCH, SPANISH and GERMAN.NOTE: If the selected language is not available for the currently playing disc, the disc's default setting is applied.SUBTITLE LANGUAGEThis setting allows you to select a preferred subtitle language. This function only applies to discs encoded with subtitles. Options: ENGLISH,  FRENCH, SPANISH, GERMAN and OFF. NOTE: If the selected language is not available for the currently playing disc, the disc's default setting is applied.MENU LANGUAGEThis setting allows you to select a preferred disc menu language. Options: ENGLISH,  FRENCH, SPANISH and GERMAN. NOTE: If the selected language is not available for the currently playing disc, the disc's default setting is applied. PICTUREPICTUREPICTUREPICTUREPICTUREPICTUREPICTURE PICTUREAUDIOAUDIOAUDIOAUDIOAUDIOAUDIOAUDIO AUDIOSYSTEMSYSTEMSYSTEMSYSTEMSYSTEMSYSTEMSYSTEM SYSTEMPLAYERPLAYERPLAYERPLAYERPLAYERPLAYERPLAYER PLAYERFMMFMMFMMFMMFMMFMMFMM FMMADJUST ADJUST ADJUST ADJUST ADJUST ADJUST ADJUST  ADJUST EXIT EXIT EXIT EXIT EXIT EXIT EXIT  EXIT TV SYSTEMTV SYSTEMTV SYSTEMTV SYSTEMSUBTITLEGLANGUAGESUBTITLEGLANGUAGETV SYSTEM TV SYSTEMSCREEN SAVERSCREEN SAVERSCREEN SAVERSCREEN SAVERMENU LANGUAGEMENU LANGUAGESCREEN SAVER SCREEN SAVERASPECT RATIOASPECT RATIOASPECT RATIOASPECT RATIOASPECT RATIO ASPECT RATIOPASSWORD SETUPPASSWORD SETUPPASSWORD SETUPPASSWORD SETUPPASSWORD SETUPPASSWORD SETUPLAST MEMORYLAST MEMORYLAST MEMORYLAST MEMORYLAST MEMORY LAST MEMORYAUDIO LANGUAGEAUDIO LANGUAGEAUDIO LANGUAGEAUDIO LANGUAGEAUDIO LANGUAGE AUDIO LANGUAGEMOVE MOVE MOVE MOVE MOVE MOVE MOVE  MOVE MENU MENU MENU MENU MENU MENU MENU  MENU NTSC NTSC NTSC NTSC ENGLISH ENGLISH ENGLISH ENGLISH NTSC  NTSC  ADULT  ADULT ADULT ADULT ADULT  ADULT ON ON ON ON ON  ON ON ON ON ON ON  ON 16:9 16:9 16:9 4:3 PS 16:9 16:9ENGLISH ENGLISH ENGLISH ENGLISH ENGLISH  ENGLISH RATINGRATINGRATINGRATING RATINGRATINGPICTUREPICTUREPICTUREPICTUREPICTUREPICTUREPICTURE PICTUREAUDIOAUDIOAUDIOAUDIOAUDIOAUDIOAUDIO AUDIOSYSTEMSYSTEMSYSTEMSYSTEMSYSTEMSYSTEMSYSTEM SYSTEMPLAYERPLAYERPLAYERPLAYERPLAYERPLAYERPLAYER PLAYERFMMFMMFMMFMMFMMFMMFMM FMMADJUST ADJUST ADJUST ADJUST ADJUST ADJUST ADJUST  ADJUST EXIT EXIT EXIT EXIT EXIT EXIT EXIT  EXIT TV SYSTEMTV SYSTEMTV SYSTEMTV SYSTEMSUBTITLEGLANGUAGESUBTITLEGLANGUAGETV SYSTEM TV SYSTEMSCREEN SAVERSCREEN SAVERSCREEN SAVERSCREEN SAVERMENU LANGUAGEMENU LANGUAGESCREEN SAVER SCREEN SAVERASPECT RATIOASPECT RATIOASPECT RATIOASPECT RATIOASPECT RATIO ASPECT RATIOPASSWORD SETUPPASSWORD SETUPPASSWORD SETUPPASSWORD SETUPPASSWORD SETUPPASSWORD SETUPLAST MEMORYLAST MEMORYLAST MEMORYLAST MEMORYLAST MEMORY LAST MEMORYAUDIO LANGUAGEAUDIO LANGUAGEAUDIO LANGUAGEAUDIO LANGUAGEAUDIO LANGUAGE AUDIO LANGUAGEMOVE MOVE MOVE MOVE MOVE MOVE MOVE  MOVE MENU MENU MENU MENU MENU MENU MENU  MENU NTSC NTSC NTSC NTSC ENGLISH ENGLISH ENGLISH ENGLISH NTSC  NTSC  ADULT  ADULT ADULT ADULT ADULT  ADULT ON ON ON ON ON  ON ON ON ON ON ON  ON 16:9 16:9 16:9 4:3 PS 16:9 16:9ENGLISH ENGLISH ENGLISH ENGLISH ENGLISH  ENGLISH RATINGRATINGRATINGRATING RATINGRATINGPICTUREAUDIOSYSTEMPLAYERFMMSMART STREAM ADJUST  EXIT TV SYSTEMSCREEN SAVERASPECT RATIOPASSWORD SETUPLAST MEMORYAUDIO LANGUAGEMOVE  MENU NTSC ADULT ON ON 16:9 ENGLISH RATING   System Menu Setting and Adjustments(Continued)
23FMM MODULATION(ON/OFF)This setting allows you to turn the FMM modulator ON or OFF.FMM CHANNELThis setting allows you to select the frequency. The unit has a 100 channel  built-in wireless FM Modulator. The FM Modulator can be set from 88.1MHz to 107.9MHz  in 0.2MHz steps, i.e.88.1,88.3,88.5,88.9,90.1 etc.To choose an FM frequency for audio playback through your vehicle’s radio:1.  Use the p q t or u cursor buttons to select a frequency not used by a radio station in the area. Press OK to select the highlighted frequency. There are a total of 3 FM CHANNEL pages containing frequencies from 88.1 MHz to 107.9 MHz in 0.2 MHz steps. To access the additional FM Channel pages, use the  t or u cursor buttons to highlight the on screen left and right arrows and press OK. Once the frequency has been selected, tune the  vehicle’s radio to the selected frequency.2.  Press the DVD button to restore the remote control to DVD functions.Note: The wireless FM modulator will perform well in most applications. However, in certain geographical areas the quality of the wireless signal may be less than optimal, resulting in static or strong local station bleed through. If this is a consistent problem, an FMDIRB (hard wired FM connection) can be installed by your dealer.PICTUREPICTUREAUDIOAUDIOSYSTEMSYSTEMPLAYERPLAYERFMMFMMSELECT SELECT EXIT EXIT FM MODULATION FM MODULATION FMM CHANNELFMM CHANNELMOVE MOVE MENU MENU ONONPICTUREAUDIOSYSTEMPLAYERFMMSELECT  EXIT MOVE  MENU 91.1MHz91.3MHz91.5MHz91.7MHz91.9MHz92.1MHz92.3MHz92.5MHz92.7MHz92.9MHz93.1MHz93.3MHz93.5MHz93.7MHz93.9MHz94.1MHz94.3MHz94.5MHz94.7MHz94.9MHz95.1MHz95.3MHz95.5MHz95.7MHz95.9MHz96.1MHz96.3MHz96.5MHz96.7MHz96.9MHz88.1MHz88.3MHz88.5MHz88.7MHz88.9MHz89.1MHz89.3MHz89.5MHz89.7MHz89.9MHz90.1MHz90.3MHz90.5MHz90.7MHz90.9MHz88.1MHzPICTUREPICTUREAUDIOAUDIOSYSTEMSYSTEMPLAYERPLAYERFMMFMMSELECT SELECT EXIT EXIT FM MODULATION FM MODULATION FMM CHANNELFMM CHANNELMOVE MOVE MENU MENU ONONPICTUREAUDIOSYSTEMPLAYERFMMSELECT  EXIT MOVE  MENU 91.1MHz91.3MHz91.5MHz91.7MHz91.9MHz92.1MHz92.3MHz92.5MHz92.7MHz92.9MHz93.1MHz93.3MHz93.5MHz93.7MHz93.9MHz94.1MHz94.3MHz94.5MHz94.7MHz94.9MHz95.1MHz95.3MHz95.5MHz95.7MHz95.9MHz96.1MHz96.3MHz96.5MHz96.7MHz96.9MHz88.1MHz88.3MHz88.5MHz88.7MHz88.9MHz89.1MHz89.3MHz89.5MHz89.7MHz89.9MHz90.1MHz90.3MHz90.5MHz90.7MHz90.9MHz88.1MHzPICTURE PICTUREAUDIO AUDIOSYSTEM SYSTEMPLAYER PLAYERFMM FMMSELECT  SELECT EXIT  EXIT FM MODULATION  FM MODULATION FMM CHANNEL FMM CHANNELMOVE  MOVE MENU  MENU ON ONPICTUREAUDIOSYSTEMPLAYERFMMSELECT  EXIT MOVE  MENU 91.1MHz91.3MHz91.5MHz91.7MHz91.9MHz92.1MHz92.3MHz92.5MHz92.7MHz92.9MHz93.1MHz93.3MHz93.5MHz93.7MHz93.9MHz94.1MHz94.3MHz94.5MHz94.7MHz94.9MHz95.1MHz95.3MHz95.5MHz95.7MHz95.9MHz96.1MHz96.3MHz96.5MHz96.7MHz96.9MHz88.1MHz88.3MHz88.5MHz88.7MHz88.9MHz89.1MHz89.3MHz89.5MHz89.7MHz89.9MHz90.1MHz90.3MHz90.5MHz90.7MHz90.9MHz88.1MHz   System Menu Setting and Adjustments(Continued)
24Playing DVDsWhen a disc is loaded. Press the DISPLAY button on the remote control to display the status banner. The status banner includes the disc title, chapter audio language , subtitle & angle.Title Selection: Some DVDs contain more than one title (e.g. sitcoms, collections, etc.)Press the numeric (0-9) buttons to initiate a change of chapter title selection. Using the repeat feature to select OFF, Chapter, Title and Repeat All to play the movies  contents.Playing Audio CDsWhen playing an audio CD, the DISPLAY banner appears automatically. The track number and the elapsed time of the disc are displayed.Selecting a Track: Selection of a specific track is accomplished by using the numbers keys. Press the number key corresponding to the desired track and the player will implement the selection.•  Press the previous button (9) to return to the previous chapter or track.•  Press the next button (:) to skip to the next chapter or track.Using the REPEAT featureThe default mode for the Repeat feature is OFF. Pressing REPEAT on the remote control consecutively changes the repeat options.•  OFF    Plays all songs on the disc and stops after all songs are played•  REP 1  Repeats 1 song•  REP DIR  Plays songs in the directory•  REP ALL  Plays all songs on the disc repeatedlyPlaying USB DevicesTo play a USB device, change the source to USB  and plug a USB device into the USB port.When a USB device is inserted into the player the navigation menu appears automatically.AUDIO  Enjoy your audio in this mode.  ex: mp3, wma, wav. . .ENTER   Playing DVD and Audio Discs
25Use the cursor keys p q t or uand OK to navigate the on screen menus.The USB port can play  AUDIO, PHOTO, VIDEO . The following formats are supported:Audio•  MP3•  WMA•  AACPhoto•  JPEG•  BMPVideo*(720 x 576 max resolution)•  AVI (MPEG4-DIVX (DIVX 4.0/5.0), MPEG4-XVID •  MPG (MPEG-1) •  MOV (MPEG4-DIVX)•  FLV (FLV1)•  SWF (FLV1) •  DAT (MPEG1) •  VOB (MPEG2)  Note: All formats may not play depending on the software used to convert the video file from its original format.Playing MP3 DiscsMP3 is a format for storing digital audio. An audio CD-quality song can be compressed into MP3 format with very little loss of quality, while taking up much less space. CD-R discs that have MP3 format files can be played on the DVD player. The DVD player plays the songs in the order they were burned on to the disc.Selecting Folders and Songs:When an MP3 disc is loaded in the player, the navigation menu will appear on the screen automatically and a song will start playing.To change songs use the         arrows to select a different song and press the        or      button to play the selected song. To change folders press the     button to move to the  root folder and press the        or        button to display all the folders on the disc. Use         the buttons to select a new folder and press the        or         button to enter the new folder. The unit will begin playing the first song of the folder.   Playing DVD and Audio Discs(Continued)Playing MP3 Discs
26To get the optimum use out of the DVD Player, please read the following:DVD Region CodeThe DVD player is preset to a region code at the factory depending on where the DVD player is sold. A DVD from a different region cannot be played in this unit and the unit will display "WRONG REGION”.Region 1- USA, CanadaRegion 2- Japan, Europe, South Africa, Middle East, GreenlandRegion 3- S. Korea, Taiwan, Hong Kong, Parts of South East AsiaRegion 4- Australia, New Zealand, Latin America (including Mexico)Region 5- Eastern Europe, Russia, India, AfricaRegion 6- China   DVD Basics
27PROBLEM SOLUTIONIR remote inoperative •Verify that the battery in the remote is fresh.•Verify that the remote sensor eye is not obstructed.Disc won't play •Insert a disc with the label side facing the viewer.•Check the type of disc you put into disc tray. This DVD only plays DVD, audio CD and MP3s.•Both the unit and the disc are coded by region. If the regionalcodes don’t match, the disc can’t be played.Play starts, but then stops  immediately•The disc is dirty. Clean it.•Condensation has formed. Allow player to dry out.No sound or distorted sound•Make sure your DVD is connected properly. Make sure all cables are securely inserted into the appropriate jacks.• If you are  using  the 2-channel IR headphones,  make  sure you turn on the IR headphone power, make sure the correct channel (A or B) is selected.•If the FM Modulator is ON make sure proper frequency has been selected. Cannot advance through a movie•Most discs prohibit advancing through the opening credits and warning information that appear at the beginning of movies.The icon (      ) appears  •The feature or action cannot be completed at this time because:  1. The disc’s software restricts it. 2. The disc’s software doesn’t support the feature (e.g., angles)  3. The feature is not available at the moment. 4. A title or chapter number that is out of range has been requested.Picture is distorted •The disc might be damaged. Try another disc.•It is normal for some distortion to appear during forward orreverse scan.   Troubleshooting
© 2016 Voxx Electronics Corp.,180 Marcus Blvd Hauppauge, NY 11788www.voxxelectronics.com   FCC CautionThis device complies with part 15 of the FCC Rules. Operation is subject to the following two conditions: (1) This device may not cause harmful interference, and (2) this device must accept any interference received, including interference that may cause undesired operation.Any Changes or modifications not expressly approved by the party responsible for compliance could void the user's authority to operate the equipment.Note: This equipment has been tested and found to comply with the limits for a Class B digital device, pursuant to part 15 of the FCC Rules. These limits are designed to provide reasonable protection against harmful interference in a residential installation. This equipment generates uses and can radiate radio frequency energy and, if not installed and used in accordance with the instructions, may cause harmful interference to radio communications. However, there is no guarantee that interference will not occur in a particular installation. If this equipment does cause harmful interference to radio or television reception, which can be determined by turning the equipment off and on, the user is encouraged to try to correct the interference by one or more of the following measures:-Reorient or relocate the receiving antenna.-Increase the separation between the equipment and receiver.-Connect the equipment into an outlet on a circuit different from that to which the receiver is connected.-Consult the dealer or an experienced radio/TV technician for help.This equipment complies with FCC radiation exposure limits set forth for an uncontrolled environment. This equipment should be installed and operated with minimum distance 20cm between the radiator & your body.

Navigation menu