Actiontec Electronics 802MRE 802.11b Wireless LAN Mini-PCI Adapter User Manual 802MR
Actiontec Electronics (Taiwan) Inc. 802.11b Wireless LAN Mini-PCI Adapter 802MR
Manual
802MR
User’s Manual
1. Wireless LAN Basics
Wireless LAN (Local Area Networks) systems offer a great number of advantages over a traditional,
wired system. Wireless LANs (WLANs) are more flexible, easier to setup and manage and often more
cost effective than their wired equivalence. Using radio frequency (RF) technology. WLANs
transmit and receive data over the air, minimizing the need for wired connections. Thus, WLANs
combine data connectivity with user mobility, and, through simplified configuration, enable movable
LANs. With wireless LANs, users can access shared information without looking for a place to plug
in and network managers can set up or augment networks without installing or moving wires.
Wireless LANs offer the following productivity, convenience and cost advantages over traditional
wired networks.•
z Mobility – Wireless LAN systems can provide LAN users with access to real-time information
anywhere in their organization. This mobility supports productivity and service opportunities
not possible with wired networks.
z Installation Speed and Simplicity – Installing a wireless LAN system can be fast and easy and
can eliminate the need to pull cable through walls and ceilings.
z Installation Flexibility – wireless technology allows the network to go where wires cannot go.
z Reduced Cost-of-Ownership – While the initial investment required for wireless LAN hardware
might be higher than the cost of wired LAN hardware, overall installation expenses and lifecycle
costs will be significantly lower. Long- term cost benefits are greatest in dynamic
environments requiring frequent moves, adds, and changes.
z Scalability – Wireless LAN systems can be configured in a variety of topologies to meet the
needs of specific applications and installations. Configurations are easily changed and range
from peer-to-peer networks suitable for a small number of users to full infrastructure networks of
thousands of users that allows roaming over a broad area.
2. Installation and Overview
Here are some steps you will perform in establishing your wireless network
connection:
z Install Access Point at first. AP is needed in case of Infrastructure network mode.
z Install software using the Installation Disktette.
z Install network protocol(s) required to communicate on your network. Most
likely you will need the TCP/IP protocol
Here are some steps you will perform in installing your driver for AC97 Soft Modem.
z Install driver using the Installation Diskette
3. Installation Procedure of 802.11b WLAN MiniPCI Card
1. Insert the card into MiniPCI Slot.
2. Power on your computer and allow Windows to load fully.
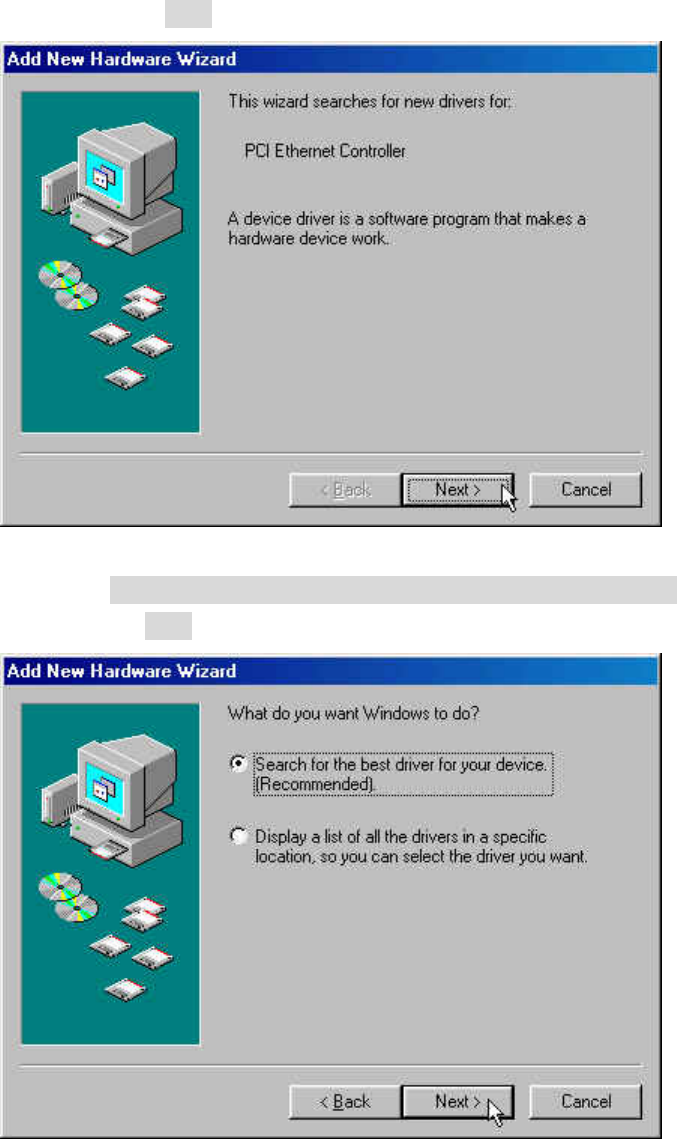
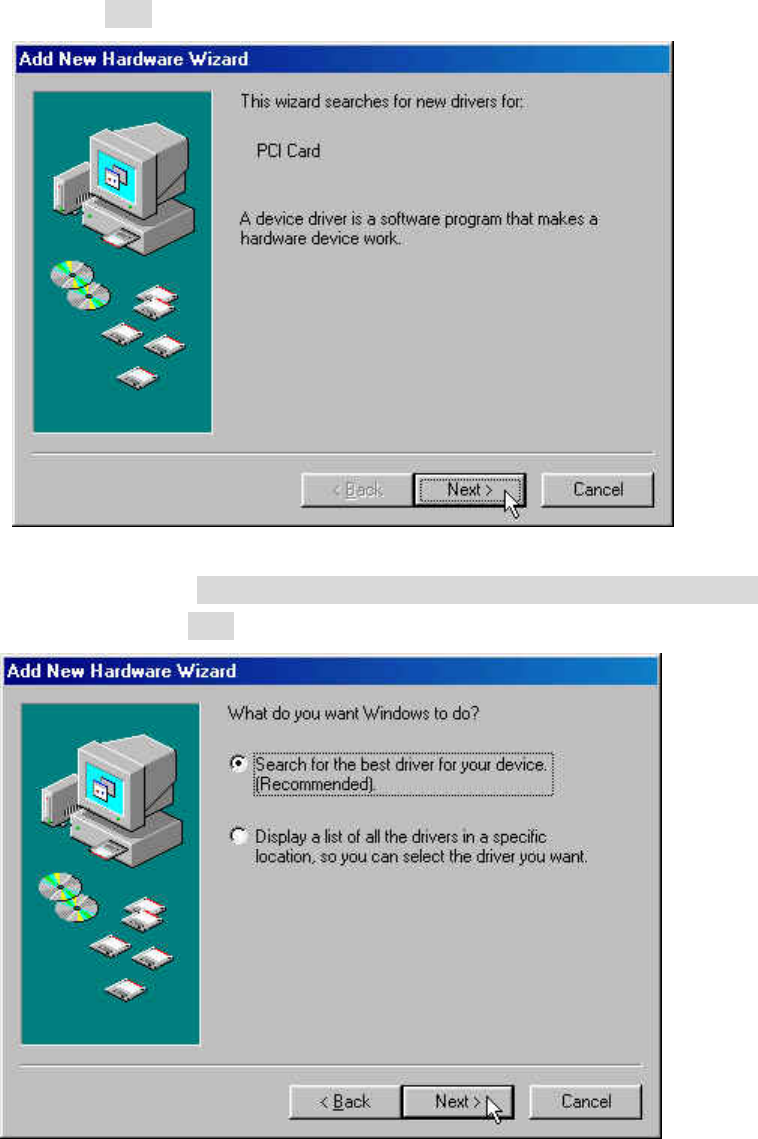
3. The Windows will detect your Mini-PCI card and show the following screen.
Please click Next
4. Select Search for the best driver for your device. (Recommended).
And click Next
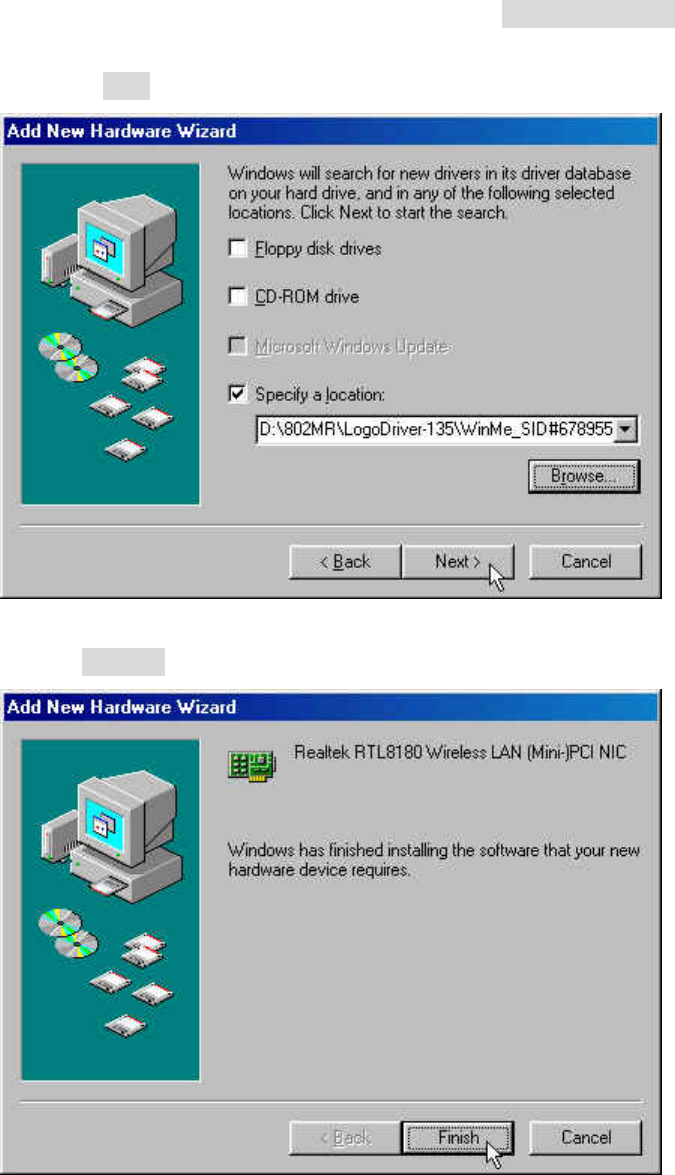
5. Insert the given Installation Diskette and select Specify a location to find out
your driver location.
Click Next to run setup.
6. Click Finished. The installation process are completely.
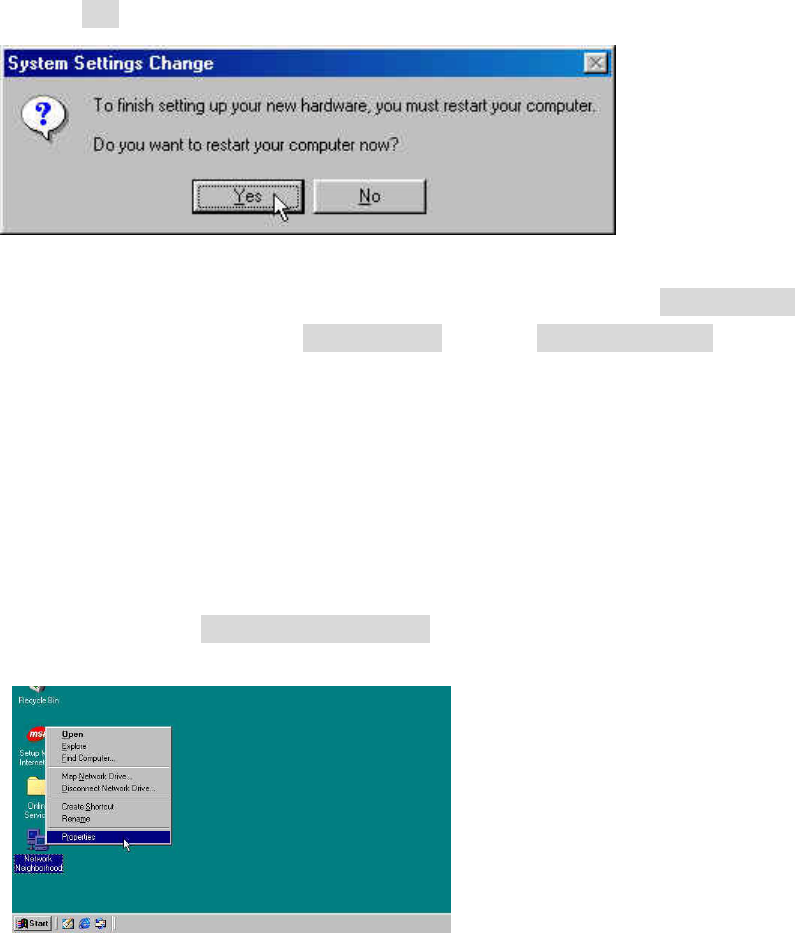
7. Click Yes to restart your computer.
8. Check for the 802.11b WLAN MiniPCI Card by right clicking on My Computer
using the mouse. Select the Device manager and then Network Adapters. If you
find the sign on the adapter, it shows the installation is not successful. If not, it means
your setup is successfully.
3.1 Install network protocol(s) required to communicate on
your network
9. Right click on the Network Neighborhood using the mouse.
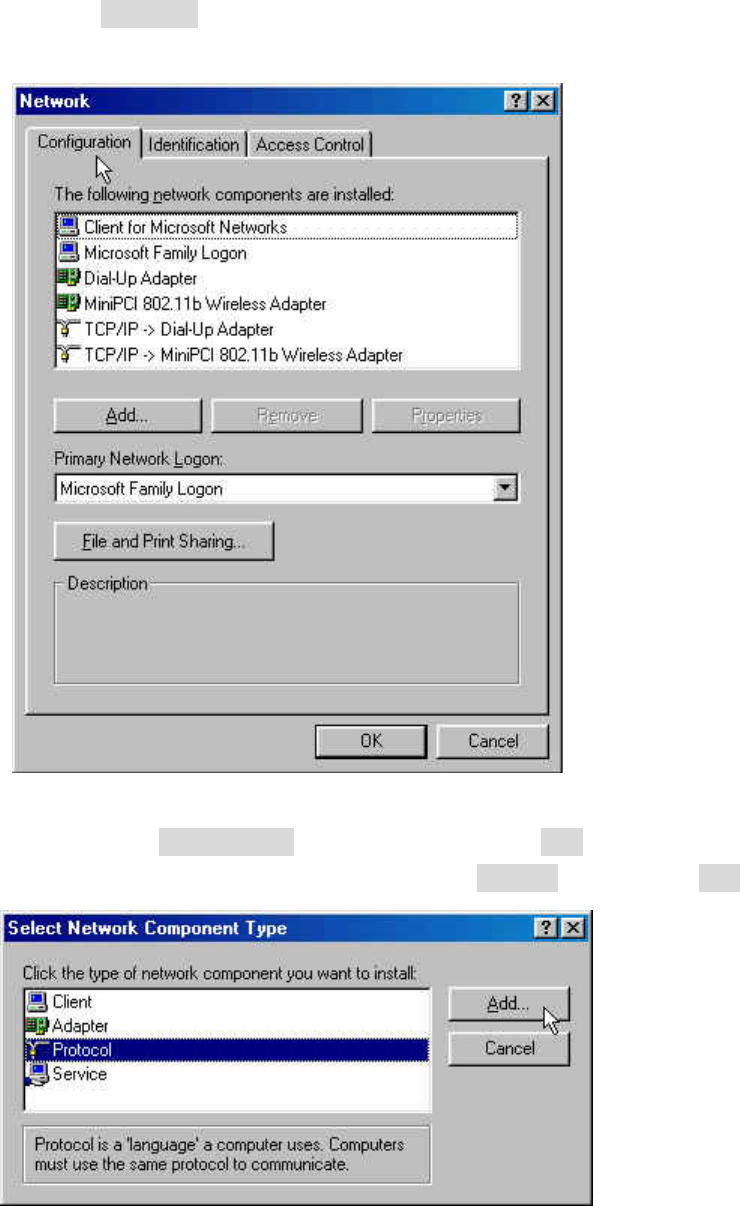
10. Select Properties from the pop up menu. The network box appears and you see
the three main tables: Configuration, Identification and Access control.
11. Click on the Configuration tab and then click on the Add button. Select Network
component Type Box appears. Click on the Protocol then click the Add Button
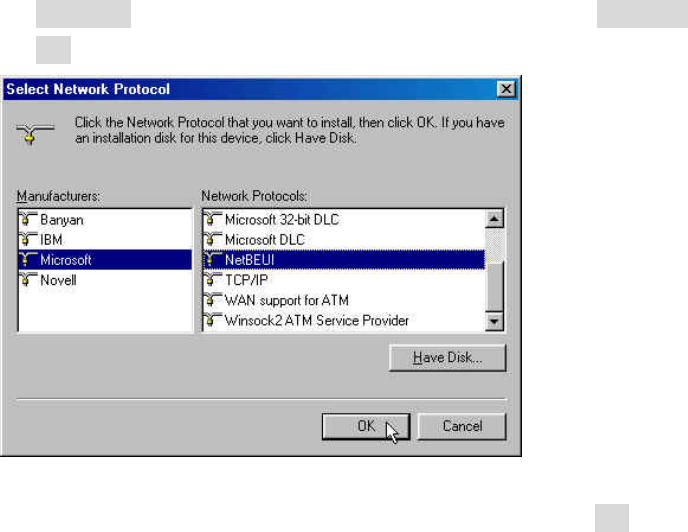
12. Select Network Protocols box appears. From the list of manufactures, Click on
Microsoft. From the list of network protocols list, select NetBEUI, then click
OK
13. The NetBEUI protocol is now installed. After clicking on OK return back to
Network Component Type box.
14. Repeat the Step 10 and 11 to add IPX/SPX protocol.
15. Repeat the step 10 and 11 to add TCP/IP protocol.
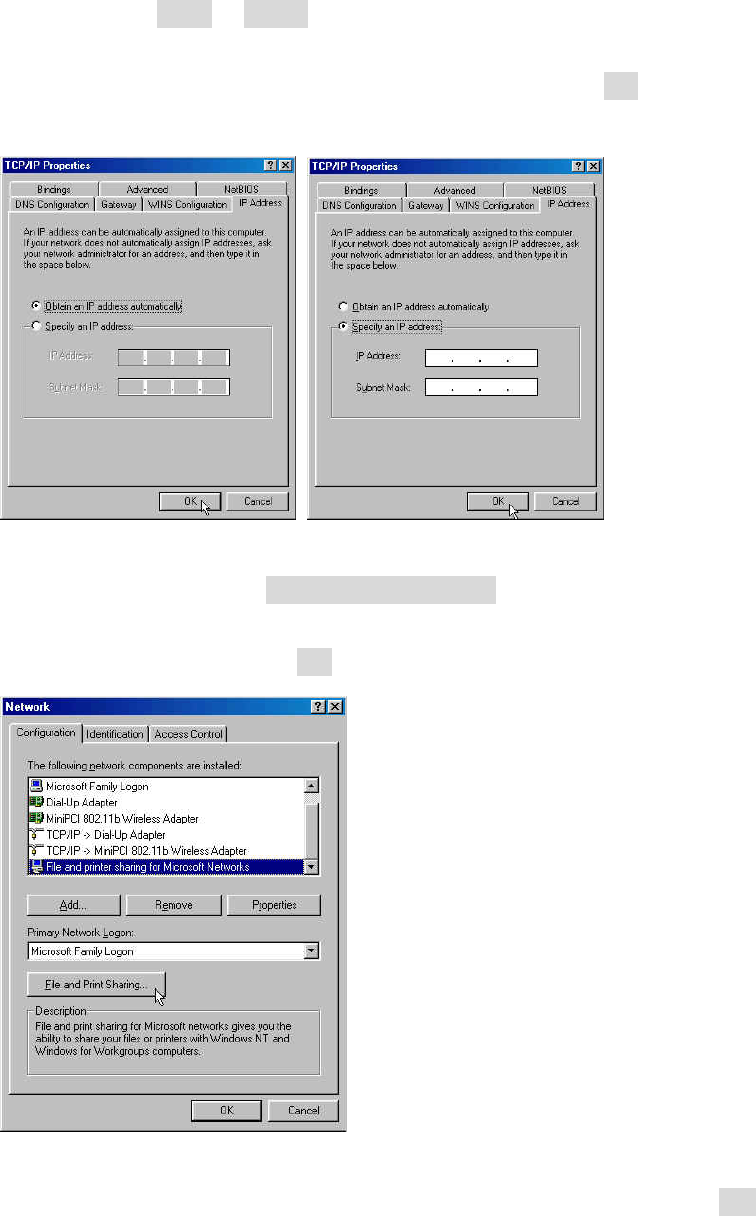
16. Click on TCP/IP option for setting the IP address for your computer. You can
select either Static or DHCP setting. If you use the static IP setup then enter the IP
value, Subnet masking, DNS, Domain/Workgroup name, and Gateway address
values. After setting these parameter appropriately, click OK to return to
Network component type.
17. Now you can select the File and Printer Sharing options as well as the Access to
your computer other users connected to the network by setting the computer
sharing Option. Click on OK
18. Screen message do want to restart your computer will pop up. Select Yes. It will
shut down your computer and will restart.
4. Installation Procedure of 56K Mini-PCI Fax Modem Card
1. Start Windows
2. Windows will immediately display the New Hardware Wizard and identify the
modem.
Click the Next button.
3. Select the option Search for the best driver for your device (Recommended)
and then click the Next button
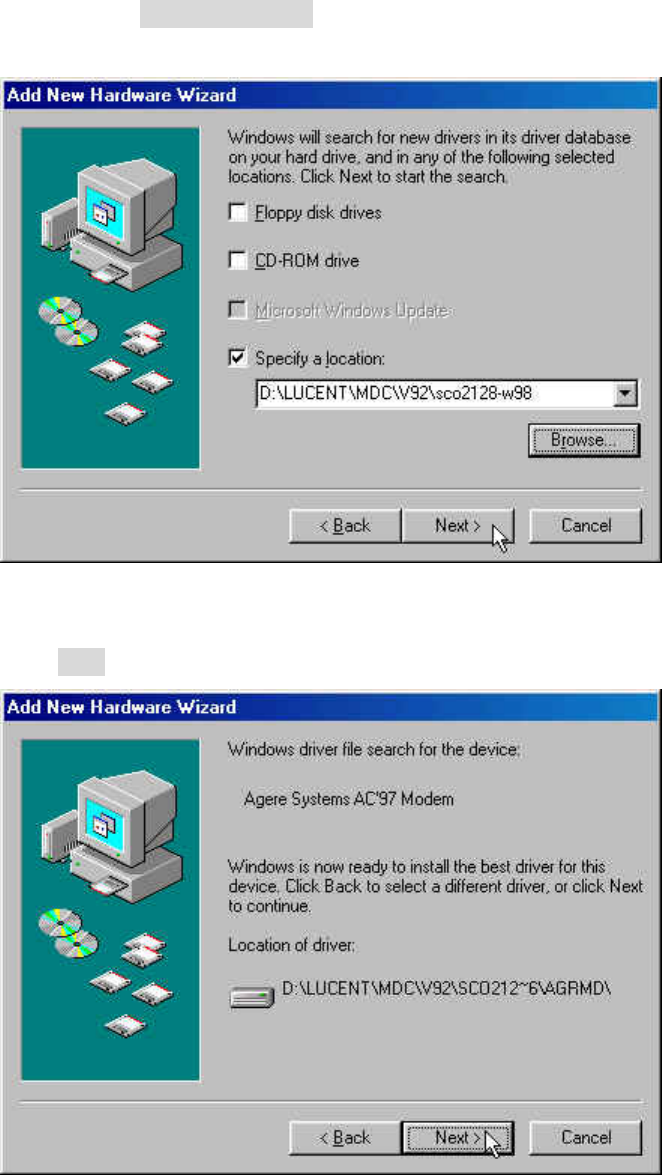
4. Please choose Specify a location & insert the installation disk into Floppy
or CD-ROM.
Windows will search for driver & display the following screen
Click Next button
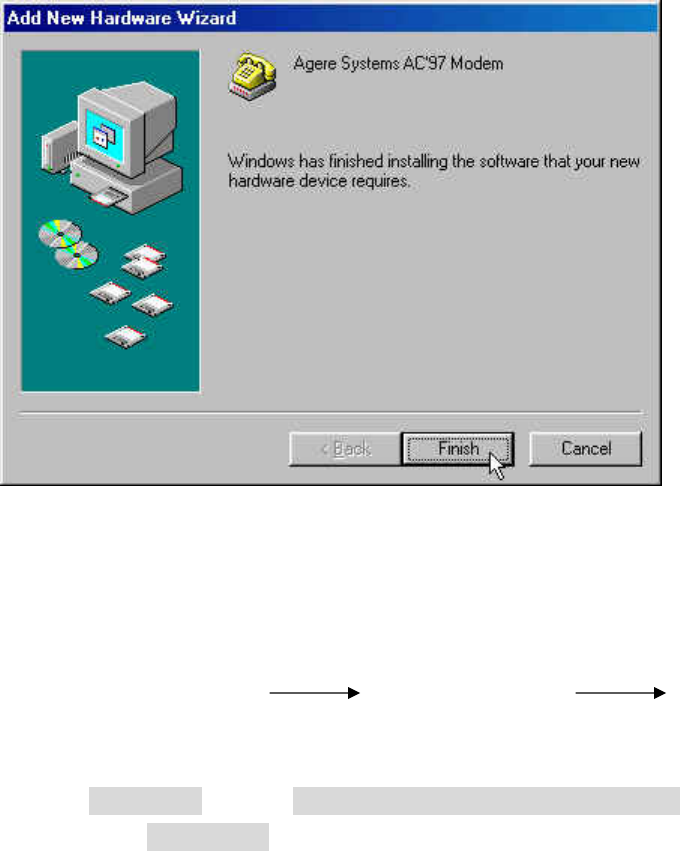
5. After the drivers are installed, click “Finish”
After Windows re-starts, you can check your modem by following instructions to
checking your 802MR if setup successfully.
6. Go to My Computer Control Panel Modem
The Modem Properties screen will be displayed.
7. Select Diagnostics , choose COM3 Agere systems AC97 Modem
and click on More Info…
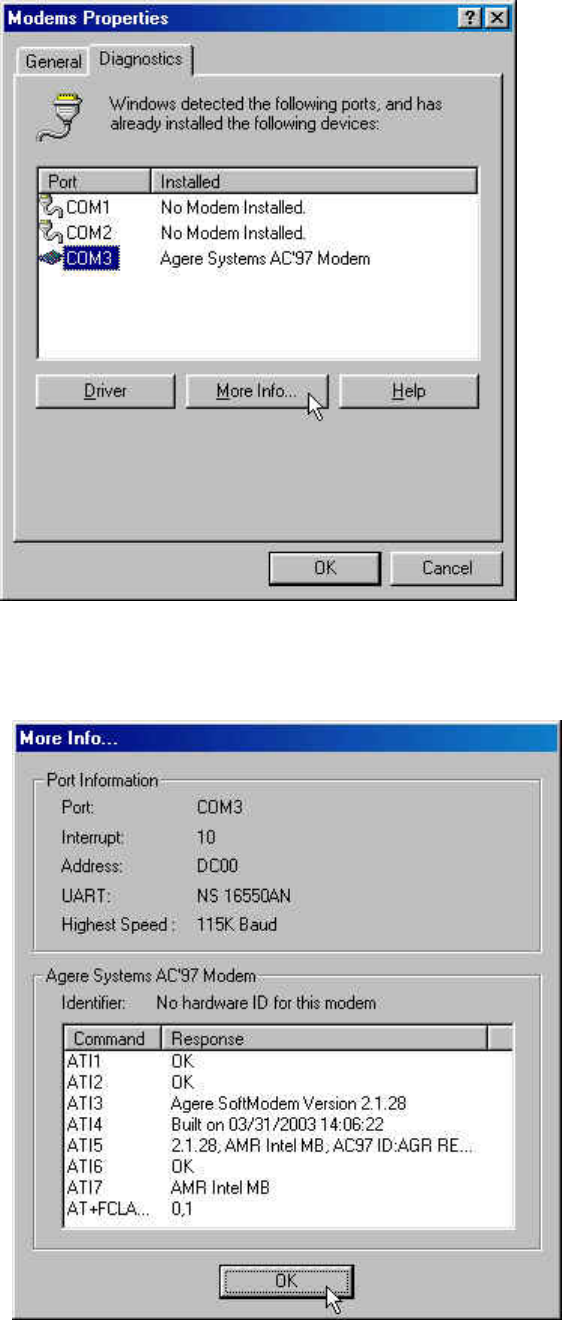
7. The Modem will respond to the following message as screen showed that means
your modem installed successfully.
Federal Communication Commission Interference Statement
This equipment has been tested and found to comply with the limits for a Class B digital device,
pursuant to Part 15 of the FCC Rules. These limits are designed to provide reasonable protection
against harmful interference in a residential installation. This equipment generates, uses and can
radiate radio frequency energy and, if not installed and used in accordance with the instructions,
may cause harmful interference to radio communications. However, there is no guarantee that
interference will not occur in a particular installation. If this equipment does cause harmful
interference to radio or television reception, which can be determined by turning the equipment
off and on, the user is encouraged to try to correct the interference by one of the following
measures:
- Reorient or relocate the receiving antenna.
- Increase the separation between the equipment and receiver.
- Connect the equipment into an outlet on a circuit different from that
to which the receiver is connected.
- Consult the dealer or an experienced radio/TV technician for help.
FCC Caution: Any changes or modifications not expressly approved by the party responsible for
compliance could void the user's authority to operate this equipment.
This device complies with Part 15 of the FCC Rules. Operation is subject to the following two
conditions: (1) This device may not cause harmful interference, and (2) this device must accept
any interference received, including interference that may cause undesired operation.
IMPORTANT NOTE:
FCC Radiation Exposure Statement:
This equipment complies with FCC radiation exposure limits set forth for an uncontrolled
environment.
This transmitter must not be co-located or operating in conjunction with any other antenna or
transmitter.

This device is intended only for OEM integrators under the following conditions:
1) The transmitter module may not be co-located with any other transmitter or antenna.
As long as conduction above is met, further transmitter test will not be required. However, the
OEM integrator is still responsible for testing their end-product for any additional compliance
requirements required with this module installed (for example, digital device emissions, PC
peripheral requirements, etc.).
IMPORTANT NOTE: In the event that these conditions can not be met (for example certain laptop
configurations or co-location with another transmitter), then the FCC authorization is no longer
considered valid and the FCC ID can not be used on the final product. In these circumstances, the
OEM integrator will be responsible for re-evaluating the end product (including the transmitter) and
obtaining a separate FCC authorization.
End Product Labeling
This device in the specific host in which it is installed and tested the ELITE G55X laptop. The final
end product must be labeled in a visible area with the following: “Contains TX FCC ID: QP7-
802MRE”.
Manual Information That Must be Included
The users manual for OEM integrators must include the following information in a prominent
location “ IMPORTANT NOTE: To comply with FCC RF exposure compliance requirements. The
antenna must not be co-located or operating in conjunction with any other antenna or transmitter.