Actiontec Electronics GT724WG ADSL/4 port Ethernet/USB/Wireless Gateway User Manual gt724wg manual draft 122906
Actiontec Electronics Inc ADSL/4 port Ethernet/USB/Wireless Gateway gt724wg manual draft 122906
UserManual.wiki
>
Actiontec Electronics
>
GT724WG User Manual
Manual
Navigation menu
Upload a User Manual
Namespaces
Wiki Guide
HTML
PDF
Info
Views
User Manual
Discussion / Help
Navigation


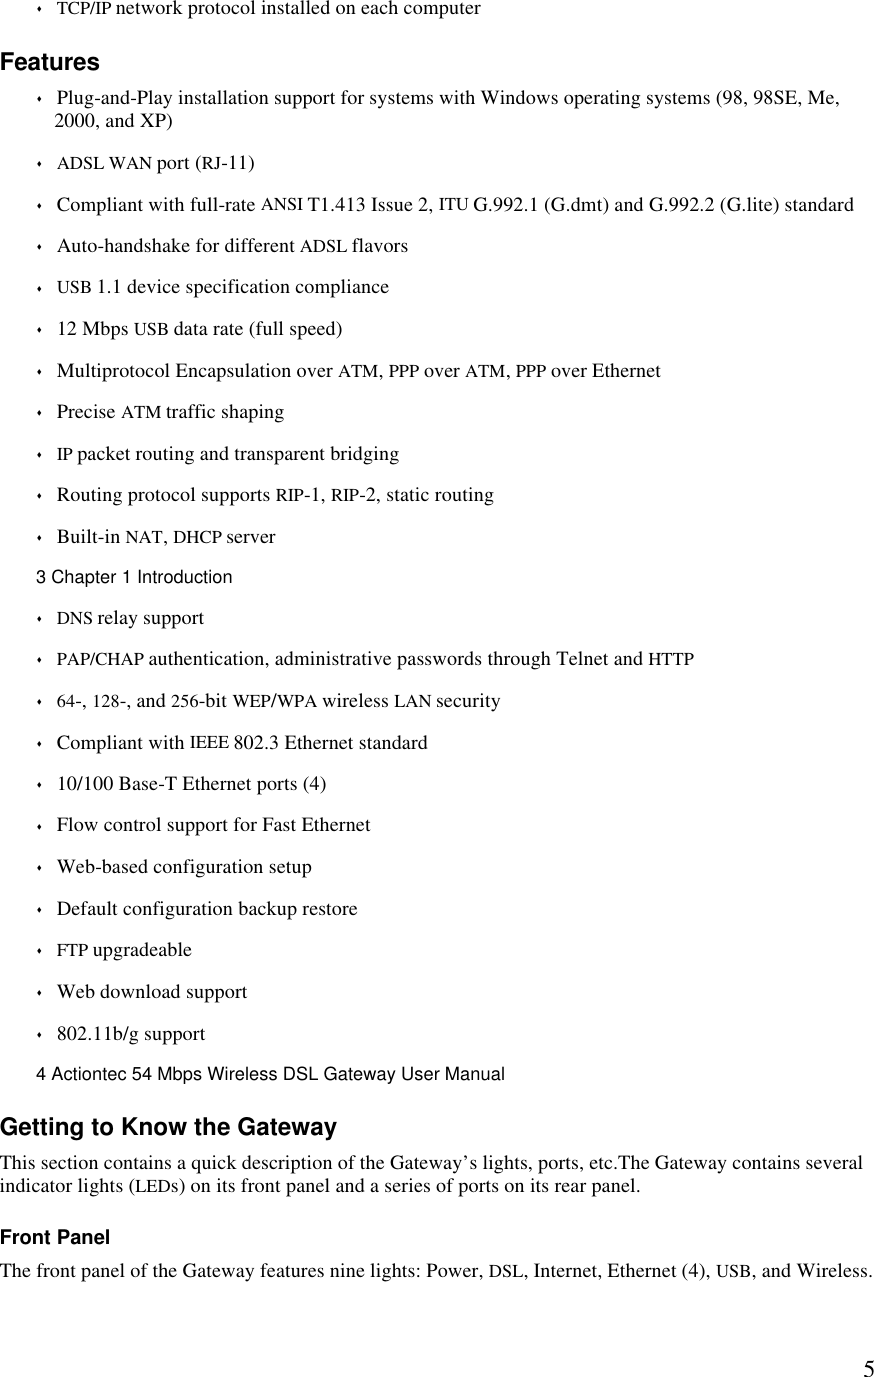
![6PowerDSLInternetEthernetUSBWirelessPowerDSLInternetEthernet1Wireless234USB1234 Power Light The Power light displays the Gateway’s current status. If the Power light glows steadily green, the Gateway is receiving power and fully operational. When the Power light flashes rapidly, the Gateway is initializing. If the Power light is not illuminated when the Power cord is plugged in and the Power switch is turned on, the Gateway has suffered a critical error and technical support should be contacted. DSL Light The DSL light illuminates when the Gateway is connected to a DSL (Digital Subscriber Line) line. When it flashes, the Gateway’s built-in DSL modem is training for DSL service.5 Chapter 1 Introduction Internet Light When the Internet light glows steadily, the Gateway is connected to the DSL provider. Ethernet Lights The Ethernet lights illuminate when the Gateway is connected via one or more of its Ethernet ports. USB Light The USB light illuminates when the Gateway is connected via its USB port. Wireless Light The Wireless light illuminates when the Gateway is activated for wireless use. Rear Panel The rear panel of the Gateway contains seven ports (Ethernet [4], Phone, USB, and Power), as well as Reset and Power switches. PowerUSBEthernet 4ResetPhoneEthernet 3Ethernet 2Ethernet 1 Phone Port The Phone port is used to connect the Gateway to a DSL connection.6 Actiontec 54 Mbps Wireless DSL Gateway User Manual USB Port The USB port is used to connect a computer to the Gateway via USB cable. Ethernet Ports The Ethernet ports are used to connect computers to the Gateway via Ethernet cable. The Ethernet ports are 10/100 Mbps auto-sensing ports, and either a straight-through or crossover Ethernet cable can be used when connecting to the ports. Reset Switch Depressing the Reset switch for one or two seconds will power cycle the Gateway (similar to unplugging and then plugging in the Gateway’s Power cord). To restore the Gateway’s factory default settings, depress and hold the Reset switch for approximately 10 seconds. The reset process will start about 10 seconds after releasing the switch.](https://usermanual.wiki/Actiontec-Electronics/GT724WG/User-Guide-746835-Page-6.png)