Activision Publishing 83787505 DONGLE FOR Wii"TONY HAWK:RIDE" SKATEBOARD CONTROLLER User Manual TH Ride TRI Wii Front and Back ai
Activision Publishing, Inc. DONGLE FOR Wii"TONY HAWK:RIDE" SKATEBOARD CONTROLLER TH Ride TRI Wii Front and Back ai
Users Manual
TITLE: Tony Hawk Ride Quick Start Guide
15-5/16” X 21-3/4” (15.3125” x 21.75”)
DATE: 3/17/09 DIE NUMBER: GH_QuickStart_F18
Back
Front
7-1/4”
7.25”
184.151mm
7-1/4”
7.25”
184.151mm
7-1/4”
7.25”
184.151mm
5-1/8”
5.125”
130.176mm
5-1/8”
5.125”
130.176mm
5-1/16”
5.0625”
128.588mm
Front View
Inside dotted lines are fold lines.
Inside white spaces are safety areas.
Outside solid lines are trim lines.
Outside dotted lines are bleed lines.
TITLE: Guitar Hero Quick Start Guide
15-5/16” X 21-3/4” (15.3125” x 21.75”)
DATE: 3/17/09 DIE NUMBER: GH_QuickStart_F18
Back
Front
7-1/4”
7.25”
184.151mm
7-1/4”
7.25”
184.151mm
7-1/4”
7.25”
184.151mm
5-1/8”
5.125”
130.176mm
5-1/8”
5.125”
130.176mm
5-1/16”
5.0625”
128.588mm
Back View
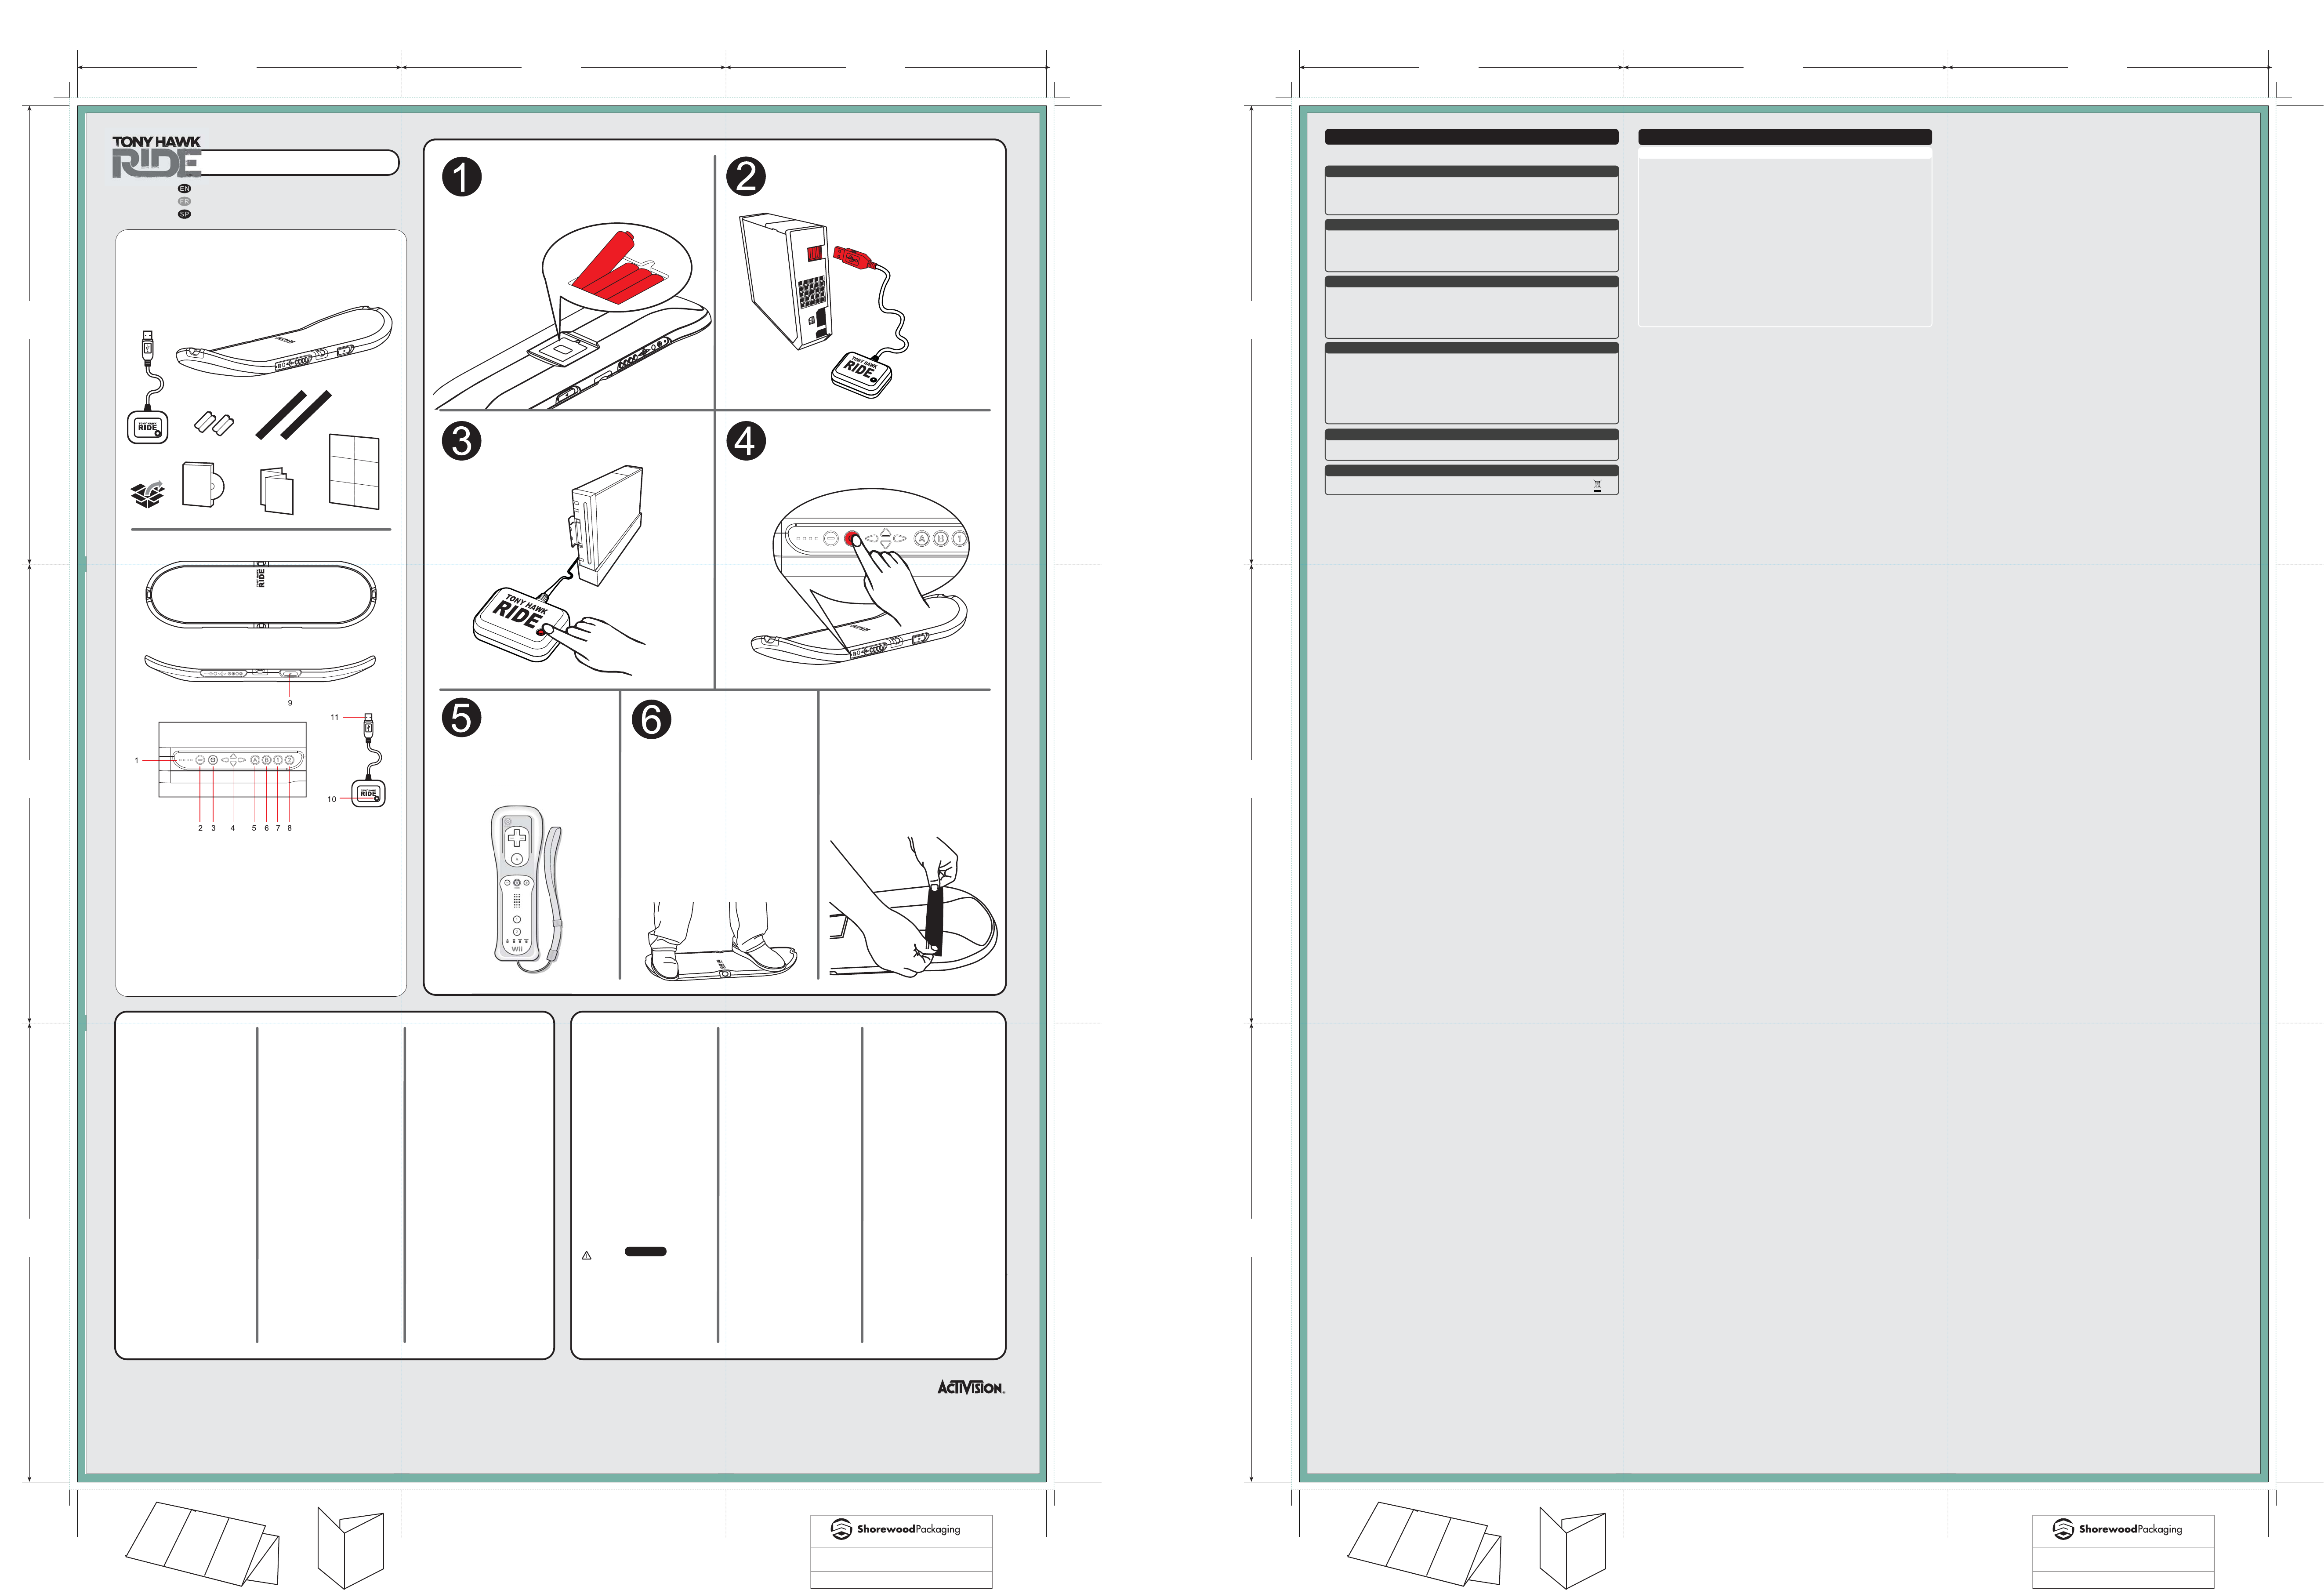
Install the batteries
Installer les piles
Coloca las pilas
Note: Opening the battery
compartment requires one (1)
Phillips head screwdriver
1. LEDs
2. - Button
3. Power Button
4. D Pad
5. A Button
6. B Button
7. 1 Button
8. 2 Button
9. + Button
Wireless receiver
10. Connect Button and receiver
status light
11. USB connector
Press Connect Button on the receiver
French
Spanish
Turn ON the Wii™ console. Before inserting
the game disc, plug in the receiver to the
USB port and make sure skateboard control-
ler connects to the receiver
French
Spanish
Press the Power Button on the skateboard controller
French
Spanish
The Wii Remote™ can
be used for navigating menu
screens. The skateboard
controller can be used to
navigate the in-game Pause
menu (see software manual
for details)
French
Spanish
For troubleshooting information, please refer to the manuals included
with the product, or go to http://warranty.thride.com
Pour tout dépannage, consultez le manuel d’instructions ou visitez
le site : http://warranty.thride.com
Para obtener información sobre la resolución de problemas, consulta el
manual de instrucciones o visita: http://warranty.thride.com
© 2009 Activision Publishing, Inc. Activision is a registered trademark and RIDE is a
trademark of Activision Publishing, Inc. All rights reserved. Tony Hawk is a registered
trademark of Tony Hawk, Inc. All rights reserved.
Hardware Manual • FRENCH
SPANISH
Important! Before using the Wii™ console
with this product, read the Wii™ console
instruction manual for safety, health and
other information regarding the use of the
Wii™ console.
Important! Before using the PLAYSTATION®3
system with this product, read the
PLAYSTATION®3 system instruction manual
for safety, health and other information
regarding the use of the PLAYSTATION®3.
Important! Before using the PLAYSTATION®3
system with this product, read the
PLAYSTATION®3 system instruction manual
for safety, health and other information
regarding the use of the PLAYSTATION®3.
Wireless Controller for Wii™
Manette sans l pour Wii™
Controlador inalámbrico para Wii™
FPO
Wii™ SKATEBOARD
CONTROLLER INSTRUCTIONS
1. Install four new alkaline batteries into skateboard
controller. Notice the four blue LEDs on the side of board
will begin blinking. This indicates the skateboard controller
is searching for a paired receiver dongle.
2. Plug in the dongle into the USB port of the Wii™
console. Once it is recognized by the system, the red LED
on the dongle will start blinking. This indicates the dongle
is searching for the paired skateboard controller.
3. If the four LEDs on the skateboard turn o, press the
Power Button once to turn on the skateboard controller.
After the skateboard controller connects with the dongle,
only one LED will stay lit. This LED indicates which
skateboard controller port you are using (1–4).
4. After booting up the game, you can use the Wii Remote™
to navigate the main menus and select options.
5. Once you start a game session, use the skateboard
controller to play the game. You can also use the
skateboard controller to navigate the in-game Pause
menu.
Auto Sleep Mode
1. If the connection with the skateboard controller is lost
for more than 30 seconds, it will enter sleep mode. Press
the Power Button on the side of board to turn the board
back on.
2. If no button is pressed or there is no movement
of the board within 15 minutes, the skateboard controller
will enter sleep mode. Press the Power Button to turn it
back on.
Re-Matching Dongle with Skateboard Controller
The dongle included in this package is already paired
with the skateboard controller. In the event you need to
pair a new dongle to the skateboard controller, please
follow these steps:
1. Plug new dongle into system and make sure the LED on
it is blinking.
2. Press and HOLD the Power Button for more than 5
seconds. The four LEDs will blink fast, indicating you are
in pairing mode.
3. Press the Connect Button on the dongle once. The LED
on the dongle will blink fast to indicate that it is in pairing
mode.
4. After a few moments, the LEDs on both the dongle
and skateboard controller will stop blinking and remain
steady, indicating that they have successfully been paired.
Battery Low
If one of the LEDs on the skateboard controller begins
blinking while the skateboard controller is on and paired,
this indicates that your batteries are getting low. Please
replace the batteries in the skateboard controller as soon
as possible.
PLAYSTATION®3 system
USE INSTRUCTIONS
IMPORTANT! For proper use and to avoid injury, read and
follow the important safety instructions in this hardware
manual and the software manual.
Maximum weight limit is 300 lbs. Use only while wearing
comfortable, at, rubber soled shoes, such as sneakers. Do not
wear shoes with heels, ip-ops or open toed shoes. Wear
comfortable clothing while using the skateboard controller.
Avoid clothing that limits your range of motion or overly baggy
clothing that may get caught on the skateboard controller.
IMPORTANT! Place the skateboard controller on a at,
horizontal and stable surface for gameplay. For safety and to
prevent marks on your oor, use indoors on a carpeted surface
only. However, for households without carpet or if you are
using the skateboard controller on a non-carpeted surface,
attach the enclosed stickers to the skateboard controller in
accordance with the instructions in this manual to reduce
potential slippage and marks to your oor. If the skateboard
controller leaves a mark on your oor, try wiping the mark with
a wet sponge. If your stickers need to be replaced, try your
local hardware store.
Make sure to clear enough space around you before playing.
Do not jump on, use excessive force on, or try to grab the
skateboard controller during gameplay. Never try to push the
buttons on the side of the skateboard controller with your
hands while you are standing on it.
Do not attempt to perform 360’s or other skateboard tricks on
the skateboard controller. Players should not attempt to
perform moves other than those depicted in the game.
Watch your balance, and make sure the skateboard controller is
lying at when you use it - do not stand the skateboard
controller on its edge.
After you are nished using the skateboard controller, put it
away in a safe place so that people will not trip over it.
Avoid excessive play. If your hands, wrists, arms, legs, feet or
eyes become tired or sore while playing, stop and rest them for
several hours before playing again.
Take frequent breaks to avoid any discomfort or cramping in
your hands, legs or feet.
If you experience discomfort or cramping in your hands, legs or
feet, try dierent play styles to nd the one most comfortable
for you.
WARNINGS
CAUTION:
This product requires physical movement, and the skateboard
controller moves when used.
You should not play if you have a medical condition that might
impact your ability to use the skateboard controller (this may
include heart, respiratory, or orthopedic conditions; high blood
pressure; symptoms linked to epilepsy or seizures; or
pregnancy).
If you have any doubts, consult with a physician.
The skateboard controller is not a skateboard. It is not intended
for any use other than in connection with the Tony Hawk: RIDE
software.
Do not use the skateboard controller with any other software
or game.
Not for use for ages under 10.
French Spanish
French
Spanish
French Spanish
CUSTOMER SUPPORT | LIMITED HARDWARE WARRANTY
Thank you for purchasing the Tony Hawk: RIDE skateboard controller. For your personal safety and the safety of others, please
carefully read this hardware manual before using the product.
WIRELESS CONTROLLER INSTRUCTION MANUAL ENGLISH
SKATEBOARD CONTROLLER CARE
(1) Keep the skateboard controller dry and away from open ames or other heat sources. (2) Do not leave the skateboard controller in a dusty or humid
place. (3) Do not modify or disassemble the skateboard controller under any circumstances. (4) Never jump on, use excessive force on, or try to grab the
skateboard controller during gameplay. Never try to push the buttons on the side of the skateboard controller with your hands while you are standing on
it. (5) Use a dry cloth to clean the skateboard controller, never use chemicals. (6) Use the skateboard controller only with the appropriate gaming system
for which it was designed. (7) Regularly inspect the skateboard controller. (8) If the skateboard controller functions in an unusual manner or produces
smoke, immediately stop use and turn o the power.
TROUBLESHOOTING
If you encounter problems, try the possible solutions provided below.
(1) Make sure the skateboard controller is wirelessly connected to the console. Refer to the instructions on the other side of this hardware manual. (2) Move
the skateboard controller closer to the console. (3) Check that the batteries still have some charge. (4) Keep the console and skateboard controller at least
two feet away from large metal objects. (5) Make sure the front of the console is positioned in the direction of the skateboard controller. (6) Cordless
phones (2.4GHz), wireless LANs, microwave ovens and some cell phones can cause interference. Turn these products o or unplug and try reconnecting
the skateboard controller.
If none of these solutions work, turn the console o, remove and reinsert the batteries into the skateboard controller and repeat the steps for connecting
the skateboard controller to the console.
BATTERY SAFETY
Incorrect use of batteries may result in battery leakage, overheating or explosion. When using batteries, be sure to follow these instructions:
(1) Make sure the positive (+) and negative (-) ends of the batteries are inserted in the correct directions. (2) Keep batteries out of reach of children. (3) Do
not mix old and new or dierent types of batteries. Use only appropriate sized batteries. (4) Do not attempt to recharge non-rechargeable type batteries.
(5) Remove the batteries when the product will not be used for an extended period of time. (6) If the battery has leaked, be sure to carefully remove all uid
with a paper towel before inserting new batteries. Take care to keep all leaked uid from touching your skin or clothes. If uid comes into contact with the
skin, ush with water immediately. (7) Dispose of batteries in accordance with local and national disposal regulations.
FCC INFORMATION FOR THE CONSUMER
This equipment has been tested and found to comply with the limits for a Class B digital device, pursuant to part 15 of the FCC Rules. These limits are
designed to provide reasonable protection against harmful interference in a residential installation. This equipment generates, uses, and can radiate radio
frequency energy and, if not installed and used in accordance with the instructions, may cause harmful interference to radio communications. However,
there is no guarantee that interference will not occur in a particular installation. If this equipment does cause harmful interference to radio or television
reception, which can be determined by turning the equipment o and on, the user is encouraged to try to correct the interference by one or more of the
following measures:
(1) Reorient or relocate the receiving antenna. (2) Increase the separation between the equipment and receiver. (3) Connect the equipment into an outlet
on a circuit dierent from that to which the receiver is connected. (4) Consult the dealer or an experienced radio/TV technician for help.
NOTE: Changes or modications not expressly approved by Activision could void the user’s authority to operate the equipment.
This device complies with Part 15 of the FCC Rules. Operation is subject to the following two conditions: (1) this device may not cause harmful interference,
and (2) this device must accept any interference received, including interference that may cause undesired operation.
IC INFORMATION FOR THE CONSUMER
This device complies with RSS 210 of Industry Canada (IC). Operation is subject to the following two conditions: (1) this device may not cause interference,
and (2) this device must accept any interference, including interference that may cause undesired operation of this device.
This Class B digital apparatus complies with Canadian ICES-003. Cet appareil numérique de la classe B est conforme à la norme NMB-003 du Canada.
PRODUCT DISPOSAL INFORMATION
Dispose of this product in accordance with local and national disposal regulations (if any), including those governing the
recovery and recycling of waste electrical and electronic equipment (WEEE).
LIMITED HARDWARE WARRANTY
Activision warrants to the original consumer purchaser of this hardware or accessories (collectively, the “Hardware”) that the Hardware will be free from
defects in material and workmanship for 90 days from the date of purchase. If the purchaser nds the Hardware defective within 90 days of original
purchase, Activision agrees to replace, free of charge, such Hardware discovered to be defective within such period as long as the Hardware is still being
manufactured by Activision. In the event that the Hardware is no longer available, Activision retains the right to substitute a similar product of equal or
greater value. Any replacement Hardware will be new or refurbished or serviceably used, at Activision’s option, and comparable in function and
performance to the original Hardware. This warranty is limited to the Hardware as originally provided by Activision and is not applicable to normal wear
and tear. This warranty shall not be applicable and shall be void if the defect has arisen through abuse, mistreatment, or neglect.
This remedy is the purchaser’s sole, exclusive remedy, and is in lieu of all other express warranties. Any implied warranties on this product prescribed by
statute, including but not limited to an implied warranty of merchantability or tness for a particular purpose, are expressly limited in duration to the
90-day period described above. Activision reserves the right to modify this warranty prospectively at any time and from time to time in our sole discretion.
When returning any Hardware for warranty replacement, please visit http://warranty.thride.com for information on initiating and completing the
warranty replacement process. For all warranty replacements, send the battery cover to the Hardware (i.e., do not send the entire skateboard controller)
with suitable protective packaging (e.g., bubble wrap or other cushioned packaging), and include: (1) a photocopy of your dated sales receipt; (2) your
name and return address typed or clearly printed; and (3) your Return Materials Authorization (“RMA”) number or other information provided to you from
our warranty system (if you have initiated a claim via such system).
NOTE: Certied mail is recommended.
For customers in North America: Send warranty replacement claims to Activision Hardware Warranty Warehouse, Attention: Returns, 7800 The Blus,
Suite C, Austell, GA 30168.
LIMITATION ON DAMAGES. IN NO EVENT WILL ACTIVISION BE LIABLE FOR SPECIAL, INCIDENTAL, OR CONSEQUENTIAL DAMAGES BASED UPON BREACH OF
WARRANTY, BREACH OF CONTRACT, NEGLIGENCE, STRICT TORT, OR ANY OTHER LEGAL THEORY. SUCH DAMAGES INCLUDE, BUT ARE NOT LIMITED TO, LOSS
OF PROFITS, LOSS OF SAVINGS OR REVENUE, LOSS OF USE OF THE HARDWARE OR ANY ASSOCIATED EQUIPMENT, COST OF ANY SUBSTITUTE EQUIPMENT,
CLAIMS OF THIRD PARTIES, INJURY TO PROPERTY, AND LOSS OF GOODWILL. SOME STATES/COUNTRIES DO NOT ALLOW (1) THE EXCLUSION OR LIMITATION
OF INCIDENTAL OR CONSEQUENTIAL DAMAGES, OR (2) LIMITATIONS ON HOW LONG AN IMPLIED WARRANTY LASTS SO THE ABOVE LIMITATIONS AND/OR
EXCLUSION OR LIMITATION OF LIABILITY MAY NOT APPLY TO YOU. THIS WARRANTY GIVES YOU SPECIFIC LEGAL RIGHTS, AND YOU MAY HAVE OTHER RIGHTS
WHICH VARY FROM JURISDICTION TO JURISDICTION.
ENGLISH
p
Wi
®
™
Position skateboard controller on oor
pointed toward the TV. Stand on top of the
skateboard controller and comfortably
position feet so that the Tony Hawk®: RIDE™
logo is in front of you as seen in the image
below. Make sure there is at least 4 feet of
clearance around the skateboard controller.
Refer to the software manual for further instructions on
alternate playing positions.
Now… get ready to RIDE!
For use on non-carpeted surfaces, apply the provided
protective stickers to the bottom of skateboard
controller as shown
PRT-0000.268.US