Ademco 50052667 Thermostat User Manual manual
Honeywell International Inc Thermostat manual
Ademco >
manual
EConnect™ TL9160AR
Wireless Programmable/Non-programmable Thermostat
Français : voir la page 25 • Español : vea la página 49
Operating Manual
69-2475EFS (Honeywell YTL9160 Operating Manual).book Page 1 Friday, June 17, 2011 3:34 PM
Do you know your thermostat configuration?
To know whether your new thermostat is configured in
programmable mode or non-programmable mode, look
for the time and day display on the thermostat screen. If
the time and day appear on the screen, the thermostat
is configured as a programmable thermostat.
Refer to the table of contents on the next page for
sections that apply to your thermostat configuration.
Before you begin
Need Help?
For assistance with this product please visit http://yourhome.honeywell.com
or call Honeywell Customer Care toll-free at 1-800-468-1502.
69-2475EFS (Honeywell YTL9160 Operating Manual).book Page 2 Friday, June 17, 2011 3:34 PM

EConnect™ Wireless Programmable/Non-programmable Thermostat TL9160AR
3
Table of contents Français : voir la page 25 • Español : vea la página 49
Non-programmable
configuration Programmable
configuration
Basic operation
Thermostat display in non-programmable mode........................4
Setting the temperature..............................................................5
Countdown mode .......................................................................6
Programmable mode
Thermostat display in programmable mode ...............................8
Following the heating schedule..................................................9
Setting the time and the date ...................................................10
Modifying the heating schedule................................................12
Temporary Hold ........................................................................14
Permanent Hold .......................................................................15
Copying the heating schedule ..................................................16
Appendices
Advanced setup........................................................................18
Replacing the batteries.............................................................20
In case of difficulty....................................................................21
Three-year limited warranty......................................................22
Regulatory information .............................................................23
69-2475EFS (Honeywell YTL9160 Operating Manual).book Page 3 Friday, June 17, 2011 3:34 PM
Operating Manual
4
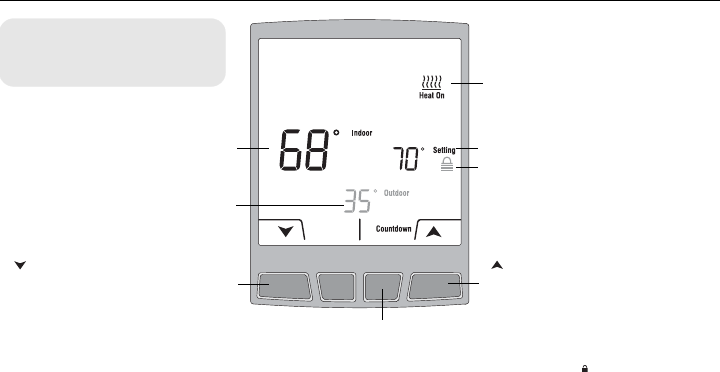
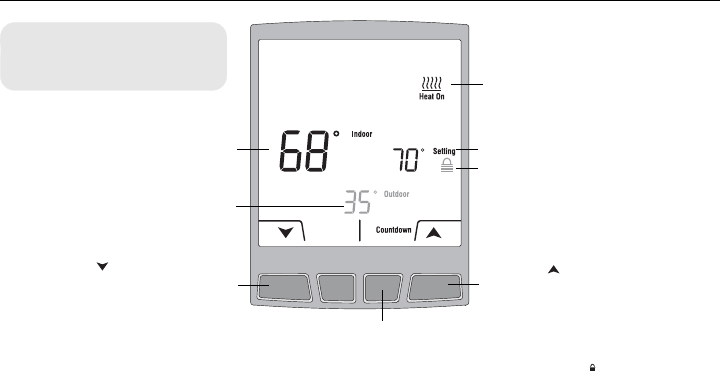
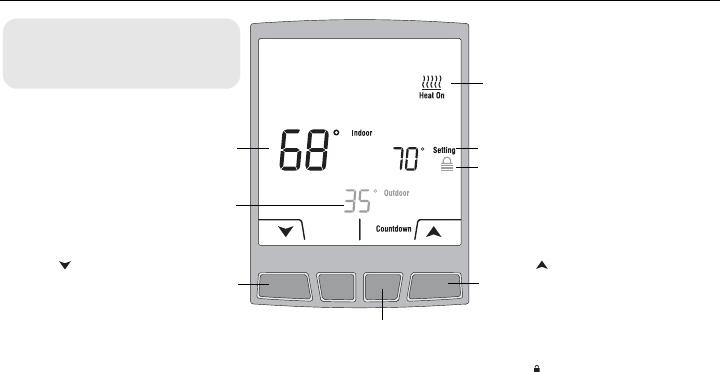
Thermostat display in non-programmable mode
Indoor temperature
(room temperature)
button
Press to decrease the temperature.
Countdown button
Press to place in countdown mode (see page 6).
Does not appear if the thermostat is locked ( ).
button
Press to increase the temperature.
Set temperature
Heating Indicator
The number of flames depends on
the heating intensity. The image
disappears when heating stops.
Outdoor temperature
(requires outdoor sensor)
Lock
The thermostat settings are totally
or partially locked. See installation
guide for details.
If your thermostat is configured
in programmable mode, see
more description on page 8.
69-2475EFS (Honeywell YTL9160 Operating Manual).book Page 4 Friday, June 17, 2011 3:34 PM
EConnect™ Wireless Programmable/Non-programmable Thermostat TL9160AR
5
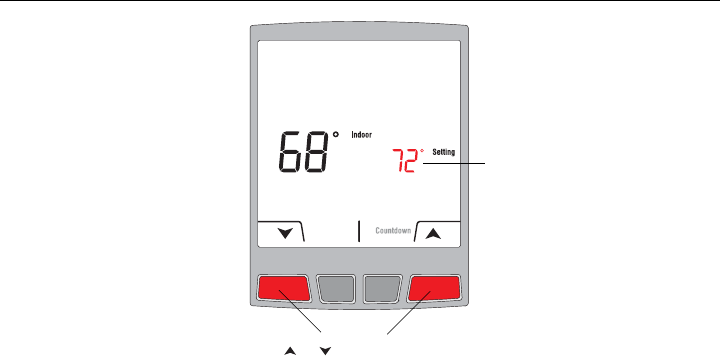
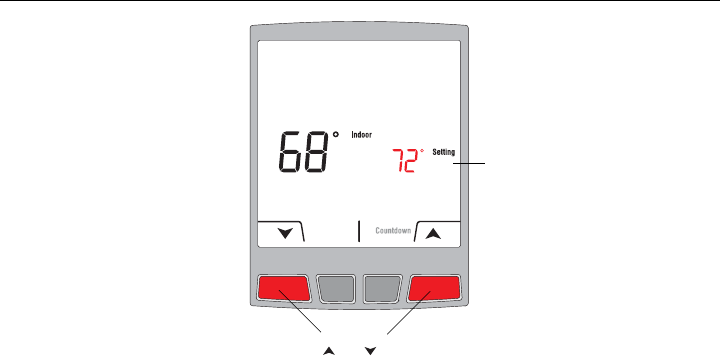
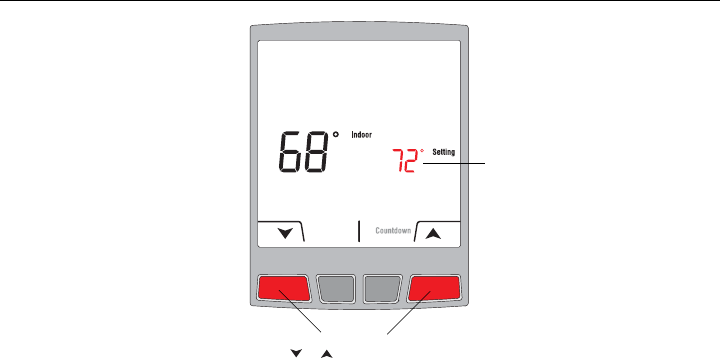
Setting the temperature
Press or to set the temperature.
Set temperature
69-2475EFS (Honeywell YTL9160 Operating Manual).book Page 5 Friday, June 17, 2011 3:34 PM
Operating Manual
6
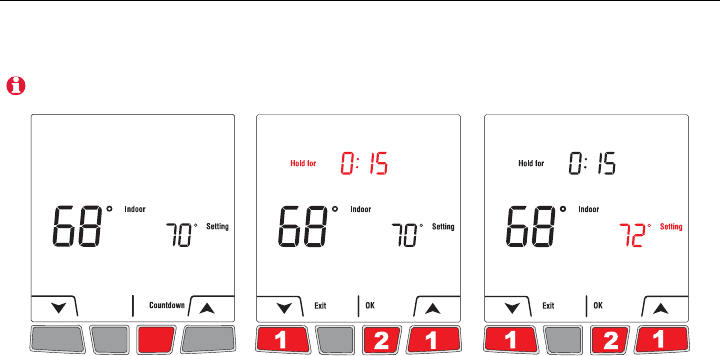
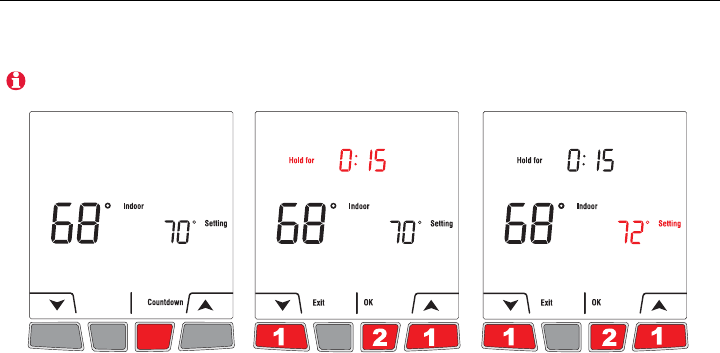
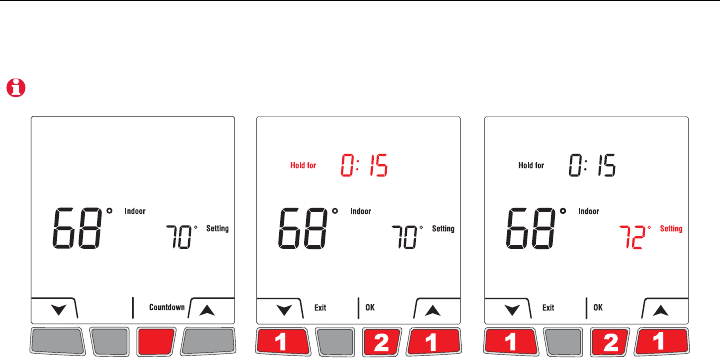
Press Countdown to set a new temperature and to select the time you wish to hold this temperature
setting. The thermostat will return to its previous or programmed temperature setting at the end of the
countdown time. The countdown time is selectable from 15 minutes to 14 days.
Countdown mode
The Countdown mode is not available when the thermostat is locked.
Press Countdown.Select the countdown time. Set the temperature.
69-2475EFS (Honeywell YTL9160 Operating Manual).book Page 6 Friday, June 17, 2011 3:34 PM
EConnect™ Wireless Programmable/Non-programmable Thermostat TL9160AR
7
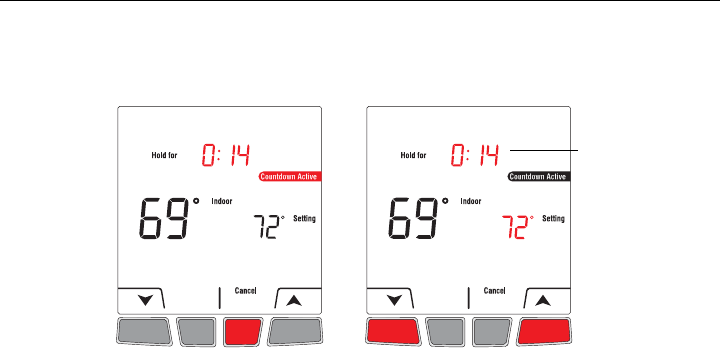
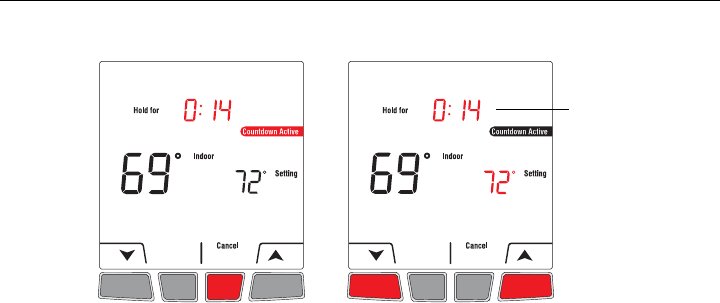
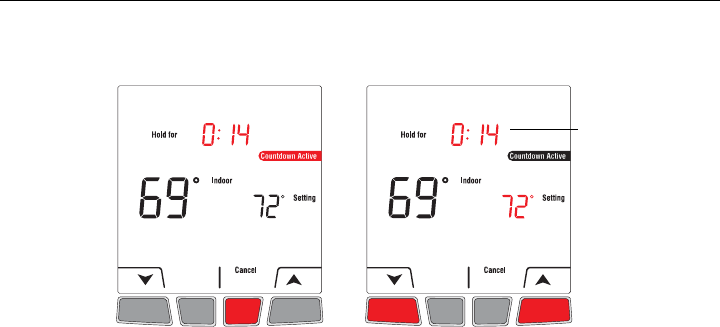
Countdown mode (cont’d)
The countdown
time changes in
real time to show
the remaining time.
You can change the countdown
time and temperature any time.
Press Cancel any time to
cancel the Countdown mode.
69-2475EFS (Honeywell YTL9160 Operating Manual).book Page 7 Friday, June 17, 2011 3:34 PM
Operating Manual
8
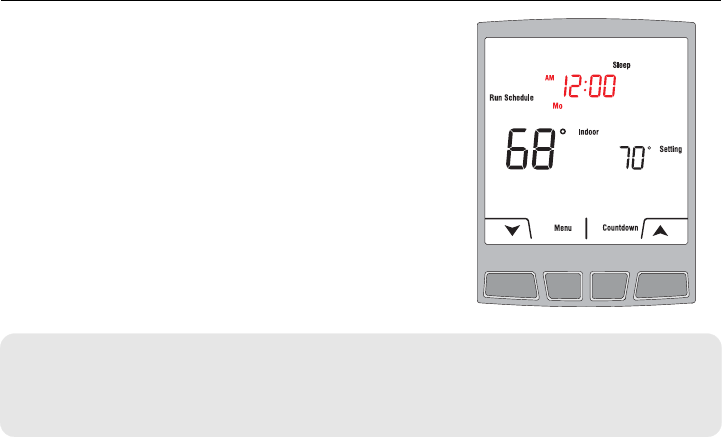
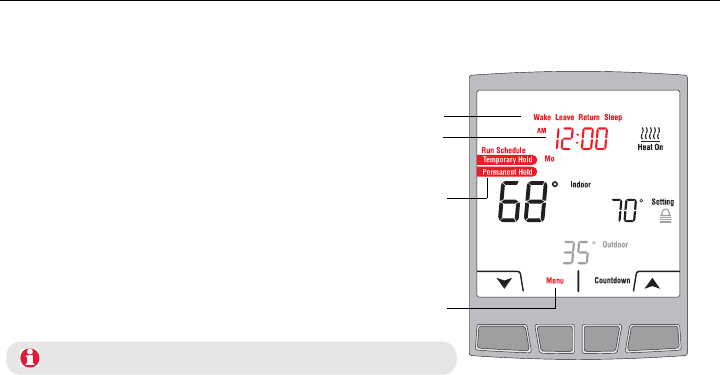
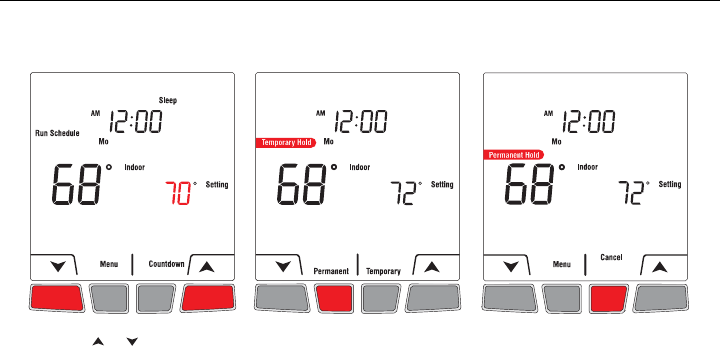
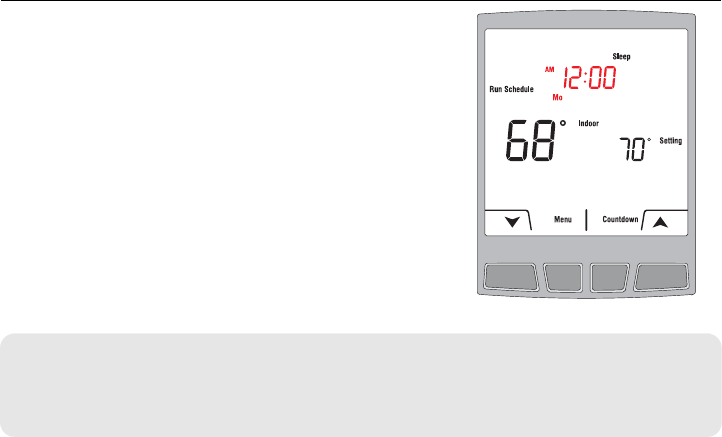
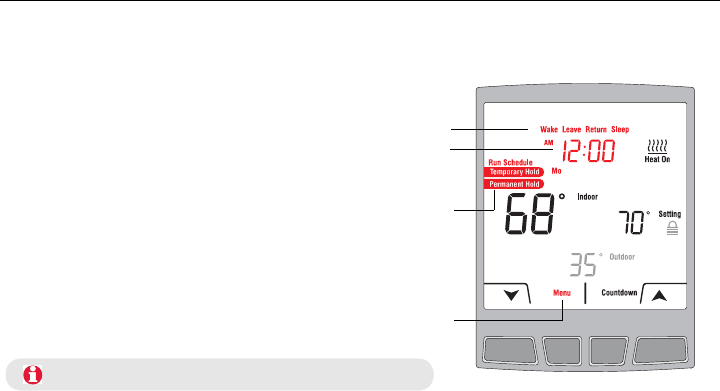
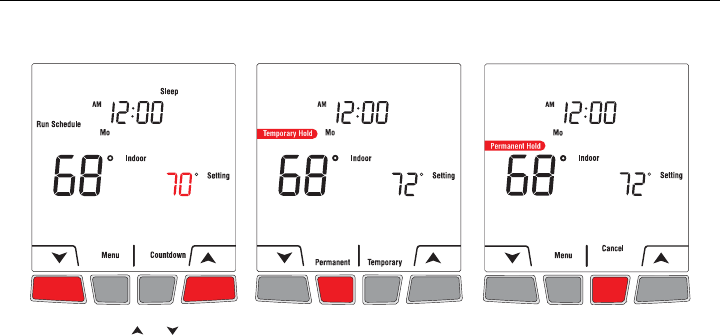
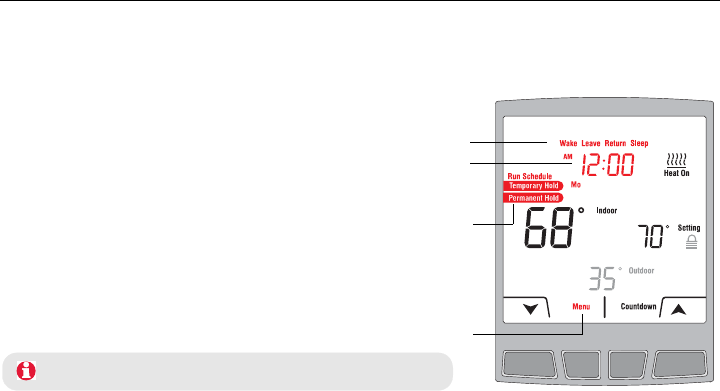
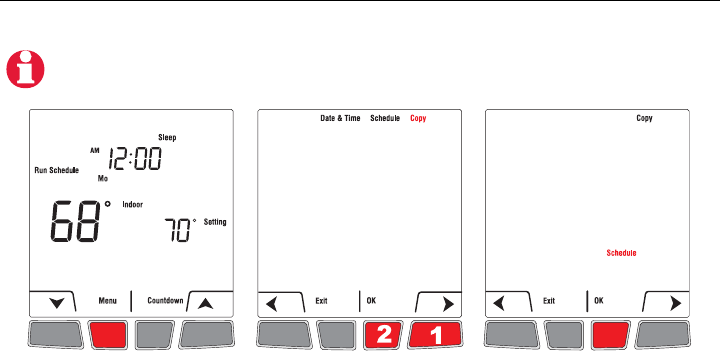
The thermostat displays the current time and day when the thermostat is configured in programmable mode. When
the thermostat is following the schedule, it also displays the current period of the schedule: Wake, Leave, Return or
Sleep. The period is not displayed when the thermostat is placed in Temporary Hold or Permanent Hold.
Thermostat display in programmable mode
Run Schedule: Appears when the thermostat is following the
schedule.
Temporary Hold: See page 14.
Permanent Hold: See page 15.
Menu button
Press to access the menu to set the time & date and the schedule.
The menu button is not available when the thermostat is locked.
See page 4 for the description of the other items on the thermostat display.
Periods of the schedule
Current time and day
69-2475EFS (Honeywell YTL9160 Operating Manual).book Page 8 Friday, June 17, 2011 3:34 PM
EConnect™ Wireless Programmable/Non-programmable Thermostat TL9160AR
9
Run Schedule appears on the screen when the thermostat is following the programmed
schedule. Your thermostat has been programmed with an energy-saving schedule which can
reduce your heating expenses by as much as 33%.
The schedule consists of 4 periods per day, which represents a typical weekday. However, you
can program the thermostat to skip (cancel) the periods that do not apply to your situation. For
example,
Leave
and
Return
periods are skipped for the weekend in the default schedule.
You can choose a different program every day; i.e., each period can have a different starting
time and a different temperature every day.
Following the heating schedule
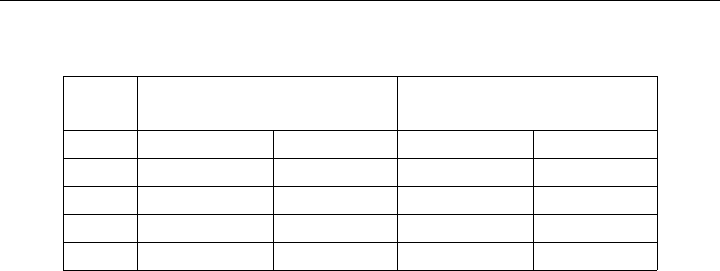
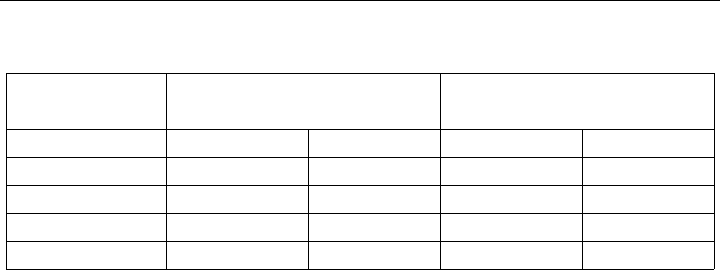
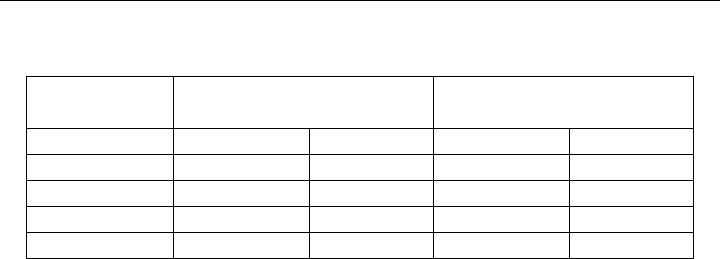
Monday to Friday
(Mo, Tu, We, Th & Fr) Saturday and Sunday
(Sa & Su)
Period Starting time Temperature Starting time Temperature
Wake 6:00 AM (6h) 70°F (21.0°C) 8:00 AM (8h) 70°F (21.0°C)
Leave 8:00 AM (8h) 62°F (16.5°C) - - - - - -
Return 6:00 PM (18h) 70°F (21.0°C) - - - - - -
Sleep 10:00 PM (22h) 62°F (16.5°C) 10:00 PM (22h) 62°F (16.5°C)
69-2475EFS (Honeywell YTL9160 Operating Manual).book Page 9 Friday, June 17, 2011 3:34 PM

Operating Manual
10
* Copy will appear only if the thermostat is linked to a remote control or an outdoor sensor.
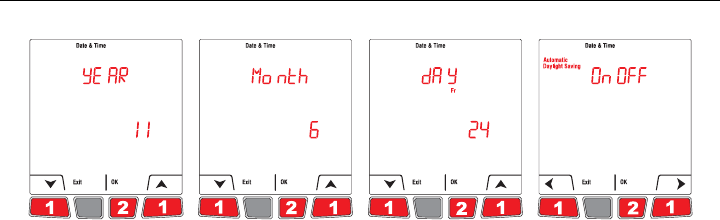
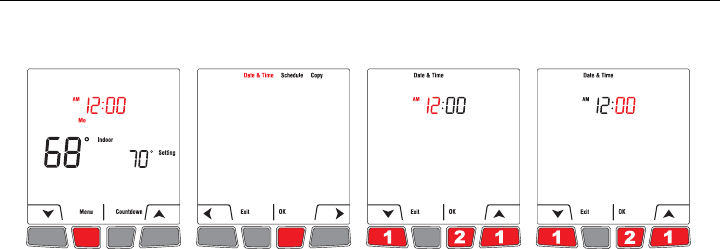
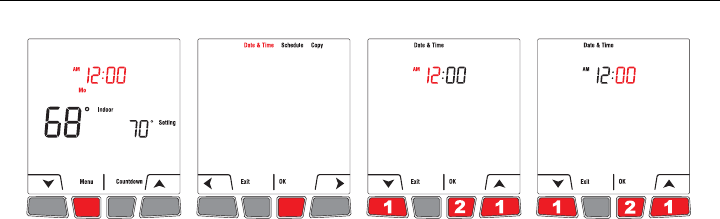
Setting the time and the date
Press Menu.Select Date & Time.Set the hour. Set the minutes.
*
69-2475EFS (Honeywell YTL9160 Operating Manual).book Page 10 Friday, June 17, 2011 3:34 PM
EConnect™ Wireless Programmable/Non-programmable Thermostat TL9160AR
11
* When this function is enabled, the thermostat switches to daylight savings time on the second Sunday of March
and to normal time on the first Sunday of November. When the function is disabled, the thermostat keeps the
normal time all year long.
Setting the time and the date (cont’d)
Set the year. Set the month. Set the day
of the month
Enable/disable
Daylight Saving Time*.
69-2475EFS (Honeywell YTL9160 Operating Manual).book Page 11 Friday, June 17, 2011 3:34 PM
Operating Manual
12
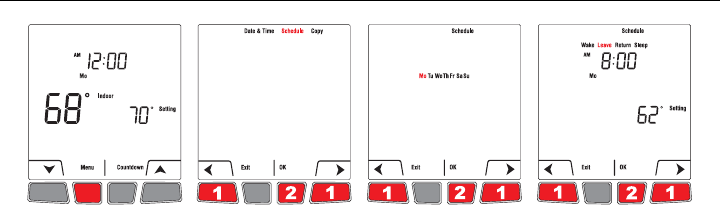
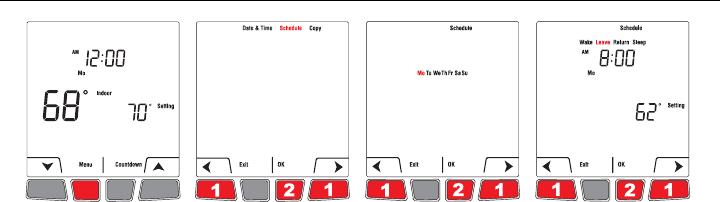
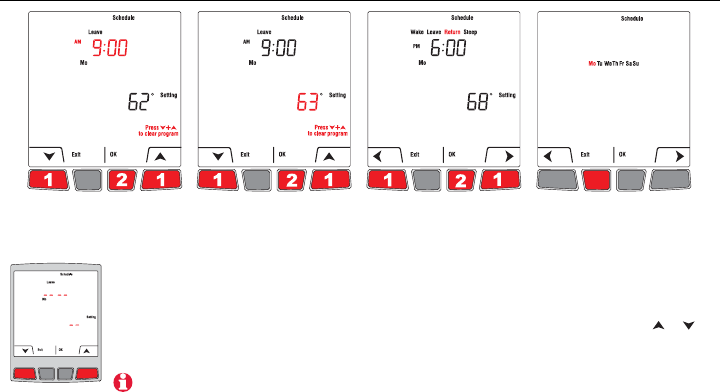
Modifying the heating schedule
Press Menu.Select Schedule.Select the day or
the group* you
wish to modify.
Select the period you
wish to modify.
*The groups are: Mo-Fr, Sa-Su and Mon-Su. Selecting a group will apply the changes to all the days within
that group.
69-2475EFS (Honeywell YTL9160 Operating Manual).book Page 12 Friday, June 17, 2011 3:34 PM
EConnect™ Wireless Programmable/Non-programmable Thermostat TL9160AR
13
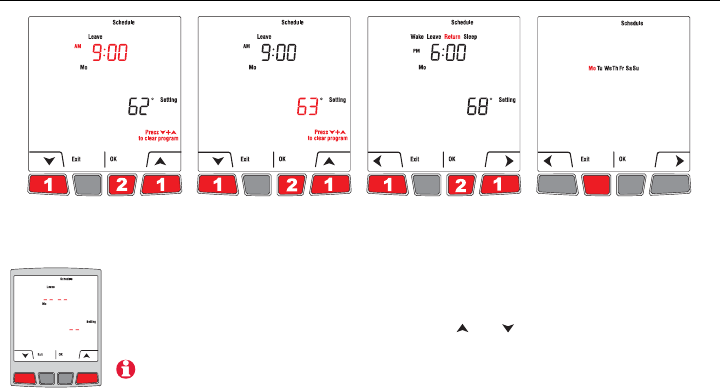
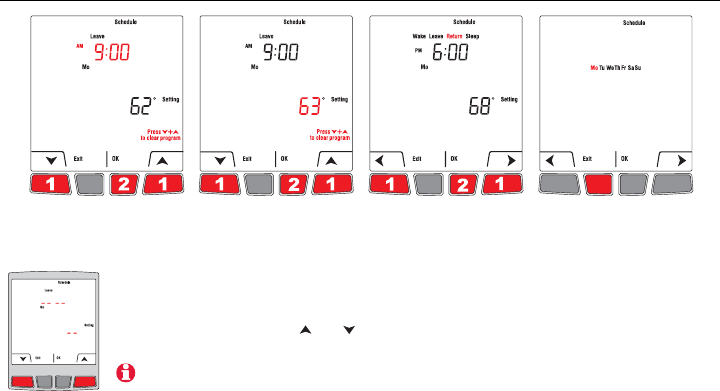
Modifying the heating schedule (cont’d)
Set the time
(15-minute
intervals)
Set the
temperature.
Select another period
or press Exit to go to
the day selection
menu (step 3).
When all changes are
done, press Exit until
you return to the
home screen.
If you wish to clear a period (e.g., you may want to skip the Leave and Return periods if you
stay home all day), select the period (step 4) and press and simultaneously. The time and
temperature settings appear as dashes when the period is cleared.
The Wake period cannot be erased.
69-2475EFS (Honeywell YTL9160 Operating Manual).book Page 13 Friday, June 17, 2011 3:34 PM
Operating Manual
14
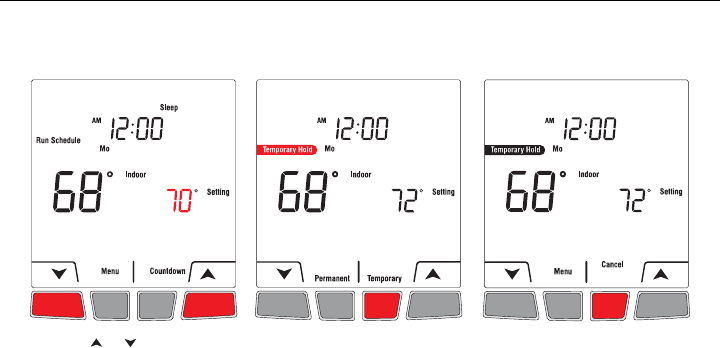
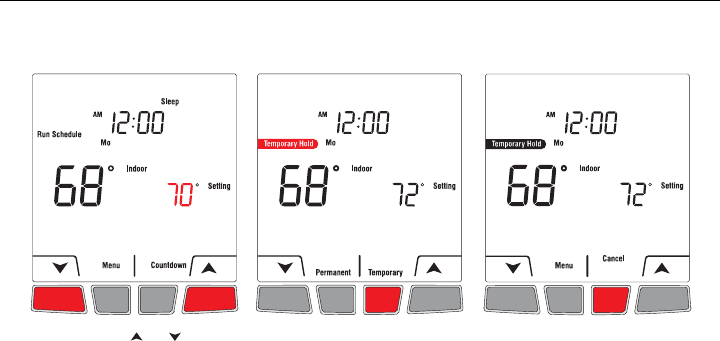
Use Temporary Hold mode to temporarily bypass the schedule and set a new temperature. The thermostat will hold
the new temperature during the current period. The thermostat will resume the heating schedule when the next period
starts or if you press Cancel.
Temporary Hold
Press or until the desired
temperature is displayed.
Press Temporary.At any time, you can press
Cancel to follow the schedule.
69-2475EFS (Honeywell YTL9160 Operating Manual).book Page 14 Friday, June 17, 2011 3:34 PM
EConnect™ Wireless Programmable/Non-programmable Thermostat TL9160AR
15
Use Permanent Hold mode to bypass the schedule and set a new temperature for an indefinite period of time. To
resume the heating schedule, press Cancel.
Permanent Hold
Press or until the desired
temperature is displayed.
Press Permanent.At any time, you can press
Cancel to follow the schedule.
69-2475EFS (Honeywell YTL9160 Operating Manual).book Page 15 Friday, June 17, 2011 3:34 PM

Operating Manual
16
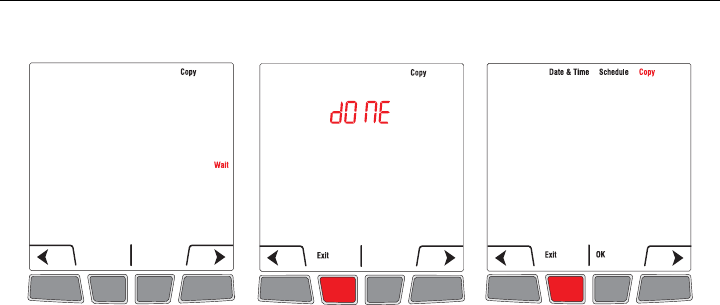
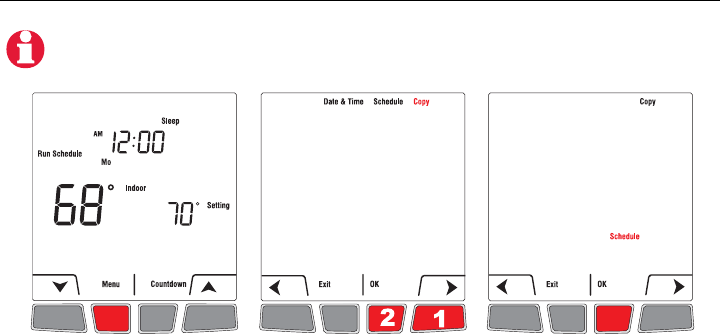
Use the Copy function to transmit the schedule settings of this thermostat to other wireless thermostats in your
house.
Copying the heating schedule
This function is available only if the thermostat is connected to a remote control or to an outdoor sensor. The
schedule settings are transmitted to any other thermostats connected to the same remote control or outdoor
sensor.
Press Menu.Select Copy.Press OK.
69-2475EFS (Honeywell YTL9160 Operating Manual).book Page 16 Friday, June 17, 2011 3:34 PM
EConnect™ Wireless Programmable/Non-programmable Thermostat TL9160AR
17
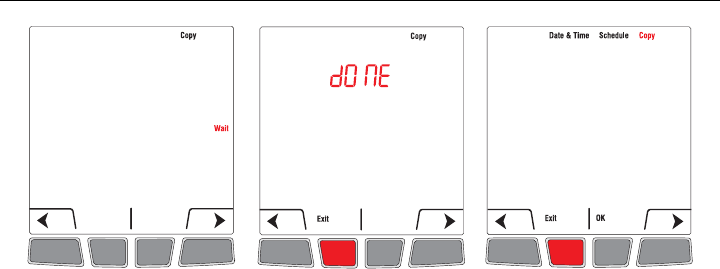
Copying the heating schedule (cont’d)
Wait flashes when the schedule
settings are transmitted to the
other thermostats (this can last
up to 2 minutes).
Done appears when the
transmission is completed.
Press Exit twice to return to
the home screen.
69-2475EFS (Honeywell YTL9160 Operating Manual).book Page 17 Friday, June 17, 2011 3:34 PM

Operating Manual
18
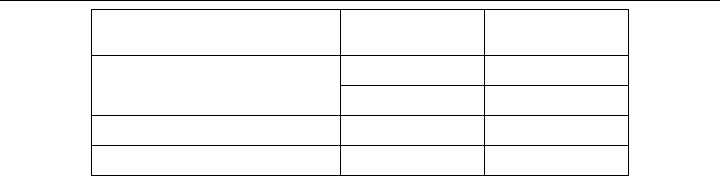
* You can set the temperature display unit in °C or °F. You can set the time display format in 12-hour or 24-hour
(military time) if the thermostat is in programmable mode.
** Accessible only if you use the thermostat in programmable mode.
When Adaptive Intelligent Recovery is on, the thermostat “learns” how long your heater takes to reach the set
temperature. The thermostat will then determine when to activate heating so the desired temperature is attained
at the desired time. The thermostat re-assesses the heating start time daily based on the previous day’s
performance. When Adaptive Intelligent Recovery is off, heating starts at the set time.
*** Leave at On to use the thermostat in programmable mode. Place at Off to use the thermostat in non-
programmable mode.
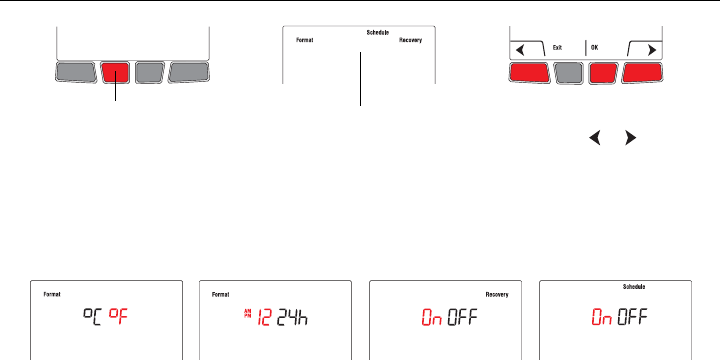
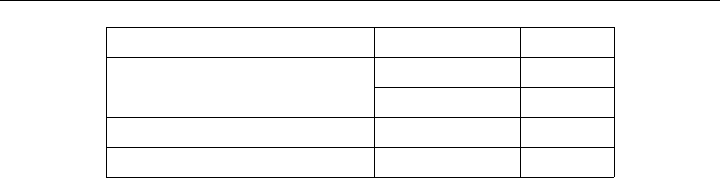
Advanced setup
Setup functions Default setting Options
Temperature and time formats * °F °C / °F
12h 12h / 24h
Adaptive Intelligent Recovery ** On On / Off
Programmable mode (Schedule) *** On On / Off
69-2475EFS (Honeywell YTL9160 Operating Manual).book Page 18 Friday, June 17, 2011 3:34 PM
EConnect™ Wireless Programmable/Non-programmable Thermostat TL9160AR
19
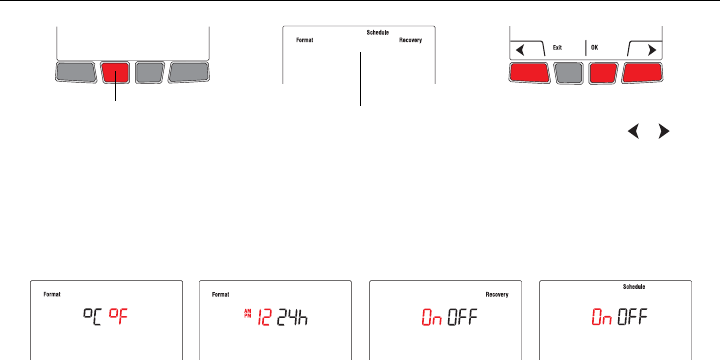
* These parameters are available only if the thermostat is configured in programmable mode.
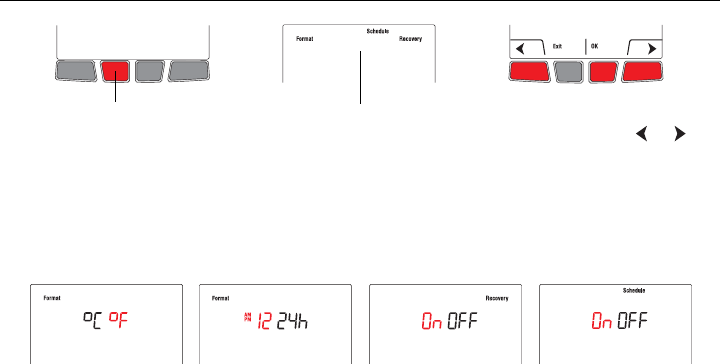
Accessing the advanced setup menu
Press this button for 5
seconds to access the
advanced setup menu.
From the advanced setup
menu, press or to
select the setup functions
and press OK.
Advanced setup menu
Adaptive Intelligent
Recovery *12h / 24h *
°C / °F Programmable mode
69-2475EFS (Honeywell YTL9160 Operating Manual).book Page 19 Friday, June 17, 2011 3:34 PM
Operating Manual
20
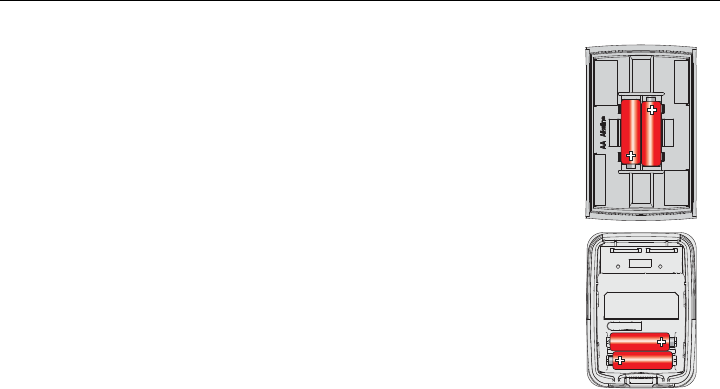
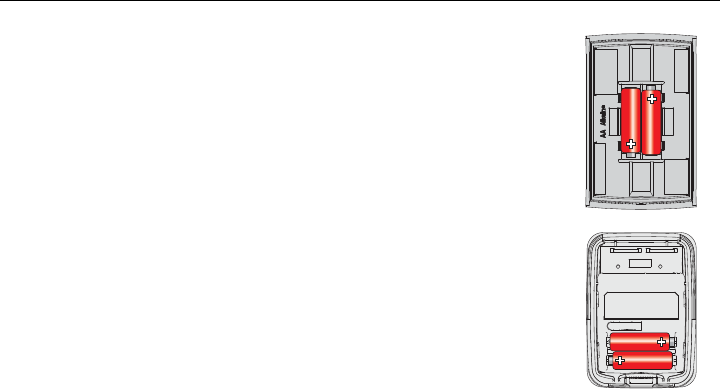
Thermostat
Install 2 new alkaline AA batteries when the Low Battery warning starts
flashing. It is recommended to replace batteries once a year, or when you will
be away for more than a month.
To access the batteries, pull the thermostat from its mounting plate.
You will need to set the time and date if new batteries are not inserted within 2
minutes after the old ones are removed. However, other settings are not
erased.
After new batteries are installed, the thermostat will automatically restore
communication with the wireless network within a few minutes.
Outdoor air sensor
Install 2 new AA lithium batteries when the Outdoor Air Sensor Low Battery
warning starts flashing on the thermostat’s screen.
To access the batteries, remove the sensor from the bracket and remove the
sensor cover.
After new batteries are installed, the sensor will automatically restore
communication with the wireless network within a few minutes.
Replacing the batteries
69-2475EFS (Honeywell YTL9160 Operating Manual).book Page 20 Friday, June 17, 2011 3:34 PM

EConnect™ Wireless Programmable/Non-programmable Thermostat TL9160AR
21
In case of difficulty / Error codes
Heating system does not respond • Check circuit breaker and reset if necessary
“Signal Lost” appears on the screen • The thermostat has lost communication with the wireless
network (usually due to power outage). Otherwise, check
circuit breaker and reset if necessary. When power is
restored, the wireless communication will be restored
within a few minutes.
The thermostat displays “LO” • The indoor temperature is below 32°F (0°C).
The thermostat displays “HI” • The indoor temperature is above 140°F (60°C).
The thermostat displays “- -” • The temperature reading is currently unavailable or the
sensor is defective.
ELECTRICAL HAZARD
The servicing or rewiring of any equipment interface module (EIM) linked to this
thermostat must be done by a certified electrician.
69-2475EFS (Honeywell YTL9160 Operating Manual).book Page 21 Friday, June 17, 2011 3:34 PM

Operating Manual
22
Honeywell warrants this product, excluding battery, to be free from defects in the workmanship or materials, under normal use
and service, for a period of three (3) years from the date of purchase by the consumer. If at any time during the warranty period
the product is determined to be defective or malfunctions, Honeywell shall repair or replace it (at Honeywell’s option).
If the product is defective,
(i) return it, with a bill of sale or other dated proof of purchase, to the place from which you purchased it; or
(ii) call Honeywell Customer Care at 1-800-468-1502. Customer Care will make the determination whether the product
should be returned to the following address: Honeywell Return Goods, Dock 4 MN10-3860, 1885 Douglas Dr. N., Golden
Valley, MN 55422, or whether a replacement product can be sent to you.
This warranty does not cover removal or reinstallation costs. This warranty shall not apply if it is shown by Honeywell that the
defect or malfunction was caused by damage which occurred while the product was in the possession of a consumer.
Honeywell’s sole responsibility shall be to repair or replace the product within the terms stated above. HONEYWELL SHALL
NOT BE LIABLE FOR ANY LOSS OR DAMAGE OF ANY KIND, INCLUDING ANY INCIDENTAL OR CONSEQUENTIAL
DAMAGES RESULTING, DIRECTLY OR INDIRECTLY, FROM ANY BREACH OF ANY WARRANTY, EXPRESS OR IMPLIED,
OR ANY OTHER FAILURE OF THIS PRODUCT. Some states do not allow the exclusion or limitation of incidental or
consequential damages, so this limitation may not apply to you.
THIS WARRANTY IS THE ONLY EXPRESS WARRANTY HONEYWELL MAKES ON THIS PRODUCT. THE DURATION OF
ANY IMPLIED WARRANTIES, INCLUDING THE WARRANTIES OF MERCHANTABILITY AND FITNESS FOR A
PARTICULAR PURPOSE, IS HEREBY LIMITED TO THE THREE-YEAR DURATION OF THIS WARRANTY.
Some states do not allow limitations on how long an implied warranty lasts, so the above limitation may not apply to you. This
warranty gives you specific legal rights, and you may have other rights which vary from state to state.
If you have any questions concerning this warranty, please write to Honeywell Customer Relations, 1985 Douglas Dr, Golden
Valley, MN 55422 or call 1-800-468-1502. In Canada, write to Retail Products ON15-02H, Honeywell Limited/Honeywell
Limitée, 35 Dynamic Drive, Scarborough, Ontario M1V 4Z9.
Three-year limited warranty
69-2475EFS (Honeywell YTL9160 Operating Manual).book Page 22 Friday, June 17, 2011 3:34 PM

EConnect™ Wireless Programmable/Non-programmable Thermostat TL9160AR
23
FCC Compliance Statement (Part 15.19) (USA only)
This device complies with Part 15 of the FCC Rules. Operation is
subject to the following two conditions:
1) This device may not cause harmful interference, and
2) This device must accept any interference received, including
interference that may cause undesired operation.
FCC Warning (Part 15.21) (USA only)
Changes or modifications not expressly approved by the party
responsible for compliance could void the user’s authority to operate
the equipment.
FCC Interference Statement (Part 15.105 (b)) (USA only)
This equipment has been tested and found to comply with the limits for
a Class B digital device, pursuant to Part 15 of the FCC Rules. These
limits are designed to provide reasonable protection against harmful
interference in a residential installation. This equipment generates
uses and can radiate radio frequency energy and, if not installed and
used in accordance with the instructions, may cause harmful
interference to radio communications. However, there is no guarantee
that interference will not occur in a particular installation. If this
equipment does cause harmful interference to radio or television
reception, which can be determined by turning the equipment off and
on, the user is encouraged to try to correct the interference by one of
the following measures:
• Reorient or relocate the receiving antenna.
• Increase the separation between the equipment and receiver.
• Connect the equipment into an outlet on a circuit different from
that to which the receiver is connected.
• Consult the dealer or an experienced radio/TV technician for help.
EIM, thermostats and outdoor sensor
To comply with FCC and Industry Canada RF exposure limits for
general population/ uncontrolled exposure, the antenna(s) used for
these transmitters must be installed to provide a separation distance of
at least 20 cm from all persons and must not be co-located or
operating in conjunction with any other antenna or transmitter.
Remote control
This portable transmitter with its antenna complies with FCC and
Industry Canada RF exposure limits for general population/
uncontrolled exposure. This device must not be co-located or
operating in conjunction with any other antenna or transmitter.
Section 7.1.3 of RSS-GEN
Operation is subject to the following two conditions:
1) This device may not cause interference, and
2) This device must accept any interference, including
interference that may cause undesired operation of the device.
Section 7.1.2 of RSS-GEN
Under Industry Canada regulations, this radio transmitter may only
operate using an antenna of type and maximum (or lesser) gain
approved for the transmitter by Industry Canada. To reduce potential
radio interference to other users, the antenna type and its gain should
be so chosen that the equivalent isotropically radiated power (EIRP) is
not more than that necessary for successful communication.
Regulatory information
69-2475EFS (Honeywell YTL9160 Operating Manual).book Page 23 Friday, June 17, 2011 3:34 PM
This page is intentionally left blank.
69-2475EFS (Honeywell YTL9160 Operating Manual).book Page 24 Friday, June 17, 2011 3:34 PM
EConnectMD TL9160AR
Thermostat programmable/non-programmable sans fil
English: see page 1 • Español: vea la página 49
Mode d’emploi
69-2475EFS (Honeywell YTL9160 Operating Manual).book Page 25 Friday, June 17, 2011 3:34 PM
Savez-vous la configuration de votre thermostat ?
Pour savoir si votre nouveau thermostat est configuré en
mode programmable ou en mode non programmable,
vérifier si l’heure et le jour sont affichés à l’écran. S’ils
apparaissent, cela signifie que le thermostat est
configuré comme un thermostat programmable.
Se référer à la table des matières sur la page suivante
pour les sections qui s'appliquent à la configuration de
votre thermostat.
Avant de commencer
Besoin d’aide?
Pour obtenir de l’aide sur ce produit, consulter le
http://yourhome.honeywell.com
ou joindre sans frais le service à la clientèle d’Honeywell au
1 800 468-1502
.
69-2475EFS (Honeywell YTL9160 Operating Manual).book Page 26 Friday, June 17, 2011 3:34 PM

EConnectMD Thermostat programmable/non-programmable sans fil TL9160AR
27
Table des matières English: see page 1 • Español: vea la página 49
Configuration
non programmable Configuration
programmable
Utilisation de base
Affichage en mode non-programmable....................................28
Réglage de la température.......................................................29
Mode Décompte.......................................................................30
Mode programmable
Affichage en mode programmable ...........................................32
Utilisation de l’horaire de chauffage .........................................33
Réglage de l’heure et du jour ...................................................34
Modification de l’horaire de chauffage......................................36
Temporary Hold (Maintien temporaire).....................................38
Permanent Hold (Maintien permanent) ....................................39
Copie de l’horaire de chauffage ...............................................40
Annexes
Fonctions avancés ...................................................................42
Remplacement des piles ..........................................................44
En cas de difficulté ...................................................................45
Garantie limitée de 3 ans .........................................................46
Information sur la réglementation.............................................47
69-2475EFS (Honeywell YTL9160 Operating Manual).book Page 27 Friday, June 17, 2011 3:34 PM
Mode d’emploi
28
Affichage en mode non-programmable
Température intérieure
(température de la pièce)
Bouton
Pour abaisser la température.
Bouton Décompte
Pour mettre en mode Décompte (voir la page 30).
N’apparaît pas si le thermostat est verrouillé ( ).
Bouton
Pour augmenter la température.
Température de consigne
Indicateur de chauffage
Le nombre de flammes dépend de
l'intensité du chauffage. L'image
disparaît lorsque le chauffage
s’arrête.
Température extérieure
(sonde extérieure requise)
Verrouillage
Les réglages du thermostat sont
complètement ou partiellement
verrouillés. Consultez le guide
d'installation pour plus de détails.
Si votre thermostat est configuré
en mode programmable, voir
plus de description à la page 32.
69-2475EFS (Honeywell YTL9160 Operating Manual).book Page 28 Friday, June 17, 2011 3:34 PM
EConnectMD Thermostat programmable/non-programmable sans fil TL9160AR
29
Réglage de la température
Appuyer sur ou pour régler la température.
Température de consigne
69-2475EFS (Honeywell YTL9160 Operating Manual).book Page 29 Friday, June 17, 2011 3:34 PM
Mode d’emploi
30
Appuyer sur Countdown (Décompte) pour régler une nouvelle température et de sélectionner la durée de
maintien de la nouvelle température. Le thermostat retournera à son réglage de température précédente ou
programmé à la fin du compte à rebours. La période de décompte est réglable de 15 minutes à 14 jours.
Mode Décompte
Le mode Décompte n'est pas accessible lorsque le thermostat est verrouillé.
Appuyer sur Countdown.Sélectionner le compte à rebours. Régler la température.
69-2475EFS (Honeywell YTL9160 Operating Manual).book Page 30 Friday, June 17, 2011 3:34 PM
EConnectMD Thermostat programmable/non-programmable sans fil TL9160AR
31
Mode Décompte (suite)
Le compte à rebours
change en temps
réel pour indiquer le
temps restant.
Vous pouvez modifier la
période de décompte et la
température en tout temps.
Appuyez sur Cancel en
tout temps pour annuler le
mode Décompte.
69-2475EFS (Honeywell YTL9160 Operating Manual).book Page 31 Friday, June 17, 2011 3:34 PM
Mode d’emploi
32
Le thermostat affiche l’heure et le jour lorsqu’il est configuré en mode programmable. Lorsque le thermostat suit
l’horaire de chauffage, il affiche aussi la période en cours : Wake (Réveil), Leave (Départ), Return (Retour) ou Sleep
(Sommeil). La période n'est pas affichée lorsque le thermostat est placé en Temporary Hold (Maintien temporaire)
ou en Permanent Hold (Maintien permanente).
Affichage en mode programmable
Périodes de l’horaire
Run Schedule: Apparaît lorsque le thermostat
suit l’horaire de chauffage.
Temporary Hold: Voir la page 38.
Permanent Hold: Voir la page 39.
Voir la page 28 pour la description des autres items affichés à l'écran
Bouton Menu
Appuyer pour accéder au menu de réglage de
l'heure, de la date et de l’horaire. Le bouton n’est pas
disponible lorsque le thermostat est verrouillé.
L’heure et le jour
69-2475EFS (Honeywell YTL9160 Operating Manual).book Page 32 Friday, June 17, 2011 3:34 PM
EConnectMD Thermostat programmable/non-programmable sans fil TL9160AR
33
Le message Run Schedule apparaît à l'écran lorsque le thermostat suit l'horaire programmé. Un
horaire écoénergetique a été programmé dans votre thermostat, vous permettant ainsi de réduire
votre facture d’électricité jusqu’à 33%.
L'horaire comprend 4 périodes par jour, ce qui représente un jour de semaine typique. Cependant, vous
pouvez programmer le thermostat pour sauter (annuler) les périodes qui ne s'appliquent pas à votre
situation. Par exemple, la période
Leave (
Départ)
et la période
Return (
Retour)
ont été annulées pour
la fin de semaine dans l’horaire par défaut.
Vous pouvez avoir un programme différent à chaque jour; c’est-à-dire, chaque période peut avoir une
heure de début différente et une température différente à chaque jour.
Utilisation de l’horaire de chauffage
lundi à vendredi
(Mo, Tu, We, Th et Fr)
samedi et dimanche
(Sa et Su)
Période Heure du début Temperature Heure du début Temperature
Wake (Réveil) 6:00 AM (6h ) 70 °F (21.0 °C) 8:00 AM (8h) 70 °F (21.0 °C)
Leave (Départ) 8:00 AM (8h) 62 °F (16.5 °C) - - - - - -
Return (Retour) 6:00 PM (18h) 70 °F (21.0 °C) - - - - - -
Sleep (Sommeil) 10:00 PM (22h) 62 °F (16.5 °C) 10:00 PM (22h) 62 °F (16.5 °C)
69-2475EFS (Honeywell YTL9160 Operating Manual).book Page 33 Friday, June 17, 2011 3:34 PM
Mode d’emploi
34
*La fonction Copy n'apparaît que si le thermostat est relié à une télécommande ou une sonde extérieure.
Réglage de l’heure et du jour
Appuyer sur Menu.Sélectionner Date & Time.Régler l’heure. Régler les minutes.
*
69-2475EFS (Honeywell YTL9160 Operating Manual).book Page 34 Friday, June 17, 2011 3:34 PM

EConnectMD Thermostat programmable/non-programmable sans fil TL9160AR
35
* Lorsque cette fonction est activée, le thermostat passe à l’heure d’été (avancée) le deuxième dimanche de mars et
à l’heure d’hiver (normale) le premier dimanche de novembre. Lorsque la fonction est désactivée, le thermostat
reste à l’heure normale à l’année longue.
Réglage de l’heure et du jour (suite)
Activer/désactiver
l’heure avancée*.
Régler l’année. Régler le mois. Régler le jour du mois.
69-2475EFS (Honeywell YTL9160 Operating Manual).book Page 35 Friday, June 17, 2011 3:34 PM
Mode d’emploi
36
Modification de l’horaire de chauffage
Sélectionner Schedule.Sélectionner le
jour ou le groupe*
à modifier.
Sélectionner la
période à modifier.
*Les groupes sont: Mo-Fr (lundi-vendredi), Sa-Su (samedi-dimanche) et Mon-Su (lundi-dimanche). Lorsque
vous sélectionnez un groupe, les changements seront apportés à tous les jours du groupe.
Appuyer sur Menu.
69-2475EFS (Honeywell YTL9160 Operating Manual).book Page 36 Friday, June 17, 2011 3:34 PM
EConnectMD Thermostat programmable/non-programmable sans fil TL9160AR
37
Modification de l’horaire de chauffage (suite)
Régler l’heure
(intervalles de
15 minutes).
Régler la
température.
Sélectionner une autre
période ou appuyer
sur Exit pour passer
au menu de sélection
du jour (étape 3).
Une fois tout changement
fait, appuyer sur Exit
jusqu’à ce que vous
reveniez à l'écran
d'accueil.
Si vous désirez effacer une période (par exemple, pour sauter les périodes de départ et les
périodes de retour si vous êtes à la maison toute la journée), sélectionnez la période (étape 4) et
appuyez simultanément sur et . Des tirets apparaissent à la place de l’heure et la
température lorsque la période est effacée.
La période de réveil ne peut être effacée.
69-2475EFS (Honeywell YTL9160 Operating Manual).book Page 37 Friday, June 17, 2011 3:34 PM
Mode d’emploi
38
Utiliser le mode Temporary Hold pour déroger temporairement à l’horaire en réglant une nouvelle température. La
nouvelle température sera maintenue pendant la période en cours. Le thermostat retournera à l'horaire de chauffage
lorsque la période suivante débutera ou si vous appuyez sur Cancel (Annuler).
Temporary Hold (Maintien temporaire)
Appuyer sur ou jusqu’à
ce que la température désirée
soit affichée.
Appuyer sur Temporary.En tout temps, vous pouvez appuyer
sur Cancel pour revenir à l’horaire.
69-2475EFS (Honeywell YTL9160 Operating Manual).book Page 38 Friday, June 17, 2011 3:34 PM
EConnectMD Thermostat programmable/non-programmable sans fil TL9160AR
39
Utiliser le mode Permanent Hold pour déroger à l’horaire et régler une nouvelle température pendant une période de
temps indéfinie. Pour revenir à l'horaire de chauffage, appuyez sur Cancel (Annuler).
Permanent Hold (Maintien permanent)
En tout temps, vous pouvez appuyer
sur Cancel pour réutiliser l’horaire.
Appuyer sur or jusqu’à
ce que la température désirée
soit affichée.
Appuyer sur Permanent.
69-2475EFS (Honeywell YTL9160 Operating Manual).book Page 39 Friday, June 17, 2011 3:34 PM
Mode d’emploi
40
Utiliser la fonction Copy pour transmettre l’horaire du thermostat aux d'autres thermostats sans fil de votre résidence.
Copie de l’horaire de chauffage
Cette fonction n’est disponible que si le thermostat est relié à une télécommande ou une sonde extérieure.
Les réglages de l’horaire sont transmis à tout autre thermostat relié à la même télécommande ou à la même
sonde extérieure.
Sélectionner Copy.Appuyer sur OK.
Appuyer sur Menu.
69-2475EFS (Honeywell YTL9160 Operating Manual).book Page 40 Friday, June 17, 2011 3:34 PM
EConnectMD Thermostat programmable/non-programmable sans fil TL9160AR
41
Copie de l’horaire de chauffage (suite)
Wait clignote pendant que
les réglages de l’horaire
sont transmis aux autres
thermostats (cela peut
durer jusqu'à 2 minutes).
Done apparaît une fois la
transmission complétée.
Appuyer deux fois sur Exit
pour revenir à l’écran
d’accueil.
69-2475EFS (Honeywell YTL9160 Operating Manual).book Page 41 Friday, June 17, 2011 3:34 PM
Mode d’emploi
42
* Vous pouvez choisir d’afficher la température en ° C ou ° F. Vous pouvez choisir afficher l’heure en format 12
heures ou format 24 heures si le thermostat est en mode programmable.
** Accessible seulement lorsque vous utiliser le thermostat en mode programmable.
Lorsque l’horaire anticipé est activé, le thermostat « apprend » combien de temps il faut à votre appareil de
chauffage pour atteindre la température programmée. Le thermostat déterminera ensuite quand démarrer le
chauffage afin que la température désirée soit atteinte à l’heure désirée. Le thermostat évalue, sur une base
quotidienne, l’heure de démarrage du chauffage en se basant sur le résultat de la journée précédente. Lorsque la
fonction est désactivée, le thermostat ne démarre le chauffage qu’à l’heure réglée, et non avant.
*** Laisser à On pour utiliser le thermostat en mode programmable. Placer à Off pour utiliser le thermostat en mode
non programmable.
Fonctions avancés
Fonctions de configuration Réglage par défaut Options
Format de la température et de l’heure * °F °C / °F
12h 12h / 24h
Horaire anticipé (Recovery) ** « On » « On / Off »
Mode programmable (Schedule) *** « On » « On / Off »
69-2475EFS (Honeywell YTL9160 Operating Manual).book Page 42 Friday, June 17, 2011 3:34 PM
EConnectMD Thermostat programmable/non-programmable sans fil TL9160AR
43
* Ces paramètres ne sont disponibles que si le thermostat est configuré en mode programmable.
Menu des fonctions avancés
Appuyez sur ce bouton
pendant 5 secondes
pour accéder au menu
des fonctions avancés.
Menu des fonctions avancés Dans le menu des fonctions
avancés, appuyez sur ou
pour sélectionner les fonctions
avancés et appuyez sur OK.
Horaire Anticipé *
12h / 24h *
°C / °F Mode programmable
69-2475EFS (Honeywell YTL9160 Operating Manual).book Page 43 Friday, June 17, 2011 3:34 PM
Mode d’emploi
44
Thermostat
Installer 2 piles alcalines AA neuves lorsque l’avertissement Low Battery
(Piles faibles) se met à clignoter à l'écran. Il est recommandé de remplacer les
piles une fois par an, ou lorsque vous vous absentez pendant plus d'un mois.
Pour accéder aux piles, tirer le thermostat de son socle.
Vous devrez régler l'heure et la date si de nouvelles piles ne sont pas insérées
dans un délai de 2 minutes après que les vieilles piles soient enlevées.
Toutefois, les autres réglages ne seront pas effacés.
Une fois les piles neuves installées, le thermostat rétablira automatiquement la
communication avec le réseau sans fil au bout de quelques minutes.
Sonde extérieure
Installer 2 piles AA neuves au lithium lorsque l’avertissement Outdoor Air
Sensor Low Battery se met à clignoter à l'écran du thermostat.
Pour accéder aux piles, retirer la sonde de son support et retirer le couvercle
de la sonde.
Une fois les piles neuves insérées, la sonde rétablira automatiquement la
communication avec le réseau sans fil au bout de quelques minutes.
Remplacement des piles
69-2475EFS (Honeywell YTL9160 Operating Manual).book Page 44 Friday, June 17, 2011 3:34 PM

EConnectMD Thermostat programmable/non-programmable sans fil TL9160AR
45
En cas de difficulté / Codes d’erreur
Le système de chauffage
ne répond pas • Vérifier le disjoncteur et le réenclencher au besoin.
“Signal Lost” apparaît à
l’écran
• Le thermostat a perdu la communication avec le réseau sans fil
(habituellement après une panne de courant). Sinon, vérifier le
disjoncteur et le réenclencher au besoin. Une fois l’alimentation
rétablie, le thermostat communiquera automatiquement avec le
réseau sans fil au bout de quelques minutes.
Le thermostat affiche “LO” • La température intérieure est inférieure à 32 °F (0 °C).
Le thermostat affiche “HI” • La température intérieure est supérieure à 140 °F (60 °C).
Le thermostat affiche “- -” • La sonde extérieure est défectueuse ou non disponible.
DANGER ÉLECTRIQUE
Tout entretien ou câblage du module d’interface avec le matériel (MIM) relié à ce
thermostat doit être effectué par un électricien certifié.
69-2475EFS (Honeywell YTL9160 Operating Manual).book Page 45 Friday, June 17, 2011 3:34 PM

Mode d’emploi
46
Honeywell garantit ce produit, à l'exception des piles, contre tout vice de fabrication ou de matière dans la mesure où il en est fait une
utilisation et un entretien convenables, et ce, pour trois (3) ans à partir de la date d'achat par le consommateur. En cas de défectuosité
ou de mauvais fonctionnement pendant la période de garantie, Honeywell remplacera ou réparera le produit (au gré de Honeywell).
Si le produit est défectueux,
(i) le retourner, accompagné d'une preuve d'achat indiquant la date d'achat, à l’endroit où il a été acheté, ou
(ii) s'adresser au Service à la clientèle de Honeywell en composant le 1 800 468-1502. Le Service à la clientèle déterminera alors si
le produit doit être retourné à l'adresse suivante : Honeywell Return Goods, Dock 4 MN10-3860, 1885 Douglas Dr N, Golden
Valley, MN 55422, ou si un produit de remplacement peut vous être expédié.
La présente garantie ne couvre pas les frais de retrait ou de réinstallation. La présente garantie ne s'appliquera pas s'il est démontré que
la défectuosité ou le mauvais fonctionnement est dû à un endommagement du produit alors que le consommateur l'avait en sa
possession.
La responsabilité de Honeywell se limite à réparer ou à remplacer le produit conformément aux modalités susmentionnées.
HONEYWELL N'EST EN AUCUN CAS RESPONSABLE DES PERTES OU DOMMAGES, Y COMPRIS LES DOMMAGES INDIRECTS
OU ACCESSOIRES DÉCOULANT DIRECTEMENT OU INDIRECTEMENT D'UNE VIOLATION QUELCONQUE D'UNE GARANTIE,
EXPRESSE OU TACITE, APPLICABLE AU PRÉSENT PRODUIT NI DE TOUTE AUTRE DÉFECTUOSITÉ DU PRÉSENT PRODUIT.
Certaines provinces ne permettent pas l'exclusion ou la restriction des dommages indirects et, par conséquent, la présente restriction
peut ne pas s'appliquer.
LA PRÉSENTE GARANTIE TIENT LIEU DE TOUTES LES AUTRES GARANTIES, EXPRESSES OU TACITES, ET LES GARANTIES
DE VALEUR MARCHANDE ET DE CONFORMITÉ À UNE FIN PARTICULIÈRE SONT PAR LES PRÉSENTES EXCLUES APRÈS LA
PÉRIODE DE TROIS ANS DE LA PRÉSENTE GARANTIE. Certaines provinces ne permettent pas de limiter la durée des garanties
tacites et, par conséquent, la présente limitation peut ne pas s'appliquer.
La présente garantie donne au consommateur des droits légaux spécifiques et peut-être certains autres droits qui peuvent varier d'une
province à l'autre.
Pour toute question concernant la présente garantie, prière d'écrire au Service à la clientèle de Honeywell à l'adresse suivante :
Honeywell Customer Relations, 1985 Douglas Drive, Golden Valley, MN 55422, ou encore composer le 1 800 468-1502. Au Canada,
prière de s'adresser au service des Produits de détail, Honeywell Limited/Honeywell limitée, 35, Dynamic Drive, Scarborough (Ontario)
M1V 4Z9.
Garantie limitée de 3 ans
69-2475EFS (Honeywell YTL9160 Operating Manual).book Page 46 Friday, June 17, 2011 3:34 PM

EConnectMD Thermostat programmable/non-programmable sans fil TL9160AR
47
Déclaration de conformité à la FCC (partie 15,19) (États-Unis seulement)
Cet appareil est conforme à la Partie 15 des règles de la FCC. Le
fonctionnement de ce système est assorti aux deux conditions suivantes :
1) L’appareil ne peut causer d’interférences nuisibles, et
2) L’appareil doit accepter les interférences reçues, y compris celles qui
pourraient nuire à son fonctionnement.
Avis de la FCC (partie 15,21) (États-Unis seulement)
Toute modification qui n’est pas autorisée expressément par la partie
responsable de la conformité de l’appareil aux règles en vigueur pourrait
rendre l’utilisateur inapte à faire fonctionner le matériel.
Déclaration sur l’interférence selon la FCC (partie 15,105 (b)) (États-Unis
seulement)
Ce dispositif a été testé et déclaré conforme aux normes spécifiées dans la
partie 15 des règlements de la FCC (Federal Communications Commission)
concernant les dispositifs numériques de classe B. Ces limites sont conçues
pour offrir une protection raisonnable contre les interférences nocives pouvant
survenir lorsque le produit est utilisé dans un environnement résidentiel. Ce
dispositif produit, utilise et émet de l’énergie radioélectrique qui peut perturber
les communications radio s’il n’est pas installé et utilisé conformément aux
instructions du fabricant. Toutefois, rien ne garantit qu’il n’y aura pas
d’interférences dans une installation donnée. Si l’appareil produit des
interférences qui nuisent à la réception radio ou télé, ce qu’on peut déterminer
en mettant l’appareil en service et hors service, l’utilisateur est invité à corriger
la situation de l’une ou l’autre des façons suivantes :
• Réorienter ou déplacer l’antenne de réception.
• Augmenter l’espace qui sépare l’appareil du récepteur.
• Brancher l’appareil à une prise faisant partie d’un circuit différent de celui
du récepteur.
• Consulter un détaillant ou technicien radio-télé d’expérience pour obtenir
de l’aide.
MIM, thermostat et sonde extérieure
Pour être conformes aux limites d’exposition aux radiofréquences établies par
la FCC et Industrie Canada pour le grand public/l’exposition non contrôlée, la
ou les antennes employées par le transmetteur doivent être installées à au
moins 20 cm de distance de toute personne et ne peuvent être situées au
même endroit qu’une autre antenne ou un autre transmetteur ou fonctionner
conjointement avec une autre antenne ou un autre transmetteur.
Télécommande
Le transmetteur portatif et son antenne sont conformes aux limites
d’exposition aux radiofréquences établies par la FCC et Industrie Canada
pour le grand public/l’exposition non contrôlée. Cet appareil ne doit pas être
placé au même endroit qu’une autre antenne ou un autre transmetteur ni
fonctionner conjointement avec d’autres antennes ou transmetteurs.
Article 7.1.3 de CNR-GEN
Le fonctionnement de ce système est assorti aux deux conditions suivantes :
1) L’appareil ne peut causer d’interférences nuisibles, et
2) L’appareil doit accepter les interférences reçues, y compris celles qui
pourraient nuire à son fonctionnement.
Article 7.1.2 de RSS-GEN
Conformément à la législation d’Industrie Canada, l’émetteur radioélectrique
ne peut fonctionner qu’avec une antenne de type et de gain maximum (ou
moins) approuvés pour le transmetteur par Industrie Canada. Pour réduire le
potentiel d’interférence radioélectrique pour d’autres utilisateurs, le type
d’antenne et son gain doivent être choisis pour que la puissance isotrope
rayonnée équivalente (PIRE) soit limitée à celle juste requise pour obtenir une
bonne communication.
Information sur la réglementation
69-2475EFS (Honeywell YTL9160 Operating Manual).book Page 47 Friday, June 17, 2011 3:34 PM
Cette page est intentionnellement laissée en blanc.
69-2475EFS (Honeywell YTL9160 Operating Manual).book Page 48 Friday, June 17, 2011 3:34 PM

EConnect™ TL9160AR
Termostato inalámbrico programable/no programable
English: see page 1 • Français : voir la page 25
Manual de
funcionamiento
69-2475EFS (Honeywell YTL9160 Operating Manual).book Page 49 Friday, June 17, 2011 3:34 PM

Manual de funcionamiento
50
¿Conoce usted la configuración de su termostato?
Para saber si su nuevo termostato está configurado en
el modo programable o no programable, busque el
visualizador de la hora y el día en la pantalla del
termostato. Si el día y la hora aparecen en la pantalla,
el termostato está configurado como programable.
Refiérase al índice de la página siguiente para las
secciones relacionadas con la configuración de su
termostato.
Antes de comenzar
¿Necesita ayuda?
Para obtener ayuda sobre este producto, visite http://yourhome.honeywell.com
o llame de manera gratuita al Servicio al cliente de Honeywell al 1-800-468-1502.
69-2475EFS (Honeywell YTL9160 Operating Manual).book Page 50 Friday, June 17, 2011 3:34 PM

EConnect™ Termostato inalámbrico programable/no programable TL9160AR
51
Índice English: see page 1 • Français : voir la page 25
Configuración
no programable Configuración
programable
Funcionamiento básico
Visualizador del termostato en modo no programable.............52
Configuración de la temperatura..............................................53
Modo de cuenta regresiva........................................................54
Modo programable
Visualizador del termostato en modo programable..................56
Cómo continuar con el cronograma de calefacción .................57
Configuración de la hora y la fecha..........................................58
Modificación del cronograma de calefacción ...........................60
Retención temporal ..................................................................62
Retención permanente.............................................................63
Cómo copiar el cronograma de calefacción.............................64
Apéndices
Configuración avanzada...........................................................66
Cambio de las baterías ............................................................68
En caso de dificultades ............................................................69
Garantía limitada de tres años .................................................70
Información sobre normativas..................................................71
69-2475EFS (Honeywell YTL9160 Operating Manual).book Page 51 Friday, June 17, 2011 3:34 PM
Manual de funcionamiento
52
Visualizador del termostato en modo no programable
Botón de temperatura interior
(temperatura de la habitación)
Botón
Presione para bajar la temperatura.
Botón de cuenta regresiva
Presione para colocar en modo de cuenta regresiva (refiérase a la pág. 6).
No aparece si el termostato está bloqueado ( ).
Botón
Press to increase the temperature.
Set temperature
Heating Indicator
The number of flames depends on
the heating intensity. The image
disappears when heating stops.
Outdoor temperature
(requires outdoor sensor)
Lock
The thermostat settings are totally
or partially locked. See installation
guide for details.
Si su termostato está configurado
en el modo programable, refiérase a
la página 56 para más información.
69-2475EFS (Honeywell YTL9160 Operating Manual).book Page 52 Friday, June 17, 2011 3:34 PM
EConnect™ Termostato inalámbrico programable/no programable TL9160AR
53
Configuración de la temperatura
Presione o para configurar la temperatura.
Configure la temperatura
69-2475EFS (Honeywell YTL9160 Operating Manual).book Page 53 Friday, June 17, 2011 3:34 PM
Manual de funcionamiento
54
Presione Countdown (cuenta regresiva) para configurar una nueva temperatura y para seleccionar la hora en que
desea mantener esta configuración de temperatura. El termostato regresará a su configuración de temperatura
previa o programada al final del tiempo de cuenta regresiva. El tiempo de cuenta regresiva puede seleccionarse
desde 15 minutos hasta 14 días.
Modo de cuenta regresiva
El modo de cuenta regresiva no está disponible cuando el termostato está bloqueado.
Presione Countdown.Elija el tiempo de la cuenta regresiva. Configure la temperatura.
69-2475EFS (Honeywell YTL9160 Operating Manual).book Page 54 Friday, June 17, 2011 3:34 PM
EConnect™ Termostato inalámbrico programable/no programable TL9160AR
55
Modo de cuenta regresiva (cont.)
El tiempo de cuenta
regresiva cambia en
tiempo real para
mostrar el tiempo
restante.
Puede cambiar el tiempo de
cuenta regresiva y la temperatura
en cualquier momento.
Presione Cancel en cualquier
momento para cancelar el
modo de cuenta regresiva.
69-2475EFS (Honeywell YTL9160 Operating Manual).book Page 55 Friday, June 17, 2011 3:34 PM
Manual de funcionamiento
56
Se muestran la hora y el día actuales y el cronograma de calefacción está disponible únicamente cuando el
termostato está configurado en el modo programable. Cuando el termostato sigue la configuración del cronograma
también muestra el período actual del cronograma: Wake (despertar), Leave (salir), Return (regresar) o Sleep
(dormir). El período no se muestra cuando el termostato se coloca en Temporary Hold (retención temporal) o
Permanent Hold (retención permanente).
Visualizador del termostato en modo programable
Activar el cronograma: aparece cuando el termostato sigue la
configuración del cronograma.
Retención temporal: refiérase a la página 62.
Retención permanente: refiérase a la página 63.
Botón del menú
Presione para acceder al menú para configurar la hora, fecha y el cronograma.
El botón del menú no está disponible cuando el termostato está bloqueado.
Refiérase a la página 52 para la descripción de los otros elementos en el
visualizador del termostato.
Períodos del cronograma
Hora y día actuales
69-2475EFS (Honeywell YTL9160 Operating Manual).book Page 56 Friday, June 17, 2011 3:34 PM
EConnect™ Termostato inalámbrico programable/no programable TL9160AR
57
Run Schedule (activar el cronograma) aparece cuando el termostato sigue la configuración del
cronograma. Su termostato ha sido configurado con una programación para ahorro de energía
que puede disminuir sus gastos de calefacción hasta en 33%.
El cronograma consiste en 4 períodos por día, lo cual representa un día laborable típico. Sin
embargo, puede programar el termostato para que omita (cancele) los períodos que no se apli-
can a su situación. Por ejemplo los períodos Leave y Return (salir y regresar) se omiten en los
fines de semana en el cronograma predeterminado.
You can choose a different program every day; i.e., each period can have a different starting
time and a different temperature every day.
Cómo continuar con el cronograma de calefacción
Monday to Friday
(Mo, Tu, We, Th & Fr) Saturday and Sunday
(Sa & Su)
Período Hora de inicio Temperatura Hora de inicio Temperatura
Wake (despertar) 6:00 AM (6h) 70°F (21.0°C) 8:00 AM (8h) 70°F (21.0°C)
Leave (salir) 8:00 AM (8h) 62°F (16.5°C) - - - - - -
Return (regresar) 6:00 PM (18h) 70°F (21.0°C) - - - - - -
Sleep (dormir) 10:00 PM (22h) 62°F (16.5°C) 10:00 PM (22h) 62°F (16.5°C)
69-2475EFS (Honeywell YTL9160 Operating Manual).book Page 57 Friday, June 17, 2011 3:34 PM
Manual de funcionamiento
58
* *Aparecerá Copy (copiar) sólo si el termostato está conectado a un control remoto o a un sensor exterior..
Configuración de la hora y fecha
Presione Menu.Seleccione Date & Time.Configure la hora. Configure los minutos.
*
69-2475EFS (Honeywell YTL9160 Operating Manual).book Page 58 Friday, June 17, 2011 3:34 PM

EConnect™ Termostato inalámbrico programable/no programable TL9160AR
59
* Cuando esta función está activada, el termostato cambia al horario de verano el segundo domingo de marzo y a la
hora normal el primer domingo de noviembre. Cuando la función está desactivada, el termostato continúa con la
hora normal durante todo el año.
Configuración de la hora y fecha (cont.)
Configure el año. Configure el mes. Configure el
día del mes.
Active/desactive
Daylight Saving Time*
(horario de verano)*.
69-2475EFS (Honeywell YTL9160 Operating Manual).book Page 59 Friday, June 17, 2011 3:34 PM

Manual de funcionamiento
60
Modificación del cronograma de calefacción
Presione Menu.Seleccione Schedule.Seleccione el día
o el grupo* que
desea modificar.
Seleccione el período
que desea modificar.
*Los grupos son: Mo-Fr (Lun-Vie), Sa-Su (Sáb-Dom) y Mon-Su (Lun-Dom). Al seleccionar un grupo se
aplicarán los cambios a todos los días dentro de ese grupo.
69-2475EFS (Honeywell YTL9160 Operating Manual).book Page 60 Friday, June 17, 2011 3:34 PM
EConnect™ Termostato inalámbrico programable/no programable TL9160AR
61
Modificación del cronograma de calefacción (cont.)
Configure la
hora (intervalos
de 15 minutos)
Configure la
temperatura.
Seleccione otro
período o presione
Exit para ir al menú
de selección del día
(paso 3).
Cuando haya
efectuado todos los
cambios, presione
Exit repetidamente
para regresar a la
pantalla principal.
Si desea eliminar un período [(por ej.: desea omitir los períodos de Leave y Return (salir y
regresar) si permanece en casa todo el día], seleccione el período (paso 4) y presione y
simultáneamente. La configuración de hora y temperatura aparece como guiones cuando se
ha borrado el período.
El período Wake (despertar) no puede borrarse.
69-2475EFS (Honeywell YTL9160 Operating Manual).book Page 61 Friday, June 17, 2011 3:34 PM

Manual de funcionamiento
62
Utilice el modo de retención temporal para eludir temporalmente el cronograma y configurar una nueva temperatura.
El termostato conservará la temperatura nueva durante el período actual. El termostato reanudará el cronograma de
calefacción cuando comience el próximo período o si presiona Cancel (cancelar).
Retención temporal
Pulse o hasta que se
muestre la temperatura deseada.
Presione Temporary.En cualquier momento, puede
presionar Cancel para continuar
con el cronograma previo.
69-2475EFS (Honeywell YTL9160 Operating Manual).book Page 62 Friday, June 17, 2011 3:34 PM

EConnect™ Termostato inalámbrico programable/no programable TL9160AR
63
Utilice el modo de retención permanente para eludir el cronograma y configurar una nueva temperatura durante un
período de tiempo indefinido. Para reanudar el cronograma de calefacción, presione Cancel.
Retención permanente
Pulse o hasta que se
muestre la temperatura deseada.
Presione Permanent.En cualquier momento, puede
presionar Cancel para continuar
con el cronograma previo.
69-2475EFS (Honeywell YTL9160 Operating Manual).book Page 63 Friday, June 17, 2011 3:34 PM
Manual de funcionamiento
64
Utilice la función Copy (copiar) para transmitir las configuraciones del cronograma de este termostato a otros
termostatos inalámbricos de su hogar.
Cómo copiar la programación de calefacción
Esta función está disponible sólo si el termostato está conectado a un control remoto o a un sensor de
exteriores. Las configuraciones del cronograma se transmiten a cualesquiera otros termostatos conectados
al mismo control remoto o sensor de exteriores.
Presione Menu.Seleccione Copy.Presione OK.
69-2475EFS (Honeywell YTL9160 Operating Manual).book Page 64 Friday, June 17, 2011 3:34 PM

EConnect™ Termostato inalámbrico programable/no programable TL9160AR
65
Cómo copiar el cronograma de calefacción (cont.)
Wait (esperar) destella cuando las
configuraciones de la programación
se transmiten a otros termostatos
(esto puede durar hasta 2 minutos).
Done (terminado) aparece
cuando la transmisión se
ha terminado.
Presione Exit (salir) dos
veces para regresar a la
pantalla principal.
69-2475EFS (Honeywell YTL9160 Operating Manual).book Page 65 Friday, June 17, 2011 3:34 PM
Manual de funcionamiento
66
* Puede configurar la unidad de visualización de temperatura en °C o °F. Puede configurar el formato del
visualizador de la hora en 12 horas o 24 horas (horario militar) si el termostato está en el modo programable.
** Accesible únicamente si utiliza el termostato en el modo programable.
Cuando la función Adaptive Intelligent Recovery está activada, el termostato "aprende" cuánto tiempo necesita
para alcanzar la temperatura que usted configuró. El termostato determinará entonces cuándo activar la
calefacción para que alcance la temperatura a la hora programada. El termostato reevalúa diariamente la hora de
inicio de la calefacción basado en el rendimiento del día anterior. Cuando la función Adaptive Intelligent Recovery
está desactivada, la calefacción comienza a la hora configurada.
*** Deje en On (encendido) para utilizar el termostato en el modo programable. Coloque en Off (apagado) para
utilizar el termostato en el modo no programable.
Configuración avanzada
Funciones de configuración Configuración
predeterminada Opciones
Formatos de temperatura y hora * °F °C / °F
12h 12h / 24h
recuperación inteligente adaptable ** On On / Off
Modo programable (Schedule) *** On On / Off
69-2475EFS (Honeywell YTL9160 Operating Manual).book Page 66 Friday, June 17, 2011 3:34 PM
EConnect™ Termostato inalámbrico programable/no programable TL9160AR
67
* Estos parámetros están disponibles únicamente si el termostato está configurado en el modo programable.
Acceso al menú de configuración avanzada
Presione este botón
durante 5 segundos para
acceder al menú de
configuración avanzada.
En el menú de configuración
avanzada, presione o
para seleccionar las funciones
de configuración y presione OK.
Menú de configuración
avanzada
Recuperación
inteligente adaptable *12h / 24h *
°C / °F Modo programable
69-2475EFS (Honeywell YTL9160 Operating Manual).book Page 67 Friday, June 17, 2011 3:34 PM

Manual de funcionamiento
68
Termostato
IInstale 2 baterías alcalinas nuevas cuando el aviso Low Battery (batería con
poca carga) comience a destellar. Se recomienda reemplazar las baterías una
vez al año o cuando esté ausente de su vivienda por más de un mes.
Para acceder a las baterías, retire el termostato de la placa de montaje.
Necesitará configurar la hora y fecha si las baterías nuevas no se insertan en
el lapso de 2 minutos después de retirar las existentes. Sin embargo, las
demás configuraciones no se borran.
Después de instalar las baterías nuevas, el termostato restablecerá
automáticamente la comunicación con la red inalámbrica en pocos minutos.
Sensor de aire exterior
Instale 2 baterías nuevas AA de litio cuando el aviso Outdoor Air Sensor
Low Battery (batería con poca carga en el sensor de aire exterior) comience
a destellar en la pantalla del termostato.
Para acceder a las baterías, retire el sensor del soporte y la tapa del sensor.
Una vez instaladas las baterías nuevas, el sensor restablecerá
automáticamente la comunicación con la red inalámbrica en pocos minutos.
Cambio de las baterías
69-2475EFS (Honeywell YTL9160 Operating Manual).book Page 68 Friday, June 17, 2011 3:34 PM

EConnect™ Termostato inalámbrico programable/no programable TL9160AR
69
En caso de inconvenientes / Códigos de error
El sistema de calefacción no
responde • Revise el interruptor de circuito y reinicie si fuese
necesario.
La pantalla muestra "Signal Lost"
(señal perdida) • El termostato perdió la comunicación con la red
inalámbrica (generalmente por un corte de energía). De lo
contrario, revise el interruptor de circuito y, si es necesario,
reinícielo. Cuando se restituya el suministro eléctrico, la
comunicación inalámbrica se restituirá a los pocos minutos.
El termostato muestra "LO" • La temperatura interior está por debajo de 32°F (0°C).
El termostato muestra "HI" • La temperatura interior está por encima de 140°F (60°C).
El termostato muestra "- -" • La lectura de la temperatura no está disponible
actualmente o el sensor está defectuoso.
RIESGO DE DESCARGA ELÉCTRICA
Un electricista certificado deberá prestar servicio o recablear el módulo de interfaz (EIM)
conectado con este termostato.
69-2475EFS (Honeywell YTL9160 Operating Manual).book Page 69 Friday, June 17, 2011 3:34 PM

Manual de funcionamiento
70
Honeywell warrants this product, excluding battery, to be free from defects in the workmanship or materials, under normal use
and service, for a period of three (3) years from the date of purchase by the consumer. If at any time during the warranty period
the product is determined to be defective or malfunctions, Honeywell shall repair or replace it (at Honeywell’s option).
If the product is defective,
(i) return it, with a bill of sale or other dated proof of purchase, to the place from which you purchased it; or
(ii) call Honeywell Customer Care at 1-800-468-1502. Customer Care will make the determination whether the product
should be returned to the following address: Honeywell Return Goods, Dock 4 MN10-3860, 1885 Douglas Dr. N., Golden
Valley, MN 55422, or whether a replacement product can be sent to you.
This warranty does not cover removal or reinstallation costs. This warranty shall not apply if it is shown by Honeywell that the
defect or malfunction was caused by damage which occurred while the product was in the possession of a consumer.
Honeywell’s sole responsibility shall be to repair or replace the product within the terms stated above. HONEYWELL SHALL
NOT BE LIABLE FOR ANY LOSS OR DAMAGE OF ANY KIND, INCLUDING ANY INCIDENTAL OR CONSEQUENTIAL
DAMAGES RESULTING, DIRECTLY OR INDIRECTLY, FROM ANY BREACH OF ANY WARRANTY, EXPRESS OR IMPLIED,
OR ANY OTHER FAILURE OF THIS PRODUCT. Some states do not allow the exclusion or limitation of incidental or
consequential damages, so this limitation may not apply to you.
THIS WARRANTY IS THE ONLY EXPRESS WARRANTY HONEYWELL MAKES ON THIS PRODUCT. THE DURATION OF
ANY IMPLIED WARRANTIES, INCLUDING THE WARRANTIES OF MERCHANTABILITY AND FITNESS FOR A
PARTICULAR PURPOSE, IS HEREBY LIMITED TO THE THREE-YEAR DURATION OF THIS WARRANTY.
Some states do not allow limitations on how long an implied warranty lasts, so the above limitation may not apply to you. This
warranty gives you specific legal rights, and you may have other rights which vary from state to state.
If you have any questions concerning this warranty, please write to Honeywell Customer Relations, 1985 Douglas Dr, Golden
Valley, MN 55422 or call 1-800-468-1502. In Canada, write to Retail Products ON15-02H, Honeywell Limited/Honeywell
Limitée, 35 Dynamic Drive, Scarborough, Ontario M1V 4Z9.
Three-year limited warranty
69-2475EFS (Honeywell YTL9160 Operating Manual).book Page 70 Friday, June 17, 2011 3:34 PM

EConnect™ Termostato inalámbrico programable/no programable TL9160AR
71
Declaración de conformidad con las regulaciones FCC (Sección 15.19)
(solo en los EE. UU.)
Este dispositivo cumple con la Sección 15 de las regulaciones FCC. El
funcionamiento está sujeto a las dos condiciones siguientes:
1) Este dispositivo no debe causar interferencia perjudicial
2) Este dispositivo deberá aceptar cualquier interferencia que se reciba,
incluso la interferencia que pudiese causar el funcionamiento no
deseado.
Advertencia de la FCC (Sección 15.21) (solo en los EE. UU.)
Los cambios o las modificaciones que no hayan sido expresamente
aprobados por la parte responsable del cumplimiento de las regulaciones
podrían anular la autoridad del usuario para hacer funcionar el equipo.
Declaración de la FCC sobre interferencias (Sección 15.105(b)) (solo en
los EE. UU.)
Este equipo fue probado y cumple con los límites de los dispositivos digitales
clase B, conforme a la Sección 15 de las regulaciones FCC. Estos límites
están diseñados para ofrecer una protección razonable contra la interferencia
perjudicial en una instalación residencial. Este equipo genera usos y puede
irradiar energía de frecuencia de radio y, si no se instala y se utiliza según las
instrucciones, puede producir una interferencia perjudicial en la comunicación
radial. Sin embargo, no se garantiza que no habrá interferencia en una
instalación particular. Si este equipo produce una interferencia perjudicial en
la recepción televisiva o radial, lo cual puede determinarse al apagar y
encender el equipo, se recomienda que el usuario intente corregir la
interferencia con una o más de las siguientes medidas:
• Vuelva a orientar y ubicar la antena receptora.
• Aumente la distancia entre el equipo y el receptor.
• Conecte el equipo a un tomacorriente en un circuito diferente a aquel en
el que está conectado el receptor.
• Consulte con su distribuidor o con un técnico experto en radio/televisión
para recibir ayuda.
EIM, termostato y sensor exterior
Para cumplir con los límites de exposición RF que establecen la FCC y
Industry Canada para la población en general/exposición no controlada, la o
las antenas usadas para estos transmisores deben instalarse a una distancia
de separación de, al menos, 20 cm de todas las personas, y no deben
colocarse ni accionarse junto con otra antena o transmisor.
Control remoto
Este transmisor portátil y su antena cumplen con los límites de exposición RF
que establecen la FCC y Industry Canada para la población en general/
exposición no controlada. Este dispositivo no deberá colocarse ni accionarse
conjuntamente con otra antena o transmisor.
Sección 7.1.3 de RSS-GEN
El funcionamiento está sujeto a las dos condiciones siguientes:
1) Este dispositivo no debe causar interferencia
2) Este dispositivo deberá aceptar cualquier interferencia, incluso la
interferencia que pudiese causar el funcionamiento no deseado del
dispositivo.
Sección 7.1.2 de RSS-GEN
De acuerdo con las regulaciones de la industria de Canadá, este transmisor
de radio puede funcionar únicamente utilizando un tipo de antena y una
ganancia máxima (o inferior) aprobada para el transmisor por la industria de
Canadá. Para disminuir la interferencia potencial del radio con otros usuarios,
el tipo de antena y su ganancia deben ser elegidas de tal forma que la
potencia isotrópa radiada equivalente (e.i.r.p.) no sea mayor de lo necesario
para una comunicación eficaz.
Información reguladora
69-2475EFS (Honeywell YTL9160 Operating Manual).book Page 71 Friday, June 17, 2011 3:34 PM
Automation and Control Systems
Solutions de régulation et d’automatisation
Sistemas para automatización y control
Honeywell International Inc.
1985 Douglas Drive North
Golden Valley, MN 55422
http://yourhome.honeywell.com
Honeywell Limited-Honeywell Limitée
35 Dynamic Drive
Scarborough, Ontario M1V 4Z9
Printed in USA
Imprimé aux États Unis
Impreso en EE.UU.
69-2473EF-01 06-11
® U.S. Registered Trademark.
© 2009 Honeywell International Inc.
Patents pending. All rights reserved.
® Marque déposée aux États Unis.
© 2009 Honeywell International Inc.
Brevets en instance. Tous droits réservés.
® Marca registrada en EE.UU.
© 2009 Honeywell International Inc.
Patentes pendientes. Todos los derechos
reservados.
69-2475EFS (Honeywell YTL9160 Operating Manual).book Page 72 Friday, June 17, 2011 3:34 PM