Ademco 8DL5853 Remote Transmitter Security - Glass Break User Manual 5 051 735 00A 5853 new
Honeywell International Inc. Remote Transmitter Security - Glass Break 5 051 735 00A 5853 new
Ademco >
II with FCC Statements
Refer to Supplemental Information (next page) for complete descriptions of these installation steps
5-051-735-00BX Page 1
®
)O
H
[
*XD
U
G
5853
Wir
e
l
ess
G
l
assb
r
ea
k D
e
t
ec
t
o
r In
s
t
a
ll
a
ti
o
n In
s
tr
uc
ti
o
n
s
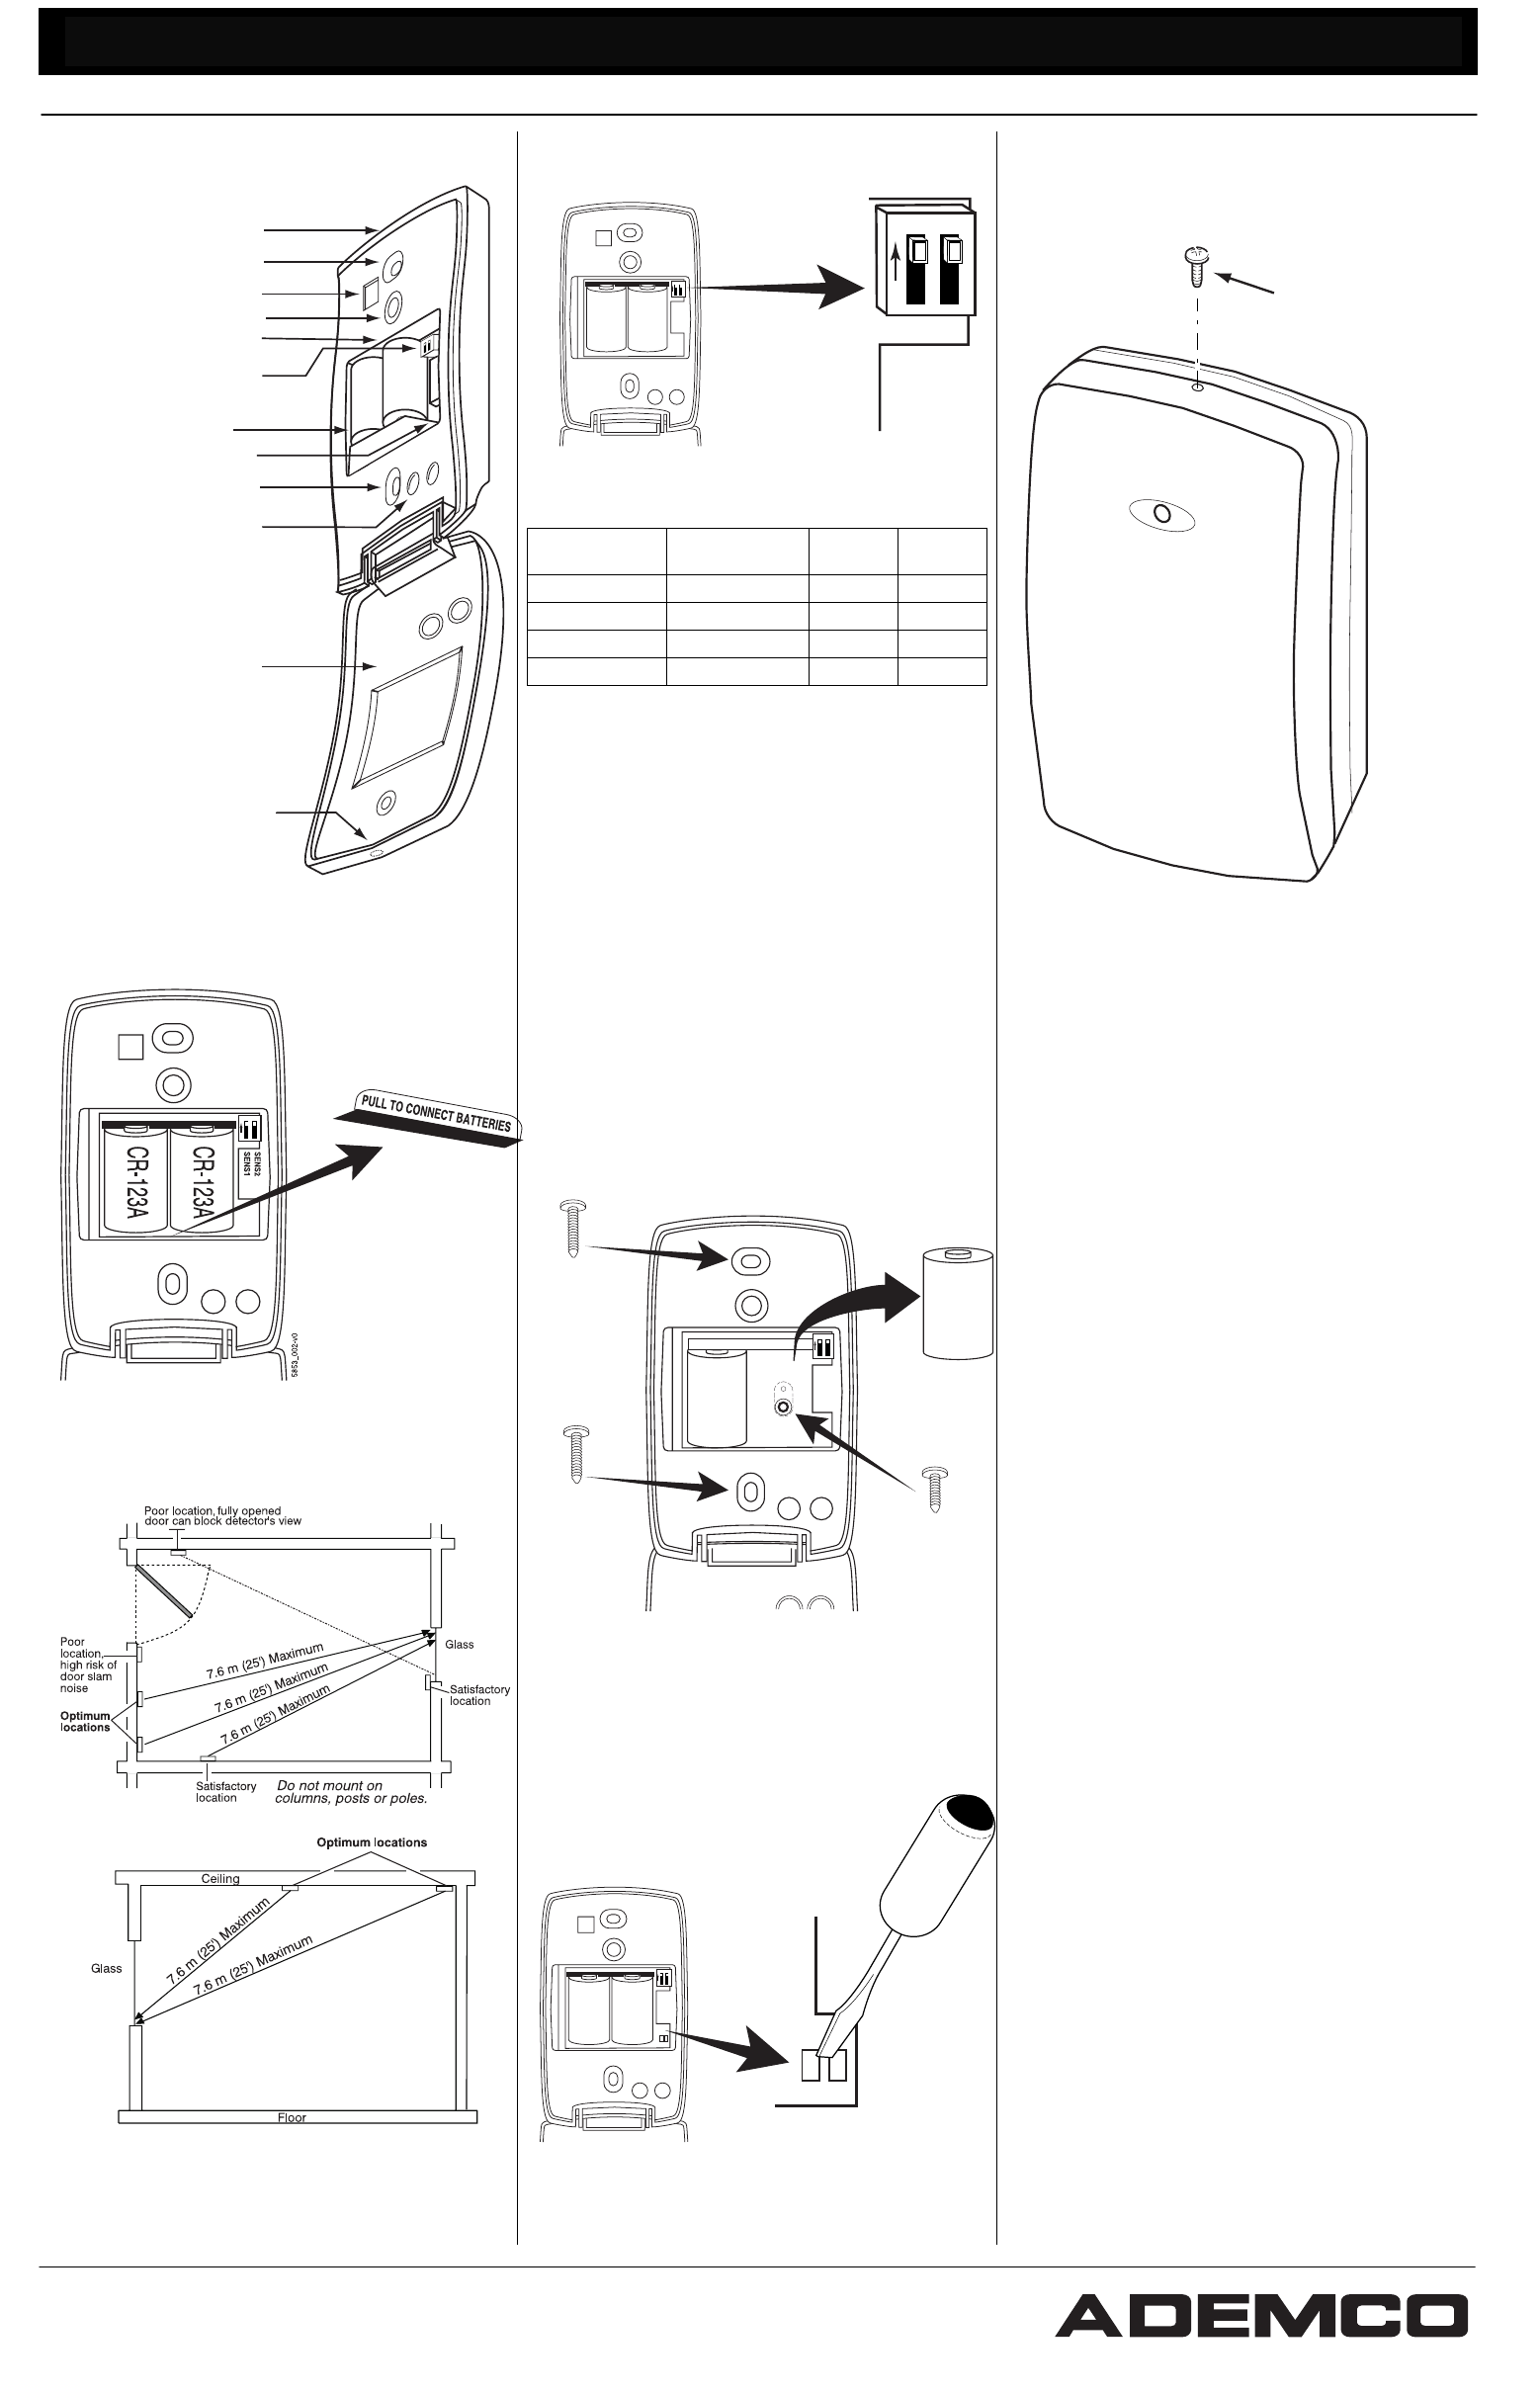
5853 Glassbreak Detector Internal Parts
CR-123A
CR-123A
Mounting Hole
Mounting Hole
Batteries
Front Tamper Switch
LED Indicators
Microphone
Sensitivity Switches
Rear Tamper (behind battery)
Test Mode pads (on PCB)
Front Cover
Latch
Break out flash
for cover screw
2
1
ON
OFF
5853_001-v0
Connect Batteries
Remove pull tab to connect batteries
Select Mounting Location
Wall Mount
(Top View)
WallMount_001-V0
Avoid mounting within
0.3m (1 ft.) of a corner
CeilingMount_001-V0
Ceiling Mount: (Side View)
Avoid mounting within
0.3m (1 ft.) of a corner
Set Sensitivity (Range)
SENS2
SENS1
CR-123A
CR-123A
SENS2
SENS1
5853_004-v0
SENS1 & SENS2 configure sensitivity
SENSITIVITY APPROXIMATE
RANGE
SENS1 SENS2
MAX 25 ft (7.6m) OFF OFF
MEDIUM 15 ft (4.6m) ON OFF
LOW 10 ft (3m) OFF ON
LOWEST 5 ft (1.5m) ON ON
Enroll Detector
Refer to text and control panel's installation
instructions.
When programming the transmitter, specify:
• Input Type = 3 (Supervised RF)
• Loop Number = 1
Mount Detector
• Use mounting holes as a template to mark
mounting locations on ceiling or wall.
•
If using the optional back tamper,
remove
the batteries, then mark the rear tamper
location through its mounting hole.
• Mount detector using appropriate hardware.
• Close detector cover when finished.
CR-123A
CR-123A
SENS2
SENS1
5853_003-v0
Optional Tamper Screw
#6 x 1-1/2"
#6 x 1"
#6 x 1-1/2"
Test Detector Installation
Enter Test Mode using GBS-7 (see text). To enter
Test Mode manually, short Test Mode pads (as below).
CR-123A
CR-123A
SENS2
SENS1
SENS2
SENS1
5853_005-v0
TEST
TEST
Install Cover Screw (optional)
5853_006-V0
2.2 mm (#4) screw,
6 mm (1/4-in.) long
Adjust
Orientation
ON
OFF
Adjust
Orientation
Wall
Wall
Adjust
Orientation
Adjust
Orientation
Per Rich Smith,
Orientation is
correct per plastic.

Refer to Installation Instructions and diagrams (next page) when installing this product
®
©2002 Pittway Corporation All Rights Reserved
FlexGuard is a registered trademark of Honeywell, Inc. - All other
brands mentioned are the trademarks or registered trademarks
of their respective owners. Specifications subject to change
without prior notice.
¬%;§l
5-051-735-00BX 2/02
)OH[*XDUG 5853 Wireless Glassbreak Detector Su
pp
lemental Information
1. General Information
The 5853 Wireless Glassbreak detector with
Transmitter senses the sound of breaking tempered,
laminated, wired, and ordinary plate glass. The self-
contained detector includes a transmitter that can send
alarms, tamper signals, and low battery messages to
the control panel. The sensor is compatible with 5800-
series wireless hardware, and is designed for
continuous operation using two 3V lithium batteries
(CR-123A or equivalent; included)
NOTE: The 5853 is not recommended for protection of
glass areas that are less than 10-7/8 inches by 10-7/8
inches. Refer to the Protected Glass Types section
and chart for complete information.
Prior to installation, you must:
• Connect its batteries by removing the tab,
• Adjust the detector’s sensitivity, and
• “Enroll” the detector’s serial number.
Refer to the following sections to install the 5853.
2. Connecting Batteries/Initial Power Up
To connect the batteries, remove the tab from the end
of the battery holder. The detector will start its power
up sequence, in which both the LED indicators will
illuminate for one second. (The LED indicators are
described later in these instructions.)
3. Adjusting Detector Sensitivity (Range)
The 5853 has four sensitivity settings, which are set
using the SENS1 and SENS2 DIP switches as shown
below. The settings are: 1) maximum; 2) medium; 3)
low; and 4) lowest. By default, sensitivity is set to
MAXIMUM.
To change the detector’s sensitivity, use a small
screwdriver to adjust the SENS1 and SENS2 switches,
as shown in the table below:
SENSITIVITY APPROX.
RANGE *
SENS1 SENS2
MAX 25 ft (7.6m) OFF OFF
MEDIUM 15 ft (4.6m) ON OFF
LOW 10 ft (3m) OFF ON
LOWEST 5 ft (1.5M) ON ON
4. Enrolling Detector Into 5800-Series Receiver
Before the control panel will recognize the 5853, you
must program the device's serial number into the
control panel. This process, ("enrolling") is described
in detail in the control panel's installation instructions.
When programming the transmitter, specify:
• Input Type = 3 (Supervised RF)
• Loop Number = 1
You can transmit the device’s serial number
automatically or enter it manually. To transmit the
number automatically, momentarily activate the front
tamper switch. To enter the serial number manually,
refer to the control panel’s instructions to enroll the serial
ID number which appears on the product.
5. Selecting Installation Location
The 5853 can be mounted on the ceiling or the wall.
Choose a mounting location that is at least 7 feet
(2.1m) from floor and no more than 25 feet (7.6m) from
the farthest protected glass. Be sure the detector has
an unobstructed line-of-sight to the protected glass!
Before mounting the detector permanently, test it to
ensure that it functions satisfactorily in the chosen
mounting location. Verify that the detector can detect
glassbreak sounds, following the directions in the
“Testing the Detector” section. Ensure that the 5853 is
within range of the receiver, following the instructions
for the signal-strength test found in the control panel’s
installation instructions.
(To send the signal required
by the test, activate the detector's front tamper switch.)
If the detector fails, relocate it and repeat both tests.
6. Mounting the Detector
NOTE: If using the rear tamper and installing on dry
wall (sheet rock), position the detector so that the rear
tamper is over a wall stud or ceiling joist.
To mount the detector:
1. Using the 5853 mounting holes as a template,
mark mounting locations on the ceiling or wall.
2.
If using the optional back tamper,
remove
the batteries, then mark the rear tamper
location through its mounting hole.
3. If required by the mounting location, install
wall anchors for the mounting screws.
4. Secure the 5853 to the wall or ceiling,
oriented so the microphone has the best line
of sight to the protected glass.
5. Reinstall the batteries if previously removed.
6. Close and secure the detector front cover.
7. Testing the Detector
The detector should be tested at least once each year.
Test the detector with the GBS-7 Glassbreak Simulator.
Other simulators will not give accurate indication of
range.
To enter the test mode manually, do the following:
To enter Test Mode manually:
1. Open the front cover.
2. Use a screwdriver to short the Test Mode
pads on the PC board (see diagram on next
page).
3. Close the front cover.
The detector’s green LED blinks approximately once per
second to indicate that it has entered the test mode.
To enter the Test Mode with the GBS-7:
1. Stand within 4.6 m (15 feet) of the detector.
2. Switch the GBS-7 to ACTIVATE and MANual
modes.
3. Point the front of the glassbreak simulator
towards the detector and press the red
START button. The simulator buzzes a short
activation code.
When the detector enters Test Mode, the green LED
on the detector flashes about once per second. If the
green LED does not flash, move closer to the detector
and repeat the procedure.
Testing the Detector (flex and audio signals):
To test the 5853, do the following:
1. Place the detector in Test Mode.
2. Set the GBS-7 switches to the TEST and
FLEX positions.
3. Position the GBS-7 near the farthest point of
the protected glass, and point it directly at the
detector. If window coverings are present,
close them fully and hold the GBS-7 between
the coverings and the protected glass.
4. Press the red START button. The simulator
clicks on and starts an eight-second armed
period.
5. Generate a flex signal by carefully striking the
glass with a cushioned tool. The GBS-7
responds with a burst of glassbreak audio.
If the detector receives both the flex and audio signals
properly, its red Alarm LED lights for 5 seconds. (Red
Alarm LED does not latch.)
Testing the Detector (audio signals only):
The GBS-7 can also be used to test the detector’s
ability to receive audio signals only. See the GBS-7
Operating Instructions for additional information. When
it receives the audio signal, the detector flickers its
green Event LED.
Exiting Test Mode:
When you have finished testing, exit Test Mode by
following the same procedure used to enter Test Mode.
The detector automatically exits Test Mode after five
minutes if no events are detected.
8. LED Indicators
The detector is equipped with two LEDs: a green Event
LED and a red Alarm LED. When the LEDs are
enabled during testing, they light in a variety of patterns
to convey the detector’s operational status. The
following table summarizes the LED messages.
(Please note that the LEDs are only enabled during
Test Mode, and are inactive during normal operation.)
CONDITION GREEN LED RED LED
Power up ON 1 second ON 1 second
Test Mode Flash once per sec OFF
Test Mode, event detected Flicker OFF
Test Mode, alarm Flash once per sec ON 5 seconds
Low Battery * Flash once per sec Flash once per sec
* If battery voltage drops too low, LEDs are no longer visible.
9. Cover Screw
The front cover can be secured after installation. To do
so, remove the cover breakout flash (illustration on next
page) and secure the front cover with a ¼-in., #4
(2.2mm) screw (supplied).
10. Maintaining Proper Operation
To maintain the 5853 Glassbreak Detector in proper
working order, please observe the following:
Replace the batteries when the system indicates a low
battery condition (refer to the control panel’s operating
instructions.) Be sure to replace the batteries with the
proper type and voltage, and ALWAYS replace both
batteries at the same time.
This device should not be relocated without the advice
or assistance of the alarm service company.
Fans, air conditioners, blowers, loudspeakers, or other
sources of vibration and sound should not be
introduced into the protected area after installation of
glassbreak detectors. If unavoidable, contact the alarm
service company; re-adjust/re-test the equipment as
needed.
11. Protected Glass Types Chart
NOTE: The 5853 is NOT recommended for protection of glass
areas smaller than 10-7/8 inches x 10-7/8 inches.
Nominal Thickness
Glass Type* Minimum Maximum
Plate 2.4mm (3/32 in.) 10mm (3/8 in.)
Tempered 3mm (1/8 in.) 10mm (3/8 in.)
Laminated1 3mm (1/8 in.) 14mm (3/8 in.)
Wired 6mm (1/4 in.) 6mm (1/4 in.)
Coated2 3mm (1/8 in.) 6.4mm (1/4 in.)
Sealed Insulating1 3mm (1/8 in.) 6mm (1/4 in.)
* Minimum size for all types is 28cm (11 in.) square; glass must be
framed in the wall or mounted in a barrier at least 0.9m (36 in.) wide.
1 Protected only if both plates in the unit are broken
2 Coated glass with security films, including films for solar protection, up
to 12 mi., thick may be used. Film Technologies, Inc.'s GLASS
GARD® GLL 1200 has been evaluated with this product by
Underwriters Laboratories Inc. at ADEMCO's request.
12. Specifications
Power:
Two 3 V Batteries (included). Replace only with ADEMCO #
466, Panasonic CR123A, Sanyo CR123A, Duracell DL123A, or
Varta CR123A (Lithium Manganese Dioxide)
Maximum/Minimum Ranges:
Maximum range is 25 ft (7.6m) from farthest protected glass.
No minimum range.
Operating Temperature:
14° to 122° F (-10° to 50° C)
Accessories:
ADEMCO GBS7 Glassbreak Simulator
13. NOTICES
FCC NOTICE (FCC ID: CFS8DL5853)
This device complies with Part 15 of FCC rules. Operation is subject to the
following two conditions: (1) This device may not cause harmful interference,
and (2) this device must accept any interference received, including
interference that may cause undesired operation.
TO THE INSTALLER
Regular maintenance and inspection (at least annually) by the installer and
frequent testing by the user are vital to continuous satisfactory operation of
any alarm system. The installer should assume the responsibility of
developing and offering a regular maintenance program to the user as well as
acquainting the user with the proper operation and limitations of the alarm
system and its component parts. Recommendations must be included for a
specific program of testing (at least weekly) to ensure the system’s proper
operation at all times.
REFER TO THE INSTALLATION INSTRUCTIONS FOR THE
RECEIVER/CONTROL WITH WHICH THIS DEVICE IS USED FOR
DETAILS REGARDING WARRANTY INFORMATION AND
LIMITATIONS OF THE ENTIRE ALARM SYSTEM.
Or use a wall anchor
that will not pull out.
wall
line-of-
site
To test, you must first place the detector in test mode.
Are these for end
user? Not likely to
see II.
Add: When ceiling mounted, the microphone
should be pointed toward the glass being
protected.
Add Note 3
3 In compliance with Underwriters Laboratories of
Canada's Standard for Intrusion Detection Units
(CAN/ULC-S306-M89):
a. Plate glass 3 mm (1/8 in.) to 10 mm (3/8 in.)
can be used.
b. ULC recognizes a maximum range for
protecting sealed insulated glass and coated glass
of 2.3 m (7.5 ft.). Sensitivity should be set at Max.
3
2,3
1,3
Missing Specs:
RFI
ESD
Dimensions & Weight
Approvals & Listings
Expected battery life
at spec conditions?
How long after first
advisory does service
guy have? (Not in scope
of this II?)