Ademco 8DL6SHKA Wireless Shock/Door/Window Sensor User Manual 20190206 v1 SiXSHOCK EXHIBIT 7 1 Manual

Ademco Inc. Wireless Shock/Door/Window Sensor 20190206 v1 SiXSHOCK EXHIBIT 7 1 Manual

Contents

User Manual_20190206_v1 - SiXSHOCK EXHIBIT 7-1 Manual
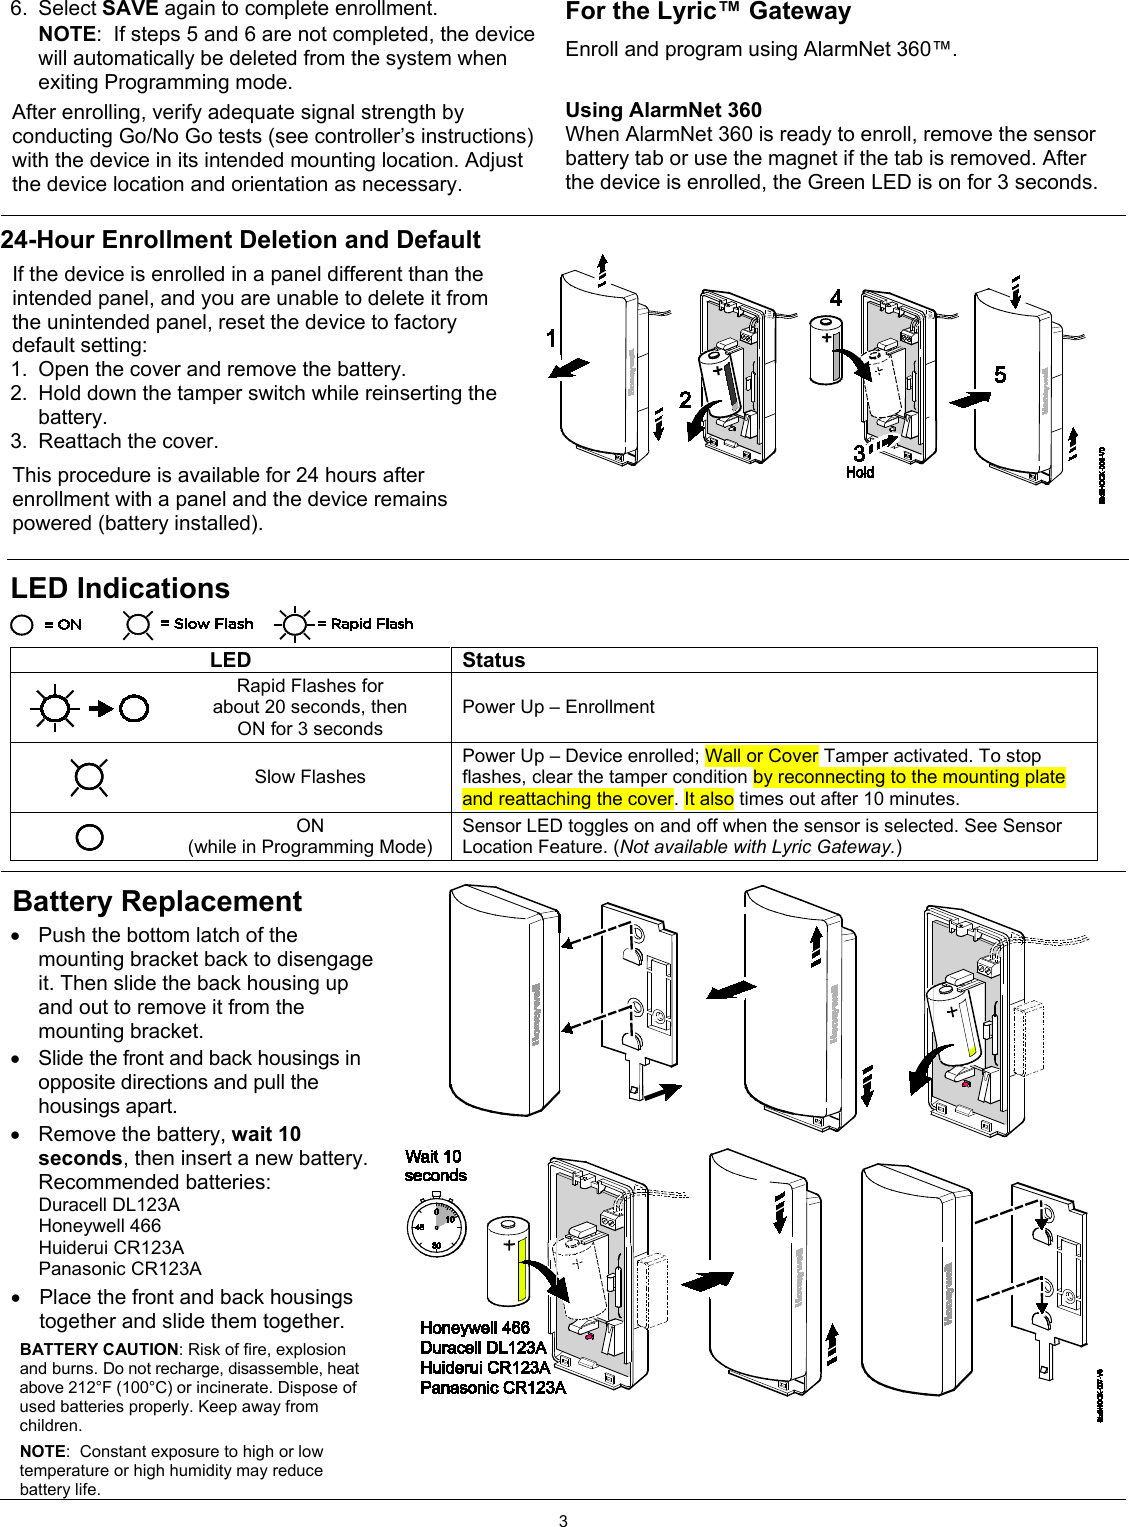
   SiXSHOCK Wireless Shock/Door/Window Sensor Installation Instructions  The SiXSHOCK is a 3-zone wireless shock/door/window sensor is intended for use with Honeywell controls that support SiX™ series devices. It provides  • Reed switch/magnet zone • External wired contact zone • Built-in shock sensor zone  Typical shock protection area:  10 - 12 sq. ft. / 5 - 6 foot radius (3.05m – 3.66m / 1.52m – 1.83m radius)  The coverage area can vary depending on the mounting surface.   Open the SiXSHOCK  Firmly slide the top and bottom housings in opposite directions and pull them apart to open the device.   Installation Options The SiXSHOCK can be mounted with several options: • Loop 1: Built-in shock sensor alarm status  • Loop 2: Normally closed, built in reed switch, used with the included magnet (1)  • Loop 3: Externally wired, closed-circuit contact loop connected to the Terminal Block   NOTE:Wiring limit is 3ft.  Gap specifications:  a. Make gap is at least 0.8" (1)  b. Break gap is at least 0.95" (1)  (reduced about 30% for steel)
 2  Mounting TheSiXSHOCKsensor MUST be mounted as follows: • On swinging doors: mount on upper corner, opposite hinge is ideal • On sliding windows and doors: on the frame  (on moving section when magnet is used) Double sided tape and screws provided for mounting.  Signal Strength Guide Signal strength: Range of 1-4 bars (green); should be minimum 1 green bar for the Zone being programmed.  Four red bars indicate poor signal strength; the device should be relocated.   See the Control’s instructions for bar indication signal strength values. Icon Description Signal Strength  Four Green Bars Good  Three Green Bars  Two Green Bars  One Green Bar  Four Red Bars Relocate the device       Enroll and Set Up  For the Lyric™ Controller NOTE: The SiXSHOCK can be enrolled and programmed before or after installation. 1. Set the Lyric Controller in Programming Mode: Security > Tools > [installer code] > Program > (scroll down) > SiX Programming. 2. Pull the battery tab to activate the SiXSHOCK. (Use the magnet if the battery tab is removed.) 3. The LED flashes (up to about 20 seconds*) during enrollment. • All services (Reed and Terminal Block) are enrolled in sequential (or next available) zone numbers. • The device sends its unique MAC ID (Serial Number); the controller registers the device and displays the transmitter data on screen. *NOTE: Enrollment time varies depending on the signal strength between the device and the controller. 4. When done, the LED is ON for 3 seconds and the control beeps to confirm enrollment.  NOTE: If the device is not successfully enrolled during the enrollment period, the LED turns off and the device powers down. Activate a tamper, wired service (loop) or the reed switch to restart the enrollment process. 5. For each zone being used, press Edit to program it. Reed Switch Zone: press the Edit button to assign the Zone Descriptors and set the Device Types. Verify the Service and Response Types and set other options as desired. Press Save. Terminal Bock Zone: select to enable and press the Edit button to assign the Zone Descriptors and set the Device Types. Verify the Service and Response Types and set other options as desired. Press Save.    NOTE: Once enrolled in a system, the SiXSHOCK cannot be used with another controller until it is removed from the current controller. See the Controller’s instructions for details. Sensor Location Feature: To verify the location of each SiX device in an installation, enter programming mode and select a SiX device. The device LED lights. Select it again to turn the LED off or select the next device to locate.
 3  6.  Select SAVE again to complete enrollment. NOTE:  If steps 5 and 6 are not completed, the device will automatically be deleted from the system when exiting Programming mode. After enrolling, verify adequate signal strength by conducting Go/No Go tests (see controller’s instructions) with the device in its intended mounting location. Adjust the device location and orientation as necessary.  For the Lyric™ Gateway Enroll and program using AlarmNet 360™.  Using AlarmNet 360  When AlarmNet 360 is ready to enroll, remove the sensor battery tab or use the magnet if the tab is removed. After the device is enrolled, the Green LED is on for 3 seconds.  24-Hour Enrollment Deletion and Default If the device is enrolled in a panel different than the intended panel, and you are unable to delete it from the unintended panel, reset the device to factory default setting: 1. Open the cover and remove the battery. 2. Hold down the tamper switch while reinserting the battery. 3. Reattach the cover.  This procedure is available for 24 hours after enrollment with a panel and the device remains powered (battery installed).    LED Indications  LED Status   Rapid Flashes for about 20 seconds, then ON for 3 seconds Power Up – Enrollment  Slow Flashes Power Up – Device enrolled; Wall or Cover Tamper activated. To stop flashes, clear the tamper condition by reconnecting to the mounting plate and reattaching the cover. It also times out after 10 minutes.  ON (while in Programming Mode) Sensor LED toggles on and off when the sensor is selected. See Sensor Location Feature. (Not available with Lyric Gateway.)  Battery Replacement  • Push the bottom latch of the mounting bracket back to disengage it. Then slide the back housing up and out to remove it from the mounting bracket.  • Slide the front and back housings in opposite directions and pull the housings apart.  • Remove the battery, wait 10 seconds, then insert a new battery. Recommended batteries:  Duracell DL123A Honeywell 466 Huiderui CR123A Panasonic CR123A  • Place the front and back housings together and slide them together. BATTERY CAUTION: Risk of fire, explosion and burns. Do not recharge, disassemble, heat above 212°F (100°C) or incinerate. Dispose of used batteries properly. Keep away from children. NOTE:  Constant exposure to high or low temperature or high humidity may reduce battery life.
   Specifications: Battery: 1 x 3V Lithium, Honeywell 466, Panasonic CR123A,     Duracell DL123A or Huiderui CR123A Tamper: Cover and Wall  RF Frequency: 2.4GHz Operating Temperature:  32° – 122° F / 0° – 50° C     (Agency Compliance 32° – 120° F / 0° – 49° C) Relative Humidity: 95% max. (Agency Compliance - 93% max.),     non-condensing  Dimensions: 1” H x 3.13” L x 1.61” W / 25.5 mm H x 79.5 mm L x 41 mm W  Approval Listings: FCC / IC cETLus Listed      Conforms to UL 634       Certified to ULC/ORD-C634 Other Standards: RoHS  Product must be tested at  least once each year  FEDERAL COMMUNICATIONS COMMISSION & INDUSTRY CANADA STATEMENTS The user shall not make any changes or modifications to the equipment unless authorized by the Installation Instructions or User's Manual. Unauthorized changes or modifications could void the user's authority to operate the equipment.    CLASS B DIGITAL DEVICE STATEMENT This equipment has been tested to FCC requirements and has been found acceptable for use. The FCC requires the following statement for your information:  This equipment generates and uses radio frequency energy and if not installed and used properly, that is, in strict accordance with the manufacturer's instructions, may cause interference to radio and television reception. It has been type tested and found to comply with the limits for a Class B computing device in accordance with the specifications in Part 15 of FCC Rules, which are designed to provide reasonable protection against such interference in a residential installation. However, there is no guarantee that interference will not occur in a particular installation. If this equipment does cause interference to radio or television reception, which can be determined by turning the equipment off and on, the user is encouraged to try to correct the interference by one or more of the following measures:   •  If using an indoor antenna, have a quality outdoor antenna installed. •  Reorient the receiving antenna until interference is reduced or eliminated. •  Move the radio or television receiver away from the receiver/control. •  Move the antenna leads away from any wire runs to the receiver/control. •  Plug the receiver/control into a different outlet so that it and the radio or television receiver are on different branch circuits. •  Consult the dealer or an experienced radio/TV technician for help. INDUSTRY CANADA CLASS B STATEMENT This Class B digital apparatus complies with Canadian ICES-003. Cet appareil numérique de la classe B est conforme à la norme NMB-003 du Canada. FCC / IC STATEMENT This device complies with Part 15 of the FCC Rules, and Industry Canada’s license-exempt RSSs. Operation is subject to the following two conditions: (1) This device may not cause harmful interference, and (2) This device must accept any interference received, including interference that may cause undesired operation. Cet appareil est conforme à la partie 15 des règles de la FCC et exempt de licence RSS d’Industrie Canada. Son fonctionnement est soumis aux conditions suivantes: (1) Cet appareil ne doit pas causer d’interférences nuisibles. (2) Cet appareil doit accepter toute interférence reçue y compris les interférences causant une réception indésirable. RF EXPOSURE Warning – The antenna(s) used for this device must be installed to provide a separation distance of at least 7.8 inches (20 cm) from all persons and must not be co-located or operating in conjunction with any other antenna or transmitter except in accordance with FCC and ISED multi-transmitter product procedures. Mise en Garde Exposition aux Fréquences Radio : La/les antenne(s) utilisée(s) pour cet émetteur doit/doivent être installée(s) à une distance de séparation d'au moins 20 cm (7,8 pouces) de toute personne et ne pas être située(s) ni fonctionner parallèlement à tout autre transmetteur ou antenne, excepté en conformité avec les procédures de produit multi transmetteur FCC et ISED.  Support and Warranty REFER TO THE INSTALLATION INSTRUCTIONS FOR THE CONTROL WITH WHICH THIS DEVICE IS USED, FOR DETAILS REGARDING LIMITATIONS OF THE ENTIRE ALARM SYSTEM. For the latest documentation and online support information, please go to: https://mywebtech.honeywell.com/   For the latest warranty information, please go to: www.honeywell.com/security/hsc/resources/wa.   For patent information, see www.honeywell.com/patents    MyWebTech  Warranty  Patents   2017 Honeywell International Inc.  Honeywell is a  registered trademark of Honeywell International Inc.   All other trademarks are the properties of their respective  owners.  All rights reserved.     SiXSHOCK   800-23972  11/17  Rev A      2 Corporate Center Drive, Suite 100 P.O. Box 9040, Melville, NY 11747 www.honeywell.com/security

Navigation menu