Ademco GPIO332 Geopoint Wireless I/O User Manual
Honeywell International Inc Geopoint Wireless I/O Users Manual
Ademco >
Users Manual

Installation Instructions
GP-IO-332, GP-IO-332-E
© Honeywell Page 1 - Printed in USA LT-GP-II-01 Rev. A
Before you begin
Before installing the GP-IO-332, configure it according to
the instructions in the Geopoint Hub and I/O Installation
and Operation Guide (LT-GPIOG) available on the Alerton
Support Network.
Overview
Warning! Always install equipment in accordance with the
instructions and in a manner consistent with electrical codes and
the authority having jurisdiction. Read all instructions before
mounting and wiring.
ATTENTION! Installez tout le matériel en conformité avec le
Code national de l'électricité et d'une manière acceptable pour
l'autorité locale compétente. Lisez tout instructions avant
l'installation du matériel. Le non respect des instructions peut
entraîner des dommages matériels ou une situation dangereuse.
The GP-IO-332 is a wireless device that eliminates the
need for long cabling between a unitary controller and its
physical I/O. Its multiple inputs and outputs can be
concentrated onto the BACnet bus by the GP-HUB-100
receiver. These instructions will help you mount and wire
the device and then verify that it functions correctly.
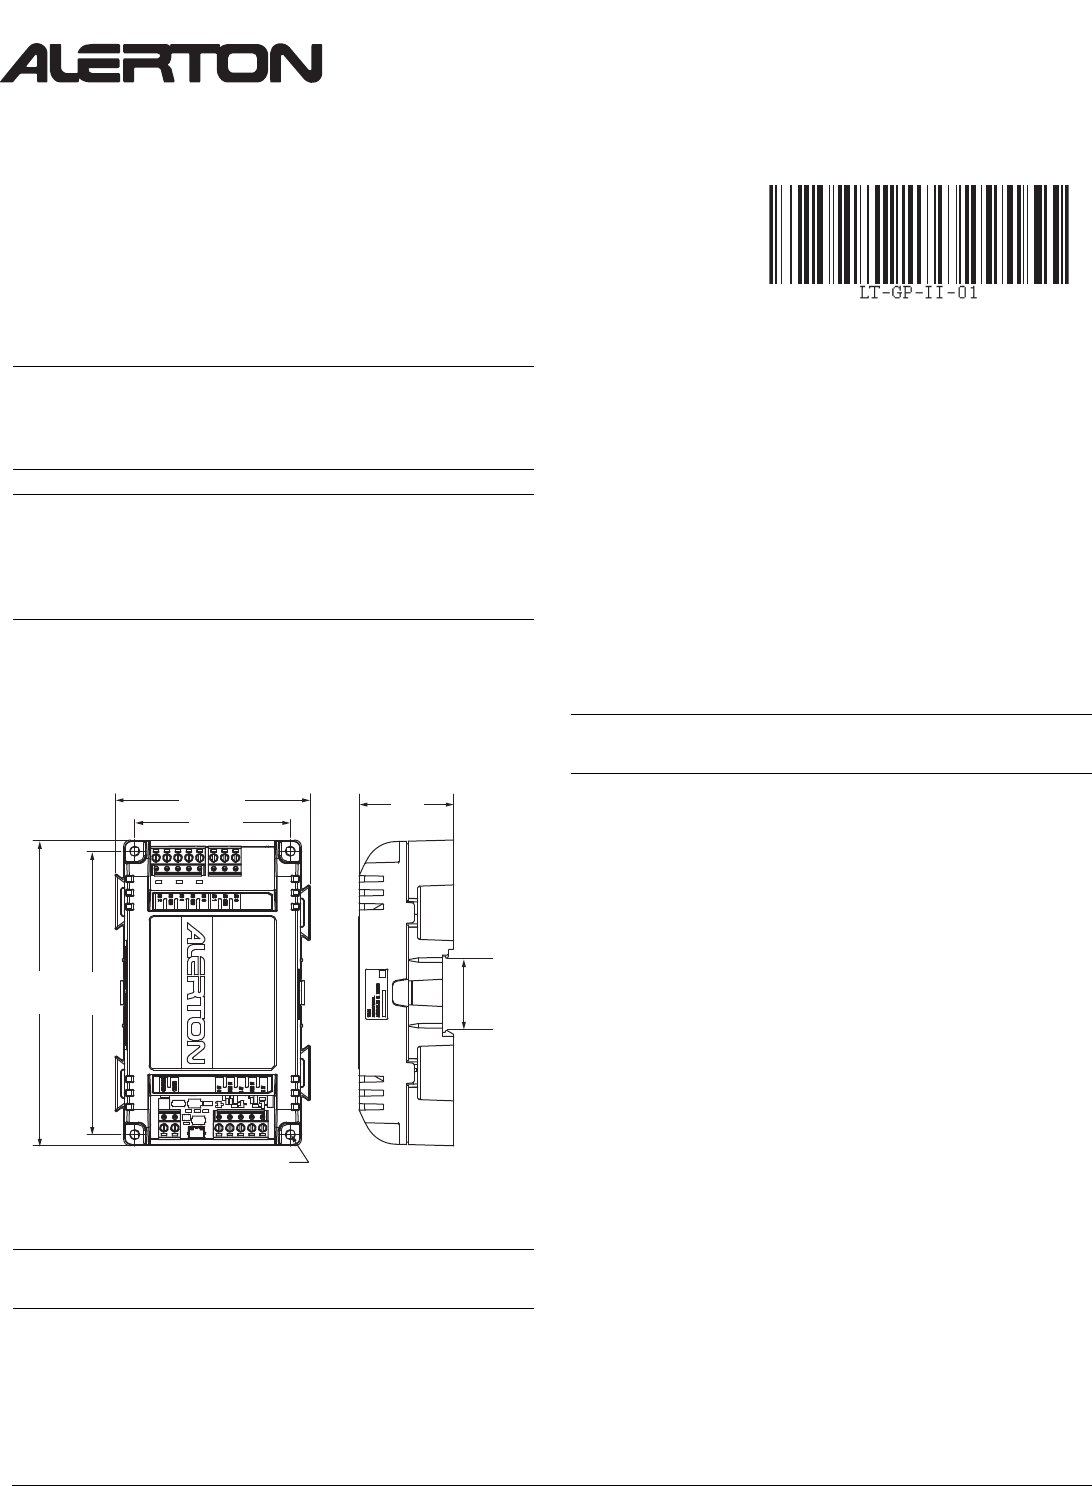
Fig. 1 GP-IO-332 dimensions in in. (mm).
Note The GP-HUB-100 signal receiver has the same
dimensions and mounting holes as the GP-IO-332.
Specifications
Supply Voltage: 24VAC (typical), 50/60Hz. 5VA (max)
Operating Temperature: -18°C to 70°C (0°F to 158°F)
Operating Humidity: RH 5% to 95%, non-condensing
Storage Temperatures: -40°C to 70°C (-40°F to 158°F)
Mounting
Choose a mounting location that reduces interference
between the GP-IO-332 and the GP-HUB. Some points to
consider when selecting a location:
The effective communication range is 400 feet through open
air and 100 feet through two non-metallic walls.
Any metal (ducting, equipment, metal studs, and so on) near
the device or between two devices will impede radio waves.
If a wall has metal components (studs, ductwork, and so on)
radio waves will tend to travel along the plane of the wall.
Mounting the device on the same wall as other device(s) will
increase signal strength.
When mounting near ductwork or other metal, use
doublesided tape to mount the device while testing radio
reception.
Mount the GP-IO-332 indoors or in a weatherproof enclosure.
Important! Enclosures, if used, must not block 2.4GHz RF. Use
polyester/fiberglass models. If unsure, consult the manufacturer.
DIN rail mounting
• To mount the GP-IO-332 on a 35mm DIN rail
1Hold the device with its top tilted toward the DIN
rail and then hook the two top tabs on the back of
the device onto the top of the DIN rail.
2Push down and in to snap the connector onto the
rail.
To remove the GP-IO-332 from a DIN rail, push straight up
from the bottom to release the top tabs and then pull the
top of the device outward.
Wall mounting
To mount the GP-IO-332 on a wall, position the device in
any orientation and secure it to the wall with size 6 or 8
screws appropriate for the mounting surface.
5.50
(139.6)
5.10
(129.4)
2.80 (71)
3.51 (89.1) 1.70
(43.3)
0.18 (4.6) MOUNTING HOLES x 4
DIN RAIL
1.4 (35)

© Honeywell Page 2 - Printed in USA LT-GP-II-01 Rev. A
Wiring
Once the GP-IO-332 is mounted, connect the power.
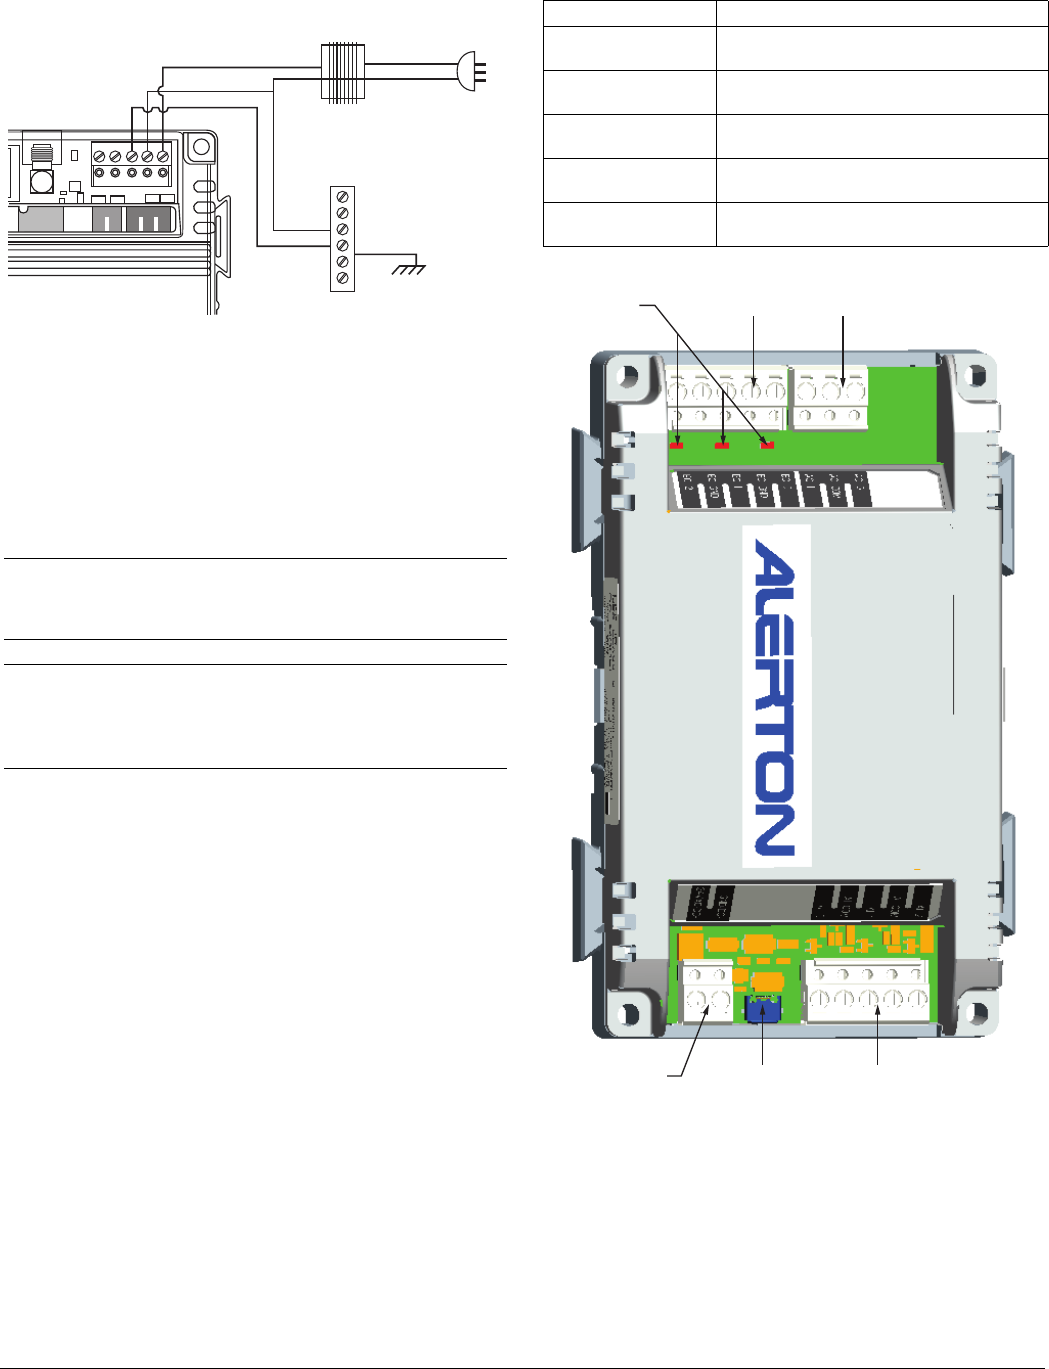
Fig. 2 Wiring diagram.
Connecting power
Connect the GP-IO-332 to 24VAC power from a UL
Listed Class-2 24VAC transformer (not included). You
can use the same transformer for the GP-HUB-100 and
other associated controller(s) as long as the total load
does not exceed 100VA and all devices are half-wave.
The GP-IO-332 is a half-wave device.
CAUTION! Half-wave devices and full-wave devices must not
use the same AC transformer. You must maintain wiring
polarity. Failure to do so can result in equipment damage.
ATTENTION! Les dispositifs demi-onde et les dispositifs à
onde pleine ne doivent pas utiliser le même transformateur AC.
Le défaut de maintient de la polarité du câblage peut
endommager l'équipement.
USB Power
The GP-IO-332 can also be powered from a USB cable
that provides 5VDC power. Some USB ports can supply
sufficient power and some can not. Review the user
documentation for the power source to determine
whether the USB port supplies sufficient power.
DIP Switches
The GP-IO-332 has two banks of DIP switches. The first,
6-position switch, sets the network address for the
wireless network (must match GP-HUB-100). The
second, 8-position switch, is used to set the Remote
Device address (0-99) that the device will use when
connecting to the Hub.
The RSSI LEDs also flash to indicate error conditions.
Fig. 3 Locations of GP-IO-332 components.
XXXXXXXXXXXXXX
GND
COM
24VAC
MSTP-
POWER
MSTP+
XFMR
24VAC
O/P
FUSED AC
SOURCE
PANEL GROUND
Table 1 RSSI Error Conditions
Flash Pattern Status
One red No communication or the device has not
joined the wireless network
One yellow and two
green
Wireless network MAC address does not
match device type
Two green Multiple devices have identical wireless
network MAC addresses
One red and one green Lost communication with GP-HUB-100.
Working to re-establish connection.
One flashing red and
two solid green
Device initialization in progress
BO LED
AC POWER
TERMINALS
USB
TERMINALS
AI TERMINALS
BO TERMINALS AO TERMINALS

© Honeywell Page 3 - Printed in USA LT-GP-II-01 Rev. A
Notice
This device complies with Part 15 of the FCC rules.
Operation is subject to the following two conditions: (1)
this device may not cause harmful interference, and (2)
this device must accept any interference received,
including interference that may cause undesired
operation.
Any modifications not expressly approved by the party
responsible for compliance could void the user’s
authority to operate this equipment. To comply with the
FCC RF exposure compliance requirements, this device
and its antenna must not be co-located or operated in
conjunction with any other antenna or transmitter.
CAN RSS-Gen/CNR-Gen Canadian
conformance statements
This device complies with Industry Canada license-
exempt RSS standard(s). Operation is subject to the
following two conditions: (1) this device may not cause
interference, and (2) this device must accept any
interference, including interference that may cause
undesired operation of the device.
Le présent appareil est conforme aux CNR d'Industrie
Canada applicables aux appareils radio exempts de
licence. L'exploitation est autorisée aux deux conditions
suivantes: (1) l'appareil ne doit pas produire de
brouillage, et (2) l'utilisateur de l'appareil doit accepter
tout brouillage radioélectrique subi, même si le brouillage
est susceptible d'en compromettre le fonctionnement.
FCC & IC Radiation Exposure Statement
This equipment complies with FCC radiation exposure
limits set forth for an uncontrolled environment and meets
the exemption from the routine evaluation limits in
section 2.5 of RSS 102.

© Honeywell Page 4 - Printed in USA LT-GP-II-01 Rev. A