Ademco Q2260SN Microwave/PIR Polling Loop Motion Sensor User Manual k5510 ii
Honeywell International Inc. Microwave/PIR Polling Loop Motion Sensor k5510 ii
UserManual.wiki
>
Ademco
>
Q2260SN User Manual
Exhibit D Users manual per 2 1033 b 3
Navigation menu
Upload a User Manual
Namespaces
Wiki Guide
HTML
PDF
Info
Views
User Manual
Discussion / Help
Navigation
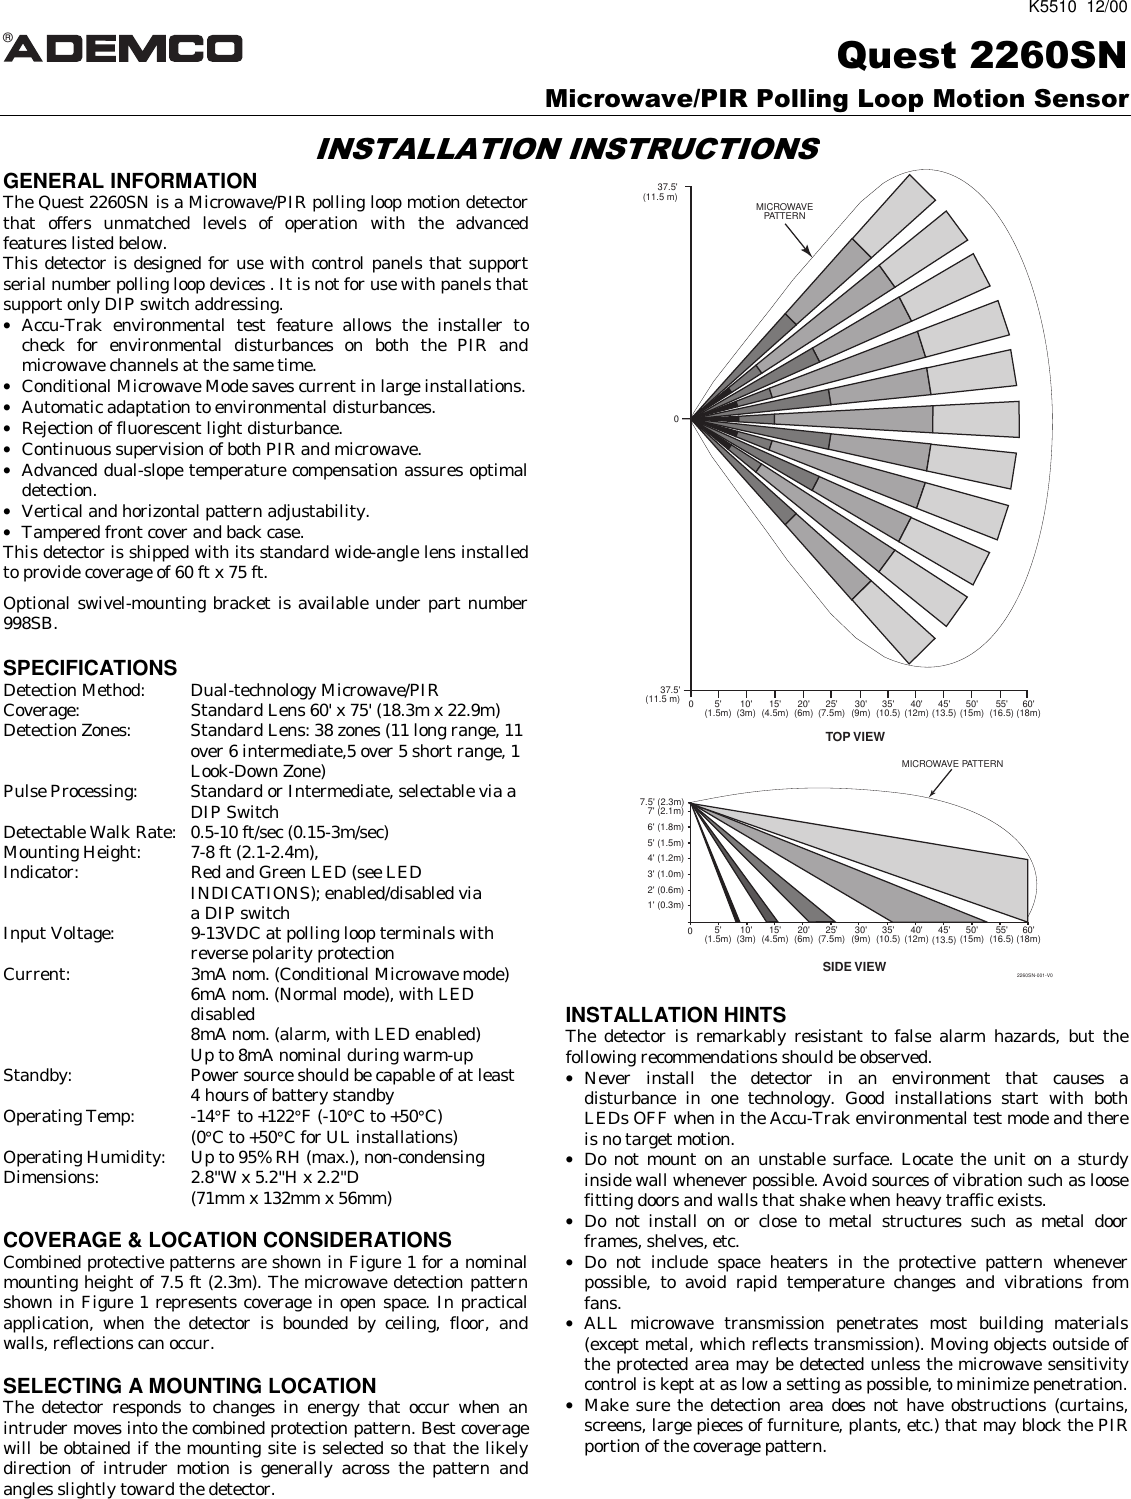
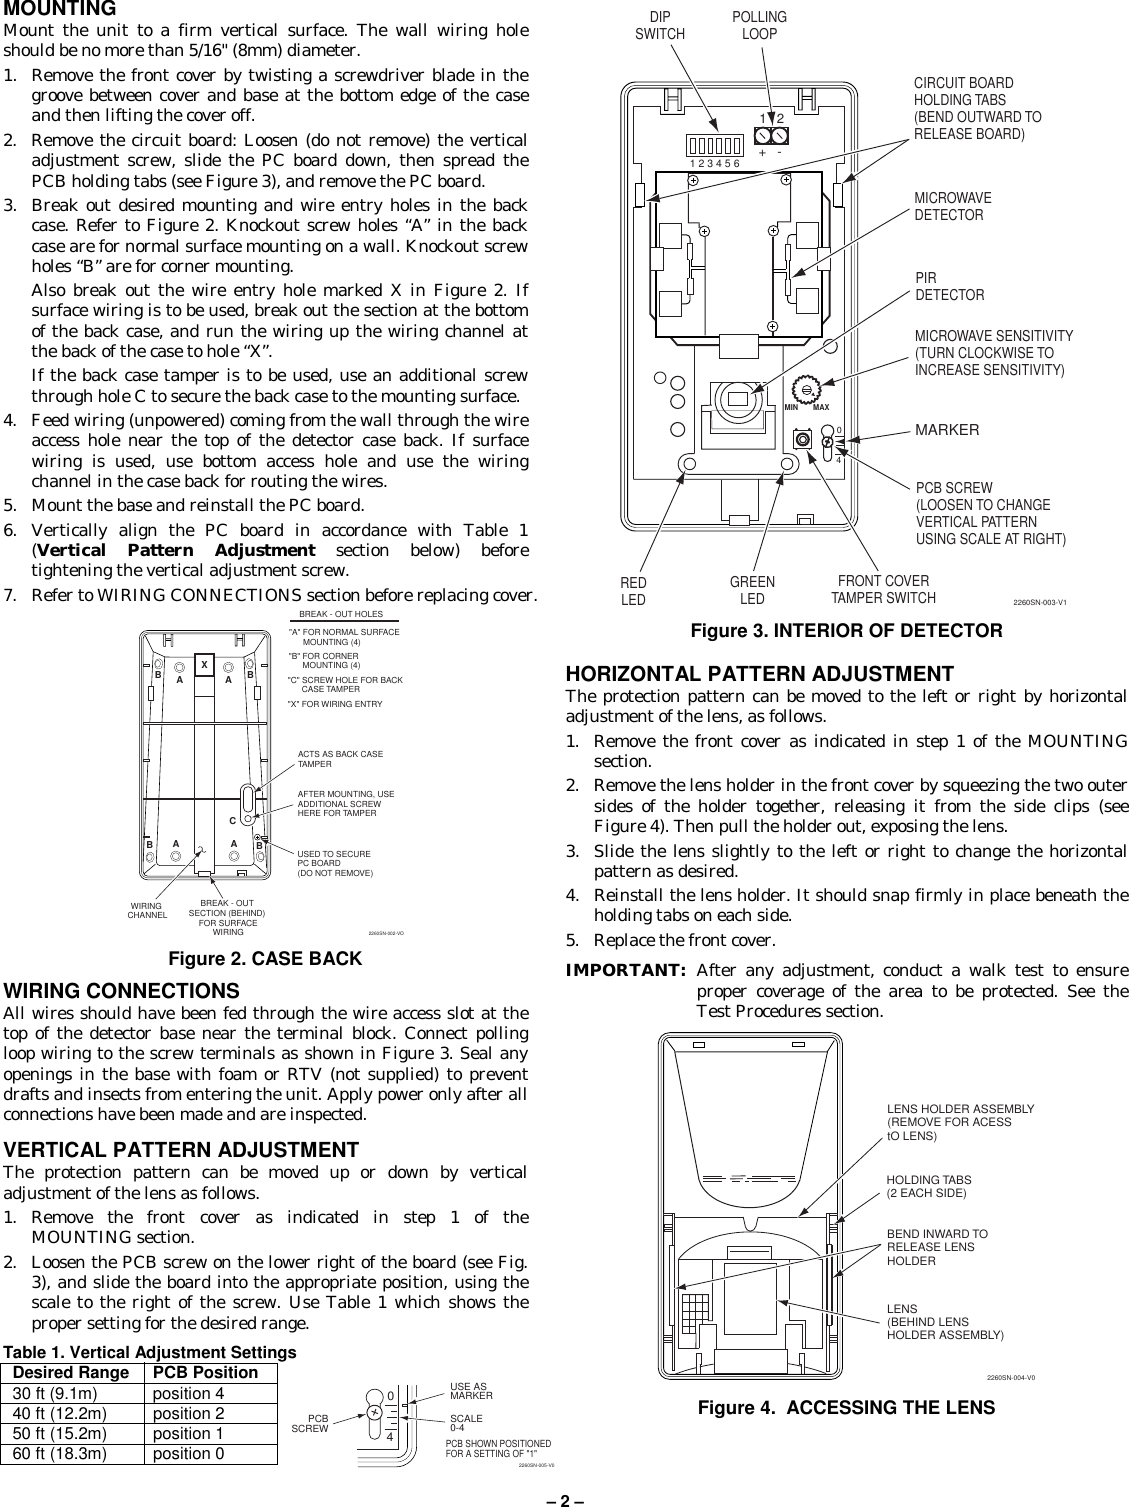
![– 3 –ADJUSTMENTS AND SELECTIONSMicrowave Sensitivity ControlTurn the potentiometer clockwise to increase sensitivity.DIP Switch Settings (use a small pointed tool to move the switch handle)No. Position Function and Explanation 1 Supervision Failure ModeON: SUSPEND PIR: In case of microwave channel failure,the unit becomes non-operational. OFF (default): REVERT TO PIR: In case of microwave channel failure,the unit reverts to the PIR only mode. 2 Fluorescent Filter ModeON: 50Hz FLTR: Digital fluorescent light filter set for 50Hz.OFF (default): 60Hz FLTR: Digital fluorescent light filter set for 60Hz. 3 LED Enable/DisableON (default): ENABLE: LEDs are enabled.OFF: DISABLE: LEDs are disabled. 4Microwave Operation ModeON (default): NORMAL: Microwave channel always on.OFF: CONDITIONAL: Microwave channel on only when PIRactivity is detected. 5 Signal Processing ModeON: INTERMEDIATE: Use this setting in normalenvironments.OFF (default): STANDARD: Use this setting for maximum false alarmimmunity. This setting tolerates environmentalextremes and is the recommended setting. 6 Accu-Trak Environmental Test ModeON: ENV TEST: Accu-Trak environmental test is enabled.OFF (default): NORMAL: Accu-Trak environmental test is disabled.LED INDICATIONS (when LEDs are enabled)MODE LED INDICATIONSPower Up Red LED is ON for 30 secondsAlarm Red LED ONAccu-Trak Green LED flashes for microwave detectionTest Mode Red LED flashes for PIR detectionSupervision Red LED flashes for PIR failure once per 3 sec.Failure Green LED flashes for microwave failure once per 3 sec.SERIAL No. IDThis unit does not utilize DIP switches to set its zone number (ID).Each unit has a unique factory-assigned serial number which mustbe entered into the control panel during the zone programmingprocedure. Therefore, this motion sensor can be used only with acontrol that supports serial number devices.Note that this motion sensor’s unique factory-assigned serialnumber can be found on the bar code label on its PC board.The motion sensor’s serial number can be entered by one of thefollowing methods:A. Downloading (Zone Definition screen of Compass software).Recommended for large installations and installations wherefoot traffic cannot be controlled.B. Entering through the keypad at the “INPUT S/N” promptduring manual zone programming (see Important note below).C. Activating the detector twice while at the “INPUT S/N” promptduring manual zone programming.If entering manually, be sure that other polling loop sensors are notactivated so that they cannot send a signal to the control while thismotion sensor is being programmed (mask motion sensors, don'topen/close doors, etc.).IMPORTANTTo be sure that other polling loop devices are not activated whenentering serial numbers manually, power the system down,disconnect the polling loop at the control, power back up again, andimmediately enter the program mode. Then proceed to Step 1 in thefollowing section. Remember to reconnect the polling loop whenprogramming is complete, powering the system down first.To enter the unit's serial number1. Using the control panel’s keypad, enter Zone Programming mode.2. Enter the Zone number, Zone Type, and other zone information forthe motion sensor, pressing [∗] to advance from prompt to prompt.3. At the "Input Type" prompt, enter "6" for SL (Serial Polling Device)and press [∗].4. At the “INPUT S/N” prompt, either enter the serial number manually(and a "1" for the loop number), or fault the motion sensor (the keypadwill "beep" to confirm signal), then wait 3-6 seconds and fault themotion sensor again (the keypad should beep again to confirm). Themotion sensor should now be enrolled. A "1" should appear under the"L" on the zone summary screen. If it does not, press [∗] and enter theloop number manually at the next screen.5. Press [∗] to continue programming other devices, or enter “00” to quit.For detailed information, refer to the Zone Programming section in thecontrol panel’s Installation Instructions.TAMPERRemoval of the cover causes a front cover tamper switch to open.Removal of the detector from the wall causes the back tamper switch toopen (if back case is tampered using a screw through the tamper hole;see Figure 2). The control panel is automatically notified via the pollingloop when either of these events occur.TEST PROCEDURESOn power-up, testing must not begin until the LED extinguishes afterfirst applying power to signify warm-up is complete, about 30 seconds. Ifthe LED begins to flash at a constant rate, refer to the section onSUPERVISION.Accu-Trak Environmental Test ModeADEMCO’s unique Accu-Trak environmental test feature easily providesan environmental check for potential false alarm sources on both thePIR and microwave channels. Simply set DIP Switch #6 to ON.Both microwave and PIR information are viewable simultaneously onthe two LEDs, providing crisp, immediate feedback (see below).NOTE: When Accu-Trak environmental test mode is selected, analarm signal is reported to the control panel to prevent leavingthe detector in the test mode.TEST LED ACCU-TRAK LED INDICATIONSPIR RED LED flashes when potential false alarm source isdetected, such as fans or heating duct.Microwave GREEN LED is ON when potential false alarm source isdetected, such as a fan or mylar balloon.IMPORTANT:Detection coverage can only be verified by walk-testing in the normaloperating mode (DIP Switch #6 set to OFF).Testing in Normal Operating ModeAfter testing with the unique Walk-Test mode, the detector should betested in the Normal Operating Mode with the following steps:1. Remove the front cover and ensure that DIP Switch #6 is set to OFFfor Normal Operating Mode.2. Set DIP Switch #5 to the Pulse Processing Option that will be used forthis installation.3. Enable the LED by setting DIP Switch #3 ON.4. Replace the front cover and walk through the protective zones,observing that the detector’s red LED lights whenever motion isdetected. If necessary, re-adjust the microwave sensitivity to theminimum level required for satisfactory detection and repeat theWalk Test.5. After Walk-Testing is complete, the LED may be disabled, if desired(DIP Switch #3 OFF).](https://usermanual.wiki/Ademco/Q2260SN/User-Guide-140342-Page-3.png)