Adept EWHEELS REMOTE CONTROL FOR GOLF TROLLEY DRIVE User Manual Glossary eWheels
Adept Industries Limited REMOTE CONTROL FOR GOLF TROLLEY DRIVE Glossary eWheels
Adept >
User Manual
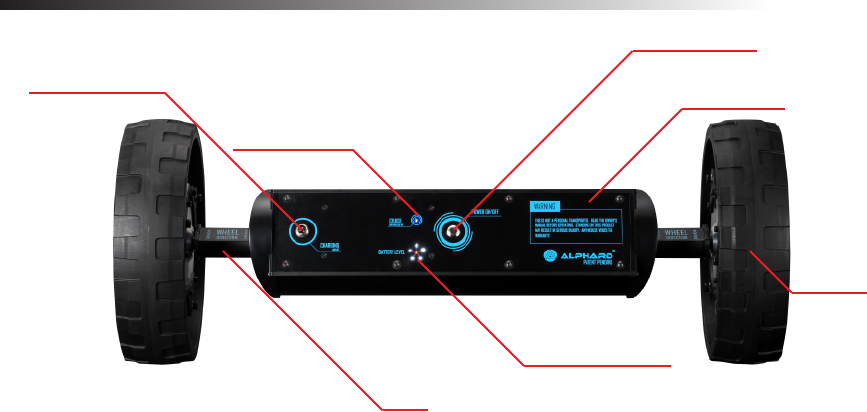
Glossary
Power On/Off
Charging Outlet
Cruise On/Off
Face Panel
Wheel
Motor
Battery Indicator
Axle

Important Information
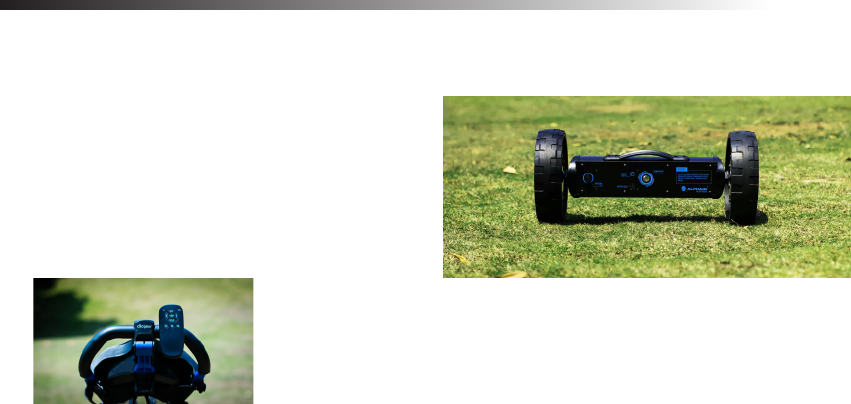
This product is designed solely for the transportation of golf equipment on a golf course (as pictured).
Warnings and important safety instructions appearing in this manual are not meant to cover all possible
conditions and situations that may occur. Common sense, caution and care must be exercised when
operating or cleaning this equipment. Always contact Alphard Golf or your local distributor/dealer about
problems or conditions that you do not understand.
RF Signals
This product complies with FCC, IC, CE, C-TICK.
Battery
This product uses 20 pieces of lithium ion cells(18650) packed
and shrink wrapped with protection circutry. The
maximum rated capacity is 158.4Wh. The battery inside this
product complies with UN38.3, and IEC62133 safety
requirements.
Remote Controller
This product uses radio frequency for controlling. Radio
frequency can go through walls. To avoid mis-triggering,
keep the remote controller in a safe location and away
from children.
Congratulations!
We know you’re excited, but it’s important to read this manual before you do anything with it. Check the
box to make sure you have everything. It contains;
▪ eWheels Main Console
▪ 2 x Brackets with Nuts and Bolts
▪ Remote Control
▪ 3 x AAA Batteries
▪ Battery Charger
▪ Magnetic Remote Holder
Installing the Brackets
When you order the eWheels, we asked that you provide the brand and model of the push cart you own. The name of the manufacturer and
model should be labelled on the box. Because every manufacturer designed their push carts differently, so the brackets were made specifically
for each of them. If the label says a different brand or model than the one you own, then exchange it at the store that you made the purchase.
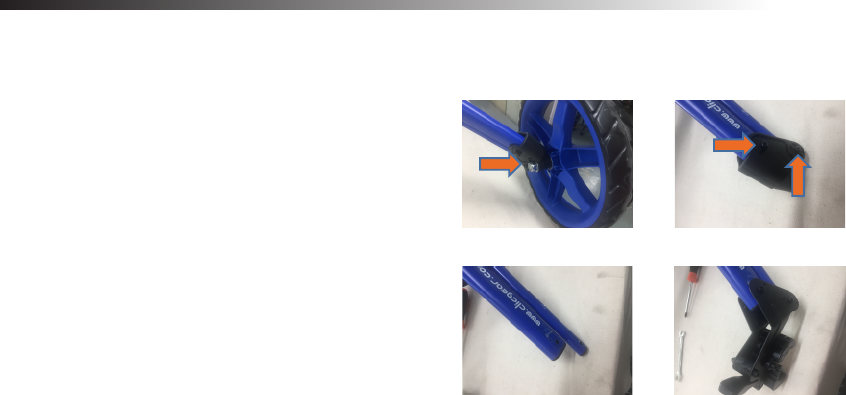
To install the brackets:
1. Remove the rear wheels. If your push cart has a rear wheel
braking mechanism, then you need to remove it first.
You can do it with a screwdriver and a wrench.
2. Remove the wheel pivots on both sides.
3. Slide the brackets onto the outrigger tubes, align the holes,
and fasten them with the nuts and bolts provided.
4. When installed properly, the opening of the crimp should be
pointing down.
Remove rear wheels Remove screws
Assemble brackets Remove plastic piece
Charging the Battery
Before you use your battery for the first time, it is imperative that it is charged fully. Failure to do this could cause irreparable damage and result
in a reduced capacity.
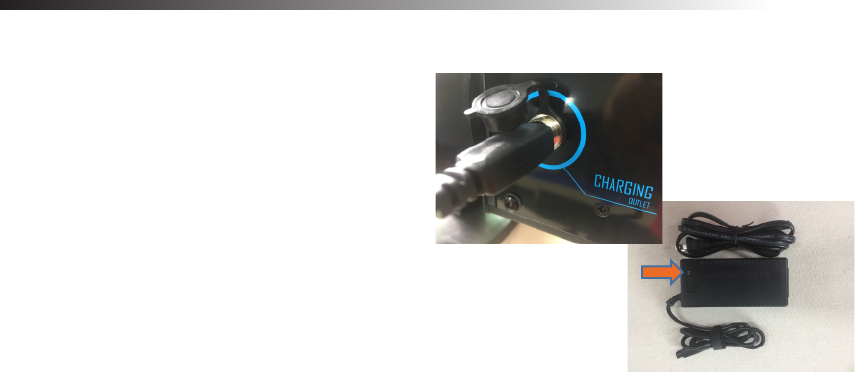
To charge the battery:
1. Plug the charger onto the face panel where it is labelled
“Charging Inlet”. The LED indicator on the battery charger
turns to red.
2. The LED indicator changes to green when charging is
completed. It should take within 4 hours to charge a fully
drained battery.
3. You can switch on the power during charging to see the
battery level.
4. For safety and to prolong the battery life, unplug the
charger immediately when charging is completed.
5. This product comes with a universal charger suitable for
line voltage between 100-240VAC 50/60Hz input, 42VDC
1.5A MAX output. We suggest only use chargers provided
by the manufacturer for safety measures. Over charging
voltage or current may cause damage to this product.
LED Indicator
Adjusting the Wheel Base
The length of the wheel base is set at maximum by default. However, every push cart is designed differently and therefore the wheel bases are
different. If your push cart has a narrow wheel base then you will need to adjust it for better performance.
To adjust the wheel base:
1. Unfold your push cart. Measure the distance from one
end of the crimp to another
2. On the eWheels, fully extend the wheels, rotate the
main body so that the face panel is facing downward.
3. Remove the screws on the stoppers.
4. Slide the wheels inward until the distance between the
tube ends matches the distance you measured.
5. Slide the wheels outward slightly until the holes on the
tube align with the hole on the stoppers.
6. Fasten the screws again tightly.
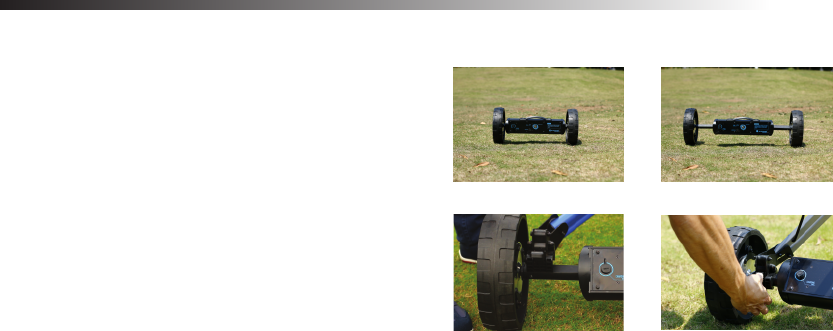
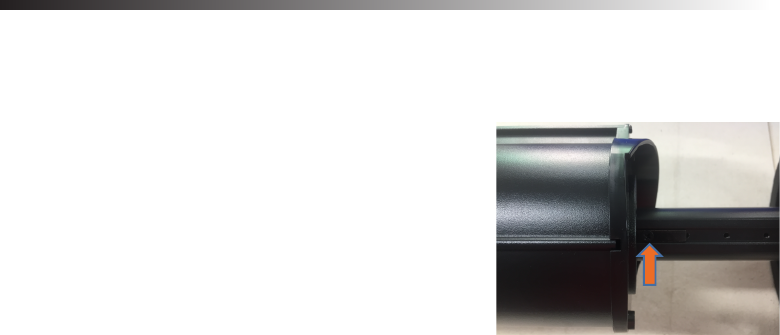
Setting Up Before the Round
1. Unfold your push cart.
2. Fully extend the eWheels.
3. Place the cart onto the axles. Make sure the crimps are laying
on the flat surface of the aluminum tubes and not the plastic
end caps. Go back to “adjusting the wheel base” on the
previous page if the wheel base is not wide enough.
4. Tighten the latches.
5. Reverse these steps to disassemble after the round.
eWheels folded eWheels unfolded
Mounting position Tighten latch
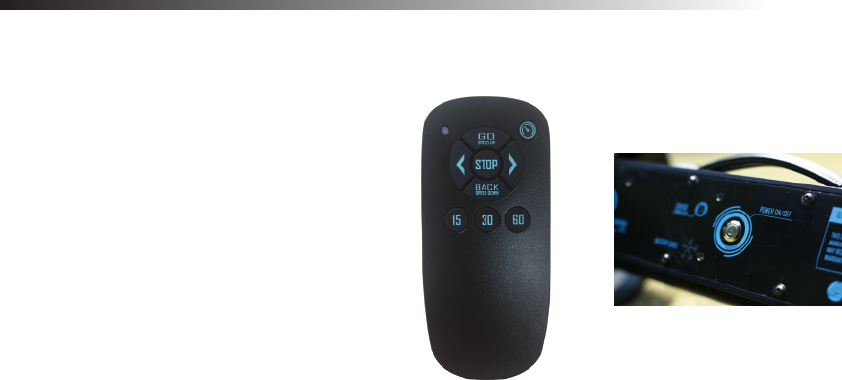
Remote Controller
Now you’re ready to go. For first time use, make sure to practice in open area. Insert the batteries in the remote controller. You’ll see a red LED
indicator blinking without having to switch any buttons. The controller is paired with the eWheels at the factory. However, if you find your
eWheels not responding to the controller, try the following.
To pair the remote controller with the eWheels:
1. Remove one battery in the controller.
2. Press and hold the “STOP” button. re-insert the battery.
3. Once inserted, the red “LED” on the controller starts
blinking. Let go of the “STOP” button.
4. Switch on the eWheels. After 3 seconds, the LED on the
controller stays lid up.
5. The devices are now paired and you’re ready for the
next step.

Controlling the eWheels
The remote control has a rated range of 50 yards, but most often you can control it up to 100 yards or more. However, we don’t recommand
leaving your cart too far away from you in case there are obstacles that is not visible to you. It has a two way communication, so it stops
automatically when the remote is out of range.
Try these commands to get familiar:
1. Press the “GO/SPEED UP” button. The cart will move forward. There are 6 different speed
levels. It is set at the third level when switching the unit on.
2. Press the “STOP” button. The cart will stop slowly.
3. Press the “GO/SPEED UP” button. This time press “GO” again a few more times. The cart
speeds up until it reaches the highest speed.
4. Press the “BACK/SPEED DOWN” button a few times. The cart slows down until it reaches
the slowest speed.
5. Press “STOP”. When the cart is stationary. Press and hold “BACK/SPEED DOWN”. The cart
moves backward until letting go of the button.

Controlling the eWheels
Steering takes a little bit of practicing. The sensitivity of the turns varies from one cart to another. Carts with swivel front wheel(s) can turn easier
than carts with a fixed front wheel. Also, the geometry of the cart itself plays a big role in turning when going uphill or downhill. The radius of
turning is better at slow speed than high speed.
To steer:
1. Press the “GO/SPEED UP” button. When the cart is moving forward, press and hold the
left or right arrow. The cart turns until letting go of the button
2. When the cart is stationary, press and hold the left or right arrow, the cart spins until letting
go of the button.
IMPORTANT
SOME CARTS HAVE A WEAKER BODY FRAME. STEERING A FIXED FRONT WHEEL
CART WHEN IT IS STATIONARY CAN CAUSE DAMAGE TO THE CART FRAME OR THE ALIGNMENT.
DO NOT ATTEMPT STEERING A FIXED FRONT WHEEL CART ON CONCRETE WHETHER IT IS
STATIONARY OR IN MOTION. IT ACCELERATES THE WEAR AND TEAR OF THE FRONT TIRE(S)
FCC STATEMENT :
This device complies with Part 15 of the FCC Rules. Operation is subject
to the following two conditions:
(1) This device may not cause harmful interference, and
(2) This device must accept any interference received, including
interference that may cause undesired operation.
Warning: Changes or modifications not expressly approved by the party
responsible for compliance could void the user's authority to operate the
equipment.
NOTE: This equipment has been tested and found to comply with the
limits for a Class B digital device, pursuant to Part 15 of the FCC Rules.
These limits are designed to provide reasonable protection against
harmful interference in a residential installation. This equipment
generates uses and can radiate radio frequency energy and, if not
installed and used in accordance with the instructions, may cause harmful
interference to radio communications. However, there is no guarantee
that interference will not occur in a particular installation. If this equipment
does cause harmful interference to radio or television reception, which
can be determined by turning the equipment off and on, the user is
encouraged to try to correct the interference by one or more of the
following measures:
Reorient or relocate the receiving antenna.
Increase the separation between the equipment and receiver.
Connect the equipment into an outlet on a circuit different from that to
which the receiver is connected.
Consult the dealer or an experienced radio/TV technician for help.