Airstream DMX Manual APP User V1.1
2016-01-04
: Adj Airstream Dmx App User Manual V1.1 Airstream DMX APP User Manual V1.1 manuals
Open the PDF directly: View PDF ![]() .
.
Page Count: 38

1
Airstream DMX
for IOS
Revision 1.1
2
Contents
Overview .................................................................................................... 4
Connecting to the Airstream DMX Bridge ........................................................ 5
App Navigation ............................................................................................ 7
Fixtures Tab ................................................................................................ 9
Patching Fixtures ................................................................................... 9
Custom Profiles .................................................................................... 11
Bridge Settings .................................................................................... 14
Lock ................................................................................................... 16
Channels Tab ............................................................................................ 17
Sliders ................................................................................................ 17
Clear Button ........................................................................................ 17
Color Picker ......................................................................................... 19
Pan / Tilt Control .................................................................................. 20
Save Button ........................................................................................ 20
Effects Tab ................................................................................................ 21
Effects Buttons .................................................................................... 21
Shape Effect ........................................................................................ 22
Save Effect .......................................................................................... 24
Color Effect ......................................................................................... 25
Flash Effect ......................................................................................... 26
Edit Effects Files and Buttons ................................................................. 27
Scenes Tab ............................................................................................... 28
Scene Definition ................................................................................... 28
Saving Scenes ..................................................................................... 29
Scene Files .......................................................................................... 30
Delete Files and Button Assignments ...................................................... 30
Solo Button ......................................................................................... 31
Effects ................................................................................................ 31
Edit a Saved Scene............................................................................... 31
Shows Tab ................................................................................................ 32
Edit a Show ......................................................................................... 32
3
Show Files ........................................................................................... 35
Delete Files and Button Assignments ...................................................... 35
Show Playback ..................................................................................... 35
File System and ITunes .............................................................................. 36
Contacts ................................................................................................... 38

4
Overview
Airstream DMX is a lighting control app designed for DJs, bands, nightclubs,
churches, trade shows or anywhere intelligent lighting fixtures are used. It is a
universal app compatible with all IOS devices running version 8.4 and higher. The
screenshots in this manual were made using an IPhone 6s. Other IOS devices will
have views that are very similar to these.
To use this app with lights, you will need the Airstream DMX Bridge available from
your ADJ products supplier. The bridge provides a private Wi-Fi network for the
IOS device to join and an ADJ Wifly network than can wirelessly control your ADJ
Wifly equipped lights. In addition, a three pin DMX512 jack is provided to control
your wired DMX512 intelligent lighting fixtures.
The app will let you patch and select up to 24 individual lighting fixtures although
more fixtures can be used if they share the same DMX512 starting addresses and
run in unison. The total number of control channels is limited to 512 (one DMX512
universe).
With this app you will be able to patch and select fixtures so that you can
program them with sliders, a color picker or a pan/tilt control and then save what
you have programmed as scenes. There are special effects generators for
movement, color and flash effects that can be saved as scenes. You can also
create scene lists and run them automatically as a timed show.
5
Connecting to the Airstream DMX Bridge
To control intelligent lighting fixtures using DMX512 or ADJ’s Wifly wireless
network, your IOS device needs to be connected to the Airstream DMX Bridge’s
Wi-Fi network. (The app can still run without the bridge but no lights will be
controlled). When the bridge is powered, it will create a local Wi-Fi network that
you can join using the Wi-Fi settings on your IOS device. The bridge network will
show up on the list of available networks in the Wi-Fi section in your device
settings. The default network name is “ADJ Airsteam DMX” and the default
password is “airstream”. Select and join this network as you would join any other
Wi-Fi network from you device. It is highly recommended that you change the
password for your bridge network before using it in public. The network will
appear on any Wi-Fi device in the vicinity of your lighting system. The “Bridge
Settings” section later in this chapter explains how to change the password.
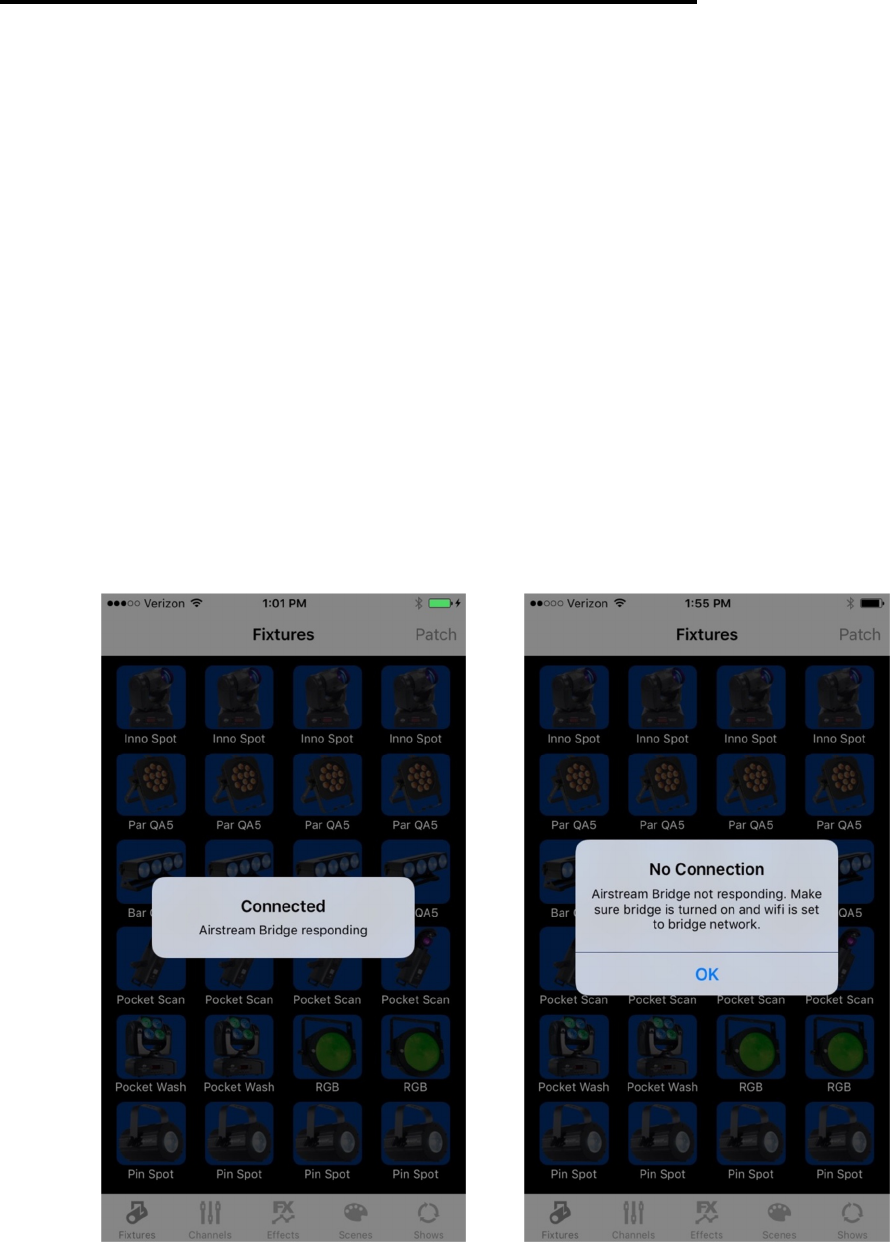
If your device is connected to the bridge network you should see an alert similar
to the one on the left when you start the app. If you are not connected you will
see something similar to the alert on the right. The app will continue to try to
connect every few seconds until a connection is established.
6
The Wi-Fi range from your IOS device to the bridge will vary depending on the
environment but you should expect no more than 75 feet for a reliable
connection. The range of the ADJ Wifly network is far greater than the range of
the bridge Wi-Fi network so it is recommended that the bridge be kept close to
your IOS device rather than close to the lights.
Important Note: If you lose your Wi-Fi connection to the bridge, your IOS
device may try to reconnect to another known network. If for example, you turn
off the bridge power or if you step out of the Wi-Fi range of the bridge, your
device might automatically connect to your home network. In that case you would
have to set the Wi-Fi on your device back to the bridge network when it is re-
established. When you see the “No Connection” alert, always check Settings to
confirm the Wi-Fi network your device is connected to. If the bridge network is
the only known network on your device, it will automatically re-connect to it when
the network is re-established.
7
App Navigation
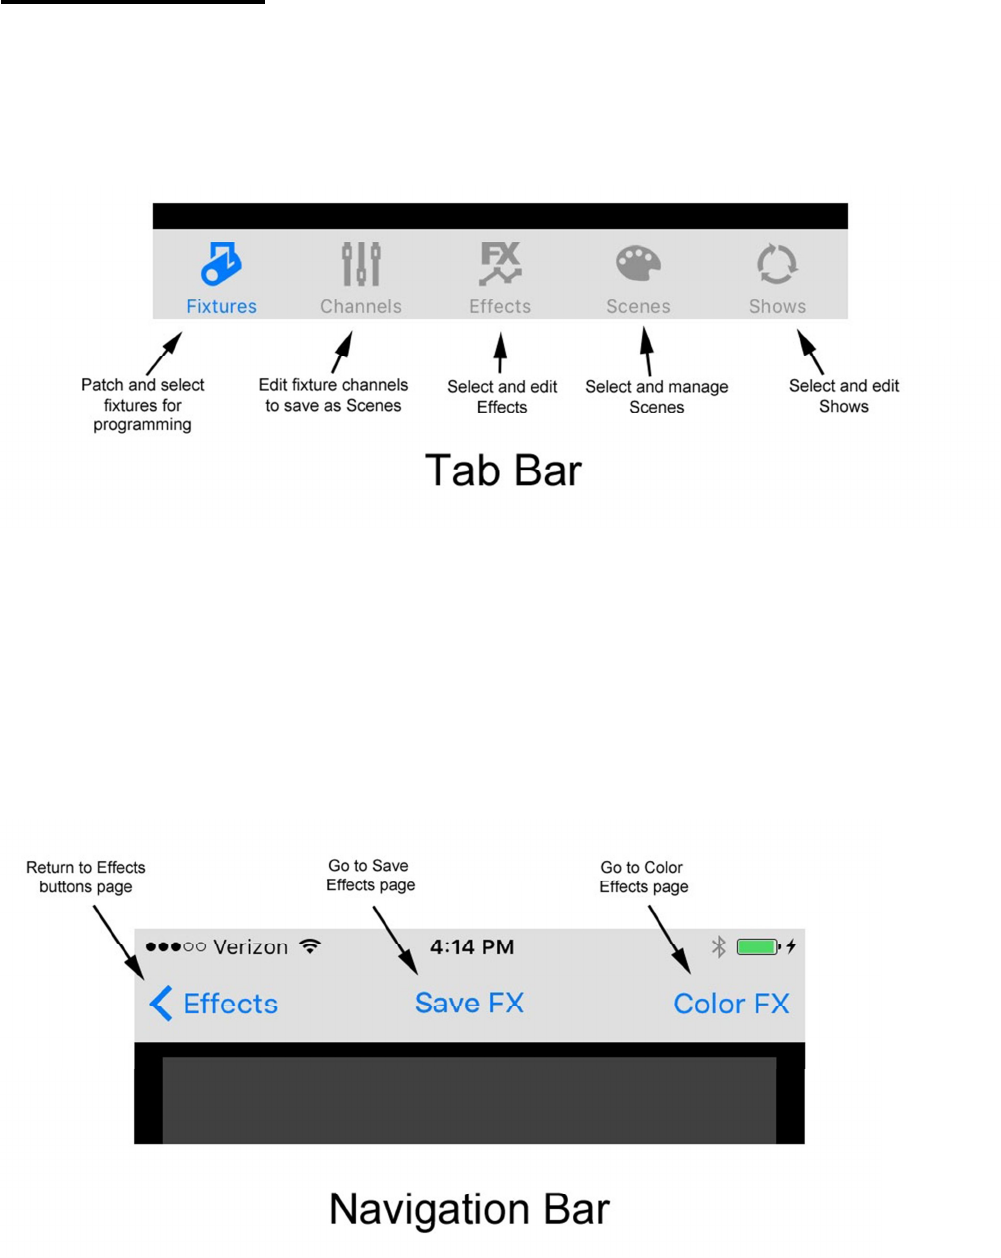
The app uses a tab bar at the bottom of the screen that’s visible while your device
is in portrait orientation. In landscape orientation, the tab bar will temporarily
disappear to allow more space on the screen to work with. For IPad, only portrait
orientation is supported so the tab bar will always be visible.
The tabs divide the app into five major sections of workflow. You can move from
tab to tab from anywhere within the app by touching a tab icon.
From within each tab, you can navigate to other views by tapping the buttons in
the navigation bar at the top of the screen. Like the tab bar, the navigation bar is
only visible while in portrait orientation. It will disappear temporarily while in
landscape orientation to allow more space on the screen. The screen shot below is
an example of one of the Effects views and how the navigation bar is used from
within that view.
8
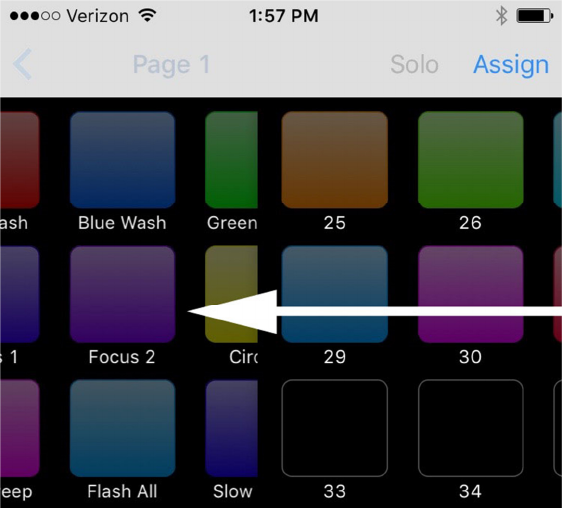
In addition to the tab and navigation bars, some views allow a swipe from the
edge of the screen to call the next view. An example of this would be to move
from Scene page 1 to Scene page 2 as shown below.
Some views will provide both a navigation bar button and allow a swipe to move
to the next view.
In a typical IOS tabbed style application, there can be many layers of views within
each tab. Each layer allows you to go deeper into the menu system depending on
where you are in your workflow. When you select a new tab you will see the last
view that was used in that tab. If you tap the tab icon a second time, it will go
back down to the tab’s root view. Tabs allow you to move quickly from function to
function without digging in and out of menu layers. For example, you can touch
the fixtures tab to select fixtures to program and then touch the channels tab to
adjust channels for the selected fixtures. This allows you to go quickly back and
forth to select new fixtures and adjust new channels.
The remainder of this manual will explain each tab and its contents.
9
Fixtures Tab
The fixtures tab is where you will select fixtures to program and where you can
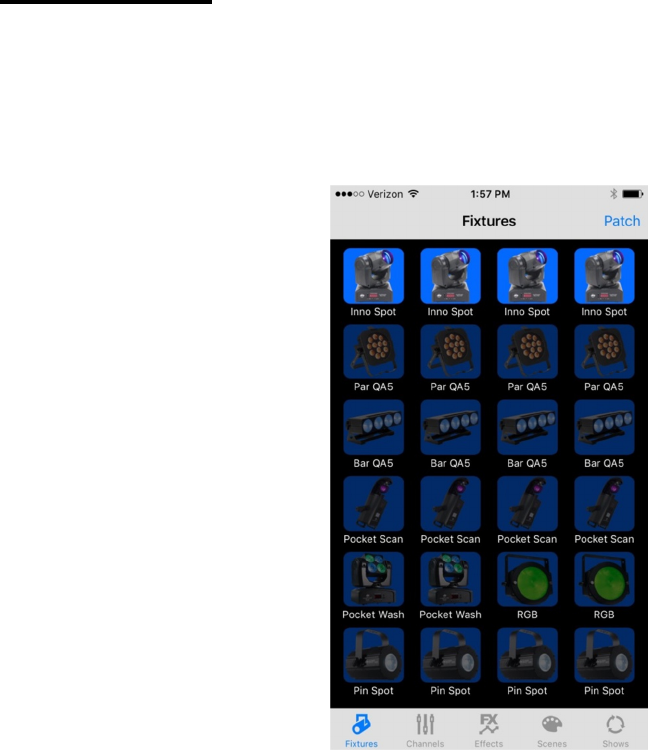
configure your fixture layout. The first view you will see is a field of 24 fixture
selection buttons. If you are running the app for the first time, your field will be
filled with empty buttons.
You will notice in this example that the top row of buttons is highlighted while the
other rows are dimmed. This indicates that the top row has been selected for
programming. Fixture selection is used to program the fixture channels as well as
to program some of the effects.
Patching Fixtures
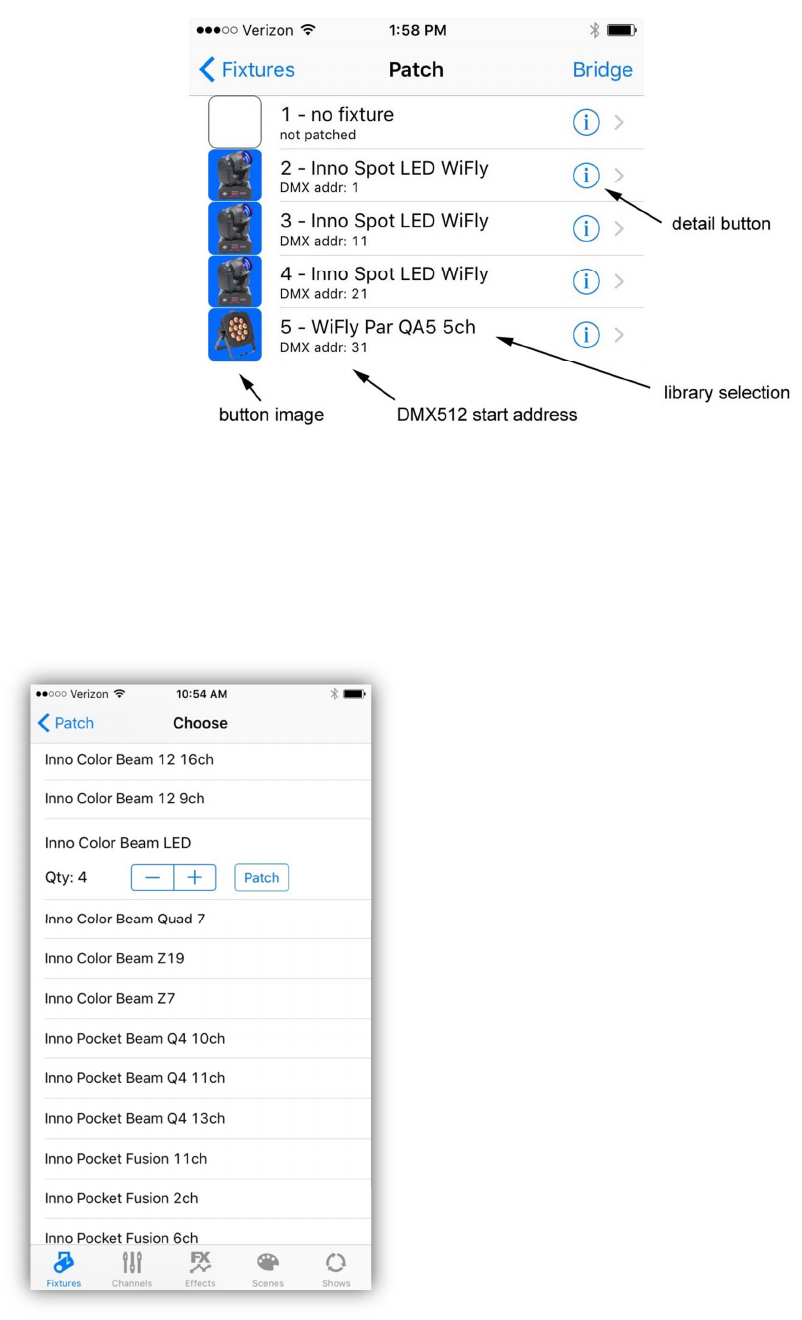
Tap the “Patch” button in the upper right navigation bar to call the patch view.
You will see a table of assignments for each of the 24 buttons. The fixtures are
assigned using a library of pre-programmed lights included with the app or from a
custom library that you can create using the fixture profile editor. DMX starting
addresses are automatically assigned to each fixture as it is patched.
The following is an example of the Patch view.
10
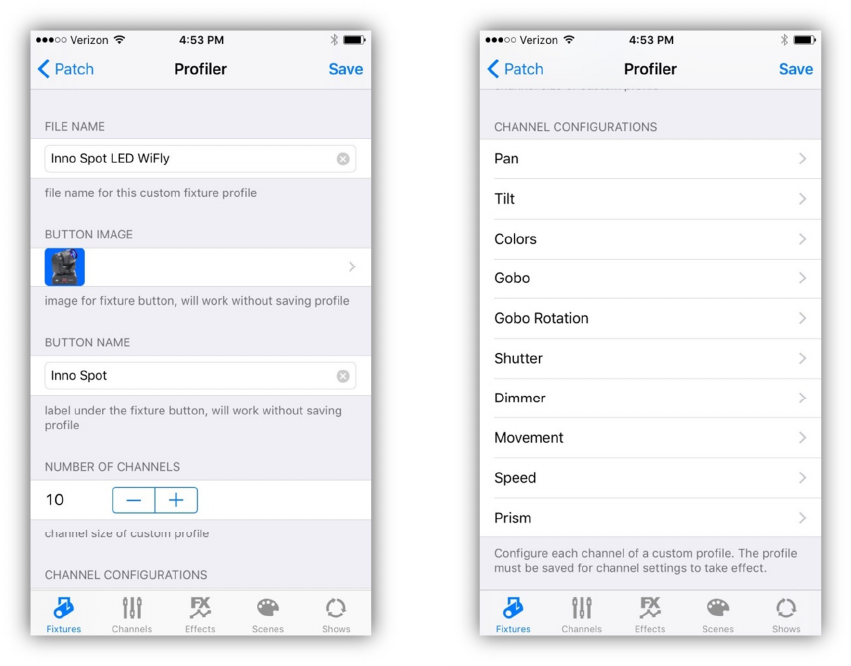
Tapping one of the rows will show the library list view with all of the fixtures
available to choose from as shown in the example below. The list is quite large so
you will have to scroll to find a desired fixture. Most ADJ fixtures are pre-loaded
and ready to go. There are also generic fixture types at the end of the list for
most LED applications. A check mark appears next to the fixture type currently
assigned.
When you select a fixture from the list, the row
will expand to show the quantity selector. Use
the inc/dec button to select the desired number
of fixtures to patch. In this example, four Inno
Color Beam LED fixtures have been selected.
Four of these fixtures will be patched starting
at the selected button location after tapping
the “Patch” button.
Helpful hint: If you plan to customize a group
of fixtures, first make a single custom profile as
explained in the next section, then save it.
Return to the patching view and then patch the
group from the custom profile.
11
Custom Profiles
Tapping the detail button in one of the Patch Table’s rows will show the Profile
Editor for that fixture. From there you can customize that individual fixture and
save it as a custom fixture profile. The following is an example of a profile taken
from the ADJ list. Profiles from the ADJ and generic libraries can be modified to
make custom profiles.
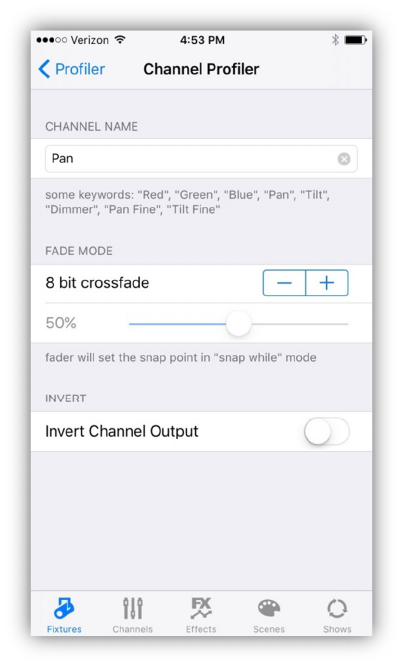
If there is a fixture assigned at the location, the Profiler fills the information from
that fixture, whether it’s a custom fixture or from the standard library. If there is
no fixture assigned, the Profiler will show an empty fixture with one channel. You
can use this to make a new profile from scratch or if you can find one from the
library that is close to what you need, modify it and then save as a custom
profile.
Important Note: The “Button Image” and the “Button Name” selectors allow you
to change the picture that appears inside the fixture button and the label under
the button. You can edit both of these for each fixture button without saving a
custom profile. Even if you are using fixtures from the standard library, you can
choose any image and enter any name to individualize each button.
12
File Name: This will be the name of your custom profile when you save it.
Button Image: This will bring up a table of fixture images to choose from. You
can individualize each button with its own image without saving.
Button Name: This will be the label that appears under the fixture button. You
can individualize each button with its own name without saving.
Number of Channels: Select the number of DMX512 channels to be used by the
fixture.
Channel Configurations: Based on the number of channels selected, a row will
be added for each channel. When you tap the row, a new table will appear
allowing you to edit a list of parameters for that channel as shown below.
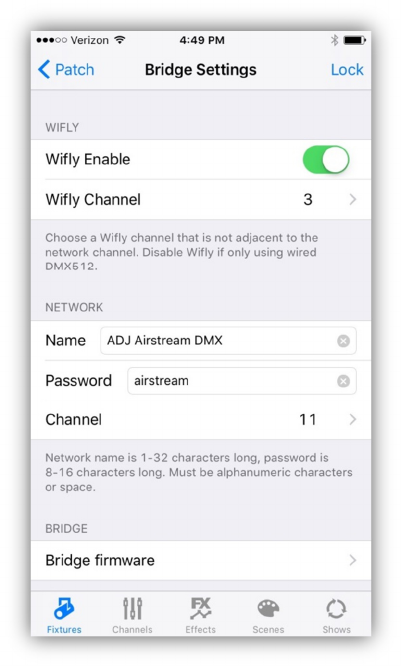
Channel Name: This is the name that will be displayed above the channel slider
and also used to identify the channel for certain features and functions. A list of
keyword channel names is shown below the row. Some color names and functions
like “Dimmer”, “Pan”, and “Tilt” are keywords used by the app. For example, the
color picker looks for “Red”, “Green” and “Blue” channels. The spelling must
match and the first letter must be capitalized. The color picker will also accept
13
“Red 1” as it looks for names starting with the word “Red”. “Pan” and “Tilt”
channels are used to identify channels for the pan/tilt controller and the shape
effects generator. “Dimmer” is used by the flash effects generator. Adding the
word “Fine” to the name of an already existing channel name will allow the
crossfader to match channel pairs in order to use 16 bit fades, for example “Pan”
and “Pan Fine”.
Fade Mode: This controls how a channel will behave during a crossfade when a
scene is called. The choices are “8 bit crossfade” - a linear one channel crossfade
to a new value, “snap before fade” - the channel jumps immediately to a new
value at the start of the scene, “snap after fade” – the channel jumps to a new
value at the end of the fade, “snap during fade” – the channel jumps to a new
value at some point in the middle of the fade, (use the slider to select the snap
point), “16 bit fade” – this is the high or coarse channel as with “Pan” when there
is a “Pan Fine”, “16 bit fade fine” – this is the low or fine channel as with “Pan
Fine”. The last two modes will generate a 16 bit linear crossfade to the new value
as long as the channels names match as explained in the previous section.
Invert Channel Output: This will invert the channel’s output on the Wifly and
DMX512 signals. Use this to adjust things like pan and tilt to match your stage
setup.
Save: There is a “Save” button in the upper right of the Profiler view. This will
create a new custom profile in your library and assign it to the fixture you are
editing. As mentioned earlier, you don’t have to use “Save” if you are only
changing the button image or label.
Swipe to Delete: Do remove a patch or delete a custom profile from your file
system, use the standard IOS swipe to delete method on any table row. When
you delete a patch (button assignment) the profile will not be erased from the
library. If you delete a custom profile from the library list, the file is permanently
deleted.
14
Bridge Settings
Tap the “Bridge” navigation button in the upper right of the Patch table view to
show the Bridge settings view. This is where can edit the Airstream DMX Bridge
network settings.
Wifly Settings: The top two rows are settings for the ADJ Wifly network. If you
are using ADJ Wifly enabled fixtures, set Wifly Enable to on and set the Wifly
channel to match the Wifly channel settings on your fixtures. Wifly supports
channels 0-14. One of the example screenshots on the next page (right side)
shows the view for setting the Wifly channel.
Note: When only using DMX512 wired fixtures, disabling the Wifly can improve
your Wi-Fi connection.
Network Name: This is the name of the private Wi-Fi network that the bridge
will create and appear in your list of available networks from Wi-Fi Settings on
you IOS device. The network name can be 1 to 32 characters long using letters,
numbers or spaces. When you change the name, it will take effect the next time
the bridge is turned on and resets.
15
Password: This is the network password that will be used to join the Wi-Fi
network. It must be 8 to 16 characters long using letters or numbers. The change
will take effect the next time the bridge is turned on. It is highly recommended
that you change the password so that your lighting network will be
secure as the network will appear on any Wi-Fi device in the vicinity.
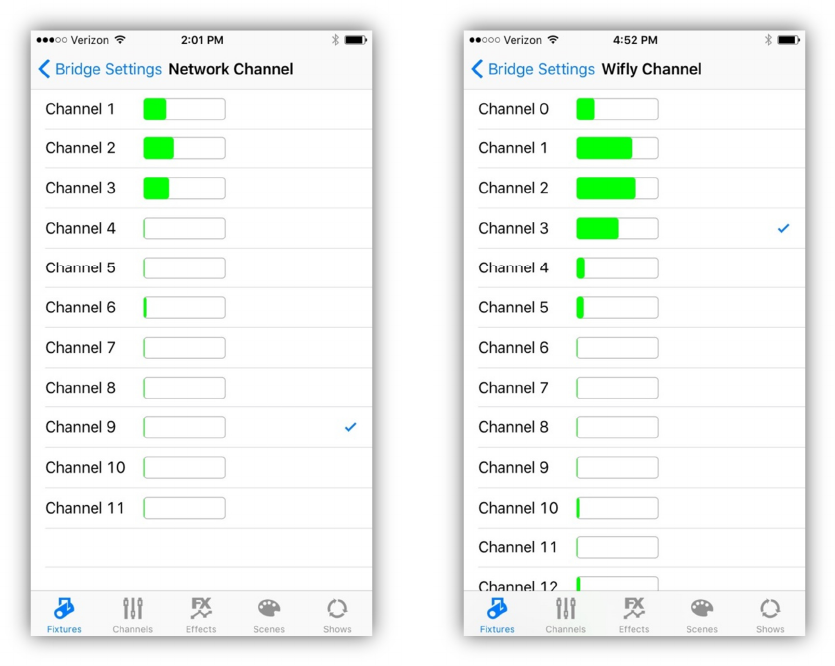
Wi-Fi Channel: This allows you to select from channels 1-11 to run your Wi-Fi
network on. Select a channel that is less used by viewing the bar next to the
channel. The selection table will show the amount of radio energy on each
channel as a green bar graph. It is recommended that the Wi-Fi and Wifly be set
to different channels and if possible be kept several channels apart. In the
examples below Wi-Fi channel 9 and Wifly channel 3 have been selected. As you
can see from the pictures, channels 1-3 are in use by other devices. The graphs
are only a quick snapshot of the radio energy at the time the view is displayed.
Bridge Firmware: This button will display the current firmware versions being
used by the various systems in the bridge.
16
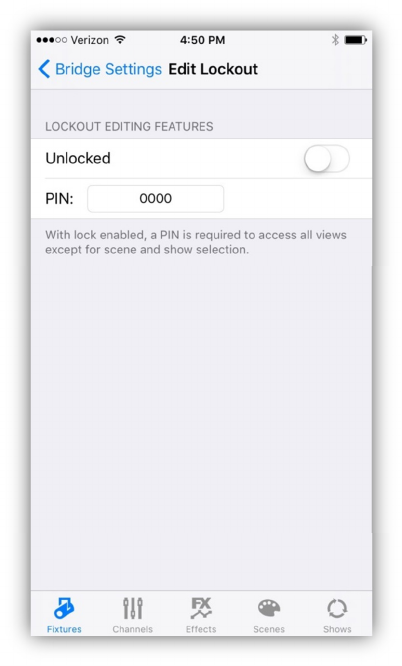
Lock
In the upper right of the Bridge Settings view there is a navigation button labeled
“Lock”. It will show a view similar to the example below. This will allow
permanent installations to lock out all programming features of the app. When
lock is turned on, only the Scenes, Shows and Unlock tabs will be available. A four
digit PIN is required to unlock. This view allows you to create your PIN and enable
lock. Take note of the pin before you touch the lock switch as you won’t be able
to unlock without it.
17
Channels Tab
The views within the channels tab are used for setting channel levels for selected
fixtures. Before using any of these views you must first highlight one or more
fixture buttons from the fixtures tab.
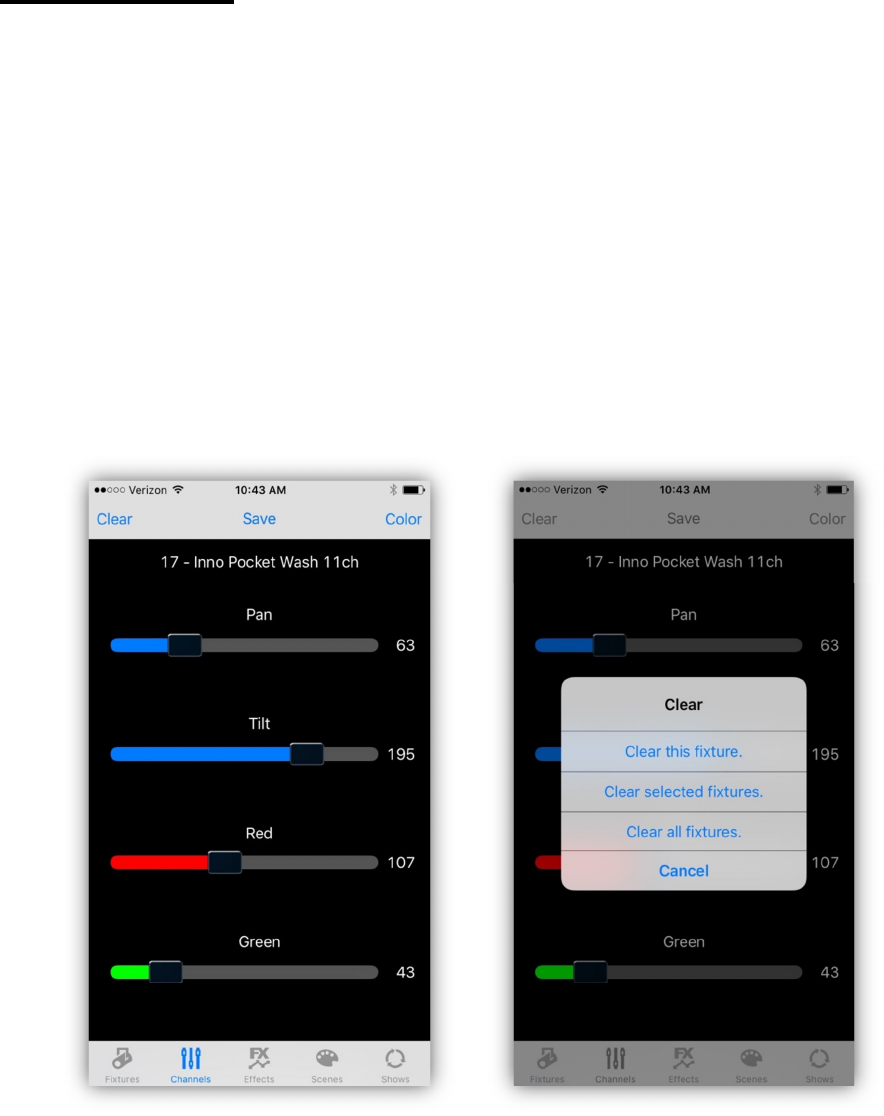
Sliders
The first view in the channels tab is the sliders view. It’s a scrollable list of
channel sliders matching the selected fixture(s). The view’s sliders will match the
current settings of the most recent fixture that was highlighted. Moving one of the
sliders will edit a channel for that fixture and any other fixture that is selected and
is of the same type. In the example below “Inno Pocket Wash” is the selected
fixture type. The channel name appears above each slider and the current
DMX512 value appears to the right of the slider.
Clear Button
In the upper left of the view is a navigation button labeled “Clear”. This button is
very important and only appears in this one location in the app. It is used to clear
18
selected groups of channels. When you clear a fixture or group of fixtures, the
fixture’s channels will be set to zero and they will be removed from the current
scene. When you tap the clear button an alert will appear as shown in the
screenshot above on the right. Tapping one of the choices in the alert will do one
of the following:
Clear this fixture: This will clear only the channels in the most recently selected
fixture, those that are currently shown in the slider view.
Clear selected fixtures: This will clear all highlighted fixtures.
Clear all fixtures: This will clear every fixture channel whether it is selected or
not.
Important Note: When you move a channel slider, that channel is automatically
marked for inclusion in a scene. To remove channels for inclusion in a scene, use
the clear button.
19
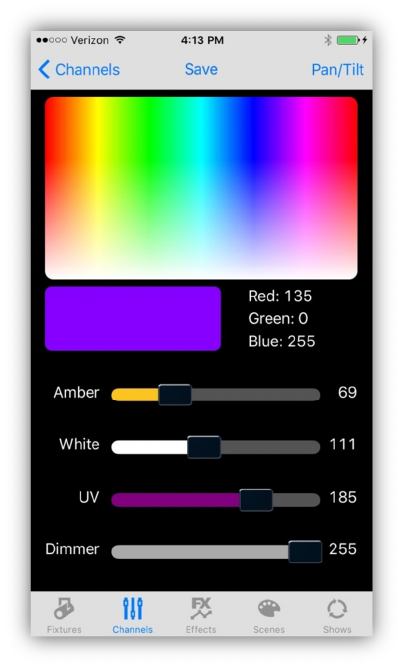
Color Picker
To show the color picker view, tap the “Color” navigation button in the upper right
of the sliders view or swipe from the right edge of the screen. The color picker
view will appear as shown in the screenshot below.
Any selected fixture that that has a Red, Green or Blue channel will be affected by
touching the hue gamut control at the top of the view. Hue values range from 0
to 360 degrees starting from left to right. Full saturation is achieved by touching
the top third of the control with decreasing saturation as you move to the bottom.
The selected color will be shown in the sample box beneath the control with the
Red, Green and Blue DMX512 values shown to the right of the sample box.
There are four faders at the bottom of the view that can control some commonly
used LED fixture channels provided the selected fixtures have channels with these
names.
20
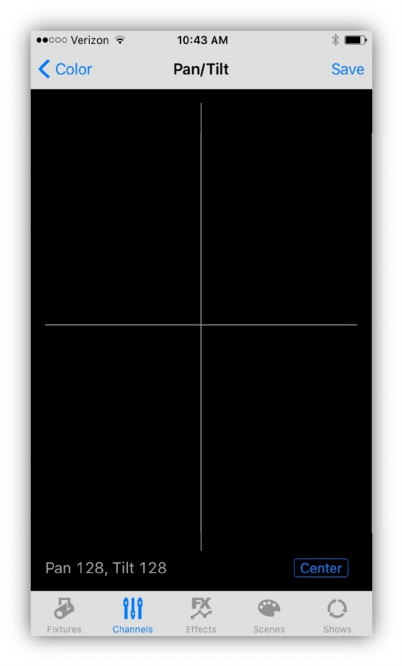
Pan / Tilt Control
Tap the Pan/Tilt navigation button in the upper right of the color picker or swipe
from the right edge of the screen to show the Pan/Tilt view.
Any selected fixture with a Pan or Tilt channel can be controlled by touching the
screen and moving the crosshairs. The DMX512 pan and tilt values will be
displayed in the lower right of the screen. There is also a Center button in the
lower right that will set the pan and tilt to the center position.
Save Button
Each of the three channel control views have navigation buttons labeled “Save”.
Tapping one of these will take you directly to the scene assignment table view.
From there you will be able to quickly save a static scene to one of the scene
buttons. For more information on scenes and how to save them, consult the
chapter “Scenes Tab” later in this manual.
21
Effects Tab
The app supports three types of special effects editors. A pan and tilt movement
shape effect, a changing color effect and a flash effect. Each type of effect can be
edited and then saved to one of 24 effects buttons that will allow you to turn the
effect on and off and include it in a scene.
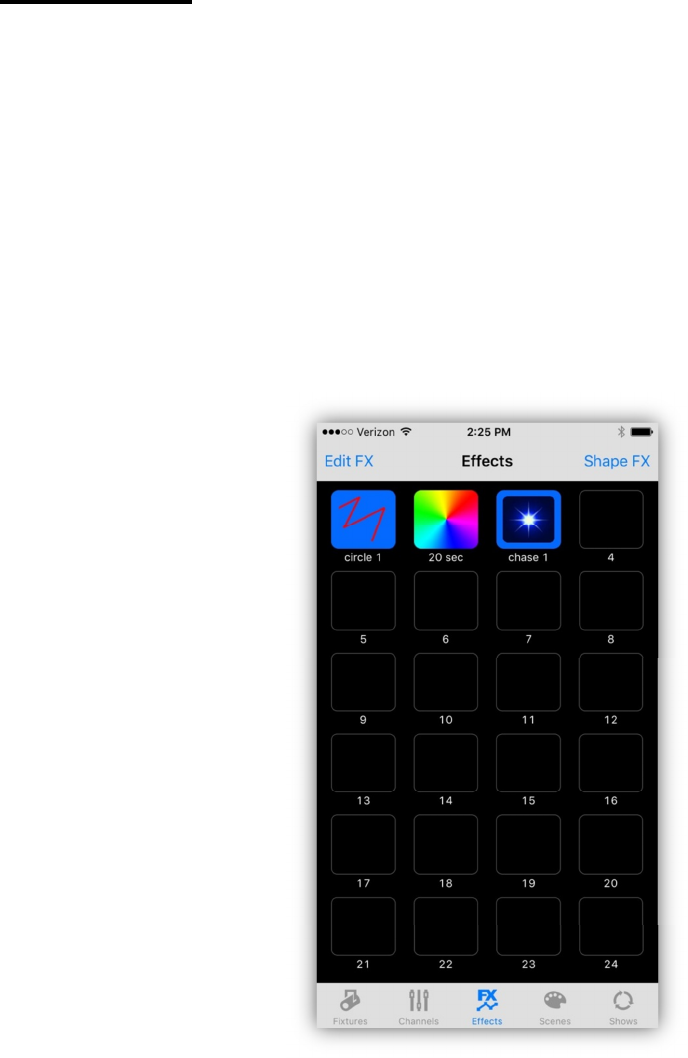
Effects Buttons
The first view that appears when you select the effects tab is the effects buttons
view. If there are no effects saved, buttons will be empty. In the picture below
there are three effects saved on the first three buttons; a shape effect on button
1, a color effect on button 2 and a flash effect on button 3.
All three buttons in the example are highlighted indicating that all three effects
are running. Tapping an effect button will toggle the effect on or off.
Important Note: When an effect is running the sleep timer on your IOS device
will be turned off temporarily to allow the effect to continue running. If you leave
the app while an effect is running the effect will temporarily pause.
22
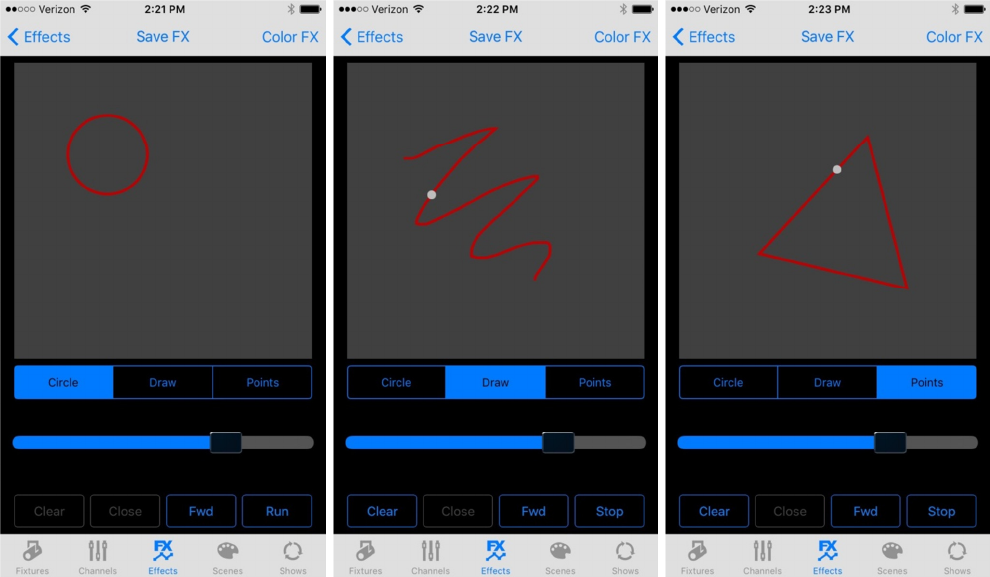
Shape Effect
Tap the navigation button in the upper right of the effects buttons view or swipe
from the right edge of the screen to show the shape effects editor. The large gray
area is the shape draw view where you can draw the path that your beam will
follow. The lower left corner of the draw view represents value 0 for both pan and
tilt and the upper right corner represents value 256.
In the three examples above you can see there are three ways to generate
shapes; circles, free draw and point to point. Select the drawing method using the
segment switch just below the draw window.
Circle: This method will automatically draw the circle for you. You can use a two
finger pinch gesture to change the size of the circle and use a single finger drag
to move the circle location.
Draw: This method requires that you draw the desired shape path with your
finger. The initial path will appear as a dotted line until you tell the editor to finish
the path by tapping the “Run” button or by tapping the “Close” button. When
finished, the path will become a solid red line.
23
Points: This method is similar to the draw method only you enter single points by
tapping the screen. The editor will automatically connect the points as you enter
them. Finish the path by tapping the “Run” button or the “Close” button.
Clear Button: Tap the “Clear” button to erase a drawing in order to start over.
This only works for the two draw methods, not the circle.
Close Button: Tap the “Close” button to connect the end of your path to its start.
Use this to create a path that you want to loop continuously. If you don’t want the
path to loop, don’t close the path, the beam will travel from end to end of your
path (bounce).
Fwd/Rev Button: This button controls the direction that the beam will follow
along the path. This will only apply to a closed path that is looping.
Run/Stop Button: This button will allow you to end the path editing process and
animate the beam path on the view as it runs. A white dot will simulate the beam
motion on the drawing.
Slider: This controls the speed of the beam. Speeds can also vary depending on
the size of the shape and distance between points.
Editing the finished path: Use a two finger pinch to shrink or enlarge the path
or use a single touch and drag to move the path. You most likely will need to view
the effect on the lights to get the desired size and location. You can move back
and forth to the fixtures tab to select fixtures to include in the effect. Only
highlighted fixtures with pan and tilt channels will respond. When you leave the
edit view the effect will pause. Tap the run button to restart the effect when you
return to the view.
Helpful Hints: The circle and points shapes are generally more precise than the
free drawn shapes. When using the draw method, the speed that you move your
finger while drawing will affect the speed of the effect. The slower you draw, the
more points will be included in the path making it run slower. Experiment until
you get the feel for what works best. To make simple linear movements like up
down or side to side, use two points. Don’t worry about the initial size or location
of the path as you can resize it and move it after drawing. Point to point paths will
often appear smoother as the crossfading is handled by the bridge. The fade time
between points will be equal so keep point to point distances close to equal if you
want an even looking effect.
24
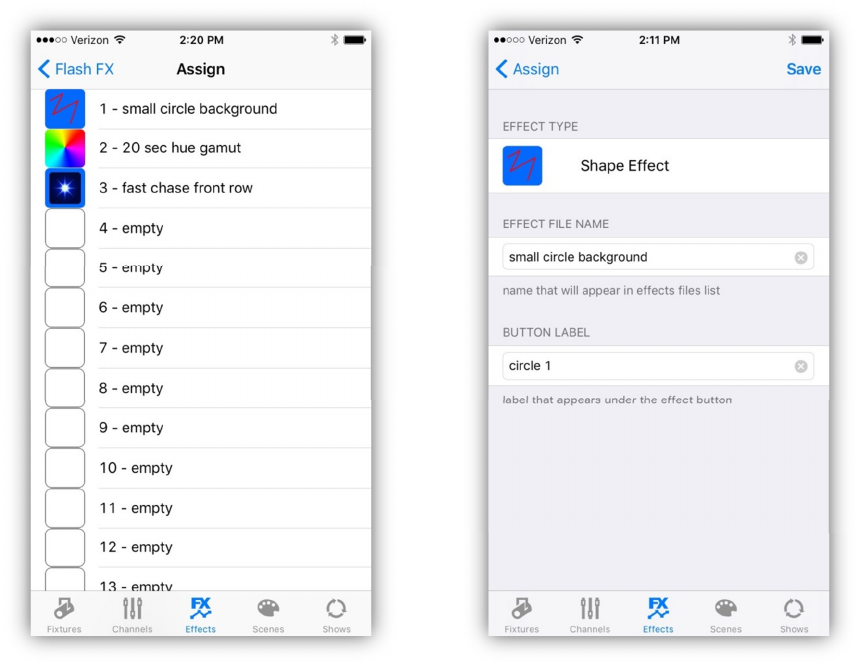
Save Effect
Tapping the “Save FX” navigation button at the top of any of the effects editors
will show the effects buttons assignment table as shown below on the screenshot
on the left. To save the effect to one of the buttons, select an empty button row.
Note: You can also select a row that’s occupied; the effect that’s assigned will be
replaced with your new effect, it won’t be erased from memory, it will only lose its
button assignment. The view on the right will appear when you select a button
location.
The button image for each type of effect will be like the ones shown in the
example. You can enter a long descriptive file name for the effect and also a short
button label that will appear on the effects button page under the button. Effects
files are stored in their own folder in the app’s documents directory. After you
have entered the names, tap the “Save” button in the upper right to save the file
and button assignment.
25
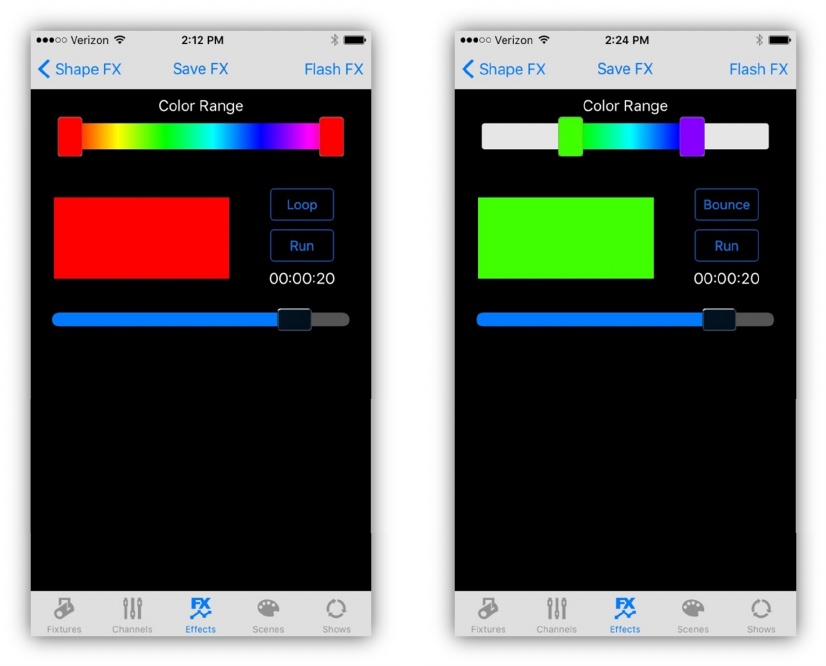
Color Effect
The color effect can be used on any fixture that has Red, Green and Blue
channels. The effect creates a changing hue gamut that fades through a range of
hue steps. Show the color effects editor by tapping the “Color FX” navigation
button in the upper right of the shape editor view or by swiping from the right
edge of the screen while in the shape editor view. A View similar to the examples
below will appear.
The range control at the top is used to set the endpoints of the color effect as
shown in the screenshot on the right. When running the effect from the editor,
the color box will show the current state of the effect. Tap the “Run” button to
view the effect in the color box and on your lights. The slider will adjust the speed
of the effect. The time display over the slider shows the total time to run the
entire gamut in hrs:min:sec format. The “Loop/Bounce” button sets the playback
mode to loop through the gamut or bounce from endpoint to endpoint. At any
time you can go to the fixtures tab and select fixtures to include in the effect. To
save the effect, use the same method as described in the previous section for the
shape effect. Note: Some fixtures may require dimmer channels to be turned on
to see the effect.
26
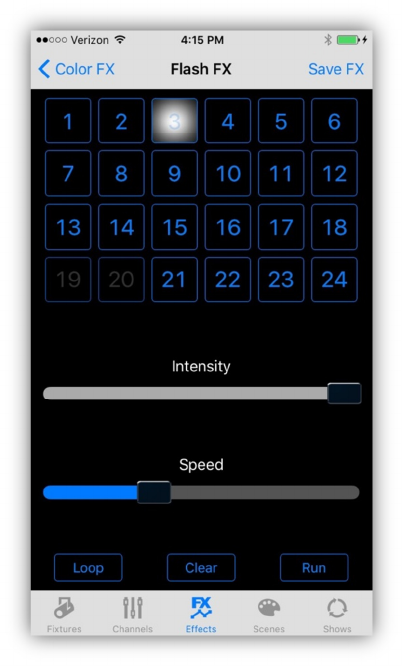
Flash Effect
The flash effect creates a flash chase for fixtures that you select using flash
buttons. The effect will work with any fixture that has a Dimmer channel. To show
the flash effect editor, tap the “Flash FX” navigation button in the upper right of
the Color FX view or swipe from the right side of the screen while in the Color FX
view. A view similar to the example below will appear.
Each of the 24 flash buttons represents one of the 24 fixtures. Only fixtures that
have dimmer channels will be highlighted in the button array. Tap each fixture
button in the order that you want the chase to run. Tap the “Run” button to view
the chase on the display and on your connected fixtures. Use the “Intensity”
slider to adjust the brightness of the flash. Use the “Speed” slider to adjust the
speed of the chase. The “Loop/Bounce” button will set the chase to loop or
bounce from endpoint to endpoint. The “Clear” button will clear the chase so that
you can start over. Fixtures to flash are selected from the flash buttons and not
from the fixtures tab as in the other effects editors. To save the effect, use the
same method as described in the previous section for the shape effect.
27
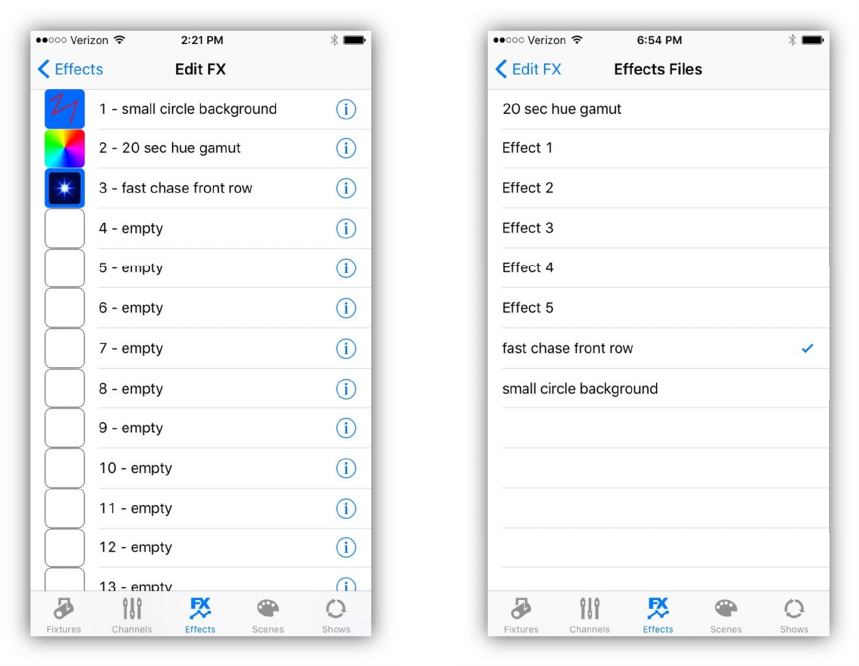
Edit Effects Files and Buttons
From the effects buttons view, tap the “Edit FX” navigation button in the upper
left. This will show a table view similar to the example below on the left. If you
select a row that contains an effect, the effect will be copied to the appropriate
editor. An alert message will confirm. You will have to unwind the views back to
the editor that matches the effect you selected for editing. From the editor you
can then make changes to the effect and then resave to the same or to a new
button location. If you change the filename for the edited effect, the original
effect will remain in the file system if you should need it later.
Tapping the detail button in a row brings up the list of effects files and shows the
file that is assigned to that button, as shown in the example on the right. A check
mark will appear next to the assigned file. You can select from the list of files to
change the file that is assigned to that button. As with most of the table views in
this app, use the “swipe to delete” method to remove a button assignment or to
delete a file. Note: Deleting a button assignment does not delete the file assigned
to the button, to delete the file you must delete from the files list (the example
above on the right).
28
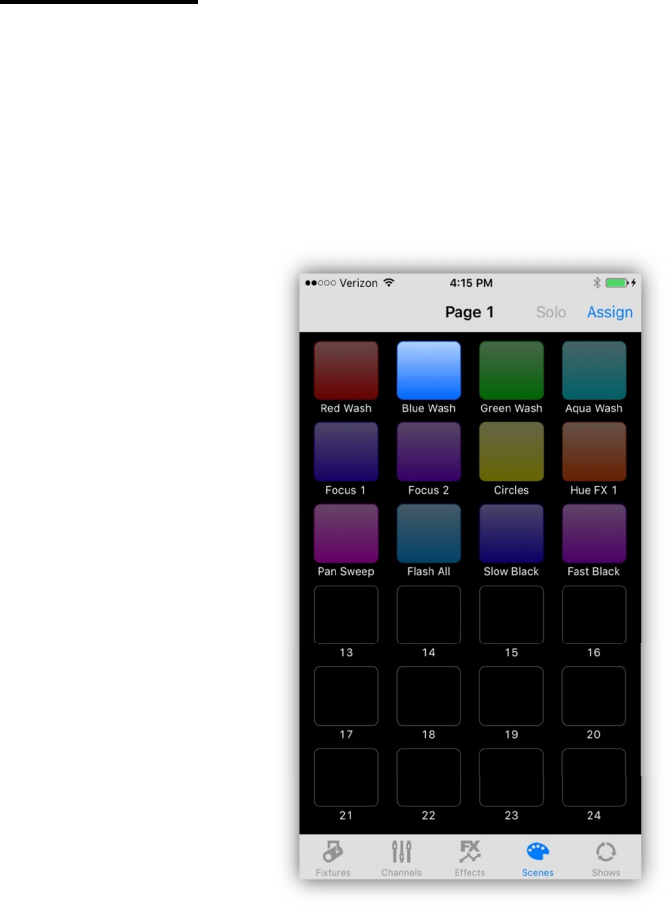
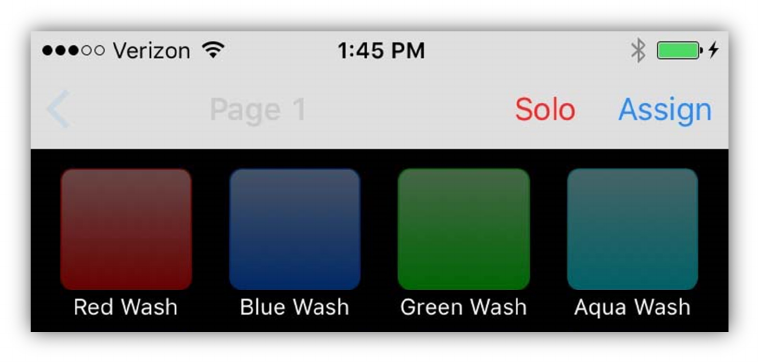
Scenes Tab
The scenes tab provides 72 scene buttons by using three pages of 24 buttons as
shown in the screenshot below. This example shows 12 scenes assigned to some
buttons on page 1. The second button “Blue Wash” is highlighted showing that
scene 2 is active. Tapping any scene button will toggle the scene on or off. When
turning on, the scene’s channels will fade in using the fade time that was saved
with the scene. Pages 2 and 3 can be called by using a swipe from the right side
of the screen.
Scene Definition
Scenes are collections of select fixtures and select channels and any running
effects. You can also save a fade time with a scene that will control how long it
will take for the scene’s channels to fade in. A scene does not necessarily control
every fixture and every channel, only those channels that are included when the
scene is saved. A scene can be as small as a single channel value.
To include a fixture and some channel values, select a fixture from the fixtures
tab, then change a channel value from the channels tab by moving one of the
channel sliders or by using the color picker or pan/tilt controls. Only channels that
29
have been changed since the last “Clear” will be included in the scene. “Clear” is
explained in the “Channels Tab” chapter.
Another way to include channels in a new scene is to call other scenes. When you
save the new scene, the other scene’s channels will automatically be included.
Important Note: When a scene is called it will check to make sure that each
fixture in the scene matches the fixtures currently patched. If a mismatch is
detected, the mismatched fixture levels will not be used. In other words, if you
re-patch your fixtures, old scenes that used other fixture types may not work.
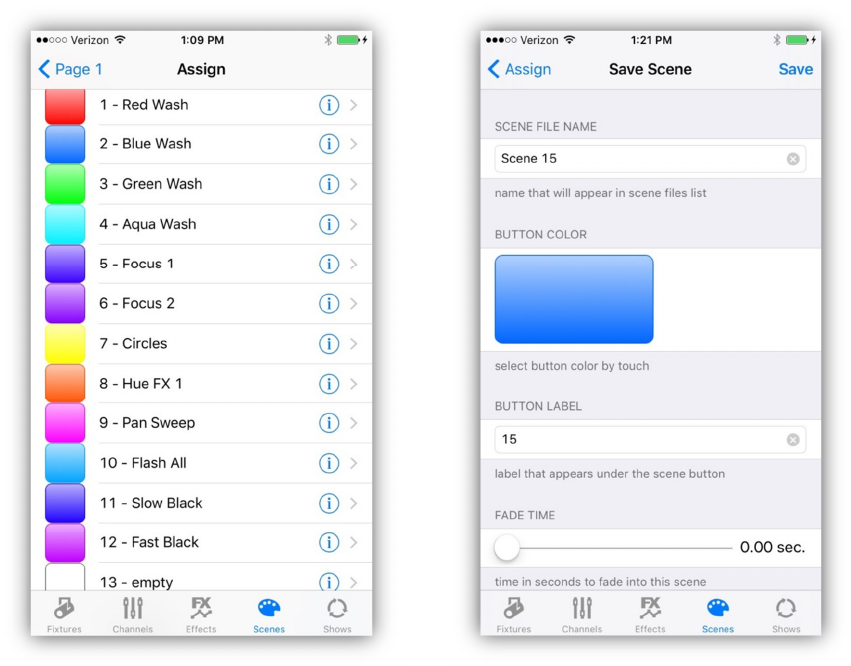
Saving Scenes
Tap the “Assign” navigation button in the upper right of any of the scene button
pages to show the button assignments table as shown in the example below on
the left. The table shows the scenes that are assigned to each of the 72 scene
buttons. Selecting one of the rows will call a view similar to the example on the
right. In the examples below, empty button row 15 was selected and the view on
the right is filled in with default names and a button color.
30
You can enter a new file name or use the default name. Typically a long
descriptive name will be used here. The button color will try to use a color that is
in the scene but will default to blue if no color is found. A short button label can
be entered, preferably a name that will fit under the scene button. Use the slider
to set the fade-in time from 0 to 12.75 seconds. Touch and drag inside the button
color box to select a new hue for the scene button. Finally, press the “Save”
button in the upper right of the view to save the scene to a file. You will see an
alert confirming the save or warning that another scene is already using that
name. If successful, the new scene will be added to the scene files folder and the
scene assigned to the selected button.
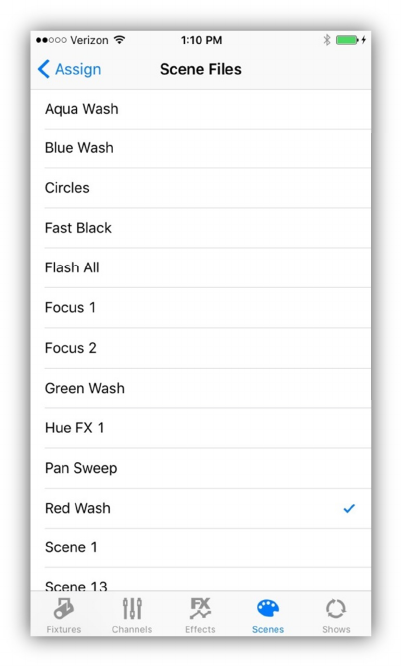
Scene Files
Although there are only 72 scene buttons, you can have as many scene files
saved as you like. The app has a scenes folder that can hold as many scenes as
memory will allow. A single scene file is very small, even if all channels are
included in the scene. To view the list of scene files, tap any of the detail buttons
in the Assign table list. A view similar to the one below will appear.
In this example, the detail button for row 1 was
tapped and a checkmark shows the file that is
assigned to that button. You can assign any file
to a button by selecting a row in the files list. A
new checkmark will show the current selection.
This allows you to manage far more than 72
scenes.
Delete Files and Button Assignments
You can use the “swipe to delete” method on
any button in the buttons assignment list or
any file in the files list. If you delete an entry
from the buttons assignment list, the button
will show “empty” but the file that was assigned
to the button will remain in the files folder. If
you delete a file, the deletion is permanent and
the file will be gone.
31
Solo Button
At the top of each scene page is a button labeled “Solo”. “Solo” will be displayed
in red when on and gray when off.
When solo is turned on only one scene at a time can be active. Only the channels
that are part of that scene will be activated and all other channels will be set to 0.
When solo is off (gray color) you can have many scenes active at once as long as
they don’t overlap. Any new scene that replaces an old scene will turn the old one
off. A new scene can partially replace an old scene if some but not all channels of
the two scenes overlap. In that case both scene buttons will stay lit indicating
that there are channels active within both of those scenes. Toggling a scene
button from lit state to dim will turn that scene off by setting its included channels
to 0. Any effects attached to the scene will also stop.
Effects
Any effects that are running when you save a scene will be included in that scene.
Turn effects on or off by tapping effects buttons within the effects tab.
Important Note: A scene only keeps a reference to the effects button number,
not the effect itself. If you change the effect that is assigned to an effects button,
it will also change the effect used by a scene that included that button.
Edit a Saved Scene
To edit a scene that’s been saved, simply call the scene by tapping its button,
(use solo mode to isolate the scene if needed), make any changes to channels
then re-save the scene. You can also combine scenes this way by calling multiple
scenes then saving as a new scene.
32
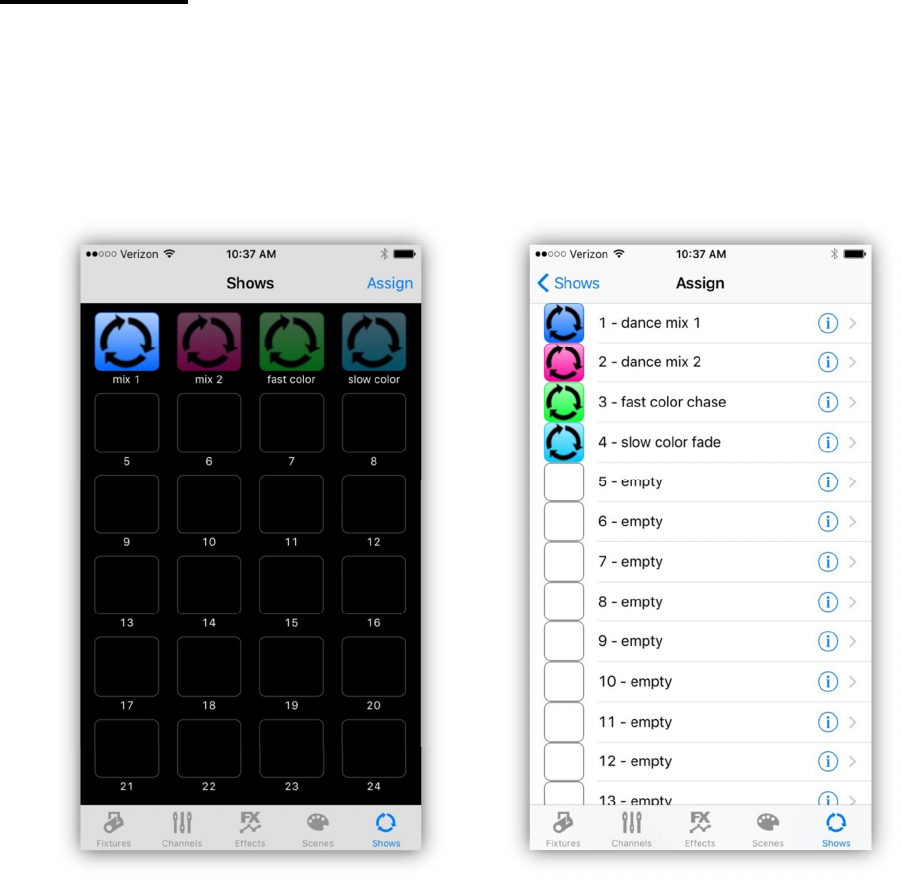
Shows Tab
Shows are simply scene lists that run on a timer. The show editor lets you
arrange a list of scenes and assign a hold time to each step in the list.
The first view in the shows tab is the show button array as shown in the example
below on the left. Button 1 is highlighted indicating that the show is running.
Edit a Show
Tapping the “Assign” navigation button in the upper right of the buttons view will
show the button assignment table as in the example above on the right. From the
assignment table you can start editing a new show or an existing one. To start a
new show, select a row that is empty. To make edits to an existing show, select
an occupied row of a show to edit. A view like the one below on the left will
appear when you select a row. In this example button 4 was selected that has an
existing show.

33
Each row in the table represents a step in the show’s scene list. To add additional
steps, tap the last row and an empty step will be added. Select any step row and
it will expand as in the example’s third row. Use the inc/dec buttons to select a
scene button number to assign to that step then use the slider to assign a hold
time. The hold time is shown to the right of the slider in min:sec format.
Tapping the “Edit” navigation button in the upper right will change the view to
appear as on the example on the right. Tapping one of the red buttons will delete
a step and touching and dragging one of the line edit buttons on the right side of
each row will let you rearrange the step order. When you are finished editing the
step order, tap “Done”.
Important Note: The scene list only references the scene button number. If you
change the scene that is assigned to a scene button it will also change the scene
that’s in any show that uses it.
34
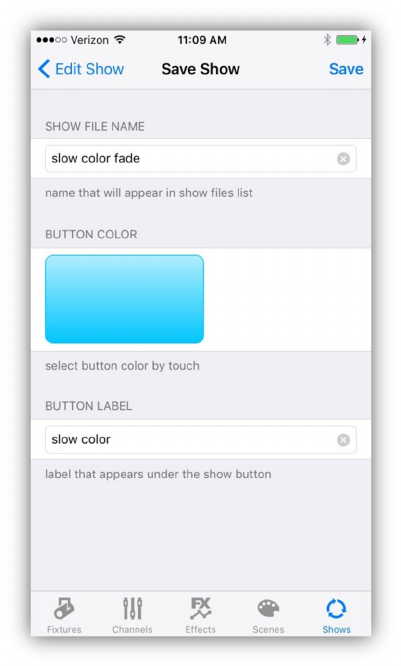
Tap the “Save” navigation button at the top of the show editor when you are
finished editing and a view similar to the example below will appear.
From this view you can enter a long descriptive file name for the show and a
shorter name that will appear under the button in the Show buttons array. Touch
and drag within the button view to change the button color. Tap the “Save”
navigation button in the upper right to save the file. An alert will appear to
confirm the save or to warn if another show is already using that name.
35
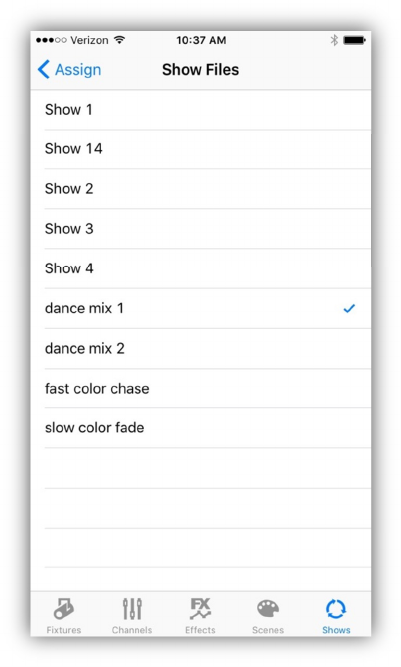
Show Files
Although there are only 24 show buttons, you can have as many show files saved
as you like. The app has a shows folder that can hold as many shows as memory
will allow. A single show file is very small. To view the list of show files, tap any of
the detail buttons in one of the Show Assign table list. A view similar to the one
below will appear.
In this example, the detail button for row 1 was
tapped and a checkmark shows the file that is
assigned to that button. You can assign any file
to a button by selecting a row in the files list. A
new checkmark will show the current selection.
This allows you to manage far more than the 24
scenes that are accessible from the buttons.
Delete Files and Button Assignments
You can use the “swipe to delete” method on
any button in the buttons assignment list or
any file in the files list. If you delete an entry
from the buttons assignment list, the button
will show “empty” but the file that was assigned
to the button will remain in the files folder. If
you delete a file, the deletion is permanent and
the file will be gone.
Show Playback
Only one show is allowed to play at a time. Tapping a show button will toggle a
show on or off. A show will loop indefinitely until you turn it off.
Important Note: When a show is running the sleep timer on your IOS device will
be turned off temporarily to allow the show to continue running. If you leave the
app while a show is running the show timer will temporarily pause.
36
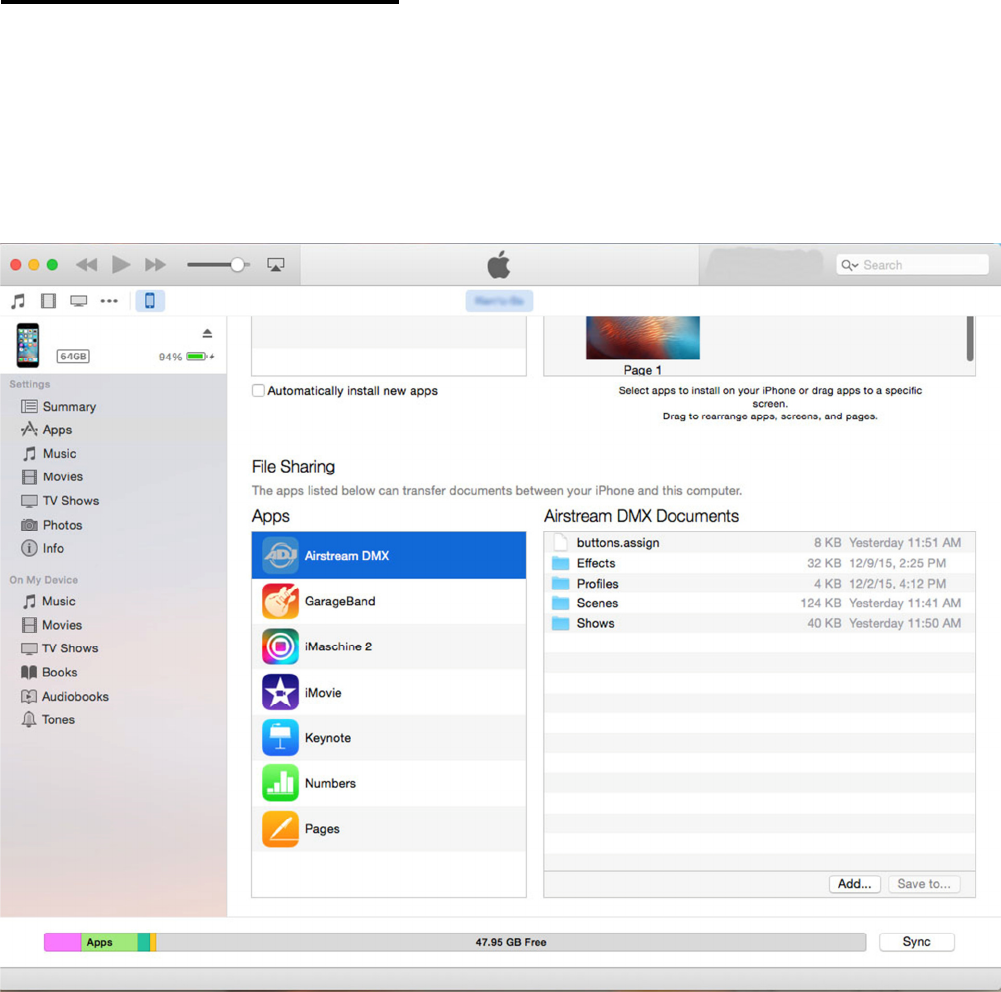
File System and ITunes
Scenes, effects, shows, and custom profiles are stored in the app’s documents
folder in your IOS device. Subfolders are created for each of these. There is also a
file that contains all of the button assignments named “buttons.assign”. You can
access these files using ITunes running on your Mac when your IOS device is
connected to it. The screenshot below is an example of the file sharing display in
ITunes connected to an IOS device that has Airstream DMX installed on it.
In the app’s documents window on the right you can see the four folders plus the
buttons.assign file. The folders can’t be opened in ITunes but they can be dragged
to your desktop where you can open and edit them. You can then drag them back
to ITunes where they will be copied back into your IOS device automatically.
37
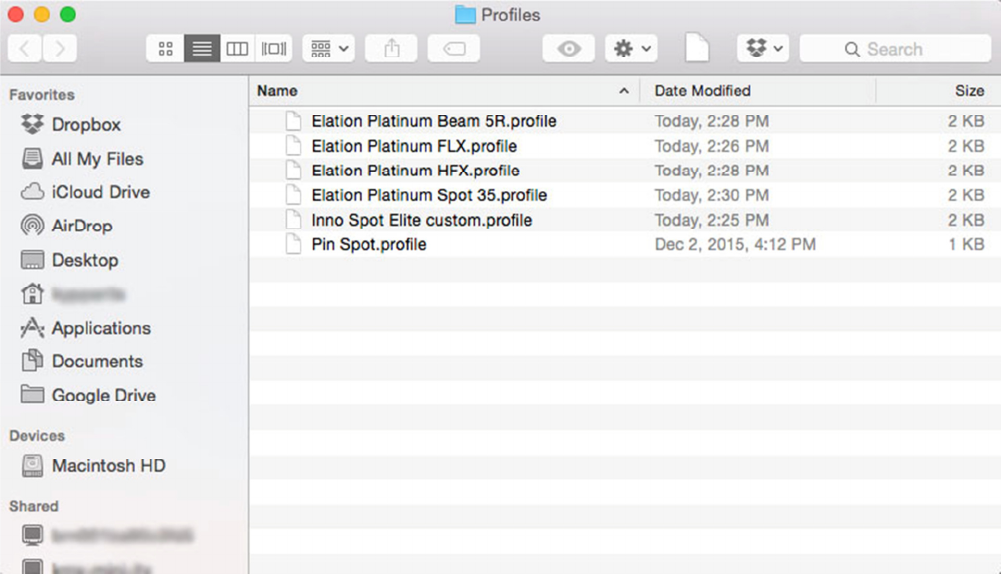
The screenshot example below shows a Finder window with the contents of the
profiles folder containing 6 custom profiles.
You can use ITunes to back up your folders on your computer or to load new files
into your IOS device. To Share custom profiles with another user, copy any new
profiles into the profiles folder on your desktop then drag the updated folder into
ITunes.
The buttons.assign file is a list of all Fixture, FX, Scene and Show button
assignments. You can store multiple copies of this file on your computer for
different lighting setups to be reused at a later time.

38
Contacts
Information and specifications in this document are subject to change without
notice. ADJ Products assumes no responsibility or liability for any errors or
inaccuracies that may appear in this manual.
ADJ Products
6122 S Eastern Ave.
Los Angeles, CA. 90040
323-582-2650
Web site: www.adj.com
Email: Info@adj.com
A.D.J. Supply Europe B.V.
Junostraat 2
6468 EW Kerkrade
Netherlands
service@adj.eu / www.adj.eu
Tel: +31 45 546 85 00 / Fax: +31 45 546 85 99
© ADJ Products ® 2015 All rights reserved.
