Uni Pak MKII EN Rev 12 16
2018-07-11
: Adj Uni Pak Mkii En Rev 12-16 Uni Pak MKII_EN Rev 12-16 manuals
Open the PDF directly: View PDF ![]() .
.
Page Count: 15
ADJ Products, LLC – www.adj.com– Uni pak II User Manual 2
©2013 ADJ Products, LLC all rights reserved. Information, specifications, diagrams, images, and instructions
herein are subject to change without notice. ADJ Products, LLC logo and identifying product names and
numbers herein are trademarks of ADJ Products, LLC. Copyright protection claimed includes all forms and
matters of copyrightable materials and information now allowed by statutory or judicial law or hereinafter
granted. Product names used in this document may be trademarks or registered trademarks of their respective
companies and are hereby acknowledged. All non-ADJ Products, LLC brands and product names are
trademarks or registered trademarks of their respective companies.
ADJ Products, LLC and all affiliated companies hereby disclaim any and all liabilities for property, equipment,
building, and electrical damages, injuries to any persons, and direct or indirect economic loss associated with
the use or reliance of any information contained within this document, and/or as a result of the improper,
unsafe, unsufficient and negligent assembly, installation, rigging, and operation of this product.
ADJ Products, LLC – www.adj.com– Uni pak II User Manual 3
Contents
FEATURES ................................................................................................................................................................................ 4
GENERAL INSTRUCTIONS ........................................................................................................................................................ 4
1. Warnings ......................................................................................................................................................................... 4
2. Cautions .......................................................................................................................................................................... 4
FRONT PANEL OVERVIEW ....................................................................................................................................................... 5
1. Front Panel ...................................................................................................................................................................... 5
REAR PANEL OVERVIEW .......................................................................................................................................................... 6
1. Rear Panel ....................................................................................................................................................................... 6
OPERATION GUIDE .................................................................................................................................................................. 6
1. General Information ....................................................................................................................................................... 6
2. DMX Addressing .............................................................................................................................................................. 7
3. Assigning as Switch Pack ................................................................................................................................................. 7
4. Assigning as Dimmer Pack .............................................................................................................................................. 9
INSTALLATION, MOUNTING AND CONNECTIONS ................................................................................................................. 10
1. Installation / Mounting ................................................................................................................................................. 10
2. Connections .................................................................................................................................................................. 10
TROUBLE SHOOTING ............................................................................................................................................................. 11
1. Trouble shooting ........................................................................................................................................................... 11
2. Replacing Fuse(s) .......................................................................................................................................................... 11
TECHNICAL SPECIFICATIONS ................................................................................................................................................. 12
ROHS - A great Contribution to the Conservation of Environment ..................................................................................... 13
WEEE – Waste of Electrical and Electronic Equipment ........................................................................................................ 14
NOTES ................................................................................................................................................................................... 15

ADJ Products, LLC – www.adj.com– Uni pak II User Manual 4
INOZIONE
FEATURES
Thank you for purchasing the Uni pak-II hybrid dimmer/switch pack.
This product includes the following features:
• 1 channel hybrid pack with dual Edison output sockets.
• Pack is user assignable between Dimmer & Switch modes.
• On board control fader allows for dim intensity adjustment, from 0-100%.
• External control fader allows for dim intensity adjustment, from 0-100%.
• 4 digit segment display shows current activity and function state.
• 3-pin standard DMX IN/OUT ports.
• 10 Amp Maximum output.
GENERAL INSTRUCTIONS
This is a one channel portable dimmer/switch pack that can be set to either dim or switch. For your
convenience, the Uni Pak-II can manually be controlled via, the on board or external HTP faders or via a DMX
console. A digital display and function buttons allow for easy and quick set up of dim preset levels as well as
DMX addressing. One three pin XLR input and one three pin XLR output are supplied to receive and send
data. Its sleek design allows for discreet installation to a truss structure or ceiling. A clamp may be placed into
the supplied holes for easy rigging.
To optimize performance of this product, please read the instructions carefully to familiarize yourself with the
basic operations.
Customer Support: If you encounter any problems, please contact your trusted ADJ reseller.
We also offer the possibility, to contact us directly: You can contact us via our website www.americandj.eu or
via email: support@americandj.eu
1. Warnings
• This unit must be earthed.
• Keep the unit dry, do not expose it to water or high levels of humidity.
• Do not allow for any flammable liquids to come in close contact with the unit.
• Handle this unit carefully, any strong shock or vibration may result in malfunction.
• Do not dismantle or modify this unit. There are no user serviceable parts inside.
• Do not operate this unit if the internal components are exposed.
• Only use an AC source that complies with the local building and electrical codes.
• When replacing fuses, always replace with the exact same type.
2. Cautions
• When unpacking, please check the unit for damages. Should you find something wrong with the unit,
please contact the dealer that you purchased it from immediately.
• All rights reserved. No part of this manual may be reproduced, in any form or by any means, without
permission in writing from Elation Professional.
Notice:
Specifications and improvements in the design of this product and this manual are subject to change without
prior notice.
ADJ Products, LLC – www.adj.com– Uni pak II User Manual 5
FRONT PANEL OVERVIEW
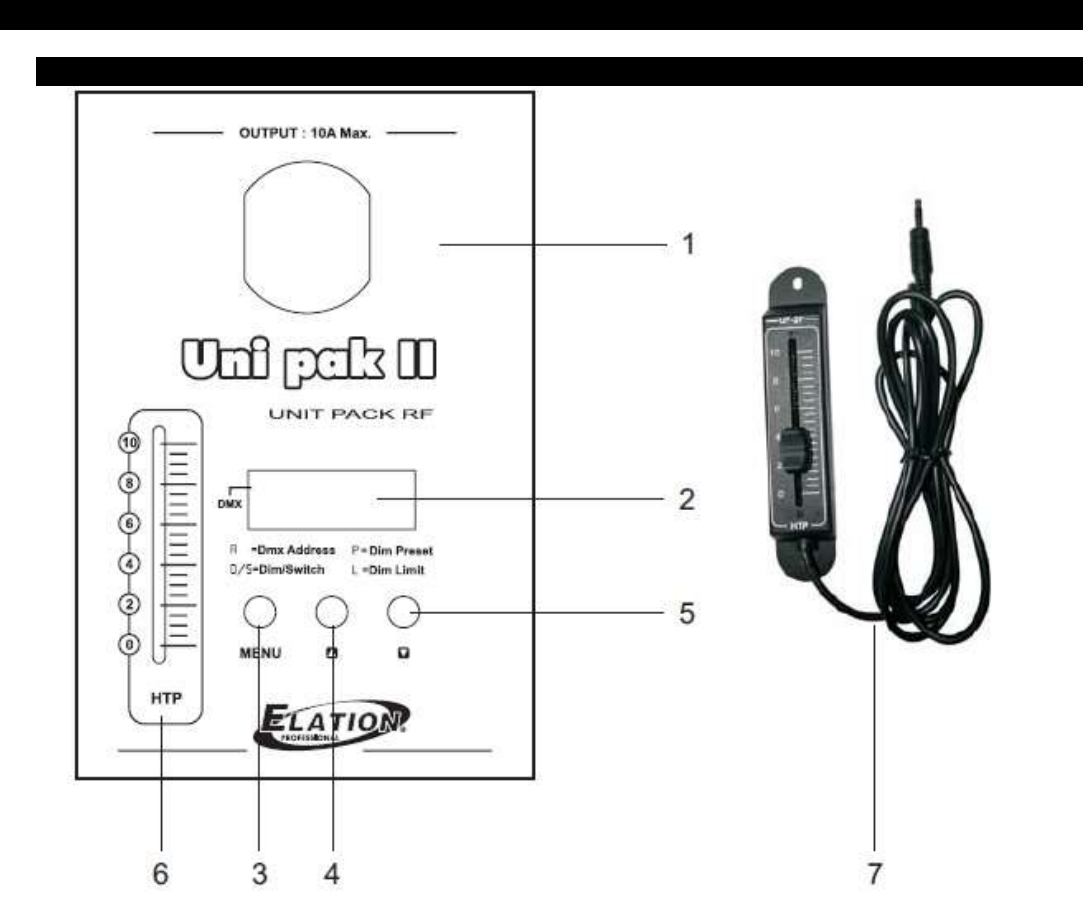
1. Front Panel
1. Output Plugs
This is a Single Shuko, 10 Amp maximum load, output.
2. Segment Display:
This digital display shows current activity or function state.
3. Menu button:
This button is used to select between four menu options.
(DMX address, Dim/Switch Mode, Dim Preset & Limit)
4. Up Arrow button
This button will increase values in the display.
5. Down Arrow button
This button will decrease values in the display.
6. HTP fader :
This fader adjusts the channel intensity and complies with the
HTP principle (Highest takes precedence).
7. External Slider
This slider has the same function as that of HTP Slider(6).
ADJ Products, LLC – www.adj.com– Uni pak II User Manual 6
REAR PANEL OVERVIEW
1. Rear Panel
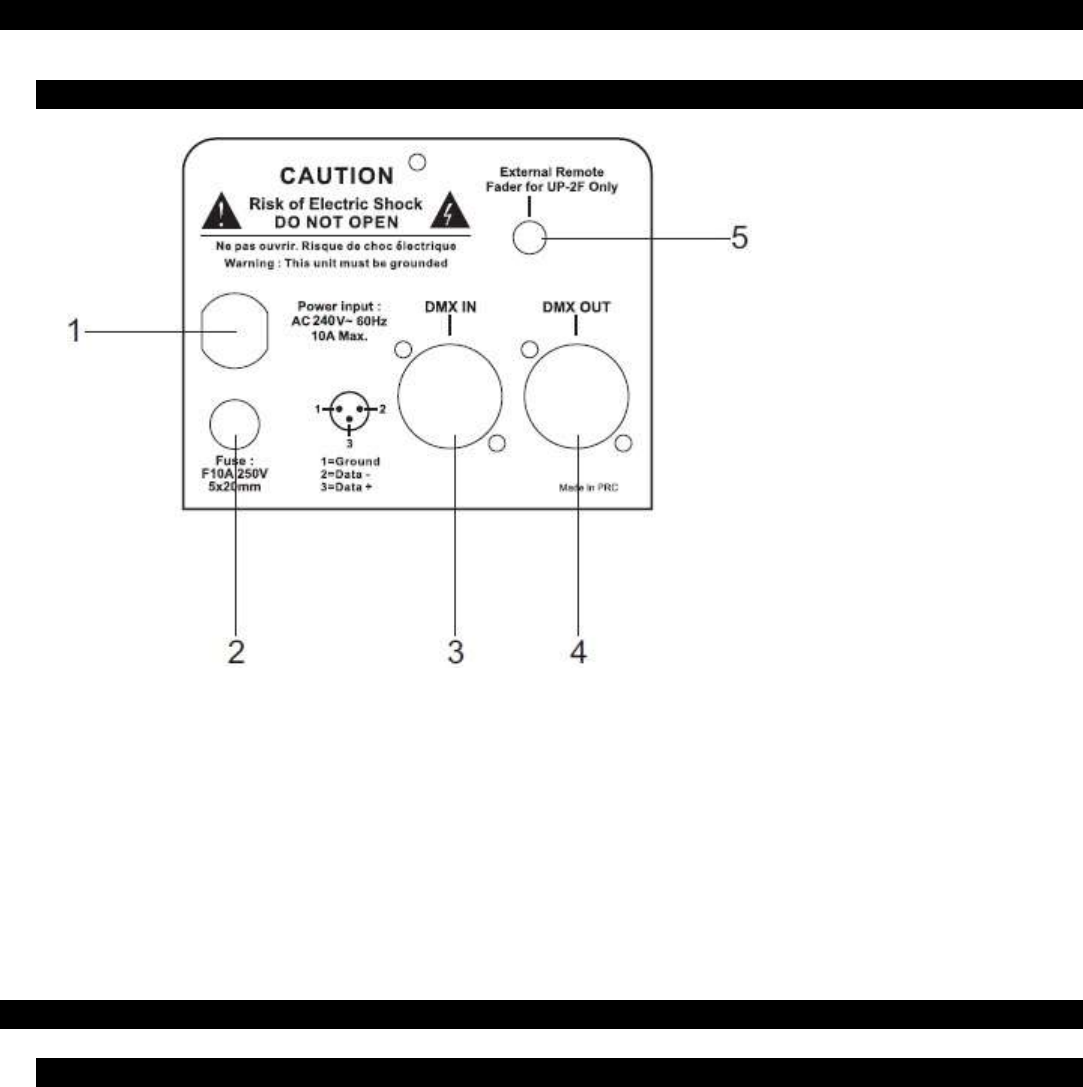
1. Power Cord:
16AWGX3C power cable. Plug intoa 240 V supply.
2. Fuse Housing:
Houses a 10A 250V 5x20mm fuse. Always replace with
same type fuse.
3. DMX Input:
3-pin XLR male socket, used to receive DMX data.
4. DMX Output:
3-pin XLR female socket, used to send DMX data.
5. Mini input socket:
This is to connect the supplied external fader for external
control if desired.
OPERATION GUIDE
1. General Information
Plug the pack into an appropriate 240V power outlet. Once powered, the Uni Pak-II will default to its previous
function state due to internal memory. In addition, the digital display will show the last set DMX address
setting.
If the power frequency is not stable, the display will show "AC-0". You will have to connect to a stable
power source or wait until the power becomes stable at the current outlet.
ADJ Products, LLC – www.adj.com– Uni pak II User Manual 7
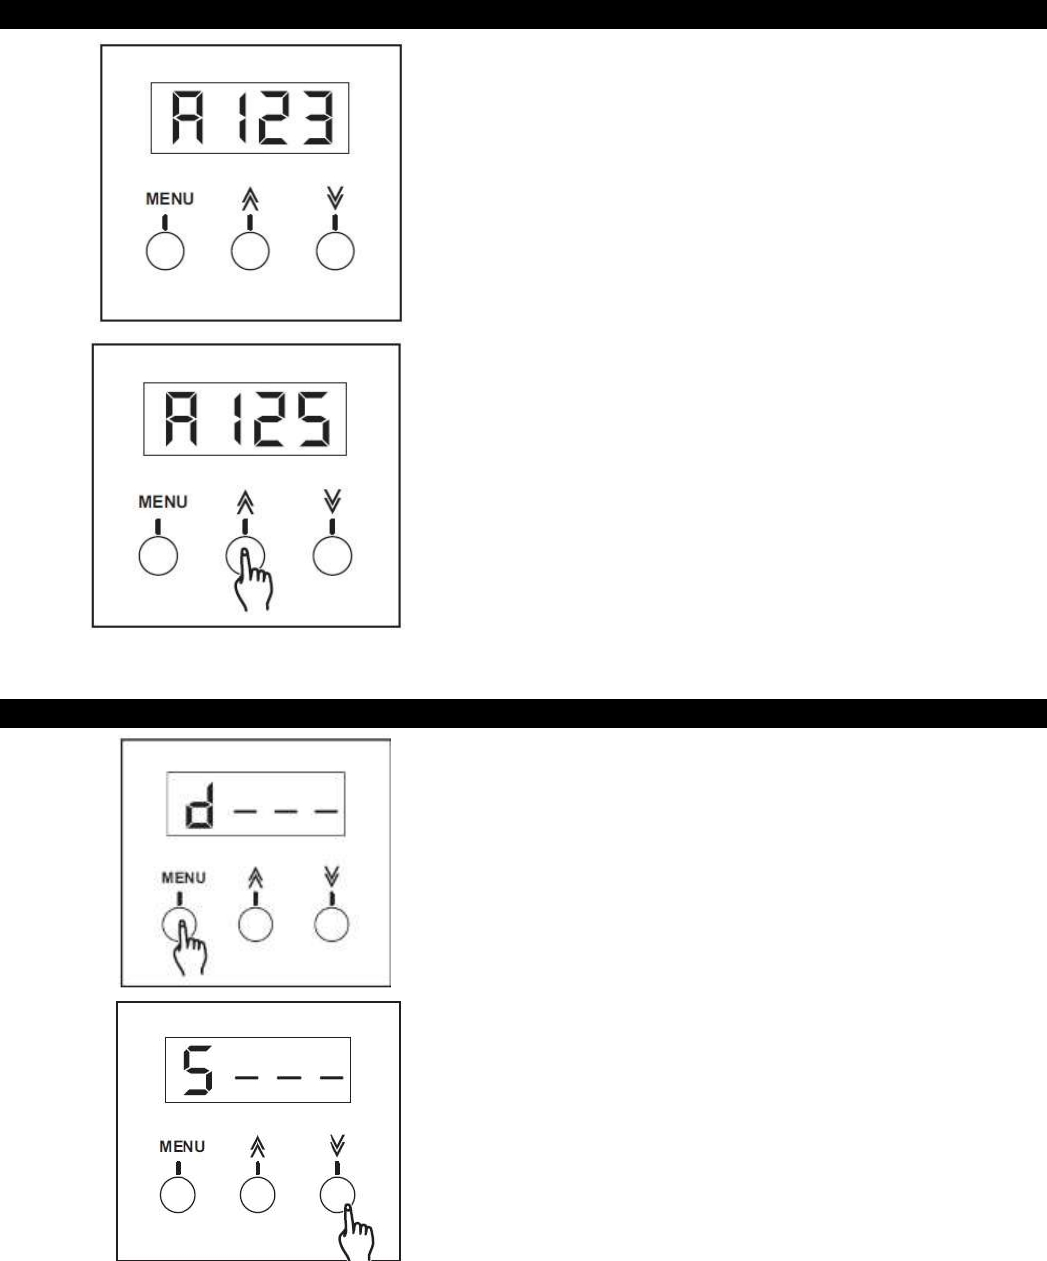
2. DMX Addressing
1. Press the “MENU” button until the letter “A”
appears in the left hand side of the display. The
display will show the “A” followed by the current
address setting. For example, if the last set DMX
channel was 123, your display should look like our
picture to the left.
2. Each tap of the Up or Down arrow buttons will
change the DMX address value once. Pressing and
holding down either the UP or Down arrow buttons
will increase or decrease the DMX address setting
quickly. Once the DMX address channel is achieve,
release the UP or Down arrow button. The new
address setting will automatically be stored into
memory.
NOTE:
When setting your DMX address, channel output
is disabled.
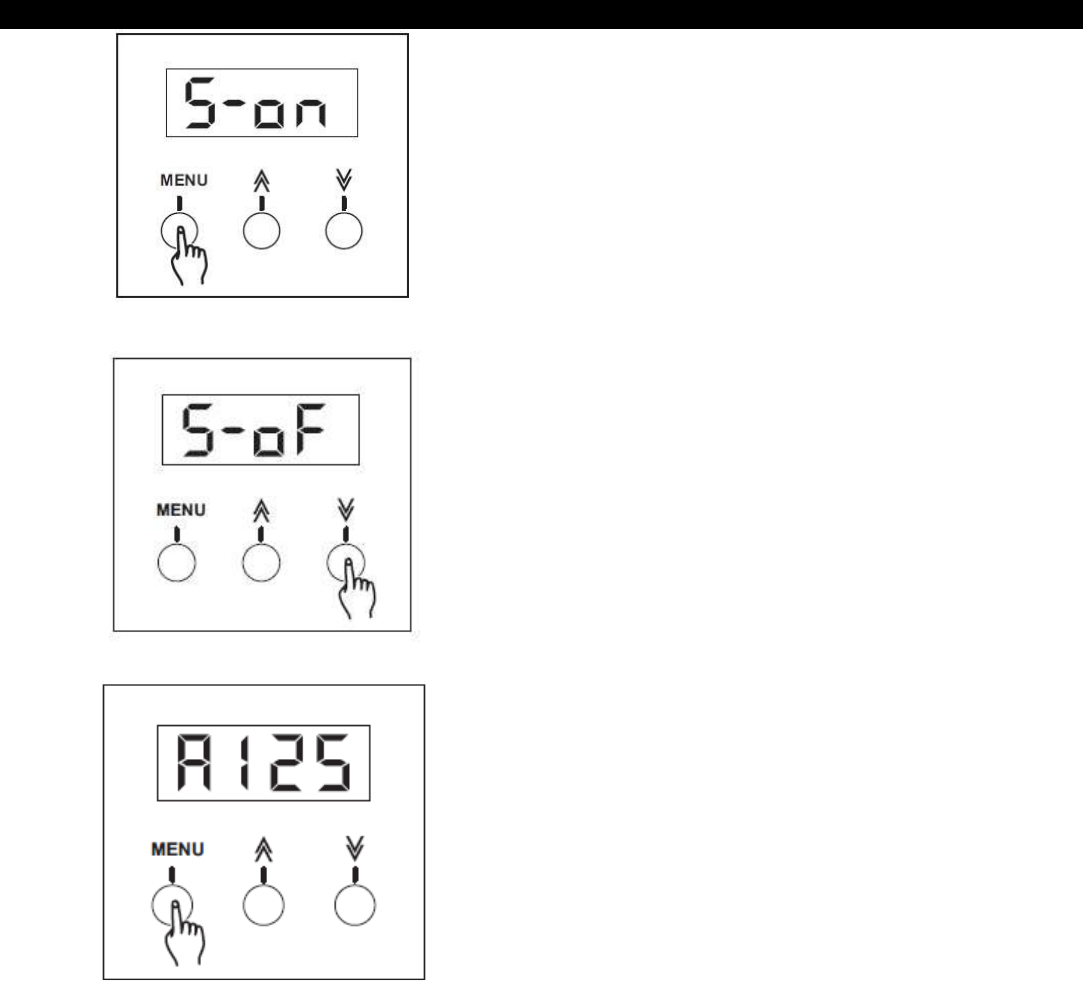
3. Assigning as Switch Pack
1. Press the “Menu” button until the letter “d” or “S”
appear in the left hand side of the display.
2. If your display shows “d”, press the down arrow
button once so it changes to “S”. If the display
already show “S”, proceed to the next step.
ADJ Products, LLC – www.adj.com– Uni pak II User Manual 8
Assigning as Switch Pack (continued)
3. Press the “Menu” button to enter Switch Pack
mode.
4. When in Switch Pack mode, there are two options
to choose from- Switch On (S-on), automatically
switches the power ON regardless of DMX signal or
Switch Off (S-of), activates switch mode via DMX
and the power will switch ON/OFF when the channel
value exceeds 40%. When channel value it less than
40%, channel output will be zero or OFF. Press the
UP/DOWN arrow buttons to select ON and OFF.
5. Once set, press the “ Menu” button to confirm the
setting and return to DMX Address mode.
ADJ Products, LLC – www.adj.com– Uni pak II User Manual 9
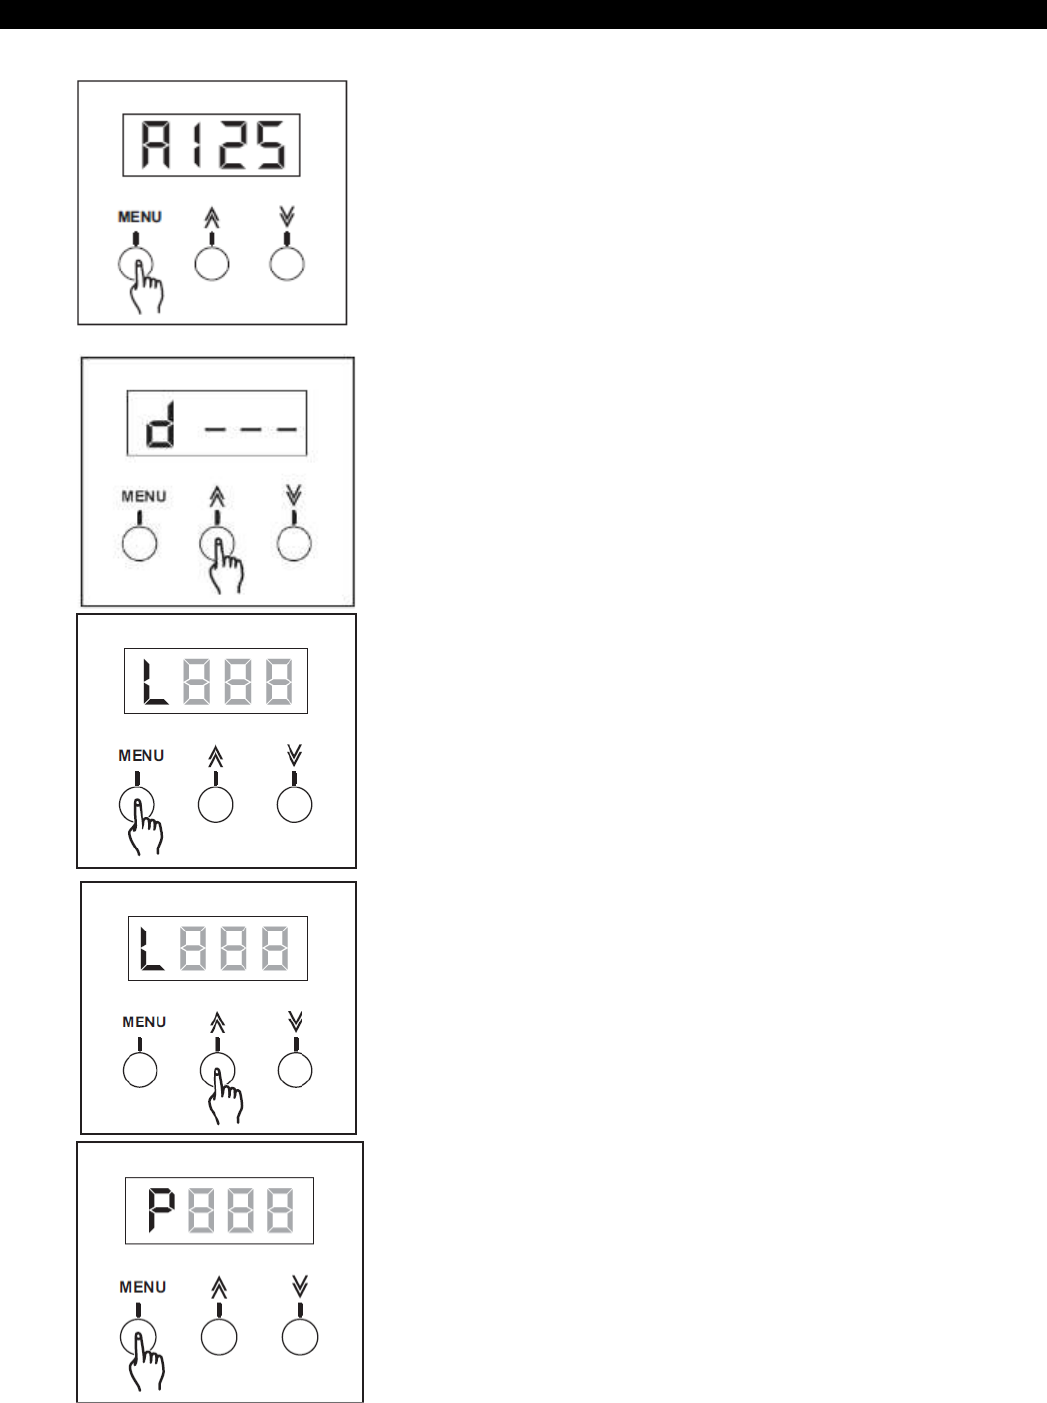
4. Assigning as Dimmer Pack
1. Press the “Menu” button until the letter “d” or “S”
appear in the left hand side of the display.
2. If your display shows “S”, press the UP arrow button
once so it changes to “d”. If the display already show
“d”, proceed to the next step.
3. Press the “Menu” button once to enter Dimmer Limit
mode.
4. Tap the Up or Down button to increase or decrease
the value within the range of 10-100. Each tap will
increase or decrease the value once. Pressing and
holding the UP or Down arrow button will increase or
decrease the value quickly.
Once the Dim Limit is achieved, it will automatically be
stored.
5. Press the “Menu” button to enter Dimmer Preset
mode.
ADJ Products, LLC – www.adj.com– Uni pak II User Manual 10
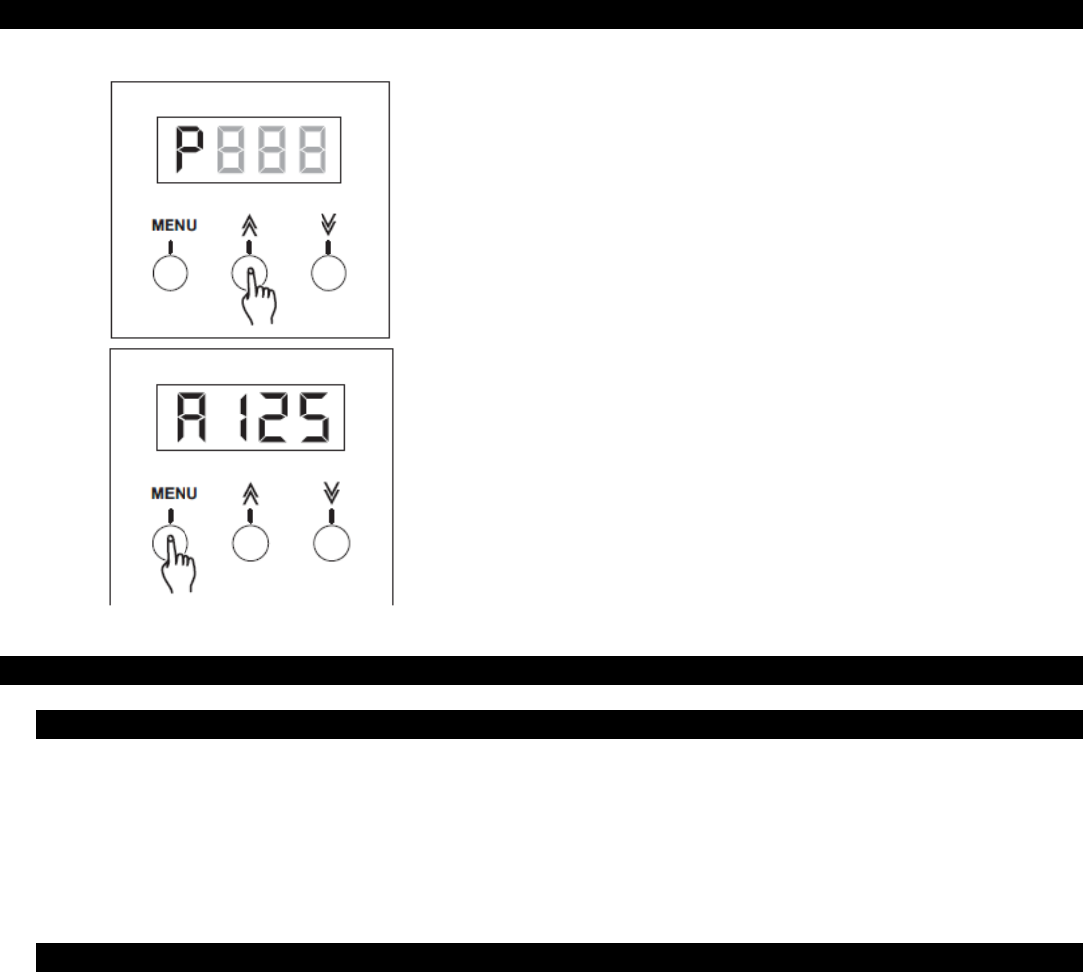
Assigning as Dimmer Pack (continued)
4. Tap the Up or Down arrow buttons to enter a dim
preset value within the range of 00-100. Each tap will
increase or decrease the value once. Pressing and
holding the UP or DOWN arrow buttons will change the
value quickly.
Once the Dim Preset level is achieved, it will be
automatically be stored.
5. Press the “Menu” button once to confirm your settings
and return to DMX Address mode.
INSTALLATION, MOUNTING AND CONNECTIONS
1. Installation / Mounting
The Uni pak-II was designed to be mounted on a truss rig or ceiling. It is recommended that you use a suitable
mounting clamp and safety cable when mounting to any structure. There are two holes on the Uni pak-II.
These are in place for a mounting clamp or to fasten to a wall or ceiling. For cooling purposes, it is necessary
to mount the pack so that air is free to circulate around the dimmer. There should be at least 12 inches of
clearance between the pack and anything surrounding it.
2. Connections
The Uni pak-II is supplied with a single 10 Amp Edison plug attached to a 16 gauge line cord. This cord should
be connected to a service capable of suppling at least 10 amps and be protected by a properly sized circuit
breaker. Lamp loads should be plugged into to the dual 10 Amp Edison sockets which are supplied on the face
of the pack. 3 pin XLR’s are supplied for the input and output of the data link. Connect out of the console or
previous fixture in line and into the input of the Uni pak-II. Connect out of the Uni pak-II and into the input of
next pack or fixture in line. It is recommended that the last pack or fixture in line include a DMX terminator into
the output. A DMX terminator consists of a 120 ohm, 1/4 watt resistor soldered across pins 2 & 3 of a 3 pin
XLR connector.

ADJ Products, LLC – www.adj.com– Uni pak II User Manual 11
TROUBLE SHOOTING
1. Trouble shooting
No Power to the pack:
Disconnect the main power line cord. Reconnect the line cord to ensure proper connection. If the problem still
persists, check the building service panel and make sure the circuit breakers are on.
No Channel output:
Disconnect the main power line cord. Check the corresponding channel fuse (see replacing fuses section).
Replace if blown. Reconnect line cord. If controlling via DMX, ensure that you are receiving DMX signal at the
pack. Indicator in the display should be flashing when signal is present. If signal is not present, check the XLR
connections from console or previous fixture in line. If problem still persists, replace XLR cable between
previous device and pack and try again.
Undesired 100% channel output:
Check the “Dim/Switch” settings. See “Assigning as Switch or Dimmer Pack” sections and set accordingly. If
problem still persists, ensure that you are not receiving channel output from your console by disconnecting the
XLR input cable.
If you’ve tried the above and the unit continues to malfunction, please contact ADJ customer service at
support@americandj.eu, your unit will require service.
2. Replacing Fuse(s)
Fuse Replacement: Disconnect the main power line cord. Use a flat head screwdriver to remove the fuse
holder cap. Pull out the old fuse and replace it with a new one of the exact same type. Replace the fuse cap
with the flat head screw driver. Do not over tighten as this may result in a broken and unusable fuse holder.

ADJ Products, LLC – www.adj.com– Uni pak II User Manual 12
TECHNICAL SPECIFICATIONS
Model:
Uni pak II
Power Input
Channel Output
DMX OUTPUT
DMX INPUT
Fuse Type
Dimensions
Weight
AC 240V~60Hz, 10 A max.
10 A max.
3-pin XLR female socket
3-pin XLR male socket
F10A 250V 5x20mm
7.17L x 3.62W x 2.56H (182x92x65mm)
2.5lbs. (1.1 Kg)

ADJ Products, LLC – www.adj.com– Uni pak II User Manual 13
ROHS - A great Contribution to the Conservation of Environment
Dear Customer,
The European Union has adopted a directive on the restriction / prohibition of the use of hazardous
substances. This directive, referred to as ROHS, is a frequently discussed topic in the electronic industry.
It restricts, among other things, six materials: Lead (Pb), Mercury (Hg), hexavalent chromium (CR VI),
cadmium (Cd), polybrimated biphenyls as flame retardant (PBB), polybrominated diphenyl, also a flame
retardant (PBDE). The directive applies to nearly all electronic and electrical devices whose mode of operation
involves electric or electromagnetic fields – in short: each kind of electronics we have around us in our
households or at work.
As manufacturers of products of the brands of AMERICAN AUDIO, AMERICAN DJ, ELATION Professional
and ACCLAIM Lighting, we are obligated to comply with the RoHS directive. Therefore, as early as two years
prior to the directive coming into force, we started our search for alternative environmentally friendly materials
and manufacturing processes.
Well before the RoHS directive took effect, all of our products were manufactured meeting the standards of the
European Union. With regular audits and material tests we can still assure that the components we use are
always RoHS-compliant and that the manufacturing process, as far as the state of technology allows, is
environmentally friendly.
The ROHS directive is an important step to the protection of our environment. We, as manufactures, feel
obligated to make our contribution in this respect.

ADJ Products, LLC – www.adj.com– Uni pak II User Manual 14
WEEE – Waste of Electrical and Electronic Equipment
Every year thousands of tonnes of electronic components, which are harmful to the environment, end up at the
waste disposals around the world. To ensure the best possible disposal or recovery of electronic components,
the European Union has adopted the WEEE directive.
The WEEE-system (Waste of Electrical and Electronic Equipment) can be compared with the system of the
“Green Spot”, which has been in use for several years. The manufactures have to make their contribution to
the utilization of waste at the time they release the product. Money resources obtained by doing so will be
applied to develop a common system of waste management. Thereby we can ensure professional and
environmentally friendly scraping and recycling program.
As manufactures, we are part of the German system of EAR and we make our contribution towards it.
(Registration in Germany: DE41027552)
That means that products of AMERICAN DJ and AMERICAN AUDIO can be left in the collection points free of
charge and they will be used in the recycling program. Products of ELATION Professional, which are used
only by professionals, shall be handled by us. Please send Elation products directly to us at the end of their
lifetime so that we can professionally dispose of them.
Like the above ROHS, the WEEE directive is an important contribution to the environment protection and we
are glad to help to clean the environment with this disposal system.
We are happy to answer any of your inquiries and welcome your suggestions at: info@americandj.eu

ADJ Products, LLC – www.adj.com– Uni pak II User Manual 15
NOTES
