Advance Security T61 Remote Control User Manual
Advance Security Inc Remote Control Users Manual
UserManual.wiki
>
Advance Security
>
T61 User Manual
Users Manual
Navigation menu
Upload a User Manual
Namespaces
Wiki Guide
HTML
PDF
Info
Views
User Manual
Discussion / Help
Navigation
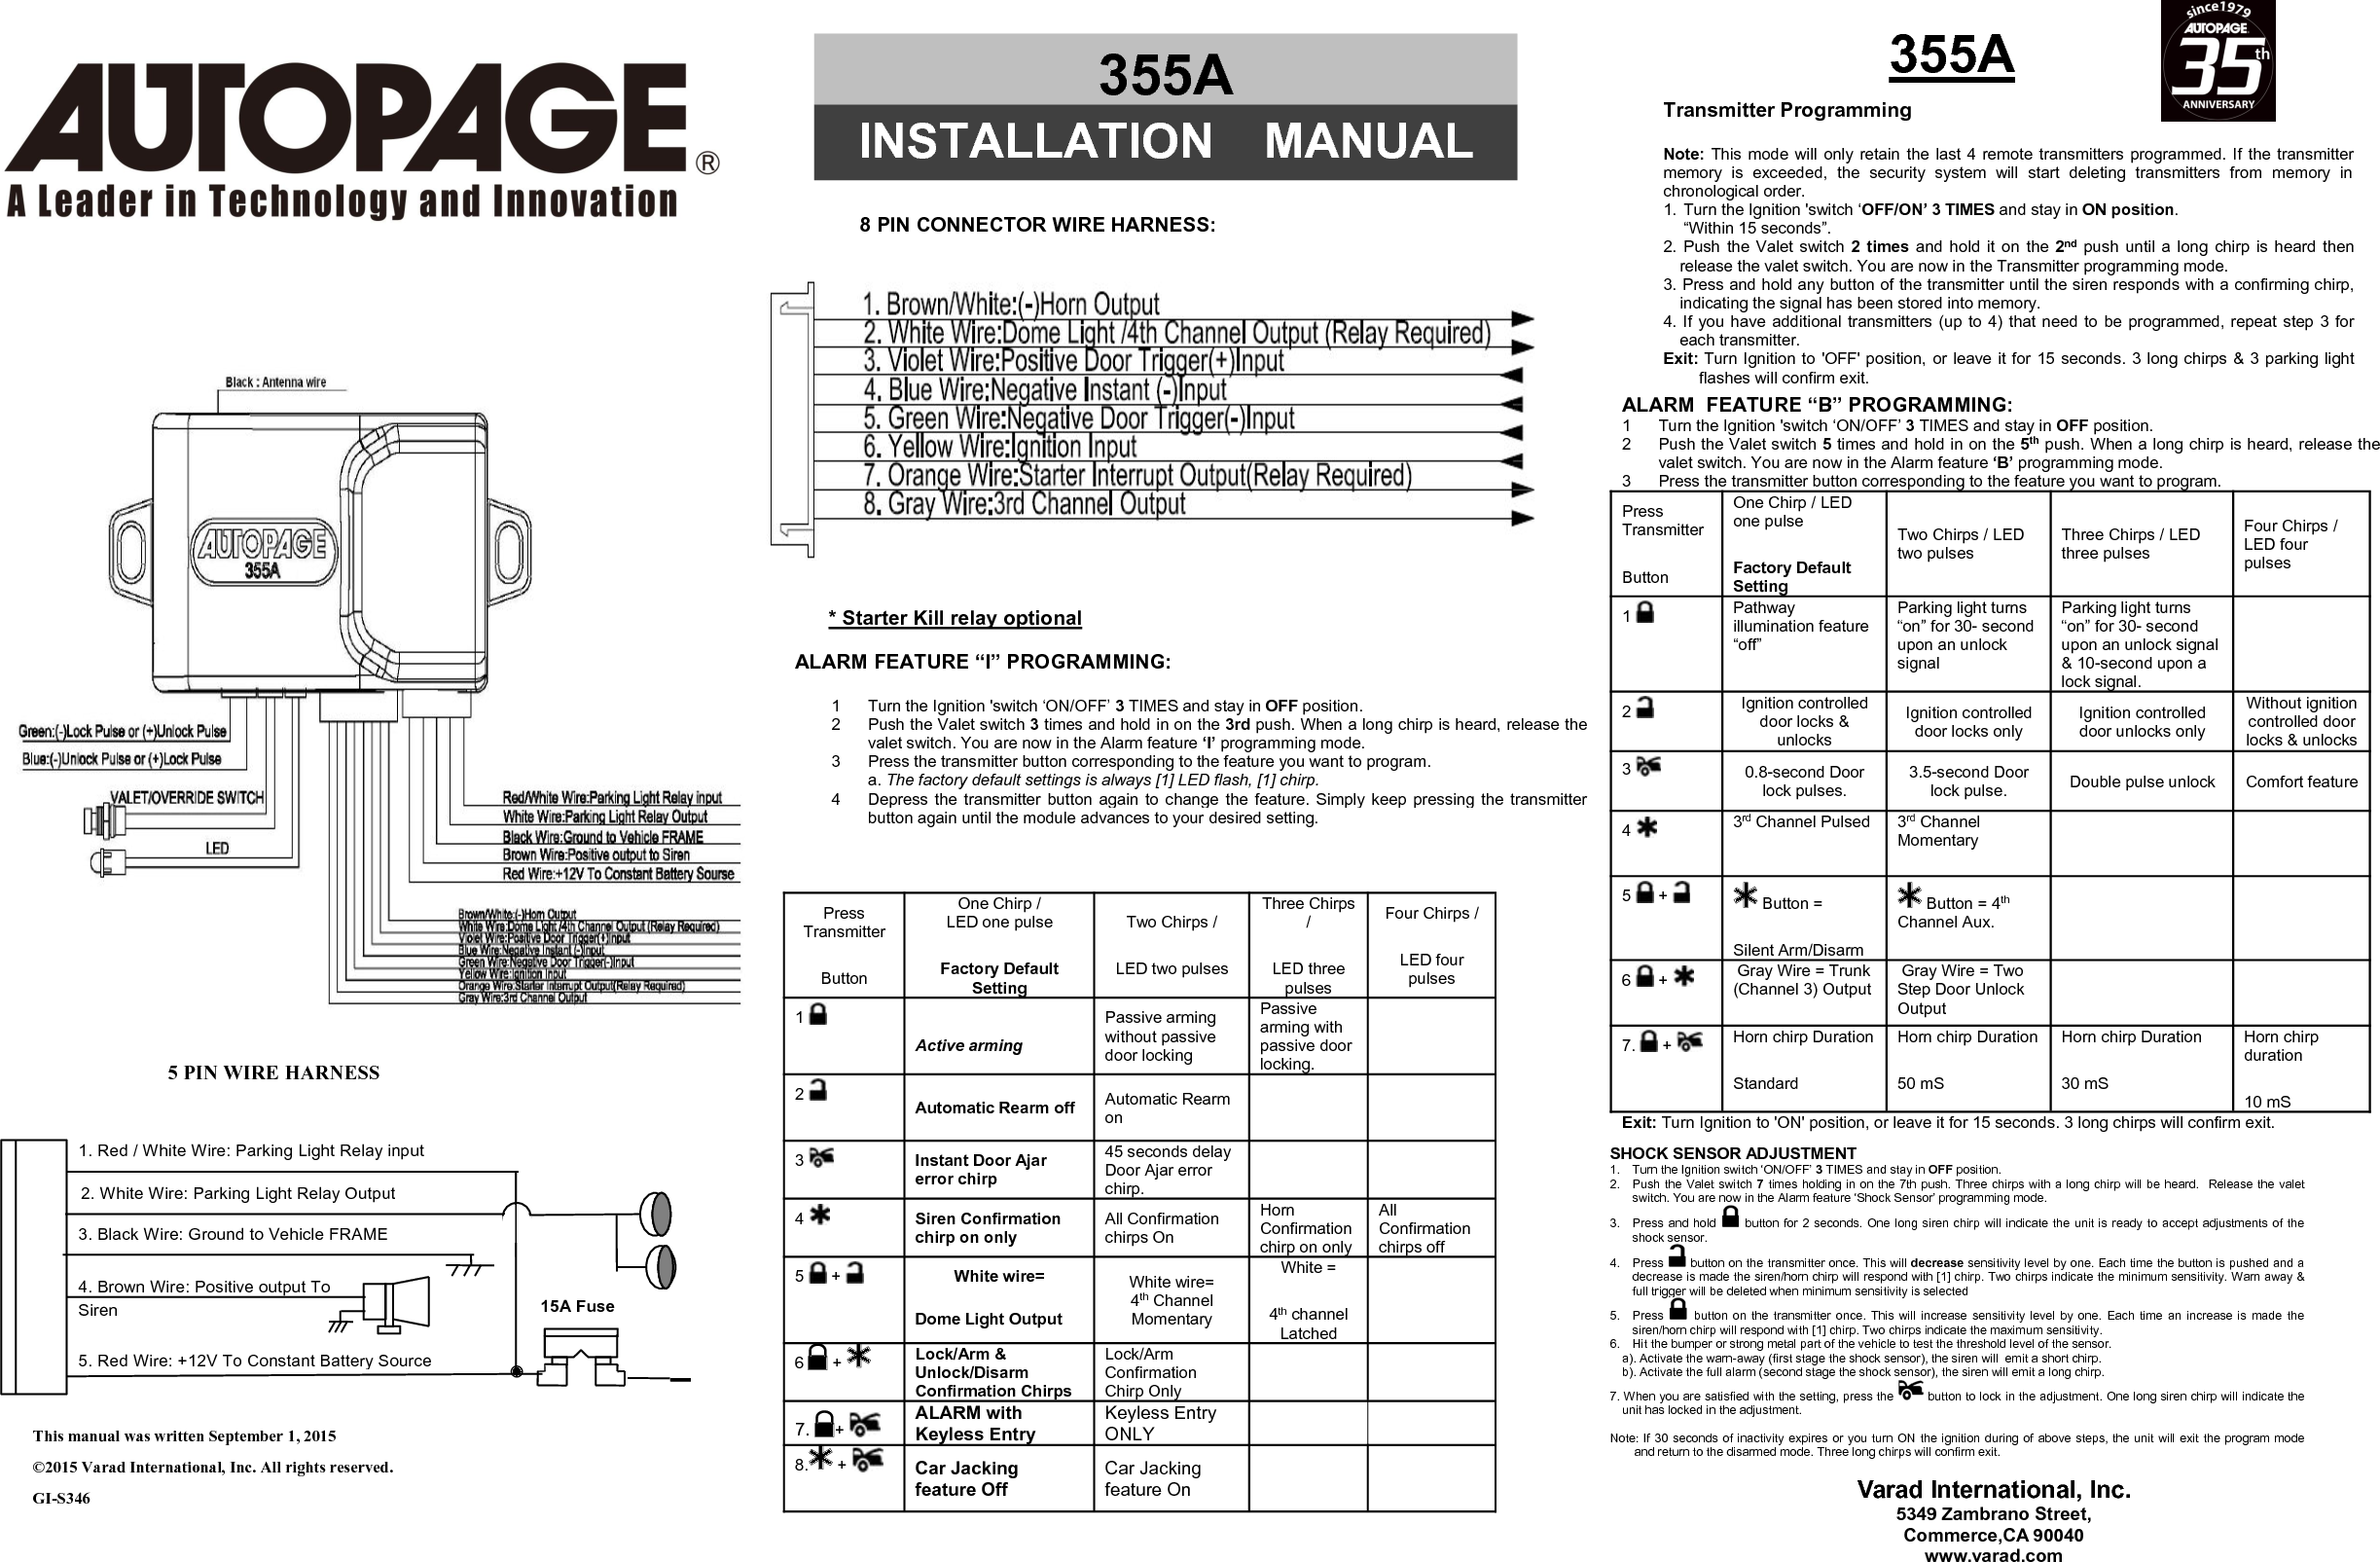
![CHANGING THE BATTERY IN YOUR TRANSMITTERSXT-53: The XT-53 transmitter uses a 3-volt lithium ion batteries (#CR2032) To replace the battery,you will need to use a small flat blade screwdriver. Locate the small notch on the lower right side of thetransmitter case next to the key ring. Using the flat blade screwdriver, carefully pry the top case from thebottom case. It should snap apart after breaking the seal. Before removing the batteries note thedirection of the positive (+) terminal. Place the new batteries in exactly the same manner, being carefulnot to bend or damage the contact terminal. Snap the cases back together and then test the transmitterto insure it arms and disarms the alarm.TRANSMITTER OPERATIONTransmitterButton System Function RemarkLock Doors & Arm SystemPanic function Press and Hold for 3 secondsCar Locator Under armed mode-Arm and Delete The 2 Stage ShockSensor Press twice within 3 seconds+Silent Arming / Disarming Ignition in "off" position.Unlock Doors & Disarm System-Two Steps Door Unlock & DisarmSystem Press twice within 3 seconds.Trunk Release (Channel 3) Press and Hold for 2 seconds-Passive Arming By-pass While the system Disarmed.Silent Arming / Disarming or 4th ch+Switching code For 2nd Car Operation.SILENT LOCKING AND UNLOCKING: ARMING / DISARMING: Press the button on thetransmitter to LOCK or UNLOCK your security system, No chirp sound will be heard; arm / disarmconfirmation will be through the vehicles parking lights only.SHOCK SENSOR / OPTIONAL SENSOR BY-PASS: Pressing the button on the transmitter twicewithin 3 seconds will arm the security system and by-pass the shock sensor. The system will chirpone additional time to confirm the sensor bypass mode was activated. The sensor bypass feature isprogrammed to activate for one arming cycle only. The security system will return to normal operationduring the next arming cyclePASSIVE LOCKING OR ARMING : ProgrammableActive arming / disarming is controlling your security system via the remote transmitter. Thissecurity system is equipped with an optional Passive Arming feature, which allows the securitysystem to arm 30 seconds after the last door is closed. Operation is as follows.1. Turn the ignition to the “OFF” position and exit the vehicle.2. After all entrances are closed, the security system LED will flash fast for 30 seconds. If youreopen any door / hood / trunk, the security system LED will stop flashing. It will begin flashingagain once all vehicle entrances are closed.3. After 30-second timer has elapsed, the security system will automatically “ARM”. The siren orhorn will chirp [1] time and the parking lights will flash [1] time.PASSIVE DOOR LOCKING: ProgrammableThe vehicle doors will automatically lock after passive arming cycle has been completed.ACTIVE UN-LOCKING – UNLOCK & DISARM:1. Press the button on the transmitter.2. The siren or horn will chirp twice and parking lights will flash twice to indicate that the securitysystem is now disarmed. The vehicle doors will unlock when interfaced with the security system.TAMPER DISARMING: (OPTIONAL). If the alarm is triggered; Upon disarming the system thesiren or horn will chirp 4 times and parking lights will flash 3 times. This will indicate that the alarmhas been triggered while armed.TWO STEP DOOR UNLOCK: (OPTIONAL) This feature will independently unlock the driver’sdoor only when disarming the security system. Pushing the button on the transmitter a secondtime within 3 seconds will unlock the entire vehicle. (Optional, Additional installation required).AUTOMATIC RE-LOCKING or RE-ARM: If this feature is selected, the security system willautomatically re-arm itself 60 seconds after disarming with remote transmitter. Automatic rearm willcancel if any door is opened before the 60 seconds timer has elapsed.DISARMING WITHOUT A TRANSMITTERThe Override function may be used if the remote transmitter is lost or inoperative.1. Enter the vehicle and turn the ignition switch to 'ON’ position. (Alarm will sound.)2. Within 10 seconds push and release the valet switchThe alarm will stop sounding and enter the disarm mode. You can now start and operate thevehicle normally.VALET MODE:The valet switch allows you to temporarily bypass all alarm functions eliminating the need to handyour transmitter to parking attendants or garage mechanics. When the system is in valet mode,all alarm functions are bypassed, however, the remote panic feature and remote door locks willremain operational.Enter Valet Mode:1. Turn the ignition to “ON” position.2. Push and hold valet switch for 2 seconds or until the LED turns on. The LED will remain on aslong as the system is in 'valet mode'.Exit Valet Mode:1. Return to normal operation, turn ignition 'ON'.2. Push and hold valet switch for 2 seconds; the LED will turn off indicating the system is exitingthe valet mode.PANIC FUNCTION:The transmitter can be used as a remote panic switch to manually trigger the alarm in case ofemergency.1. Press and hold the button on the transmitter for 3 seconds. The alarm will immediatelysound.2. To stop the alarm, press and hold the button for 3 seconds on the transmitter, the panicmode will be turned off immediately.3. If the button is not pressed, the alarm will automatically stop after 30 seconds.TRIGGER THE SYSTEM: (OPTIONAL) If alarm option is installed.When armed, your vehicle is protected as follows:1. Light impacts will trigger the warn-away signal. A long chirp from siren /horn.2. Heavy impacts / Doors open / Hood open / Trunk open / Turning on the ignition switch- All will trigger theprogrammed sequence.The starter disable relay (if installed) prevents the vehicle’s starter from cranking. The siren or horn and parkinglights will turn on to alert of an intrusion for 30 seconds. Then the siren or horn will stop and automatically resetand re-arm. If any the sensors or detectors are still active, the alarm system will sound a maximum of three-30second cycles.ANTI CAR-JACKING: (OPTIONAL) If alarm option is installed.Warning: If you don't need the carjacking function in this alarm system, be sure to set carjacking feature “OFF”.This system is default setting Car-jacking “OFF”.1. TRANSMITTER ACTIVATES THE CAR JACKING:Press and hold +button on the transmitter for 1 second while the vehicle’s ignition is ON. The parkinglight will turns on for 1.5” seconds to indicate car jacking activated.2. DOOR SWITCH ACTIVATE CAR JACKING:1. Turn the ignition switch to “ON” position, the system is armed.2. Once the system is armed, if you are forced from the vehicle, the system will active the carjacking triggerwhen the door is opened and closed while the ignition is “ON”.TRIGGER THE CAR JACK MODE:3-timer circuits will function as follows:First timer:a. 50 seconds after the system has been triggered. The siren or horn will start chirping for 15 seconds.b. During this 15 seconds period of chirping, you will be alerting to push the valet switch once to turn off thecar-jacking feature.c. If not, it will enter second timer car jacking.Second timer:65 seconds after the system has beer triggered. The siren or horn starts alarming and the parking light startsflashing.Third timer:90 seconds after the system has been triggereda. The siren or horn will still be alarming and the parking light flashing.b. The starter disable will activate to prevent the vehicle from starting.c. It will remain active until the vehicle's battery power exhausted.OVERRIDE THE SYSTEM TO TURN OFF CAR JACKING:Turn the ignition switch from OFF to ON, and within 10 seconds push valet switch. The siren or horn willstop and the system will be disarmedIGNITION CONTROL DOOR LOCKS.If the vehicle’s door locks have been interfaced to the security system, the system will automatically lock thevehicle's doors when the ignition is turned “ON” and /or unlock the vehicle’s doors when the ignition is turned“OFF”.TRUNK RELEASE: Press and hold button on transmitter for three seconds to remote control the trunkrelease or other electric devices.CAR LOCATOR : Press the button on the transmitter when the vehicle is in the armed / locked mode to activecar locator function. The siren or horn will chirp 6 times. The parking light will flash 12 times, allowing you to easilylocate your car.ALARM OPERATING CONDITION: (OPTIONAL)Function Siren or hornParking LightsLED DoorsStarterDisable1. Arm 1 Chirp 1 Flash Slow flash Locking On2. Disarm 2or4 Chirps 2 or 3 Flashes Off or Fast flash Unlocking Off3. Trigger Alarming Flashing Slow flash On4. Panic Alarming Flashing Slow flash Locking OnACTIVE LOCKING – LOCK & ARMING:1. Press button on transmitter.2. The siren or horn will chirp once and the parking lights will flash once indicating that the system isnow armed. The vehicle doors will lock upon arming when interfaced with the security system.Note: Defective sensor reminder: If the siren or horn sounds 3 chirps, then you have left a door, trunk,or hood lid ajar. (OPTIONAL)LIMITED LIFETIME WARRANTY PROVISIONS( U.S. ,Continental U.S. and Canada Only)VARAD International offers an industry-leading lifetime system warranty on the Autopage brand of remote start and securityproducts which protects users of its products from defects in material and workmanship under normal use and circumstances. Thiswarranty only covers materials both sold and installed by an "Authorized Dealer" of Autopage product"Authorized Dealer" is defined by VARAD International as a company who qualifies to purchase Autopage products directly fromVARAD International, or one of its approved distributors. Thus, products not sold nor installed by an "Authorized Dealer" are notcovered by this warranty. This includes, but is not limited to, Autopage products sold on Amazon.com that are not supplied directlyby Amazon or eBay.com. If you would like more information on "Authorized Dealer" locations, please e-mailCustomerservice@Varad.com or visit www.Autopageusa.com.Autopage Lifetime System Warranty does NOT cover remote transmitters, or RF kits, as these materials are covered by a separatewarranty. Autopage remote transmitters are covered by a 1-year warranty, which protects users from defects in material andworkmanship.VARAD International warrants to the original purchaser that this product shall be free of defects in material and workmanship undernormal circumstances for the period of time that the original owner of this product owns the vehicle in which it is first installed;except that the remote controller unit, or "brain", for the period of five years from the date of installation to the original owner of thisproduct. When purchased or prepaid postal to VARAD International, 5349 Zambrano Street, Commerce,CA, USA within thewarranty period, and if the product is defective, VARAD International i.e. Autopage will at its own option, repair or replace as such.To the maximum extent allowed by law, any and all warranties are excluded by the manufacturer and each entity participating in thestream of commerce there with. This exclusion includes but is not limited to, the exclusion of any and all warranty of merchantabilityand/or any and all warranty of fitness for a particular purpose and/or any and all warranty of non-infringement or patents, in theUnited States of America and/or abroad. Neither the manufacturer of any entities connected therewith shall be responsible or liabilityfor any damages whatsoever, including but not limited to, any consequential damages, incidental damages, damages for loss of time,loss of earnings, commercial loss, loss of economic opportunity and the like, notwithstanding the above, manufacturer does offer alimited warranty to replace or repair the control module, or "brain", as described above.Some states do not allow limitations on how long an implied warranty will last or the exclusion or limitation on how long an impliedwarranty will last or the exclusion or limitation of incidental or consequential damages. This warranty gives you the specific legalrights, and you may also have other rights, which vary state to state.VARAD International i.e. Autopage, is not responsible or liable for any damages whatsoever, including but not limited to, anyconsequential damages, incidental damages, damages for loss of time, loss of earnings, commercial loss, loss of economicopportunity, and the like that may or may not result from the operation of Autopage products. Not with standing the above, VARADInternational i.e. Autopage does offer a limited warranty to replace or repair the control module, or "brain", as described above.](https://usermanual.wiki/Advance-Security/T61/User-Guide-2739141-Page-1.png)
![15A Fuse 5. Red Wire: +12V To Constant Battery Source 4. Brown Wire: Positive output To 3. Black Wire: Ground to Vehicle FRAME 2. White Wire: Parking Light Relay Output 1. Red / White Wire: Parking Light Relay input Siren Transmitter ProgrammingNote: This mode will only retain the last 4 remote transmitters programmed. If the transmittermemory is exceeded, the security system will start deleting transmitters from memory inchronological order.1. Turn the Ignition 'switch ‘OFF/ON’ 3 TIMES and stay in ON position.“Within 15 seconds”.2. Push the Valet switch 2 times and hold it on the 2nd push until a long chirp is heard thenrelease the valet switch. You are now in the Transmitter programming mode.3. Press and hold any button of the transmitter until the siren responds with a confirming chirp,indicating the signal has been stored into memory.4. If you have additional transmitters (up to 4) that need to be programmed, repeat step 3 foreach transmitter.Exit: Turn Ignition to 'OFF' position, or leave it for 15 seconds. 3 long chirps & 3 parking lightflashes will confirm exit.355A5 PIN WIRE HARNESSThis manual was written September 1, 2015©2015 Varad International, Inc. All rights reserved.GI-S346* Starter Kill relay optionalALARM FEATURE “I” PROGRAMMING:1 Turn the Ignition 'switch ‘ON/OFF’ 3TIMES and stay in OFF position.2 Push the Valet switch 3times and hold in on the 3rd push. When a long chirp is heard, release thevalet switch. You are now in the Alarm feature ‘I’ programming mode.3 Press the transmitter button corresponding to the feature you want to program.a. The factory default settings is always [1] LED flash, [1] chirp.4 Depress the transmitter button again to change the feature. Simply keep pressing the transmitterbutton again until the module advances to your desired setting.PressTransmitterButtonOne Chirp /LED one pulseFactory DefaultSettingTwo Chirps /LED two pulsesThree Chirps/LED threepulsesFour Chirps /LED fourpulses1Active armingPassive armingwithout passivedoor lockingPassivearming withpassive doorlocking.2Automatic Rearm off Automatic Rearmon3Instant Door Ajarerror chirp45 seconds delayDoor Ajar errorchirp.4Siren Confirmationchirp on onlyAll Confirmationchirps OnHornConfirmationchirp on onlyAllConfirmationchirps off5 +White wire=Dome Light OutputWhite wire=4th ChannelMomentaryWhite =4th channelLatched6+Lock/Arm &Unlock/DisarmConfirmation ChirpsLock/ArmConfirmationChirp Only7. +ALARM withKeyless EntryKeyless EntryONLY8.+Car Jackingfeature OffCar Jackingfeature OnALARM FEATURE “B” PROGRAMMING:1 Turn the Ignition 'switch ‘ON/OFF’ 3TIMES and stay in OFF position.2 Push the Valet switch 5times and hold in on the 5th push. When a long chirp is heard, release thevalet switch. You are now in the Alarm feature ‘B’ programming mode.3 Press the transmitter button corresponding to the feature you want to program.PressTransmitterButtonOne Chirp / LEDone pulseFactory DefaultSettingTwo Chirps / LEDtwo pulsesThree Chirps / LEDthree pulsesFour Chirps /LED fourpulses1Pathwayillumination feature“off”Parking light turns“on” for 30- secondupon an unlocksignalParking light turns“on” for 30- secondupon an unlock signal& 10-second upon alock signal.2Ignition controlleddoor locks &unlocksIgnition controlleddoor locks onlyIgnition controlleddoor unlocks onlyWithout ignitioncontrolled doorlocks & unlocks30.8-second Doorlock pulses.3.5-second Doorlock pulse. Double pulse unlock Comfort feature43rd Channel Pulsed 3rd ChannelMomentary5 +Button =Silent Arm/DisarmButton = 4thChannel Aux.6 +Gray Wire = Trunk(Channel 3) OutputGray Wire = TwoStep Door UnlockOutput7. +Horn chirp DurationStandardHorn chirp Duration50 mSHorn chirp Duration30 mSHorn chirpduration10 mSExit: Turn Ignition to 'ON' position, or leave it for 15 seconds. 3 long chirps will confirm exit.SHOCK SENSOR ADJUSTMENT1. Turn the Ignition switch ‘ON/OFF’ 3TIMES and stay in OFF position.2. Push the Valet switch 7times holding in on the 7th push. Three chirps with a long chirp will be heard. Release the valetswitch. You are now in the Alarm feature ‘Shock Sensor’ programming mode.3. Press and hold button for 2 seconds. One long siren chirp will indicate the unit is ready to accept adjustments of theshock sensor.4. Press button on the transmitter once. This will decrease sensitivity level by one. Each time the button is pushed and adecrease is made the siren/horn chirp will respond with [1] chirp. Two chirps indicate the minimum sensitivity. Warn away &full trigger will be deleted when minimum sensitivity is selected5. Press button on the transmitter once. This will increase sensitivity level by one. Each time an increase is made thesiren/horn chirp will respond with [1] chirp. Two chirps indicate the maximum sensitivity.6. Hit the bumper or strong metal part of the vehicle to test the threshold level of the sensor.a). Activate the warn-away (first stage the shock sensor), the siren will emit a short chirp.b). Activate the full alarm (second stage the shock sensor), the siren will emit a long chirp.7. When you are satisfied with the setting, press the button to lock in the adjustment. One long siren chirp will indicate theunit has locked in the adjustment.Note: If 30 seconds of inactivity expires or you turn ON the ignition during of above steps, the unit will exit the program modeand return to the disarmed mode. Three long chirps will confirm exit.8 PIN CONNECTOR WIRE HARNESS:355AINSTALLATION MANUALVarad International, Inc.5349 Zambrano Street,Commerce,CA 90040www.varad.com](https://usermanual.wiki/Advance-Security/T61/User-Guide-2739141-Page-2.png)