Advance Security TR30 Car Alarm Transceiver User Manual MODEL 6876
Advance Security Inc Car Alarm Transceiver MODEL 6876
User manual
REMOTE ENGINE STARTER
WITH ALARM SYSTEM
OWNER’S MANUAL
LCD REMOTE CONTROL TRANSCEIVER:
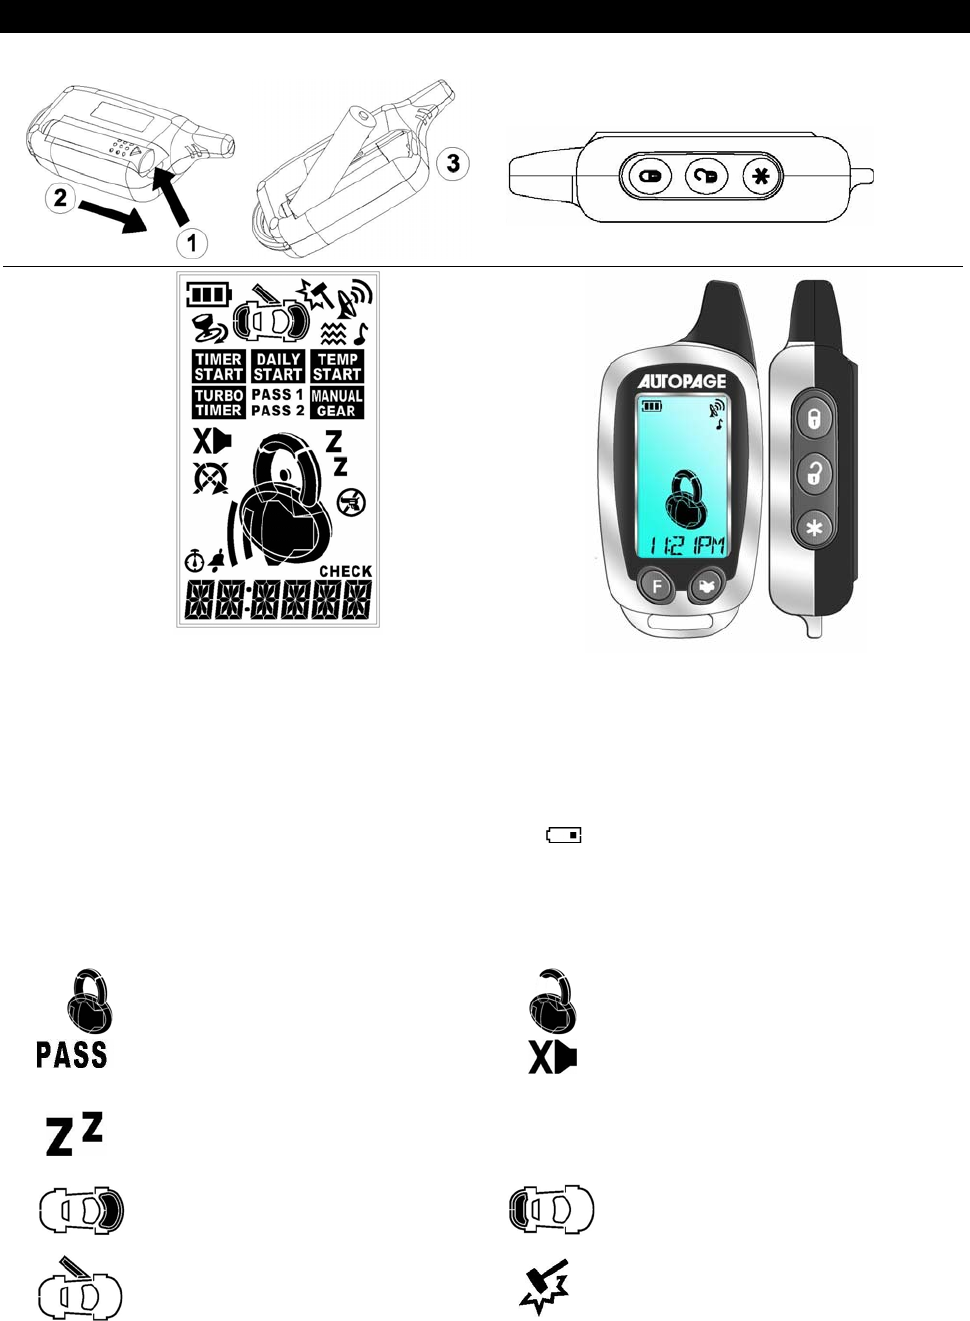
A. BATTERY REPLACEMENT:
This system needs no specific maintenance beyond remote control battery replacement. The 2-way
remote is powered by a 1.5V AAA battery. The 1-way remote is powered by a pair of 3V, CR2032 battery
Battery Level Indicator (2-way remote)
The Battery Level indicator has three level indicators that serve as a visual indication of battery charge.
When the battery reaches a low charge level that requires replacement, the remote control will generate
a single notification chirp, and the Battery Level indicator will flash continuously.
Gently pull the end of the battery door away from the top of the remote control then slide the door up to
expose the battery and remove the expired battery. Place the new battery into the remote. When power is
returned the remote control will display all icons in the LCD and generate all beeper tones once. Press
any button on the remote to terminate the beeper tone review.
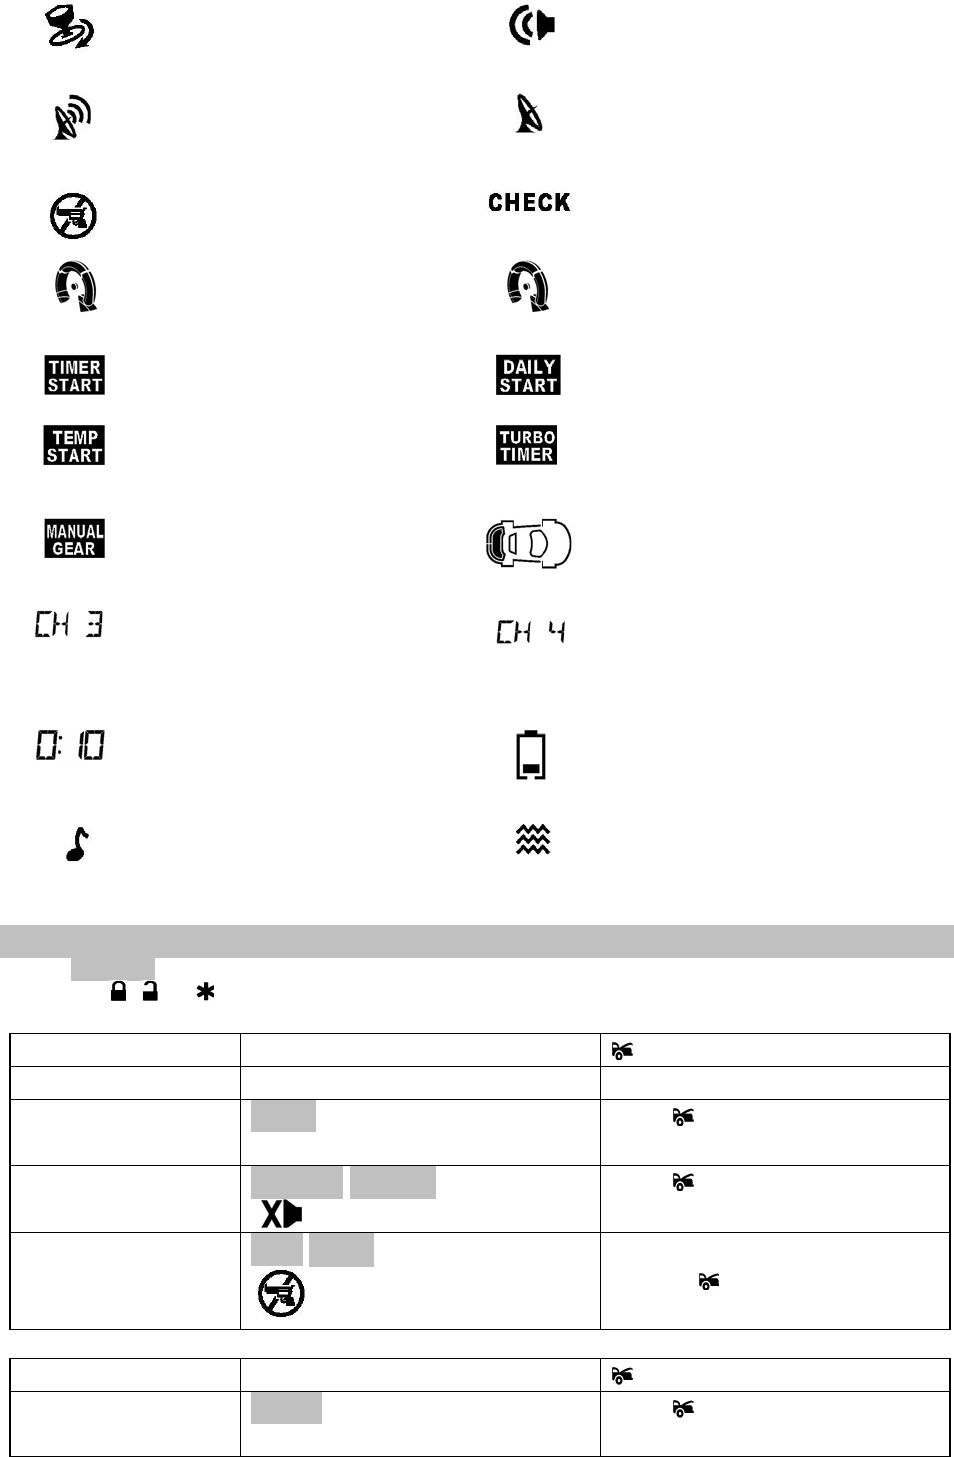
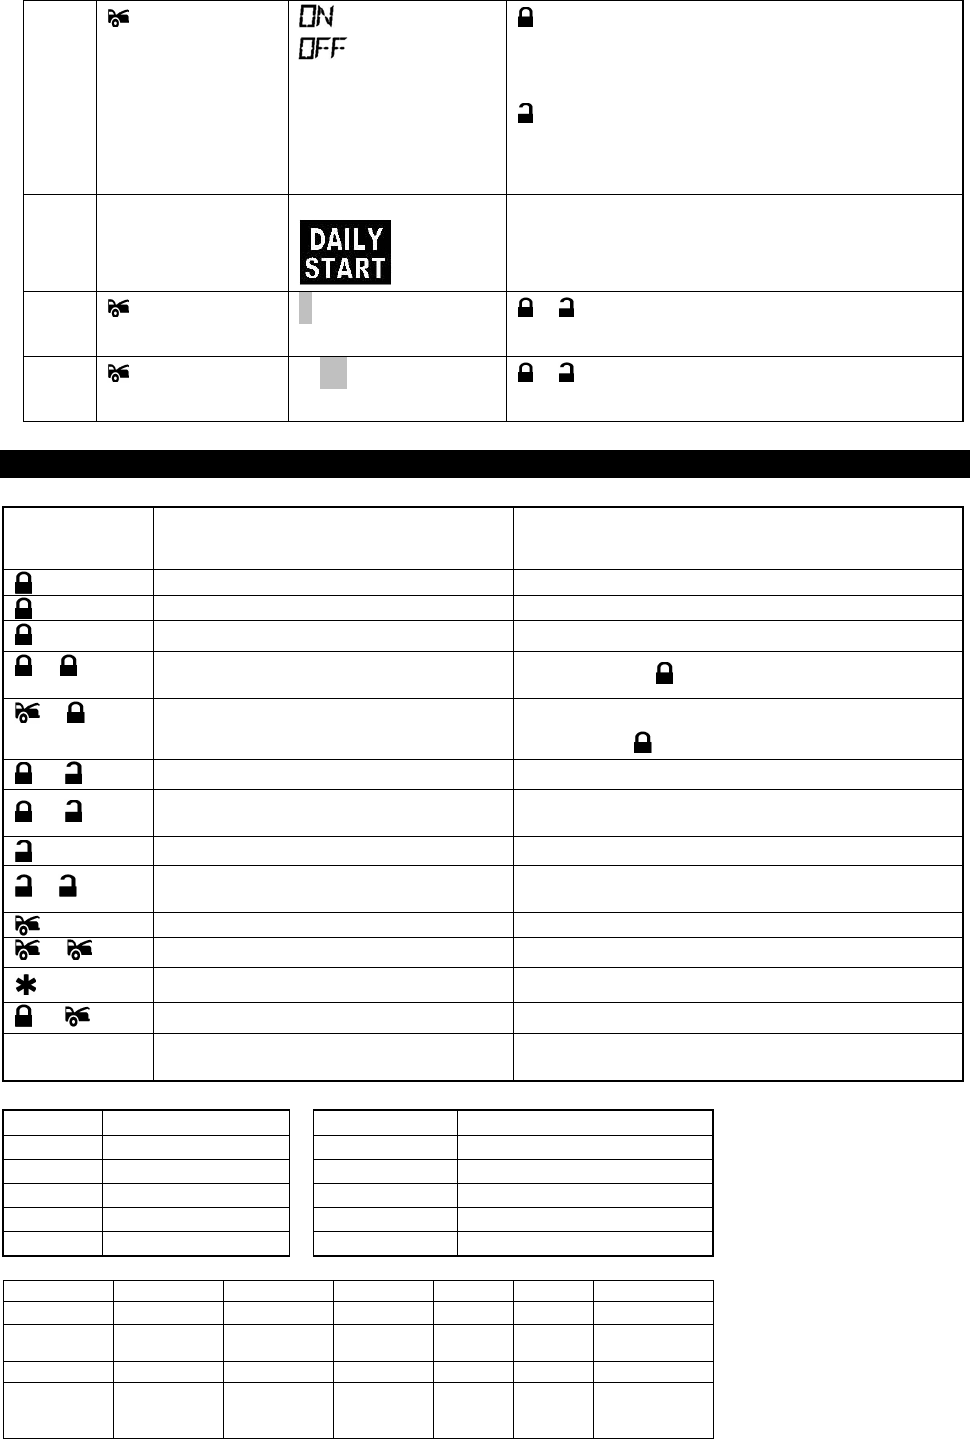
B. STANDARD LCD ICON CONFIGURATIONS:
The lock icon will be displayed when
the door locked.
The unlock icon will be displayed
when the door unlock
Sensor Bypass
Sensor 1bypass under Arm mode
Hidden Alarm Mode
The security system arm with hidden
alarm function
Valet Mode
Remote start and alarm functions shall
be temporarily on hold.
Hood Trigger
Hood is illegally opened (Zone 1)
Trunk Trigger
Trunk is illegally opened (Zone 2)
Door Open Warning
Doors are illegally opened (Zone 3)
Sensor Trigger
Trigger on Sensor 1 (Zone 4)
1
Ignition Trigger
Ignition switch is illegally turned on
(Zone 5)
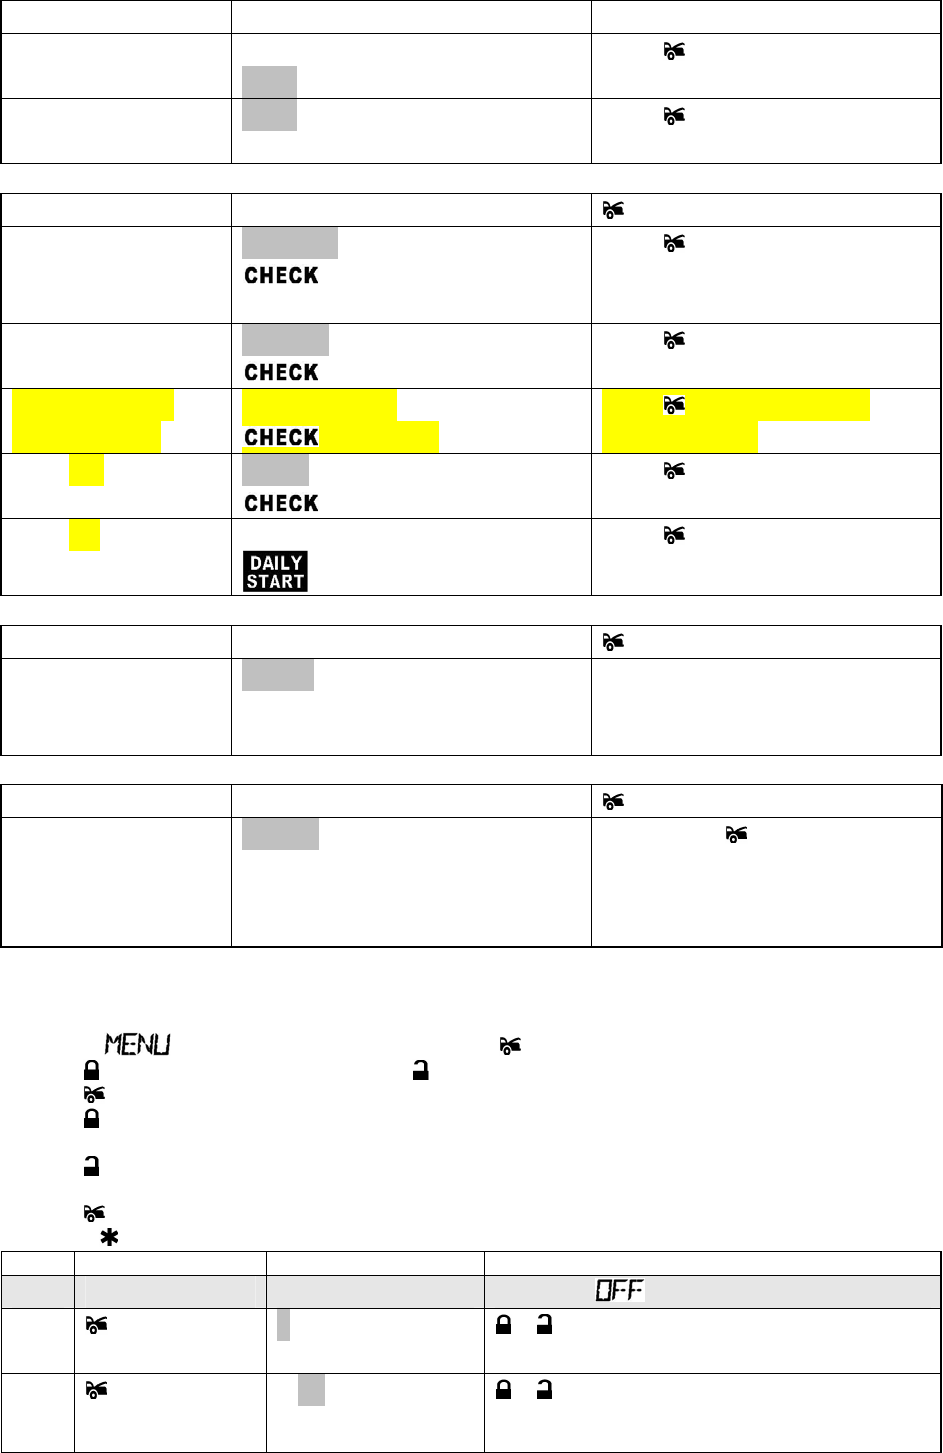
System trigger
Remote Transmission
You are transmitting the signal to
control unit
In – Range Indicator
Your are within the remote control
range.
Anti Car-Jack Mode
Activate the anti car-jacking mode
Icon flash under check mode
Engine Cranking
Your vehicle engine Cranking by
remote control
Engine Running
Your vehicle's engine is running
Timer Control Start
Engine start automatically every 2 or
3 hours.
Daily Start
Engine start automatically at the same
time next day
Temperature Start
Engine start automatically when reach
programmed temperature.
Turbo Timer
Turbo timer was set up
Manual Gear
Engine Start Memorizing for the car
with manual gear was set up
Activate Channel 3 (Trunk Release).
Activate Channel 3
Activate Channel 4
12:00 Time Monitor
12:00 Alarm Clock
You have set morning call alarm
Parking Meter
Reminder when time is up for parking
Low Battery
You have to replace the battery of
remote control.
Melody Mode
Remote Control alert user through
melody sound
Vibration Mode
Remote Control vibrates when the
system is triggered
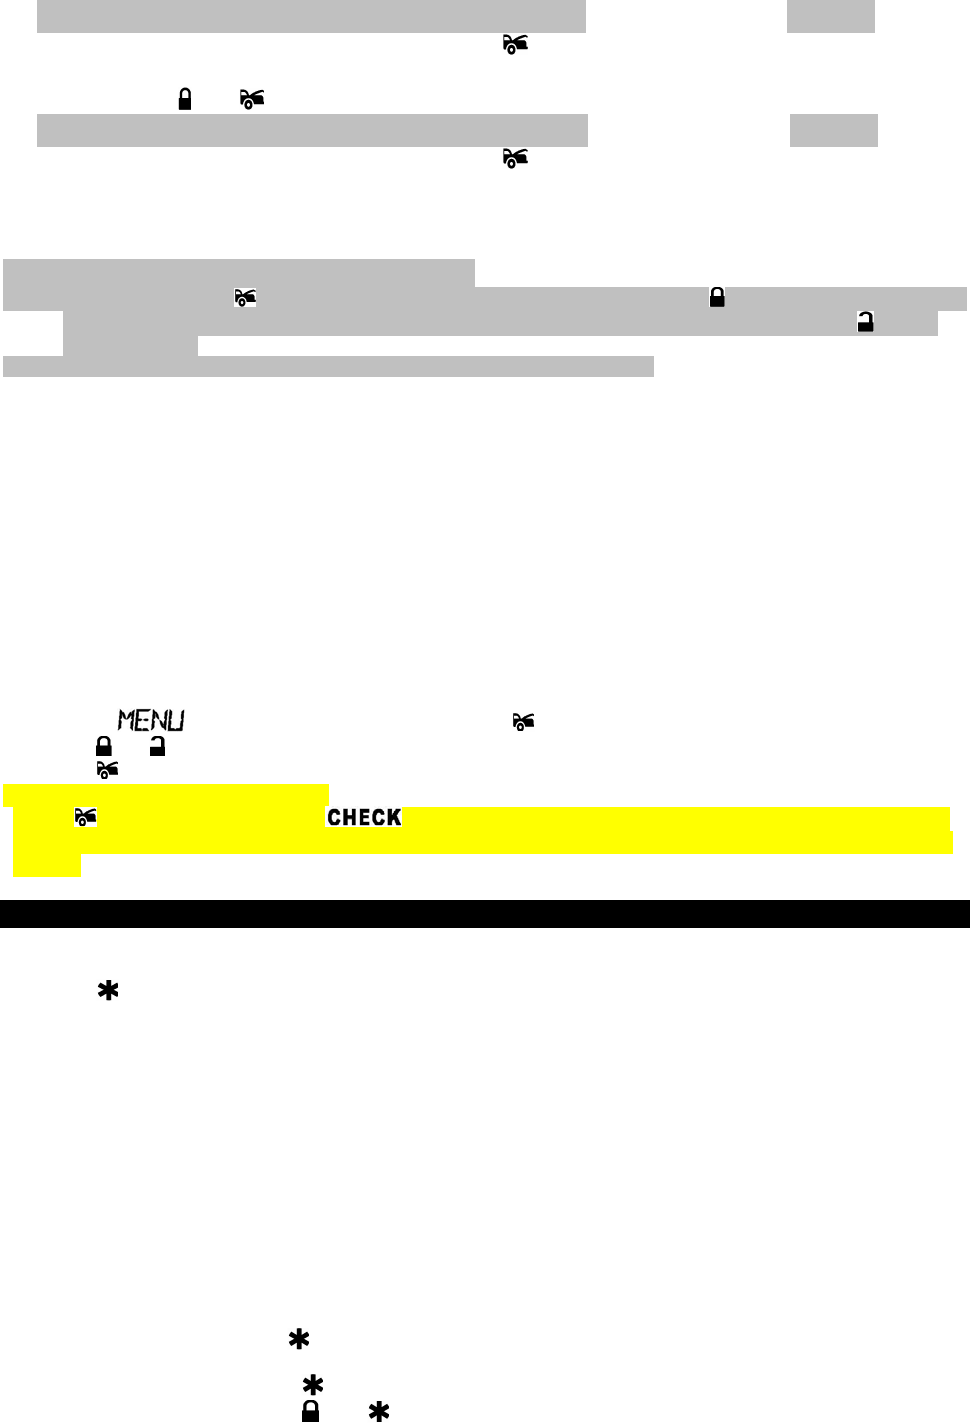
C. LCD REMOTE CONTROL TRANSCEIVER OPERATION:
Enter : Press and hold F Button until beep sound respond from LCD transceiver indicate into table 1 – 5
as below.
Exit: Press , or button to exit this mode.
Table 1: one beep to confirm
F Button LCD Display Button
Press once Backlight turns on for 5 seconds
Press twice within 5
seconds
PASS and
PASS icon flashing
Press button to arm the alarm
and bypass the sensor 1.
Press three times
within 5 seconds
HIDDEN ALARM and
icon flashing
Press button to arm system and
with Hidden Alarm Function.
Press four times within
5 seconds
CAR JACK and
icon flashing
Under ignition in "on" position press
and hold button for 2 seconds to
activate anti car jacking functions.
Table 2: two beeps to confirm
F Button LCD display Button
Press and hold the F
Button for 2 second
MENU flashing Press button to enter the menu
mode
2
until 2 beeps sounded
Press three times
within 5 seconds
CH 3 flashing
Press button to activate channel
4 functions.
Press four times within
5 seconds
CH 4 flashing Press button to activate channel
5 function
Table 3: three beeps to confirm
F Button LCD display Button
Press and hold the F
Button for 3 second
until 3 beeps sounded
STATUS and
icon flashing
Press button to check the
vehicle’s status.
Press two times within
5 seconds
ALARM and
Press button to check the
vehicle’s trigger status.
Press three times
within 5 seconds
VOLTAGE and
icon flashing
Press button to check the
vehicle’s Voltage.
Press four times within
5 seconds
TEMP and
icon flashing
Press button to check the
outside temp. status
Press five within 5
seconds
Start timer and
icon flashing
Press button to activate or
cancel daily start.
Table 4: four beeps to confirm
F Button LCD display Button
Press and hold the F
Button for 4 second
until 4 beeps sounded
DEMO mode Backlight ON until DEMO operation
end.
Table 5: Do-Re-Mi sounds to confirm
F Button LCD display Button
Press and hold the F
Button for 6 second
until Do-Re-Mi
sounded
DEFLT flashing Press & hold button for 2
seconds to back to default setting
and 1 chip for confirm
D. PROGRAMMING LCD REMOTE:
Selecting and Adjusting Menu options:
Press and hold F button for 1 second until 2 beeps sound, then release the F button.
The text will flash on the LCD screen, press button to enter the menu.
Press button to move up in the menu or button to move down in the menu.
Press button to select the option you would like to adjust.
Press button to increase the value, to activate or deactivate a function or to toggle through
the selection.
Press button to decrease the value, to activate or deactivate a function or to toggle
through the selection.
Press button to move to the next sub-option or go back to the main menu.
EXIT: Press button to exit the menu mode.
Order Menu Option LCD display Functions
1 Parking Menu PARK METER Default is
- Parking hours 0:30
0 is flashing
, - Adjusts parking hour
(value from 0 to 2).
- Parking
minutes
0:30
30 is flashing
, - Adjusts parking minute
(value from 0 to 59).
3
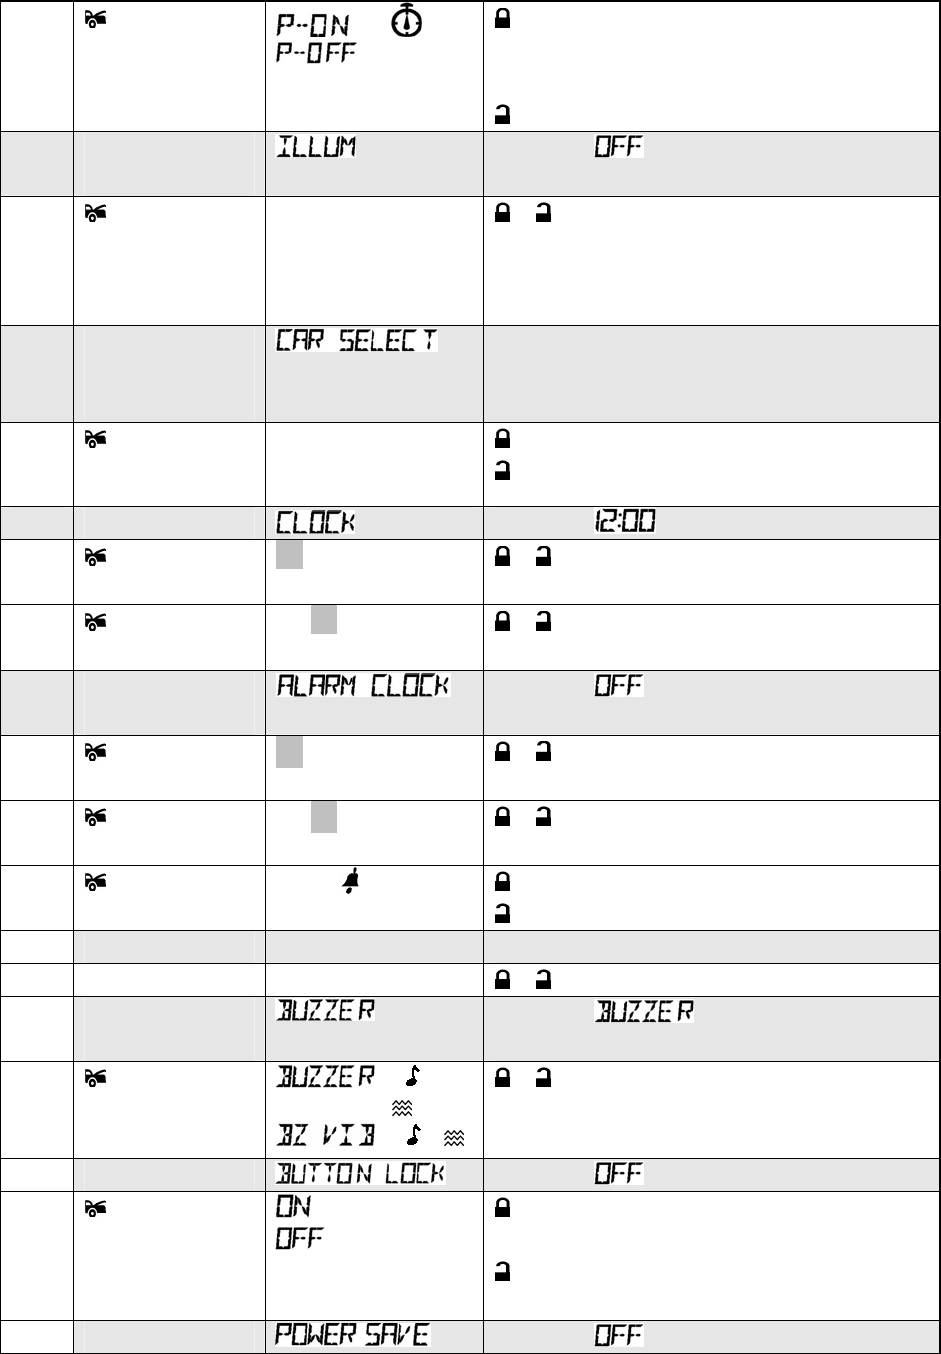
- Toggle
Parking
countdown
+ or
- Enables parking countdown.
There is a beep 5 min. before the Parking
countdown reaches 0.
- Disables parking countdown.
2 Illumination
Menu
Default is
- Toggle
Illumination
Mode
3 SEC. or
5 SEC. or
OFF
, Basic operation with backlight
Illumination 3 SEC. or 5 SEC.;
OFF – basic operation without backlight
illumination.
3 Second Vehicle
Security
Operation Menu
Default is CAR 1
- Car Select CAR 1 or
CAR 2
-CAR 1 operation.
- CAR 2 operation.
4 Clock Menu Default is
- Clock hours
12:00AM
12 is flashing , - Adjusts clock hour from 0 to 12
- Clock minutes
12:00AM
00 is flashing , - Adjusts clock minute from 0 to 59
5 Alarm Clock
Menu
Default is
- Alarm hours
12:00AM
12 is flashing , - Adjusts alarm clock hour from 0 to 12
- Alarm
minutes
12:00AM
00 is flashing
, - Adjusts alarm clock minute from 0 to 59
- Toggle alarm
ON + or
OFF
- Enable alarm clock or
- Disable alarm clock
6 Back Light Color COLOR Default is COLOR 7
COLOR 1- 7 , - Adjusts color from Color 1 to Color 7
7 Confirmation
Menu
VIBRTE
Default is
- Toggle BZ
VIB
+ or
VIBRTE + or
+ +
, - Buzzer or Vibration
8 Button Lock Default is
- Toggle button
lock
- button lock / Disable the transmission
function temporarily
- button unlock / Enable the transmission
Function.
9 Power Save Default is
4
- Toggle power
save
- While the power save mode, the LCD
remote transceiver uses “0” current to
save the battery power.
- Power save OFF
Exit: Press any button of the LCD remote
transmitter to exit the “Power Save Mode”.
10 Daily Start Timer
Setting
Daily Start Time Adjust Only (ex. 7:30AM)
- Daily Start
Hour
7:30AM
7 is flashing
, - Adjusts clock hour from 0 to 12
- Daily Start
Minute
7:30AM
30 is flashing , - Adjusts clock minute from 0 to 59
OPERATION:
A. REMOTE TRANSMITTER OPERATION:
Transmitter
Button System Function Remark
Lock Doors & Arm System
Panic function Press and Hold for 3 seconds
Car Locator Under armed mode
- Arm and Delete The 2 Stage Shock
Sensor Press twice within 3 seconds
- Arm System and Hidden Alarm
Function
Press within 3 seconds and Hold
button for 2 seconds
+ Silent Arming / Disarming Ignition in "off" position.
+ Active Anti Car-Jacking Mode Ignition in "on" position press and hold for 2
seconds
Unlock Doors & Disarm System
- Two Steps Door Unlock & Disarm
System Press twice within 3 seconds.
Trunk Release (Channel 3) Press and Hold for 2 seconds
- Passive Arming By-pass While the system Disarmed.
Activate or Turn Off The Remote Start Press button once.
+ Channel # 4 Timer Output (4) Optional
II Switching code For 2nd Car
Operation. For regular XT-65 remote transmitter Only
B CHIRP INDICATORS: C. PARKING LIGHT:
Chirp Function
Parking light Function
1 chirp Arm 1 flash Arm
2 chirps Disarm 2 flashes Disarm
3 chirps Defective Reminder 3 flashes Disarm / Triggered
4 chirps Disarm / Triggered 12 flashes Car Locator
6 chirps Car Locator Constant On Under Remote Start
D. ALARM OPERATING CONDITION:
Siren / Horn Parking Light LED Doors Starter Dome Light
1. Arming 1 or 3 Chirps 1 Flash Slow Flash Locking Disable
2. Disarming 2 or 4 Chirps 2 or 3 Flashes Unlocking Turns on for 30
-second
3. Trigger Alarming Flashes Slow Flash Disable Flashes
4. Passive
Starter
Disable Fast Flash Disable
5

5. Panic Alarming Flashes Flashes
6. Car-Jacking Alarming Flashes Disable Flashes
7. Car Locator 6 Chirps 12 Flashes Locking
E. ACTIVE ARMING – LOCK & ARM:
1. Press button on the transmitter.
2. The siren will chirp once and parking light will flash once indicating that the system is now armed. The vehicle’s
doors will lock upon arming if interfaced with the security system.
DEFECTIVE SENSOR REMINDER: If the siren sounds 3 chirps, then you have left a door, trunk, or hood lid ajar.
SILENT ARMING / DISARMING: Press the transmitter and buttons at the same time will arm or disarm your
security system, No chirp sound will be heard, arm / disarm confirmation will be through the vehicles parking lights
only.
SENSOR BY-PASS:
The sensor bypass feature is programmed to activate for one arming cycle only. The security system will
return to normal operation during the next arming cycle.
Sensor By-Pass : Press button while “PASS “ icon flash (see Table 1) or press the button two
times within 5 seconds will arm the security system and by-pass the sensor (shock sensor).
HIDDEN ALARM FUNCTION:
Press button while icon flash (see Table 1) or press the button first; within 3 seconds press
the button to activate the hidden alarm function. The security system will arm and with “Hidden Alarm
Function” The siren / horn will be silenced even if the sensor is triggered in the armed status. Alarm
indication will only appear on the LCD.
F. PASSIVE ARMING
Active arming / disarming is controlled by your security system via the remote transmitter. This security system is
equipped with an optional Passive Arming feature, which allows the security system to arm 30 seconds after the last
door is closed. Operation is as follows.
1. Turn the ignition to the “OFF” position and exit the vehicle.
2. After all entrances are closed, the security system LED will flash fast for 30 seconds. If you reopen any door / hood /
trunk, the security system LED will stop flashing. It will begin flashing again once all vehicle entrances are closed.
3. After 30-second timer has elapsed, the security system will automatically “ARM”. The siren will chirp [1] time and the
parking lights will flash [1] time.
PASSIVE ARMING WITH PASSIVE DOOR LOCKING
The vehicle doors will automatically lock after the passive arming cycle has been completed.
PASSIVE ARMING BY-PASS: While the system is disarmed, Press the button twice, the system will respond
with [1] chirp and LED will turn “ON”. The security system will remain in this temporary state for as long as you wish.
To exit passive by-pass, press the transmitter or buttons and the system will return to normal status.
G. ACTIVE DISARMING – UNLOCK & DISARM:
1. Press button on the transmitter.
2. The siren will chirp twice and the parking lights will flash twice indicating that the security system is now disarmed.
The vehicle’s doors will unlock and the dome light will turn on for 30 seconds upon disarming. (Note: Power door
locks and dome light must be installed with the security system.)
TAMPER DISARMING: If the alarm is triggered upon disarm, the system’s siren will chirp 4 times, and the parking
lights will flash 3 times.
PATHWAY ILLUMINATION: When receiving an unlock /disarm signal, this feature will turn the parking lights “ON” for
30 seconds and for 10 seconds upon the lock signal.
TWO STEPS DOOR UNLOCK: This feature will independently unlock the driver’s door only when disarming the
security system. Pushing the button a second time within 3 seconds will unlock the other doors.
AUTOMATIC RE-ARM: If this feature is selected, the security system will automatically re-arm itself in 60 seconds
after disarming with remote transmitter. Automatic rearm will cancel if any door is opened before the 60 seconds timer
has elapsed.
H. DISARMING WITHOUT A TRANSMITTER
OVERRIDES THE ALARM WITHOUT PASSWORD PIN CODE:
(Factory Default Setting)
The Override function may be used if the remote transmitter is lost or inoperative.
1. Enter the vehicle and turn the ignition switch to 'ON’ position.
2. (Alarm will sound.)
3. Within 10 seconds push and release the valet switch. The alarm will stop sounding and enter the disarm mode. You
can now start and operate the vehicle normally.
OVERRIDE THE ALARM WITH PASSWORD PIN CODE:
Unlike valet switch easily found, and defeated, this security system allows the consumer to program a password pin
code. Offering a higher level of security.
1. Enter the vehicle and turn the ignition switch to 'ON’ position. (Alarm will sound.)
2. Within 5 seconds, enter your chosen first digit code by pressing and releasing the Valet Switch. (When finished
6

above procedures, system's siren will stop alarming, lights will stop flashing, but the vehicle can’t be started.)
3. Within 15 seconds of the last digit code enter (the 1st code), then turn the Ignition Switch “OFF” and then “ON”.
4. Within 15 seconds, enter your chosen second digit code by pressing and releasing the Valet Switch.
5. Turn the ignition switch “OFF” position. 4 Chirps from siren/horn and 3 flashes from the parking light indicate the
system has disarmed.
Note : You must override the alarm within 60 seconds. If not, the system will automatically re-arm.
EXAMPLE: To Override The System With The Password Code 83,
1. Enter the vehicle and turn the ignition switch to the 'ON’ position.
(Alarm will sound.)
2. Within 5 seconds, Press and Release the Valet Switch 8 times, (When finished the system's siren will stop alarming,
lights stop flashing, but the vehicle can not be started or driven away.)
3. Within 15 seconds of entering the last digit code enter (the 1st code), turn the Ignition Switch “Off” and then “ON”.
4. Within 15 seconds, Press and Release the Valet Switch 3 times.
5. Turn the Ignition Switch to the “Off” position. 4 Chirps form siren/horn and 3 flashes from the parking lights will indicate
the system has disarmed.
I. VALET MODE:
VALET MODE: (System in Disarm)
The valet switch allows you to temporarily bypass all alarm function, eliminating the need to hand your transmitter to
parking attendants or garage mechanics. When the system is in valet mode, all alarm functions and remote start
functions are bypassed, however, the remote panic feature and remote door locks will remain operational. To use the
valet mode, the system must first be disarmed either by using your remote transmitter, or by operating the Manual
Override sequence.
Get into/out valet mode using the ignition key.
Enter Valet Mode:
a). Under disarm mode, turn the ignition to “ON” position.
b). Press and hold valet switch for 2 seconds until the LED turns on. The LED will remain on as long as
the system is in 'valet mode'.
Exit Valet Mode:
a). Turn ignition 'on'.
b). Push and hold valet switch for 2 seconds, The LED will turn off indicate the system are exiting the
valet mode.
J. CAR LOCATOR
Under armed mode, press the button to active car locator function. The siren will chirp 6 times. The
parking light will flash 12 times, for you to easily locate your car.
K. PANIC FUNCTION:
The transmitter can be used as a remote panic switch to manually trigger the alarm in case of emergency.
1. Press and hold the button for 3 second. The alarm will immediately sound.
2. During panic mode, the normal function of this transmitter button will be disabled. The transmitter and
buttons can be used to lock and unlock the door (if the option is installed), however once the button is pressed,
the vehicle’s starter disable device, (where installed) will be disengaged allowing the vehicle to start.
3. To stop the alarm, press and hold the transmitter or button on the transmitter again for 3 seconds. Also, if
any transmitter buttons other than or button is pressed and released, the panic mode will be turned off
immediately.
4. If the button is not pressed, the alarm will automatically stop after 30 seconds.
L. TRIGGER THE SYSTEM
When armed, your vehicle is protected as follows:
Light impact will trigger the warn-away signal.
Heavy impacts / Doors open /(if installed) Hood open / (if installed) Trunk open / Turning on the ignition
key will trigger the programmed sequence.
The starter disable relay (if installed) prevents the vehicle’s starter from cranking. The siren, horn, parking
lights, and dome light will turn on alerting of an intrusion for 30 seconds. Then it will stop and automatic
reset and re-arm. If the any one of the sensors or detectors is still active, the alarm system will sound a
maximum of 3 times of 30 seconds cycles
NOISE ABATEMENT CIRCUIT: Your system has a “Noise Abatement Circuit”. It prevents annoying repetitive
trigger sequences due to faulty door pin switches or environmental conditions such as thunder,
jackhammers airport noise, etc.
Here’s how “Noise Abatement Circuit” works: The alarm triggers five times. Each time, the same sensor or
switch has triggered the alarm; the “Noise Abatement Circuit” will interpret this pattern of triggers as a
false alarm. After the third trigger, the “Noise Abatement Circuit” ignores, or bypasses, that sensor or
switch until a different sensor or switch is trigger.
7

“Noise Abatement Circuit” covers doors (Hood/Trunk) differently: If the alarm is triggered by an open door
for six full cycles, the doors will be bypassed until the trigger ceases.
M. ANTI CAR- JACKING
Warning: If you don't need the car jacking function in this alarm system, be sure to set car jacking feature
“OFF”. This system is default setting all cars jacking “OFF”.
ACTIVE ANTI CAR JACKING:
1.Under ignition on press F button four times while “CAR JACK” flash on text area(see Table 1), then
press button to activate Anti Car-Jacking mode or
Under ignition on press and hold the and buttons at the same time for 2 seconds. The parking
lights will turn on for 1.5 seconds to indicate the system enter the anti car-jacking mode.
2.Once the system in anti car-jacking mode, the system will be triggered when the door is opened and
closed while the ignition is “ON”.
PASSIVE ANTI CAR- JACKING:
It will operate as noted below:
1. Turn the ignition switch to the “ON” position and the system will arm.
2. Once the system is armed, if you are forced from the vehicle, the system will trigger when the door is opened and
closed while the ignition is “ON”.
TRIGGER THE ANTI CAR -JACKING MODE:
a). 50 seconds after the system has beer triggered. The siren will start chirping for 15 seconds.
b). During this 15 second period of chirping, you will be alerted to push the valet switch once to turn off the car-jacking
feature. If not, it will enter a second timer for car jacking.
c). 65 seconds after the system has been triggered, the siren will start sounding and the parking lights will start
flashing.
d). 90 seconds after the system has been triggered,
1. The siren will sound and the parking lights will flash, and
2. The starter disable will activate to prevent the vehicle from starting.
3. It will remain active until the vehicle's battery power is exhausted.
OVERRIDE THE SYSTEM TO TURN OFF ANTI CAR- JACKING:
Turn the ignition switch from OFF to ON, and within 10 seconds push valet switch, the siren will stop and the system
disarmed
Note: If you use password pin code to double protect the vehicle security, you will need to use it to completely disarm
the system.
N. SYSTEM’S TRIGGER CHECK (For two-way transceiver operation only)
Press and hold F button of LCD remote until 3 beeps sound , release and re-press F button again, the
LCD remote will show “ALARM “ icon flash on text area (see Table 3), then press button to activate
system trigger check.
Note: If it has no response then you are out of range.
O. SYSTEM’S STATUS CHECK (For two-way transceiver operation only)
Press F button of LCD remote until 3 beeps sound , the LCD remote will show “STATUS “ icon flash on
text area (see Table 3) then press button to activate system status check.
It responds with one melody sound and all vehicles’ status records will immediately displayed on the LCD
screen.
Note: If it has no response then you are out of range.
P. DRIVER PAGING / LOSE & FOUND (For two-way transceiver operation only)
It is useful the event that someone wants to page the driver of the parked vehicle or someone cannot find
his LCD remote transceiver.
Under the ignition switch “off” condition, press and hold the valet switch for 2 seconds to page the driver,
one chirp sound shall be emitted from the vehicle and the paging melody sound continues sounding from
you Remote LCD transceiver.
Q. DOME LIGHT CONVENIENCE SUPERVISION (Optional Feature)
The alarm has a unique feature that will turn on your vehicle dome light as follows:
1. Upon disarming, the interior light will remain on for 30 seconds.
2. If the vehicle is intruded, the interior light will flash for the same duration as the siren.
Note: Turning on the ignition switch or arming the alarm will turn off the dome light.
R. IGNITION CONTROL DOOR LOCK/UNLOCK. (Programmable Feature)
If the vehicles door locks have been interfaced to the security system, the system will automatically lock the vehicle's
doors when the ignition is turned “ON” and /or unlock the vehicle’s doors when the ignition is turned “OFF”.
(Default is “OFF”)
S. TRUNK RELEASE (CHANNEL 3) OUTPUT.
Press and hold button on the transmitter for two seconds to remote control the trunk release or other
electric devices or
8
Press and hold F button of LCD remote until 2 beeps sound , release and re-press F button again the
LCD remote will show “CH 3” icon flash, then press button to activate channel 3 function.
T. CHANNEL 4 TIMER CONTROL OUTPUT
Press the transmitter and buttons at the same time to active Channel 4 function. or
Press and hold F button of LCD remote until 2 beeps sound , release and re-press F button twice the
LCD remote will show “CH 4” icon flash, then press button to activate channel 4 function.
Channel 4 is user-programmable timer output. You may program the built-in timer to send a ground signal for any time
duration from 1 second to 120 seconds. For instance, this timer output may be used to turn on the headlight, power
window or sunroof. (Factory defaults setting at momentary output.)
U. POWER SAVER MODE (Default OFF)
Under Menu mode press button while “POWER SAVE” icon flash, press button Power save ON, while
the power save mode, the LCD remote transceiver use “0” current to save the battery power. Press button
Power save OFF
Exit: Press any button of the LCD remote transmitter to exit “Power Save Mode”.
V. POWER ON MEMONRY:
This security system is equipped with circuitry that will allow the unit to remember its alarm state if the
power is lost and then reconnected.
W. SECOND VEHICLE SECURITY OPERATION:
Your 5-button remote transmitter can be utilized to control a second vehicle security system, To program the remote
control transmitter to a second vehicle, follow the instructions for Transmitter programming.
* For the standard transmitter (II) is shift button.
1. Prior to pushing any button on the transmitter. Press the Select II button first on the transmitter.
2. Once II button is pressed the LED on the transmitter will illuminate for 3 seconds to indicate the second transmitter
pin code has built-in.
3. While the LED is illuminated, press any button on the remote control transmitter to control a second vehicle security
system.
** For LCD transceiver – 2nd car operation :
a. Press and hold F button of LCD remote for 1 second until 2 beeps sound, then release the F button.
b. The text will flash on the LCD screen, press button to enter the menu.
c. Press or button to move up or down in the menu, find CAR SELECT on the menu.
d. Press button to select the option you would like to adjust CAR 1 or CAR 2 for further operation.
X. CHECK VEHICLE’S VOLTAGE:
Press button while VOLTAGE icon flash (see Table 3); the vehicle’s voltage will be shown
on the LCD screen. Please note that this data is for your reference only. Please check the exact data on
vehicle.
REMOTE START OPERATION:
A. TO REMOTE START THE VEHICLE:
When you want to start your vehicle,
1. Press button once on the transmitter.
2. The parking light will activate to indicate the remote start received the signal.
3. The engine will start in approximately 5 seconds.
4. Once the engine is running, after couple seconds the parking lights will turn on and the climate controls
will activate and adjust the vehicle’s interior temperature to your preset setting. (While the vehicle is
running, the “minutes” digit on the LCD screen will flash and the will indicate count down timer based on
the 5, 10, 20 or 30 minute run time set up by your installation center.)
5. The vehicle will run for a programmable 5 to 30 minute cycle before shutting down. (When the unit
shuts off the count down timer will turn off and the transmitter will play a melody.)
NOTE: The Remote Start Unit will not start the vehicle if any one of the following conditions exists:
1. The hood is opened.
2. The brake pedal is pressed.
3. The optional remote start enable toggle is switched to the “OFF” position. (If installed)
4. The gear selector is in any gear other then “PARK” or “NEUTRAL”
SAFE START (Child safety mode)
Factory default is set to press the button once on the transmitter to start the vehicle. You can program this feature
to eliminate an accidental remote start:
1. The user presses the transmitter buttons twice within 3 seconds to start the vehicle. or
2. The user presses the transmitter and buttons at the same time to start the vehicle.
NOTE: Contact your installing dealer to activate this feature.
9

B. OPERATE THE VEHICLE WHILE RUNNING FROM THE REMOTE START:
To operate the vehicle while engine running from the remote start,
1. Insert the ignition key and turn it to “ON” (not the start) position.
2. Press the brake pedal.
Note: If the brake pedal is pressed before the key is in the ON position, the engine will shut down.
C. TEMPORARY STOP FEATURE:
This feature allows the vehicle to remain running after the key has been removed from the ignition. This feature is
useful for occasions when you wish to exit and lock the vehicle for short periods of time, but would like to leave the
motor running and the climate control on.
1.Before turning off the engine, press the button once on the transmitter and the LED indicator will flash 3 times to
confirm enter.
2.Turn the ignition key to OFF position. (The engine will stay running.)
3.The engine will run until the pre-programmed time elapsed or shutdown input is received.
D. TURBO CHARGE MODE:
Turbo charge mode keeps the engine running after arriving at you destination for a programmable period of 1, 3 or 5
minutes, This allows the vehicle’s engine time to conveniently cool down the turbo after you have left the vehicle. To
activate:
1. While the engine is running, pull up the hand brake and place the transmission gear in the park position.
2. Before turning off the engine, press and release and buttons at the same time.
-- The LED will flash indicating the remote start has entered the turbo charge mode appear on LCD remote.
3. Take the “Ignition Key” from the key cylinder.
-- Engine keeps running. --
4. Exit and secure the vehicle.
-- Engine continues running until the pre-programmed time elapsed. --
NOTE: This feature only applies to vehicles with Turbo Engines.
E. TIMER START:
This unit can be programmed to start and run the engine every 3 hours or punctually at the same time next morning,
the engine will run for the programmed running time and then shut down.
IMPORTANT: Timer Start should be used only in open areas, never start and run the vehicle in on enclosed space as
a garage or carport.
Daily Timer Start: The feature is very useful for the driver who wants to run the vehicle punctually at the same time
next morning. Before set-up of the “Daily Timer Start”, you should set you time for engine start.( see Timer Setting /
Timer set-up for “Daily Timer Start, page 21)
ENTER:
1. Press the button once to remote start the vehicle. As soon as the vehicle is running and the parking lights have
turned on or are flashing.
2. Immediately depress the button once, within 2 seconds
3-a. 3 Hours Timer Start: Rapidly depresses the button (or depresses + buttons, if you program +
buttons = Start / Stop button.) The parking light will flash (3) times / icon appear. The siren or horn chirps (3)
times. The vehicle is now programmed to start every 3 hours.
3-b. Daily Timer Start: Depress the transmitter “F” button first, within 3 seconds press button. The parking
light will flash (6) times. The siren chirps (6) times. The vehicle is now programmed to start at the real time of the
next day. Your set time for the next day engine start flashes for approx. 3 seconds on the LCD screen. After 3
seconds icon stays displayed on the LCD screen.
Or Follow page 5 programmed Daily Start Timer on LCD remote, then follow page 4 Table-3-4 press button of
LCD REMOTE TRANSCEIVER OPERATION to activate or cancel Daily Start feature.
4. Press the brake pedal to stop the vehicle running.
Exit the timer start: Timer start can be exited manually as follows:
1. Make sure the remote start system is not operating the engine.
2. Turn the ignition on. The LED and parking light will flash (4) times. The horn chirps (4) times. Or
1. Press the button twice to remote start the vehicle. As soon as the vehicle is running and the parking light have
turned on or flashing.
2. Immediately depress the button then press and hold the button for 2 seconds. (or depresses +
buttons, if you program + buttons = Start / Stop button.) The parking light will flash (4) times.
The siren or horn chirps (4) times. The vehicle is no longer programmed to start automatically.
F. TEMPERATURE CHECK
With the built in temperature sensor you can monitor, Through the LCD screen, the present indoor temperature of the
passenger compartment before cooling or heating your vehicle.
10

11
Press the transmitter “F” buttons first, within 3 seconds press button; the in-door temperature will be shown on
the LCD screen. This reading may be higher than actual ambient temperature due to the greenhouse and is relative
only the inside vehicle temperature.
G. TO TURN OFF THE REMOTE START:
When the engine is running (by remote start), if you want to stop it,
1. Press button once on the remote transmitter under remote start mode.
2. Move the optional remote start enable toggle switch to OFF position. (If installed)
3. Press the brake pedal
The vehicle will shut down and turn off the parking light to indicate engine stopped.
H. SHUT-DOWN INPUT FOR REMOTE STARTER:
If any of the following conditions exist while the system is operating, the engine will not start or will shut
down immediately:
1. The hood is opened.
2. The brake pedal is pressed.
3. The parking (hand) brake is released (For Standard Transmission Gear Vehicle or Turbo Timer Mode)
4. Engine is over-revved. {“Tachometer checking type” only}
5. The pre-programmed run time (5 /10 / 20 / 30 minutes) has elapsed.
6. Press button twice on the remote transmitter under remote start mode.
7. The system trigger.
8. The vehicle refused to start running after {3} unsuccessful attempts.
I. DISABLING THE REMOTE START SYSTEM: (If installed)
This device complies with part 15 of the FCC rules. Operation is subject to the following
two conditions.
1) This device may not cause harmful interference, and
2) This device must accept any interference received, including interference that may
cause undesired operation.
Per FCC 15.21, you are cautioned that changes or modifications not expressly
approved by the part responsible for compliance could void the user’s authority to
operate the equipment.