Advanced Equipment USA 70020-002 Golf Master Caddy User Manual
Advanced Equipment USA Corp. Golf Master Caddy
User Manual
HERCULES Golf Master
Operating Instructions
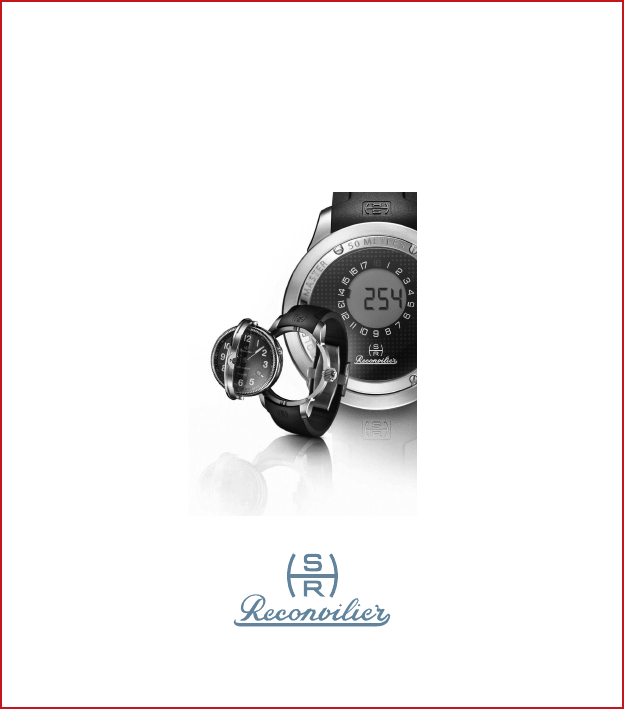
Société Horlogère Reconvilier AG located in Zug
Société Horlogère Reconvilier AG
located in Zug
Ober Altstadt 6
CH-6300 ZUG Switzerland
Tel. +41-41-7202125
Fax +41-41-7202126
info@reconvilier.com
www.reconvilier.com
Status: July 2012 – Subject to modifications and amendments
1
Overview of all product elements you have
received with the purchase of this watch:
– Reconvilier HERCULES Golf Master watch
– «Caddie» (small GPS-Receiver from Trilogis Sàrl)
– USB-connection cable to the PC
– Tools to adjust rubber band and to adjust the watch
– Reconvilier warranty card with Username and Password
(to be able to download golf course data, the Course Manager
user software and the «Caddie»-Sync software as well as the
necessary user manuals from the Reconvilier website)
Please do not forget to charge your «Caddie»
using the enclosed USB-connection cable via
your PC (initial charge approx. 6 – 7 hrs)
2
Dear Reconvilier Customer,
Congratulations to your new Reconvilier HERCULES Golf
Master!
The Reconvilier HERCULES Golf Master represents a
masterpiece of state-of-the-art Swiss timekeeping combined
with most modern GPS-technology. A product, which gets
every golf enthusiast excited.
Fascination of this watch is more than just precise time keeping.
It is the fascination in realizing creative ideas, a concert of fantasy
and precision.
The enthusiasm for handcrafted masterpieces up to the smallest
detail, not easy to recognize, but surprising in its function.
Please read this manual very carefully to ensure perfect opera-
tion of this watch.
In case of any questions please access www.reconvilier.com
We welcome you in the small circle of people, who ask more
from their watch than mere accuracy!
3
CONTENTS
Technical Features
Analog Application
«Rotar»-Mechanism
Digital Application
Functionality
1. Status without Synchronization
2. Stand-by-Mode
3. Time-Mode
4. Synchronization-Mode
5. Golf-Mode
6. Setting-Mode
Useful Tips
Critical Information
4
Technical Features
Your HERCULES Golf Master shows you the time in hours,
minutes and seconds as well as the date on its analog dial. By
using the «Rotar»-Mechanism you will get to the digital dial,
a LCD-display on the flip side of the watch. There you can
get not only the exact digital time but also the exact distance
between the location of the golf player and the front or center
of the green in meter or yards (switchable) for each hole of a
previously stored golf course.
Watch housing and buckle is made of titanium. The strap is made
of high quality leather or rubber. The watch is water-resistant
up to 50 meters and protected on both sides by a strong and un-
scratchable sapphire-glass. The watch is espacially shock-resistant
(special «shock-absorber»), to better meet the extreme challenges
on the golf course.
To ensure long lasting endurance and reliability of performance,
you have to read and apply this user manual very carefully!
5
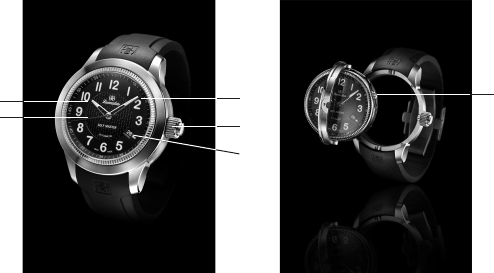
Analog Application
The HERCULES Golf Master with its details:
1 Hour hand
2 Minute hand
3 Seconds hand
4 Date indicator
5 Large crown (bayonet crown) to unlock the «Rotar»
mechanism (opening and turning of the inner case)
6 Covered Crown:
x normal (inside)/winding position
a Date fast forward
b Time adjustment
1
3
2
5
4
6
x, a, b
6
Winding and adjustment of the watch:
Turn left the large crown (bayonet crown) a quarter of a turn,
open the case and press the inner case, allowing the watch to
slide out. Now you can see the inner crown.
To adjust the time, pull the arrow to the second «b» Position.
This position will stop the watch and the seconds. Now you can
adjust the watch precisely by the second. Afterwards push the
crown back in its original position.
In case the Golf Master has not been used for some time, it
should be wound by hand.
To do so you must right turn the inner crown (still inside, no pull,
position «x») about 20 times to reach an initial full winding.
The watch fully wound has a power reserve of about 44 hours.
Adjustment of the date:
Pull the inner crown only once to position «a». Now you can
adjust the date (fast forward) turning the crown to the right.
Important: Never adjust the date between 10.00 and 02.00 hours
because the automatic date mechanism is working during these
hour settings. After the adjustment push the crown back in the
original position «x».
7
Reading the watch in the dark:
The dial as well as the hour hand and minute hand of your watch
have been manufactured with light elements. These assure even
in complete darkness excellent readability of the time.
8
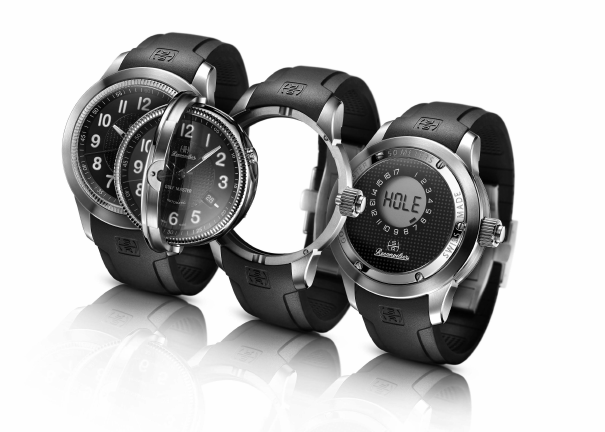
The «Rotar»-mechanism
The «Rotar-mechanism» developed by Reconvilier enables the
usage of a precise Swiss analog watch movement combined with
a modern digital technology to measure distances on golf courses.
Day-to-day and for example at evening events, after the golf
game, the luxurious, analog dial is on top.
9
Digital Application
When the Golf Master is applied for distance measurement on
the golf course, the digital dial must be turned to the front; the
following steps have to be taken:
1. Step:
Turn the large crown (bayonet crown) by a quarter of a turn to
the left to unlock and open the case
2. Step:
Turn the inner case by 180 degrees and close it again (the case
will «click-in».
3.Step:
Turn the large crown (bayonet crown) now a quarter of a turn
to the right and lock it. Important: The red mark/line must be
visible on top before you turn the crown.
Now the watch is ready to be used as a distance measuring device
on the golf course.
10
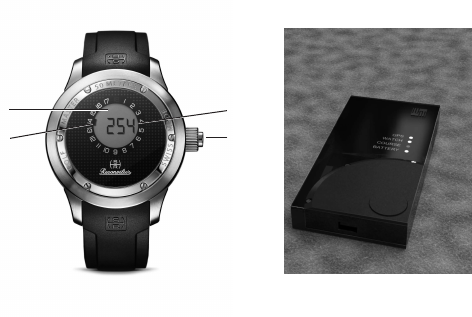
1
2
3
4
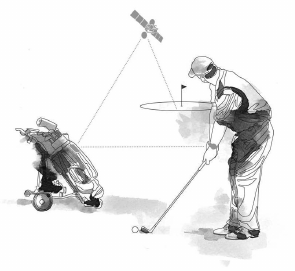
The Reconvilier Golf Master and its «Caddie» on the golf course:
accessible
1 LCD-display
2 Cursor to show the number of the hole
3 Distance display/time display
4 LCD-control-button in the crown
«Caddie»:
GPS/RF-converter with four controls (GPS, Watch, Course,
Battery) and connection for USB/PC.
Important: Before you use the watch for the first dime down-
load and read your user manual for the «Caddie» from the Re-
convilier website!
11
Functionality
The functionality of the Golf Master for use on the golf course is
based on the collaboration of four combined technical compo-
nents:
A. Course Manager to load worldwide golf course information
(accessable via the Reconvilier website)
B. Computer with USB-interface (not part of the watch) to
download the specific «golf course information» onto the
«Caddie» from the Reconvilier website
C. «Caddie»: GPS-receiver and software to calculate the golf
course data in meter/yards as well as sending modul to the
watch
D. Reconvilier HERCULES Golf Master
Technically, two main processes are key for precise functioning
of your Golf Master: The «Caddie» (C) receives actual GPS
position data and compares them with the memorized/down-
loaded GPS coordinates of the database (A). The watch (D)
reads these data via a Radio Frequency (RF)- transmission and
displays them to the user on the digital display.
The advantage of using RF-Technology for the data transmission
to the Golf Master is, that using RF one can transmit over distan-
ces up to 30m. Which means, that the «Caddie» can be stored or
12
located up to that distance sideways from the player (e.g. in the
golfbag, trolley or buggy) without impacting the quality of the
information.
The use of the HERCULES Golf Master function is extremely
easy:
Step 1:
Download the desktop application Course Manager with the
«Caddie» synchronication software (with all its neccessary drivers
– automatically added) to your computer. You get these easily via
www.reconvilier.com applying your Username und Password
(see warranty card).
Step 2:
Create and Download the golf course data of your desired golf
course in your personal desktop application (see separate manual
on Reconvilier website). Up to 20 different golf courses can be
downloaded and synchronised with the caddy (e.g. useful for
extended golf trips).
Step 3:
After saving these data on your desktop application, you can
synchronize these with the «Caddie» («Caddie-Sync») using the
USB connection between your computer and your caddy with
the USB cable, which is part of the package.
13
For use on the golf course you must bring the Golf Master
watch as well as the «Caddie»!
On the course, turn on your caddy and position it visibly (clip) at
your golfbag, trolley, cart or your belt (so that it can well receive
GPS data from the satellites at any time!).
Step 4:
Now activate your Golf Master watch. Just turn – as already
described on page 9 – the digital dial to the front and lock it.
On the digital dial you see the LCD-display, which can now be
controlled with the LCD-control-button. The LCD-control-
button is embedded in the middle of the large crown (bayonet
crown) and secured by a pressure spring. This button is the main
user element for the Golf Master distance measurements!
14
Please check before using the Golf Master on the golf course:
1. Are the correct golf course data loaded from the database
(Course Manager)?
2. Is the «Caddie» synchronised with these data (display after
«Caddie-sync»: «ready to play golf»)?
3. Is the «Caddies» battery fully charged (via USB-computer-
connection)?
4. Are «Caddie» and Golf Master watch turned on and activa-
ted?
General comment to the functionality of the HERCULES Golf
Master in «golf mode»:
The basic logic of the LCD-control-button:
› press once and short: activate, select, move on
› double press short: deactivate, leave menu
› press once and long (2 seconds): program, confirm

15
The LCD-display basically consists of three elements:
› central display of the distance to the green (front/center) in
meter/yards and alternatively: display of the digital time
› round display of 18 holes on the dial
› blinking display of one of the 18 holes (Cursor) to show the
actual golf hole played
If all holes are blinking at the same time, it is an error message.
The blinking of six Cursor elements shows necessary waiting
times of electronic processes.
16
On the following pages the specific functions will be described in
detail:
1. Status without Synchronization
In the status without synchronization it is impossible to display
the digital time as well as to use the watch in golf-mode to show
distances. For example, after renewing the watch battery, you
must synchronize watch and «Caddie» again (resetting).
2. Stand-By-Mode
In the stand-by-mode the digital display is turned off and the
electronics of the watch are in sleep mode. You can move easily
from stand-by-mode into time-mode pressing the LCD-control
button in the crown once and short.
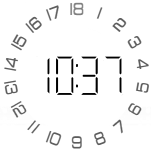
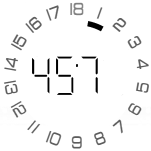
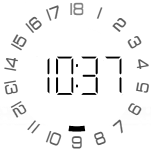
3. Time-Mode
In time-mode the LCD-display shows the actual time. You switch
from stand-by-mode (display off) into time-mode by pressing the
LCD-control button once and short.
The time display is only possible after successful synchronization
of the watch (otherwise you see «0:00» on the display)!
17
Time Display
Time display is in hours and in minutes. Seconds will not be dis-
played in the digital time-mode. In 24-hours mode the two dots
between hours and minutes are blinking; in the 12-hours mode
either the top (AM) or the button (PM) dot is displayed. The
time can be adjusted to the actual local time zone (see paragraph
on time zone setting below).
4. Synchronization-Mode (Normal mode on the golf course)
The watch is – as already described -designed in a way, that it
uses a GPS/RF-Transmitter («Caddie»). Watch and «Caddie»
must be synchronized. With the synchronization-mode this status
will be established. You activate the synchronization-mode pres-
sing the LCD-control-button once and long (2 seconds) when in
the time mode. You deactivate the synchronization mode double
pressing the LCD-control-button short.
18
The synchronization mode will also be automatically deactivated,
when it is impossible to synchronize watch and caddy within 60
seconds – to save battery.
Successful synchronization requires GPS Information, golf
course data and that watch and «Caddie» are in reach (max.
30 m) of each other.
With the successful synchronization, digital time actualization/
synchronization takes place automatically.
19
5. Golf-Mode
In golf-mode the watch receives automatically all necessary golf
course data from the «Caddie» (number of the hole played, dis-
tance to the green – front or center) and shows this information
on the digital display. The golf-mode will be activated by pressing
the LCD-control button once and short when in time-mode.
Pressing it twice short (double press) will deactivate the golf-mo-
de and return to time-mode again. In case the watch is not used
approx. 10 minutes in golf-mode it will automatically deactivate
and return to stand-by-mode (display turns off)!
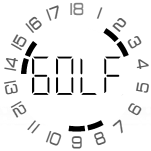
Step 1: Activation of the golf watch:
Press and hold the LCD-control-button for approximately 3 se-
conds. The display shows «GOLF» and the circle of the cursors
is closing clockwise. The watch is activated and shows the actual
time (time mode).

20
Step 2: Activation of the Golf-Mode
Press the LCD-control-button once and short:
With successful synchronization, good GPS-Reception (5-7
satellites), the correct golf course information in the «Caddie»
(see «Caddie Sync») and the «Caddie» in reach of the watch the
display now shows your location (e.g. hole 1) and the distance to
the green in meters or yards.
21
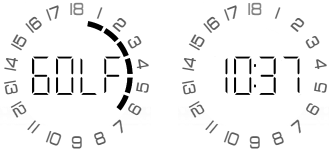
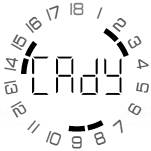
If this display does not come up, there may be three potential
reasons/indications:
1. «Caddie» is not activated or not in reach: Display: «CAdY»
and rotating Cursors (2)
To fix: Activate the «Caddie» or locate him closer to the watch
(within 30 m)!
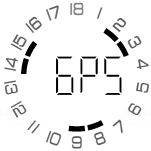
2. GPS problems und GPS search
The «Caddie» does not receive sufficient GPS-signals (for ex-
ample inside buildings or signal disruptions (e.g. thunderstorms,
heavy clouds, strong other radio sources or metalgrids close by).
22
Important: When first connecting to the various satellites, it
can take up to five minutes until the «Caddie» has received and
applied all GPS-signals!
Display: «GPS» und rotating cursors (2)
To fix: Make sure that the «Caddie» can receive all GPS-signals
optimally!
23
3. Golf-Course not saved, or no known/recognized colf course
close by
If there is no golf course loaded as reference or the golf course
loaded/saved is not close enough (ca. 5000 m) and therefore
a GPS recognition is impossible for the «Caddie», the display
shows «Golf» with rotating cursors (2).
To fix: Load the right golf course data of your – to be played –
golf course or move closer to the course selected.
24
Important Tips during the Golf Game
Front or center of the green
Only if the database does not hold front of the green information
but instead only center of the green data, the watch will display
the distance to the center of the green, shown by the blinking
upper dot between the single and double meter digits.
Regularly, when the display shows the distance to the front of the
green, no dot is displayed.
25
Automatic switch to the next hole
When on the golf course the display shows the hole currently
played as one single piece (cursor) of the circle as well as the
distance to the front or center of the green in meter or yards (ad-
justment m/y see chapter 6) the «Caddie» automatically switches
from hole to hole. At any time you can also manually switch to
the next or any other hole (see next paragraph).
If you step on to the green with about 20 - 25 meters distance to
the hole and leave it again after successful putting the «Caddie»
will automatically switch to the next hole.
Important: The «Caddie» will always measure the distance to the
front or center of the green (depending on the database infor-
mation). If, for example, the «Caddie» stays in your trolley while
you are putting, it can be possible that it does not recognise that
you passed that closest point to the hole and are already moving
on to the next hole, because its distance information did not
change (e.g. «Caddie» in the trolley).
Then you have to switch manually to the next hole.
26
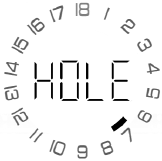
Switching to other holes («Hole-Mode»)
You just have to press and hold the LCD-control-button for
approx. 2 seconds. The display switches from the golf-mode di-
rectly into the «Hole-Mode». «Hole» flashes, now you can switch
from hole to hole by pressing once and shortly the LCD-control-
button. The cursor always displays the hole you are selecting.
Pressing and holding the LCD-control-button for 2 seconds
again will return the watch to the golf-mode.
Important: It always takes a few seconds afterwards until the
«Caddie» has calculated the new information and the display
switches back from «HOLE» to the distance display.
Just simply wait until the display shows the distance again.
27
Time Display in the Golf-Mode
Anytime during the game you can move to the time-mode by
pressing the LCD-control-button once and short.
In this case the blinking cursor shows the total number of holes
(9 or 18) of the golf course you are currently playing. After ap-
proximately 8 seconds the display will automatically return to the
golf-mode.
Step 3: Deactivating the Golf-Mode
To leave the golf-mode, you double press the LCD-control-
button and the watch will return in time-mode. Another double
pressing of the LCD-control-button will turn off the electronic
and return to stand-by-mode.
To save battery the watch will also automatically turn off (stand-
by mode) if not in use for 2 hours.
28
6. Settings-Mode
The settings-mode allows to show the settings of the watch and
adjusting them. The settings-mode can be activated by pressing
and holding the LCD-control-button for 2 second while the
watch is activated and in time-mode.
There are 5 different settings:
A: Watch/«Caddie» pairing
B: Meter or yards
C: 12- or 24-hours display
D: Time zone adjustment
E: Information of the watch (not described, only important for
the manufacturer)
Pressing the LCD-control-button once and short will then select
the various setting elements and you can browse through the
settings.
29
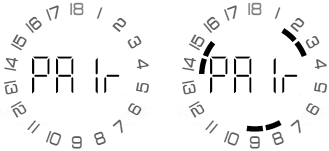
Pairing with the «Caddie»
The first setting is «Pairing», shown in the display as «PAIr»:
At delivery the watch and the «Caddie» are «paired», which
means as pair connected – they recognise each other.
If for any reason a new pairing is neccessary you will need to do
the following:
«Caddie» (see separate user manual/downloaded from www.re-
convilier.com) and watch will be connected while both in pairing
mode. While pairing the watch display shows both: «PAIr» and
the rotating cursors (2). See «Caddie» operating instructions on
how to put «Caddie» in pairing mode.
After successful pairing the watch automatically returns to the
golf mode.
30
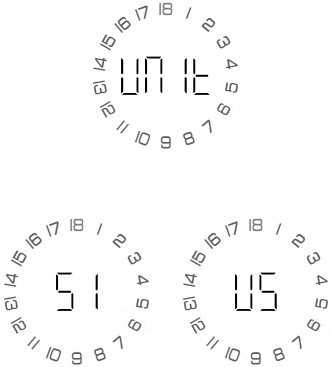
Setting of meter/yards
You can choose between meter = «SI» (international system of
units) or Yards = «US» (U.S. customary units).
After the pairing-mode you will get to the «unit-mode» by short
pressing the LCD-control-button:
The LCD-control-button must now be pressed and held for 2
seconds to change the setting.
Pressing the LCD-control-button once you can toggle between
«SI» und «US». To confirm and return to the setting-mode you
again press and hold the LCD-control-button for 2 seconds.

31
Adjustment of the hours display
You can select between 24-hours- or 12-hours-display-mode.
Display in setting-mode is «HOUr»:
Again, you must press and hold the LCD-control-button for 2
seconds to adjust the formats.
By pressing the LCD-control-button once and short you can
toggle between the two formats:
To confirm and return to the previous mode you again have to
press and hold the LCD-control button for two seconds.
32
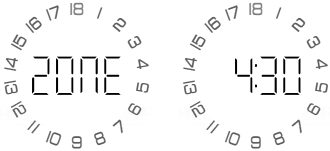
Setting of the time zone
The HERCULES Golf Master receives its digital time informa-
tion via the GPS-signal.
To adjust for the local time zone of the specific country, you must
adjust the difference between the GPS-time zone and the local
time zone. The display in this mode shows «ZONE»:
The maximum difference is -12 hours up to +14 hours. Again
you must press and hold the LCD-control-button for 2 seconds
to change settings:
Then the current time zone will be displayed blinking and can be
changed by short pressing of the LCD-control button.
To confirm and return to the previous mode you again have to
press and hold the LCD-control-button for 2 seconds.
33
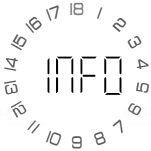
Info
With the setting «INFO» a number of technical informations
about the watch can be displayed:
– Firmware Version
– Serial Number, first part
– Serial Number, second Part
This information is only important for the manufacturer and
cannot be changed by the user.
34
Useful Tips
Water-Resistance
After any opening of the watch (e.g. after changing battery) the
water resistance of the watch has to be checked by a professional
watch dealer or watch maker. In any case we recommend che-
cking the water resistance once per year through an authorized
watch dealer!
Battery lifetime
The golf-mode function uses a small high performace battery
(CR 2016) with an average lifetime of approx. two golf seasons,
depending on how often and how long the watch has been used
in activated golf-mode.
Change of the battery should only be done by an authorized
dealer or any other professional watch specialist.
Service
All parts of this watch are made from high quality materials and
components. But some parts undergo normal usage and wear-
out. It is important that these parts are regularly oiled and that
any stains of oil will be removed to secure smooth mechanical
movements. Therefore Reconvilier recommends a general service
of the watch every 3-5 years. Please contact any
35
authorized dealer or Reconvilier directly (via
www.reconvilier.com)
Usage of the rubber watchstrap
The sportive and high-end touch of the HERCULES Golf
Master is underlined by a high performance rubber watchstrap.
Caoutchuc is a natural product, is very flexible und comfortable
when worn and perfectly meets the high and tough requirements
during a golf game.
The strap can be flexibly adjusted in its length. Small adjustments
can be done using different positions in the latch. For larger
adjustments you or your watch dealer can cut the rubber strap
at the predetermined cut points using a sharp knife. For this, the
strap needs to be opened with the help of the enclosed precision
tool (opening the two screws at the side of the housing). After
adjustment put the screws back into place and secure them
tightly.
For any further questions please contact the Reconvilier-Service-
Organization via www.reconvilier.com.
36
Critical Information
Failure to avoid the following potentially hazardous situations
could result in death or serious injury.
GPS-Navigation warnings
This system contains or accepts location and GPS data and you
must follow these guidelines as well as ensure safe usage.
– When navigating, carefully compare information displayed on
the «caddie» to all available navigation sources, including signs,
course conditions, weather conditions and other factors that
may affect safety while using the distance device. For safety,
always resolve any discrepancies before continuing to play.
– The «caddie» is designed to provide only distance suggesti-
ons. It is not a replacement for user attentiveness and good
judgment. Do not follow the «caddie`s» suggestions if they
suggest unsafe maneuvers or would place anybody in an unsafe
situation.
Course Date Information
The Reconvilier HERCULES Golf Master uses a combination of
data sources. Virtually all data sources contain some inaccurate
or incomplete data. In some countries, complete and accurate
37
map information is either not available or is prohibitively expen-
sive.
Health warnings
– Always consult your physician before sport activities. If you
have a pacemaker or other implanted electronic device, consult
your physician before using this RF-Technology system.
– The device, the watch and the «caddie», are consumer devices
and could suffer from interference from and cause interference
to external electrical sources.
Battery warnings
If these guidelines are not followed, the internal battery may
experience a shortened life span or may present a risk of damage
to the GPS system, fire, electrolyte leak, chemical burn and/or
injury.
– Do not leave the «caddie» exposed to a heat source or in a
high-temperature environment, such as in the sun in an unat-
tended golf-cart. To prevent damage, remove the caddie from
the golf-cart or store it out of direct sunlight.
– Do not dissemble, incinerate or puncture the caddie.
38
– When storing the «caddie» for an extended time, store within
the following temperature range: From 32°F to 77°F (0°C to
25°C).
– If using an external battery charger only use the Reconvilier
accessory approved for the caddie.
Declaration of Conformity
Hereby, Reconvilier declares that this product is in compliance
with the essential requirements and other relevant provisions of
Directive 1999/5/EC.
FCC Compliance
The device complies with part 15 of the FCC rules. Operation
is subject to the following two conditions: 1. This device may
not cause harmful interference, and 2. this device must accept
any interference received, including interference that may cause
undesired operation. This equipment has been tested and found
to comply with the limits for a Class B digital device, pursuant to
part 15 of the FCC rules. These limits are designed to provide re-
asonable protection against harmful interference in a residential
installation. This equipment generates, uses and can radiate radio
frequency energy and may cause harmful interference to radio
communications if not installed and used in accordance with the
instructions. However, there is no guarantee that interference
39
will not occur in a particular installation. If this equipment does
cause harmful interference to radio or television reception, which
can be determined by turning the equipment off or on, the user
is encouraged to try to correct the interference by one or more of
the following measures:
– reorient or relocate the receiving antenna
– increase the separation between the equipment and the receiver
– connect the equipment into an outlet on a circuit different from
that to which the receiver is connected
– consult the dealer or an experienced radio/TV technician for
help
This product does not contain any user-serviceable parts. Re-
pairs should only be made by an authorized Reconvilier Dealer.
Unauthorized repairs or modifications could result in permanent
damage to the equipment and void warranty and your authority
to operate this device under part 15 regulations.