Advanced Mobile Payment AMP9000 AMP 9000 User Manual
Advanced Mobile Payment Inc. AMP 9000 Users Manual
Users Manual

Advanced Mobile Payment Inc.
DQ-9000-1-E AMP 9 Series Countertop / Mobile Terminal Quick Reference Guide
AMP 9 Series Mobile Terminal
Quick Reference Guide
AMP 9000
2015 Advanced Mobile Payment Inc. (AMP) All rights reserved. AMP, the AMP logo, vTerminal
are either trademarks or registered trademarks of AMP in Canada and/or other countries. All other
trademarks or brand names are the properties of their respective holders. All features and
specifications are subject to change without notice. Product display image for representation
purposes only. Actual product display may vary. Reproduction or posting of this document without
prior AMP approval is prohibited.
Electrical Considerations
Unpacking the shipping carton
Open the shipping carton and inspect all its contents for possible tampering or damage.
The AMP 9 Series terminal is a secure device and any tampering may cause cease to
function properly.
To unpack the shipping carton
Remove and inspect the following items
Terminal
USB charger power supply
Remove plastic wrapping from the terminal
Remove plastic protective film from the LCD (if applicable)
Use only approved power supply that is provided with this device, using other
power supply may cause damage to the device or risk of fire.
Avoid using this product during electrical storms.
Avoid locations near electrical appliances or other devices that cause excessive
voltage fluctuations or emit electrical noise (for example, air conditioners,
electric motors, neon signs, high-frequency or magnetic security devices, or
computer equipment).
Do not use the terminal near water or in moist conditions.
AMP 9XXX-POS 1
USB charger power Supply 1
USB cable 1
Thermal paper roll 1
Stylus lanyard 1
Quick Reference Guide 1
Package contents
Do not use a terminal that has been damaged or tampered. AMP 9 series terminal
comes equipped with tamper-evident labels. If a label or component appears
damaged, please notify the shipping company and your AMP representative or
service provider immediately.
Keep the shipping carton and packing materials for feature packing or moving
terminal.
Advanced Mobile Payment Inc.
DQ-9000-1-E AMP 9 Series Countertop / Mobile Terminal Quick Reference Guide

Examining terminal features before starting the installation
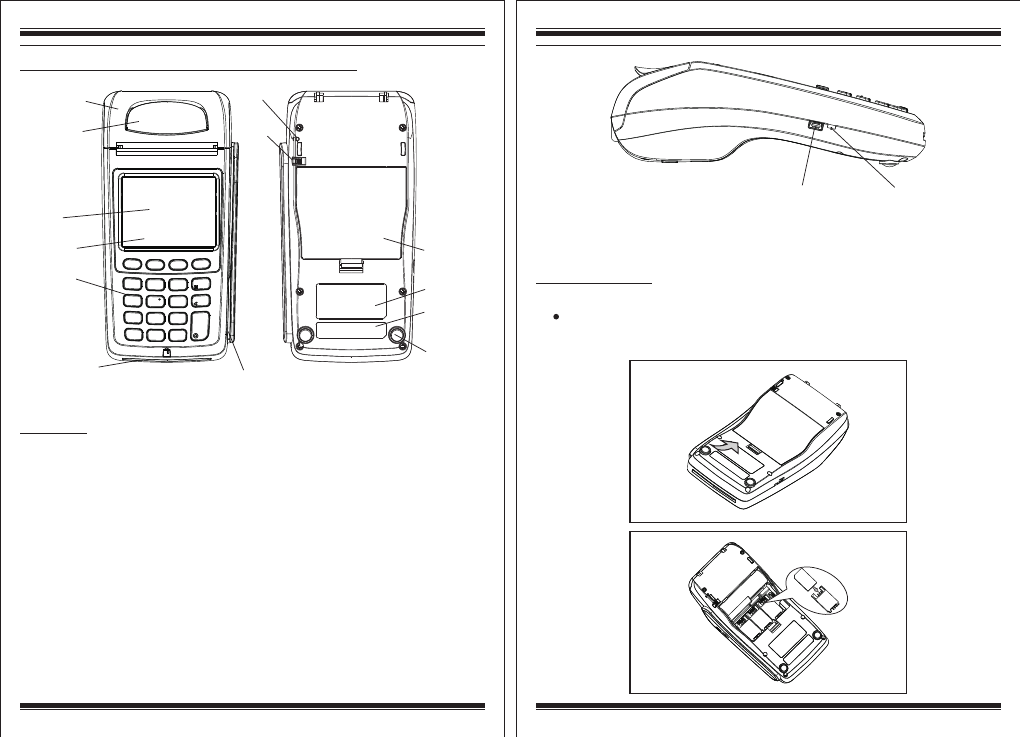
Top view Back view
Paper holder Lid
LCD display
Keypad
User smart card slot Magnetic stripe card
Rubber pad
Barcode Label
Tag label
Back cover
Stylus pen
Antenna
inductive zone
Handle
Lanyard hole
Paper holder lid: Thermal paper roll holder lid
Handle: Pull handle to open the paper holder lid
LCD display: 2.8 inch and 320*240 TFT LCD. Optional signature capture function.
Antenna inductive zone: The zone for tapping contactless card
Key pad: 10 alphanumeric keys, 8 functional keys, 1 power switch key.
User smart card slot: Supporting EMV card with contact surface facing up.
Magnetic Card Reader: ISO7812, 1/2 Tracks or 2/3 Tracks or 1/2/3 Tracks, bi-directional
swiping with the magnetic stripe facing LCD.
Rubber pad: Four pads, anti-vibration/non-slip.
Tag label: Showing model name, rated device parameter.
Barcode Label: Device extra information.
Back cover: Remove the cover to install battery or SIM/UIM/SAM card.
Lanyard hole: Slide lanyard through and make a loop on the outside.
Description
USB Port LED Indicator
Interface Figure
LED indicator: Power status indicator of device
USB Port: USB communication / Battery charger interface.
SAM/SIM installation
If a SIM or SAM is required and is not already inserted, insert a SIM/SAM in
to the socket marked as SIM or SAM.
Place the terminal face down and remove the battery cover.
Advanced Mobile Payment Inc.
DQ-9000-1-E AMP 9 Series Countertop / Mobile Terminal Quick Reference Guide
Advanced Mobile Payment Inc.
DQ-9000-1-E AMP 9 Series Countertop / Mobile Terminal Quick Reference Guide
Install
card figure
SIM/UIM
Open the back
cover figure

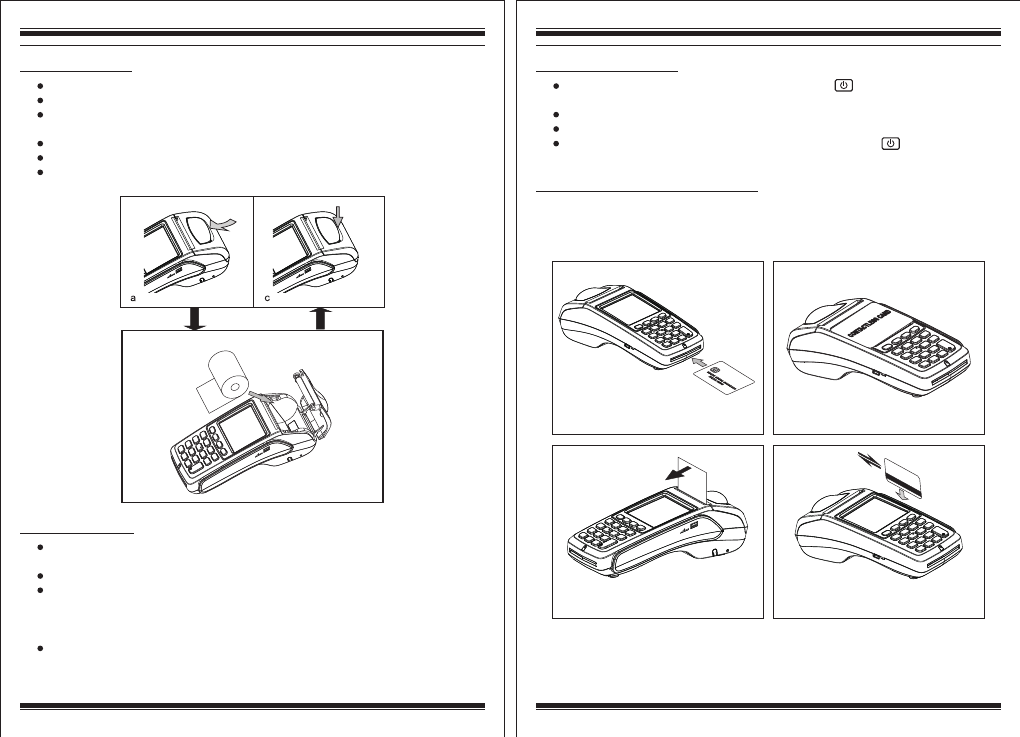
Paper roll installation
Gently pull upwards on the lever located on the middle of the printer door.
Discard any packing material from the paper roll.
Put and fit the roll as shown in the figure below and notice the correct orientation
of the paper while fitting it in.
Pull the paper round 10cm until protrudes from the top of the terminal.
Close the printer door and gently push it until a 'click' sound is heard.
Remove the excess paper by tearing along the serrated edge.
Loading thermal
paper roll figure
b
Charging the terminal
Insert USB cable in to the USB port and plug the other side of USB cable in to the
USB charger then plug the USB charger directly into the electrical power outlet.
Charging the battery will take 2 to 4 hours.
Battery charging status is indicated in the top right hand corner of the display.
when the terminal is switched on and also in the LED at left side of the terminal
when the terminal is in off state. The LED lit Red when the battery is charging and
turns to Green after the battery is fully charged.
When terminal is not in use leave it connected to the power supply to maintain
charge.
Turning on/off the terminal
Press and hold down the power button marked as until the display
illuminates and the device starts to boot on.
Your terminal may prompt you to enter your MID as a security check
The device can be powered both with AC power supply or battery (if supplied)
To switch off the terminal press and hold the power button for 2 to 3
seconds while the device is on.
How to present payment card to the device
Below pictures show how you can present the payment card to the device. Please
refer to the User Manual for performing all transaction types and reading card data
by keypad, swipe, or contactless.
Insert user smart card
How to tear off paper How to swipe card
Advanced Mobile Payment Inc.
DQ-9000-1-E AMP 9 Series Countertop / Mobile Terminal Quick Reference Guide
Advanced Mobile Payment Inc.
DQ-9000-1-E AMP 9 Series Countertop / Mobile Terminal Quick Reference Guide

Troubleshooting
In the event you experience issues with this product, please refer to relevant
procedure detailed below. If this doesn't resolve the issue please contact your
service provider or visit www.amobilepayment.com for more information and
assistance.
Poor printing performance
Check if the printer door is closed fully.
Ensure that the orientation and installation of the paper roll is correct.
Refer to User Manual for further printer setup options.
No Display
Check the battery is fitted correctly.
Check the LED at the side of the terminal for the status of the battery and
make sure that the battery is charged.
Check USB power supply and all connections.
Ensure the power is connected to wall power socket.
Poor battery life
Charge the battery for 2 to 4 hours and check if the full charge LED at the
left side of the terminal turns to Green.
Check battery charge indicator on LCD is at maximum.
Refer to User Manual for expected battery life and more information.
Card read error or cannot read cards
Ensure that the orientation of the magstripe card is correct. The magnetic
stripe should be downward and face the LCD of the device.
Ensure that you swipe the card at steady speed.
Ensure that the chip card has been inserted in the correct orientation.
Ensure that the contactless card has been placed at a distance of 0 to 4cm
from the terminal display.
Repeat the test with another card of the same type.
Caution and Safety Instructions
Do not use the terminal if it is tampered or there is any sign of tampering.
Do not disassemble, service or repair any part of terminal.
To avoid any potential hazard of electrical shock do not use the terminal in wet
environment.
Use only the supplied power adaptor with an electrical outlet of the correct rating.
Only use the battery supplied or specified by AMP.
Do not expose to excessive heat and cold. Refer to device spec for more information.
Do not use ethanol and other corrosive liquid to clean the device.
Dispose any part in an environmentally sound manner and accordance with local laws.
AMP will not be liable for any damage resulting from user operation that does not
comply with the guidance stated.
Advanced Mobile Payment Inc.
Address: Unit 401, 15 Wertheim Court, Richmond Hill, Ontario L4B 3H7 Canada
Tel: +1 905 597 2333
Fax: +1 289 809 0133
Email: sales@amobilepayment.com
Website: www.amobilepayment.com
www.vterminal.com
2015 Advanced Mobile Payment Inc. (AMP) All rights reserved. AMP, the AMP logo, vTerminal
are either trademarks or registered trademarks of AMP in Canada and/or other countries. All other
trademarks or brand names are the properties of their respective holders. All features and
specifications are subject to change without notice. Product display image for representation
purposes only. Actual product display may vary. Reproduction or posting of this document without
prior AMP approval is prohibited.
Advanced Mobile Payment Inc.
DQ-9000-1-E AMP 9 Series Countertop / Mobile Terminal Quick Reference Guide
Advanced Mobile Payment Inc.
DQ-9000-1-E AMP 9 Series Countertop / Mobile Terminal Quick Reference Guide
FCC Caution:
Any Changes or modifications not expressly approved by the party responsible for compliance
could void the user's authority to operate the equipment.
This device complies with part 15 of the FCC Rules. Operation is subject to the following
two conditions: (1) This device may not cause harmful interference, and (2) this device
must accept any interference received, including interference that may cause undesired
operation.
IMPORTANT NOTE:
Note: This equipment has been tested and found to comply with the limits for a Class B digital
device, pursuant to part 15 of the FCC Rules. These limits are designed to provide reasonable
protection against harmful interference in a residential installation. This equipment generates,
uses and can radiate radio frequency energy and, if not installed and used in accordance with
the instructions, may cause harmful interference to radio communications. However, there is
no guarantee that interference will not occur in a particular installation. If this equipment does
cause harmful interference to radio or television reception, which can be determined by turning
the equipment off and on, the user is encouraged to try to correct the interference by one or
more of the following measures:
—Reorient or relocate the receiving antenna.
—Increase the separation between the equipment and receiver.
—Connect the equipment into an outlet on a circuit different from that to which the receiver is
connected.
—Consult the dealer or an experienced radio/TV technician for help.
Specific Absorption Rate (SAR) information
SAR tests are conducted using standard operating positions accepted by the FCC with the
POS terminal transmitting at its highest certified power level in all tested frequency bands,
although the SAR is determined at the highest certified power level.Before a new POS terminal
is a available for sale to the public, it must be tested and certified to the FCC that it does not
exceed the exposure limit established by the FCC, Tests for each POS terminal are performed
in positions and locations (e.g. at the ear and worn on the body) as required by the FCC. For
body worn operation, this POS terminal has been tested and meets the FCC RF exposure
Guidelines.