Advantage PressurePro APPINTRX Tire Sensor Receiver User Manual
Advantage PressurePro, LLC Tire Sensor Receiver
User Manual

Engineering 205 West Wall Street, Harrisonville, MO 64701 1-800-959-3505 www.pressurepro.us
GATEWAY and GATEWAY LITE
INSTALLATION MANUAL
. . . . . . . . . . . . . . . . . . . . . . . . . . . . . . . . . . . . . . . . . . . . . . . . .
This manual provides an overview of what is entailed with installing the
PressurePro Gateway onto a vehicle. Included are descriptions of the Gateway
and the cabling.
For Devices:
GWRE32 – Drop and Hook Gateway
GWRLT – Gateway Lite
*Gateway in this manual refers to both devices.
Engineering 205 West Wall Street, Harrisonville, MO 64701 1-800-959-3505 www.pressurepro.us
CAN/J1939 INSTALLATION
Installing the PressurePro Gateway involves 3 components: Power/Ground, coax antenna,
and CAN/J1939 connections.
1. Determine method of CAN access inside the dash (Extended details on page 3). The
Gateway can be mounted anywhere that allows the Gateway Cable (3 ft.) to reach
the J1939 access points and allows the coax antenna to be attached. The Gateway
features two holes for mounting.
2. It is important to note that Power/Ground needs to be connected. The Gateway
cannot be powered by the CAN Bus (Green/Yellow) connections alone. (Note: If
Gateway cable colors do not match Green/Yellow & Red/Black. Contact Pressure Pro
for wiring diagrams.)
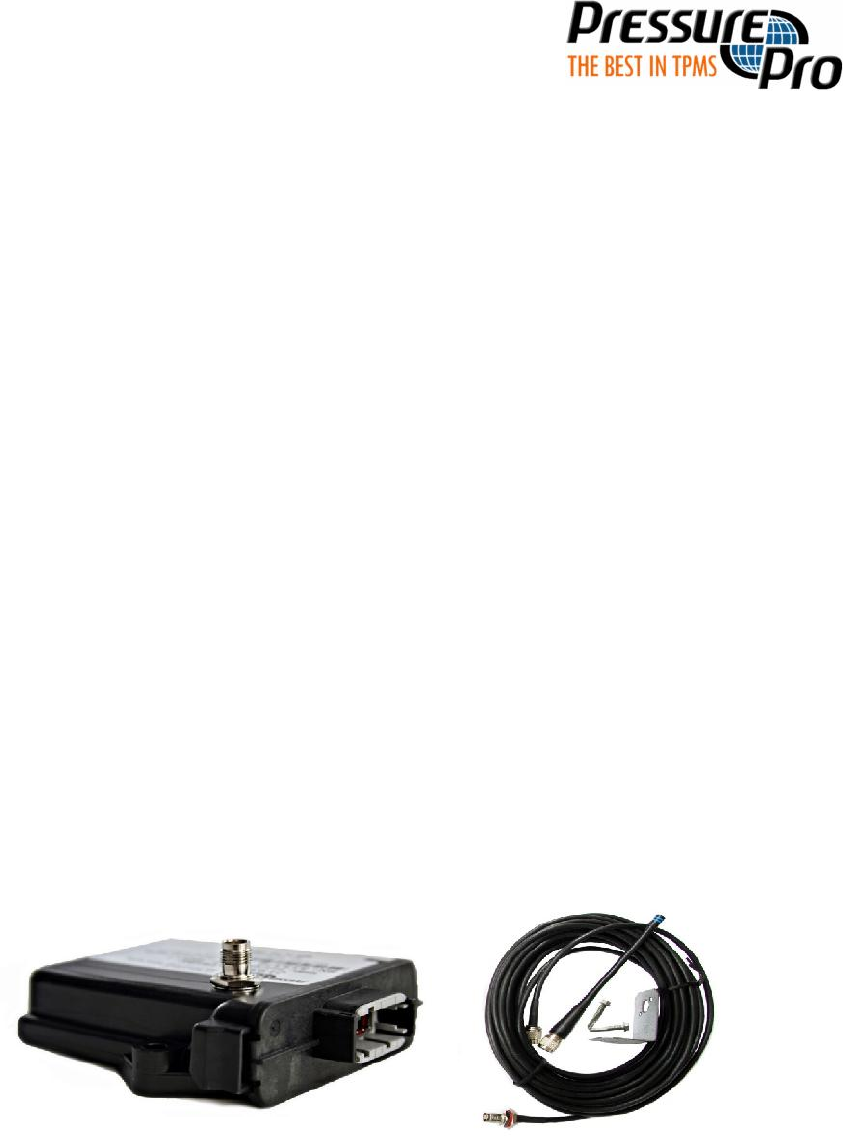
3. The 35ft long TNC coax antenna (connects to the Gateway) is used to allow for easy
installation towards the back of the tractor. The coax cable should be run through
the firewall, and zip-tied to the frame to prevent “wear and tear”. The preferred
Antenna mounting location is on a rear trailer cross member, pointed down, at least
18 inches off the ground. The coax antenna kit includes L-mounting brackets for the
6 inch antenna. It is important for the antenna to be mounted to metal, but to not
be surrounded by metal.
Photo of Gateway, 35ft. Coax, and Cabled Antenna with bracket

Engineering 205 West Wall Street, Harrisonville, MO 64701 1-800-959-3505 www.pressurepro.us
RS-232 Connections
When connecting to the Gateway via RS-232, simply connect the make db9 to your device’s
female db9.
CAN BUS CONNECTIONS
The most unfamiliar aspect of installation will be locating, identifying, and accessing the
CAN Bus. The physical CAN Bus network, otherwise known as a J1939 backbone, has 120
ohm terminating resistors on both ends. On many trucks one resides behind the center dash
panel, but terminating resistors can be in door runners, behind the dash, and other
locations. Newer vehicles also have multiple CANs; you will need to verify which CAN you
need to connect to prior to installation.
Upon completion of installation, there should be two 120ohm terminating resistors, one per
end of the J1939 backbone.
The preferred methods of accessing the CAN Network, in order, are:
1. Use a Y-Connector at the end of the J1939 Backbone.
First, identify the part number, or take a picture of your backbone connector and
terminating resistor. Then submit to your installation service provide r. PressurePro offers Y-
Connectors and Jumpers for plug and play installation termination on your Gateway Cable.
The Y-Connector will provide a removable 120ohm resistor. (In-depth instructions on pages
4-5)
2. Use the Diagnostic port. (Not SAE recommended)
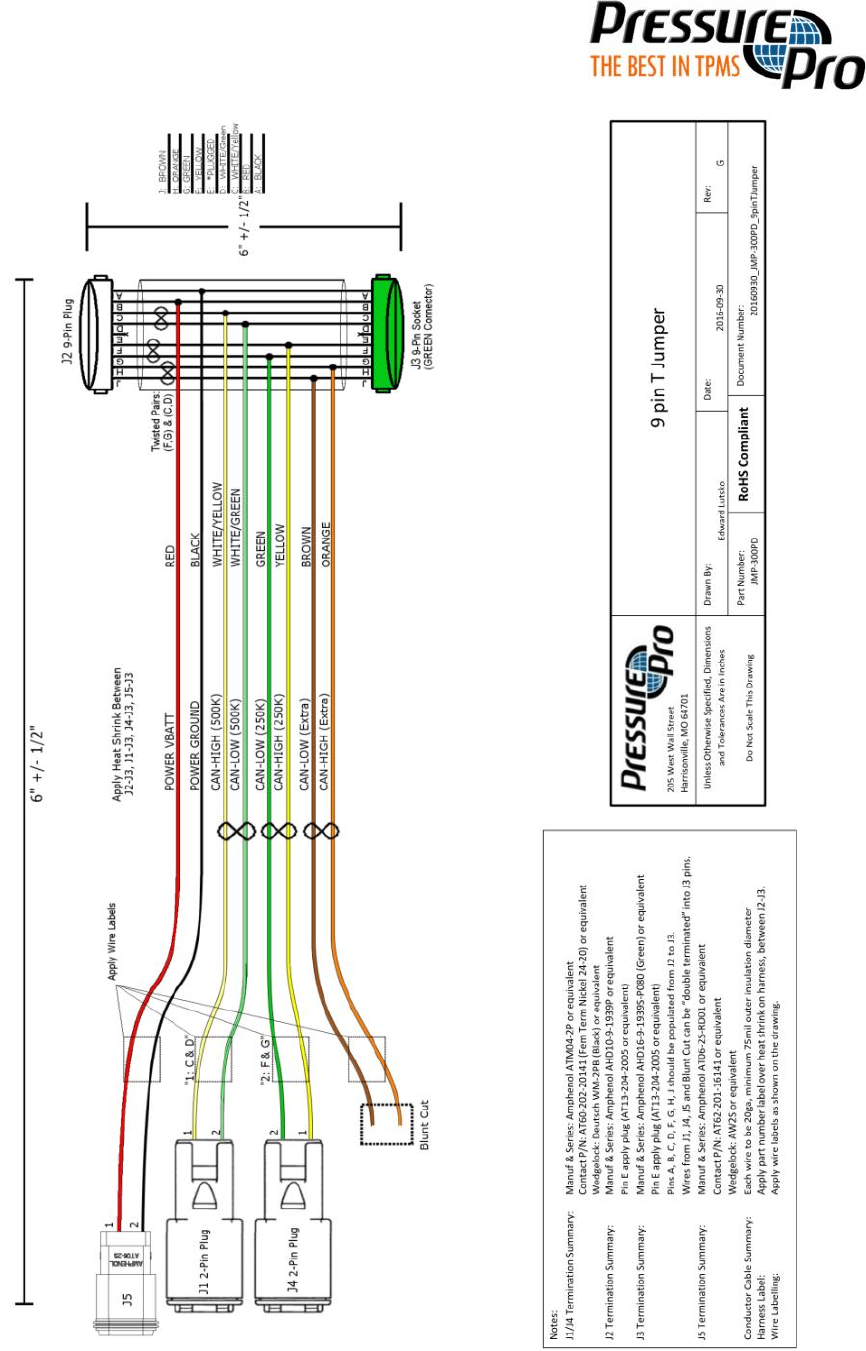
Most trucks have a 9-pin diagnostic port available in the cab. PressurePro has designed a 9-
pin T-Jumper that allows our Gateway to plug directly into the port. The T-Jumper provides
a free diagnostic port for any other device that requires it. The Diagnostic Port is usually
located in the back of the dashboard under the steering wheel. The Gateway can be
installed “hidden away” if the coax antenna can be run outside.
Engineering 205 West Wall Street, Harrisonville, MO 64701 1-800-959-3505 www.pressurepro.us
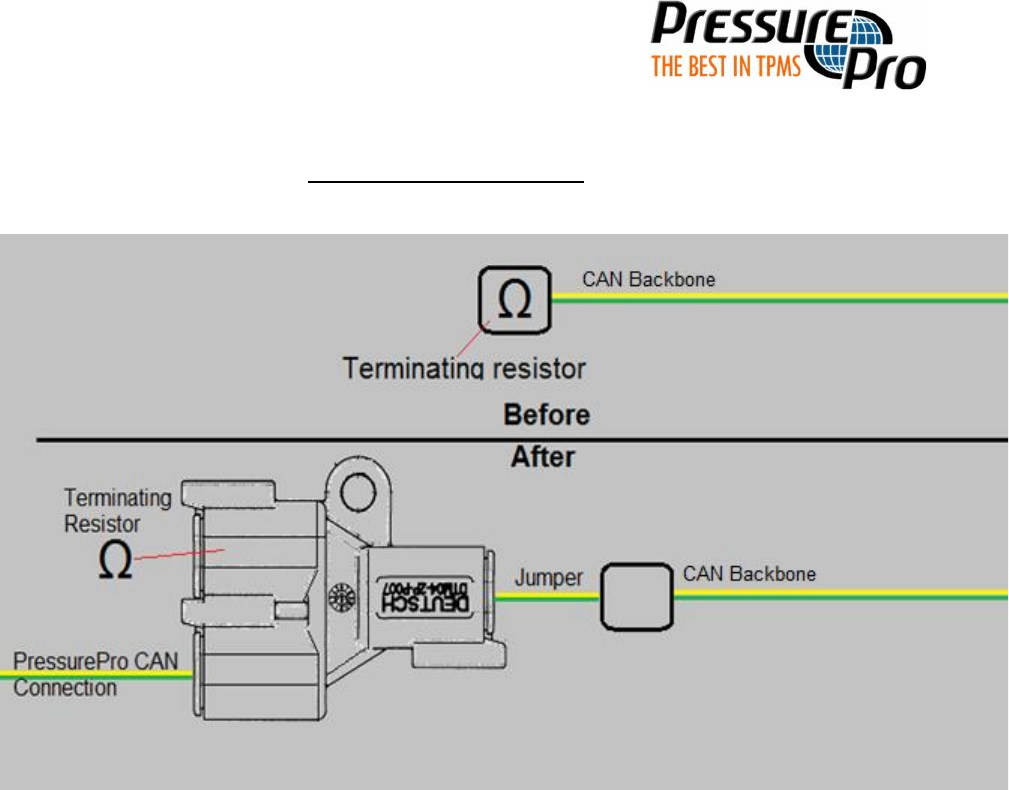
Terminating Resistor
1. Remove Terminating Resistor from Vehicle CAN Backbone.
2. Insert Jumper into open CAN Backbone.
3. Insert opposite end of Jumper (Deutsch 2pin) into Deutsch 2pin Y.
Provided Terminating Resistor (In Deutsch 2pin Y) will replace original
Terminating Resistor. (Do not reinstall original Terminating Resistor)
4. Verify PressurePro CAN connection is plugged in Deutsch 2pin Y.
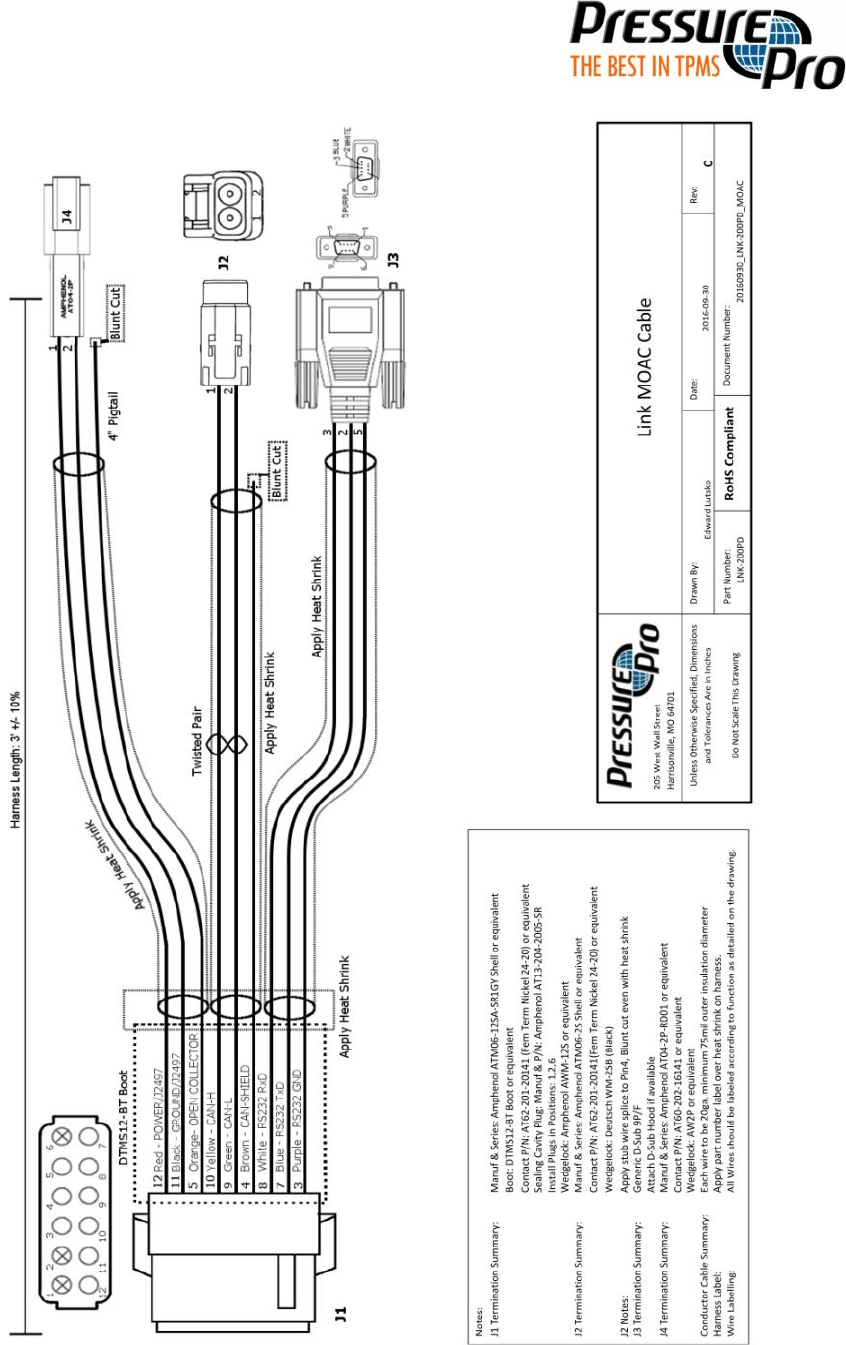
5. Plug Pressure Pro CAN connection - Deutsch 12pin plug properly into Gateway. (Fully
inserted when it clicks).
6. Ensure Red (Power) and Black (Ground) are connected to an Ignition power source,
and a proper ground. (Note: If Gateway cable colors do not match Green/Yellow &
Red/Black. Contact Pressure Pro for wiring diagrams.)
Engineering 205 West Wall Street, Harrisonville, MO 64701 1-800-959-3505 www.pressurepro.us
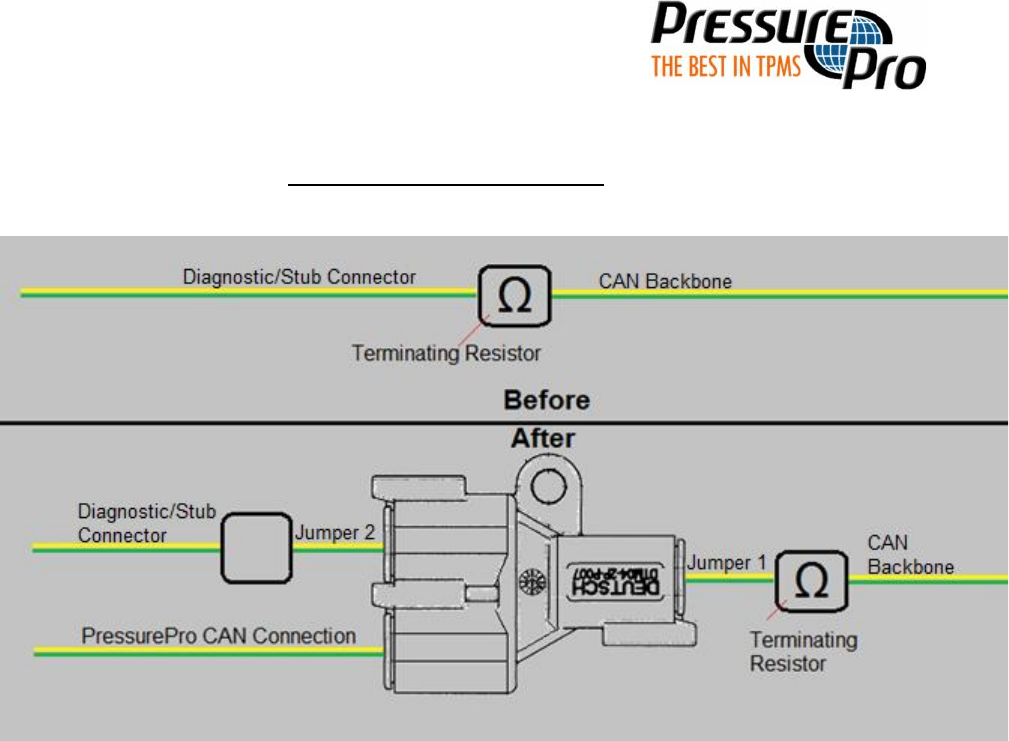
IN-LINE RESISTOR (Stub)
1. Remove Diagnostic/Stub connection from CAN Backbone. (Terminating Resistor may
be attached to the Diagnostic/Stub connector. Remove Terminating Resistor from
Diagnostic/Stub CAN connector, and add to Jumper 1.)
2. Insert Jumper 1 (with original Terminating Resistor) into CAN Backbone.
3. Insert opposite end of Jumper 1 (Deutsch 2pin) into Deutsch 2pin Y.
4. Remove Deutsch 2pin 120ohm Resistor from Deutsch 2pin Y.
5. Plug Diagnostic/Stub Connection into Jumper 2, and Jumper 2 - Deutsch 2pin plug into
the final open receptacle in Deutsch 2pin Y (Formerly filled by Deutsch 2pin Resistor).
6. Verify PressurePro CAN connection Deutsch 2pin Y is plugged in.
7. Plug Pressure Pro CAN connection - Deutsch 12pin into Gateway. (Fully inserted when
it clicks).
8. Ensure Red (Power) and Black (Ground) are connected to an Ignition power source,
and a proper ground. (Note: If Gateway cable colors do not match Green/Yellow &
Red/Black. Contact Pressure Pro for wiring diagrams.)
Engineering 205 West Wall Street, Harrisonville, MO 64701 1-800-959-3505 www.pressurepro.us
Engineering 205 West Wall Street, Harrisonville, MO 64701 1-800-959-3505 www.pressurepro.us

Engineering 205 West Wall Street, Harrisonville, MO 64701 1-800-959-3505 www.pressurepro.us
Operates under all normal voltage conditions for either 12V or 24V vehicles as outlined in SAE J1455,
and will remain undamaged by any fault voltages outlined in J1455 AND SAE J1113-11, class L3
exposure, for either 12V or 24V vehicle systems.
Overall dimensions: 4.6”Wide, 1.4”High, 5.3” Long – including flanges but excluding side-connector.
Operating Temperature -40°C / -40F to +85°C / 302F
RX Frequency 433.92 MHz FM
Effective Data Rate 17,700 bits/sec
This device complies with Part 15 of the FCC Rules and with Industry Canada license-exempt RSS
standard(s). Operation is subject to the following two conditions: (1) This device may not cause harmful
interference, and (2) This device must accept any interference received, including interference that may
cause undesired operation.
This device has been tested to these CE standards: will be updated.