Advantage PressurePro APS2 Wireless Tire Pressure and Temperature Sensor User Manual
Advantage PressurePro, LLC Wireless Tire Pressure and Temperature Sensor
User Manual
CORPORATE OFFICES:
ADVANTAGE PRESSUREPRO, LLC
205 W. WALL STREET; HARRIS0NVILLE, MO 64701
TEL: 816-887-3505 FAX: 816-887-3705
www.pressurepro.us
FOR ORDERING OR TECHNICAL ASSISTANCE, CONTACT YOUR DEALER.
WARRANTY AUTHORIZATION:
FOR RETURN AUTHORIZATION ON WARRANTY ISSUES
CALL PRESSUREPRO TOLL FREE AT: 800-959-3505
To activate your Warranty, visit www.pressurepro.us and click on the
“Register Your Product” box (located on the homepage under Quick Links).
Customers must retain their original purchase receipt as a copy will be
required for warranty or service work on your PressurePro product.
Developed and Manufactured in the USA
04.21.15 16
PRESSUREPRO DESCRIPTION
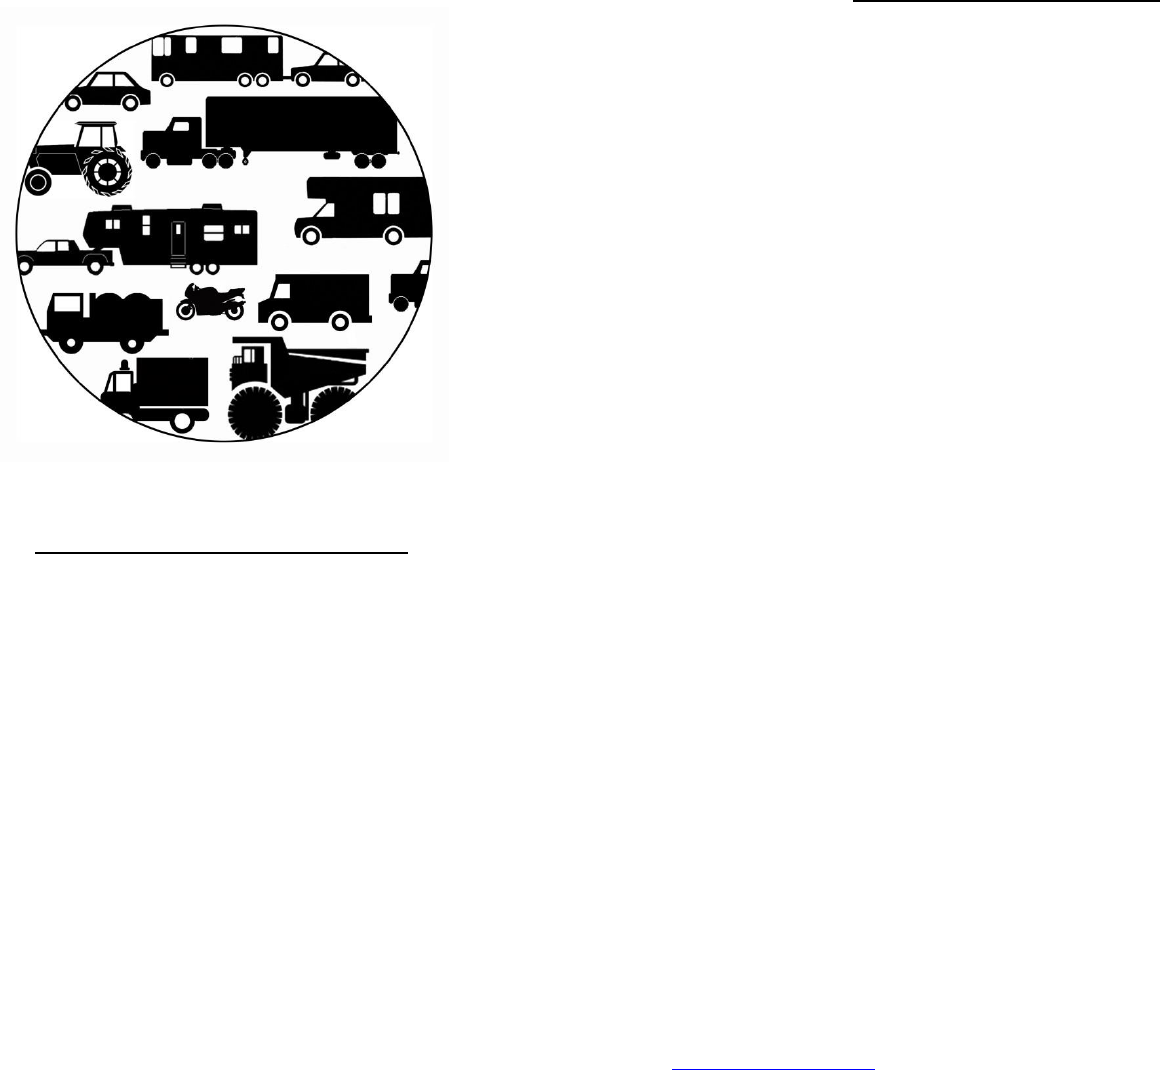
PressurePro is a wireless electronic Tire Pressure Monitoring System (TPMS) that is
designed to display current tire pressures on demand, whether moving or stationary.
PressurePro systems, which can be used on all pneumatic tires, consists of two basic
components: Tire Sensors which screw onto the valve stems of the tires, and a Display.
The Sensors read tire pressure every 7 seconds (12,343 times a day), and transmit a
coded RF signal to the Display every 5 minutes assuring timely information. If an
alarm level is reached, PressurePro Sensors will override the normal update and alert
the Display immediately (see “Alerts” section). During an alert, the tire location
flashes on the Display, the current pressure reading for that tire flashes, and an
audible alert sounds.
PressurePro systems provides users with the market’s most comprehensive alert
schedule, with two low pressure alerts, a high pressure alert, a high temperature
alert, a fast leak alert, and a cross axle alert, all user customizable.
PressurePro is a monitoring system and will not prevent tires from losing pressure or
failing, but it can provide early notice of potential problems and alert to low tire
pressure situations. Because of the quirks of RF Transmissions and interference, no
guarantee of signal reception can be made. PressurePro is not meant to function as a
pressure gauge or low pressure indicator.
2
Regulatory Information
PressurePro Tire Sensors
FCC ID: RMDAPS2 Model: APS2
IC: 4785A-APS2
PressurePro Pulse Display
Contains FCC ID: RMD4R Model: APM4
Contains IC: 4785A-4R
These devices comply with Part 15 of the FCC Rules and with Industry Canada license-
exempt RSS standard(s). Operation is subject to the following two conditions: (1) This
device may not cause harmful interference, and (2) This device must accept any
interference received, including interference that may cause undesired operation.
Les présent appareil est conforme aux CNR d'Industrie Canada applicables aux
appareils radio exempts de licence. L'exploitation est autorisée aux deux conditions
suivantes : (1) l'appareil ne doit pas produire de brouillage, et (2) l'utilisateur de
l'appareil doit accepter tout brouillage radioélectrique subi, même si le brouillage est
susceptible d'en compromettre le fonctionnement.
Note: Changes or modifications not expressively approved by the party responsible for
compliance could void the user's authority to operate the equipment.
Conformity documentation is held on file at PressurePro’s Headquarters. Copies can be
obtained by authorized parties by calling +1-816-887-3505, or by submitting an inquiry
to support@pressurepro.us.
15
LIMITED WARRANTY
ONE YEAR LIMITED WARRANTY: Subject to the limitations and exclusions set forth in this Limited
Warranty, PressurePro is warranted by Advantage PressurePro, LLC (hereinafter “APP”) against
defects in material or workmanship that result in a product failure during the one-year period
following the date of purchase. This Limited Warranty applies only to claims made by the original
end user (hereinafter “you”) and cannot be assigned, transferred or conveyed to any subsequent
users.
EXCLUSIONS FROM COVERAGE: This Warranty does not apply to any claims arising from misuse,
abuse, unauthorized repair or alteration, circumstances where PressurePro is improperly installed or
improperly wired contrary to PressurePro product instructions; or damage or defect attributable to
fire or other casualty, including, without limitation, acts of God or exposure to abrasive or corrosive
materials or pollutants, or attributable to collision or other accidents involving vehicles upon which
the PressurePro is installed. Removal or alteration of labels voids product Warranty. Only
PressurePro accessories may be used with PressurePro products. The use of other accessories with
PressurePro product is prohibited and can damage the PressurePro product. Warranty problems
caused by use of accessories not supplied by APP will not be covered under the warranty.
LIMITATIONS: APP expressly limits the applicability of the implied warranty of merchantability and
the implied warranty of fitness for a particular purpose to the one-year warranty period as provided
herein. Some states don’t allow limitations on how long an implied warranty lasts, so the above
limitation may not apply.
To the extent permitted by state law, the remedy of repair or replacement discussed below is the
sole remedy available to the end user under this Limited Warranty. THIS LIMITED WARRANTY
SPECIFICALLY EXCLUDES ALL INCIDENTAL, SPECIAL, OR CONSEQUENTIAL DAMAGES. SOME STATES
DO NOT ALLOW THE EXCLUSION OR LIMITATION OF INCIDENTAL OR CONSEQUENTIAL DAMAGES, SO
THE ABOVE LIMITATION OR EXCLUSION MAY NOT APPLY TO YOU. To the extent permitted by state
law, APP’s liability for PressurePro will not exceed the purchase price paid for the product.
NOTICE: This warranty gives you specific legal rights, and you may also have other rights, which vary
from state to state.
EXCLUSIVE AGREEMENT: To the extent permitted by state law, this One Year Limited Warranty is a
complete and exclusive statement of the warranties, which apply to the PressurePro; there are no
express or implied warranties beyond those expressly stated above. No employee, agent, dealer or
other person is authorized to give any warranties on behalf of the APP, except as authorized in
writing.
STATUTE OF LIMITATIONS: To the extent permitted by state law, in purchasing the PressurePro you
agree that any action for breach of contract or warranty must be commenced within one year after
the cause of action has accrued.
PROCEDURE: In the event that a product failure covered by this warranty occurs while this warranty
is in effect, APP will, at its option, either: (a) repair the defective unit; (b) replace the defective unit
with a new unit; or (c) replace the defective unit with a refurbished unit. APP will ship your repaired,
new, or refurbished unit to you without charge for parts, service, or any other cost (except shipping
and handling) incurred by APP or its representatives in connection with the performance of this
warranty. Failed units covered under this warranty must be sent by you to APP with shipping prepaid
by you. You are responsible for all costs incurred in the removal, reinstallation, and shipping of the
unit. A copy of the sales slip received by you at the point of purchase of the unit must accompany
the returned unit. Call APP for Warranty Return Authorization.
14
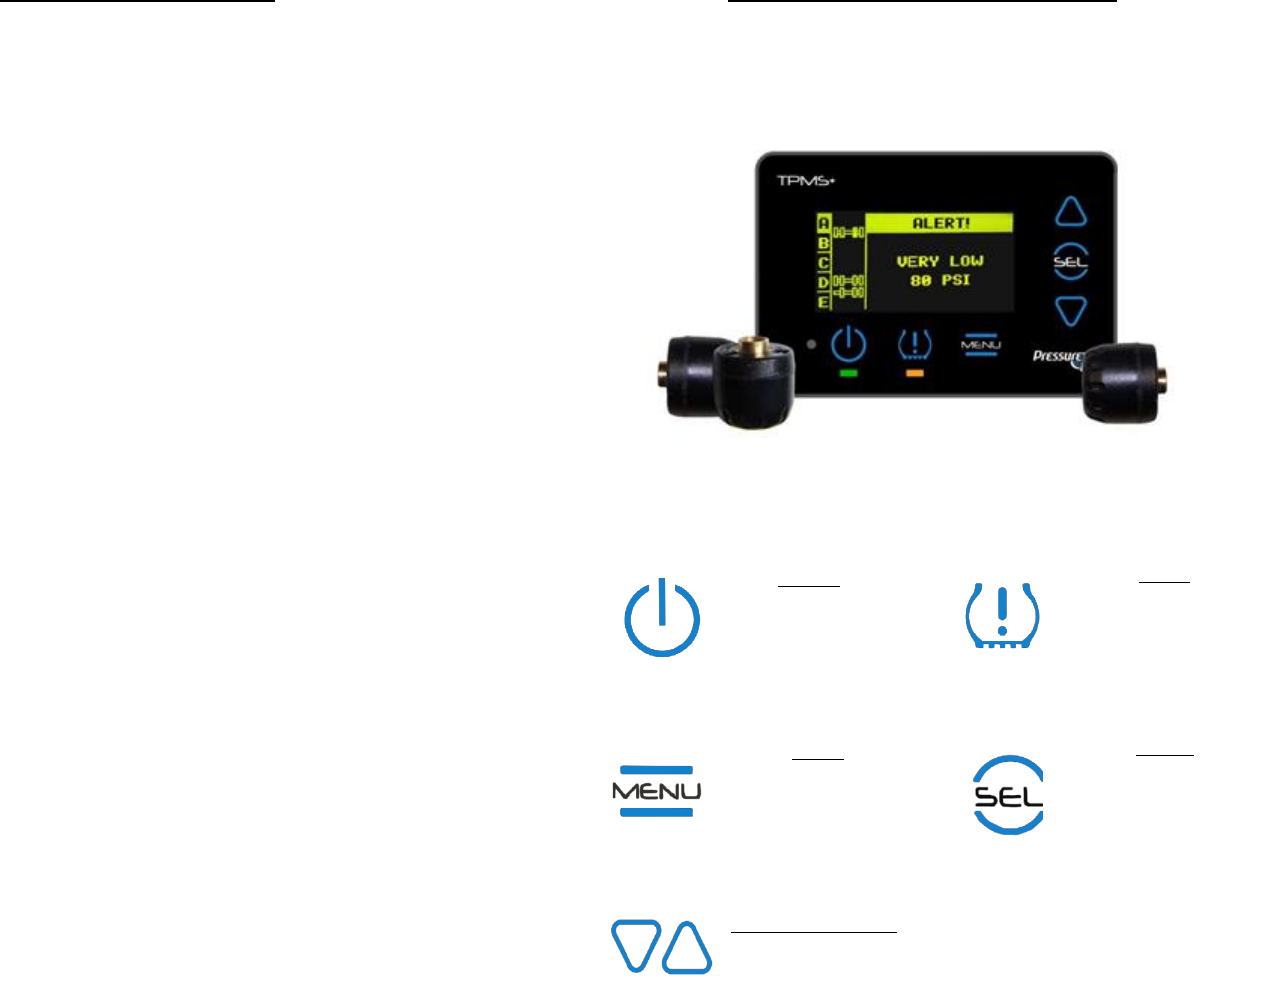
DISPLAY BUTTON FUNCTIONS
POWER
Power Screen
Exits all Menus
MENU
Enter Main Menu
Moves back within
menus
UP/DOWN ARROWS
Navigates through
screens and positions
Scrolls through tire
positions and
readings in operation
mode.
3
ALERT
Quick access
prioritization of alerts
Alert/Warning Indicator
Reminder Light
SELECT
Selects (and moves
forward) Display
functionality during
programing and use

PRE-INSTALLATION INSTRUCTIONS
When Sensors are installed, they recognize the tire’s current pressure as their BASELINE,
therefore tire pressure at the time of installation is important. It is recommended to
install Sensors with all tires inflated to the manufacturer’s recommended pressures while
the tires are “cool”. Installation in the morning before vehicle movement is optimal, but
not necessary. Installations can be done when tires are “warm”, though doing so, without
manually resetting the reference pressures, may cause false alerts. If installation is done
while tires are “warm”, simply reset the reference pressures using the following
instructions:
MENU → VEHICLE SETTINGS → REF PRESSURES → AXLE REF PRESSURE or VEH REF
PRESSURE → Axle or Vehicle → Adjust reference pressure using → Use to
save the new reference pressure NOTE: AXLE allows the user the ability to control
reference pressures by axle; VEH allows the user the ability to control the reference
pressure based on the virtual unit or vehicle
Tires and valve stems should be carefully inspected prior to installation of the system
to ensure that they are in good condition. Defective valve stems must be replaced. At
times, it may be necessary to clean the threads of the valve stem with a wire brush
before installing a Sensor.
The valve core (the small valve inside the valve stem) must depress fully and release
air for the Sensor to activate. The Sensor might not activate properly if the valve core
pin is not flush with the end of the valve stem, allowing a good release of air to
interface with the Sensor. It is not unusual to find valve cores installed too deep, which
will cause the Sensor to not activate properly. The valve core should be centered.
Check valve core by pressing the end of a thumbnail directly into the valve core to
make sure it releases a “burst” of air.
NOTE – When installing Sensors on vehicles with aluminum valve stems: New autos
may include factory installed TPMS Systems. New vehicles with TPMS utilize aluminum
valve stems while PressurePro Sensors are made with brass threads. Brass will bond to
aluminum due to the galvanic action between the different metals. When installing
PressurePro Sensors to aluminum stems, carefully apply dielectric grease, an anti-seize
compound, to the aluminum stem being careful to apply only to the threaded area of
the valve stem. IMPORTANT: Remove Sensors every 4 weeks to ensure that the
aluminum stem and brass threads don’t bond. If storing the vehicle for extended
periods, remove the Sensors from the aluminum stems.
NOTE: When using mounting options with your PULSE Display, use #8-32 machine
screw. 1/4" length is recommended for most applications. Hand tighten only.
4
SPECIFICATIONS
SENSOR
Transmit Range Approx. 300 feet (Line-of-Sight) +
Operating Frequency 433.92 MHz FM
Operating Temperature Range -30°C / -22 °F to +70°C / 158 °F
Excursion Temperature Range Short durations up to +150 °C / 302 °F
Weight .66 oz. (18 grams)
Dimensions 1.01" H x 1.11" Dia.
Batteries Internal, sealed unit Lithium Coin Cell
Non-rechargeable/Non-replaceable
Pressure Range 8 to 217 PSI/55 to 1500 kPa/1 to 15 BAR
Accuracy +/- 3%
DISPLAY
Power Requirements 12 or 24 VDC; 200 mA max current.
Fuse Rating: F2A 250V
Dimensions 4.5” W x 3.0” H x 1.0” D
Mounting screw size #8-32 machine thread 1/4” internal
length. Hand tighten only
Tire Positions Maximum of 80 tire positions
Pressure Alert Levels/Options Alerts are completely customizable. For
convenience, your Display comes factory set at
the following levels.
i. Low Pressure = 15% and 25% loss
ii. High Pressure = 25% increase
iii. Cross Axle Alert = 20% variation
iv. Fast Leak Alert = OFF
Temp. Alert Levels/Options 93 °C / 200°F (User Configurable)
Built in Advanced Capabilities RS232, J1939 & USB data feeds
Data logging and download
US Letter Patent # 6,453,737 (Other Patents Pending)
Products using RF signals are subject to interference causing a loss of signal. Reception
depends on the environment and conditions present at the time of use. PressurePro is a
device meant for displaying tire pressures and has been designed to be as reliable as
possible with the use of RF transmissions. There is no guarantee of signal reception. This
device complies with part 15 of the FCC rules. Operation is subject to the following two
conditions: (1) this device may not cause harmful interference, and (2) this device must
accept any interference received, including interference that may cause undesired
operation. PressurePro is a device meant for displaying tire pressures.
13
TIPS
VEHICLE STORAGE: If storing your vehicle for extended periods, remove the Sensors. Mark
each Sensor’s location so it can be replaced on the same tire location from where it was
removed (eliminating the need for reprogramming), or use a sectional storage device (similar
to a tackle box divider system). When putting the system back on, power up Display first, next
screw Sensors onto their original wheel locations. Pressure readings will show on Display (can
take up to 1 minute for new readings to report). PressurePro system is now active.
CAUTIONS: (1) Know the general condition of tires before moving the vehicle. Running on
deflated tires can ruin a tire. (2) The 2/3 oz. Sensor, on a typical RV or large truck, normally
will not require the tire be rebalanced. Smaller tires may require rebalancing. (3) It is
important to make sure valve stems are in good condition.
REMOTE ANTENNA FOR UNIQUE APPLICATIONS: Due to the unique features of RF
signals and the construction and interference from electronics on some vehicles, an
Optional Antenna Kit or Echo Repeater may be needed. Contact your Dealer/Distributor.
RESETTING BASELINE PRESSURE: MENU → VEHICLE SETTINGS → REF PRESSURES → AXLE
REF PRESSURE or VEH REF PRESSURE → l Axle or Vehicle → Adjust reference pressure
using rro → Use the button to save the new reference pressure. *NOTE: AXLE
allows the user the ability to control reference pressures by axle, VEH allows the user the
ability to control the reference pressure based on the virtual unit or vehicle
ALERT SETTINGS
*Note: All alert settings are vehicle specific settings. You will need to se the vehicle after
sel ’ing the parameter to be adjusted. rro to the vehicle you wish to adjust and .
LOW and HIGH PRESSURE: MENU → VEHICLE SETTINGS → ALERT SETTINGS → LOW
PRESSURE or HIGH PRESSURE → Use arro to adjust percentage of reference pressure for
alarm triggering → Use the SE button to save the new alarm setting. *NOTE: Low
Pressure has two alarm settings. The extremely low pressure (adjustable) & slightly low
pressure (calculated at 5/8ths of the extreme; toggled on/off). LOW & HIGH PRESSURE
alarms are factory set at 25%, with slightly low pressure toggled on.
ACROSS AXLE %: MENU → VEHICLE SETTINGS → ALERT SETTINGS → ACROSS AXLE % →
Use arro to adjust the percentage deviation per axle allowable. *NOTE: Across Axle % is
factory set at 20%.
HIGH TEMPERATURE: MENU → VEHICLE SETTINGS → ALERT SETTINGS → HIGH
TEMPERATURE → Use rrow to adjust the High Temperature Alert. *NOTE: High
Temperature alarm is factory set to 200°F.
LEAK DETECTION: MENU → VEHICLE SETTINGS → ALET SETTINGS → LEAK DETECTION →
Use arro to adjust the percentage deviation → Use arro to adjust the time limit for
deviation. *NOTE: Leak Detection is factory set as OFF.
12
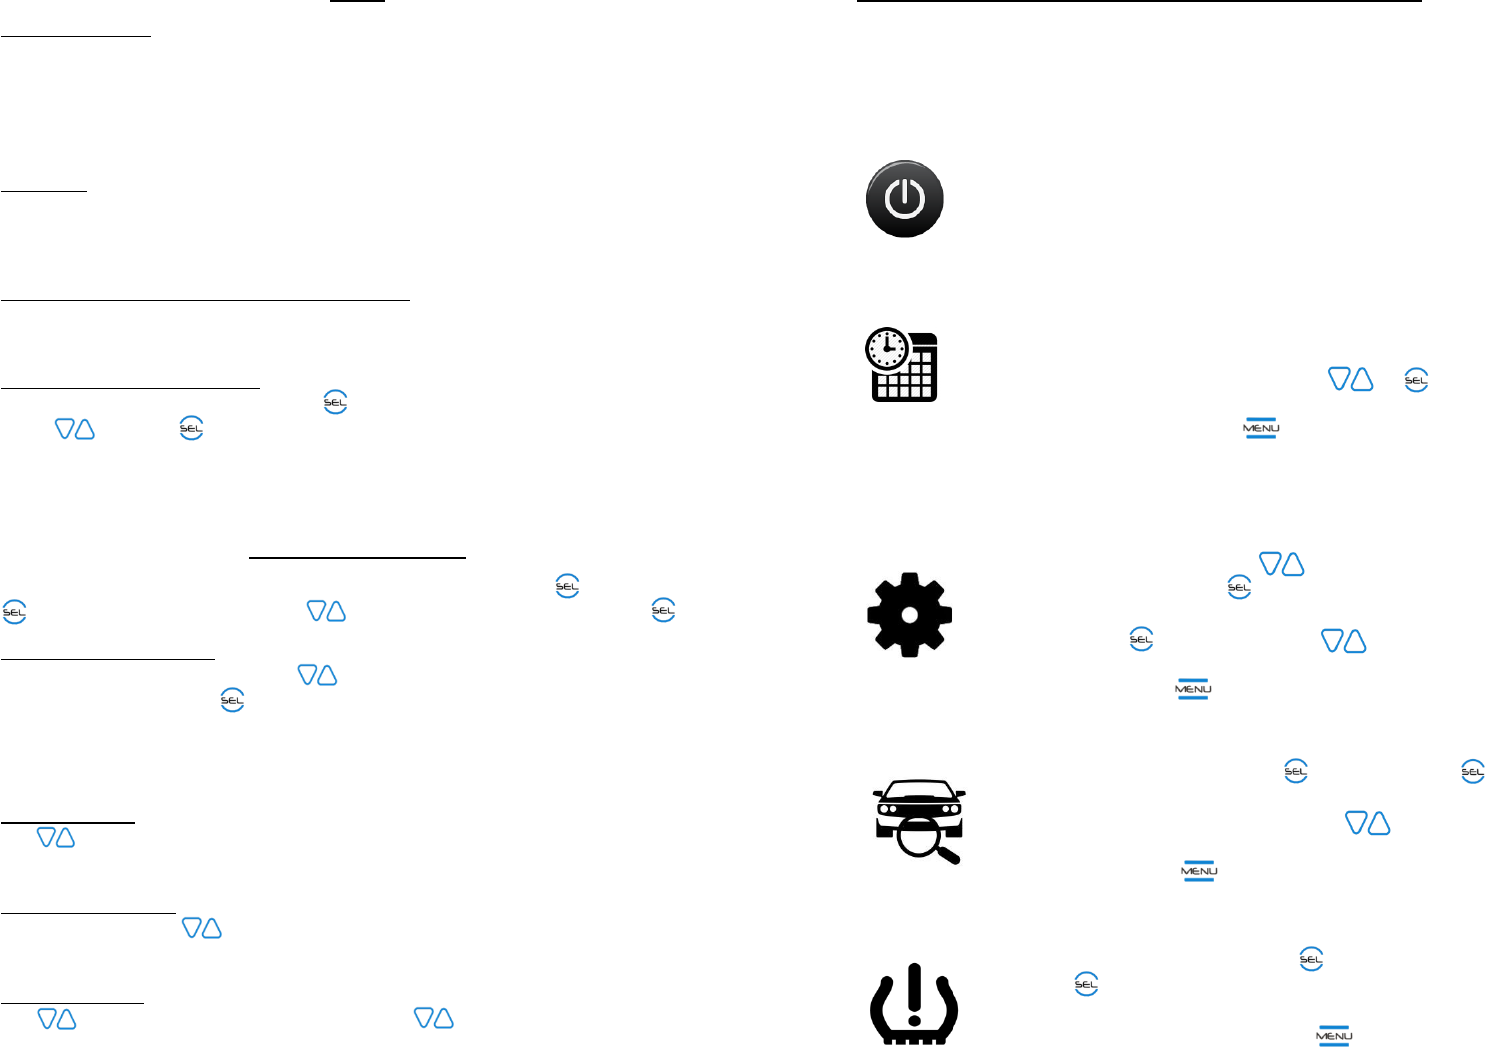
INITIAL SYSTEM SET-UP & CONFIGURATION
First things first! Upon initial powering of your PULSE Display, please take a
minute to configure your unit’s time and date and vehicle configuration, and – if
you want – set your custom alert settings.
GIVE IT POWER!
Find your PressurePro power cord.
Connect the 6-Pin Molex connecter to your Display.
Connect opposite end to a 12V or 24V power source
(via an accessory lighter or hard-wiring).
SET TIME AND DATE:
Your Display will automatically take you to a screen
prompting you to set your time and date and will
walk you through the set-up. Use arro to the
date and time settings.
When complete, press MEU to leave ‘Display’ screen
and return to the “VEHICLE SETTINGS”.
CONFIGURE VEHICLES (IF MONITORING MULTIPLE UNITS)
Towed units and trailers are considered their own vehicle:
From the main “MENU”, to “VEHICLE
SETTINGS” and push SE .
If you have a tow vehicle, or are monitoring multiple
vehicles, sel “+/- Vehicles”, and through and
activate the desired number of vehicles. When
finished, press ME to return to “VEHICLE SETTINGS”.
SELECT VEHICLE ID:
From “VEHICLE SETTINGS”, el “VEHICLE ID” and sel
the vehicle you want to name.
Follow the Display’s prompts (using arrow to name
vehicle). Repeat as needed for all vehicles. When
finished, press E to return to “VEHICLE SETTINGS”.
SET YOUR ALERTS:
From “VEHICLE SETTINGS”, Sel “ALERT SETTINGS”,
sel the alert option you’d like to customize, and
follow the Display’s prompts to change alert
settings. When finished, press ME until returned
to the main “MENU”.
5
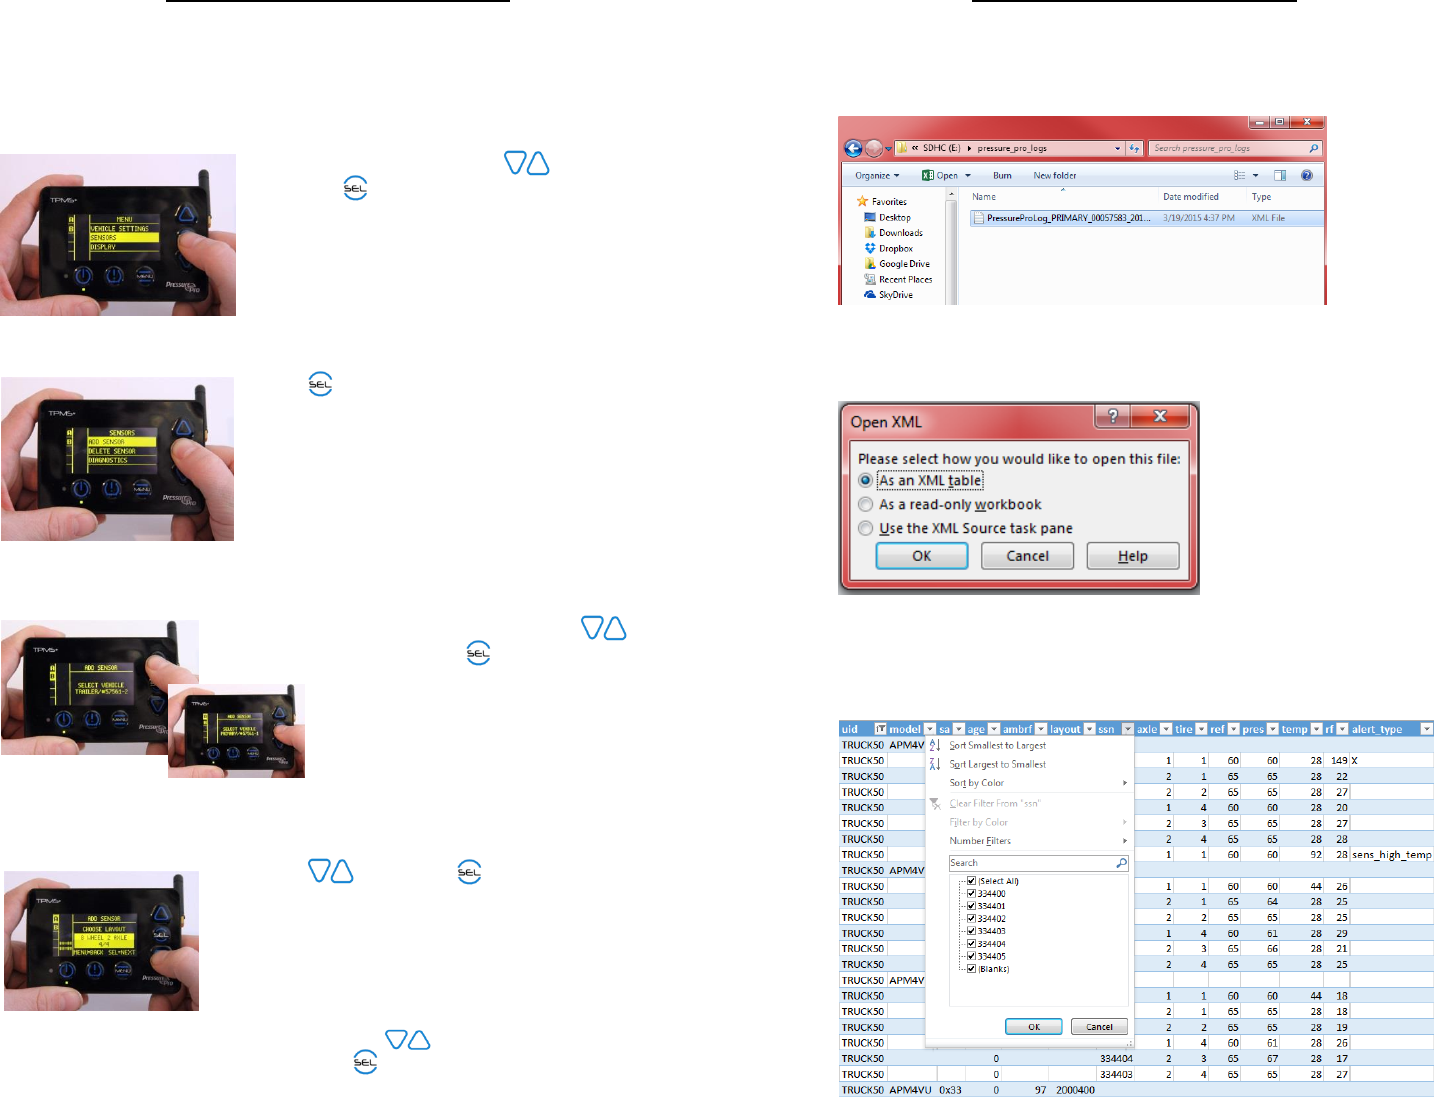
PROGRAMMING SENSORS
DO NOT PUT SENSORS ON TIRES. (You’d be amazed at the number of calls
received to prompt this note.) Simply follow the simple steps below and you’ll be
set-up in minutes!
1. From the main “MENU”, scroll to “SENSORS”
and sel .
2. Sel “ADD SENSORS”.
3. If monitoring more than one unit, scroll to
desired vehicle and se .
4. Scroll through and sel the desired vehicle
layout (or create a custom layout) following
prompts.
Your Display will automatically populate your
configuration and default to the front, left tire
position for installation. To choose another
position, arrow to the desired location then
press .
6
DATA LOGGING IMPORT
1. Access the “Computer” menu and open the SD card folder.
2. Open “pressure_pro_logs” and locate files contained in the exported date.
3. Select the data log file you wish to open
4. Open as an XML table and click “OK” to allow Excel to create a schema
5. Your Excel should open with filterable tabs, allowing you to organize and
process your TPMS+ Data.
11
DATA LOGGING CAPABILITIES
PULSE comes standard with market leading data logging capabilities. If your Display is
powered, it is saving data sent from your Sensors. Data Logging allows a complete
history of your tire performance to be downloaded from the Display. Your PULSE
Display allows transfer of the complete data log by way of a microSD. Data logs will
export in .xml format, and works with many programs. PressurePro suggests using
Excel.
Export Instructions: MENU → VEHICLE SETTINGS → LOGGING → EXPORT LOG.
Features and benefits of the data logging function
Time stamped data
Set logging interval from 1 to 99 minutes
Can log up to 45 days of data for most configurations and logging intervals
Displays data for each tire/sensor separately
Summary report to view all system alerts during current logging period
Data provided per each logging event
1. Reference pressure (which alerts are based upon)
2. Pressure for each tire
3. Tire temperature
4. Signal strength from each position
5. All alerts
What you can infer from the data
1. When vehicle starts moving.
2. When vehicle comes to stop for long periods of time (>15 minutes).
3. Dangerous operating conditions. Temperature is displayed at all times,
specifically when the tire temperature has reached the danger zone of 100°C
(>200°F). Tire rubber compounds begin to break down at these temperatures.
4. When a vehicle is in remote areas with little around them.
5. If proper cold pressures are being maintained.
6. When sensors are removed from tire and for how long.
7. When tire began to lose air, when it alarmed and how long it ran in an alert
condition.
8. When data logger was turned off. (Optionally Password Controlled.)
9. Validation of driver statements.
10
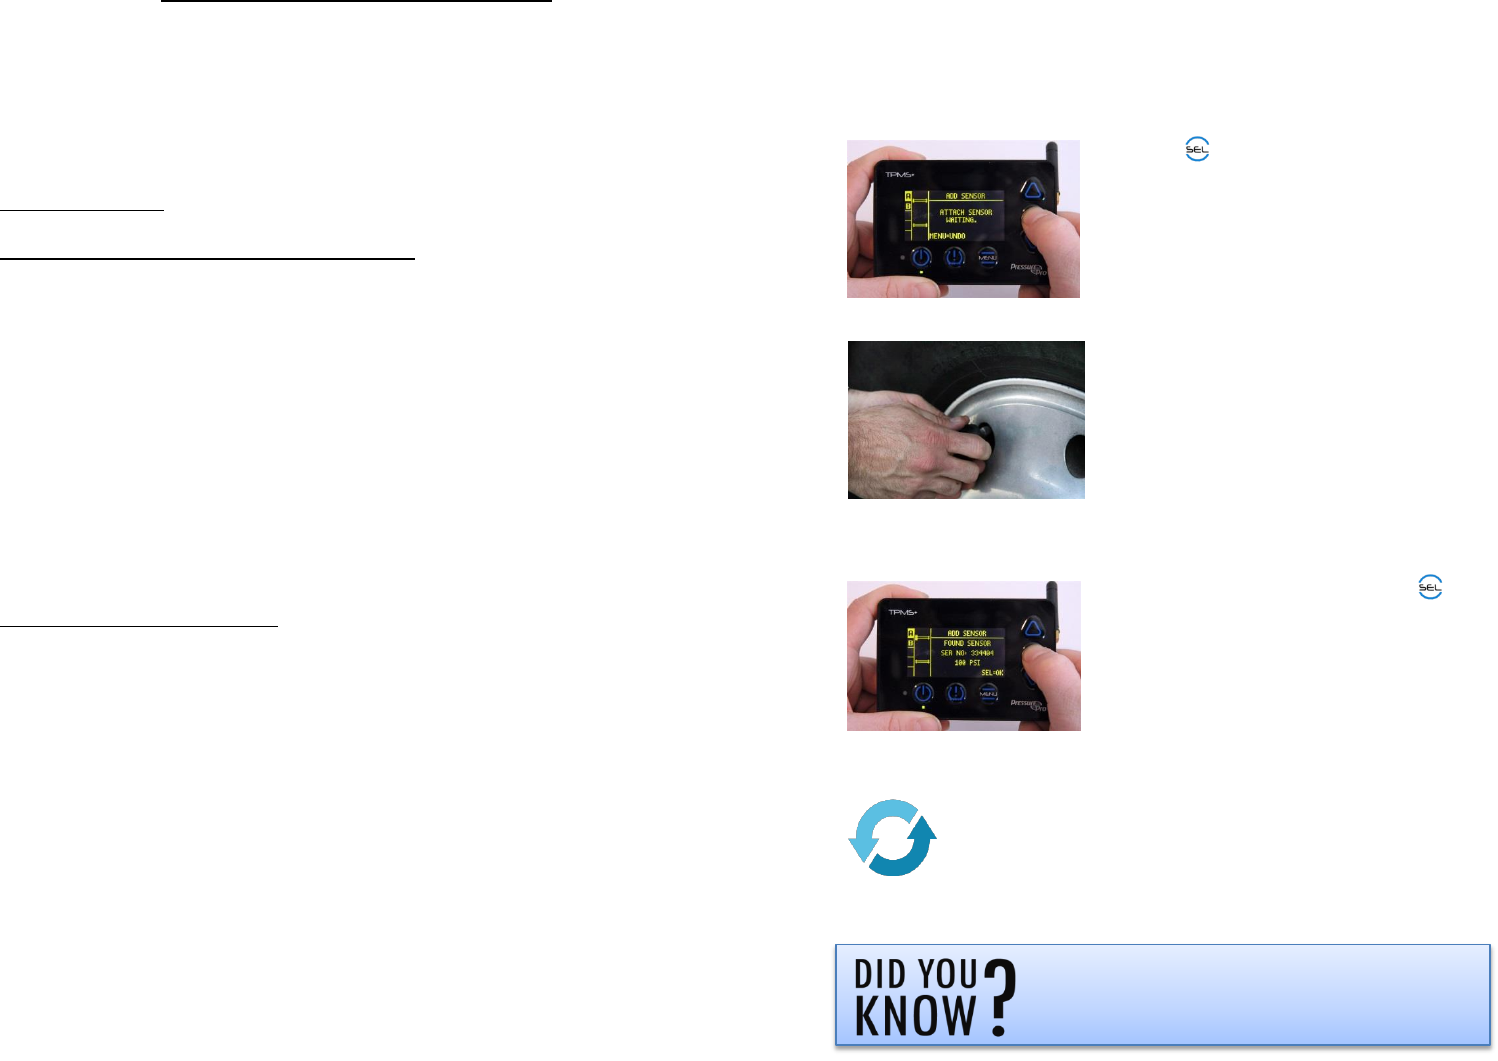
5. Press SEL to install a Sensor to noted
location. Your Display will begin searching
for a Sensor recently pressurized.
6. Attach a Sensor to the noted location’s
valve stem, and wait for a reading to
populate (this can take up to 60
seconds).
7. When a pressure populates, press SEL to
lock in the Sensor and move to next
location.
Repeat steps 5-7 as needed for all desired locations. When
finished, press the power button twice to place Display in
operation mode. Installation is now complete.
Your PressurePro Sensors sample your tire
performance every 7 seconds? That’s over
12,342 tire checks every day, moving or
parked, ensuring top savings and safety.
7

FREQUENTLY ASKED QUESTIONS
WHAT SHOULD BE DONE IF A LOW PRESSURE ALERT IS SOUNDED? Immediately pull over
and check low tire. Be sure to check valve stem for damage. If no visual leaks are spotted,
perform a soap bubble test on the area to locate the leak.
CAN I STORE MY VEHICLE WITH THE DISPLAY ON? The Display draws 25mA to 100mA of
power. It’s possible the Display could drain the vehicle’s battery over an extended period of
time. If storing vehicle for more than one month it is recommended that you unplug Display
and remove Sensors (see “Tips” section – “Vehicle Storage”).
DOES DISPLAY NEED TO BE POWERED BY LIGHTER ACCESSORY? No. Hardwiring is actually
a preferred method of powering as it reduces back feed interference. Connect the red wire
to a 12 or 24-volt DC positive power source (direct wire to the battery is not required). The
black wire should be connected to a ground or chassis. When direct wiring, it is important
to install a 2 AMP in-line, fast blow fuse to protect the Display from voltage spikes.
DISPLAYS DAMAGED DUE TO HIGH VOLTAGE OR HIGH CURRENT ARE NOT COVERED BY
WARRANTY.
CAN DISPLAY BE USED INDEPENDENTLY ON FRONT OR BACK VEHICLE? Yes.
MENU → VEHICLE SETTINGS → +/- VEHICLES → to desired Vehicles → Turn
“ON”/”OFF” (Using the button). *Note: Vehicle Layout settings, programmed sensors,
and reference pressures are saved when a vehicle is turned “OFF”
WHAT HAPPENS WHEN I REMOVE A SENSOR TO INFLATE A TIRE? Display will show “00”
reading. After 15 minutes, the Display shows 3 question marks (???).
WHAT IS THE “REMINDER” ALERT? After an alert has been acknowledged with a button
press, the amber TPMS Alert/Warning Quick Indicator Light will remain solid as a reminder
of the alarm/warning condition.
HOW DO I DELETE SENSORS? MENU → SENSORS → DELETE SENSORS → to desired
vehicle A-E (if applicable) → to desired tire location → Confirm deletion.
CAN I USE A SEALANT OR EQUALIZER POWDER IN THE TIRE WITH PRESSUREPRO? If
using a sealant or powder, PressurePro recommends the use of a filtered valve stem (or
filtered core) to reduce the chance of the Sensor becoming clogged.
TIRE PRESSURES INCREASE WHILE DRIVING – DO I NEED TO DO ANYTHING? While
driving, it is normal for tires to increase pressure and temperature.
DO I NEED TO REBALANCE MY TIRES WHEN USING A SENSOR? The 2/3 ounce Sensors, on
large tires (RV/Truck), seldom necessitate a tire be rebalanced. Smaller tires may require a ½
ounce stick-on weight opposite the Sensor, or rebalancing.
WHAT SHOULD I DO IF A SENSOR IS LOST OR DAMAGED? Contact your Dealer or
Distributor to order a new Sensor.
8
WHEN DO MY SENSORS TRANSMIT?
1. Within 60 seconds of screwing Sensor onto the valve stem.
2. Every 5 minutes while updating, under normal conditions.
3. During an Alarm Condition.
4. When a Sensor is removed from its valve stem.
IF I UNPLUG OR LOSE POWER, MUST I REPROGRAM DISPLAY? No. Settings are always
retained unless physically deleted. Display shows 3 question marks (???) until Sensors
send a new updated reading within the normal 5 minute reporting period.
DURING INSTALLATION, NO SIGNAL WAS RECEIVED FROM THE SENSOR. Higher radio
frequency (RF) transmissions propagate mostly via straight lines and along line-of-sight
pathways. PressurePro Sensors are required to accomplish a daunting task – transmit from
a vehicle’s tires to the Display. If a Sensor fails to give a pressure reading, slightly move the
Display, remove the sensor for 20 seconds, and reattach sensor.
AFTER INSTALLATION, PRESSURE READINGS DROP ON DISPLAY – ACTUAL TIRE PRESSURE
REMAINS CORRECT. The probable cause is poor interaction between the Sensor and valve
core. Unscrew the Sensor and again hand-tighten the Sensor. (Be sure the Sensor and
valve stem are not cross-threaded.) If condition still persists, contact your
Distributor/Dealer.
POWER CORD & FUSE / WHY DOESN’T MY DISPLAY TURN ON? If your Display does not
power, make sure the cord is properly connected. Check the fuse located in the cigarette
lighter end of the cord by unscrewing the silver ring (at the silver tip) of the plug. Remove
the bolt centered in the cigarette lighter end. Replace if necessary with a 2 amp in-line,
fast blow fuse.
HOW DO I CHANGE BETWEEN MEASUREMENT UNITS? The PressurePro Display can show
pressure and temperature values in imperial or metric units. The TPMS+ Display shows the
measurement unit to the right of all readings. To adjust the measurement unit follow
these instructions: MENU → DISPLAY → MEASUREMENT UNITS → PRESSURE or
TEMPERATURE → desired unit of measurement
WHAT HAPPENS DURING A BLOWOUT? During a blowout (or situation with complete loss
of pressure) the Display will signal at a 25% loss in pressure and read “00”. There may be
instances, such as in a catastrophic blowout, when a Sensor or stem is blown off the tire,
the vehicle moves out of signal range and no signal (alert) is received.
HOW DO I SET OR CHANGE MY PASSWORD ON MY DISPLAY? The PULSE gives you
password protection abilities to eliminate accidental or intentional tampering with settings.
To set or change your password: MENU > DISPLAY > ADVANCED> PASSWORD > Toggle
ON/OFF > “0000” is the factory password > CHANGE PASSWORD > Scroll through your
new password > LOG OUT to activate password.
9