Advantech Co DLM8110WL Computer User Manual DLT M8110 Draft
Advantech Co Ltd Computer DLT M8110 Draft
Contents
- 1. Users Manual
- 2. User Manual
User Manual
User Manual
DLT-M8110
Computer
PWS-870 User Manual
Copyright
The documentation and the software included with this product are copyrighted 2016
by AdvantechDLoG Co., Ltd. All rights are reserved. AdvantechDLoG Co., Ltd.
reserves the right to make improvements in the products described in this manual at
any time without notice. No part of this manual may be reproduced, copied, translated
or transmitted
in any form or by any means without the prior written permission of AdvantechDLoG
Co.,Ltd. Information provided in this manual is intended to be accurate and reliable.
However, AdvantechDLoG Co., Ltd. assumes no responsibility for its use, nor for any
infringements of the rights of third parties, which may result from its use.
Acknowledgements
All other product names or trademarks are properties of their respective owners.
Declaration of Conformity
CE Conformity Statement
Radio products with the CE alert marking comply with the R&TTE Directive (1999/5/
EC) issued by the Commission of the European Community. Compliance with this
directive implies conformity to the following European Norms (in brackets are the
equivalent international standards)
EN 60950-1 (IEC60950-1) - Product Safety
Products that contain the radio transmitter are labeled with CE alert marking and may
also carry the CE logo.
FCC Compliance Statement
This device complies with part 15 of the FCC Rules. Operation is subject to the
following
two conditions:
1. This device may not cause harmful interference;
2. This device must accept any interference received, including interference that may
cause undesired operation.
Caution! Exposure to Radio Frequency Radiation.
The radiated output of this device is far below the FCC radio frequency
exposure limits. Nevertheless, the device shall be used in such a manner
that the potential for human contact during normal operation is minimized.
When connecting an external antenna to the device, the antenna
shall be placed in such a manner to minimize the potential for human
contact during normal operation.
This equipment has been tested and found to comply with the limits for a Class B
digital device, pursuant to part 15 of the FCC Rules. These limits are designed to
provide reasonable protection against harmful interference in a residential installation.
This equipment generates, uses and can radiate radio frequency energy. If this
equipment does cause harmful interference to radio or television reception, which
can be determined by turning the equipment off and on, the user is encouraged to try
and correct the interference by one or more of the following measures:
However, there is no guarantee that interference will not occur in a particular
installation. If this equipment does cause harmful interference to radio or television
reception, which can be determined by turning the equipment off and on, the user is
encouraged to try to correct the interference by one or more of the following
measures:
Reorient or relocate the receiving antenna
Increase the separation between the equipment and receiver Connect the
equipment into an outlet on a circuit different from that to which the receiver is
connected
Consult the dealer or an experienced computer technician for help
FCC RF Radiation Exposure Statement:
This Transmitter must not be co-located or operating in conjunction with any
other antenna or transmitter.
This equipment complies with FCC RF radiation exposure limits set forth for an
uncontrolled environment.
This equipment should be installed and operated with a minimum distance
of 0mm between the radiator and your body.
Caution!
Any changes or modifications not expressly approved by the party responsible for
compliance could void the user's authority to operate the equipment.
Antennas
Only use the supplied antenna. Unauthorized antennas, modifications or change to the
antennas could violate FCC regulations and void the user’s authority to operate the
equipment.
For operation within 5.15 ~5.25GHz /5.25 ~5.35GHz/5.47 ~5.725GHz frequency range, it
is restricted to indoor operations to reduce any potential for harmful interference to
co-channel Mobile Satellite System (MSS) operations. The band from 5600-5650MHz
will be disabled by the software during the manufacturing and cannot be changed by the
end user. This device meets all the other requirements specified in Part 15E, Section
15.407 of the FCC Rules.
The availability of some specific channels and/or operational frequency bands are
country dependent and are firmware programmed at the factory to match the intended
destination. The firmware setting is not accessible by the end user.
FCC ID : M82-DLM8110WL
Technical Support and Assistance
1. Visit the AdvantechDLoG website at http://support.advantech.com where you
can find the latest information about the product.
2. Contact your distributor, sales representative, or Advantech's customer service
center for technical support if you need additional assistance. Please have the
following information ready before you call:
– Product name and serial number
– Description of your peripheral attachments
– Description of your software (operating system, version, application software,
etc.)
– A complete description of the problem
– The exact wording of any error messages
Safety Instructions
Use the following safety guidelines to help protect yourself and DLT-M8110
Do not attempt to service the DLT-M8110 yourself. Always follow installation
instructions closely.
Be sure that nothing rests on the AC adapter's power cable and that the cable is
not located where it can be tripped over or stepped on.
Do not cover the AC adaptor with papers or other items that will reduce cooling;
also, do not use the AC adapter while it is inside a carrying case.
Use only the AC adapter, power cord, and batteries that are approved for use
with this DLT-M8110. Use of another type of battery or AC adapter may cause
risk of fire or explosion.
If you use an extension cable with the AC adapter, ensure that the total ampere
rating of the products plugged in to the extension cable does not exceed the
ampere rating of the extension cable.
When you move the DLT-M8110 between environments with very different
temperature and/ore humidity ranges, condensation may form on or within the
DLT-M8110. To avoid damaging the device, allow sufficient time for the moisture
to evaporate before using the DLT-M8110.
When you disconnect a cable, pull on its connector or on its strain relief loop, not
on the cable itself. As you pull out the connector, keep it evenly aligned to avoid
bending any connector pins. Also, before you connect a cable make sure both
connectors are correctly oriented and aligned.

Battery Safety
RTC Battery Caution
RISK OF EXPLOSION IF BATTERY IS REPLACED BY AN INCORRECT TYPE.
DISPOSE OF USED BATTERIES ACCORDING TO THE INSTRUCTIONS.
Do not place the battery incorrectly as this may cause danger of explosion.
Dispose of used batteries according to the manufacturer's instructions.
Do not dispose of batteries in a fire. They may explode. Check with local
authorities for disposal instructions.
Battery Pack Caution
The battery used in this device may present a risk of fire or chemical burn if
mistreated. Do not disassemble, heat above 60°C, or incinerate. Replace
battery with Li-ion 7.2V 3800mAh and Cell SANYO only. Use of another battery
may present a risk of fire or explosion.
Dispose of used batteries according to local disposal regulations. Keep away
from children. Do not disassemble and do not dispose of in a fire.
Battery Charge Notice
It is important to consider the environment temperature whenever you are charging
the Lithium-Ion battery pack. The process is more efficient at normal room
temperature or slightly cooler. It is essential that you charge batteries within the stated
range of 0°C to 45°C. Charging batteries outside of the specified range could damage
the batteries and shorten their charging life cycle.
Storage and Safety Notice
Although charge Lithium-Ion batteries may be left unused for several months, their
capacity may be depleted due to the build up of internal resistance. If this happens
they will require recharging prior to use. Lithium-Ion batteries may be stored at
temperatures between -20°C to 60°C, however they may be depleted more rapidly at
the high end of this range. It is recommended to store batteries within normal room
temperature ranges.
Chapter 1
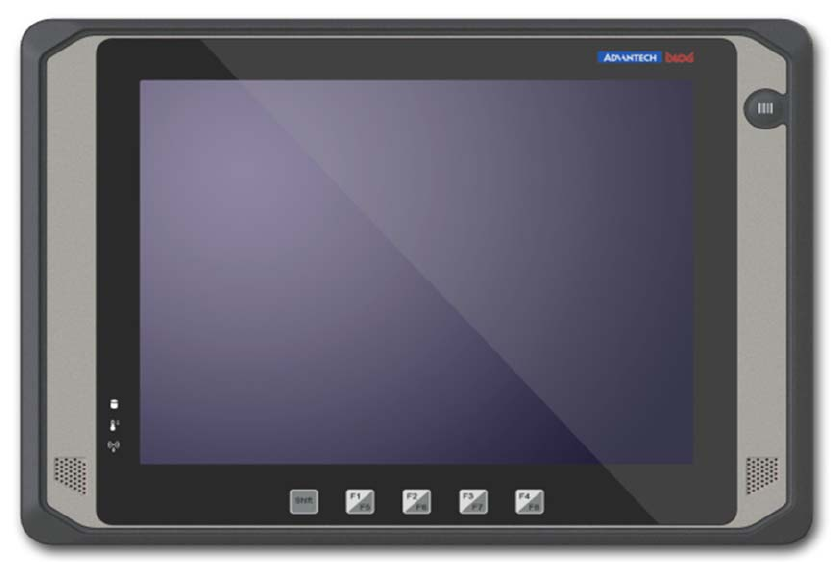
Rugged and Ready to Go
Congratulations on your purchase of the DLT-M8110 Vehicle Mounted Terminal. This
product combines rugged design with reliable performance and powerful
functionality to best suit all your needs, in a wide range of working conditions. This
user manual outlines all you need to know to set up and use your DLT-M8110. If you
have any further questions or queries, contact our technical support team via our
website:
http://www.advantechdlog.com/
Symbols Used in this Manual
Denotes information that must be observed.
Failure to do so may result in personal harm or damage to
the product.
Denotes information that must be observed.
Failure to do so may result in personal harm or damage to
the product.
Product Features
•Powered by Intel® Haswell Bay Trial-I series E3827 CPU inside
•10.4” XGA display with P-CAP and Resistive touch as optional
• 8 user programmable function keys
• Hot-swappable battery provides up to 8 hours operation.
•Built-in camera, 2D barcode scanner and WiFi
• Fully rugged design with MIL-STD-810F and IP65 certified.
Package Contents
Ensure all the following items are present when you receive your DLT-M8110. If any
of these items are missing, contact your vendor immediately.
Screens used in this manual are for illustrative purposes
only. Actual screens may vary depending on your product
version.
• DLT-M8110 Vehicle mounted terminal
• AC power adaptor
• 2x slim Batteries
• Safety notes
• Quick start guide
Optional Accessories
• Desk docking station
• Vehicle docking station
• Big battery
• Battery charger
Exploring the DLT-M8110
Front View
No. Component
1 Barcode/camera trigger button
2 Speaker
3 8 programmable function keys
4 Shift LED
5 WiFi LED
6 Bluetooth LED
7 Storage LED
8 Power LED
9 Temperature LED
1
2
3
4
5
6
7
8
9
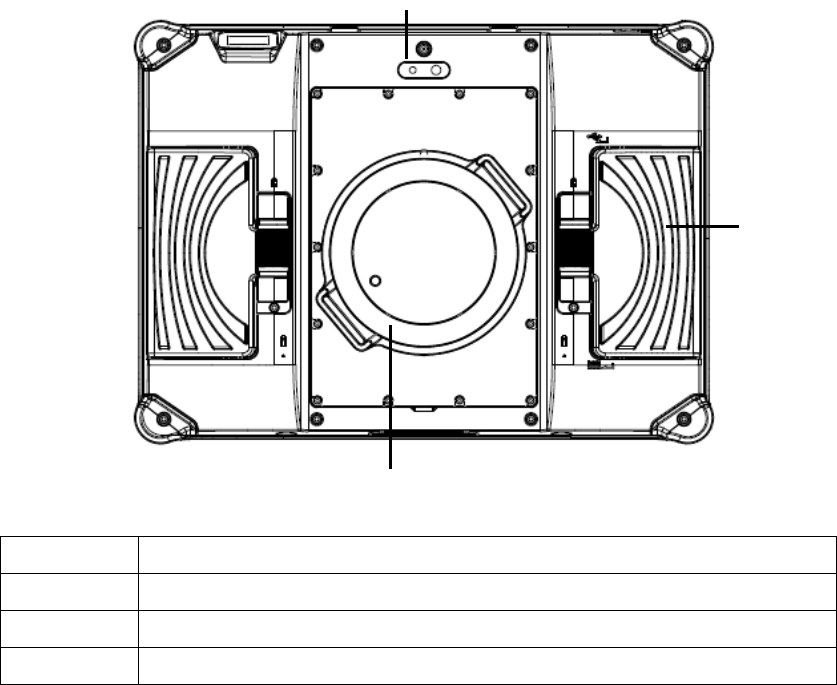
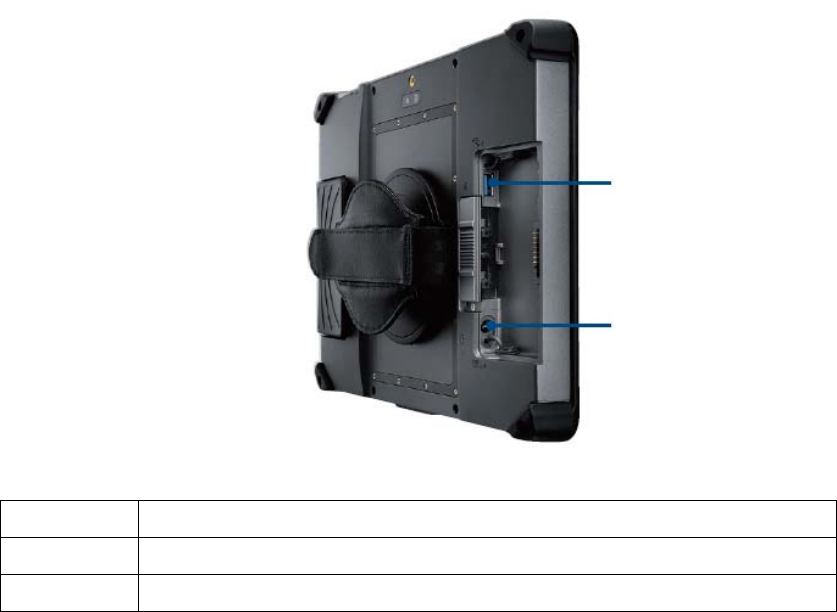
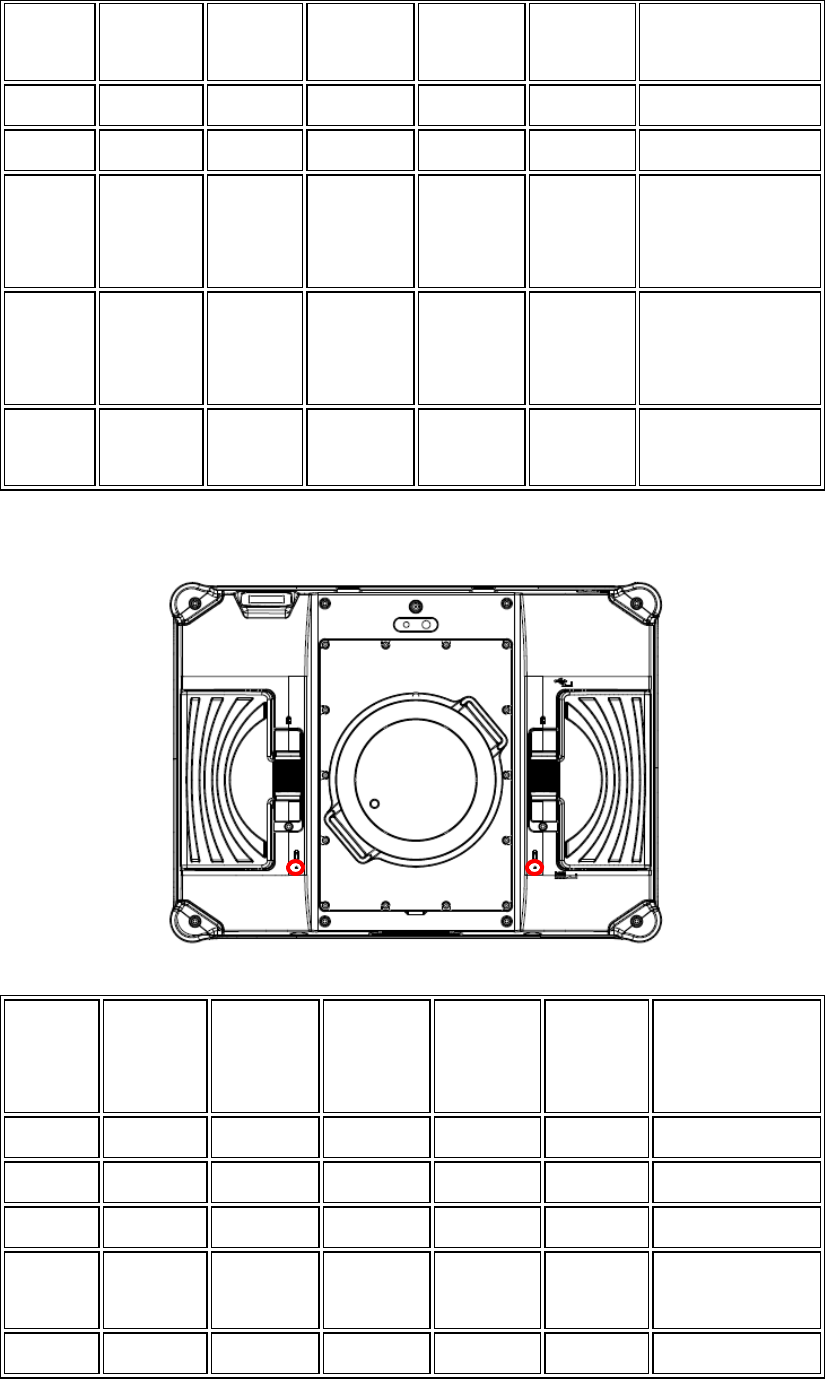
Rear View
No. Component
1 Camera
2 Battery
3 Hand strap
1
2
3
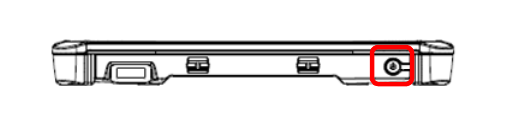
Side Views
No. Component
1 USB 3.0
2 DC-in connector
2
1
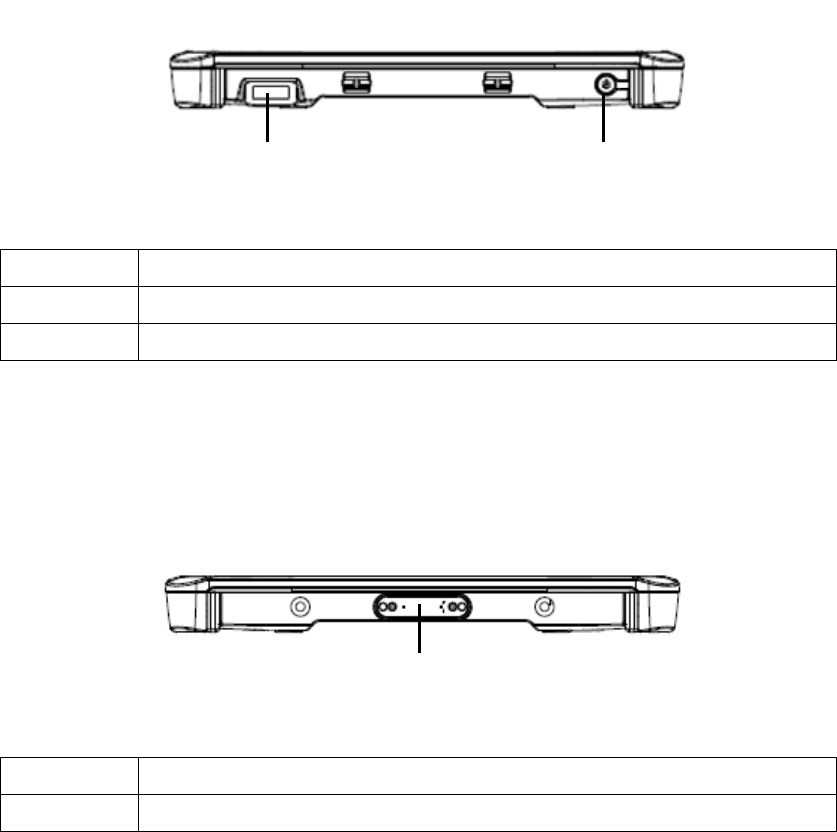
Top View
No. Component
1 Barcode scanner
2 Power on/off button
Bottom View
No. Component
1 Docking connector
l
1
1 2
Chapter 2
Getting Started & Making Connections
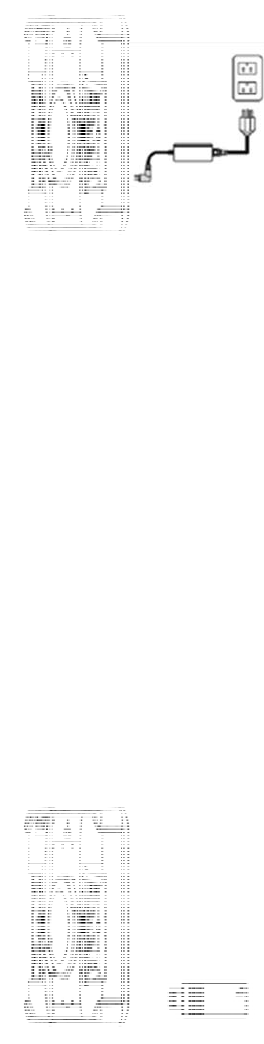
Connecting the Power
Before using your DLT-M8110, you must fully charge the battery. Connect the power
adapter as shown and leave to charge for:
• A minimum of 2 hours when using thin battery
• A minimum of 5 hours when using think battery
You also can use vehicle docking, office docking or battery charger to charge the
battery.
Insert batteries on device
When battery is fully charged, insert 2 batteries on device.
Connecting USB Devices
You can connect peripheral devices, such as a USB keyboard and mouse, as well as
other wireless devices using the USB ports on the PWS-870. PWS-870 has one USB 3.0
port on the both side and one USB 2.0 port on the left side.
Chapter 3
Turning on & Controlling the DLT-M8110
Turning On
1. Press and hold the power button to turn on the DLT-M8110.
24
Controlling the DLT-M8110
Using the Touch Screen
The DLT-M8110 is equipped with touch screen technology, for ease of use when you
are on the go. Simply tap the screen with your finger to select icons and run
applications.
Using the Tap Function
• To emulate a left click single tap the screen once.
• To emulate a right click tap and hold the screen.
• To emulate a double click, tap the screen twice.
Using the On-Screen Keyboard
Tap keyboard icon to bring up the on-screen keyboard.
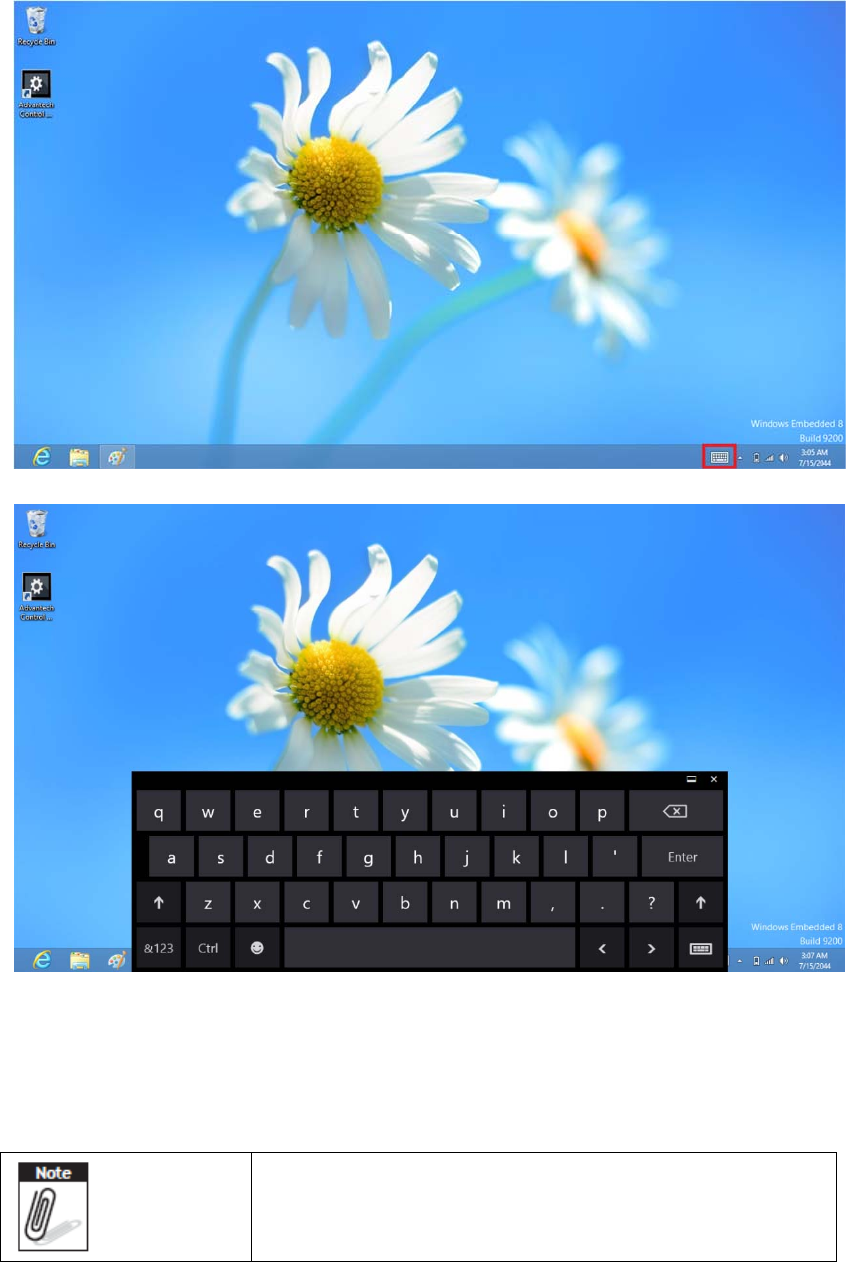
Use your finger to tap and enter letters, numbers and symbols as you would with a
regular keyboard.
Making WiFi Connection
WiFi access requires a separate purchase of a service
contract with a wireless service provider. Contact a
wireless service provider for more information.
The DLT-M8110 comes pre-loaded with WLAN module, you can send and receive
signals to a WiFi network then synchronize files.
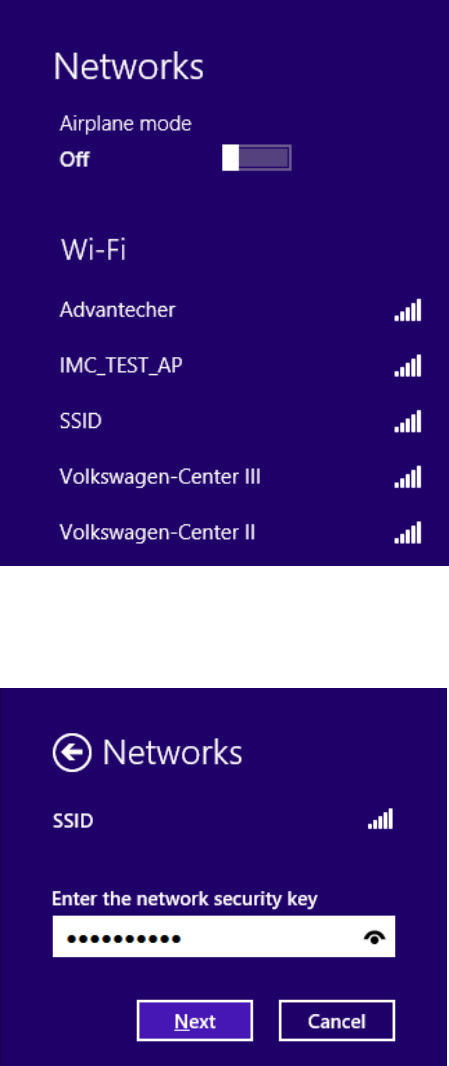
A wireless network can be added either when the network is detected or by
manually entering settings information. Before doing these steps, determine if
authentication information is needed.
1. Click the wireless connection icon in the notification area.
2. Turn on WiFi and select one of the wireless connections and click Connect.
3. You are prompted to enter a Security key for secure access. Contact the network
administrator for this key.
4. Enter the required Security key and then tap Next to connect.
5. The wireless connection is negotiated and you see the following screen.
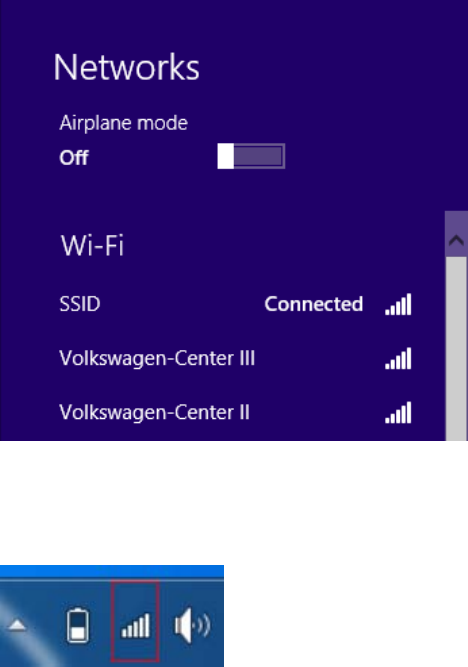
The wireless connection icon in the notification area shows a connected status
whenever a wireless connection is present.
Making Bluetooth Connections
The DLT-M8110 comes with built-in Bluetooth functionality that allows you to
connect and communicate with other Bluetooth-enabled devices.
Setting Up Bluetooth
Follow these instructions to set up a Bluetooth connection.
1. Bluetooth is turned off in default setting, so if you want to connect to a
Bluetooth device, please make sure the Bluetooth is turned on in
Tap Module Control in Module page and turn on the Bluetooth
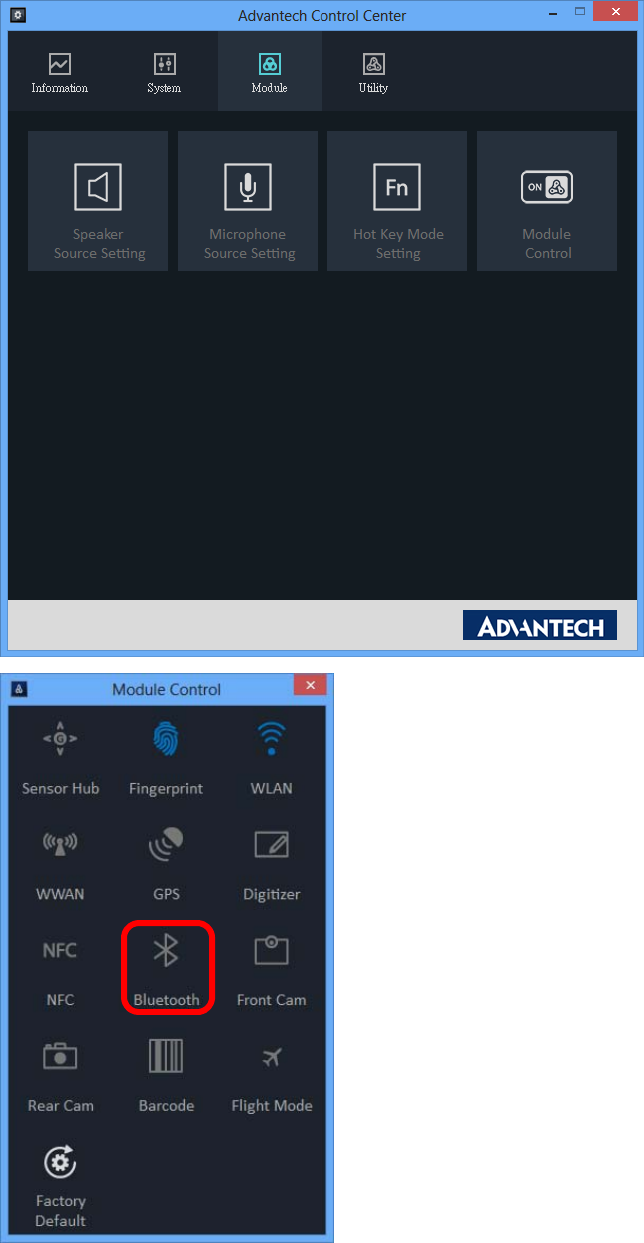
2. In notification area, tap Bluetooth logo and select Add a Device.
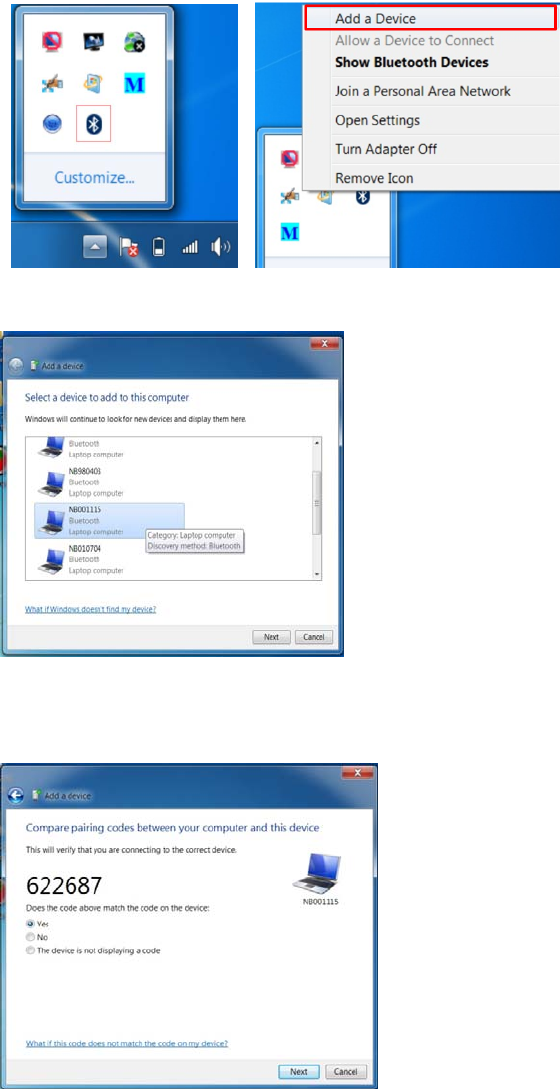
3. Select Bluetooth device and tap Next to add Bluetooth device.
4. Select Next for both DLT-M8110 and the blue tooth device after passkey is
confirmed.
5. The Bluetooth device is successfully added into DLT-M8110.
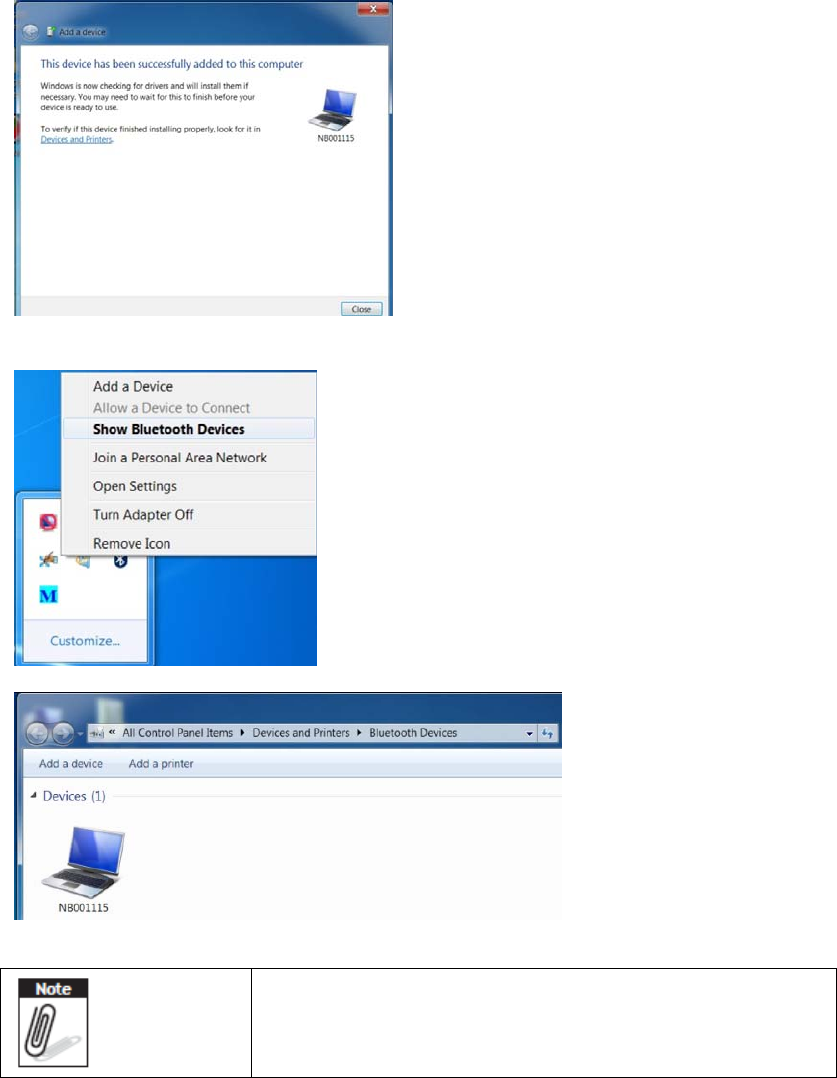
6. To view Bluetooth device added, tap Show Bluetooth Devices.
It is recommended that you use a passkey to prevent
unauthorized access to your DLT-M8110.
Chapter 4
Using MDevice utility
MDevice for DLT-M8110
MDevice is a useful tool for user to get DLT-M8110 basic system information and
control DLT-M8110 easily
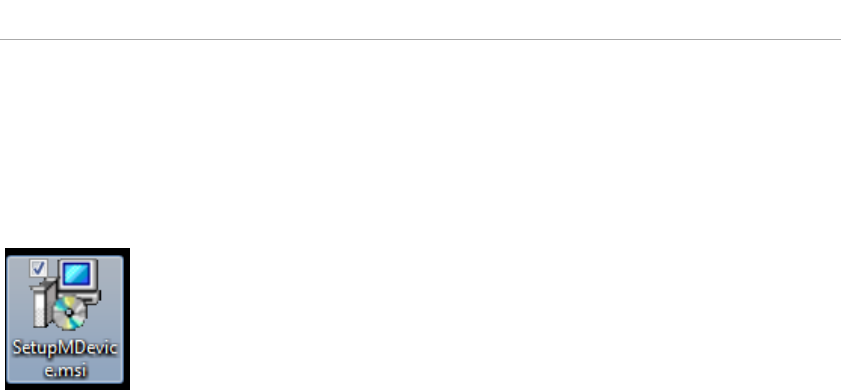
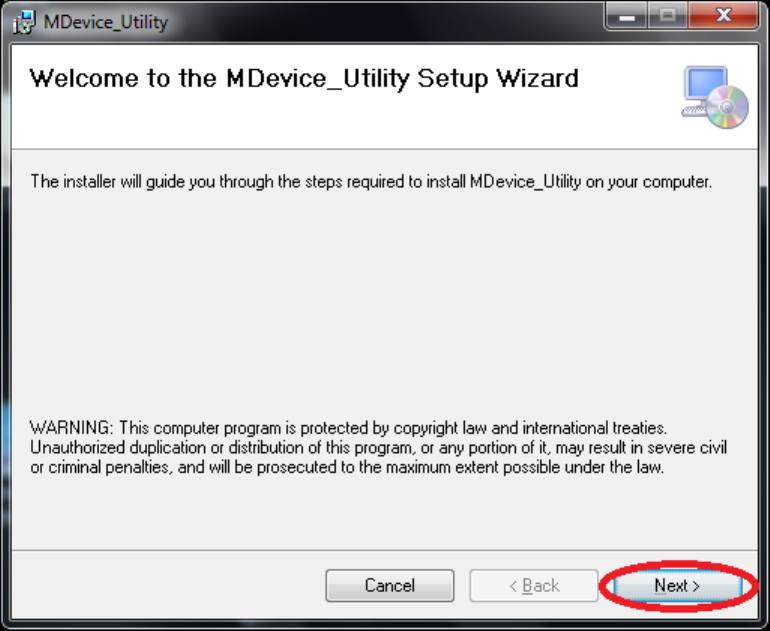
Install MDevice Utility
Bylaunchingtheinstaller(SetupMDevice.msi),usercansimplyinstallMDevice
Utility.
1.DoubleClickinstallertotriggerinstallprocess
2.ClickNext
3.Modifyinstallfolderifnecessaryandsetwhocanusethistool;thenclickNext
again
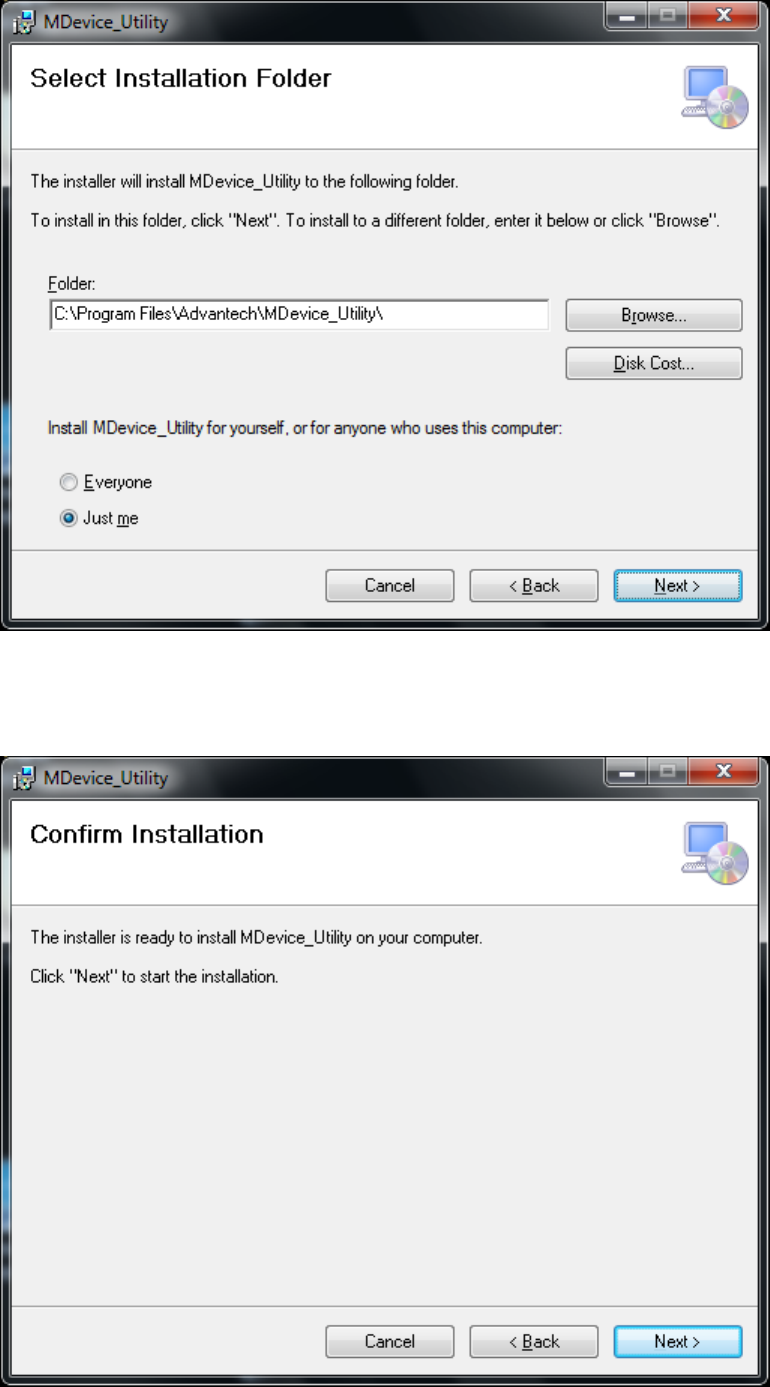
4.ClickNext
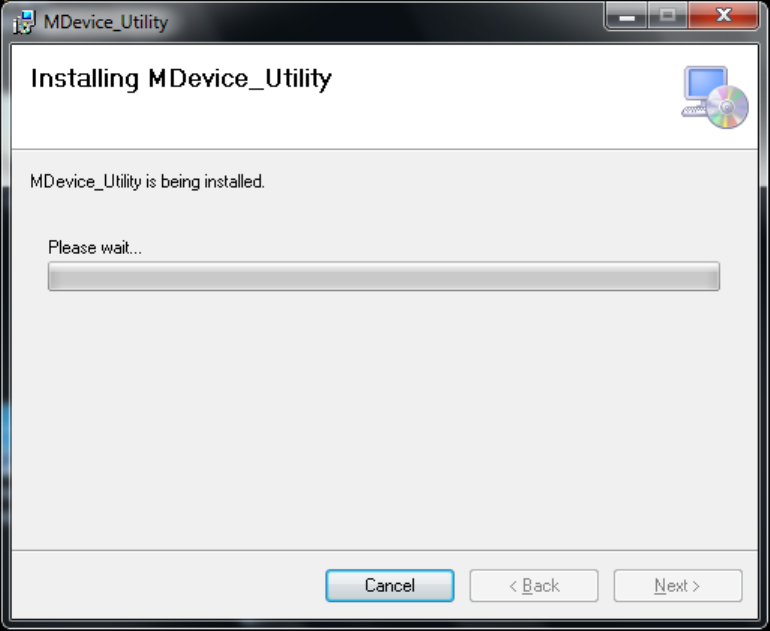
5.Theinstallationisprocessing,pleasewaittillitfinished.
6.InstallCompletely
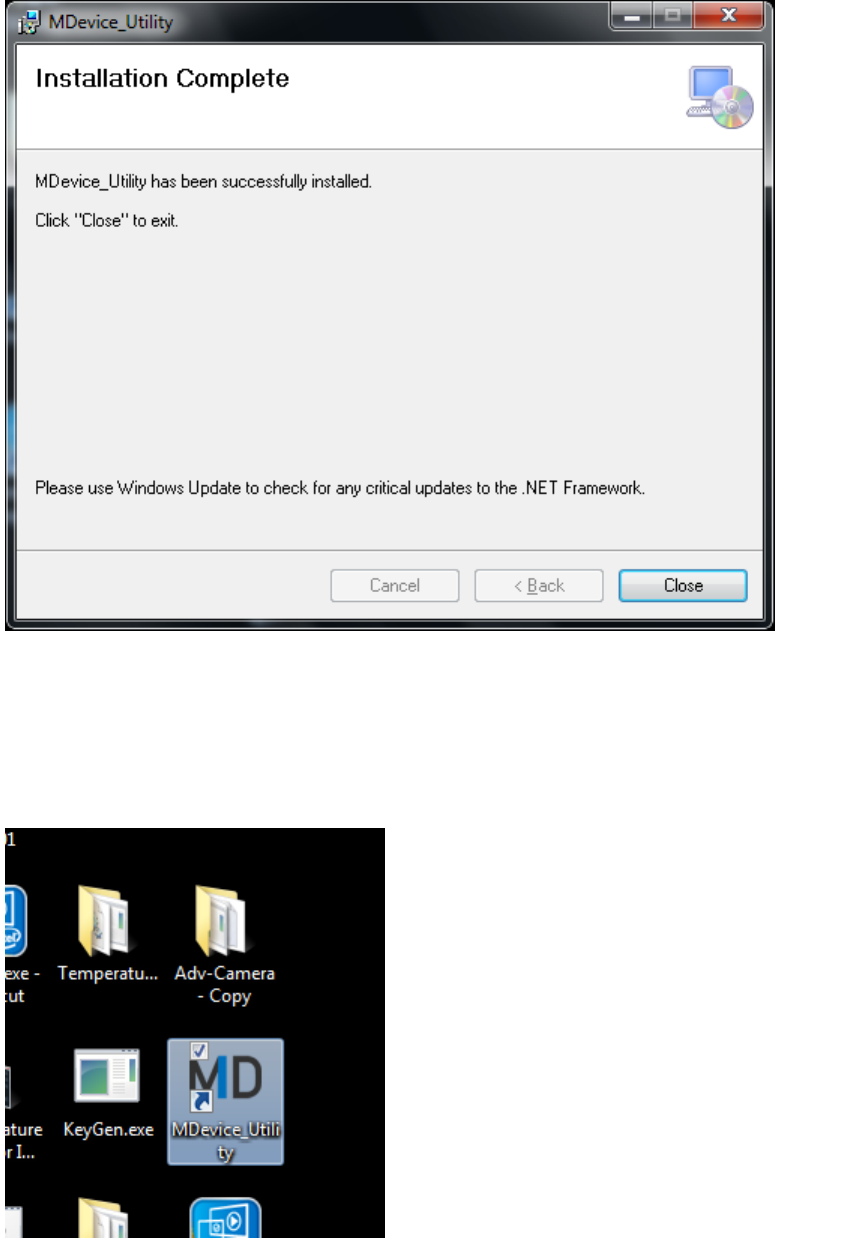
After install ...
1.Everytimedevicebootsup,MDeviceUtilitywillbelaunchedautomatically.
2.MDeviceUtilitylinkwillappearinDesktop
3.MDevice_UtilityandUninstalllinkswillappearinprogrammenu
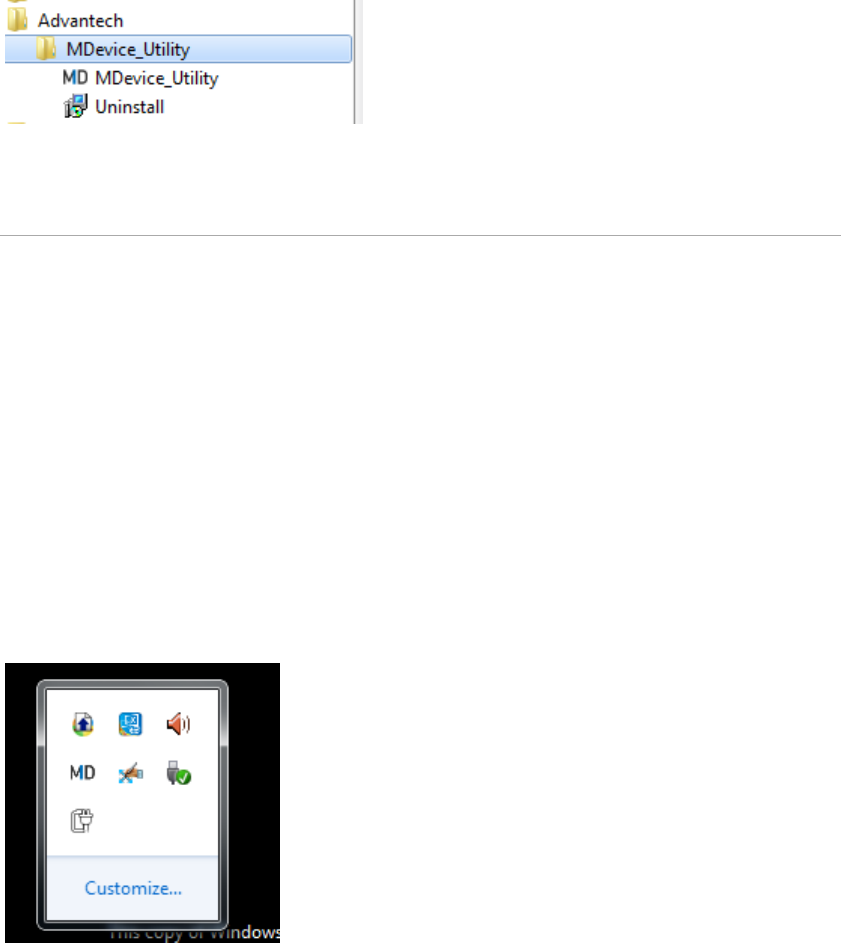
Launch MDevice Utility
BydoubleclickingtheMDevice_UtilitylinkinDesktoporclickingthelinkinuser
programmenu,usercanlaunchtheutilitymanually.
Theutilitywillrunatbackground.Usercanstarttoconfiguretheutilityorterminate
itbybellowsteps:
1. Start
Step1.RightClickMDiconinSystemtray:
Step2.ChooseStartConfigTool
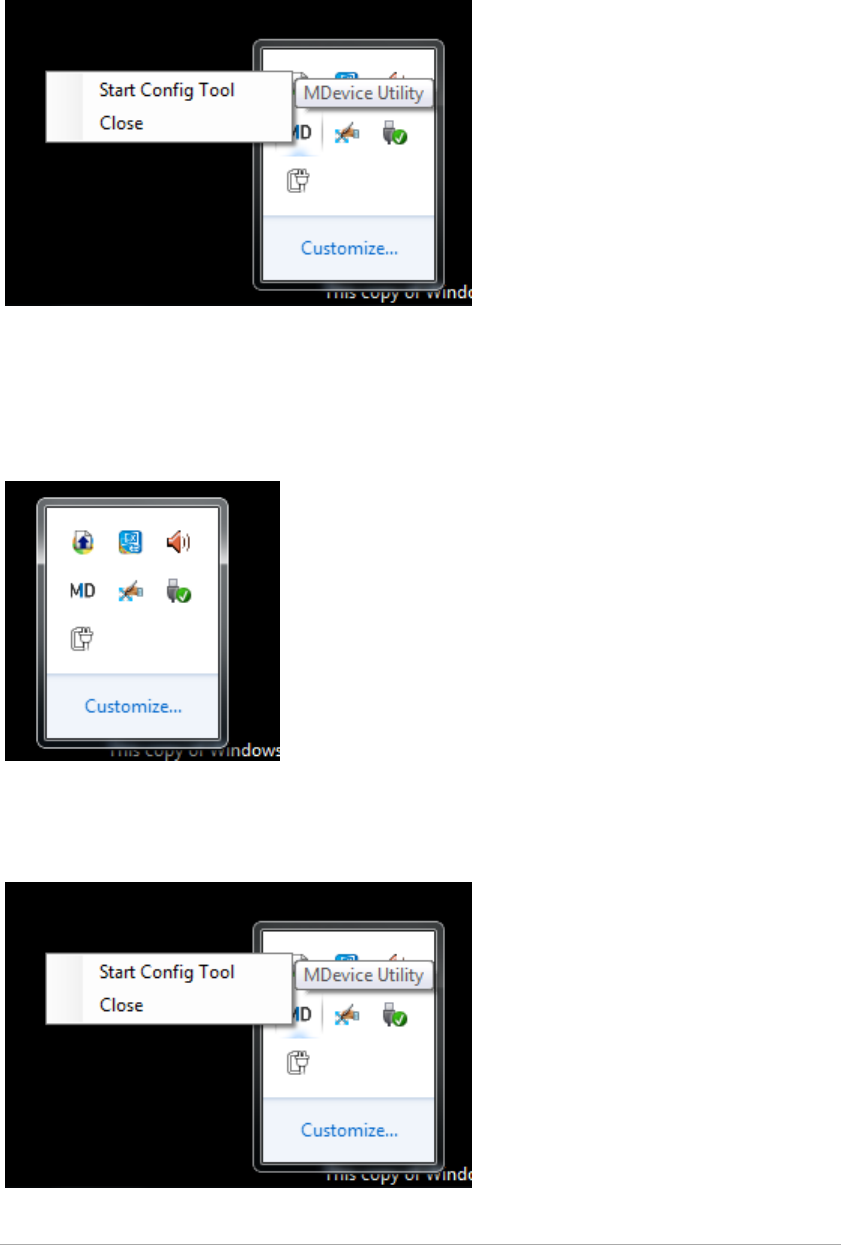
2. Terminatetheutility
Step1.RightClickiconinSystemtray:
Step2.ChooseClose
Login
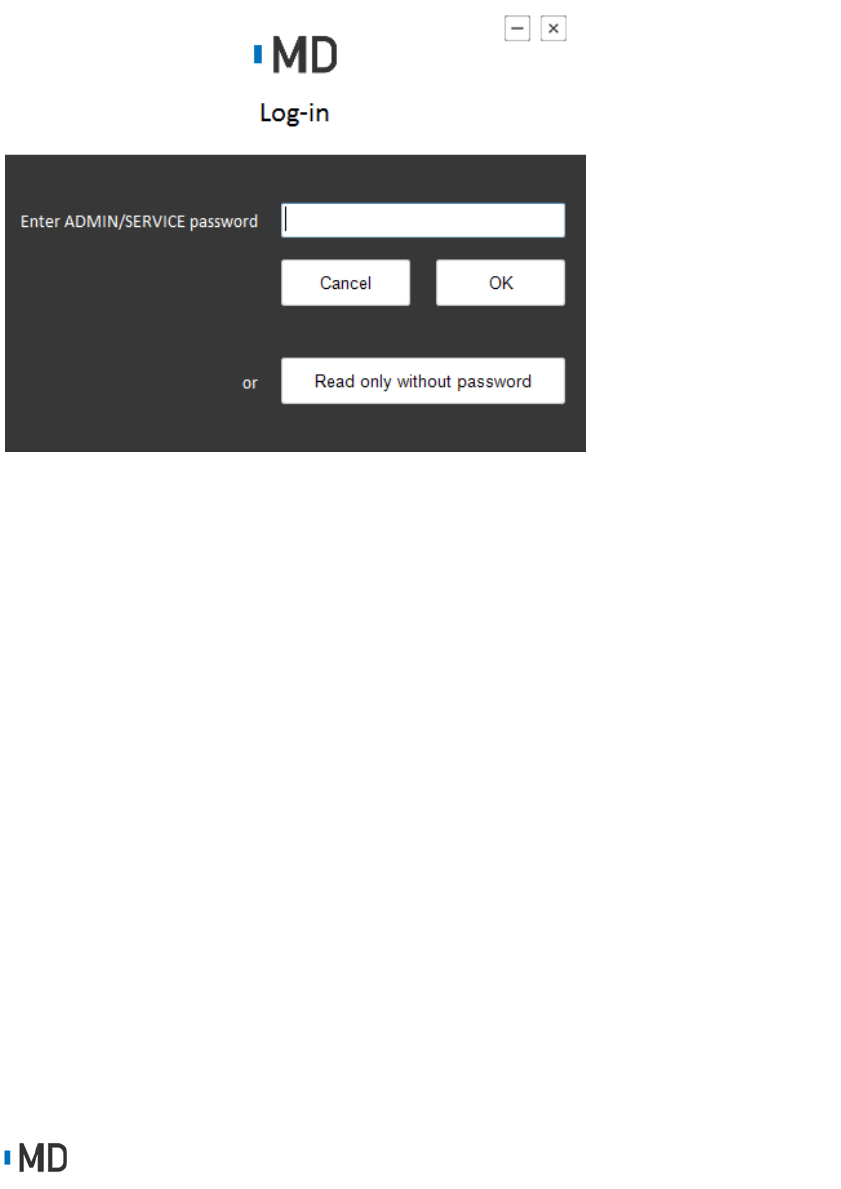
Inthisform,usercandecidewhichmodetheutilitywillbe.
ForUsermode,usercansimplyclick"Readonlywithoutpassword".
ForAdministratormode,usershouldinputtheADMINpasswordandclick"OK".
ForServicemode,userareaskedtoinputaone‐timepassword,whichgeneratedby
Key‐Generatetool.
Login Permission
TherearethreemodesinMDeviceUtility.
UseMode:Userisabletoviewthewholesettingitems,butnotallowedtochange
thesetting.
Correspondingicons:
.
AdministratorMode:Userisabletoviewthewholesettingitems,butonlyallowed
tosetlimitedsettingitems.Someofthesettingitemsareimpossibletochanged.
Correspondingicons:
ServiceMode:Userisabletoview/modifythewholesettingitems.
Correspondingicons:
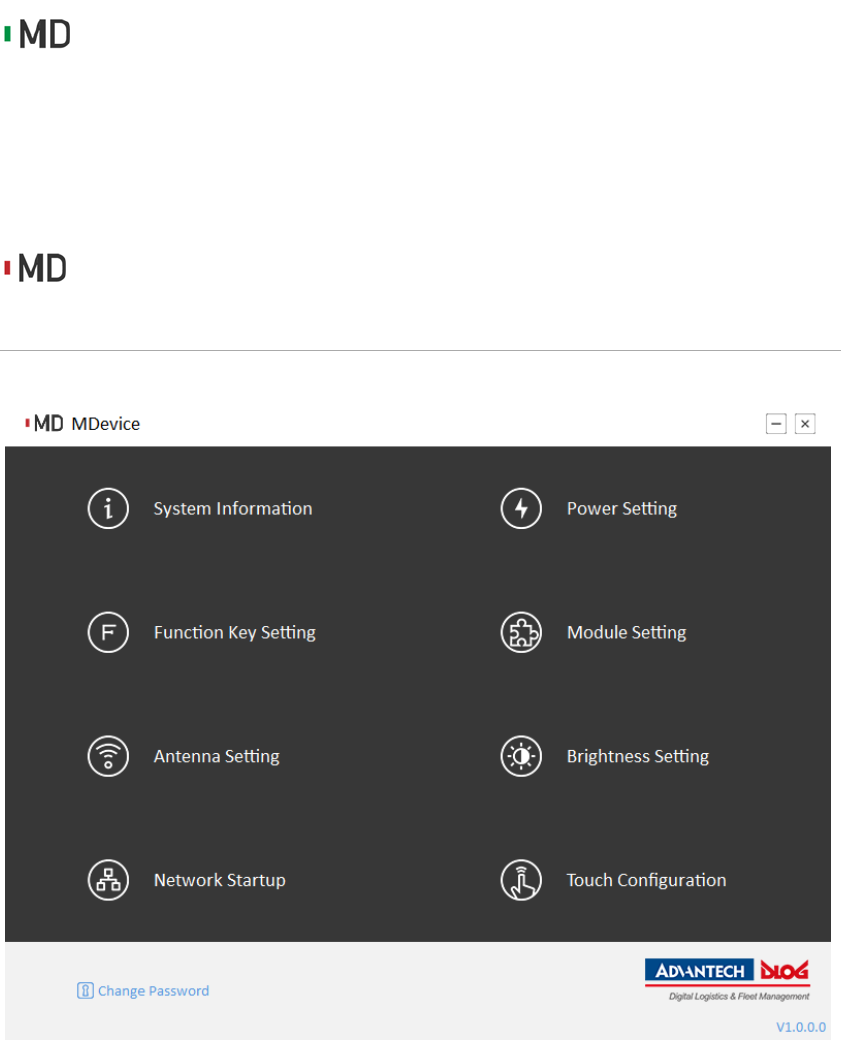
Menu
Inmenuform,usercangointoeachsettingbysimplyclickthebutton.
Note:ChangePasswordishiddeninusermode.
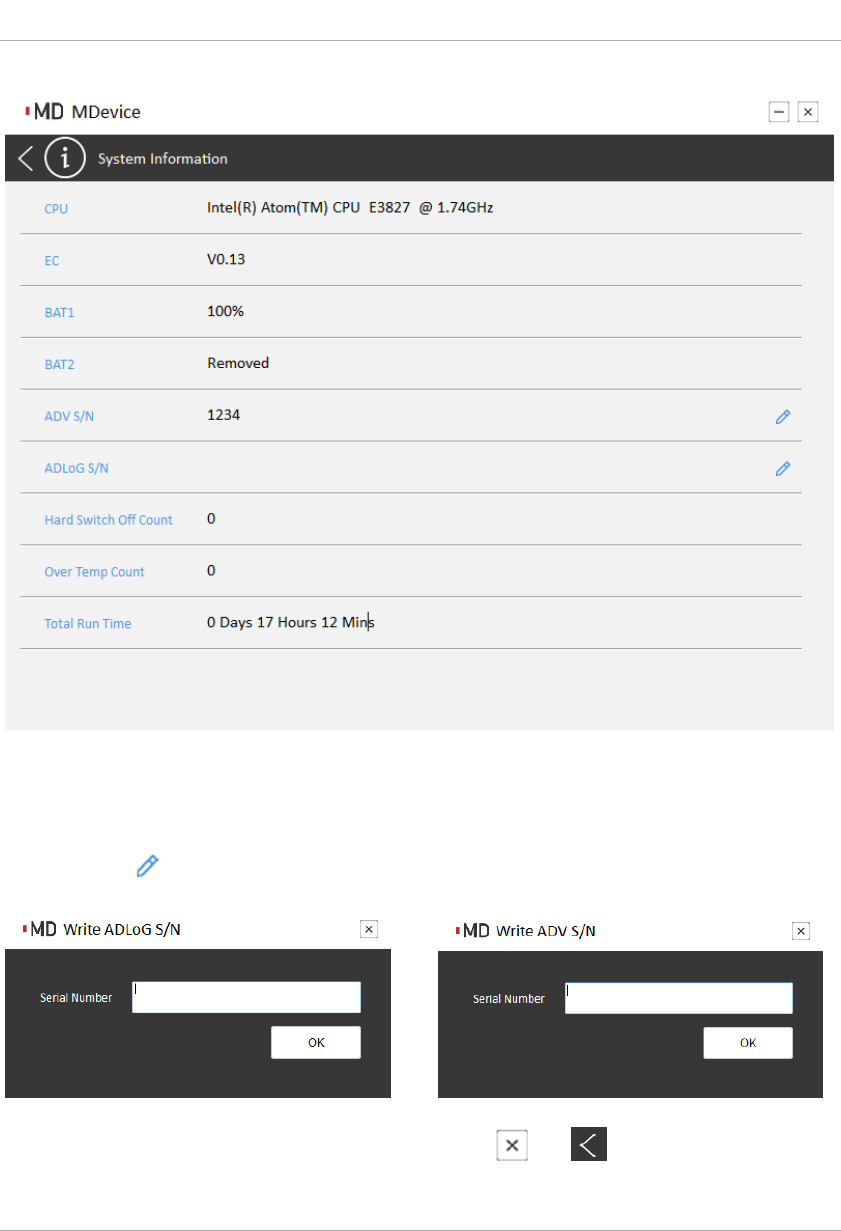
System Information
Inthisform,userisabletowatchthesysteminformation.Onlyinservicemode,user
canclickthe icontoconfiguretheS/N.
Andthen,usercanbacktomenupagebyclicking or .
Power Setting
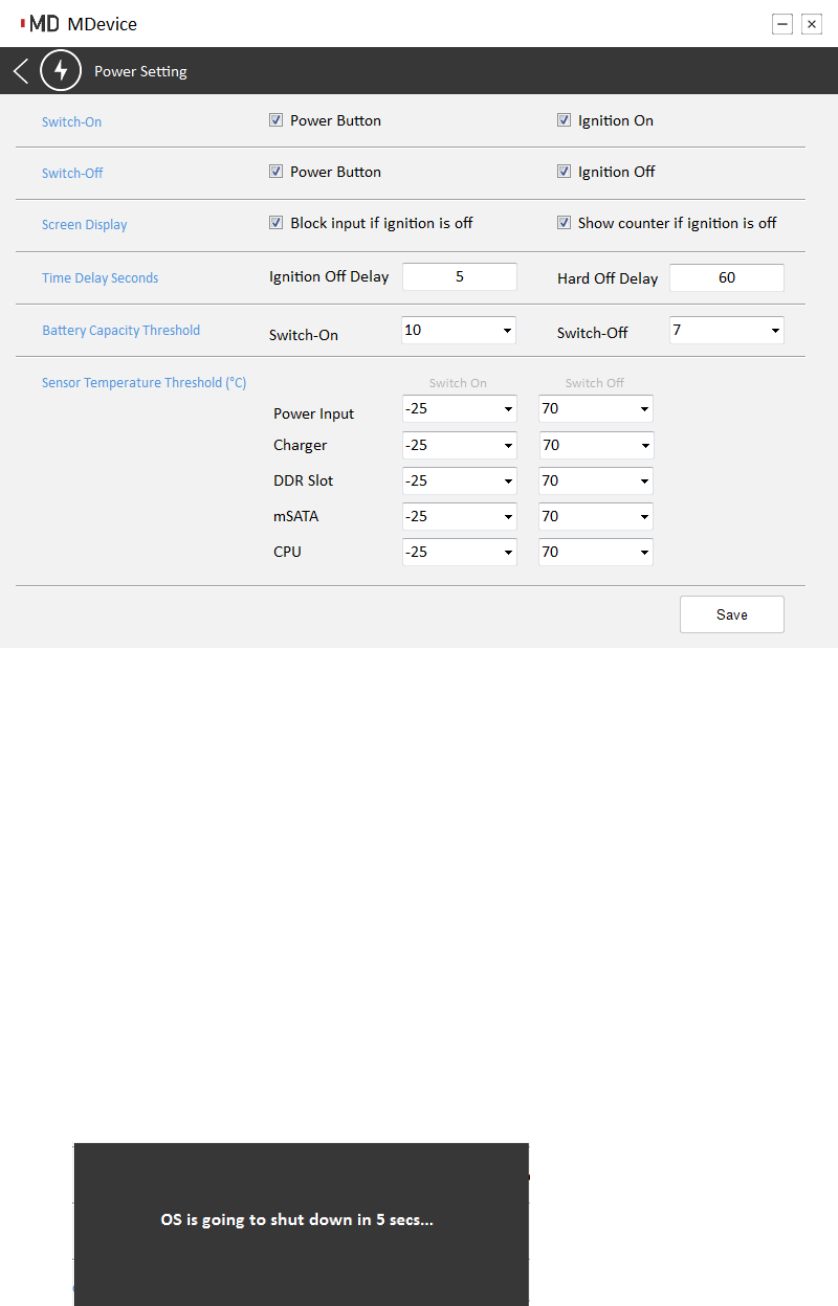
Inthisform,usercanconfigurethepowersetting.
Switch‐On:Toconfigurewhichsourceisallowedtoturnonthedevice.
Switch‐Off:Toconfigurewhichsourceisallowedtoturnoffthedevice.
ScreenDisplay:Toconfigurethebehaviorwhilereceivingignitionoffevent.
Blockinput:Whilereceivingignitionoffevent,alltheinputs(ex.touch,keyboard,
mouse)willbeblocked.
Showcounter:Whilereceivingignitionoffevent,utilitywillshowacountdown
dialogtonotifytheuser.
TimeDelaySeconds:Toconfigurethedelayseconds.
IgnitionOffDelay:ThewaitingtimetotriggeraOSshutdowneventwhileignitionoff.
HardOffDelay:Thewaitingtimetotriggerapowershutdowneventwhileignition
off.
BatteryCapacityThreshold:Toconfigurethepercentagethresholdofbatteryfor
switch‐on/offevent.
SensorTemperatureThreshold:Toconfigurethetemperaturethresholdofeach
senorforswitch‐on/offevent.
Andthen,usercanbacktomenupagebyclicking or .
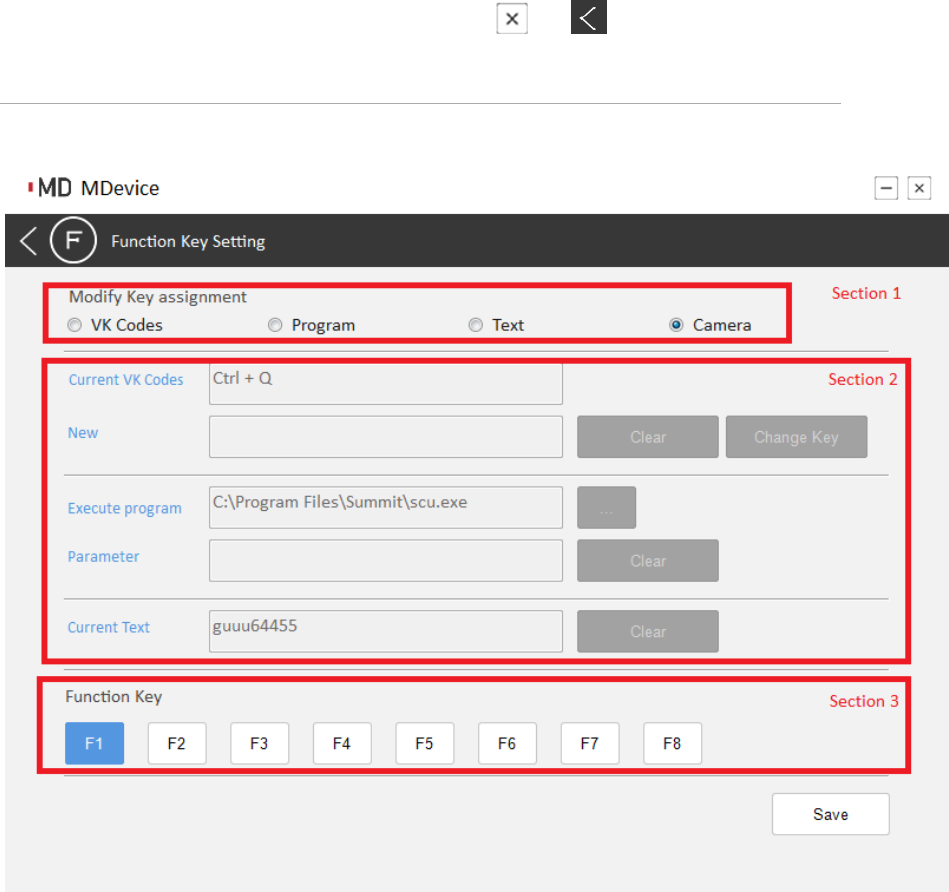
Function Key Setting

Thisformisforsettingorviewingthefunctionofeachfunctionkey.
InSection1:
Usercanswitchthetypeoffunction.Thereare4typesoffunctionusercanset:
VKcodes:Thefunctionkeywhichissettothistypewillsendvirtualkeycodeswhich
supportsmaxto3combinationofkeys.
Program:Thefunctionkeywhichissettothistypewilltriggeraapplication.
Text:Thefunctionkeywhichissettothistypewillsendaplaintext.
Camera:Thefunctionkeywhichissettothistypewilllaunchthecameraapplication.
InSection2:
Usercansetthedetailsofthefunctioninthissection.
InSection3:
Usercanswitchthefunctionkey.
Module Setting
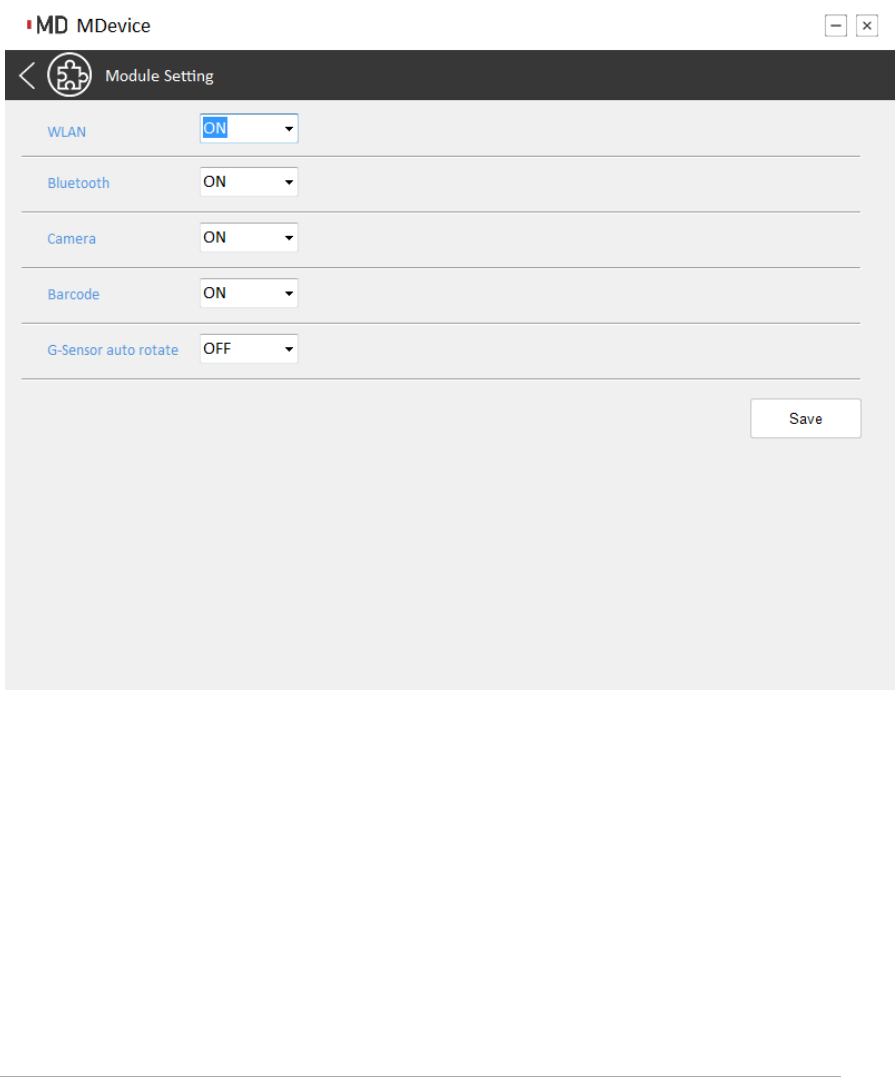
WLAN:Enable/DisableWiFi
Bluetooth:Enable/DisableBT
Camera:Enable/DisableCamera
Barcode:Enable/DisableBarcode
G‐sensorautorotate:Enable/DisableG‐sensorautorotefeature
Antenna Setting

ThisformisforselectingAntenna.
Brightness Setting

Thisformisforsettingbrightnessinexternalpowermodeorbatterymode.
Network Startup
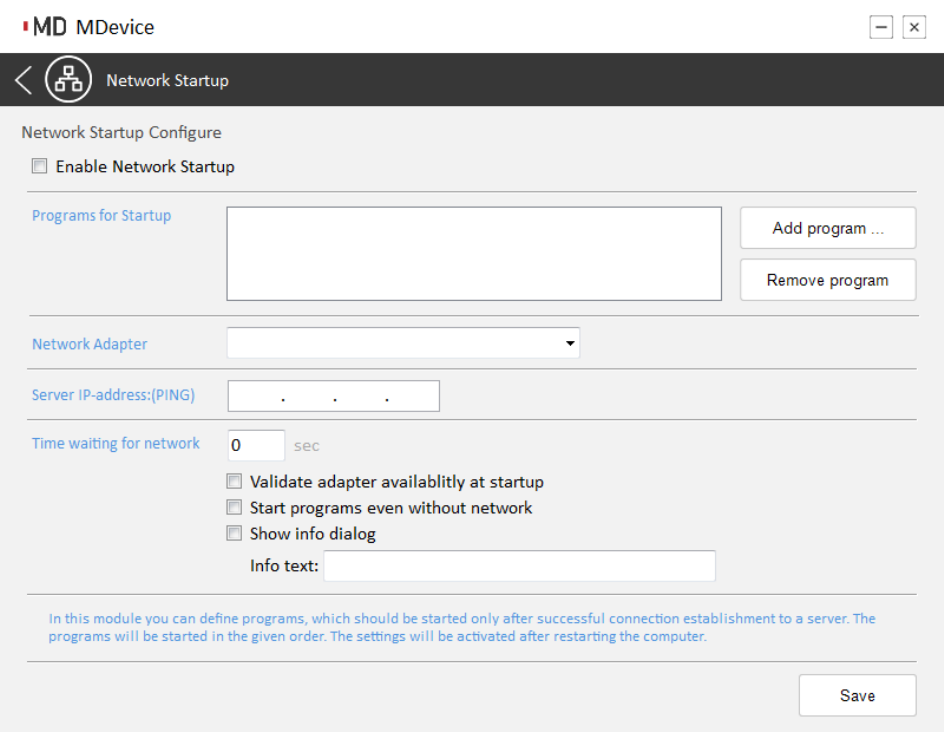
Networkstartupfeaturewillcheckthewhetherdeviceisconnectedwithserverat
boot‐upstageandtakeactionaccordingtothecheckresult.
EnableNetworkStartup:Checkedifuserwanttoenablethisfeature
ProgramsforStartup:It'sforsettingthestartupprogramlist,usercanaddprogram
byclickingAddprogram...button,orremoveprogrambyRemovedprogrambutton.
NetworkAdapter:Tospecifyanetworkadapterforthenetworkcheckingevent.
ServerIP‐address(PING):It'sforsettingtheserverIP.
TimeWaitingfornetwork:It'sforsettingthewaitingtimefornetwork,ifdevices
cannotconnecttoserverwithinthetimelimit,thecheckresultofnetworkisfailed.
Validateadapteravailabilityatstartup:Checkedifuserneedtochecktheadapteras
well.
Startprogramsevenwithoutnetwork:Checked,ifuserneedtolaunchthestartup
programswhichlistinProgramsforStartup, eventhecheckingresultisfailed.
Showinfodialog:Itisforsettingthetextinformationwhichwillbeshownduring
checkingnetwork.
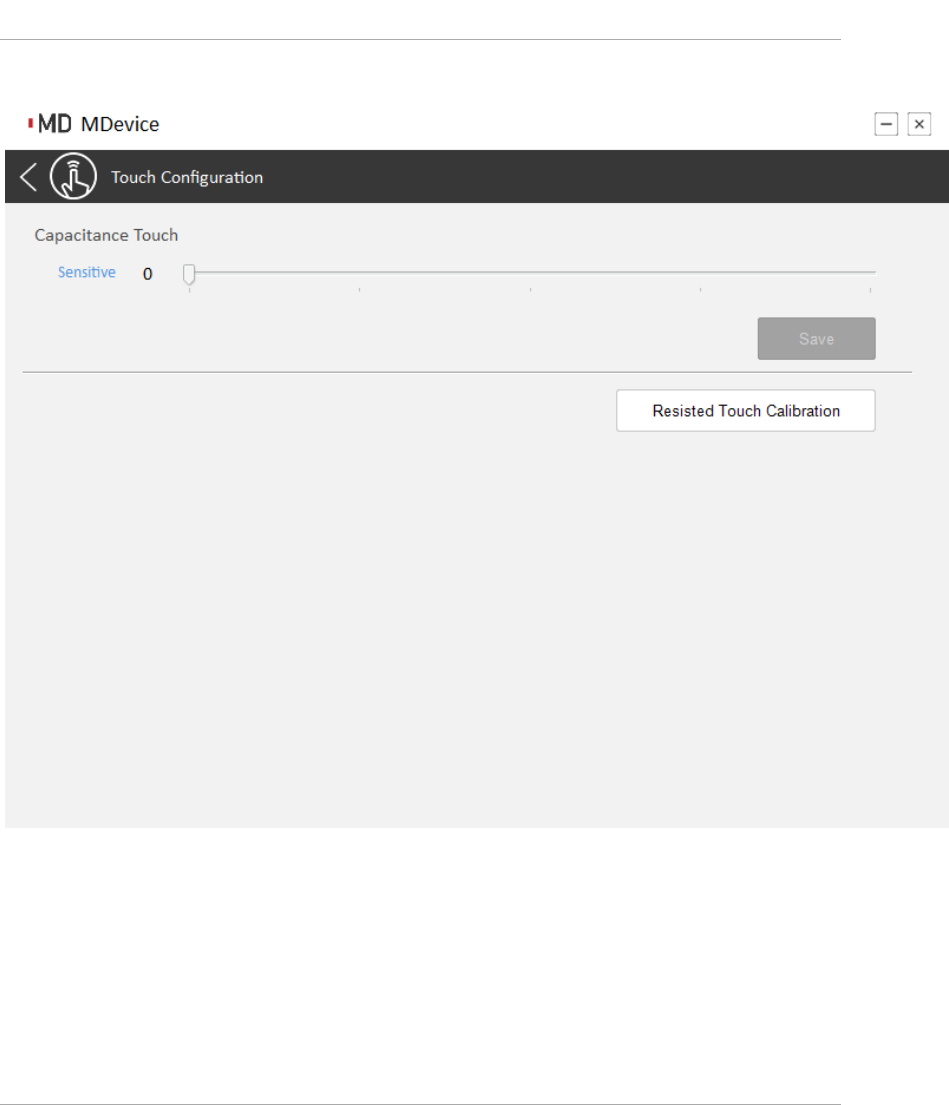
Touch Configuration
Capacitancetouchsensitive:It'sforsettingthesensitiveoftouch.It'sonlyavailable
whendeviceisusingcapacitancetouch.
ResistedTouchCalibration:It'sfortouchcalibration.It'sonlyavailablewhendevice
isusingResistedtouch.
Change Password
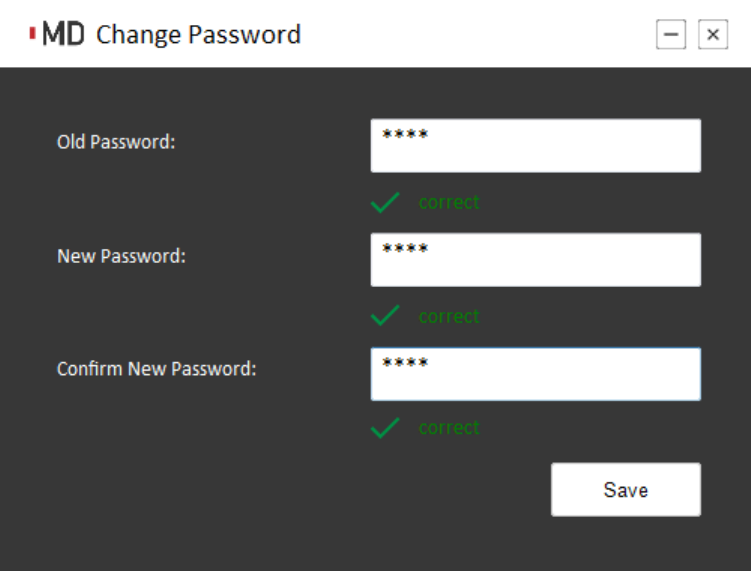
ThisformisforchangingtheADMINpassword.
Chapter 5
Maintenance
Maintaining the Battery
• Do not expose heat or attempt to disassemble the battery, and do not place the
battery in water or in a fire.
• Do not subject the battery to strong impact, such as a blow from a hammer, or
stepping on or dropping it.
• Do not puncture or disassemble the battery.
• Do not attempt to open or service the battery.
• Replace only with batteries designed specifically for this product.
• Keep the battery out of reach of children.
• Dispose of used batteries according to local regulations.
Maintaining the LCD Display
• Do not scratch the surface of the screen with any hard objects.
• Do not spray liquid directly on the screen or allow excess liquid to drip down inside
the device.
• Do not place anything, such as food and drink, on the screen at any time to prevent
damage to the screen.
• Clean the LCD display only with a soft cloth dampened with denatured alcohol or a
proprietary LCD screen cleaner.
Cleaning the DLT-M8110
1. Turn off the DLT-M8110 and unplug the power cord.
2. Wipe the screen and exterior with a soft, damp cloth moistened only with water.
Do not use liquid or aerosol cleaners on the screen, as these will discolor the finish
and damage the screen.
PWS-870 User Manual
Chapter 6
Appendix

Specifications
Feature Specifications
CPU & Chipset Intel Atom Baytrail-I, E3827 (1.75GHz)
Memory Single SO-DIMM, DDR3L-1067, Up to 4GB.
Storage SQF MSATA 820 MLC (-40 ~ 85°C), SLC option
Display 10.4" XGA (1024 x768) LED Backlight LCD (340 bits)
Touch Panel Gorilla Glass for PCAP touch solution or Chemical Tempered Glass for Resistive
touch solution (Optional)
Sensor Accelerometer (G-sensor), Screen Rotation: 0°, 90°, 270°
Wireless
Communication
Default WIFI 802.11 a/b/g/n
Default Bluetooth V4.0 (Class2) + EDR
Camera 5M pixel CMOS Sensor
Data Collection Built-in 2D barcode scanner
Audio Output Integrated speakers
Input Capacitive multi-touch
Programmable button x8
On-screen QWERTY keyboard
LED Status Indicator WiFi LED / Storage LED /Power LED / Battery LED / Temperature LED
External I/O
Interfaces
USB 3.0 x 1
DC-in x 1
Docking Port x1 (32PIN)
Power Supply Small battery: 2S1P 7.2V 1750mAh
Big battery: 2S2P 14.4V 3800mAh
AC Adapter: AC 100V-240V 50/60Hz
OS Support Windows Embedded 8.1 Industry Pro 64bit
Windows Embedded 8 Standard 64bit
Windows Embedded 7 64bit
Windows 7 Pro 64bit
Temperature &
Humidity(with
battery)
Operating Temperature: 0 to 45 ºC
Storage Temperature: -20 to 60 ºC
Operating Humidity: 5%~95% @ 40 ºC
IP Rating IP65
Drop & Vibration MIL-STD-810F, Method 516.5, Procedure IV (or comparable EN test specification;
see also test in regard to

810G). Description: Drop: 26 drops from 1.22 m onto concret
EN60721 5M3 certified
EMC CE/FCC/SAR/R&TTE/Telecom
Safety UL/CB / LVD
Accessories Vehicle Docking Station
Desk Docking Station
Big Battery
Battery charger
Dimensions 304mm (W) x 221mm (D) x 31.84mm (H) (w/thin battery)
Weight 1.3kg without hand strap

LED Status
Power / Thermal LED
DUTon/offGreenLED OrangeLED RedLEDRemark
OFF OFF OFF OFF SystemOFF
(S5)
ON Static OFF OFF SystemON
(S0)
ON Blinking OFF OFF System
SLEEP(S3)
ON OFF OFF StaticOver
Temperatur
e
ON OFF OFF BlinkingSensor
Faulty
Front Battery LED
DUT
on/off
AC
Adapter
In
BatteryGreen
LED
Orange
LED
RedLED Remark
OFF x OFF OFF OFF SystemOff(S5)
OFF OFF Static OFF BatteryCharging
OFF OFF OFF OFF BatteryFull
ON x Static OFF OFF SystemOn(S0)
Battery>30%
ON OFF Static OFF BatteryCharging
ON OFF OFF OFF BatteryFull
ON x Blinking OFF OFF Battery<30%
light0.5sec,dark
0.5sec
ON x OFF Blinking OFF Battery<10%
light0.2sec,dark
0.8sec
ON/OFF xOFF OFF StaticBatteryRead
Failure
Rear Battery LEDs
DUT
on/off
AC
Adapter
In
BatteryGreen
LED
Orange
LED
RedLED Remark
ON Static OFF OFF Battery>30%
ON Blinking OFF OFF Battery<30%
ON OFF Blinking OFF Battery<10%
ON OFF OFF StaticBatteryRead
Failure
ON xx OFF OFF OFF Battery

Removed