Advantech Co PWS440 Computer User Manual PWS 440 User Manual 0813 2
Advantech Co Ltd Computer PWS 440 User Manual 0813 2
Contents
- 1. User_Manual-1
- 2. User_Manual-2
- 3. Users Menu-1
- 4. Users Menu-2
User_Manual-2

PWS-440 User Manual 28

Chapter 4
4
Getting Connected
PWS-440 User Manual 30
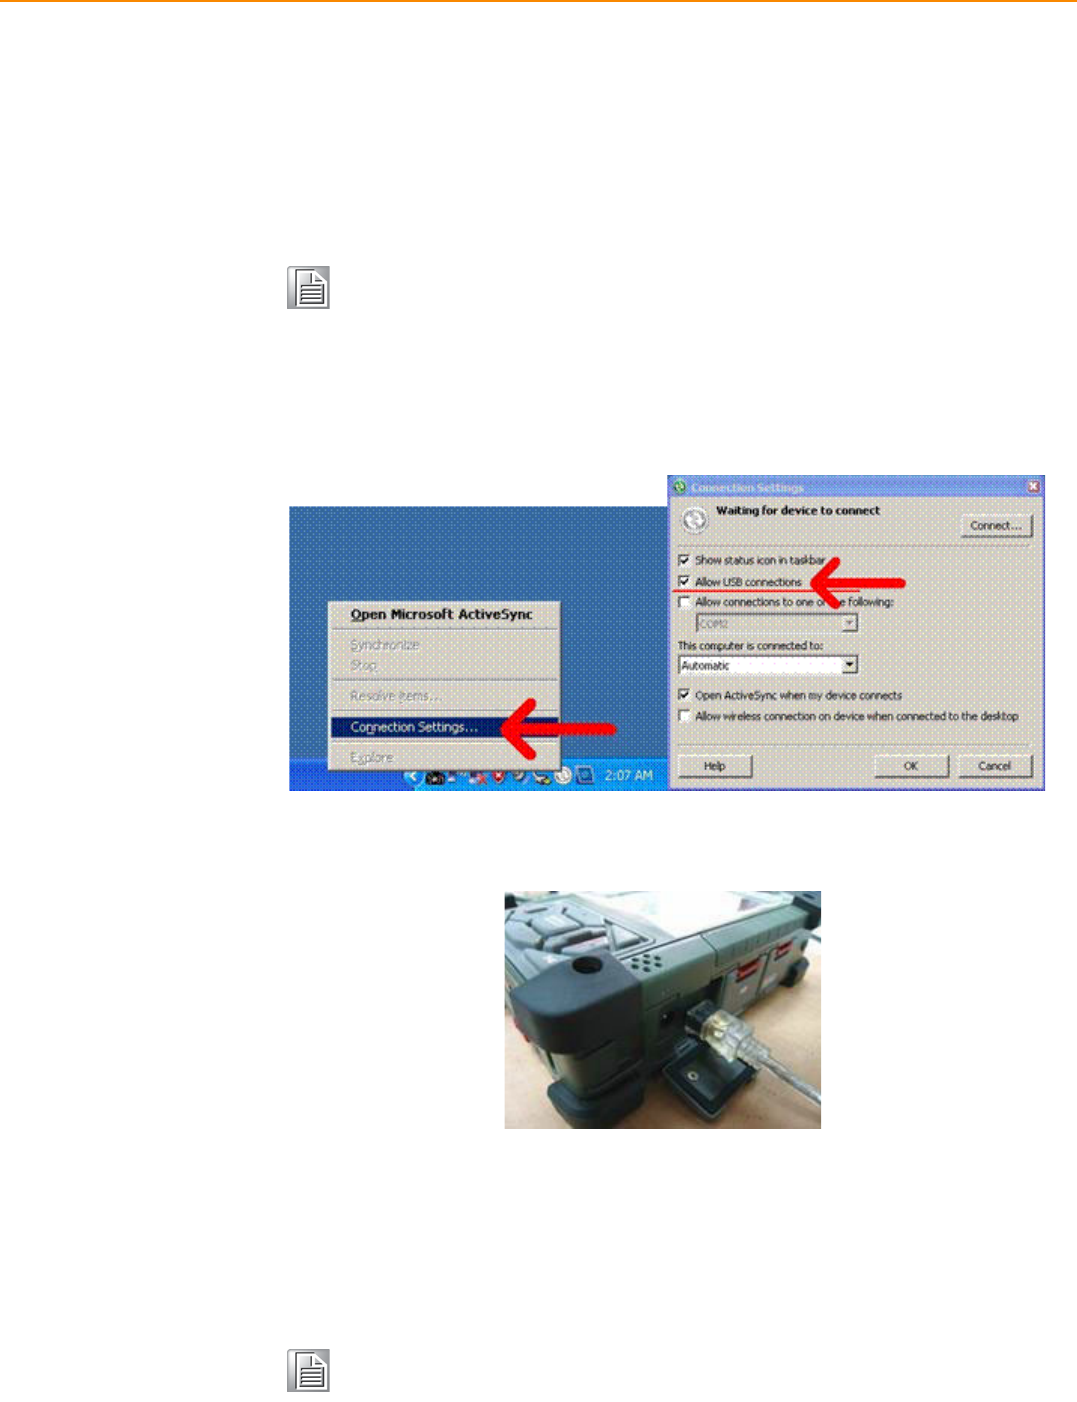
4.1 Installing Microsoft ActiveSync
In order to exchange data between your computer and the PWS-440 and install extra
applications or utilities to the PWS-440, Microsoft ActiveSync must be installed on
your computer. Connect the PWS-440 to a PC using a USB type B cable. Download
the latest version of Microsoft ActiveSync from the Microsoft website.
4.1.1 Connecting to Your Computer
1. After ActiveSync has been installed, connect the USB B cable to the USB port
on your PWS-440.
2. Plug the other end of the USB cable into a USB port on your computer.
3. Turn the device on.
4. ActiveSync starts automatically and configure the USB port to work with the
PWS-440.
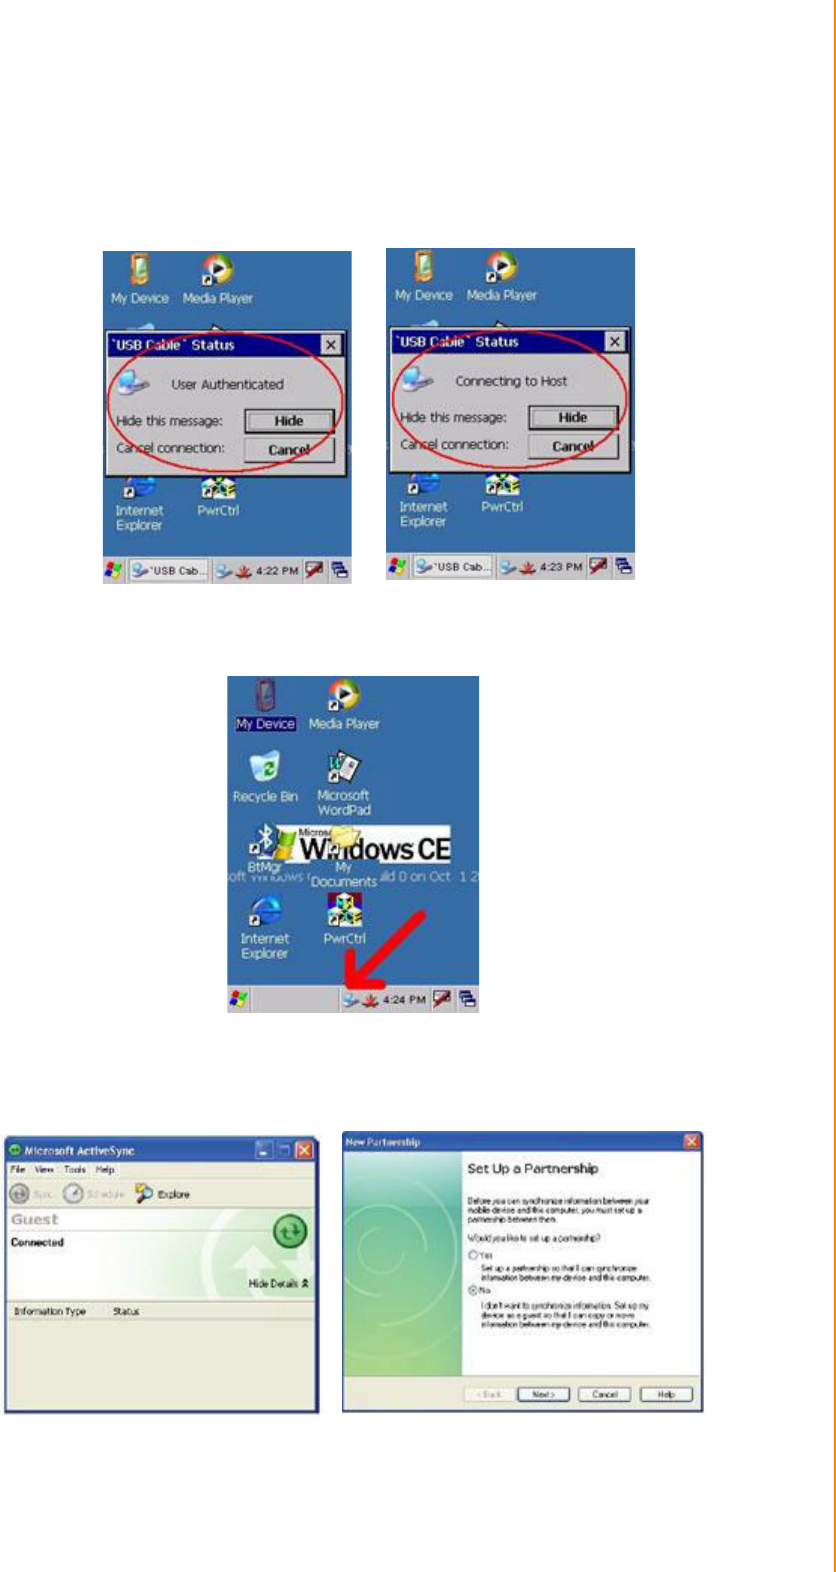
The New Partnership setup wizard will automatically start.
Note! If you have a previous version of the Microsoft ActiveSync installed in
your computer, uninstall it first before installing the latest version of
Microsoft ActiveSync.
Note! If ActiveSync doesn’t start automatically, click Start -> Programs ->
Microsoft
31 PWS-440 User Manual
Chapter 4 Getting Connected
ActiveSync.
If a message appears indicating that it is unable to detect a connection, click the
Cancel button and manually configure the communication settings.
1. Follow the onscreen instructions.
2. When the configuration process is complete, the ActiveSync window appears.
3. Synchronization will be initialized and will take place if you’ve chosen to syn-
chronize periodically or upon connection.
4. ActiveSync detects the PWS-440 and establishes a connection.
5. Click No, and then click Next.
PWS-440 User Manual 32
4.2 Connecting with Bluetooth
Your device is equipped with Bluetooth wireless technology that you can use to syn-
chronize information with a computer equipped with a Bluetooth adapter or access
point. Bluetooth wireless technology allows you to communicate with the computer
whenever it is within range. Follow these instructions to set up a Bluetooth connec-
tion.
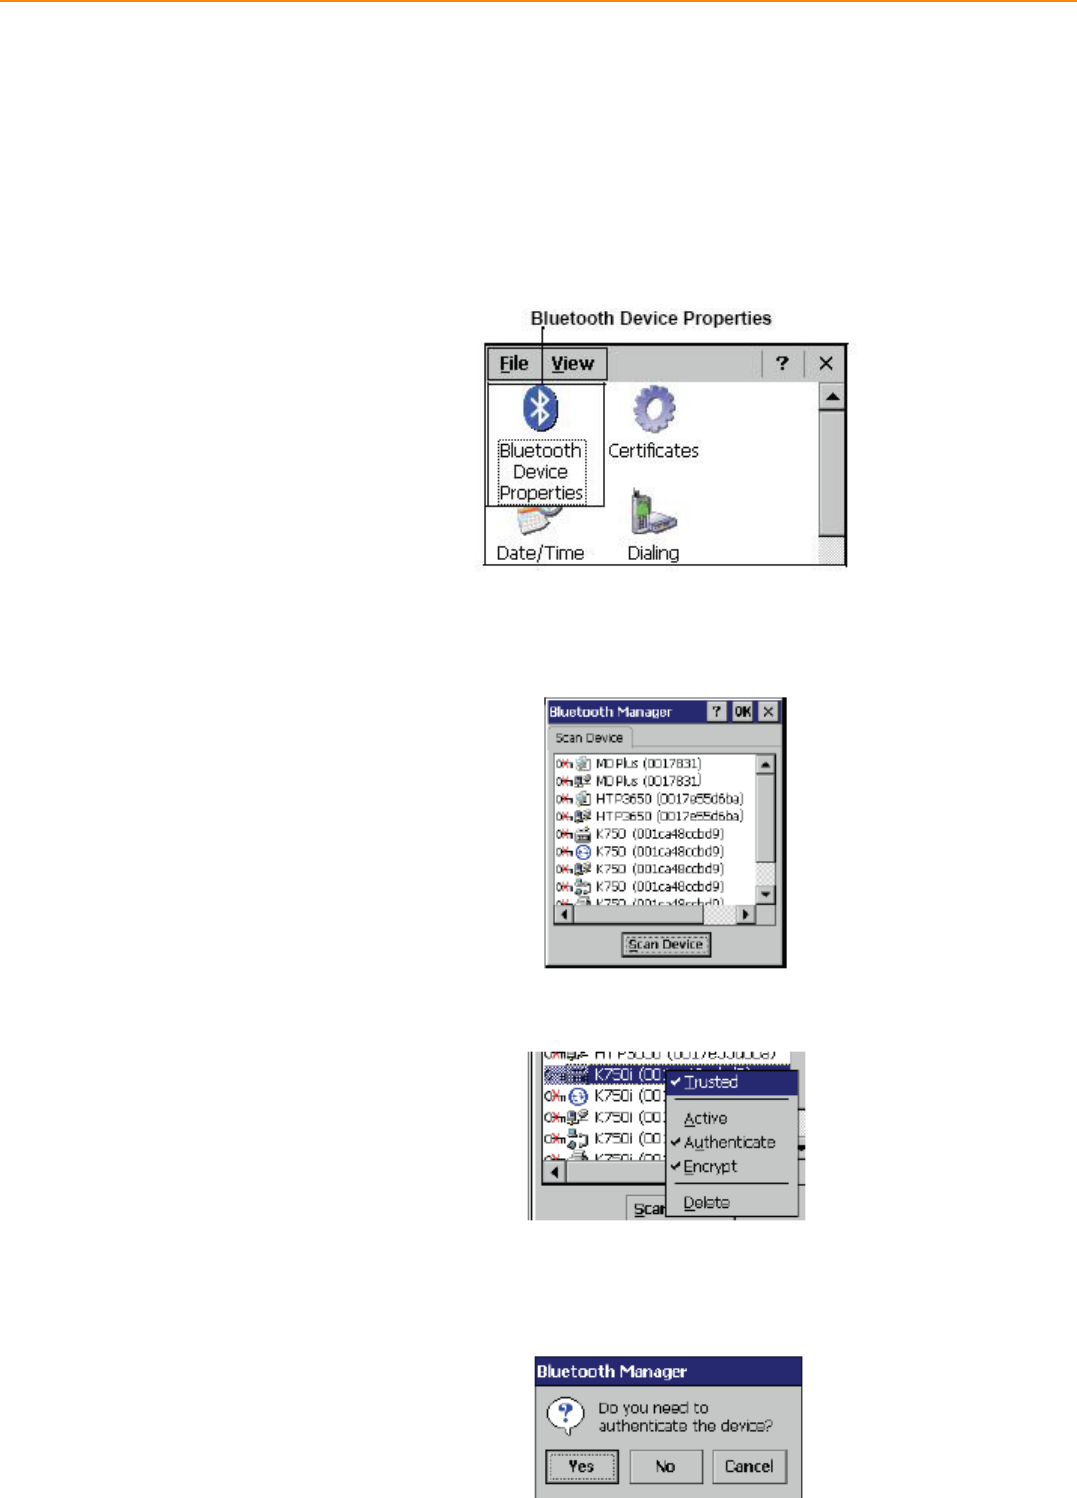
1. Tap Start ->Settings -> Control Panel and double-tap Bluetooth Device
Properties.
The Bluetooth Manager opens.
2. Tap Scan Device. Bluetooth Manager scans for local Bluetooth devices and dis-
plays a list of all Bluetooth enabled devices within range.
3. Double tap a device in the list to display a context menu.
4. Tap Trusted to add the device to the trusted Bluetooth devices list.
You are prompted to authenticate the device. If you want to authenticate the
device now, go to step 5. Otherwise, go to step 7.
33 PWS-440 User Manual
Chapter 4 Getting Connected
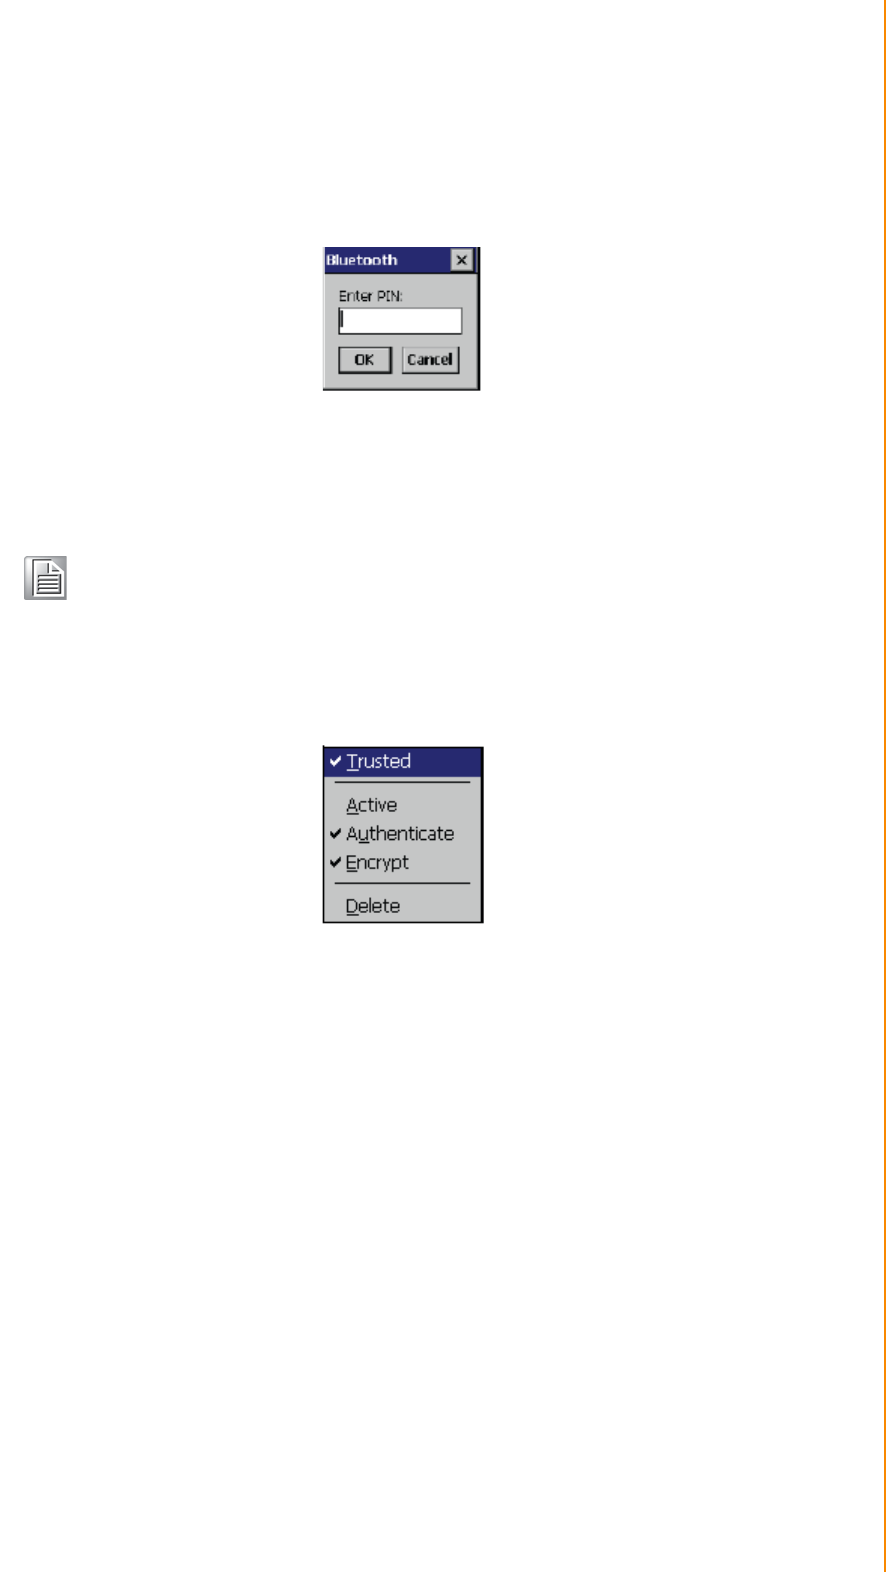
5. Tap Yes to authenticate the device. You are prompted for the device’s pin code.
Enabling trusted devices to the Bluetooth manager’s list. You can mark the
device as trusted without authenticating the device by tapping No when
prompted to authenticate the device.
6. Enter the pin code and tap OK to authenticate the device. Tap No to cancel
authentication.
Trusted: Tap to add or remove the device from the trusted device list. When
checked, the red X on the key next to the device is removed.
Active: Tap to make the device active or inactive.
Authenticate: Tap to authenticate the device and add the device to the trusted
devices list.
Encrypt: Tap to enable or disable encryption of data transferred between the PWS-
440
and a Bluetooth device.
Delete: Deletes the device from the Bluetooth Manager list
Note! If you enter the wrong pin code, an authentication fail message appears.
The red X disappears on the entry’s key icon, and the context menu’s
additional options become available. The additional options are
described as follows:
PWS-440 User Manual 34
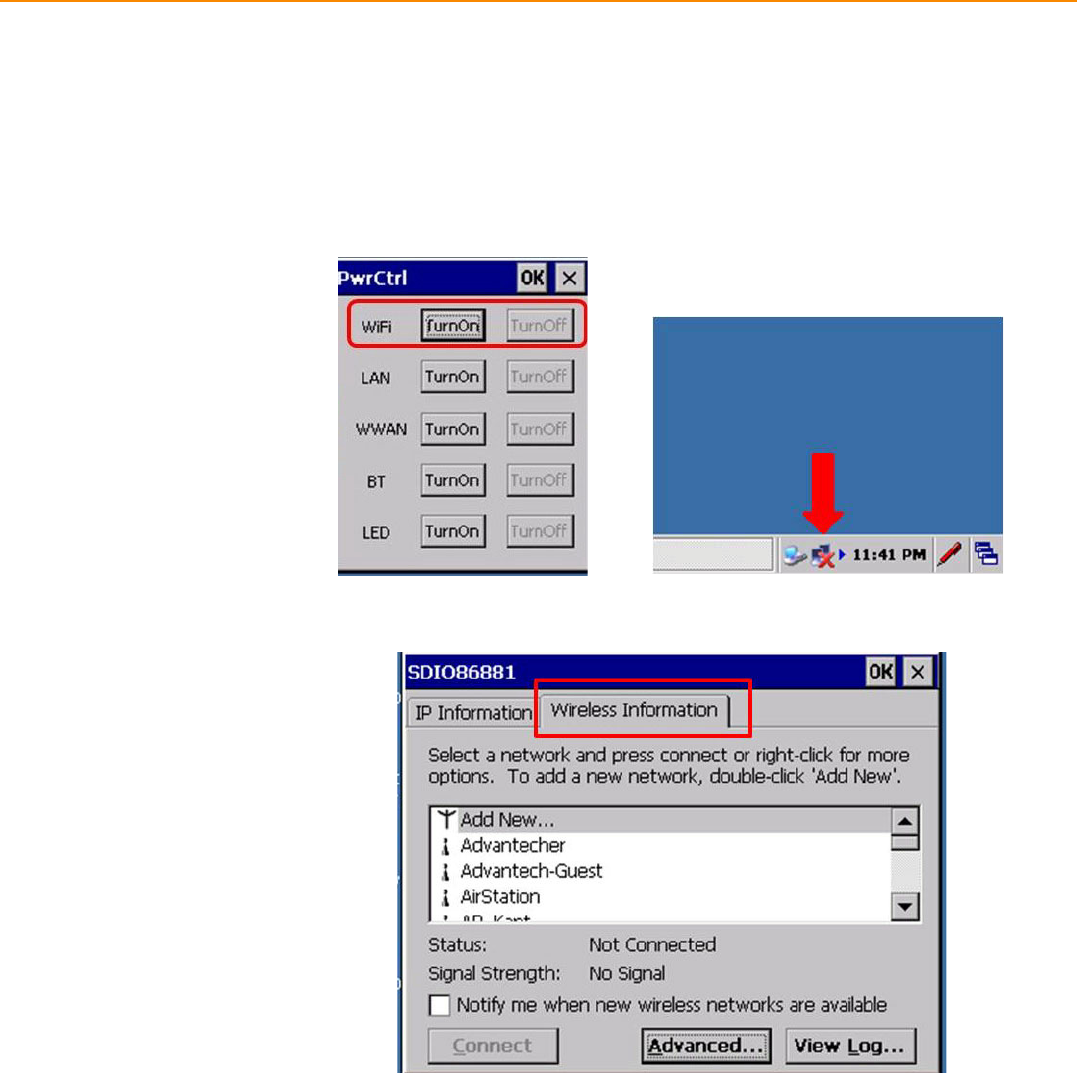
4.3 Connecting to a WLAN (WiFi)
Through a WiFi (wireless) connection you can add a new network, connect to an
existing network, change the advanced wireless settings and view wireless network-
ing log information. To establish a WiFi connection, follow the steps below:
1. From START -> PROGRAM -> Utility -> “PwrCtrl”, and choose WLAN “ON” .
Then, click on the WIFI icon.
2. Select the Wireless Information tab to display the available options.
35 PWS-440 User Manual
Chapter 4 Getting Connected
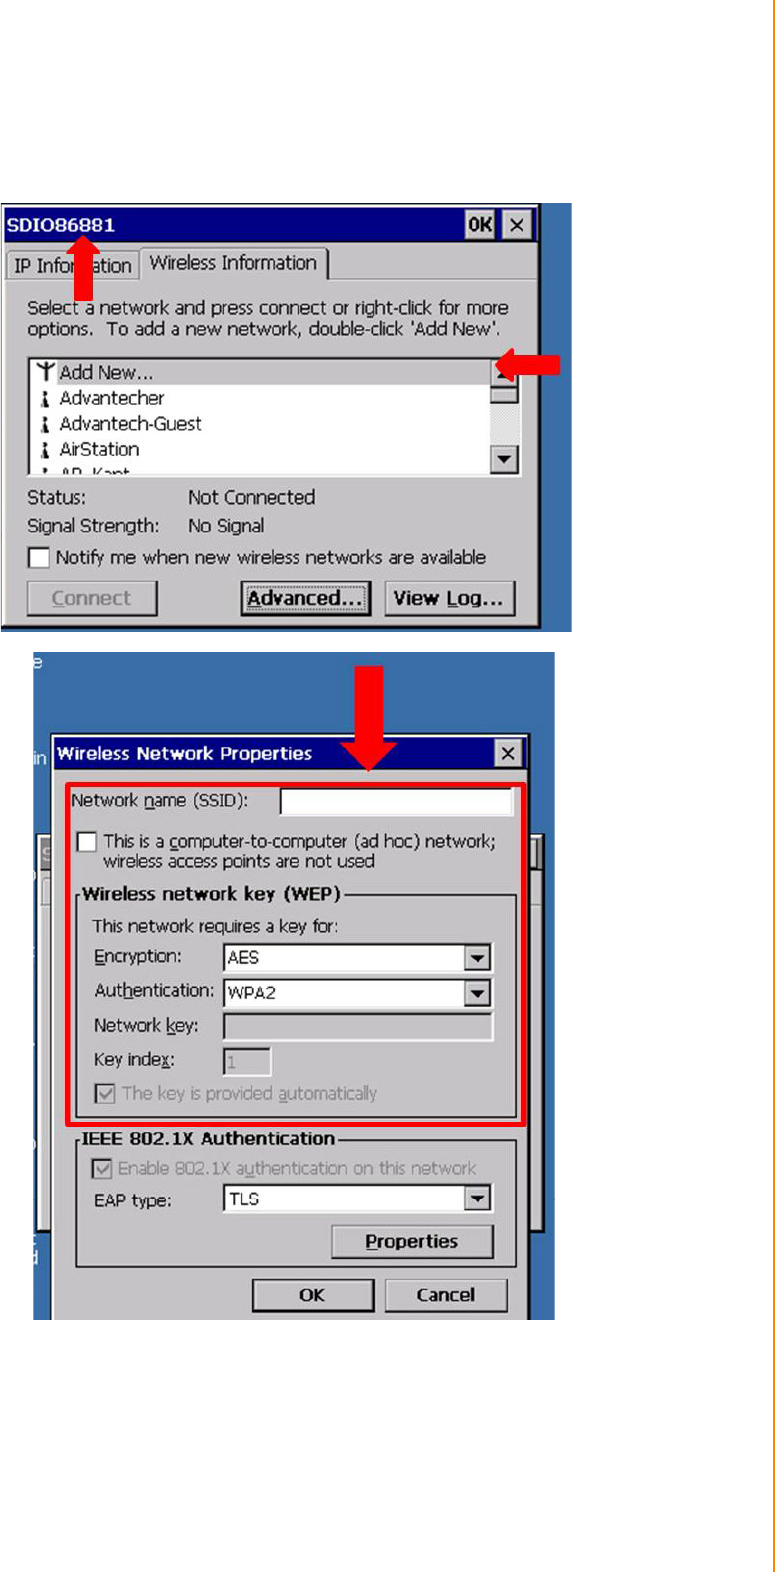
4.3.1 Add a New Network
1. To add a new network, double-click Add New.
PWS-440 User Manual 36
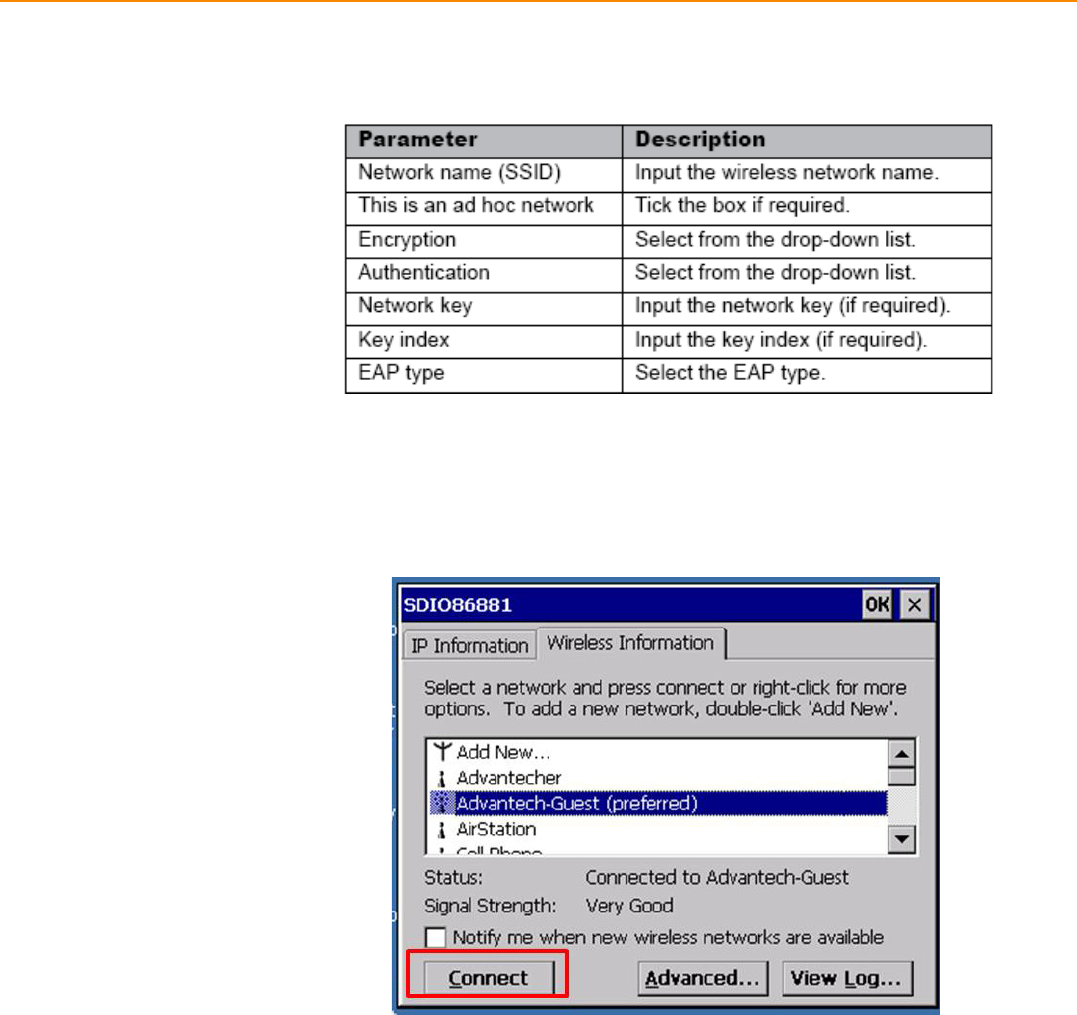
2. When the following screen displays, input the required parameters as explained
in the following table:
3. Click OK to connect.
4.3.2 Connect to an Existing Network
1. Select a network from the list and press Connect or right-click for more options.
2. Click OK to connect.
37 PWS-440 User Manual
Chapter 4 Getting Connected
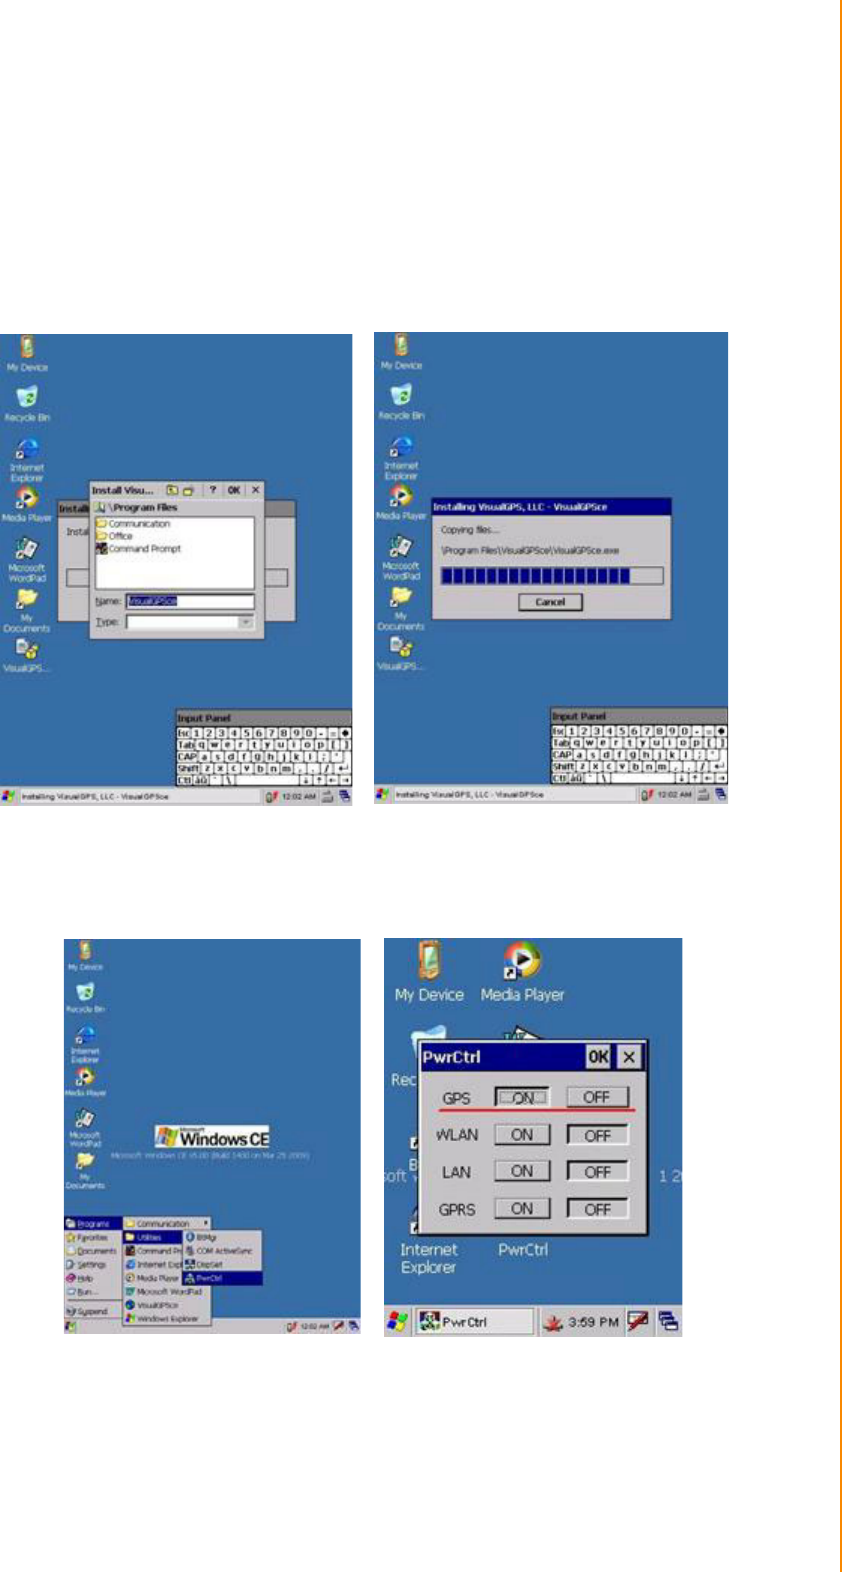
4.4 Connecting GPS
To run GPS Demo program, it need to download VisualGPS from internet. Copy this
program onto Deskonchip1 to save, and double tag to install VisualGPS as follow
instruction.
Copy “visualGPSceinstall.CAB” to PWS-440 ®C Desktop, and execute “visualGPS-
ceinstall.CAB” on desktop.
Follow these instructions to set up a GPS connection.
1. From START -> PROGRAM -> Utility -> “PwrCtrl”, and choose GPS “ON”.
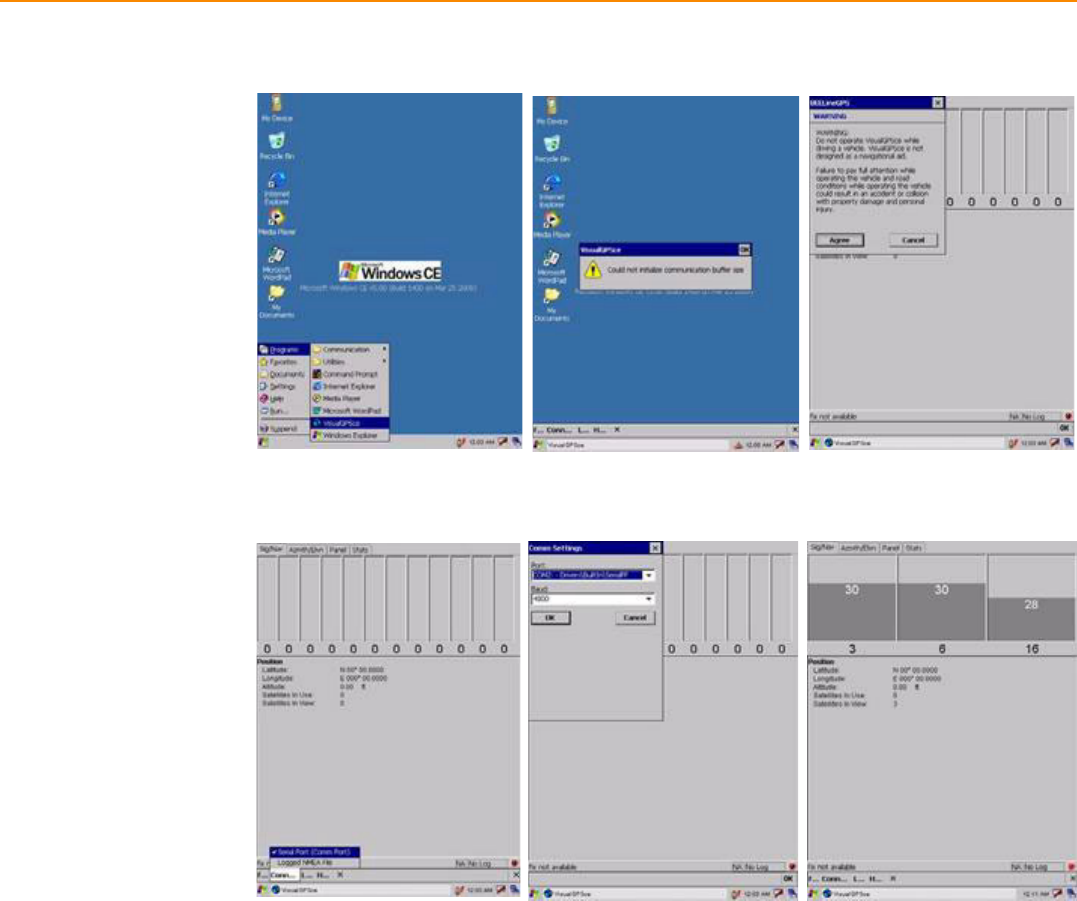
PWS-440 User Manual 38
2. Tap Start -> Program -> VisualGPS.
3. Click COM2. and Baudrate 9600. Then, OPEN GPS to start the “GPS”.
4. When GPS is active, click GPS status to display the satellite status.
5. Allow approximately 60 seconds (very first time) for GPS longitude and latitude
display. Note: GPS display approximately time depend on the environment.

41 PWS-440 User Manual
Chapter 4 Getting Connected
4.5 COM Port list
Below is reference for COM Port list.
COM No. Indicate
0 Cradle
1 RS232
2 RS232 / 422(Optional) /485 (Optional)
3 Virtual COM port
4 Virtual COM port
5 GPS (baud:9600)
6 BT (baud:921600)
7 ActiveSync
8 Visual COM port
9 Visual COM port

PWS-440 User Manual 42

Chapter 5
5
Advance Settings
PWS-440 User Manual 44
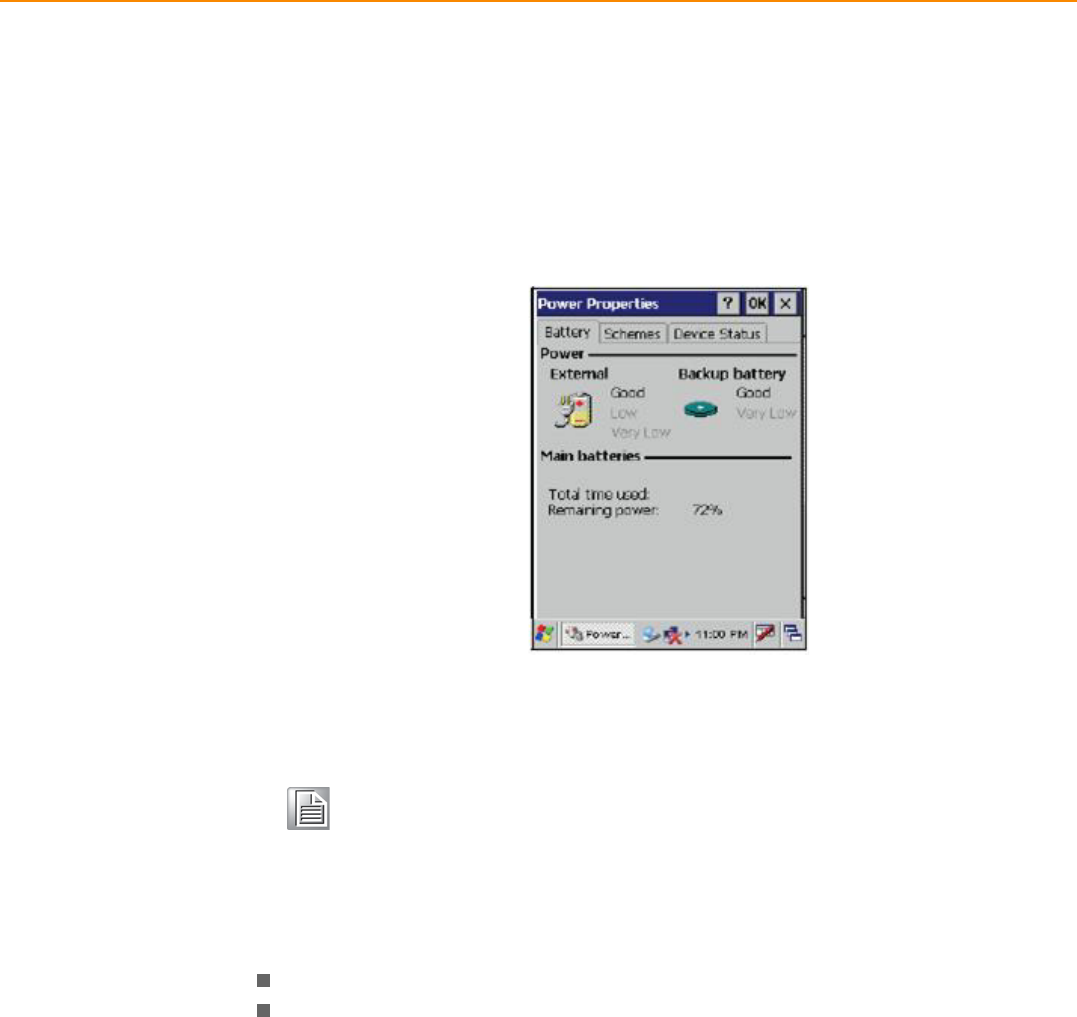
5.1 Checking the Battery Status
This section describes how to view the power level for both the main and backup bat-
tery and how to set power saving options. To check the main and backup battery sta-
tus:
1. Open Power Properties. Tap Start -> Settings -> Control Panel. Then double-
tap Power.
The Power screen appears.
2. The battery menu item displays the status of the main and backup batteries.
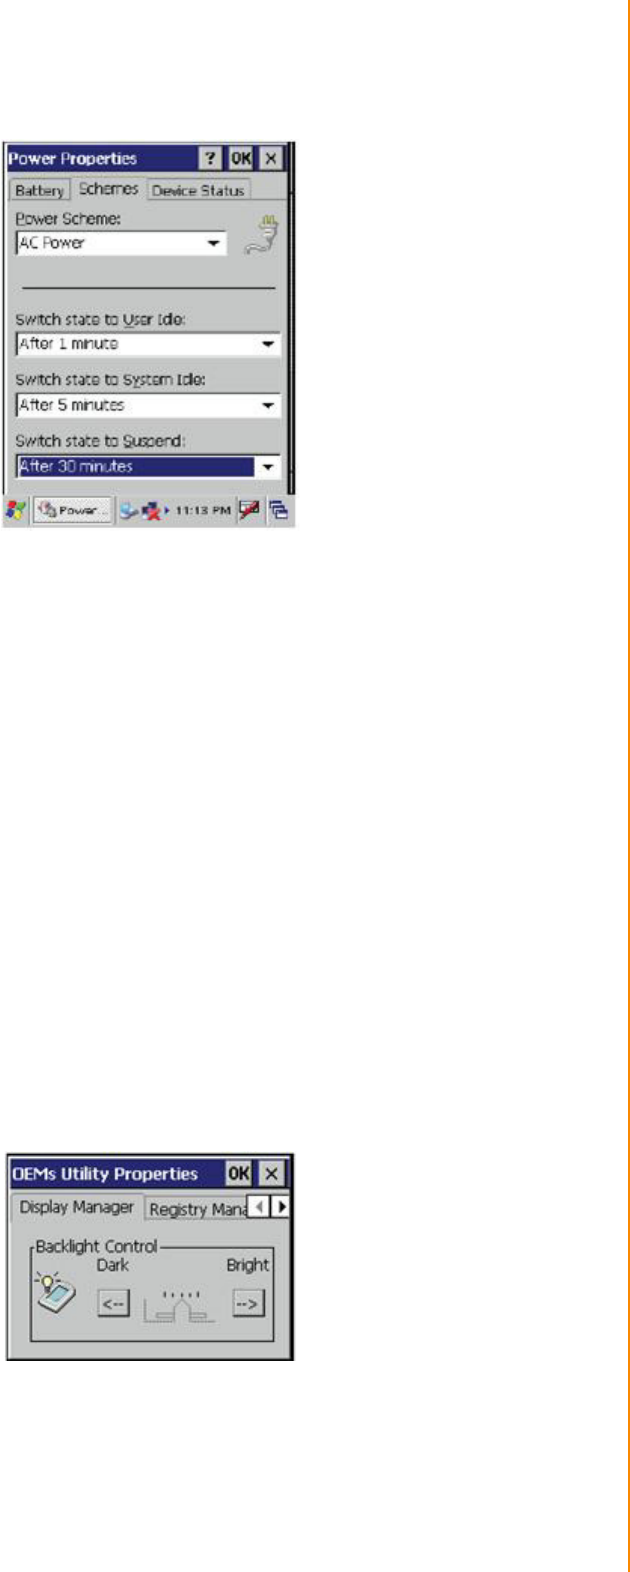
5.2 Optimizing Battery Life
You can extend the PWS-440 battery life by doing either of the following:
Change the automatic power settings
Minimize the use of the backlight
5.2.1 Changing the Automatic Power Settings
To change the automatic power settings:
1. In the Power Properties screen tap the Schemes tab.
2. Tap the arrow next to the Power Scheme and select Battery Power.
3. Tap the arrows next to the following three power saving scenarios and select the
desired time out for each item.
Note! It is necessary to charge the battery when the battery charge reaches
below 13%. If the battery does not accept a charge, contact Technical
Support.
45 PWS-440 User Manual
Chapter 5 Advance Settings
- Switch state to User Idle: PWS-440 enters power saving mode when there is no
user input after the selected time-out. The backlight brightness is reduced. The back-
light resumes normal brightness when the LCD is Touched.
- Switch state to System Idle: PWS-440 enters power saving mode when there is
no system activity after the selected time-out. The backlight is turned off. The back-
light turns on when the LCD is touched.
- Switch state to Suspend: PWS-440 enters suspend mode when there is no user
input or system activity after the selected time-out.
Time out values range from Never, and 4/5/10/30 minutes.
5.2.2 Adjusting Backlight Settings
The power consumption of the LCD backlight may be high, turn off the backlight func-
tion if it is not necessary. If a backlight is required, set “automatically turn off the back-
light” function.
To change backlight settings:
1. Tap Start -> Settings -> Control Panel.
2. Tap OEMs Utility.
3. Select Display Manager, and tap the arrow next to Dark or drag the slider to the
left to reduce the screen brightness.
PWS-440 User Manual 46
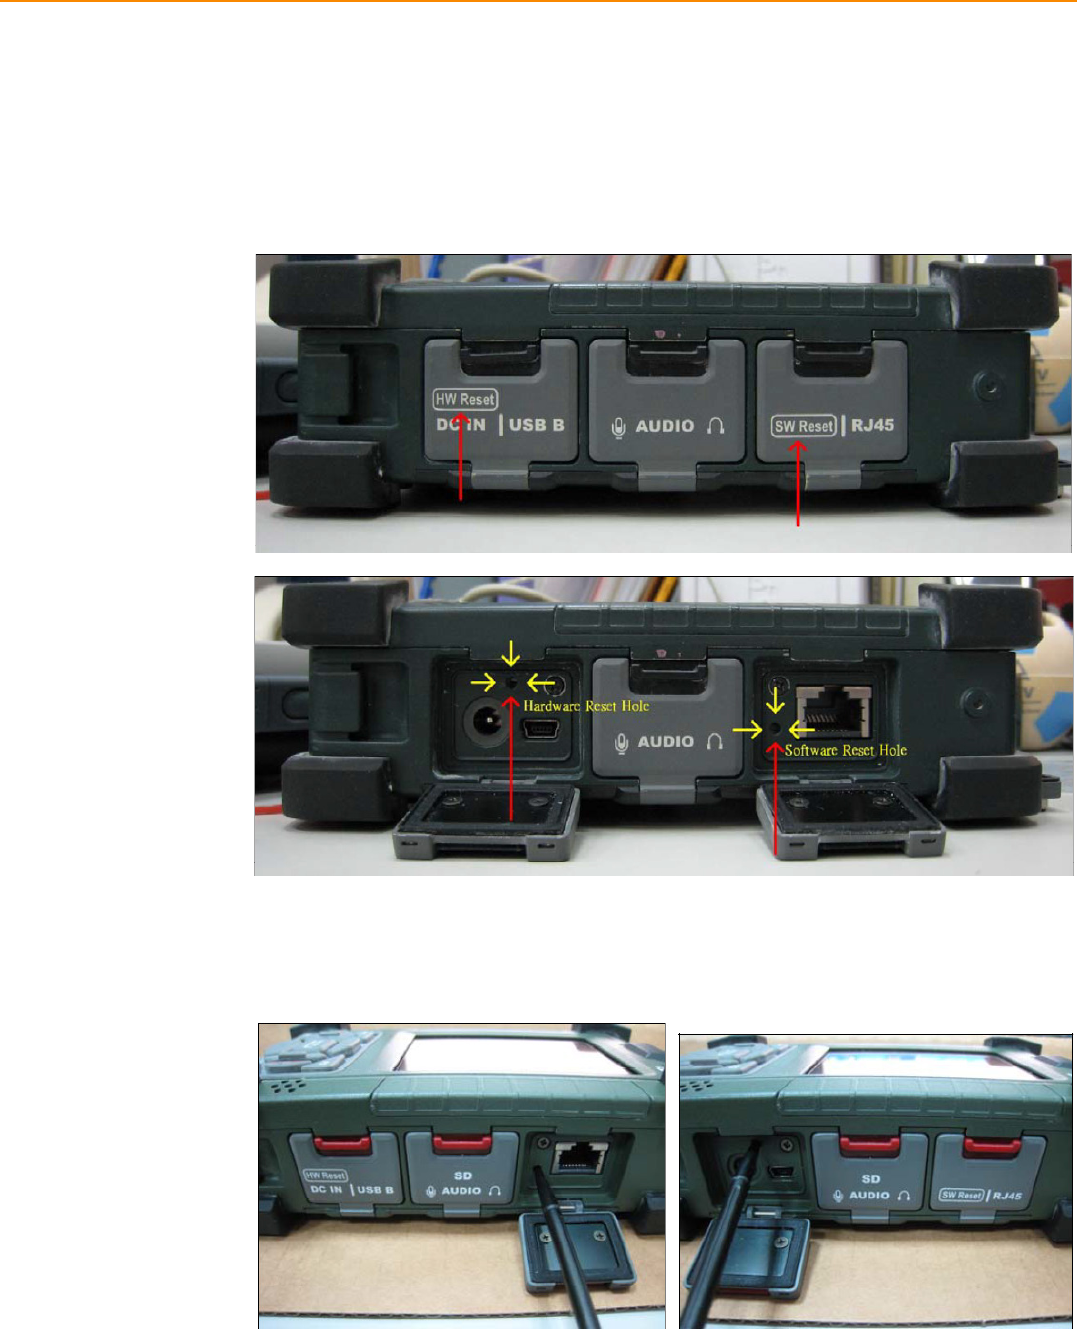
5.3 Performing a System Reset
You may need to perform a reset if the device freezes (i.e., device no longer
responds to the buttons on the screen). A reset allows your device to get a fresh
start, similar to rebooting a computer. This will restart your device and adjust memory
allocation. All records and entries are retained after a reset. Unsaved data in open
programs may in some cases be lost.
Performing a Hardware reset
1. Remove the stylus from its holder.
2. Lightly press the tip of the stylus to the reset button located on the PWS-440.

47 PWS-440 User Manual
Chapter 5 Advance Settings

www.advantech.com
Please verify specifications before quoting. This guide is intended for reference
purposes only.
All product specifications are subject to change without notice.
No part of this publication may be reproduced in any form or by any means,
electronic, photocopying, recording or otherwise, without prior written permis-
sion of the publisher.
All brand and product names are trademarks or registered trademarks of their
respective companies.
© Advantech Co., Ltd. 2013
This equipment has been tested and found to comply with the limits for a Class B
digital device, pursuant to Part 15 of the FCC Rules. These limits are designed to
provide reasonable protection against harmful interference in a residential installation.
This equipment generates, uses and can radiate radio frequency energy and, if not
installed and used in accordance with the instructions, may cause harmful interference
to radio communications. However, there is no guarantee that interference will not
occur in a particular installation. If this equipment does cause harmful interference
to radio or television reception, which can be determined by turning the equipment off
and on, the user is encouraged to try to correct the interference by one of the
following measures:
Reorient or relocate the receiving antenna.
Increase the separation between the equipment and receiver.
Connect the equipment into an outlet on a circuit different from that to which
the receiver is connected.
Consult the dealer or an experienced radio/TV technician for help.
FCC Caution: Any changes or modifications not expressly approved by the party
responsible for compliance could void the user's authority to operate this equipment.
This device complies with Part 15 of the FCC Rules. Operation is subject to the
following two conditions: (1) This device may not cause harmful interference, and (2)
this device must accept any interference received, including interference that may
cause undesired operation.
1. This Transmitter must not be co-located or operating in conjunction with any other
antenna or transmitter.
2. This equipment complies with FCC RF radiation exposure limits set forth for an
uncontrolled environment. This equipment should be installed and operated with a
minimum distance of 20 centimeters between the radiator and your body.