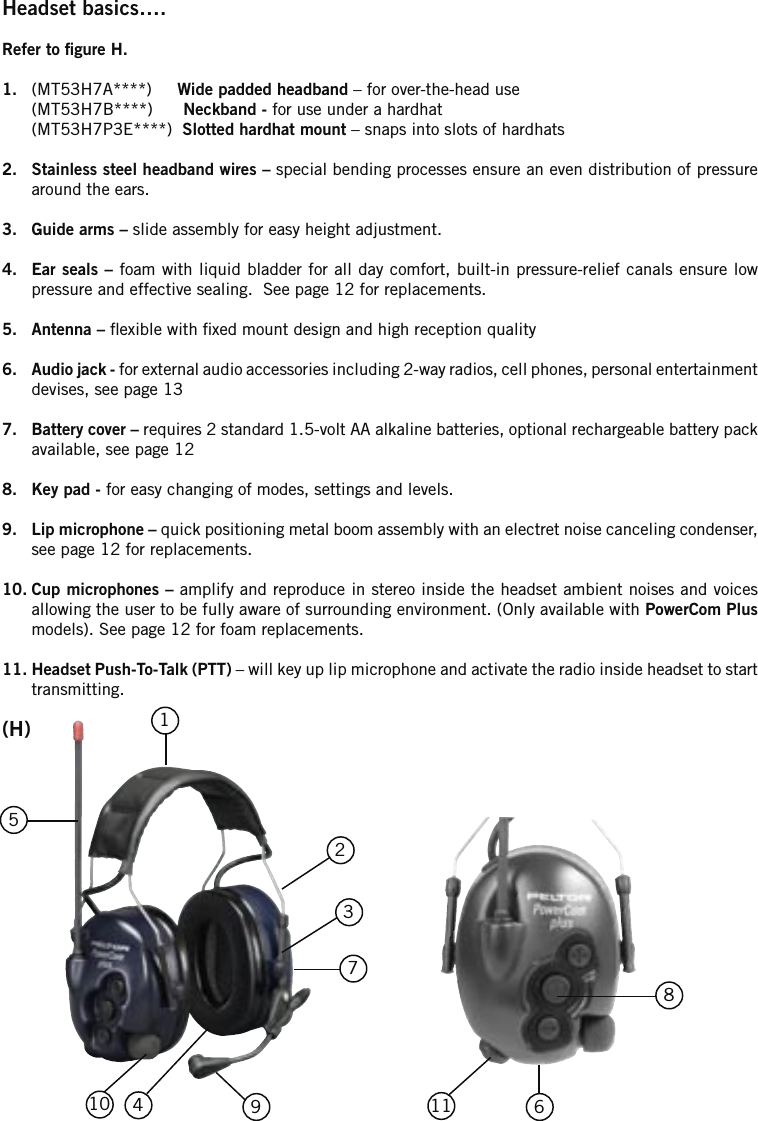
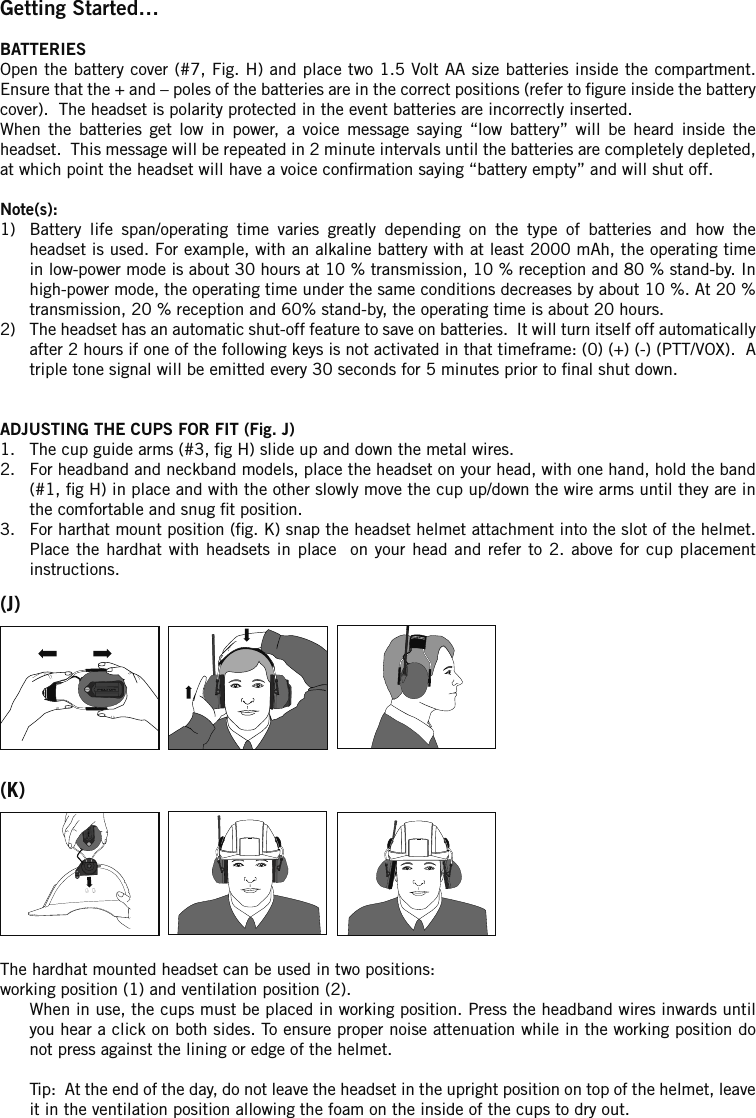
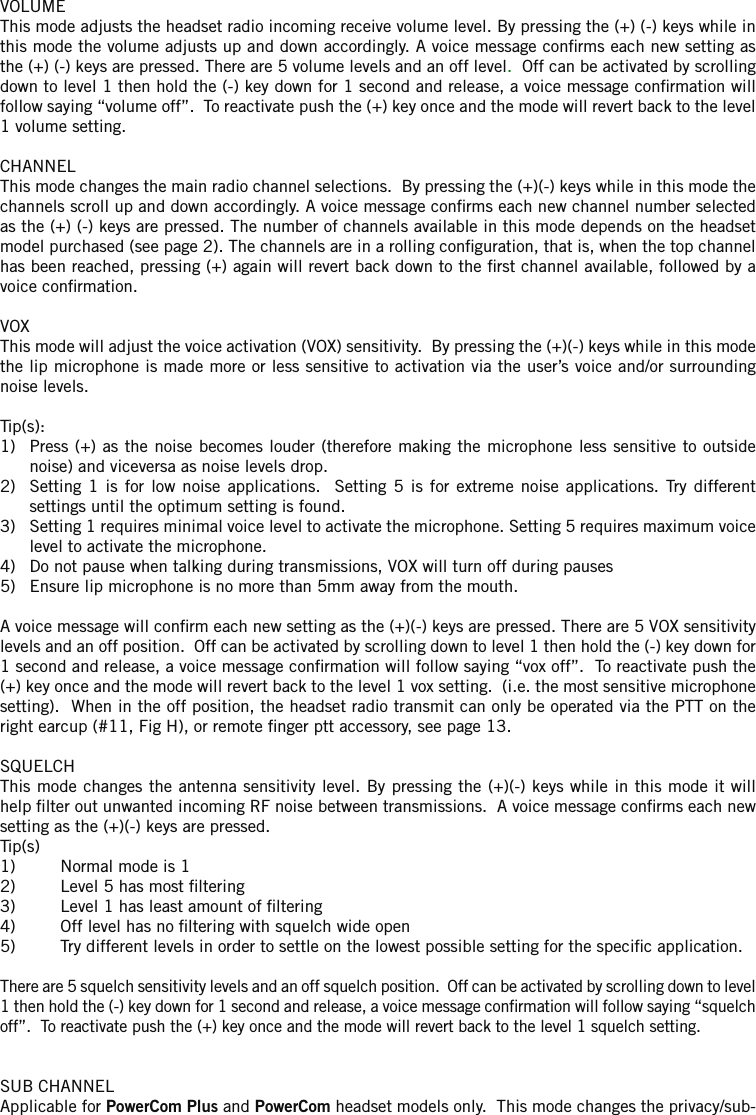
Aearo MT53H749 HEADSET TRANSCEIVER, 49 MHz User Manual FP PowerCom US

Aearo Company HEADSET TRANSCEIVER, 49 MHz FP PowerCom US

USERS MANUAL

POWERCOM PLUSPOWERCOMLITECOM
ENG  Instruction manualESP   Instrucciones de uso FRA  Mode d’emploi PowerCom PlusPowerComLite-Com
PowerCom Plus    462-467 MHz (FRS)    14 channels, 38 sub-channels    FCC and Industry Canada (IC) approvedModel Numbers:MT53H7A4610  Headband modelMT53H7B4610  Neckband modelMT53H7P3E4610  Slotted hardhat mount modelPowerCom    462-467 MHz (FRS)    14 channels, 38 sub-channels    FCC and Industry Canada (IC) approvedModel Numbers:MT53H7A4600  Headband modelMT53H7B4600  Neckband modelMT53H7P3E4600  Slotted hardhat mount modelLiteCom    49.830-49.890 MHz    5 channels    FCC and Industry Canada (IC) approvedModel Numbers:MT53H7A4900  Headband modelMT53H7B4900  Neckband modelMT53H7P3E4900  Slotted hardhat mount model
PELTOR 2-WAY RADIO HEADSETSTHANK-YOU for your purchase of Peltor’s latest self-contained2-way radio headset product.PowerCom Plus, PowerCom, and LiteCom all offer reliable, efcient communication between two or more people in noisy environments. Although  these  products  are  very  user-friendly,  please  take  the  time  to  read  this  instruction  manual carefully to ensure proper set-up and use of all features•  PowerCom Plus and PowerCom are 2-way radio headsets pre-programmed to 22 or 14 channels in the FRS and/or GMRS frequency band with 38 privacy sub-channels. These units have up to 0.15 watts of transmitting power with a range of 2 km outdoors. The range will vary depending on local surrounding environmental conditions. •  LiteCom is a 2-way radio headset pre-programmed to 5 channels in the 49 MHz frequency band.  This unit has up to 0.1 watts of transmitting power with a range of 100M outdoors.  The range will vary depending on local surrounding environmental conditions.•  The PowerCom Plus/PowerCom headsets will not communicate with the LiteCom headsets.   However, PowerCom Plus headsets will communicate with PowerCom headsets.•  All models feature advanced ghost voice conrmations of mode and level selections.   As an added bonus, the ghost voices are selectable by the user in every model.  Language options are English, French or Spanish.Depending  on  the  product  purchased,  they  will  communicate  with  other  similar  license-free  radio products in the FRS, GMRS and 49 MHz frequencies. These devises  comply  with part  15 of  the FCC  rules  and  regulations.   Operation  of these  devices  are subject to the following two conditions:1) These devises may not cause harmful interference, and2) These devises must accept any interference received, including interference that may cause undesired operation
Headset basics….Refer to gure H.1.  (MT53H7A****)     Wide padded headband – for over-the-head use  (MT53H7B****)      Neckband - for use under a hardhat  (MT53H7P3E****)  Slotted hardhat mount – snaps into slots of hardhats2.  Stainless steel headband wires – special bending processes ensure an even distribution of pressure around the ears.3.  Guide arms – slide assembly for easy height adjustment. 4.  Ear seals – foam with liquid bladder for all day comfort, built-in pressure-relief canals ensure low pressure and effective sealing.  See page 12 for replacements.5.  Antenna – exible with xed mount design and high reception quality 6.  Audio jack - for external audio accessories including 2-way radios, cell phones, personal entertainment devises, see page 13 7.  Battery cover – requires 2 standard 1.5-volt AA alkaline batteries, optional rechargeable battery pack available, see page 128.  Key pad - for easy changing of modes, settings and levels.9.  Lip microphone – quick positioning metal boom assembly with an electret noise canceling condenser, see page 12 for replacements.10. Cup microphones – amplify and reproduce in stereo inside the headset ambient noises and voices allowing the user to be fully aware of surrounding environment. (Only available with PowerCom Plus models). See page 12 for foam replacements.11. Headset Push-To-Talk (PTT) – will key up lip microphone and activate the radio inside headset to start transmitting.61234571110(H)98
Getting Started… BATTERIESOpen the battery cover (#7, Fig. H) and place two 1.5 Volt AA size batteries inside the compartment. Ensure that the + and – poles of the batteries are in the correct positions (refer to gure inside the battery cover).  The headset is polarity protected in the event batteries are incorrectly inserted. When  the  batteries  get  low  in  power,  a  voice  message  saying  “low  battery”  will  be  heard  inside  the headset.  This message will be repeated in 2 minute intervals until the batteries are completely depleted, at which point the headset will have a voice conrmation saying “battery empty” and will shut off.Note(s): 1)  Battery  life  span/operating  time  varies  greatly  depending  on  the  type  of  batteries  and  how  the headset is used. For example, with an alkaline battery with at least 2000 mAh, the operating time in low-power mode is about 30 hours at 10 % transmission, 10 % reception and 80 % stand-by. In high-power mode, the operating time under the same conditions decreases by about 10 %. At 20 % transmission, 20 % reception and 60% stand-by, the operating time is about 20 hours.2)  The headset has an automatic shut-off feature to save on batteries.  It will turn itself off automatically after 2 hours if one of the following keys is not activated in that timeframe: (0) (+) (-) (PTT/VOX).  A triple tone signal will be emitted every 30 seconds for 5 minutes prior to nal shut down.ADJUSTING THE CUPS FOR FIT (Fig. J)1.  The cup guide arms (#3, g H) slide up and down the metal wires.2.  For headband and neckband models, place the headset on your head, with one hand, hold the band (#1, g H) in place and with the other slowly move the cup up/down the wire arms until they are in the comfortable and snug t position.3.  For harthat mount position (g. K) snap the headset helmet attachment into the slot of the helmet.  Place the  hardhat with  headsets in  place   on  your  head  and  refer  to  2.  above  for  cup  placement instructions.The hardhat mounted headset can be used in two positions:working position (1) and ventilation position (2).   When in use, the cups must be placed in working position. Press the headband wires inwards until you hear a click on both sides. To ensure proper noise attenuation while in the working position do not press against the lining or edge of the helmet.  Tip:  At the end of the day, do not leave the headset in the upright position on top of the helmet, leave it in the ventilation position allowing the foam on the inside of the cups to dry out.(J)(K)
Operating Instructions……… PowerCom Plus, PowerCom and LiteCom all operate on the same simple 3 key touch pad conguration (#8 g H) and 1 PTT button.1.  On/Off/Mode Selection (O)  This  button  will  turn  the  headset  on  or  off  by  holding  it  down  for  more  than  2  seconds.  Once  theheadset is turned on, it reverts  to a mode menu selection button, see below for mode menu details.Step-by-step mode menu selectionSimply press the (O) key and the headset will conrm via a voice message what mode menu has been selected.  Every time the (O) key is pressed it continues onto the next mode menu item followed by a voice conrmation.  Once in the mode of choice, refer to instructions below on the (+) and (-) keys.Quick step mode menu selectionBy pushing (0) key several times in a row, it will quickly scroll down the modes the equivalent number of times the (0) was pushed, followed by a voice conrmation of the menu item selected.The headset will revert back to Surround Volume Mode (in PowerCom Plus headsets) and Radio Volume mode (in PowerCom and LiteCom headsets) if the (0) or (+) (-) keys are not activated within 5 seconds while  making  selections.    A  beep  will  be  heard  in  the  headset  indicating  mode  has  automatically reverted.2. UP (+)  Increases the steps within the mode selected, followed by a voice   conrmation of step selected.3. DOWN (–)  Decreases the steps within the mode selected, followed by a voice   conrmation of step selected.4. PTT  Located on the backside of the right ear cup. The thumb activated push-to-talk button will  key  up  the  lip  microphone  and  activate  the  radio  inside  the  headset  to  start transmitting.Operating Details…Turn the unit on by pressing the (O) key for more than 2 seconds and promptly let go, the headset will emit a  raising  series  of 3 tones conrming the headset is turned on.  To  turn the unit off, again hold the (0) button for 2 seconds and promptly let go, the headset will emit a decending series of 3 tones conrming the headset is off.Once the headset is on and ready to be used, the (0) key becomes the mode menu selection button:Mode Menu SelectionsSURROUND Applicable for PowerCom Plus headset models only.This mode adjusts the volume level of the cup microphones (#10 g H). Pressing the (+) (-) keys while in this mode will either increase or decrease the surrounding ambient noise level being reproduced inside the headset.  A voice message conrms each  new setting as the (+) (-) keys are pressed. There are 5 volume levels and an off level.  Off can be activated by scrolling down to level 1 then hold the (-) key down for 1 second and release, a voice message conrmation will follow saying “surround off”.  To reactivate push the (+) key once and the mode will revert back to the level 1 surround volume setting.
VOLUME   This mode adjusts the headset radio incoming receive volume level. By pressing the (+) (-) keys while in this mode the volume adjusts up and down accordingly. A voice message conrms each new setting as the (+) (-) keys are pressed. There are 5 volume levels and an off level.  Off can be activated by scrolling down to level 1 then hold the (-) key down for 1 second and release, a voice message conrmation will follow saying “volume off”.  To reactivate push the (+) key once and the mode will revert back to the level 1 volume setting.CHANNELThis mode changes the main radio channel selections.  By pressing the (+)(-) keys while in this mode the channels scroll up and down accordingly. A voice message conrms each new channel number selected as the (+) (-) keys are pressed. The number of channels available in this mode depends on the headset model purchased (see page 2). The channels are in a rolling conguration, that is, when the top channel has been reached, pressing (+) again will revert back down to the rst channel available, followed by a voice conrmation.VOXThis mode will adjust the voice activation (VOX) sensitivity.  By pressing the (+)(-) keys while in this mode the lip microphone is made more or less sensitive to activation via the user’s voice and/or surrounding noise levels.Tip(s):     1)  Press (+) as  the noise becomes louder (therefore making the microphone  less sensitive to outside noise) and viceversa as noise levels drop.2)  Setting 1  is  for  low  noise  applications.    Setting  5  is  for  extreme  noise  applications.  Try  different settings until the optimum setting is found.3)  Setting 1 requires minimal voice level to activate the microphone. Setting 5 requires maximum voice level to activate the microphone.4)  Do not pause when talking during transmissions, VOX will turn off during pauses5)  Ensure lip microphone is no more than 5mm away from the mouth.A voice message will conrm each new setting as the (+)(-) keys are pressed. There are 5 VOX sensitivity levels and an off position.  Off can be activated by scrolling down to level 1 then hold the (-) key down for 1 second and release, a voice message conrmation will follow saying “vox off”.  To reactivate push the (+) key once and the mode will revert back to the level 1 vox setting.  (i.e. the most sensitive microphone setting).  When in the off position, the headset radio transmit can only be operated via the PTT on the right earcup (#11, Fig H), or remote nger ptt accessory, see page 13.SQUELCH This mode changes the antenna sensitivity level. By pressing the (+)(-) keys while in this mode it will help lter out unwanted incoming RF noise between transmissions.  A voice message conrms each new setting as the (+)(-) keys are pressed.   Tip(s)1)  Normal mode is 12)  Level 5 has most ltering3)  Level 1 has least amount of ltering4)  Off level has no ltering with squelch wide open5)  Try different levels in order to settle on the lowest possible setting for the specic application.There are 5 squelch sensitivity levels and an off squelch position.  Off can be activated by scrolling down to level 1 then hold the (-) key down for 1 second and release, a voice message conrmation will follow saying “squelch off”.  To reactivate push the (+) key once and the mode will revert back to the level 1 squelch setting.  SUB CHANNELApplicable for PowerCom Plus and PowerCom headset models only.  This mode changes the privacy/sub-
channel  selections.    By  pressing  the  (+)(-)  keys  while  in  this  mode  the  channels  scroll  up  and  down accordingly. A voice message conrms each new channel number selected as the (+) (-) keys are pressed. There are 38 sub channels plus an open 0 channel. The channels are in a rolling conguration, that is, when the  top channel has been reached, pressing (+) again  will revert back down to the rst channel available, followed by a voice conrmation.Tip(s)1)  PowerCom Plus and PowerCom headsets are compatible and will transmit to each other.2)  In order to communicate properly, all headsets in the group must be on the same main channel and same  sub-channel.  POWERApplicable for only PowerCom Plus and PowerCom headset models.  This mode allows the selection of two transmitting power levels. When (+) is pressed, a voice conrmation will follow and the headset will be in the maximum (high) output power transmitting mode. When the (-) is pressed, a voice conrmation will follow and the headset will be in the lowest (low) output power transmitting mode.Tip(s)1)  This mode can be used as a battery conservation feature2)  Depending on  distance transmitting,  high power  setting  is  not  always  required  for good  coverage.  Evaluate units in environment to be used for optimum setting.3)  The high setting will consume more battery power than the low setting.LANGUAGEThis mode  allows the selection of voice conrmations in the  headset to be in one of three languages:  English, French or Spanish. By pressing the (+) (-) keys while in this mode the languages will scroll up and down accordingly.  A voice message will conrm language selected. Notes:1)  The mode will revert back to Surround Volume Mode (in PowerCom Plus headsets) and Radio Volume mode (in PowerCom and LiteCom headsets) if the (0) or (+) (-) keys are not activated within 5 seconds while  making  selections.  A  beep  will  be  heard  in  the  headset  indicating  mode  has  automatically reverted.2)  The headsets will also automatically shut-off if one of the following buttons (0) (+) (-) (PTT/VOX) is not pressed within a span of 2 hours. Three tones are emitted every 30 seconds for 5 minutes prior to shut down.PUSH-TO-TALK (PTT) BUTTON FUNCTIONALITYLocated on the backside of the right ear cup, pressing this button keys up the lip microphone and enables radio transmission manually. The radio will transmit, and the lip microphone will stay open as long as the button is pressed.VOX DISABLE FEATURE-Short cutDouble clicking the PTT button quickly will disable the vox feature, conrmed by a long beep signal in the headset. To reactivate, double click the PTT  button again  and the vox will be enabled, conrmed by a short double beep signal in the headset.Tip:  Excellent feature to use if operator moves from low to high noise periodically during  the work day.
ALTERNATE BELT RADIO OR CELL PHONE ACCESSORY USEDouble click on the PTT button prior to plugging in the external 2-way communication accessories (FL6R + FL50 belt PTT combination, or FL6S) into the audio jack on the  bottom  of  the  headset (#6, g H, page 4). When using this feature, the PTT on the headset will activate the headset radio into transmit mode, and the FL50 belt PTT will activate the alternate belt radio into transmit mode.Note, these instructions do not apply when using receive-only accessories. Simply plug in the receive only accessories into the audio jack (#6, g H, page 4)MAINTENANCEClean the outside of the headset regularly with soap and warm water. Note: Do not immerse in uids. If the headset is exposed to internal moisture, remove the hygiene kit and let the unit dry out. Do not store the headset in temperatures exceeding +55°C, for example in on a car dashboard or behind the windshield.The ear seals deteriorate over time, inspect them regularly to ensure that there are no cracks.  New earseals ensure optimum comfort and proper noise attenuation. Refer to page 15 for ordering information.Certain  chemical  substances  may  be  harmful  to  this  product.  Contact  the  manufacturer  for  more information.When  changing  batteries,  protect  the  electronics  from  being  damaged  by  always  turning  off  the  unit manually prior to replacing batteries.  Refer to page 5 for proper battery replacement procedure.Always  wear,  adjust,  clean  and  maintain  the  headset  according  to  these  instructions.    If  not,  noise attenuation characteristics and other electronic functions may be compromised.CAUTIONWhen set  to  full  gain the earphones can produce an equivalent sound level of up to 87dB(A). This is considered safe for daily 8-hours use, as long as the time spent in receiving mode does not exceed 2,5 hours. If the time spent listening to the earphones exceeds 2,5 hours per day the gain setting must be reduced  below  maximum.  One  step  below  maximum  gain  produces  an  equivalent  sound  level  of  82 dB(A), considered safe even if used in the listen mode, in noise, for a full 8-hours day. If after wearing this device, tinnitus (ringing or buzzing in the ears) is heard, or your hearing seems mufed or dulled, or for any other reason you suspect a hearing problem, the volume levels should be reduced and the t, condition, and adequacy of this device should be checked for the noise in which it is being worn. If the condition persists see an audiologist or physician for a professional review.FCC Regulations and Licensing Application InformationPeltor (General Mobile Radio Service) Two-way Radio headsetsThe  FCC  requires  operators  on  the  GMRS  and  Private  Land  Mobile  (PLM)  frequencies  to  obtain  an FCC  license  prior  to  use.  To  apply  and  learn  more  about  licenses,  please  visit  the  FCC  website  at www.fcc.gov.
A GMRS license requires Form 605 and Form 159.  A (PLM) license requires Form 601 and Form 159 Schedule D and H.  Please note that application fees will be applicable.  You can obtain a copy of the FCC Forms mentioned above by calling 1-800-418-3676. Further detailed instructions are available by calling the FCC at 1-888-225-5322.  In addition, you can download the forms, register on-line, and obtain further information at the FCC’s Web site: www.fcc.gov/formpage.htmlSafety informationYour wireless transceiver contains low power transmitter. When the transmitter is activated it sends out radio frequency (RF) signals. This device is authorized to operate at a duty factor not exceed 50%.Use only  the  supplied  antenna.  Unauthorized  antennas,  modications,  or  attachments  could  damage  the transmitter and violate FCC regulationsGMRS License :Use of GMRS radios within the United States requires a FCC GMRS license. An individual 18 years of age or older, who is not a representative of a foreign government is eligible to apply for a GMRS system license. You will need two forms from the FCC, FCC Form 159 and FCC Form 605 Main Form and Schedule F. You can nd the forms online at http://www.fcc.gov/formpage.html, or call 1-800-418-3676.NRRThe NRR attenuation data are displayed on page 11. Improper  t  of  this  device  will  reduce  its  effectiveness  in  attenuating  noise.  Consult  this  manual  for proper tting instructions. For further information, please write Aearo Company, 8001 Woodland Drive, Indianapolis, Indiana 46278. The level of noise entering a person´s ear, when a hearing protector is worn as directed, is closely approximated by the difference between the A-weighted environmental niose level and the NRR.Example: 1.  The environmental noise level as   measured as the ear is 92 dBA2.  The NRR is 22 decibels (dB)3.  The level of noise entering the ear   is approximately equal to 70 dBA.The NRR used in the above example was acheived under laboratory conditions. Although hearing protectors can be recomended for protection against the harmful effects of impulsive noise, the noise reduction rating (NRR) is based on the attenuation of continuous noise and may not be an accurate indicator of the protection attainable against impulsive noise such as gunre.
17.34.022.12.631.92.437.12.433.22.436.13.5MT53H7A4900LiteCom38.03.4 253150 6300 CSAANNR38.72.737.42.317.34.022.12.631.92.437.12.433.22.436.13.5MT53H7A4600PowerCom38.03.4 253150 6300 CSAANNR38.72.737.42.318.64.323.63.131.82.836.62.231.22.436.43.6MT53H7A4610PowerCom Plus39.02.6 253150 6300 CSABNNR39.52.738.33.6AttenuationPowerCom PlusLiteComPowerCom
SPARE PARTSHY79 Hygiene kitConsists of two  snap-in  ear cushions and  foam  pads. Replace at  least  twice a year to ensure proper attenuation, hygiene and comfort.  Sold as a pair, enough for one headset replacement.HY100A Ear seal comfort padA single-use sweat absorbing pad that is placed on the ear seals.  Sold in packages of 100 pair.HYM1000 Lip microphone hygiene tapeTape  wraps  around  the  lip  microphone  to  protect  against  moisture  and  harsh environmental  conditions.      Wind  and  water  resistant,  great  for  hygienic  purposes when  headsets  are  shared.  Sold  in  boxes  of  5  metres,  good  for  approximately  50 replacements.M995 Lip microphone foam wind screenEffective protection from wind noise, also protects against dirt and increases the life span and of microphone element. One per package.M60/2 Cup microphone foam windsock (#10, Fig H)Applicable for PowerCom Plus only products.  One pair per package.1173 SV Battery coverReplacement battery cover.MT53-02  Boom microphone assemblyReplacement boom microphone with plug-in connector
SPARE PARTS cont.88009-00000  Rechargeable battery packPeltor AA rechargeable battery pack includes wall transformer.Audio accessory jack (#6, Fig H) connectionsFL6S  Cell phone patch-cord2.5 mm stereo contact plug assembly for use with cell phones.FL6T  Listen-only patch-cord3.5 mm stereo plug, wired in mono for use with personal entertainment devises.FL6BT  Listen-only patch-cord3.5 mm mono plug, for use with 2-way radios and accessories with a 3.5 mm audio jackFL6BS  Listen-only patch-cord2.5 mm mono plug, for use with 2-way radios and accessories with 2.5 mm audio jackTK56  Remote ring nger PTTRemote nger push-to-talk button with 48” lead cableFL6R – External 2-way radio patch-cordCable  assembly  for  adapting  PC+,  PC,  LC  to  an  alternate  2-way  radio.    Comes  with  Nexus  TP-120 connector which mates with standard Peltor FL50 radio PTT patchcords (sold separately).  For a complete list of FL50 2-way radio accessory cables, please contact customer service.
FREQENCY AND CHANNEL ALLOCATIONS BY PRODUCT    PowerCom  PowerCom  LiteComFrequency  Licence  PowerCom Plus  PowerCom PlusMHz  Band   FRS/GMRS models  FRS only models     Channel Allocation*  Channel Allocation*  Channel Allocation                                                                                                                                                                .49.830  Free  149.845  Free  249.860  Free  349.875  Free  449.890  Free  5   462.5625  FRS/GMRS  1  1462.5875  FRS/GMRS  2  2462.6125  FRS/GMR  3  3462.6375  FRS/GMRS  4  4462.6625  FRS/GMRS  5  5462.6875  FRS/GMRS  6  6462.7125  FRS/GMRS  7  7467.5625  FRS only  8  8467.5875  FRS only  9  9467.6125  FRS only  10  10467.6375  FRS only  11  11467.6625  FRS only  12  12467.6875  FRS only  13  13467.7125  FRS only  14  14462.550  GMRS only  15462.5750  GMRS only  16462.6000  GMRS only  17462.6250  GMRS only  18462.6500  GMRS only  19 Not to be used along Canadian boarder disclaimer462.6750  GMRS only  20 Nationwide emergency  and road information channel462.7000  GMRS only  21 Not to be used along Canadian boarder disclaimer462.7250  GMRS only  22467.550  GMRS only  23467.5750  GMRS only  24467.6000  GMRS only  25467.6250  GMRS only  27467.6750  GMRS only  28467.7000  GMRS only  29467.7250  GMRS only  30*individual channels also have 38 privacy/sub-channels – see next page
PRIVACY/SUB-CHANNEL FREQUENCY ALLOCATION LIST . Chart below is only applicable to PowerCom Plus and PowerCom headset models.   Frequency  Sub-  Frequency  Sub-  Frequency  Sub-Hz  Channel  Hz  Channel   Hz  Channel  Allocation    Allocation    Allocation   .                              67.0  01  107.2  14  167.9  27   71.9  02            110.9   15  173.8  28    74.4  03  114.8  16  179.9  2977.0  04  118.8  17  186.2  3079.7  05  123.8  18  192.8  31 82.5  06  127.3  19  203.5  3285.4  07  131.8  20  210.7  3388.5  08  136.5  21  218.1  3491.5  09  141.3  22  225.7  3594.8  10  146.2  23  233.6  3697.4  11  151.4  24  241.8  37100.0  12  156.7  25  250.3  38103.5  13  162.2  26  off  00Address information for warranty/repair work:Please contact customer service prior to returning any products for servicing.Customer Service Contact Information:WebSite:  www.aearo.comE-mail  peltor_communications@aearo.comPhone  1-800-665-2942For Canada:Peltor Communications546 Bryne Drive, Unit CBarrie, ON  L4N-9P6For USA and Mexico:Aearo CompanyAttn: Peltor Warranty Center90 Mechanic StreetSouthBridge, MA  0155
For Canada:Peltor Communications546 Bryne Drive, Unit CBarrie, ON  L4N-9P6For USA and Mexico:Aearo Company90 Mechanic StreetSouthBridge, MA  0155

Navigation menu