Aearo MT53H7WS PeltorWS User Manual FP3567 WS omslag
Aearo Company PeltorWS FP3567 WS omslag
Aearo >
Manual
USING
WIRELESS TECHNOLOGY
HEADSET
WIRELESS SOLUTIONS
Canada
Aearo Canada
7115 Tomken Road
Mississauga, ON L5S 1X7
905-795-0700
peltor_communications@aearo.com
England
Aearo Ltd, First Avenue, Poynton, Cheshire
England, SK12 1FJ
Tel. +44 (01625) 878320, Fax. +44 (01625) 877348
ukinfo@aearo.co.uk
France
Aearo LPE S.A., 5 Avenue Arago, 94345 Joinville le Pont Cedex, France
Tel. +33 1 48 85 20 88, Fax. +33 1 48 85 39 43
frinfo@aearo.fr
Germany
Informationsbuero Aearo GmbH
Postfach 10 06 12, D-76260 Ettlingen
Ottostr. 1, D-76275 Ettlingen, Germany
Tel. +49 (0)7243 7611-0, Fax. +49 (0)7243 7611-18
deinfo@aearo.de
Italy
Aearo Srl,
Via Boccaccio 37, 20090 Trezzano sul Naviglio, Italia
Tel. +39 (02) 48402625, Fax. +39 (02)48402616
itinfo@aearo.it
Spain
Aearo Proteccion Laboral S.A
C/Balmes 152 7o 2a, 08008 Barcelona, Spain
Tel. +34 900 99 44 80, Fax. +34 900 99 44 79
esinfo@aearo.es
Sweden
Peltor AB, Box 2341, Malmstensgatan 19
SE-331 02 Värnamo, Sweden
Tel. +46 (0)370 65 65 65, Fax. +46 (0)370 65 65 99
info@peltor.se
Switzerland
Walter Gyr AG, Bachstrasse 41, 8912 Obfelden, Switzerland
Tel. +41 (0)1761 5372, Fax +41 (0)1761 9715
USA
Aearo Company
5457 W. 79th Street
Indianapolis, IN 46268
317-692-6666
peltor_communications@aearo.com
FP3567 Peltor Marketing Communication Vmo.
Peltor AB
Box 2341, SE-331 02 Värnamo, Sweden
Tel. +46 (0)370-69 42 00, Fax +46 (0)370-151 30
email: info@peltor.se Internet: www.peltor.se
Member of the Aearo group
(C)
(B)
2
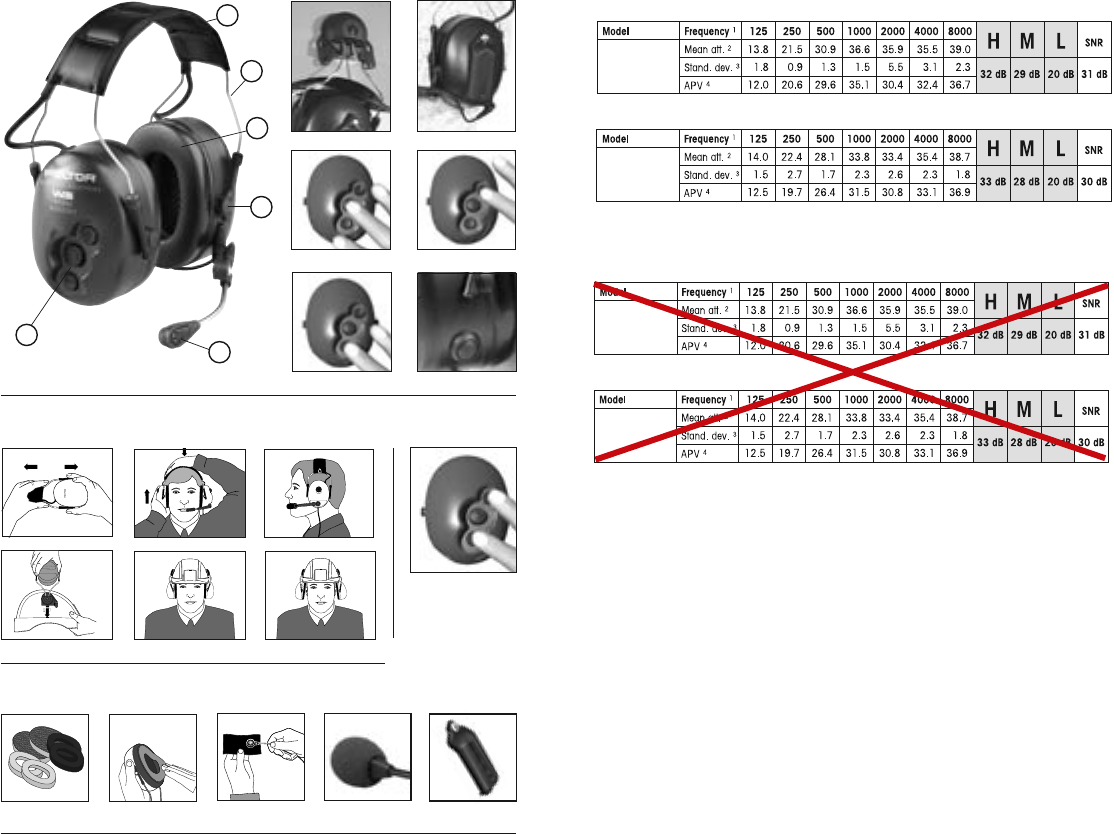
1.1
3
4
5
1.2 6
7
7.3
7.27.1
(D:1)
(F:1)
Attenuation headband, weight: 368 g
Attenuation for helmet attachement, weight: 417 g
MT53H7AWS2
MT53H7BWS2
MT53H7P3EWS2
(H)
3
HYM1000
2
HY100
5
1173 SV
1
HY79 M60/2
4
46
5
13
2
7.4
(F:2)
Attenuation headband, weight: 368 g
Attenuation for helmet attachement, weight: 417 g
MT53H7AWS2
MT53H7BWS2
MT53H7P3EWS2

1
Peltor WS Headset

2
3
*) Peltor Wireless Solutions är ett trademark (™) i Europa
Peltor WS Headset
Med Peltor WS headset kan du enkelt och smidigt kommunicera trådlöst
över kommunikationsradio och telefon, även i bullrig miljö. Peltor WS Head-
set ingår i sortimentet Peltor Wireless Solutions*). Här ingår även Peltor
WS adapter och övriga produkter, som använder sig av världsstandarden
Bluetooth® för överföring av Ijud. Headsetet är effektivt bullerdämpande för
att skydda hörseln och har en bullerkompenserad mikrofon, som möjliggör
tillförlitlig kommunikation, även vid höga bullernivåer.
Peltor WS Headset är testat och godkänt i enlighet med PPE-direktivet
89/686/EEC och EMC-direktivet 89/336/EEC, vilket innebär att kraven för
CE-märkning är uppfyllda.
För att du skall bli riktigt nöjd med din nya Peltorprodukt, är det viktigt att du
läser igenom hela bruksanvisningen. Du behöver även bruksanvisningen för
den enhet, som headsetet skall fungera med; Peltor WS adapter, mobiltele-
fon eller annan utrustning med Bluetooth®.
(A) Funktioner
• Headsetet kan kommunicera trådlöst med en annan Bluetooth-enhet.
• Kan användas ca 10 meter från den andra Bluetooth-enheten, även
utom synhåll, utan att tappa kontakten.
• Traksättet är ”full duplex”, dvs samtidig kommunikation i båda rikt-
ningarna.
• Volymjustering och svarsknapp är placerade på höger kåpa.
• Headsetet har justerbar medhörning.
• ”Ringsignal” genereras vid inkommande telefonsamtal.
• Om telefonen har röststyrningsfunktion kan uppringning ske via
headsetets mikrofon.
• Två 1,5V (AA) batterier ger en ungefärlig driftstid på ca 2000 timmar i
stand-by och ca. 70 timmar taltid.
• Polaritetsskydd skyddar kretsen vid felvändning av batterier.
• Varningssignal avges vid låg batterispänning.
• Tonsignaler avges vid till- och frånslag av headsetet.
• Tonsignal avges vid synkronisering av Bluetooth-enheter.
(B) Egenskaper
1.1 Extra bred hjässbygel (MT53H7AWS2) med mjuk stoppning för bästa
komfort under hela arbetsdagen.
1.2 Speciellt anpassat hjälmfäste (MT53H7P3EWS2) med fästen för visir
och regnskydd.
2. Individuellt fjädrande bygeltrådar i rostfritt fjäderstål ger en jämn tryck-
fördelning runt öronen. Stålbyglar behåller sin spänst bättre an plast-
byglar inom ett brett temperaturområde.
3. Låg tvåpunktsupphängning och enkel höjdinställning utan utskjutande delar.
4. Mjuka och breda skum/vätskefyllda tätningsringar med inbyggda
tryckutjämningskanaler ger lågt tryck, effektiv tätning och individuell
komfort.
5. Mikrofon som är effektivt bullerkompenserad och har en robust mikro-
fonarm med ”Quick Positioning-funktion”.
6. Batterilock för enkelt batteribyte. Två alkaliska 1,5-voltsbatterier typ
AA medföljer. Peltor har också en NiMH-ackumulator, som kan ersätta
torrbatterier.
7. Knappsats som medger lätt och smidig reglering av funktioner.
7.1 On/Off och funktionsknapp
7.2 Volym upp
7.3 Volym ned
8. PTT (push-to-talk) Sändningsknapp
2
3
(C) Montering/lnställning
Batterier
Skruva av och vik ut batterilocket (se bild 6). Sätt i de två medföljande 1,5-
voltsbatterierna (typ AA). Kontrollera att batteriernas plus- och minuspoler är
rättvända! (Se g. i locket.)
Laddningsbar ackumulator från Peltor kan också användas efter montering
enligt den instruktion som följer med ackumulatorn.
Justering av hjässbygel
(C:1) Dra ut kåporna och sätt headsetet över öronen så att tätningsringarna
sluter ordentligt tätt.
(C:2) Justera höjden på kåporna till en tät, komfortabel anpassning. Gör
detta genom att dra kåpan upp eller ned, samtidigt som du håller ned
hjässbygeln.
(C:3) Bygeln ska sitta rakt upp på huvudet.
Justeringav hjälmfäste
(C:4) Montering. Tryck ner hjälmfästet i hjälmens slitsfäste tills det ”snäpper
i” i hjälmen.
(C:5) Arbetsläge. Vid användning i bullrig miljö måste headsetet vara i ar-
betsläge. Trådbyglarna trycks inåt tills du hör ett ”klick” på båda sidor.
Försäkra dig om att kåpan och bygeltråden i arbetsläge inte ligger mot
inredningen eller skyddshjälmens kant så att läckage kan uppstå.
(C:6) Ventileringsläge. Om du vistas i tyst miljö kan kåporna sättas i venti-
leringsläge.
OBSERVERA! För att ha full skyddseffekt måste headsetet användas
i arbetsläge 100% av den tid, som du vistas i bullriga miljöer. För bästa
skyddseffekt; för undan eventuellt hår kring öronen, så att tätningsringarna
sluter tätt mot huvudet. Eventuella glasögonskalmar skall vara så tunna som
möjligt och sitta tätt mot huvudet.
(D) Användningsinstruktion
(D:1) Till- och frånslag
• Slå på headsetet genom att hålla ner Till/från-knappen (B:7.1) under
ca två sekunder. Lysdioden lyser grönt tills knappen släpps upp och
blinkar därefter grönt var 5:e sekund.
• Stäng av headsetet genom att hålla ner Till/från-knappen (B:7.1) under
ca två sekunder. Lysdioden lyser rött tills knappen släpps upp och är
därefter släckt.
Manuell frånkoppling av headsetet är alltid möjlig. Headsetet stängs av au-
tomatisk efter 2 timmar om Bluetooth-förbindelsen med adapter eller telefon
har brutits. Även med Bluetooth-länken uppkopplad kommer headsetet att
stängas av 15 timmar efter senaste sändning.
(D:2) Synkronisering med annan Bluetooth-enhet
• Koppla upp Bluetooth-länken mellan headsetet och en annan
Bluetooth-enhet med headsetet i från-läge genom att under minst
2 sekunder samtidigt trycka på knapparna volym upp (+) och volym
ned (-). Observera att headsetet under tiden ska vara i från-läge!
Efter en lyckad synkronisering, vilket bekräftas med ljudsignal, kopplas
headsetet till och kommunikation över Bluetooth-länken är möjlig.
Sykronisering kan ske under max. 3 minuter. Om synkroniseringen inte
lyckas under tiden, stängs headsetet av automatiskt.
Synkroniseringsdata för åtta Bluetooth-enheter kan lagras i headsetet och
det är möjligt att växla mellan dem genom att koppla från en enhet och
aktivera anslutningen från en annan enhet. Exempel: Slå från en ansluten
adapter och anslut en telefon genom synkronisering med hjälp av dess
4
5
meny. För att återgå till adaptern, koppla ner anslutningen från telefonen
i telefonmenyn igen och slå till adaptern. Om det nns många Bluetooth-
användare i närheten kan uppkopplingen behöva upprepas för att synkronisera
och etablera länken. Försök igen!
Vid synkronisering med en telefon med Bluetooth® kan man vanligtvis i dess
display se vilken eller vilka enheter som är länkade till den och inom räck-
vidd. Ett Peltor WS headset bekräftas med texten ”Peltor WS” i telefonens
display.
OBS! Vissa telefonmodeller kräver en ”pin code” för att telefonen ska kunna
identiera headsetet. Om ett sådant krävs, är det fyra nollor (0000). Detta
gäller för samtliga Peltor WS Headset och kan inte ändras av användaren.
(D:3) Svar på anrop från kommunikationsradio ansluten
via Bluetooth-adapter
Sändning sker med PTT-funktion (Push-to-Talk) och är endast tillgänglig, när
headsetet är länkat till en kommunikationsradio via Peltor WS adapter.
• Tryck in PTT-knappen (B:7.4) kontinuerligt för sändning med kommu-
nikationsradio och släpp upp den helt under mottagning.
OBS! För att uppnå maximal bullerkompensation ska mikrofonen på headse-
tet användas på ett avstånd av 3 - 5 mm från läpparna.
(D:4) Röststyrd sändning (VOX)
Röststyrd sändning är möjlig när headsetet är anslutet mot kommunikations-
radio via Peltor WS adapter. VOX-funktionen är inbyggd i adaptern.
• Tryck in PTT-knappen (B:7.4) kort två gånger i snabb följd under mot-
tagning. Två toner bekräftar inställningen. (Ca 1 sekunds fördröjning
pga av att svaret kommer från adaptern.)
• Tryck in PTT-knappen (B:7.4) kort igen under mottagning för att avbry-
ta röststyrd sändning via kommunikationsradion. En lång ton bekräftar
ändringen.
VOX-inställningen kvarstår i maximalt 2 timmar, även utanför räckvidden,
men avbryts om headsetet stängs av.
OBS! För att uppnå maximal bullerkompensation ska mikrofonen på headse-
tet användas på ett avstånd av 3 - 5 mm från läpparna.
(D:5) Ringsignal från ansluten telefon
Ringsignal bestäms av telefonen. Om telefonen skickar ut sin egen speciella
ringsignal hörs denna. Annars hörs headsetets signal, som består av fyra
toner i följd med stigande frekvens.
(D:6) Svar på inkommande samtal via ansluten telefon
• Tryck kort på PTT-knappen (B:7.4) för att ansluta telefonsamtal till
headsetet.
OBS! För att uppnå maximal bullerkompensation ska mikrofonen på
headsetet användas på ett avstånd av 3 - 5 mm från läpparna.
(D:7) Röstuppringning från headset via ansluten telefon
Denna funktionalitet ligger i telefonen och är därför specik för varje telefon.
• Tryck kort på PTT-knappen (B:7.4) och säg sedan röstmärket.
En del telefoner skickar inte någon kvittenssignal när det är dags att tala in
röstmärket.
(D:8) Återuppringning för samtal via ansluten telefon
• Tryck längre än 2 sekunder på PTT-knappen (B:7.4) för att repetera en
uppkoppling av ett telefonsamtal till headsetet.
4
5
Denna funktion är endast tillgänglig med mobiltelefon som använder ”Blue-
tooth handsfree prole”.
(D:9) Växling mellan telefonsamtal via ansluten telefon
• Tryck längre än 2 sekunder på PTT-knappen (B:7.4) för att växla tele-
fonsamtal till headsetet.
Denna funktion är endast tillgänglig med mobiltelefon som använder ”Blue-
tooth handsfree prole”.
(D:10) Inställning av ljudnivån vid mottagning
Ljudet kan regleras i 5 steg.
• Tryck kort på volym upp + (B:7.2) för att höja volymen ett steg.
• Tryck kort på volym ner - (B:7.3) för att sänka volymen ett steg.
Ljudnivån kan också ändras genom att hålla ner respektive volymknapp en
längre tid. En ton hörs för varje steg och en lägre ton i ändläget. Det tar ca.
4 sek från min. till max. eller tvärtom. Justering av ljudnivån kan endast ske
under pågående samtal. Senast valda inställning lagras vid avstängning.
Ljudnivån i headsetet kan ändras från mobiltelefonen, om den understöder
denna funktion. (Se telefonens bruksanvisning).
Mikrofondämpning (muting) påverkar endast ljudet från headsetmikrofonen
och är endast möjlig när ljudlänken är uppkopplad. Mikrofondämpningen
återställs efter varje uppkoppling.
OBS! Anpassa volymen när du arbetar i bullrig miljö, eftersom alla varnings-
signaler följer med volyminställningen.
(D:11) Inställning av medhörning vid sändning och under telefonsamtal
När medhörning är aktiverad hörs även din egen röst i headsetet. Nivån på
medhörningen kan ställas in i 5 steg. Inställning kan endast ske med ljud-
länken uppkopplad. När funktionen kopplas från nns medhörning endast
medan PTT-knappen är intryckt eller om VOX är aktiv eller under röstanrop
med mobiltelefon.
• Tryck kort 2 gånger i snabb följd på On/Off-knappen för att koppla
till reglering av medhörning. Tillkoppling bekräftas med 2 korta låga
toner.
• Tryck kort på volym upp + (B:7.2) för att höja volymen ett steg. Änd-
ringen bekräftas med en kort ton.
• Tryck kort på volym ner - (B:7.3) för att sänka volymen ett steg. Änd-
ringen bekräftas med en kort ton.
Nivån kan också ändras genom att hålla ner respektive volymknapp en
längre tid. En ton hörs för varje steg och en lägre ton i ändläget. Det tar ca.
4 sek från min. till max. eller tvärtom. Justering av ljudnivån kan endast ske
under pågående samtal.
• Tryck åter kort på On/Off -knappen för att koppla från reglering av
medhörning. Efter 15 sekunder kopplas ändringsfunktionen annars
från automatiskt. Frånkopplingen bekräftas med en kort hög ton.
Den inställda nivån lagras och gäller även efter avstängning eller batteribyte.
(D:12) Flyttning av samtal från headset till telefon
Denna funktion nns i telefonen och är därför specik för varje telefon.
(D:13) Avslutning av samtal via ansluten telefon
• Tryck kort på PTT-knappen (B:7.4) för att avsluta telefonsamtal.
6
7
(D:14) Varning för lågt energiinnehåll i batteriet
Vid lågt energiinnehåll i slutet av användningstiden sjunker spänningsnivån
på batteriet och när omkring 5 minuter återstår av användningstiden, varnar
headsetet med tre korta toner var 30:e sekund för att batteribyte snarast bör
ske. Headsetet stängs av automatiskt när batteriet är tomt.
(D:15) Räckviddsindikering
Om synkronisering redan har gjorts, söker headsetet vid nästa tillslag auto-
matiskt efter den länkade Bluetooth-adaptern eller -telefonen.
När Bluetooth-länken upprättats, indikeras det med två toner med stigande
frekvens. Om länken inte kan upprättas, hörs två toner med fallande frek-
vens. (Det sker inga automatiska återinkopplingsförsök.)
Om räckvidden överskridits och länken brutits, söker headsetet efter den
synkroniserade enheten under 3 minuter. För att spara energi sker därefter
återinkopplingsförsök endast var 15:e minut, tills länken åter kan upprättas,
eller tills headsetet stängs av automatiskt (se D:1 ovan) Om länken kan åter-
upprättas indikeras återinkopplingen genom två toner med stigande frek-
vens, men om ingen förbindelse kan nås, är headsetet redo för att senare
upprätta Bluetooth-länken med den synkroniserade adaptern eller mobiltele-
fonen. Om förbindelsen med en mobiltelefon bryts medan Bluetooth-länken
är etablerad, sker dock ingen automatisk återinkoppling.
Varningssignalen (två toner med fallande frekvens) försvinner automatiskt
om headsetet åter kommer inom räckvidden.
• Tryck kort på till/från-knappen (B:7.1) för att stänga av varningssignalen.
• Tryck kort på någon av headsetets knappar för att eventuellt koppla till
varningssignalen igen.
(D:16) Andra indikeringar
GSM-förbindelsen bruten
Om telefonen tappar förbindelsen med telenätet hörs en varningssignal var
10:e sekund.
Hands-Free Prole
Vid kommunikation med utrustning, som arbetar med Bluetooth Headset
Prole, ger två toner med fallande frekvens besked om att samtalet är
nedkopplat.
(F) Viktig information
Headsetet måste användas, justeras, rengöras och underhållas i enlighet
med instruktionerna i denna bruksanvisning.
Headsetet och i synnerhet tätningsringarna kan försämras med tiden och bör
undersökas med täta mellanrum, så att inga sprickor eller Ijudläckage nns.
Förvara inte headsetet i temperaturer över +55°C, t.ex. bakom en vindruta
eller ett fönster.
OBS! Om dessa rekommendationer inte följs, kan dämpning och funktion
påverkas negativt.
Rengör headsetet regelbundet utvändigt med tvål och Ijummet vatten.
OBS! Headsetet får inte doppas ner i vattnet.
Headsetet kan påverkas negativt av vissa kemiska ämnen. Ytterligare infor-
mation kan inhämtas från Peltor.
6
7
(G) Tekniska data
Art.nr. MT53H7AWS2, MT53H7P3EWS2, MT53H7BWS2
Peltor WS Headset är anpassat för Bluetooth® V.1.2 standard (headset- och
handsfree-prolerna) och är certierat i enlighet med:
EN 300 328 (radio test)
EN 301 489-1/-7-17 (EMC test)
EN 60 950 (electric safety, low voltage directive)
FCC part 15.247 (US and Canada radio test)
Peltor WS Headset är också testat och godkänt enligt PPE-direktivet
89/686 EEC, samt tillämpliga delar av Europastandard EN 352-1:1993/
EN 352-3:1996.
Dämpningsvärden är hämtade i testrapport för certikat (EC type exami-
nation certicate) utfärdat av FIOH, Laajaniityntie 1, FIN-01620 Vantaa.
ID#0403.
Vikt: 390 gr.
Dämpningsvärden (Tabell F:1)
1. Frekvens i Hz
2. Medelnivå dämpning i dB
3. Standardavvikelse i dB
4. APV
Radioteknisk specikation (Bluetooth®):
Traksätt: Duplex
Frekvens: 2,4 -2,5 GHz
Räckvidd: Ca. 10 m (0dBm)
Överföringshastighet: 1 Mbit/sekund
Uteffekt: 1 mW (0dBm)
Frekvenshoppning: 1600 gånger/sekund
(H) Reservdelar & Tillbehör
Hygiensats Art.nr HY79
Lätt utbytbar hygiensats, som består av två dämpkuddar och tätningsringar
med snäppfunktion. Byt minst två gånger om året för att säkerställa en kon-
stant dämpnings-, hygien-, och komfortnivå.
Clean engångsskydd Art.nr HY100A
Ett engångsskydd som enkelt anbringas på tätningsringarna. Förpackning
om 100 par.
Mike Protector Art.nr HYM1 000
Fukt- och vindtätt samt hygieniskt. Effektivt skydd, som ökar livslängden för
mikrofonen. Förpackning om 5 meter, som räcker till ca 50 byten.
Vindskydd for mikrofon Art.nr M995
Effektivt mot vindbrus och skyddar mikrofonen och ökar dess livslängd. Le-
vereras med ett skydd per paket.
Ackumulatorbatteri Art.nr ACK03
NiMH-ackumulator, som kan ersätta 2x1,5 V standardbatterier av typ AA i de
esta Peltorprodukter.
Batterilock Art.nr 1173 SV
Batterilock i slagtålig polypropenplast.

8
9
Peltor WS Headset
The Peltor WS headset provides you with a simple and convenient way of
communicating wirelessly with a communication radio or mobile phone even
in noisy environments. The Peltor WS Headset is part of the Peltor Wireless
Solutions*) range, which also includes the Peltor WS adapter and other
Peltor products that use the global Bluetooth® standard to transmit sound.
The headset has efcient noise attenuation to protect your hearing and has
a noise-compensating microphone that permits reliable communication even
when noise levels are high.
The Peltor WS Headset has been tested and approved in accordance with
PPE directive 89/686/EEC and EMC directive 89/336/EEC, which means
that it complies with the requirements for CE marking.
In order to get full satisfaction from your new Peltor product, it is important
that you read the user’s instructions thoroughly. You will also need the user’s
instructions for the device that the headset is to be used with: a Peltor WS
adapter, mobile phone or other Bluetooth® device.
A. Functions
• The headset can communicate wirelessly with another Bluetooth device.
• Can be used up to around 10 metres from the other Bluetooth device,
even out of line of sight, without losing contact.
• The communication mode is full duplex, allowing simultaneous communi-
cation in both directions.
• Volume adjustment and push-to-talk button are located on the right shell.
• The headset has adjustable side tone.
• Ring tone is generated when there is an incoming call.
• Calls can be made using the headset microphone if the mobile phone
supports voice activation.
• Two 1.5-V (AA) batteries give an operating time of around 2000 hours on
stand-by and around 70 hours of talk time.
• Polarity protection prevents damage to circuits if batteries are inserted
incorrectly.
• Warning signal when battery voltage is low.
• Audible tones indicate when headset is switched on and off.
• Audible tone conrms pairing with other Bluetooth devices.
B. Features
1.1 Extra wide headband (MT53H7AWS2) with soft padding for maximum
comfort throughout the working day.
1.2 Specially adapted helmet mounting (MT53H7P3EWS2) with attach-
ments for visor and rain protection.
2. Individually sprung headband wires of stainless sprung steel to
ensure uniform pressure around the ears. Steel headband wires retain
their resilience better than regular plastic headbands over a wide tem-
perature range.
3. Low, two-point attachment and easy height adjustment with no pro-
truding parts.
4. Soft, wide foam/uid-lled cushions with built-in pressure-relieving
canals to ensure low pressure, effective sealing and individual comfort.
5. Microphone that efciently compensates for ambient noise and is
mounted on a robust quick-positioning arm.
6. Battery cover permits easy replacement of batteries. Two alkaline 1.5-
V AA batteries are included. Peltor can also supply a NiMH recharge-
able battery to replace disposable batteries.
*) Peltor Wireless Solutions is a trademark (™) in Europe
8
9
7. Keypad for easy regulation of functions.
7.1 On/Off and function button.
7.2 Raise volume.
7.3 Lower volume.
8. PTT (push-to-talk) transmit button.
C. FITTING/ADJUSTMENT
Batteries
Undo the screw and open the battery cover (g. 6). Insert the two 1.5-V
AA batteries. Check that the positive and negative terminals on the bat-
teries are correctly positioned! (See diagram on cover.)
A rechargeable battery from Peltor can also be used and should be t-
ted as described in the instructions that come with the battery.
Adjusting the headband
(C:1) Slide out the cups and place the headset over your ears so that
the cushions t snugly.
(C:2) Adjust the height of the cushions to give a close and comfortable t
by sliding the cups up or down while holding the headband in place.
(C:3) The headband should sit on top of your head.
Adjusting the helmet mounting
(C:4) Fitting. Press the helmet mounting into the slot on the side of the
helmet until it clicks in place.
(C:5) Working position. When used in a noisy environment the headset
must be worn in the working position. Press the wires inwards
until you hear a click on both sides. In the working position, make
sure that the shells and headband wires do not catch on the
helmet harness or the edge of helmet, which could prevent the
cushions from sealing properly.
(C:6) Parking position. If you are working in a quiet environment the
cups can be placed in the parking position.
NOTE! To give full protection the headset must be worn in the
working position 100% of the time that you spend in a noisy envi-
ronment. For optimum protection push hair away from your ears so that
the cushions t closely against your head. Spectacle frames should be
as thin as possible and lie close against your head.
D. INSTRUCTIONS FOR USE
D:1 Switching on and off
• Switch on the headset by holding in the On/Off button (7.3) for about
two seconds. The LED will glow green until the button is released and
will then ash green once every ve seconds.
• Switch off the headset by holding in the On/Off button (7.3) for about
two seconds. The LED will glow red until the button is released and
will then go out.
The headset can be switched off manually at any time. The headset is
switched off automatically after two hours if the Bluetooth link with the
adapter or telephone is broken. Even when the Bluetooth link is still
open, the headset will be switched off 15 hours after the last transmis-
sion.
10
11
D:2 Pairing with another Bluetooth device
• Establish the Bluetooth link between the headset and another Blue-
tooth device by pressing the raise volume (+) and lower volume (-)
buttons simultaneously for at least two seconds. Note that the head-
set must be switched off while you do this!
An audible tone will indicate when pairing has been successful, after
which the headset is switched on and communication across the
Bluetooth link will be possible. If pairing is not successful within three
minutes, the headset is switched off automatically.
Pairing data from eight Bluetooth devices can be stored in the headset,
and you can switch between them by disconnecting from one device
and activating the connection from another device. For example: Switch
off a linked adapter and connect to a mobile phone by using its menu
to establish pairing. To reconnect to the adapter, disconnect from the
mobile phone by using its menu again and then switch on the adapter.
If there are a lot of Bluetooth users nearby, you may have to pair the
devices again to re-establish the link. Try again!
If the unit is paired with a Bluetooth® telephone, the display on the
phone will normally show which device or devices are linked to it and
within range. Pairing with a Peltor WS headset is conrmed by the text
“Peltor WS” on the mobile phone’s display.
NOTE: Some models of mobile phone require a pin code in order for
the mobile phone to identify the headset. If this is required, enter four
zeroes (0000). This applies to all Peltor WS headsets and cannot be
changed by the user.
D3 Replying to a call from a communication radio connected via
the Bluetooth adapter
You can transmit by pressing the PTT (Push-to-Talk) button, but only
when the headset is linked to a communication radio via a Peltor WS
adapter.
• Press and hold the PTT button (7.4) to transmit using the communi-
cation radio, and release it completely to receive.
NOTE: For maximum noise compensation, the microphone on the
headset must be positioned 3–5 mm from your lips.
D4 Voice-activated transmission (VOX)
Voice-activated transmission is possible when the headset is connected
to a communication radio via a Peltor WS adapter. The voice activation
feature is built into the adapter.
• Briey press the PTT button (7.4) twice in rapid succession while
receiving. Two audible tones will conrm the command (after around
a second’s delay, since conrmation comes from the adapter).
• Briey press the PTT button (7.4) again while receiving in order to
end voice-activated transmission via the communication radio. A long
audible tone will conrm the change.
The voice-activated transmission setting will last for up to two hours,
even outside radio range, but will be cancelled if the headset is switched
off.
NOTE: For maximum noise compensation, the microphone on the
headset must be positioned 3–5 mm from your lips.
10
11
D5 Ring tone from a connected telephone
The ring tone is determined by the mobile phone. If the mobile phone
retransmits its own special ring tone, then you will hear this. Otherwise
you will hear the headset ring tone, which consists of a series of four
tones rising in frequency.
D6 Answering incoming calls using a connected mobile phone
• Briey press the PTT button (7.4) to take the call using the headset.
NOTE: For maximum noise compensation, the microphone on the
headset must be positioned 3–5 mm from your lips.
D7 Making voice-activated calls from a headset using a connected
mobile phone
This feature is provided by some mobile phones and is therefore spe-
cic to each phone.
• Briey press the PTT button (7.4) and say your voice code.
Some mobile phones do not give a prompt signal when it is time to say
your voice code.
D8 Number call back using a connected mobile phone
• Press and hold the PTT button (7.4) for more than two seconds to
reconnect the headset to the last number called.
This feature is only available on mobile phones that use the Bluetooth
hands-free prole.
D9 Switching between calls using a connected mobile phone
• Press and hold the PTT button (7.4) for more than two seconds to
switch a phone call to the handset.
This feature is only available on mobile phones that use the Bluetooth
hands-free prole.
D10 Adjusting the volume of received calls
There are ve volume settings.
• Briey press raise volume + (7.2) to increase the volume by one step.
• Briey press lower volume - (7.3) to decrease the volume by one step.
The volume can also be adjusted by holding in the relevant volume but-
ton for a longer period. A tone will indicate each step, with a lower tone
at the end of the range. It takes about four seconds to go from min. to
max. or vice versa. The volume can only be adjusted while a call is in
progress. The last setting is stored when the headset is switched off.
The headset volume can be adjusted from a mobile phone if it sup-
ports this feature. (See the user’s instructions for the telephone.)
Microphone muting only affects the sound from the headset microphone
and is only possible when the audio link is connected, Microphone mut-
ing is reset after each connection.
NOTE! Adjust the volume when you are working in a noisy environment,
since all warning signals will be controlled by the volume setting.
D11 Adjusting side tone while transmitting and during phone calls
When side tone is switched on, you will also hear your own voice in
the headset. There are ve side tone settings. The level can only be
adjusted when the audio link is connected. When this feature is
switched off, side tone will only work when the PTT button is pressed,
or if voice-activated transmission is active, or during a voice call with a
mobile phone.
12
13
• Briey press the On/Off button twice in rapid succession to adjust side
tone. Two short, low tones will conrm that it has been selected.
• Briey press raise volume + (7.2) to increase the volume by one step.
The change will be conrmed by a brief tone.
• Briey press lower volume - (7.3) to decrease the volume by one
step. The change will be conrmed by a brief tone.
The volume can also be adjusted by holding in the relevant volume but-
ton for a longer period. A tone will indicate each step, with a lower tone
at the end of the range. It takes about four seconds to go from min. to
max. or vice versa. The volume can only be adjusted while a call is in
progress.
• Briey press the On/Off button again to switch off side tone adjust-
ment. Otherwise the adjustment mode will be automatically switched
off after 15 seconds. A short, high tone conrms that you have left
adjustment mode.
The set level is saved even when the headset is switched off or the
batteries are replaced.
D12 Switching a call from the headset to a mobile phone
This feature is provided by some mobile phones and is therefore spe-
cic to each phone.
D13 Ending a call on a connected mobile phone
• Briey press the PTT button (7.4) to end the call.
D14 Low battery level warning
When the batteries are nearing the end of their useful life the voltage will
drop, and when around ve minutes of battery life are left, the headset
will sound three short tones every 30 seconds to warn you that the
batteries should be replaced as soon as possible. The headset will be
switched off automatically when the batteries are discharged.
D15 Range indication
If pairing has already been carried out, the headset will automatically
search for the linked Bluetooth adapter or mobile phone when it is next
switched on.
Two tones of rising frequency will indicate when the Bluetooth link has
been established. If the link cannot be established, you will hear two
tones of decreasing frequency. (There will be no automatic attempt to
reconnect.)
If the range has been exceeded and the link is broken, the headset will
continue searching for the paired device for three minutes. In order to
save energy, subsequent attempts to reconnect will only be made every
15 minutes, until the link is re-established or the headset is switched off
automatically (see D1 above). If the link can be re-established, recon-
nection is indicated by two tones of rising frequency, but if no connection
is made, then the headset will continue trying to establish the Bluetooth
link with the paired adapter or mobile phone later. If the connection with
a mobile phone is broken while the Bluetooth link is established, how-
ever, no automatic attempt will be made to reconnect.
The warning signal (two tones of decreasing frequency) will stop auto-
matically if the headset comes within range again.
• Briey press the On/Off button (7.1) to switch off the warning signal.
• Briey press any of the buttons on the headset if you want to switch
the warning signal back on.
12
13
D16 Other indications
GSM connection broken
If the mobile phone loses connection with the telephone network a
warning signal will sound every 10 seconds.
Hands-free Prole
During communication with equipment that uses the Bluetooth Headset
Prole, two tones of rising frequency will indicate that the call has been
disconnected.
F. IMPORTANT INFORMATION
The headset must be used, adjusted, cleaned and maintained in
accordance with these user’s instructions.
The headset and the cushions in particular may deteriorate with age
and should therefore be checked at regular intervals to make sure that
there is no cracking or sound leakage.
Do not store the headset at temperatures above +55°C, for example on
a dashboard or windowsill.
NOTE! Failure to follow these recommendations may lead to loss of
attenuation and performance.
Clean the exterior of the headset regularly with soap and warm water.
NOTE! The headset must not be immersed in water.
The headset may be damaged by some chemical substances. Please
contact Peltor for additional information.
“This device complies with part 15 of the FCC Rules. Operation is
subject to the following two conditions: (1) This device may not cause
harmful interference, and (2) this device must accept any interference
received, including interference that may cause undesired operation.”
G. TECHNICAL DATA
Art. no. MT53H7AWS2, MT53H7BWS2, MT53H7P3EWS2
The Peltor WS Headset is designed to comply with the Bluetooth® V.1.2
standard (headset and hands-free proles) and has been certied in
accordance with:
EN 300 328 (radio test)
EN 301 489-1/-7-17 (EMC test)
EN 60 950 (electrical safety, low-voltage directive)
FCC part 15.247 (US and Canada radio test)
The Peltor WS Headset has also been tested and approved to PPE
directive 89/686 EEC, and applicable parts of the European standards
EN 352-1 :1993/EN 352-3:1996.
Attenuation values are taken from test reports for EC type-examina-
tion certicate, produced by FIOH, Laajaniityntie 1, FIN-01620 Vantaa,
Finland. ID#0403.
Weight: 390 gr/ 13.75 oz incl. batteries
14
Attenuation values (Table F:2)
1. Frequency in Hz
2. Average attenuation value in dB
3. Standard deviation in dB
4. APV
Radio specication (Bluetooth®):
Communication: Duplex
Frequency: 2.4–2.5 GHz
Range: Approx. 10 m (0 dBm)
Transfer rate: 1 Mbit/second
Output: 1 mW (0 dBm)
Frequency hopping: 1600 times/second
H. SPARE PARTS & ACCESSORIES
HY79 – Hygiene kit
Easily replaced hygiene kit that consists of two snap-in attenuation
inserts and ear cushions. Replace at least twice a year to ensure a
consistent level of attenuation, hygiene and comfort.
Clean single-use protectors – HY100A
Hygienic, single-use protector that is easy to apply to the ear cushions.
Supplied in packs of 100 pairs.
Mike Protector – HYM1000
Moisture and wind-resistant and hygienic. Effective protection that
extends the life of the microphone. Supplied in 5-metre pack that is suf-
cient for around 50 changes.
Wind mufer for microphone – M995
Effectively reduces wind noise, protects the microphone and extends its
life. One per package.
Rechargeable battery – ACK03 (EU), 88009-00000 (US)
NiMH rechargeable battery for replacing 2 x 1.5 V standard AA batteries
in most Peltor products.
Battery cover – 1173 SV
Battery cover made of impact-resistant polypropylene plastic.
Note: This equipment has been tested and found to comply with the
limits for a Class B digital device, pursuant to Part 15 of the FCC Rules.
These limits are designed to provide reasonable protection against
harmful interference in a residential installation. This equipment
generates, uses and can radiate radio frequency energy and, if not
installed and used in accordance with the instructions, may cause
harmful interference to radio communications. However, there is no
guarantee that interference will not occur in a particular installation. If
this equipment does cause harmful interference to radio or television
reception, which can be determined by turning the equipment off and
on, the user is encouraged to try to correct the interference by one or
more of the following measures:
- Reorient or relocate the receiving antenna.
- Increase the separation between the equipment and receiver
- Connect the equipment into an outlet on a circuit different from that to
which the receiver is connected.
- Consult the dealer or an experienced radio/TV technician for help.
Caution:
Modifications not expressly approved by this company could void the
user's authority to operate the equipment