Aeg Competence E4100 1 Users Manual COMPETENCE_E4100 1_Japan.bk
e41001 bec55a4a-e005-45ff-919a-23186a26eb3b AEG Oven E4100-1 User Guide |
2015-01-21
: Aeg Aeg-Competence-E4100-1-Users-Manual-350987 aeg-competence-e4100-1-users-manual-350987 aeg pdf
Open the PDF directly: View PDF ![]() .
.
Page Count: 68
COMPETENCE E4100-1
The Versatile Built-In Oven
User Instructions

2
Dear customer,
Please read these operating instructions carefully.
Pay particular attention to the section “Safety information” on the first
few pages. Please retain these operating instructions for later refer-
ence. Pass them on to possible new owners of the appliance.
The following symbols are used in the text:
1 Safety instructions
Warning: Information concerning your personal safety.
Important: Information on how to avoid damaging the appliance.
3 Information and practical tips
2 Environmental information
1. These numbers indicate step by step how to use the appliance.
2. ...
3. ...
In the event of any technical problems please contact your nearest
CUSTOMER SERVICE CENTRE at any time. (Addresses and telephone
numbers may be found in the appendix under "Customer Service
Centres“).
You should also refer to the section "Service"“.
Printed on environmentally friendly paper.
Thinking ecologically means acting ecologically ...

3
Contents
Operating Instructions . . . . . . . . . . . . . . . . . . . . . . . . . . . . . . . . . . . . 5
Safety . . . . . . . . . . . . . . . . . . . . . . . . . . . . . . . . . . . . . . . . . . . . . . . . . . . . . . . . 5
Disposal . . . . . . . . . . . . . . . . . . . . . . . . . . . . . . . . . . . . . . . . . . . . . . . . . . . . . . 7
Description of the Appliance . . . . . . . . . . . . . . . . . . . . . . . . . . . . . . . . . . . . 8
General Overview . . . . . . . . . . . . . . . . . . . . . . . . . . . . . . . . . . . . . . . . . . . . . . . 8
Control Panel . . . . . . . . . . . . . . . . . . . . . . . . . . . . . . . . . . . . . . . . . . . . . . . . . . 8
Oven Features . . . . . . . . . . . . . . . . . . . . . . . . . . . . . . . . . . . . . . . . . . . . . . . . . . 9
Oven Accessories . . . . . . . . . . . . . . . . . . . . . . . . . . . . . . . . . . . . . . . . . . . . . . . 10
Before Using for the First Time . . . . . . . . . . . . . . . . . . . . . . . . . . . . . . . . . 11
Setting the clock . . . . . . . . . . . . . . . . . . . . . . . . . . . . . . . . . . . . . . . . . . . . . . . 11
Initial Cleaning . . . . . . . . . . . . . . . . . . . . . . . . . . . . . . . . . . . . . . . . . . . . . . . . . 12
Using the Rings . . . . . . . . . . . . . . . . . . . . . . . . . . . . . . . . . . . . . . . . . . . . . . . 13
Cooking with the Rings . . . . . . . . . . . . . . . . . . . . . . . . . . . . . . . . . . . . . . . . . . 14
Using the Oven . . . . . . . . . . . . . . . . . . . . . . . . . . . . . . . . . . . . . . . . . . . . . . . . 15
Switching the Oven On and Off . . . . . . . . . . . . . . . . . . . . . . . . . . . . . . . . . . . 15
Oven Functions . . . . . . . . . . . . . . . . . . . . . . . . . . . . . . . . . . . . . . . . . . . . . . . . 16
Inserting the Shelf and Universal Baking Tray . . . . . . . . . . . . . . . . . . . . . . . 18
Inserting/Removing the Fat Filter . . . . . . . . . . . . . . . . . . . . . . . . . . . . . . . . . 19
Working with the Electronic Clock . . . . . . . . . . . . . . . . . . . . . . . . . . . . . . . . 20
Uses, Tables and Tips . . . . . . . . . . . . . . . . . . . . . . . . . . . . . . . . . . . . . . . . . . . 27
Boiling . . . . . . . . . . . . . . . . . . . . . . . . . . . . . . . . . . . . . . . . . . . . . . . . . . . . . . . . 27
Settings for cooking on the rings . . . . . . . . . . . . . . . . . . . . . . . . . . . . . . 27
Baking . . . . . . . . . . . . . . . . . . . . . . . . . . . . . . . . . . . . . . . . . . . . . . . . . . . . . . . . 28
Baking Table . . . . . . . . . . . . . . . . . . . . . . . . . . . . . . . . . . . . . . . . . . . . . . . . 30
Tips for baking . . . . . . . . . . . . . . . . . . . . . . . . . . . . . . . . . . . . . . . . . . . . . . 33
Pies and Gratin Table . . . . . . . . . . . . . . . . . . . . . . . . . . . . . . . . . . . . . . . . . 34
Frozen Ready Meals Table . . . . . . . . . . . . . . . . . . . . . . . . . . . . . . . . . . . . . 35
Roasting . . . . . . . . . . . . . . . . . . . . . . . . . . . . . . . . . . . . . . . . . . . . . . . . . . . . . . 36
Roasting table . . . . . . . . . . . . . . . . . . . . . . . . . . . . . . . . . . . . . . . . . . . . . . 38
Grilling . . . . . . . . . . . . . . . . . . . . . . . . . . . . . . . . . . . . . . . . . . . . . . . . . . . . . . . 40
Grilling Table . . . . . . . . . . . . . . . . . . . . . . . . . . . . . . . . . . . . . . . . . . . . . . . 40
Defrosting . . . . . . . . . . . . . . . . . . . . . . . . . . . . . . . . . . . . . . . . . . . . . . . . . . . . . 41
Defrosting table . . . . . . . . . . . . . . . . . . . . . . . . . . . . . . . . . . . . . . . . . . . . . 41
Preserving . . . . . . . . . . . . . . . . . . . . . . . . . . . . . . . . . . . . . . . . . . . . . . . . . . . . . 42

4
Cleaning and Care . . . . . . . . . . . . . . . . . . . . . . . . . . . . . . . . . . . . . . . . . . . . . 44
Exterior of the Appliance . . . . . . . . . . . . . . . . . . . . . . . . . . . . . . . . . . . . . . . . 44
Oven Interior . . . . . . . . . . . . . . . . . . . . . . . . . . . . . . . . . . . . . . . . . . . . . . . . . . 44
Accessories . . . . . . . . . . . . . . . . . . . . . . . . . . . . . . . . . . . . . . . . . . . . . . . . . . . . 44
Fat Filter . . . . . . . . . . . . . . . . . . . . . . . . . . . . . . . . . . . . . . . . . . . . . . . . . . . . . . 45
Shelf Support Rails . . . . . . . . . . . . . . . . . . . . . . . . . . . . . . . . . . . . . . . . . . . . . 46
Oven Lighting . . . . . . . . . . . . . . . . . . . . . . . . . . . . . . . . . . . . . . . . . . . . . . . . . 47
Cleaning the Oven Ceiling . . . . . . . . . . . . . . . . . . . . . . . . . . . . . . . . . . . . . . . 48
Oven Door . . . . . . . . . . . . . . . . . . . . . . . . . . . . . . . . . . . . . . . . . . . . . . . . . . . . . 49
Oven Door Glass . . . . . . . . . . . . . . . . . . . . . . . . . . . . . . . . . . . . . . . . . . . . . . . . 50
What to do if ... . . . . . . . . . . . . . . . . . . . . . . . . . . . . . . . . . . . . . . . . . . . . . . . 52
Technical Data . . . . . . . . . . . . . . . . . . . . . . . . . . . . . . . . . . . . . . . . . . . . . . . . 53
Oven Interior Dimensions . . . . . . . . . . . . . . . . . . . . . . . . . . . . . . . . . . . . . . . . 53
Regulations, Standards, Directives . . . . . . . . . . . . . . . . . . . . . . . . . . . . . . . . . 53
Installation Instructions . . . . . . . . . . . . . . . . . . . . . . . . . . . . . . . . . . . 54
Safety Instructions for the Installer . . . . . . . . . . . . . . . . . . . . . . . . . . . . . . . . 54
Guarantee Conditions . . . . . . . . . . . . . . . . . . . . . . . . . . . . . . . . . . . . . 61
Customer Service Centres . . . . . . . . . . . . . . . . . . . . . . . . . . . . . . . . . 62
Index . . . . . . . . . . . . . . . . . . . . . . . . . . . . . . . . . . . . . . . . . . . . . . . . . . . . . . . . 66
Service . . . . . . . . . . . . . . . . . . . . . . . . . . . . . . . . . . . . . . . . . . . . . . . . . . . . . . 67

Operating Instructions
5
Operating Instructions
1 Safety
Electrical Safety
•The appliance may only be connected by a registered specialist.
•In the event of any faults or damage to the appliance: remove fuses
or switch off.
•It is not permissible to clean the appliance with a steam or high
pressure cleaner for safety reasons!
•Repairs to the appliance may only be carried out by specialists. Re-
pairs carried out by inexperienced persons may cause injury or serious
malfunctioning. If your appliance needs repairing, please contact
your local AEG Service Force Centre or your specialist dealer.
Child Safety
•Never leave children unsupervised when the appliance is in use.
Safety whilst Using
•This appliance is intended to be used for cooking, frying and baking
food in the home.
•Take care when connecting electric appliances to sockets nearby. Do
not allow connecting leads to come into contact with hot rings or to
catch beneath the hot oven door.
•Warning: Risk of burns! The interior of the oven becomes hot dur-
ing use.
•Using ingredients containing alcohol in the oven may create an alco-
hol-air mixture that is easily ignited. In this case, open the door care-
fully. Do not have embers, sparks or naked flames in the vicinity when
opening the door.

Operating Instructions
6
To Avoid Damaging Your Appliance
•Do not line your oven with aluminium foil and do not place a baking
tray or dish on the oven floor, otherwise the oven enamel will be
damaged by the resulting build up of heat.
•Juice from fruit that drips from baking trays will leave marks that
cannot be removed. For very moist cakes, use the universal baking
tray.
•Do not put any weight on the oven door when it is open.
•Never pour water directly into the hot oven. The enamel may be dam-
aged.
•Using force, especially on the edges of the front glass panel, may
break the glass.
•Do not store inflammable objects in the oven. They may ignite when
the oven is switched on.
•Do not store moist food in the oven. The enamel may be damaged.

Operating Instructions
7
2 Disposal
Disposing of the packaging material
All materials used can be fully recycled.
Plastics are marked as follows:
•>PE< for polyethylene, as used for the outer wrapping and the bags
inside.
•>PS< for polystyrene foam, e.g., as used for the padding materials.
They are completely free of CFCs.
Disposal of old appliances
1 Warning: Before disposing of old appliances please make them inoper-
able so that they cannot be the source of danger.
To do this, disconnect the appliance from the mains supply and re-
move the mains lead.
To protect the environment, it is important that worn out appliances
are disposed of in the correct manner.
•The appliance must not be disposed of with household rubbish.
•You can obtain information about collection dates or public refuse
disposal sites from your local refuse department or council.
Operating Instructions
8
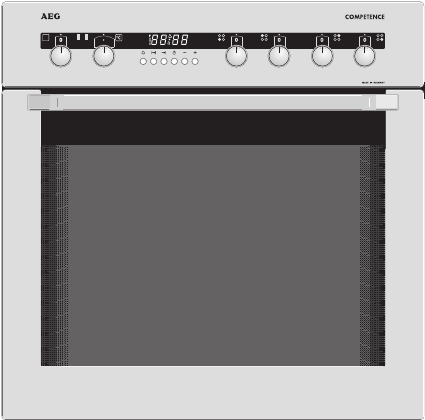
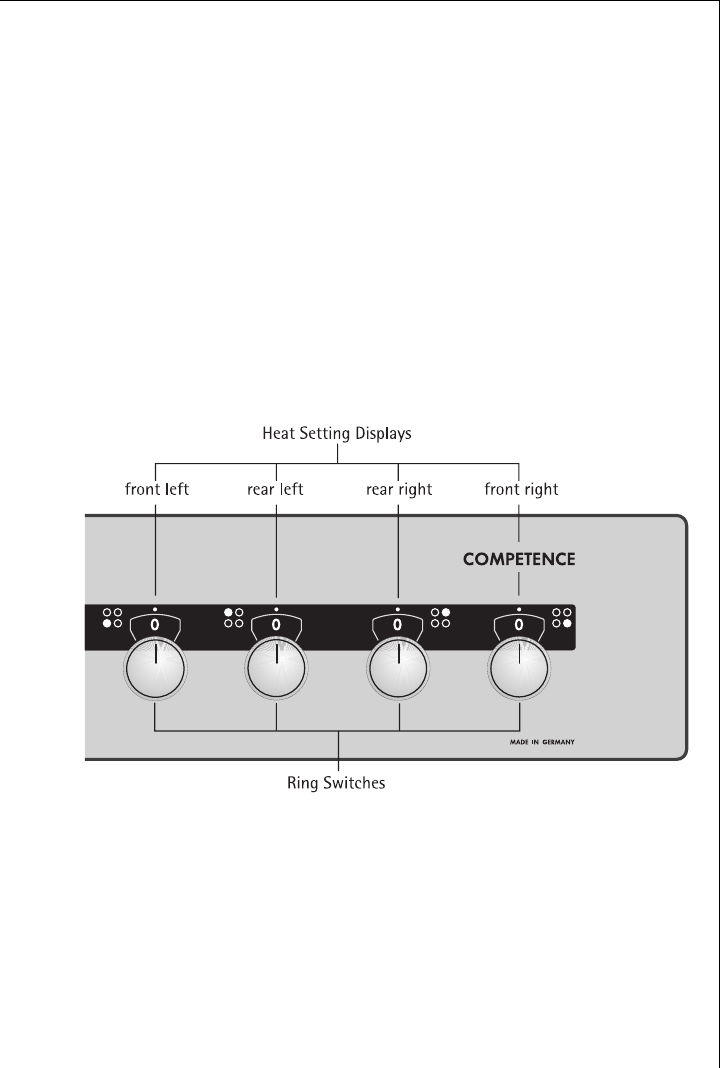
Description of the Appliance
General Overview
Control Panel
Operating Instructions
9
Oven Features
Oven steam vent
The steam from the oven is fed di-
rectly upwards via the duct in the
rear of the cooking surface.
Operating Instructions
10
Oven Accessories
Combination shelf
For dishes, cake tins, items for
roasting and grilling.
Universal baking tray
For moist cakes, juicy roasts or as a
baking sheet or collecting vessel for
fat.
Baking tray
For cakes and biscuits
Operating Instructions
11
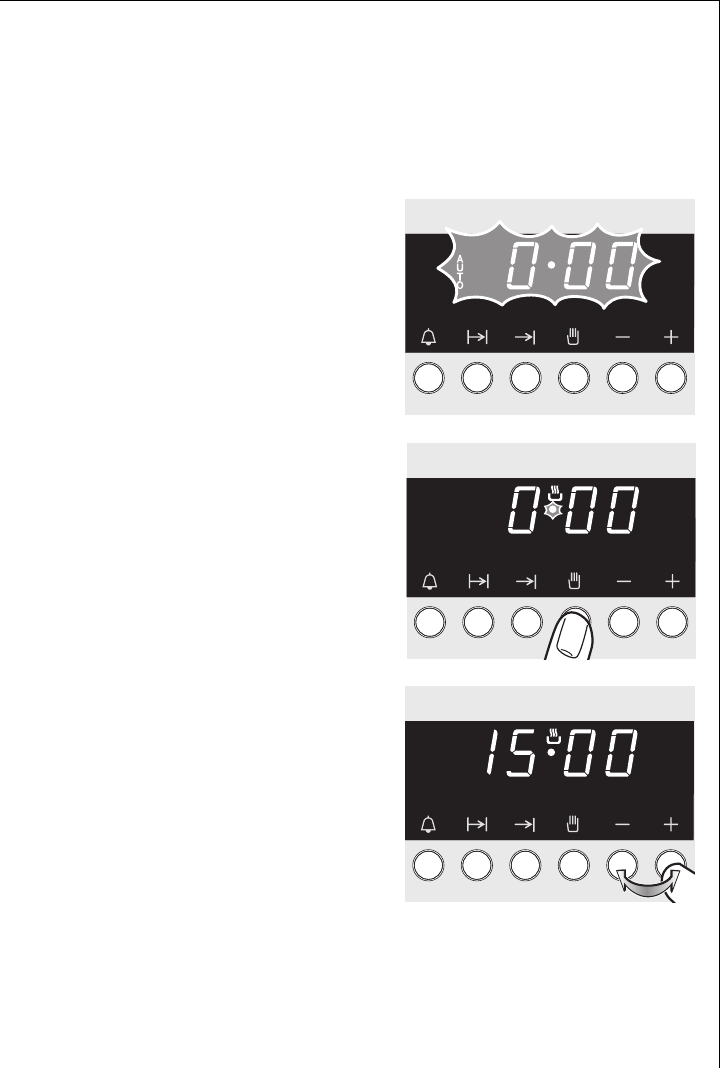
Before Using for the First Time
Setting the clock
3 The oven only operates when the clock has been set.
The clock display flashes when the
appliance is first connected, or after
a power failure.
4. Press the M button briefly.
5. Start setting the current time
within 5 seconds, using the + or
- buttons.
The appliance is now ready to use.

Operating Instructions
12
Initial Cleaning
Before using the oven for the first time you should clean it thoroughly.
1 Caution: Do not use any caustic, abrasive cleaners! The surface could
be damaged.
3 To clean metal fronts use commercially available cleaning agents.
1. Turn the oven function switch to oven lighting L.
2. Remove all accessories and the shelf support rails and wash them with
warm water and washing up liquid.
3. Then wash out the oven with warm water and washing-up liquid, and
dry.
4. Wipe the front of the appliance with a damp cloth.
Operating Instructions
13
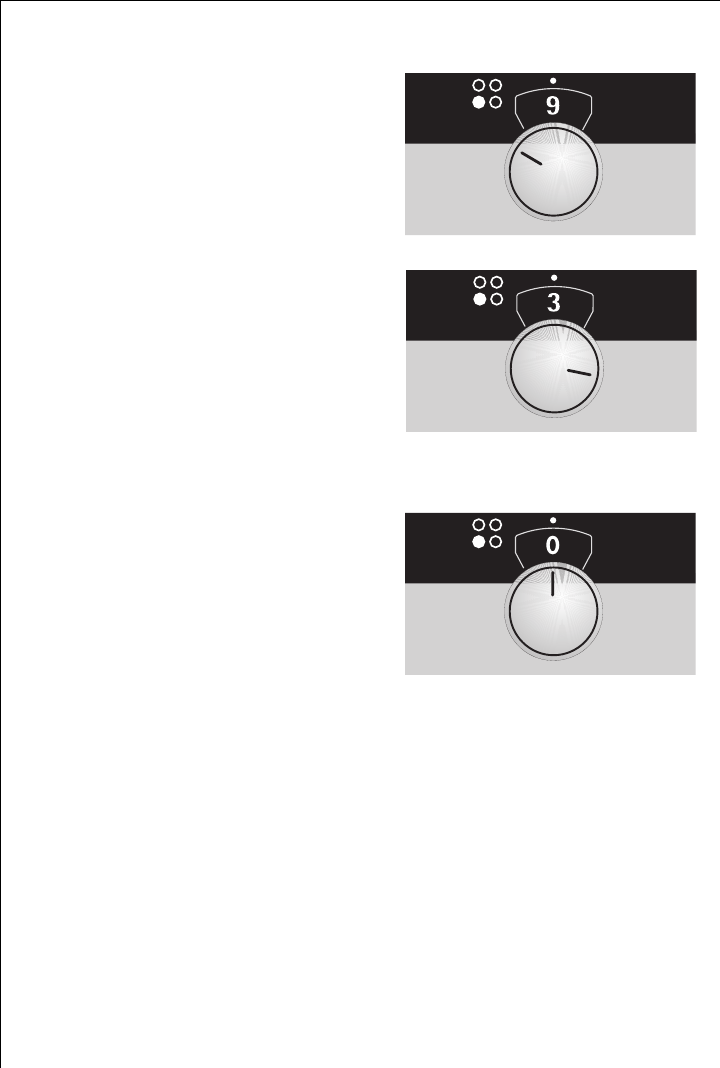
Using the Rings
3 Also refer to the operating instructions for your built-in hob. It con-
tains important information on ovenware, operation, cleaning and care.
Heat settings
•You may select the heat settings within the range of settings 1-9.
•Intermediate positions may be selected between settings 2 and 7.
They are marked with a dot.
1 = lowest heat setting
9 = highest heat setting
Operating Instructions
14
Cooking with the Rings
1. For heating up/browning, select a
high heat setting.
2. As soon as steam starts to form or
the oil is hot, turn back to the heat
setting necessary for further cooking.
3. To stop cooking, turn back to the zero
position.
2 Switch the cooking zone off approx. 5-10 minutes before cooking is
finished to make use of the residual heat. This saves electricity.
Operating Instructions
15
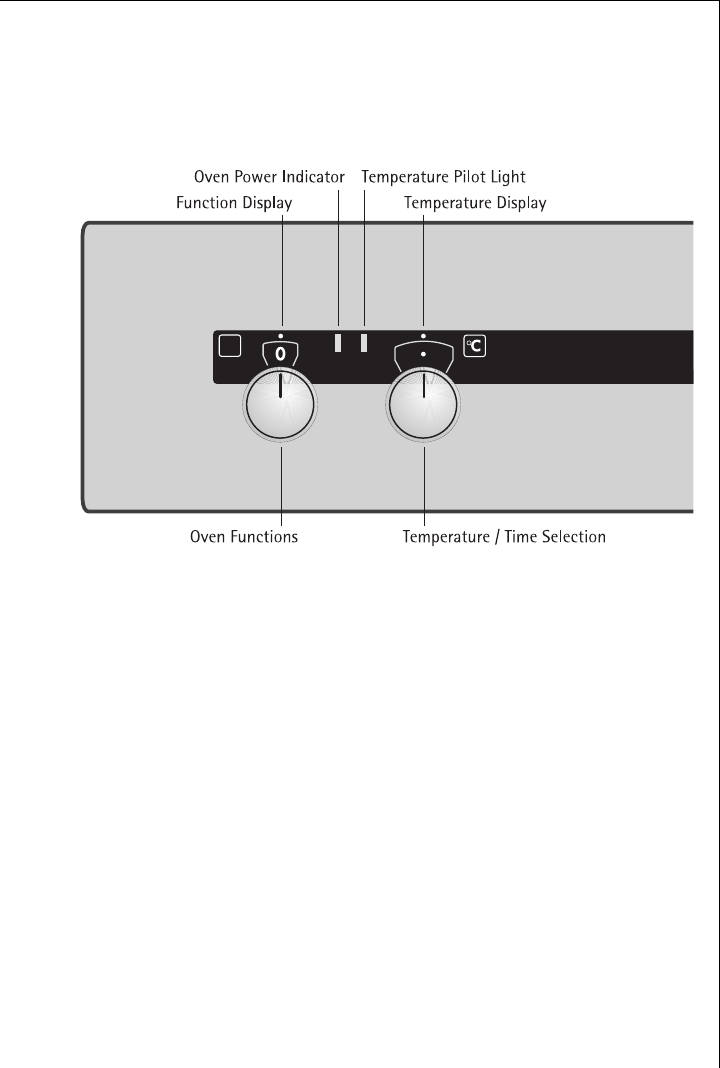
Using the Oven
Switching the Oven On and Off
1. Turn the “oven functions” switch to the required function.
2. Turn the “temperature selection” switch to the required temperature.
The yellow oven power indicator will remain on while the oven is in use.
The red temperature pilot light comes on while the oven is heating up.
3. To switch off the oven turn the “oven functions” switch and the “tem-
perature selection” switch to the off position.
3 Cooling fan
The fan comes on automatically when the oven is in use in order
to keep the surfaces of the appliance cool. Once the oven has been
switched off the fan continues running to cool down the appliance
and then switches itself off automatically.

Operating Instructions
16
Oven Functions
The oven has the following functions:
LOven lighting
With this function you can illuminate the oven interior, e.g., for clean-
ing.
The heating element is not in use.
SPizza & baking
For baking cakes on one level and for pastries that need more brown-
ing and a crispy base. These include such foods as pizza, quiche lorraine,
and cheese cake.
Set oven temperatures 20-40 °C lower than when using conventional.
Conventional is used and in addition the fan is switched on.
UFan cooking
For baking on up to three levels at the same time.
Set oven temperatures 20-40 °C lower than when using conventional.
The rear wall heating element is used and in addition the fan is
switched on.
OConventional
For baking and roasting on one level.
The conventional heating elements are in use.
Ü Bottom heat
For crisping and browning cakes with crispy bases.
The bottom heating element is in use.

Operating Instructions
17
ADefrost
To begin to thaw and to defrost such items as flan, butter, bread, fruit
or other frozen foods.
For this function the fan operates without heating.
FGrill
For grilling flat foods placed on the middle of the shelf such as steaks,
escalopes or fish, or for toasting.
The grill heating element is in use.
ZDual grill
For grilling larger quantities of flat foods such as steaks, escalopes or
fish, or for toasting.
Top heat and the grill heating element are in use.
IRotitherm
For roasting larger pieces of meat or poultry on one level. This function
is also suited to cooking foods au gratin and browning.
The grill heating element and fan operate alternately.
Operating Instructions
18
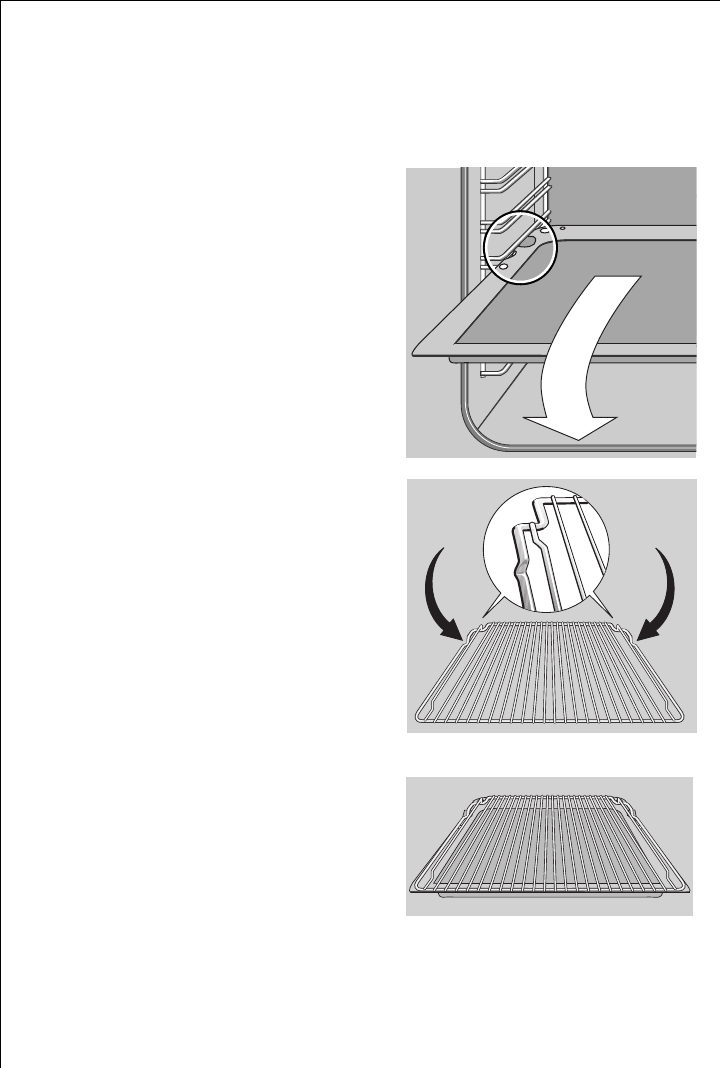
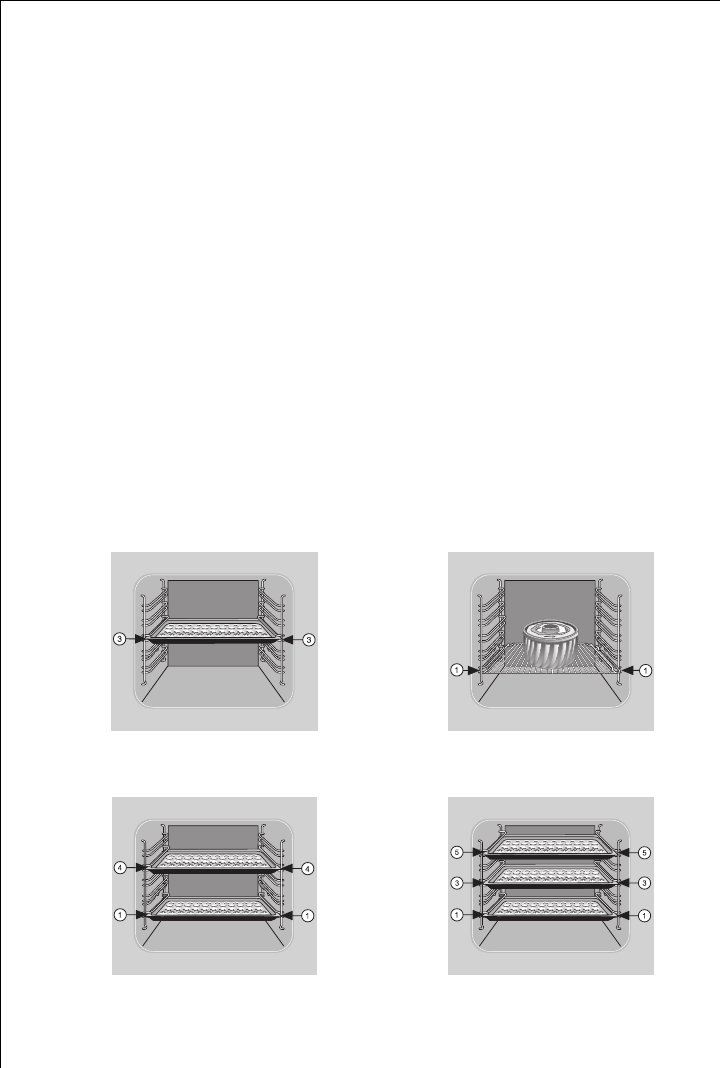
Inserting the Shelf and Universal Baking Tray
3 Anti-tip device
All slide-in units have a small bulge on the left and right. This bulge is
an anti-tip device and must always point to the rear of the oven.
Tray or universal baking tray:
The anti-tip device must point to-
wards the rear of the oven.
Inserting shelf:
Insert the shelf unit with both guide
rails pointing upwards. The anti-tip
device must point downwards and
be positioned to the rear of the
oven compartment.
Inserting shelf and tray:
When the shelf unit and universal
baking tray are used together, care-
fully place the shelf anti-tip device
in the bulges on the tray.
✘
Operating Instructions
19
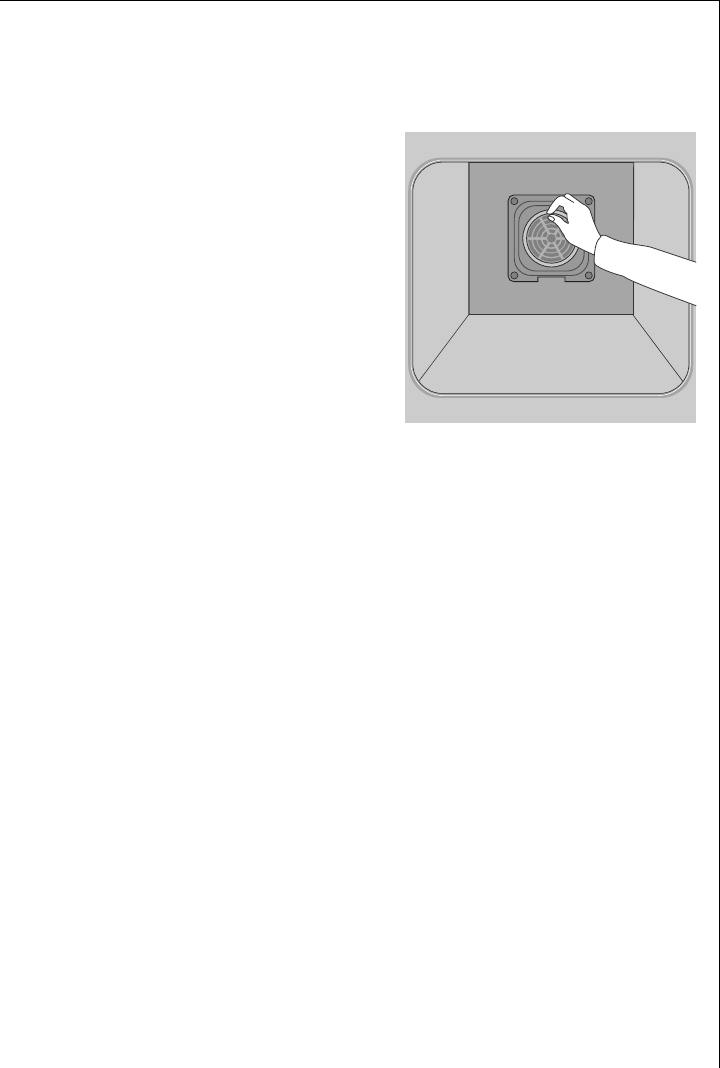
Inserting/Removing the Fat Filter
The fat filter protects the rear wall heating element against splashes of
fat when roasting.
Inserting the fat filter
Holding the fat filter by the tab, in-
sert the two retainers into the
opening on the rear wall of the
oven (fan opening) from the top
downwards.
Removing the fat filter
Take hold of the tab on the fat filter
and remove by pulling upwards.
Operating Instructions
20
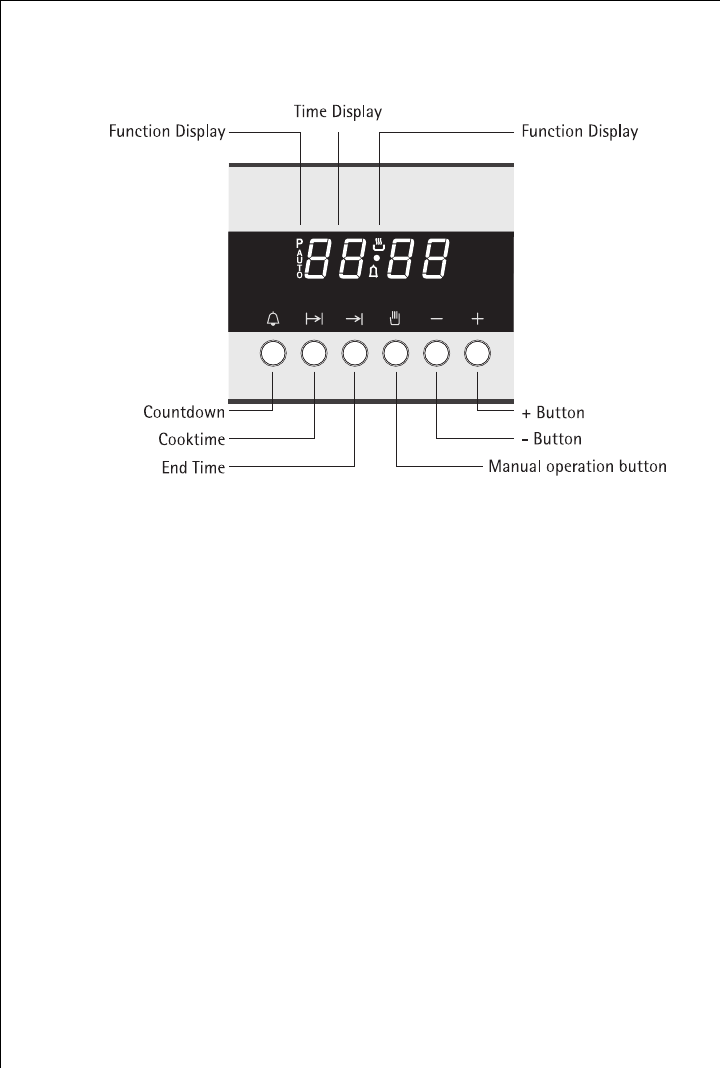
Working with the Electronic Clock
The electronic clock has the following functions:
Countdown C
To set a countdown. A signal sounds after the time has elapsed.
This function does not affect the functioning of the oven.
Cook time <
To set how long the oven is to be in use.
End time >
To set when the oven is to switch off again.
Manual operation M
Pressing button M transfers the oven from automatic to manual oper-
ation.

Operating Instructions
21
3 General Hints
•After a clock function has been set, the desired times can be set or
changed within 5 seconds using the + or - buttons.
•“P” indicates that the clock is running at 60 Hz.
•After using the Cook Time <-/End > function has been used,
the oven must be switched from Automatic to Manual operation
by pressing the Mbutton.
Operating Instructions
22
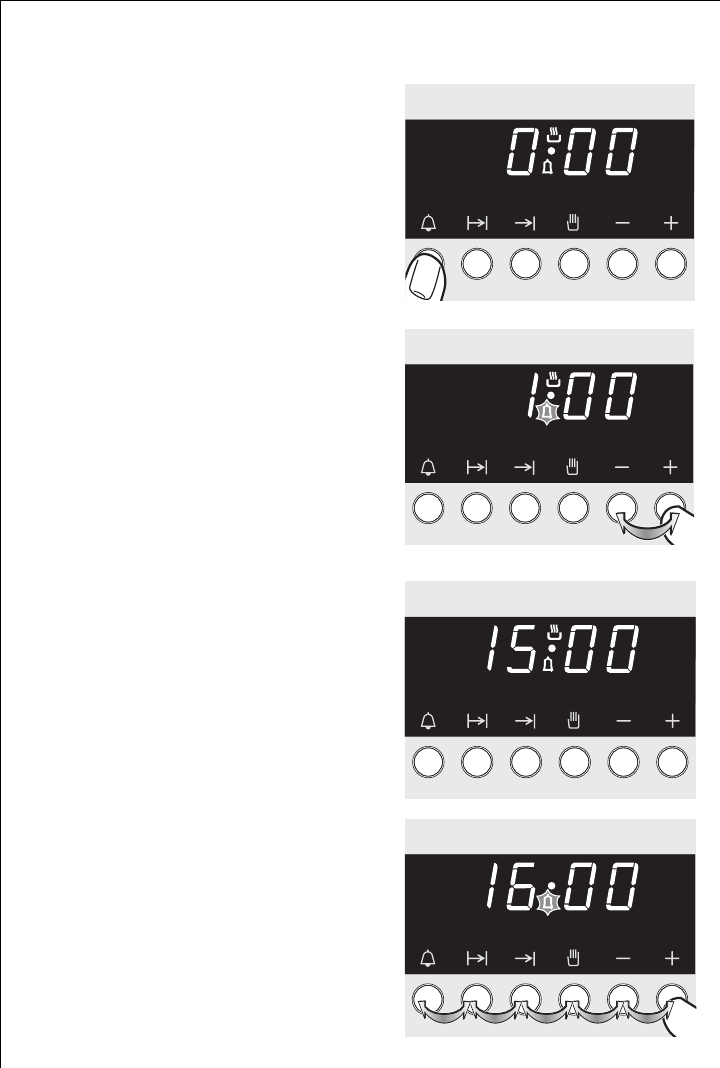
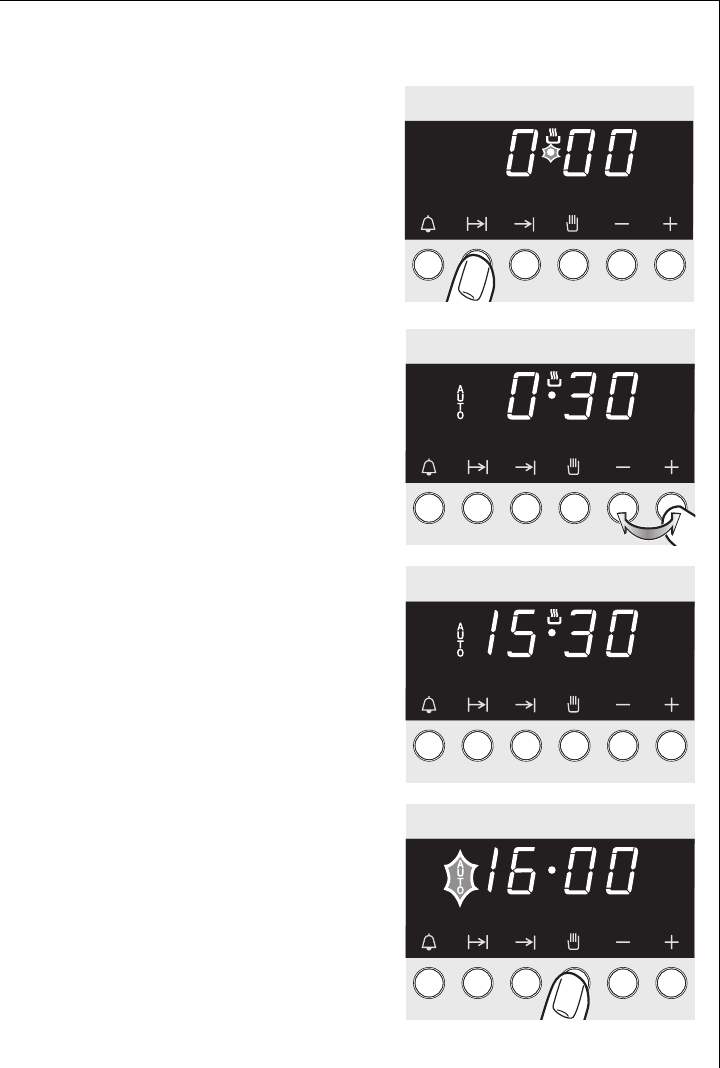
Countdown C
1. Press the Countdown C button.
2. Set the desired time using the + or
- buttons.
3 The remaining time can be checked
by pressing the Countdown
button C again
Press any button to switch off the
signal.
A few seconds after a Countdown
time has been set, the normal clock
display re-appears, showing the cur-
rent time.
When the Countdown is completed,
an audible signal is sounded for
5minutes.
The maximum length of time that
can be set is 90 minutes.
Operating Instructions
23
Cook time <
1. Press the < button.
2. Set the desired cooking time (up to
10 hours) using the + or - but-
tons.
The display shows the current time
again after about 5 seconds. The
AUTO symbol indicates that the
oven is now in Automatic operation.
When the set time has elapsed, a
signal sounds for 5 minutes, and the
oven switches itself off.
3. Press the M button to stop the
signal and the programme. Turn
the oven function and tempera-
ture selectors to OFF.
Operating Instructions
24
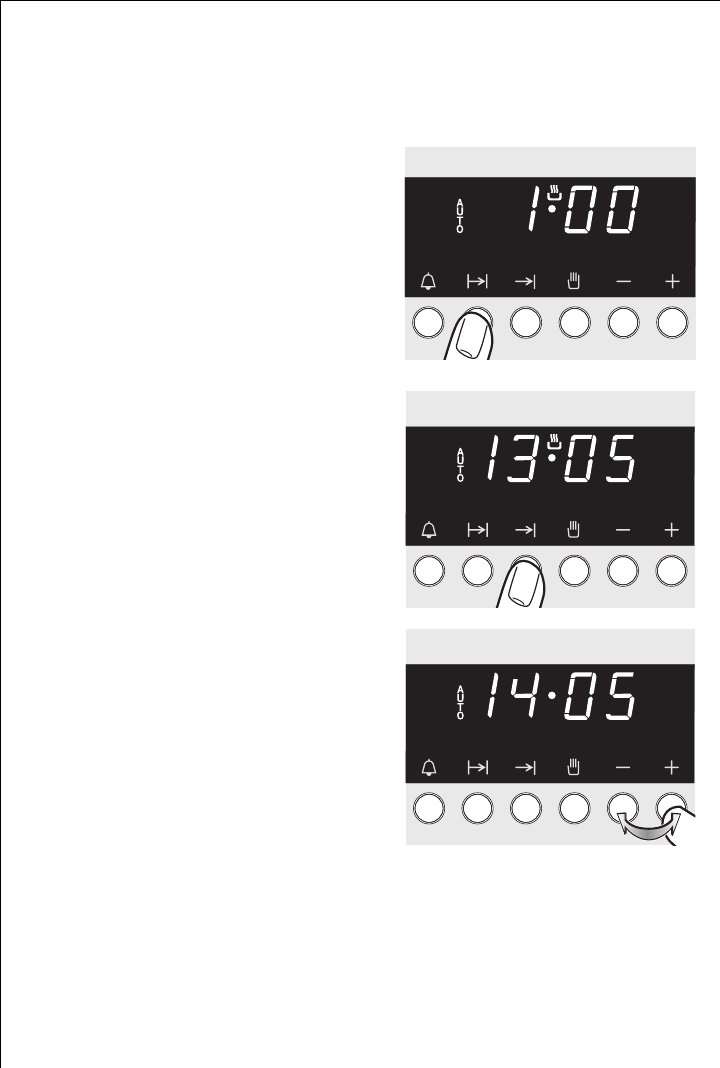
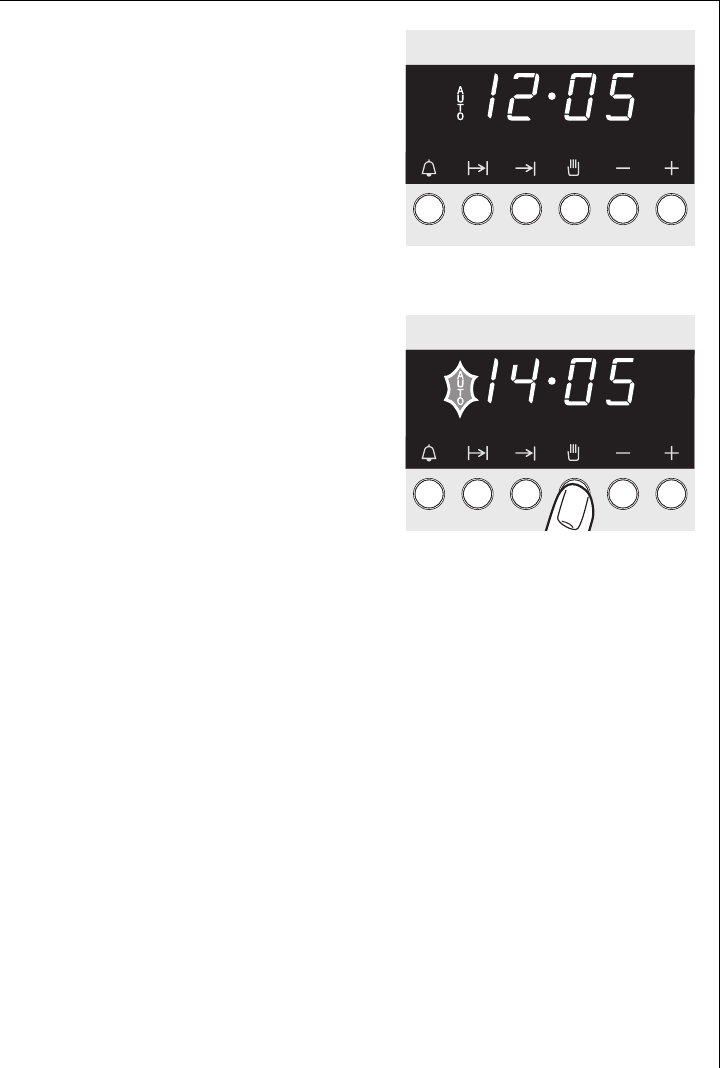
Combining the Cook Time < and End > functions
3 Cook Time < and End > can be used together, to switch the oven on
or off automatically at a later time.
1. Select the desired oven function
and temperature.
Use the Cook Time function < to
set the length of time necessary to
cook the meal.
For example, 1 hour.
2. Press the > button.
Set the desired switch-off time us-
ing the + or - buttons.
Operating Instructions
25
The AUTO symbol appears, and the
clock time is shown on the display.
For example, 12:05:00.
The oven switches off automatically
when the set time is reached.
For example, 13:05.
And switches off again at the end of
the set cooking time.
for example, 14:05.
When the time has elapsed, the
AUTO symbol flashes, a signal is
sounded for 5 minutes, and the
oven switches itself off.
3. Stop the signal and the pro-
gramme by pressing the M but-
ton. Turn the oven function and
temperature selectors to OFF.
Operating Instructions
26
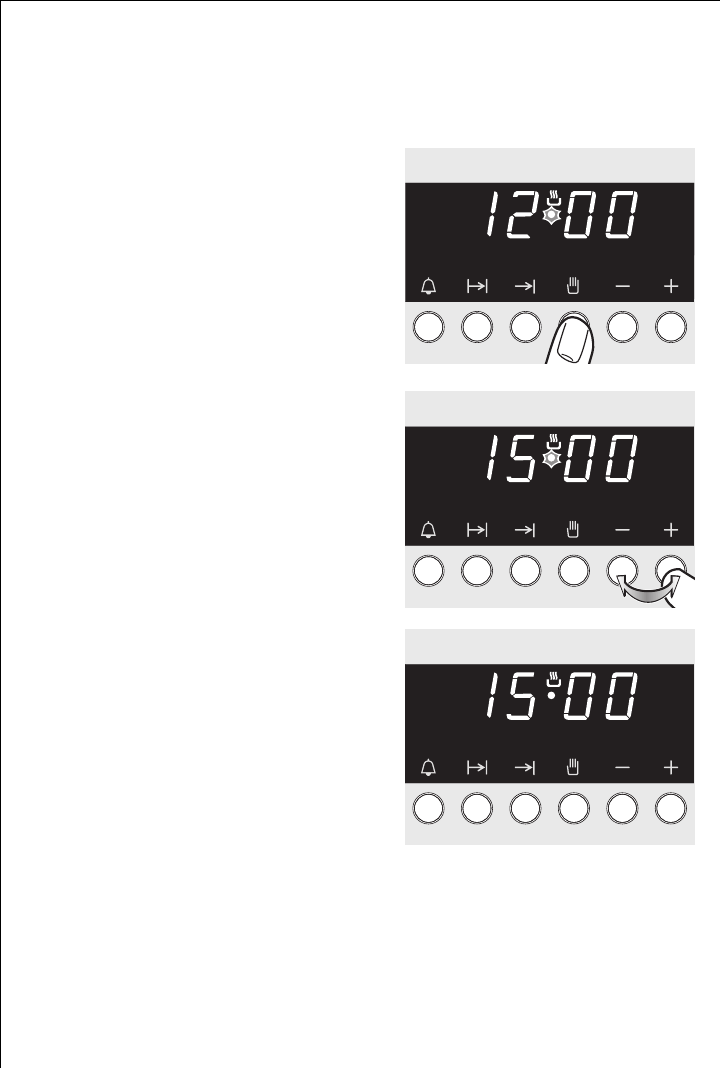
Adjusting the clock
3 The clock can only be adjusted if none of the automatic functions
(Cook Time < or End >) has been set.
1. Push the M button briefly.
2. Set the current time using the + or
- buttons.
The clock shows the current time
again after 5 seconds.
The appliance is now ready to use.

Operating Instructions
27
Uses, Tables and Tips
Boiling
The information given in the following tables is for guidance. The
switch setting required for cooking depends on the quality of the pans
and the type and quantity of food.
Settings for cooking on the rings
1 Overheated fats and oils catch fire quickly. When cooking foods in fat
or oil (e.g., chips) please do not leave the appliance unattended.
Switch
setting
Cooking /
Continuation
cooking level
Suitable for
9Heating up Heating up large quantities of water, cooking
pasta
7-9 Heavy
browning
Deep-frying chips,
browning meat, e.g., stewing steak,
frying, e.g., potato cakes, loin chops, steaks
6-7 Gentle
frying
Frying meat, escalopes, veal cutlet cordon bleu
chops, rissoles, sausages, liver
roux, lightly frying
eggs, pancakes, deep-fried fritters
4-5 Boiling
Boiling larger quantities of food,
stews and soups, steaming potatoes,
boiling meat stock
3-4 Steaming,
stewing
Braising vegetables,
braising meat, cooking rice pudding
2-3 Simmering
Simmering rice and milk dishes
(stir occasionally),
steaming small quantities of potato or vegetables,
heating prepared dishes
1-2 Melting
Beaten omelette, egg garnish, hollandaise sauce,
keeping dishes warm,
melting butter, chocolate, gelatine
0Residual heat, off position
Operating Instructions
28
Baking
Use the pizza & baking S, fan cooking U or conventional O oven
functions for baking.
3 Remove the fat filter when baking, as otherwise the baking time is
longer and the surface will brown unevenly.
Baking tins
•Coated baking tins and tins made of dark metal are suitable for
conventional O heat.
•Light metallic, glass and ceramic containers are also suitable for pizza
& baking S and fan cooking U.
Shelf positions
•Pizza & baking S or conventional O can both be used for baking on
one level.
•Using fan cooking U it is possible to bake flat, dry cakes and pastries
on up to 3 baking trays at the same time
3 General information
•Always count the shelf positions from the bottom upwards.
1 Baking tray
e.g., shelf position 3
1 Baking tin:
e.g., shelf position 1
2 Baking trays:
Shelf positions 1 and 4
3 Baking trays:
Shelf positions 1, 3 and 5

Operating Instructions
29
•Insert baking trays with the sloped edge to the front!
•Always place cake tins in the middle of the shelf.
•With pizza & baking S or conventional O you can also bake two
items simultaneously by placing the tins next to one another on the
shelf. There is no significant increase in baking time.
Notes on the baking tables
In the tables you will find information on temperatures, cooking times
and shelf positions for a selection of dishes.
•The temperatures and cooking times are for guidance only since these
are dependent on the mixture, quantity and cake tin used.
•We recommend that you use the lower temperature initially and only
select a higher temperature if necessary, e.g., if more browning is re-
quired or the cooking time is too long.
•If you cannot find specific information for one of your own recipes,
use information given in a similar recipe for guidance.
•When cakes are baked on trays or in tins on more than one oven po-
sition at once the baking time may be increased by 10-15 minutes.
•Items that might drip (e.g., pizzas, fruit flans) should only be prepared
on one level.
•Variations in the height of the item to be baked can lead to different
degrees of browning at the start of baking. In this case please do not
change the temperature setting. Differences in the degree of
browning will balance out during baking.
2 For longer cooking times switch off the oven approx. 10 minutes before
the end of the cooking time to make use of the residual heat.
Unless otherwise stated, the information in the tables assumes starting
with a cold oven.

Operating Instructions
30
Baking Table
Baking on one shelf position
Type of cake or pastry Pizza & baking SConventional OTime
Shelf
position
from
bottom
Tempera-
ture
ºC
Shelf po-
sition
from
bottom
Tempera-
ture
ºC
For both
functions
Hrs.: Mins.
Cakes in cake tins
Ring-shaped or
bowl-shaped cakes 1150-160 1160-180 0:50-1:10
Madeira cake/
king cake 1140-160 1150-170 1:10-1:30
Sponge cake 1150-160 1160-180 0:25-0:40
Shortcrust pastry flan
base 3170-180 2190-21010:10-0:25
Sponge flan base 3150-170 2170-190 0:20-0:25
Covered apple flan 1150-170 1170-190 0:50-1:00
Savoury flan
(e.g., quiche lorraine) 1160-180 1190-210 0:30-1:10
Cheesecake 1140-160 1170-190 1:00-1:30
Cakes and pastries on
baking trays
Plaited roll/ring 3160-170 3170-190 0:30-0:40
Fruit loaf 3150-17013160-18010:40-1:00
Bread (rye bread) initially
.....................................then 1.180-2001
140-160 22501
160-180
0:20
0:30-1:00
Cream puffs/eclairs 3160-17013190-210 0:15-0:30
Swiss roll 3150-17013180-20010:10-0:20
Dry streusel cake 3150-160 3160-180 0:20-0:40
Butter cake/sugar cake 3160-17013190-21010:15-0:30

Operating Instructions
31
Fruit flan (with a yeast
dough/sponge base)23150-170 3170-190 0:25-0:50
Fruit flans on shortcrust
pastry base13160-170 3170-190 0:40-1:20
Tarts with delicate fillings
(e.g., curd cheese, cream,
sugar-topped cakes)
- - 3 160-18010:40-1:20
Pizza (with deep topping)21180-200 1190-21010:30-1:00
Pizza (thin) 1200-220 1230-30010:10-0:25
Unleavened bread 1200-220 1270-30010:08-0:15
Flat sweet or savoury
pies 1180-200 1210-230 0:35-0:50
Biscuits
Shortcrust biscuits 3150-160 3170-19010:06-0:20
Small piped biscuits 3140-150 3160-180 0:10-0:40
Sponge fingers 3150-160 3170-190 0:15-0:20
Meringues 380-100 3100-120 2:00-2:30
Macaroons 3100-120 3120-140 0:30-0:60
Small pastries made with
yeast dough 3160-170 3170-190 0:20-0:40
Small pastries made with
puff pastry 3170-18013190-21010:20-0:30
Bread rolls 3180-20013180-22010:20-0:35
1) Pre-heat the oven
2) Use the combination/fat tray or the fat tray!
Information printed in bold type indicates the preferred oven function in each
case.
Type of cake or pastry Pizza & baking SConventional OTime
Shelf
position
from
bottom
Tempera-
ture
ºC
Shelf po-
sition
from
bottom
Tempera-
ture
ºC
For both
functions
Hrs.: Mins.

Operating Instructions
32
Baking on several shelf positions
Type of cake or pastry
Fan cooking U
Time
Hours:
Mins.
Shelf position from bottom Tempera-
ture ºC
2 Levels 3 Levels
Cakes and pastries on
baking sheets
Cream puffs/eclairs 1/4 -160-18010:35-0:60
Dry streusel cake 1/4 -140-160 0:30-0:60
Biscuits
Shortcrust biscuits 1/4 1/3/5 150-160 0:15-0:35
Small piped biscuits 1/4 1/3/5 140-150 0:20-0:60
Sponge fingers 1/4 -160-170 0:25-0:40
Meringues 1/4 -80-100 2:10-2:50
Macaroons 1/4 -100-120 0:40-1:20
Small pastries made with
yeast dough 1/4 -160-170 0:30-0:60
Small pastries made with
puff pastry 1/4 -170-18010:30-0:50
Bread rolls 1/4 -180-19010:30-0:55

Operating Instructions
33
Tips for baking
Baking result Possible cause Solution
The cake is under-
cooked at the bottom
Wrong shelf position Insert the cake at a lower
shelf position
The cake collapses (is
sticky, soft in the
middle, damp
patches)
Cooking temperature too high Set to a lower temperature
Cooking time too short Increase cooking time
Cooking times may not be
reduced by using a higher
cooking temperature
Too much liquid in mixture Next time use less liquid.
Check that you have beaten
the mixture for the correct
length of time, particularly
when using a food-processor.
Cake is too dry Cooking temperature too low Set a slightly higher baking
temperature next time
Cooking time too long Reduce cooking time
Cake is unevenly
browned
Cooking temperature too high
and cooking time too short
Set to a lower temperature
and increase cooking time
Mixture is spread unevenly Spread mixture evenly on the
baking tray
Fat filter is still in position Remove fat filter
Cooking time too lon Temperature too low Set a slightly higher baking
temperature next time
Fat filter is still in position Remove fat filter

Operating Instructions
34
Pies and Gratin Table
Conventional O Rotitherm I Time
Shelf
position
from
bottom
Temp.
°C
Shelf
position
from
bottom
Temp.
°C
Hrs: Mins.
Pasta bake 1180-200 1160-170 0:45-1:00
Lasagne 1180-200 1160-170 0:25-0:40
Vegetables au
gratin11200-220 1160-170 0:15-0:30
Pizza ba-
guettes1
1) Pre-heat the oven.
Information printed in bold type indicates the preferred oven function for the
dish.
1200-220 1160-170 0:15-0:30
Sweet
soufflés 1180-200 - - 0:40-0:60
Fish pies 1180-200 1160-170 0:30-1:00
Stuffed vege-
tables 1180-200 1160-170 0:30-1:00

Operating Instructions
35
Frozen Ready Meals Table
3 When frozen foods are used the trays inserted may distort during cook-
ing. This is because of the large differences in temperature between the
frozen item and the oven. Once the trays have cooled the distortion will
disappear again.
Food to be
cooked
Shelf
position
from bottom
Oven function Temperature Time
Frozen pizza 3Conventional
O
in accordance
with the
maker's instruc-
tions
in accordance
with the maker's
instructions
Chips1
(300-600 g)
1) Comment: Turn chips 2-3 times during cooking.
3Rotitherm I 200-220 °C 15-25 Mins.
Baguettes 3Conventional
O
in accordance
with the
maker's instruc-
tions
in accordance
with the maker's
instructions
Fruit flan 3Conventional
O
in accordance
with the
maker's instruc-
tions
in accordance
with the maker's
instructions

Operating Instructions
36
Roasting
Use the rotitherm I or conventional O oven functions for roasting.
Ovenware for roasting
•Any heat-resistant dish is suitable for roasting (refer to the manufac-
turer's instructions!).
•If the dish has plastic handles, check that they are heat-resistant (re-
fer to manufacturer's instructions!).
•Large roasts can be roasted directly on the universal baking tray or
on the shelf with the universal baking tray underneath (e.g. tur-
key, goose, 3-4 chickens, 3-4 knuckles of veal).
•We recommend that all lean pieces of meat should be roasted in a
casserole dish with a lid (e.g. veal, marinated beef, pot roast, frozen
meat.) In this way the meat will retain its juices.
•In order to obtain a tasty outside crust we recommend roasting
pieces of meat in a casserole dish without a lid (e.g. roast pork, lamb
and mutton, meat loaf, duck, 1-2 knuckles of veal, 1-2 chickens, small
fowl, roast beef, fillets, game).
3 Tip: The oven will be less dirty if you always use a dish for roasting!
Shelf positions
•Please see the following table for the shelf positions to be used.

Operating Instructions
37
3 Notes on the roasting table
Information is given in the table on suitable oven functions, tempera-
ture settings, cooking times and shelf positions for various types of
meat. The information is for guidance.
•We recommend roasting meat and fish with a minimum weight of
1kg in the oven.
•In general the conventional O oven function is particularly suitable
for very lean meat such as fish or game. For all other types of meat
(particularly poultry) we recommend the rotitherm I function.
•To stop meat juices or fat burning onto dishes or the oven, we recom-
mend adding a little liquid to the roasting dish.
•Turn the joint as required (after 1/2 - 2/3 of the cooking time).
3 Tip: Baste large joints and poultry several times during cooking with
the meat juices. This will produce better roasting results.
2 Switch off the oven approx. 10 minutes before the end of the cooking
time to make use of the residual heat.

Operating Instructions
38
Roasting table
Type of meat Quantity Conventional ORotitherm ITime
Weight Shelf po-
sition
from bot-
tom
Tempera-
ture
ºC
Shelf
position
from
bottom
Tempera-
ture
ºC
Hours:Mi
ns.
Beef
Pot roast 1-1.5 kg 1200-250 - - 2:00-2:30
Roast beef or fil-
let
per cm of
thickness
- rare per cm of
thickness 1250-27011190-200 0:05-0:06
- medium rare per cm of
thickness 1250-27011180-190 0:06-0:08
- well done per cm of
thickness 1210-25011170-180 0:08-0:10
Pork
Shoulder, neck
ham joint 1-1.5 kg 1210-220 1160-180 1:30-2:00
Chop, smoked
loin chop 1-1.5 kg 1180-190 1170-180 1:00-1:30
Meat loaf 750 g-
1kg 1170-180 1160-170 0:45-1:00
Knuckle of pork
(pre-cooked)
750 g-
1kg 1210-220 1150-170 1:30-2:00
Veal
Roast veal 1 kg 1210-220 1160-180 1:30-2:00
Knuckle of veal 1.5-2 kg 1210-225 1160-180 2:00-2:30
Lamb
Leg of lamb,
roast lamb 1-1.5 kg 1210-220 1150-170 1:15-2:00
Saddle of lamb 1-1.5 kg 1210-220 1160-180 1:00-1:30

Operating Instructions
39
Game
Saddle of hare,
haunch of hare
up to 1
kg 3220-25013160-170 0:25-0:40
Saddle of venison 1.5-2 kg 1210-220 1160-180 1:15-1:45
Haunch of venison 1.5-2 kg 1200-210 1160-180 1:30-2:15
Poultry
Poultry portions
4-6 pieces
per
200 -
250 g
3220-250 3180-200 0:35-0:50
Chicken halves
2-4 pieces
per
400-
500 g
3220-250 3180-200 0:35-0:50
Chicken,
poulard 1-1.5 kg 1220-250 1170-180 0:45-1:15
Duck 1.5-2 kg 1210-220 1160-180 1:00-1:30
Goose 3.5-5 kg 1200-210 1150-160 2:30-3:00
Turkey
2.5-
3.5 kg
4-6 kg
1200-210
180-200 1150-160
140-150
1:30-2:00
2:30-4:00
Fish (steaming)
Whole fish 1-1.5 kg 2/3 210-220 2/3 160-170 0:45-1:15
1) Pre-heat the oven.
Information printed in bold type indicates the preferred oven function for the dish.
Type of meat Quantity Conventional ORotitherm ITime
Weight Shelf po-
sition
from bot-
tom
Tempera-
ture
ºC
Shelf
position
from
bottom
Tempera-
ture
ºC
Hours:Mi
ns.

Operating Instructions
40
Grilling
To grill use the grill F oven function or dual grill Z with temperature
setting z.
1 Important: Always grill with the oven door closed.
3 Always pre-heat the empty oven for 5 minutes using the grill func-
tions!
Ovenware for grilling
•Use the shelf unit and universal tray together for grilling.
Shelf positions
•For grilling flat foods you should mainly use the 4th shelf position
from the bottom.
Notes on the grilling table
The grilling times are only for guidance and will vary depending on the
type and quality of meat or fish.
•Grilling is particularly suitable for flat pieces of meat and fish.
•Turn the food halfway through grilling.
Grilling Table
Food for grilling Shelf position
from bottom Grilling time
1st side 2nd side
Rissoles 48-10 mins. 6-8 mins.
Fillet of pork 410-12 mins. 6-10 mins.
Grilled sausages 48-10 mins. 6-8 mins.
Beef fillet steaks,
veal steaks 46-7 mins. 5-6 mins.
Fillet of beef, sirloin
(approx. 1 kg) 310-12 mins. 10-12 mins.
Toast 1
1) Do not use the universal baking tray together with the grilling shelf unit.
32-3 mins. 2-3 mins.
Toast with topping 36-8 mins. -

Operating Instructions
41
Defrosting
To defrost, use the defrost A oven function without setting a tempera-
ture.
Dishes for defrosting
•Remove packaging and place the food on a plate on the shelf.
•Do not use a plate or dish to cover as these significantly increase the
defrosting time.
Shelf positions
•Insert the shelf in the 1st position from the bottom to defrost.
Notes on the defrosting table
The table below offers some guidance on defrosting times.
Defrosting table
Dish
Defrost-
ing time
Mins.
Final de-
frosting
time Mins.
Note
Chicken, 1000 g 100-140 20-30
Place the chicken on an upside-down
saucer on a large plate. Halfway
through cooking turn or cover with
foil.
Meat, 1000 g 100-140 20-30 Halfway through cooking turn or
cover with foil.
Meat, 500 g 90-120 20-30 Halfway through cooking turn or
cover with foil.
Trout, 150 g 25-35 10-15 Do not cover
Strawberries, 300 g 30-40 10-20 Do not cover
Butter, 250 g 30-40 10-15 Do not cover
Cream, 2 x 200 g 80-100 10-15
Do not cover
(Cream may be whipped when some
of it is still slightly frozen)
Flan, 1400 g 60 60 Do not cover

Operating Instructions
42
Preserving
For making preserves, use the bottom heat Ü oven function.
Preserving jars
•When making preserves, use only commercially available jars of the
same size.
3 Jars with twist-off tops or with a bayonet fastening and metal
containers are not suitable.
Shelf positions
•Use the 1st shelf position from the bottom for making preserves.
Notes on preserves
•Use the universal tray for preserves. There is room for up to six jars,
each with a capacity of 1 litre.
•The jars should all be filled to the same level and closed.
•Position the jars on the universal baking tray so that they do not
come into contact with one another.
•Pour about ½ litre of water into the universal baking tray so that
there is sufficient moisture in the oven.
•As soon as bubbles begin to appear in the first jars (for 1-litre jars this
takes about 35-60 minutes), switch off the oven or reduce the tem-
perature to 100° C (see table).

Operating Instructions
43
Preserving Table
The stated times and temperatures are for guidance only.
Preserves
Temperature
in
°C
Preserving
time until
bubbles form
Mins.
Continued
cooking
at 100°C
Mins.
in switched
off oven
standing time
Soft fruit
Strawberries, blue-
berries, raspberries,
ripe gooseberries
160-170 35-45 - -
Unripe gooseberries 160-170 35-45 10-15 -
Fruit with stones
Pears, quinces,
plums 160-170 35-45 10-15 -
Vegetables
Carrots 160-170 50-60 5-10 60
Mushrooms 160-170 40-60 10-15 60
Gherkins 160-170 50-60 -
Mixed Pickles 160-1700 50-60 15 -
Kohlrabi, peas,
asparagus 160-170 50-60 15-20 -
Beans 160-170 50-60 - -
Plum purée 160-170
50
45
-6-8 hrs.
-
-

Operating Instructions
44
Cleaning and Care
1 Warning: For safety reasons cleaning the appliance with a steam jet
cleaner or high-pressure water cleaner is not permissible!
Exterior of the Appliance
Wipe the front of the appliance with a soft cloth dipped in warm soapy
water.
•Do not use scourers, caustic cleaners or abrasive items.
•Use commercially available cleaners for metal fronts.
Oven Interior
1 Warning: The oven must be switched off and cold before cleaning.
Clean the appliance after each use. This is the easiest way to remove
spills and prevents them being burnt on.
1. Switch on the oven lighting L when cleaning.
2. Every time you use the oven, wipe it out afterwards with water and
washing-up liquid, then dry. Do not use any abrasive items.
3. Remove stubborn marks with special oven cleaners.
1 Important: Always follow the manufacturer's instructions when using
oven spray!
Accessories
Wash all slide-in units (shelf unit, baking tray, shelf support rails etc.)
after each use and dry well. Soak briefly to make them easier to clean.

Operating Instructions
45
Fat Filter
1. Clean the fat filter in hot water and washing up liquid or in the dish-
washer.
2. Badly burned on soiling can be removed by boiling the filter in a little
water to which 2-3 tablespoonsful of dishwasher cleaner has been
added.
Operating Instructions
46
Shelf Support Rails
The shelf support rails on the left and right hand sides of the oven can
be removed for cleaning the side walls.
Removing the shelf support rails
First pull the front of the rail away
from the oven wall (1) and then un-
hitch at the back (2).
Fitting the shelf support rails
3 Important! The rounded ends of
the guide rails must be pointing for-
wards!
To re-insert, first hook the rail into
place at the back (1) and then insert
the front and press into place (2).
Operating Instructions
47
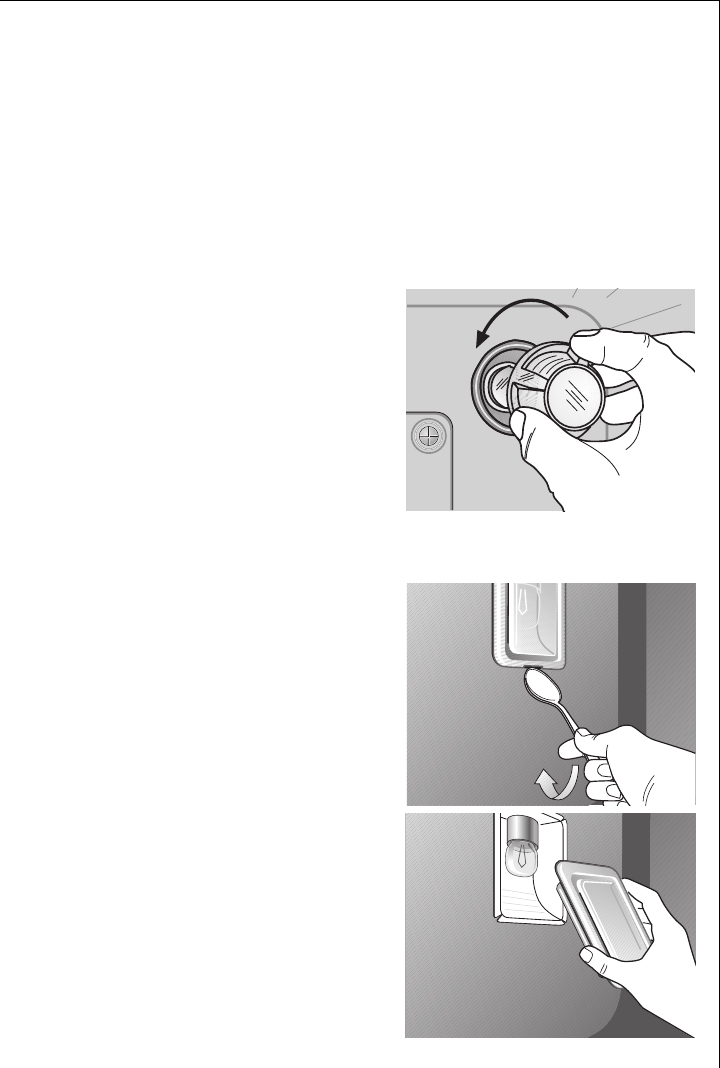
Oven Lighting
1 Warning: There is a danger of electric shock! Prior to changing the
oven light bulb:
–Switch off the oven!
–Remove the fuses in the fuse box or switch off the circuit breaker.
3 Place a cloth on the oven floor to protect the oven light and glass
cover.
Changing the rear oven light/Cleaning the glass cover
1. Remove the glass cover by turning
it anti-clockwise and then clean it.
2. If necessary:
replace bulb with a 40 watt,
230 V, 300 °C heat-resistant,
oven light bulb.
3. Refit the glass cover.
Changing side oven light/Cleaning glass cover
1. Remove the left shelf support rail.
2. Remove the glass cover with the aid
of a narrow, blunt implement (e.g.,
teaspoon) and clean it.
3. If necessary:
replace bulb with a 25 watt,
230 V, 300 °C heat-resistant,
oven light bulb.
4. Refit the glass cover.
5. Insert the shelf support rail.
Operating Instructions
48
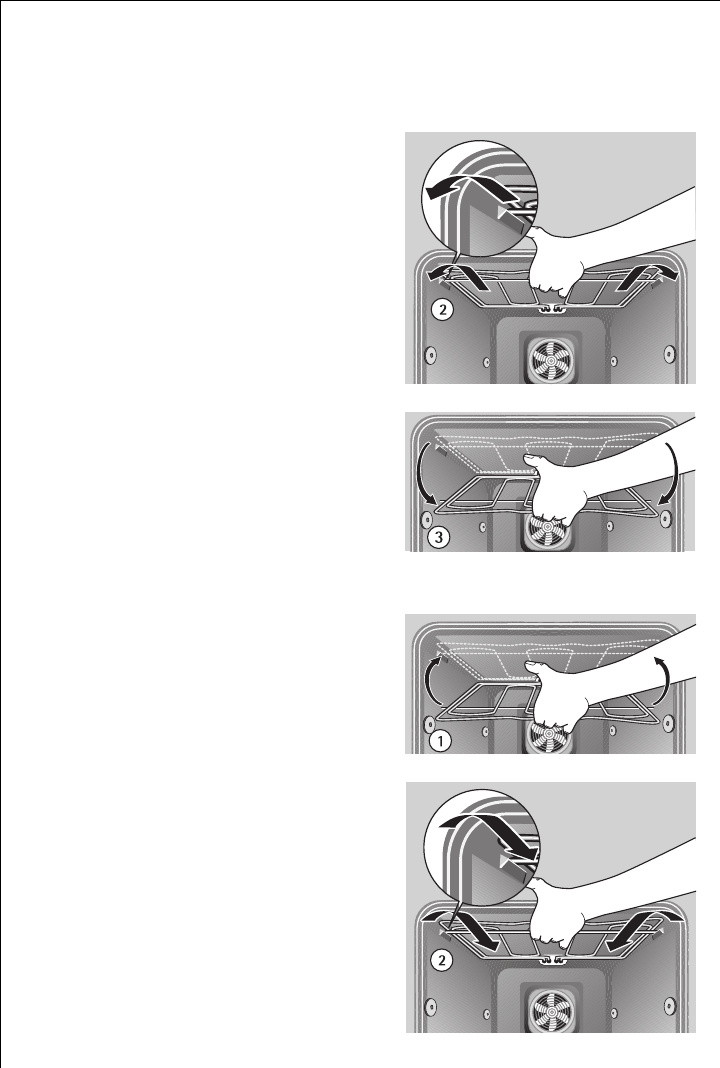
Cleaning the Oven Ceiling
The upper heating element can be folded down to make it easier to
clean the oven ceiling.
Folding down the heating ele-
ment
1 Warning: Only fold down the heat-
ing element when the oven is
switched off and there is no risk of
being burnt!
1. Remove the side shelf support rails.
2. Grip the heating element at the
front and pull it forwards and out
over the support lug on the inner
wall of the oven.
3. The heating element will now fold
down.
1 Caution: Do not use force to press
the heating element down! The
heating element might break.
Cleaning the oven ceiling
Repositioning the heating ele-
ment
1. Move the heating element back up
towards the oven ceiling.
2. Pull the heating element forwards
against the spring pressure and
guide it over the oven support lug.
3. Settle it onto the support.
4. Insert shelf support rail.
1 Important: The heating element
must be positioned correctly and se-
curely on both sides above the sup-
port lug on the inner wall of the
oven (2).
Operating Instructions
49
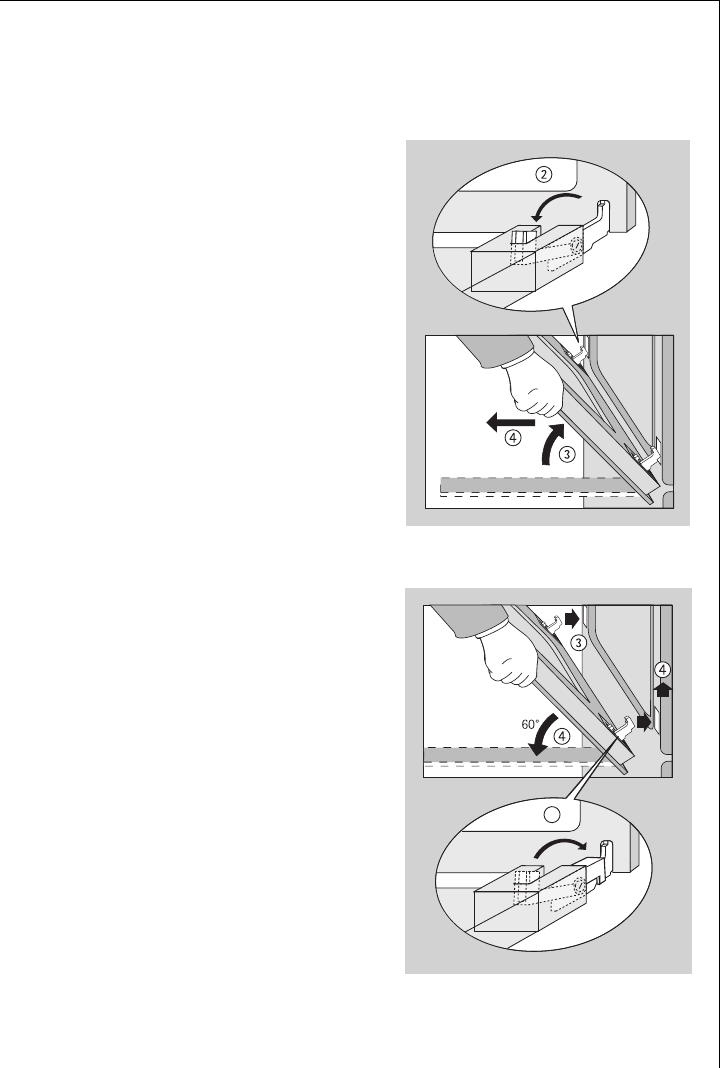
Oven Door
The oven door of your appliance may be removed for cleaning.
Removing the oven door
1. Open the oven door completely.
2. Completely fold back the brass-
coloured clamping lever on both
door hinges.
3. Grip the oven door with both hands
on the sides and close it to about
3/4 going past the point of resist-
ance.
4. Pull the door away from the oven
(Caution: heavy!).
5. Place the door, with the outer sur-
face downwards, on a soft, flat sur-
face, for example a blanket, to avoid
scratches.
Hanging the oven door
1. With both hands take hold of the
sides of the door from the side on
which the handle is positioned.
2. Hold the door at an angle of
approx. 60°.
3. Slide the door hinges simultane-
ously as far as possible into the two
slots on the right and left at the
bottom of the oven.
4. Lift the door up until resistance is
met and then open fully.
5. Lift the brass-coloured clamping le-
vers on both door hinges back to
their original position.
6. Close the oven door.
5
Operating Instructions
50
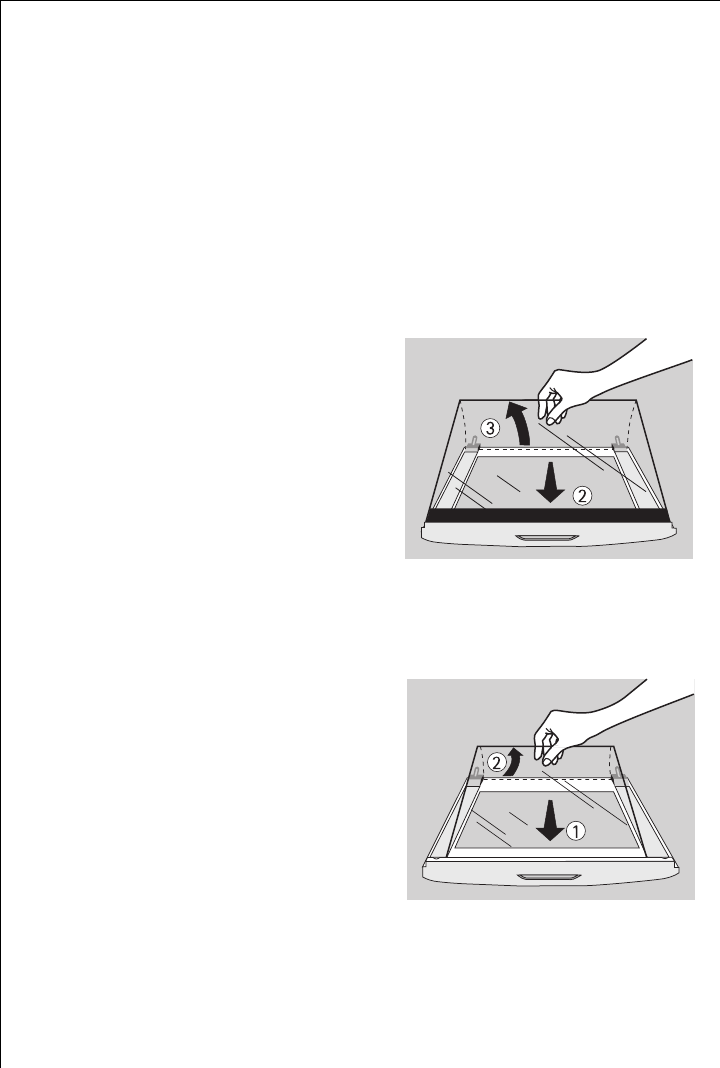
Oven Door Glass
The oven door is fitted with three glass panels mounted one behind the
other. The inner panels may be removed for cleaning.
1 Warning: Carry out the following steps only when the oven door is un-
hinged! When left on its hinges, the door could rise rapidly due to the
lighter weight when the glass is removed and could cause injury.
1 Important: Using force, especially on the edges of the front glass
panel, may break the glass.
Removing the top door glass
1. Unhinge the oven door and place it
on a soft, flat surface with the han-
dle facing down.
2. Take hold of the upper glass panel
at the lower edge and slide it
against the spring pressure in the
direction of the oven door handle
until it is free at the base.
3. Raise the panel gently at the base
and pull out.
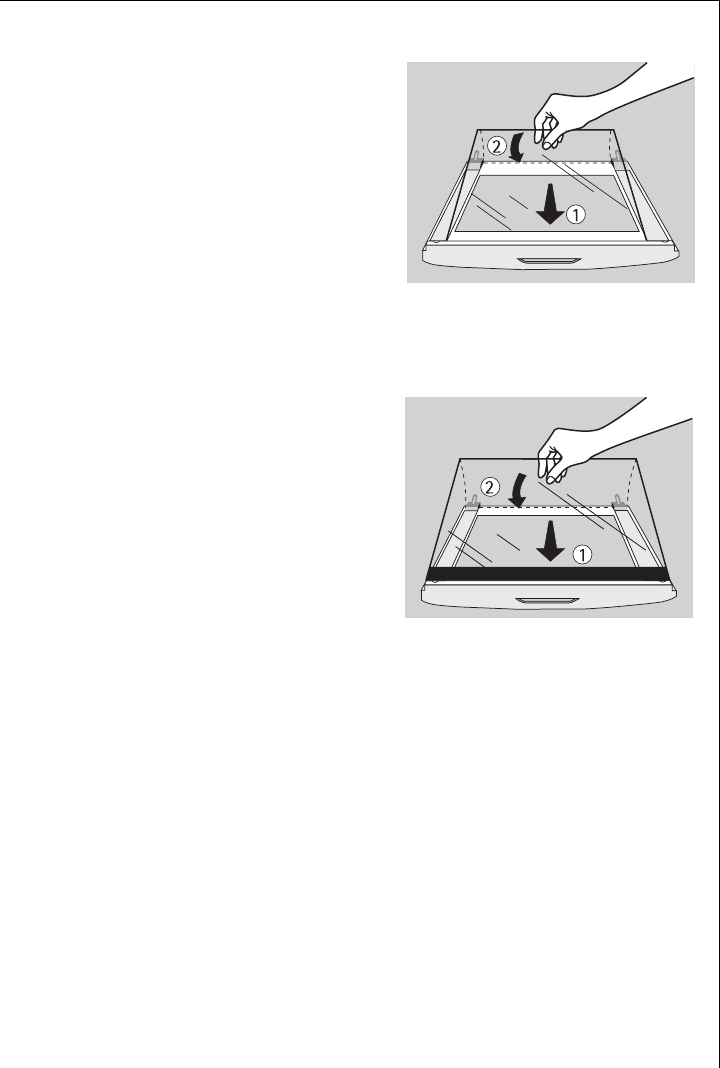
Removing the middle door glass
1. Grip the bottom edge of the middle
glass panel and push it in the direc-
tion of the oven door handle until it
is free at the base.
2. Raise the panel gently at the base
and pull out.
Clean the glass door panels
Operating Instructions
51
Inserting the middle door glass
1. Insert the middle glass panel at an
angle from above into the section
of the door in which the handle is
located.
2. Lower the middle glass panel and
slide it under the lower bracket to-
wards the lower door edge as far as
it will go.
Inserting the upper door glass
1. Insert the upper glass panel at an
angle from above into the section
of the door in which the handle is
located.
2. Lower the glass panel. Lay the panel
against the spring on the lower
door edge in front of the retaining
section on the handle side, and slide
it under the retaining section.
The glass panel must be firmly in
position!
Re-hang the oven door

Operating Instructions
52
What to do if ...
If you cannot rectify the fault with the help of the information
given above, please contact your local Service Force Centre.
1 Warning: Repairs to the appliance may only be carried out by qualified
specialists. Improper repairs can give rise to significant hazards for the
user.
If the appliance has been used improperly, the customer service engi-
neer's visit or that of the specialist dealer will not be free of charge,
even during the warranty period.
Information for appliances with a metal front:
3 Due to the cold front of your appliance the inner door glass may steam
over briefly if you open the door during or shortly after baking or
roasting.
Symptom Possible cause Solution
The cooking zones do
not function.
The appropriate cooking
zone has not been switched
on.
Switch on the cooking zone.
The circuit breaker (at the
household fuse box) has
tripped or the fuse has
blown.
Check the circuit breaker or
fuse.
The oven does not heat
up.
The oven has not been
switched on. Switch on the oven.
The time has not been set. Set the time.
The necessary settings have
not been made. Check the settings.
The circuit breaker (at the
household fuse box) has
tripped or the fuse has
blown.
Check the fuse.
If the circuit breaker trips or
the fuse blows several times,
please call an approved elec-
trician.
The oven lighting does
not come on.
The oven light bulb has
blown.
Replace the light bulb in the
oven (see Cleaning and Care).

Operating Instructions
53
Technical Data
Oven Interior Dimensions
Regulations, Standards, Directives
This appliance meets the following standards:
•EN 60 335-1 and EN 60 335-2-6
relating to the safety of electric appliances for household use and
similar purposes and
•EN 60350 and
•DIN 44546 / 44547 / 44548
relating to the operating features of household electric cookers.
•EN 55014-2
•EN 55014
•EN 61000-3-2
•EN 61000-3-3
relating to basic requirements for electromagnetic compatibility pro-
tection (EMC).
4 This appliance complies with the following EC directives:
•73/23/EWG dated 19.02.1973 (Low Voltage Directive)
•89/336/EWG dated 03.05.1989 (EMC Directive including
Amending Directive 92/31/EWG).
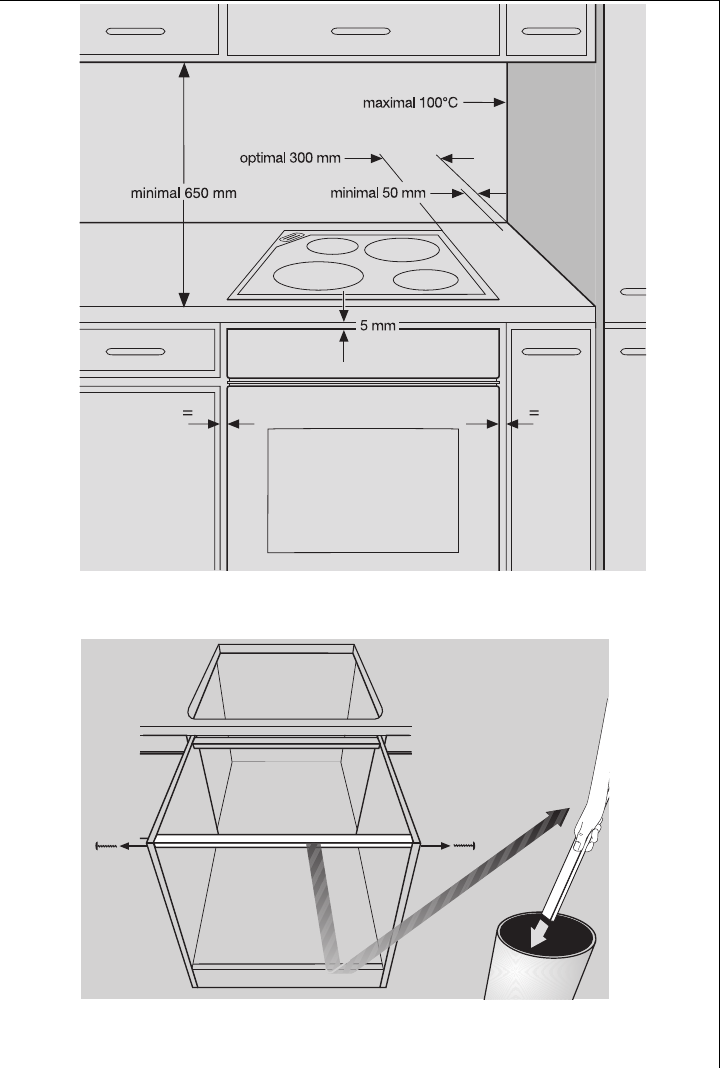
Height x Width x Depth 31 cm x 41 cm x 41 cm
Capacity (usable capacity) 52 l

Installation Instructions
54
Installation Instructions
1 Important: The new appliance is only to be installed and connected up
by an approved installer.
Please observe this instruction, otherwise the warranty will not cover
any damage that may occur.
1 Safety Instructions for the Installer
•A device must be provided in the electrical installation which allows
the appliance to be disconnected from the mains at all poles with a
contact opening width of at least 3mm.
Suitable isolation devices are e.g. circuit breakers, fuses (screw-type
fuses are to be removed from the holder), earth leakage trips and
contactors.
•Anti-shock protection must be guaranteed by the installation.
•The unit in which the appliance is fitted must satisfy the require-
ments of DIN 68930 in respect of stability.
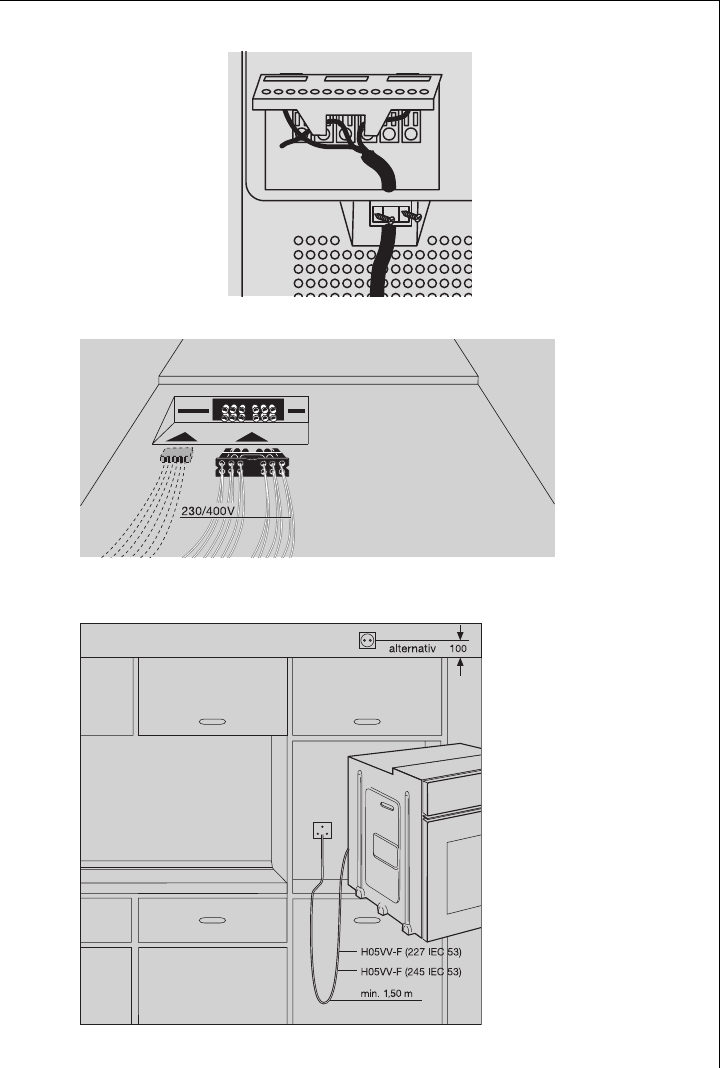
•Built-in ovens and cooking surfaces are fitted with special connector
systems. They may only be combined with appliances with a matching
system.
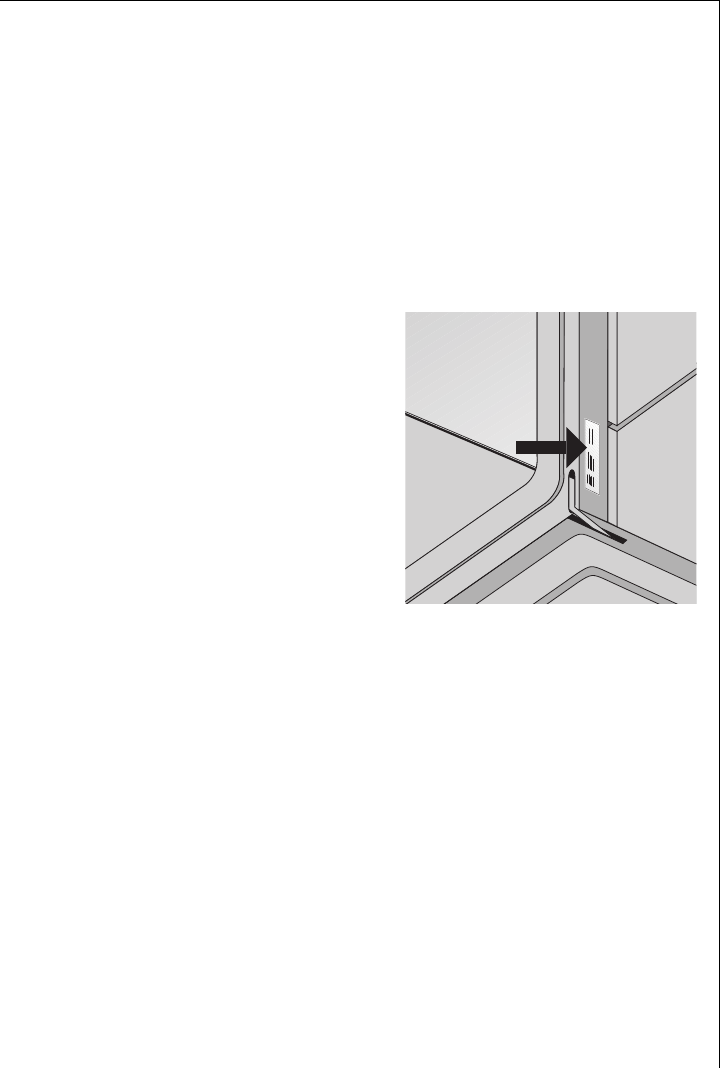
Installation Instructions
55
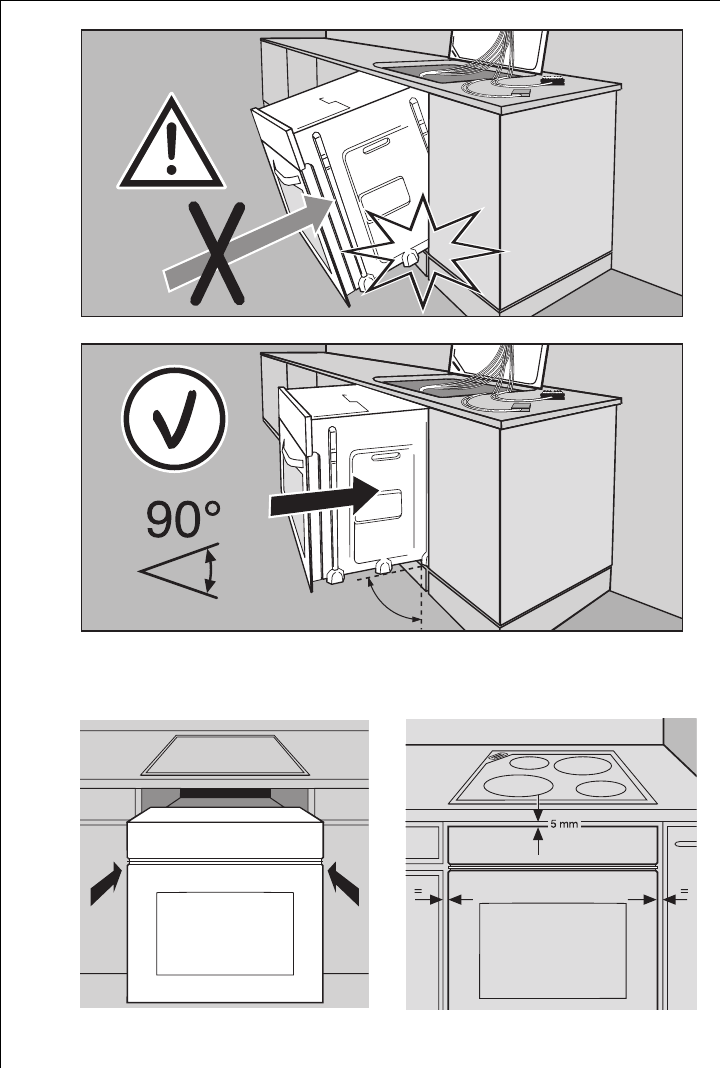
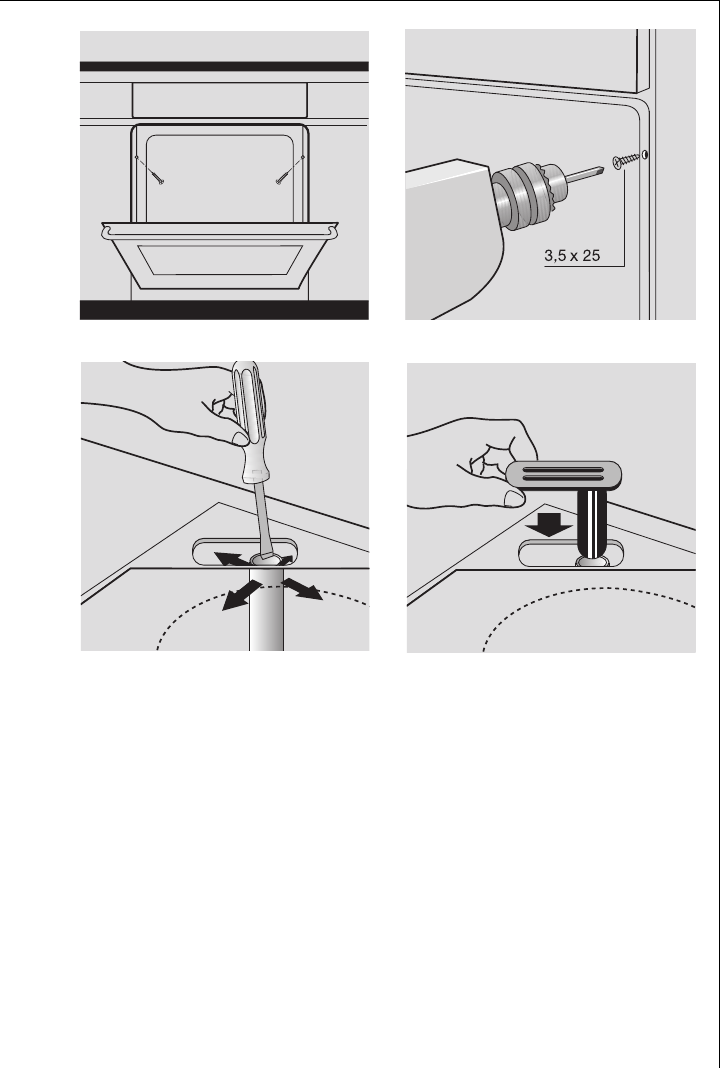
1
2
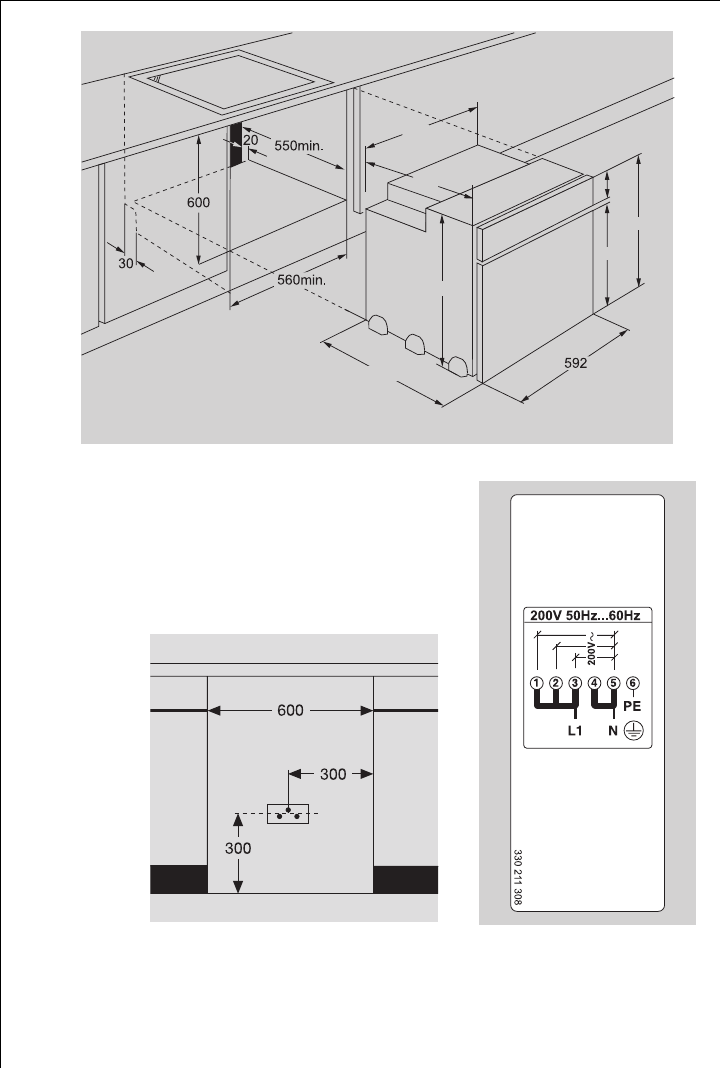
Installation Instructions
56
3
4
5
114
594
467
567
584
541
546
Installation Instructions
57
6
7
8
Installation Instructions
58
9
10 11
Installation Instructions
59
12 13
14 15
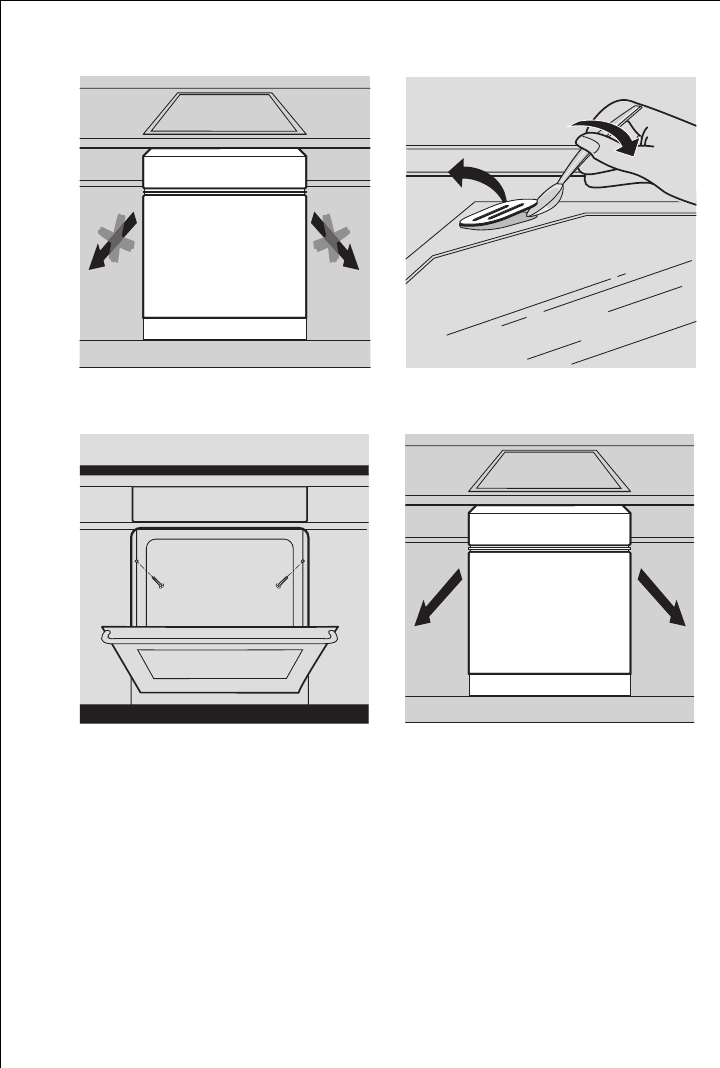
Installation Instructions
60
Removal
12
34

Guarantee Conditions
61
Guarantee Conditions
Weitere Kundendienststellen im Ausland
In diesen Ländern gelten die Garantiebedingungen der örtlichen Partner. Diese können
dort eingesehen werden.
Further after-sales service agencies overseas
In these countries our AEG agents’ own guarantee conditions are applicable. Please ob-
tain further details direct.
Autres agences étrangères assurant le service après-vente
Dans ces pays, les conditions de garantie des concessionnaires de la région sont vala-
bles. Vous pouvez les consulter sur place.
Otros puntos de Postventa en el extranjero
En estos países rigen las condiciones de nuestros representantes locales. las cuales
pueden ser consultadas allí mismo.
Ulteriori uffici del servizio tecnico assistenza clienti all’estero
In questi paesi sono valide le condizioni di garanzia dei partner locali. Queste condizioni
possono essere esaminante sul luogo.
Serviços de assistência técnica no estrangeiro
Nestes países são válidas as condições de garantia dos concessionários locais, podendo
aí ser consultadas.

Customer Service Centres
62
Customer Service Centres
U.A.E. Abu Dhabi
Universal Trading Company
P.O. Box 43 99
Tel.: 335331
Jordan
Jordan Household
Supply Co. Ltd.
P.O. Box 3/68
Amman/Tel.: 69 70 50
Malta
ITC
International Trading Com-
pany
White House Building
Mountbatte Street
Blata L-Bajda/Tel.: 220644
Egypt
Middle East Commercial
Center
P.O. Box 19
Kairo-Heliopolis
Tel.: 29917/31634
Kanada
EURO-LINE Appliances
2150 Winston PARK Drive 20
Oakville, Ontario L6H 5V1
Tel.: 905 829 3980
Fax: 905 829 3985
Mauritius
Happy World Centre Ltd.
P.O. 7 54
1 Chausee Street
Port Louis
Tel.: 25355
Australia
ANDI-Co Pty. Ltd
9 Kingston Town Close
Oakleigh VIC 3166
Tel.: (03) 9569 1235
Fax: (03) 9569 1450
Korea (South)
Core Incorp.
3/F Chewoo Bldg.
200 Nonhyun-Dong
Kangnam-Ku
Seoul
Telefon 82 2 549 89 61
Namibia
AEG NAMIBIA (PTY) LIM-
ITED-Jeppe Street
Northern Industrial Area
Windhoek
Tel.: (061) 21-6082/4
Fax: (061) 217838
Bahrain/Arabian Gulf
A.A. Zayani & Sons
P.O. Box 9 32
Bahrain
Tel.: 261060
Croatia
Electrolux D.O.O.
Suplova 7
10000 Zagreb
Tel.: 1 61 19512
Fax: 1 61 19513
New Zealand
Euro-Life New Zealand Ltd.
Privat Bag
58 Symonds Street
Auckland
Tel.: (09) 525 2222
Bulgaria
Electrolux Bulgaria E.O.O.D.
91 Levski Blvd.
1000 Sofia
Tel.: 2 806676
Fax. 2 980 5276
Kuwait/Arabian Gulf
Ali Al-Ghanim Est.
P.O. Box 10 83
Tel.: 5322463
Fax: 5242114
Nouvelle Caledonie
Socometra N.C.
B.P. 483
Nouman
Tel.: 275444

Customer Service Centres
63
Cyprus
Hadjikyrlakos & Sons Ltd.
Prodromou 121
P.O. Box 21587
Nicosia 1511
Service Telephones:
Nicosia 02 481226
Limassol 05 562182
Larnaca 04 633929
Paphos 06 932 699
Lebanon
Adib & Assaferi
P.O. Box 539
Tripoli
Oman
Moshin Haider Darwish
P.O. Box 1 35
Muscat
Tel.: 703743
Estonia
Electrolux Estonia Ltd.
Mustamäe tee 24
EE0006 Tallinn
Tel.: (372) 6 650 090
Fax: (372) 6 650 092
Latavia
Electrolux Latavia Ltd.
Terlaton Street 42/44
1011 Riga
Tel.: 371 2 297821
Fax: 371 2 821286
Poland
Electrolux Poland Sp. zo.o.
ul. Domaniewska 41
02-034 Warszawa
tel.: 022 874 33 33
fax: 022 874 33 00
Hongkong
Wo Kee Services Ltd.
585-609 Castle Peak Road
Kwai Chung N.T.
Hongkong
Tel.: 2494 4000
Lthuania
Electrolux Lthuania
Verkui 29
2600 Vilnus
Tel.: 372 272 3326
Fax: 372 272 3366
Russia
Electrolux Russia Ltd.
16 Olympiysky prospekt
129090 Moscow
Tel.: (095) 937 7837
Fax: (095) 926 5513
Israel
Electricity & Electronic
Services-Evis LTD.
19 Hataasia st.
Raanana,
Industrial area 43654
Tel: 972-9-7448118
Fax: 972-9-7603618
e-mail:evis@evis.co.il
Malaysia
Arzbergh Engineering
No. 49A/B, Jalan Petaling
Utama 7
4600 Petaling Jaya
Tel.: 3 795 1084
Fax: 3 795 1082
Saudi Arabia
Alia Trading Corporation
P.O. Box 4101
King Abdul Aziz Street
Riyadh
Tel.: 4645977
Al Nahas Est.
Musaidia Market I
P.O. Box 1 15 29
Jeddah
Tel.: 6606852
Japan
Electrolux Japan Ltd.
Yasuda Warehouse 4F 3-3-12
Heiwajima Ota-Ku
Tokyo
Tel.: 81 3 3544 3363
Fax: 81 3 3763 6143
Singapore
Arzbergh Engineering
19 Tanglin Road 06-07
Singapore 247909
Tel.: 65 7356572
Fax: 7351124
Slovenia
Electrolux Slovenia D.O.O.
Traska Ul. 132
1000 Ljubljana
Tel.: 61 1234 137
Fax: 61 1234 238

Customer Service Centres
64
Thailand
OLYMPIA Thai Ltd.
44 Ratchadapisek Road
10320 Bangkok
Tel.: 2 513 6111
Fax: 2 513 2574
Slovakia Rep.
Electrolux Slovakia S.R.O.
Seberiniho 1
821 03 Bratislava
Tel.: 7 4333 9745
Fax: 7 4333 6976
South Africa
AEG (Pty) Ltd.
55, 12th Road
P.O. Box 1 02 64
Kew/Johannesburg 2000
Tel.: 8069111
Hungary
Electrolux Lehel KFT
(AEG Div)
Erzsebet’Kiralyne Utja 87
1142 Budapest
Tel.: 00361/251 84 44
USA
ANDI Co. Appl. Inc. East
65 Campus Plaza
Edison, New Jersey 0837
USA/Tel.: (201) 2258839
Syria
Masri & Shami
P.O. Box 24 96
Damascus
Tel.: 214080

65

Index
66
Index
A
Accessories . . . . . . . . . . . . . . . . . . . . . . . . . . 18
B
Baking tray . . . . . . . . . . . . . . . . . . . . . . . . . 10
Bottom heat . . . . . . . . . . . . . . . . . . . . . . . . 16
C
Cleaning
accessories . . . . . . . . . . . . . . . . . . . . . . . . 44
initial cleaning . . . . . . . . . . . . . . . . . . . . 12
oven door . . . . . . . . . . . . . . . . . . . . . . . . . 49
shelf support rails . . . . . . . . . . . . . . . . . . 46
Clock . . . . . . . . . . . . . . . . . . . . . . . . . . . . . . . 20
Adjusting the clock . . . . . . . . . . . . . . . . . 26
Cook time . . . . . . . . . . . . . . . . . . . . . . . . 23
Countdown . . . . . . . . . . . . . . . . . . . . . . . 22
Combination shelf . . . . . . . . . . . . . . . . . . . . 10
Control panel . . . . . . . . . . . . . . . . . . . . . . . . . 8
Conventional . . . . . . . . . . . . . . . . . . . . . . . . 16
Cooking . . . . . . . . . . . . . . . . . . . . . . . . .14, 27
Customer Service . . . . . . . . . . . . . . . . . . . . 67
Customer service . . . . . . . . . . . . . . . . . . . . . 62
D
Defrosting . . . . . . . . . . . . . . . . . . . . . . .17, 41
Description of the appliance . . . . . . . . . . . . 8
Dishes with toppings . . . . . . . . . . . . . . . . . 34
Disposal . . . . . . . . . . . . . . . . . . . . . . . . . . . . . 7
Door . . . . . . . . . . . . . . . . . . . . . . . . . . . . . . . 49
Dual grill . . . . . . . . . . . . . . . . . . . . . . . . . . . 17
F
Fan cooking . . . . . . . . . . . . . . . . . . . . . . . . . 16
Fat filter . . . . . . . . . . . . . . . . . . . . . . . . . . . . 45
G
Grill . . . . . . . . . . . . . . . . . . . . . . . . . . . . . . . . 17
Grilling . . . . . . . . . . . . . . . . . . . . . . . . . . . . . 40
Guarantee . . . . . . . . . . . . . . . . . . . . . . . . . . 61
I
Insert anti-tip . . . . . . . . . . . . . . . . . . . . . . . 18
L
Lighting . . . . . . . . . . . . . . . . . . . . . . . . . . . . 47
O
Oven
accessories . . . . . . . . . . . . . . . . . . . . . . . . 10
door . . . . . . . . . . . . . . . . . . . . . . . . . . . . . .49
functions . . . . . . . . . . . . . . . . . . . . . . . . . .16
light . . . . . . . . . . . . . . . . . . . . . . . . . . . . . .47
steam vent . . . . . . . . . . . . . . . . . . . . . . . . .9
P
Pizza & baking . . . . . . . . . . . . . . . . . . . . . . .16
R
Ready meals . . . . . . . . . . . . . . . . . . . . . . . . .35
Repairs . . . . . . . . . . . . . . . . . . . . . . . . . . . . . . .5
Ring
use . . . . . . . . . . . . . . . . . . . . . . . . . . . . . . .13
Roasting . . . . . . . . . . . . . . . . . . . . . . . . . . . .36
Rotitherm . . . . . . . . . . . . . . . . . . . . . . . . . . .17
S
Safety . . . . . . . . . . . . . . . . . . . . . . . . . . . . . . .5
Shelf . . . . . . . . . . . . . . . . . . . . . . . . . . . . . . .18
Shelf support rails . . . . . . . . . . . . . . . . . . . .46
Soufflés . . . . . . . . . . . . . . . . . . . . . . . . . . . . .34
T
Tables and tips . . . . . . . . . . . . . . . . . . . . . . .27
U
Universal baking tray . . . . . . . . . . . . . . 10, 18
Using the oven . . . . . . . . . . . . . . . . . . . . . . .15
W
What to do if ... . . . . . . . . . . . . . . . . . . . . . .52
Service
67
Service
The Chapter “What to do if ...” lists a number of faults that you can cor-
rect by yourself. If a fault occurs, please refer to that chapter first.
Is it a technical fault?
Contact Customer Service. (You will find the addresses and telephone
numbers under “Customer Service addresses”.)
Have the necessary information ready before you call. This will make it
easier to make a fault diagnosis and decide whether repairs are neces-
sary.
If possible, record the following de-
tails:
•Type of fault.
•In what circumstances did it oc-
cur?
Before calling, always note down
the the following numbers, which
you will find on the Rating Plate:
•PNC Number (9 digits),
•S-No Number (8 digits).
We recommend writing these num-
bers here, so that they will be
quickly available in the event of a fault:
During the Warranty Period, in what circumstances do you have to
pay repair costs?
•If you could have could have corrected the fault by yourself using the
Fault Table (see Section “What to do if ...”);
•if several journeys are required by Customer Service technicians, for
example, if they are not given all necessary information prior to their
initial visit, and have to return to find the correct replacement parts.
You can avoid unnecessary journeys by repair technicians, by having
the correct information ready before calling Customer Service.
PNC . . . . . . . . .
S-No . . . . . . . .
AEG Hausgeräte GmbH
Postfach 1036
D-90327 Nürnberg
http://www.aeg.hausgeraete.de
© Copyright by AEG
822 923 150-A-301101-00 Subject to change without notice
