Aeon Labs DSC11 SMART STRIP User Manual
Aeon Labs LLC. SMART STRIP
User Manual
Smart Strip
http://aeot.ec/spprt/strip
View the expanded manual:
Electric power strip is widely used in our everyday
lives, normal power strips have a shortage of
consume some more extra energy, with the
development of technology, and as time going
these strips are gradually out of style, become
unable to meet peoples' requirement any more.
Aeon Labs developed a specific strip--Smart Strip,
which could be programmed, scheduled,
controlled and communicated with controllers
from anywhere in the world.
Aeotec by Aeon Labs Smart Strip
Familiarise yourself with your Smart Strip
Products that are Z-Wave certified can be
used and communicate with other Z-Wave
certified devices.
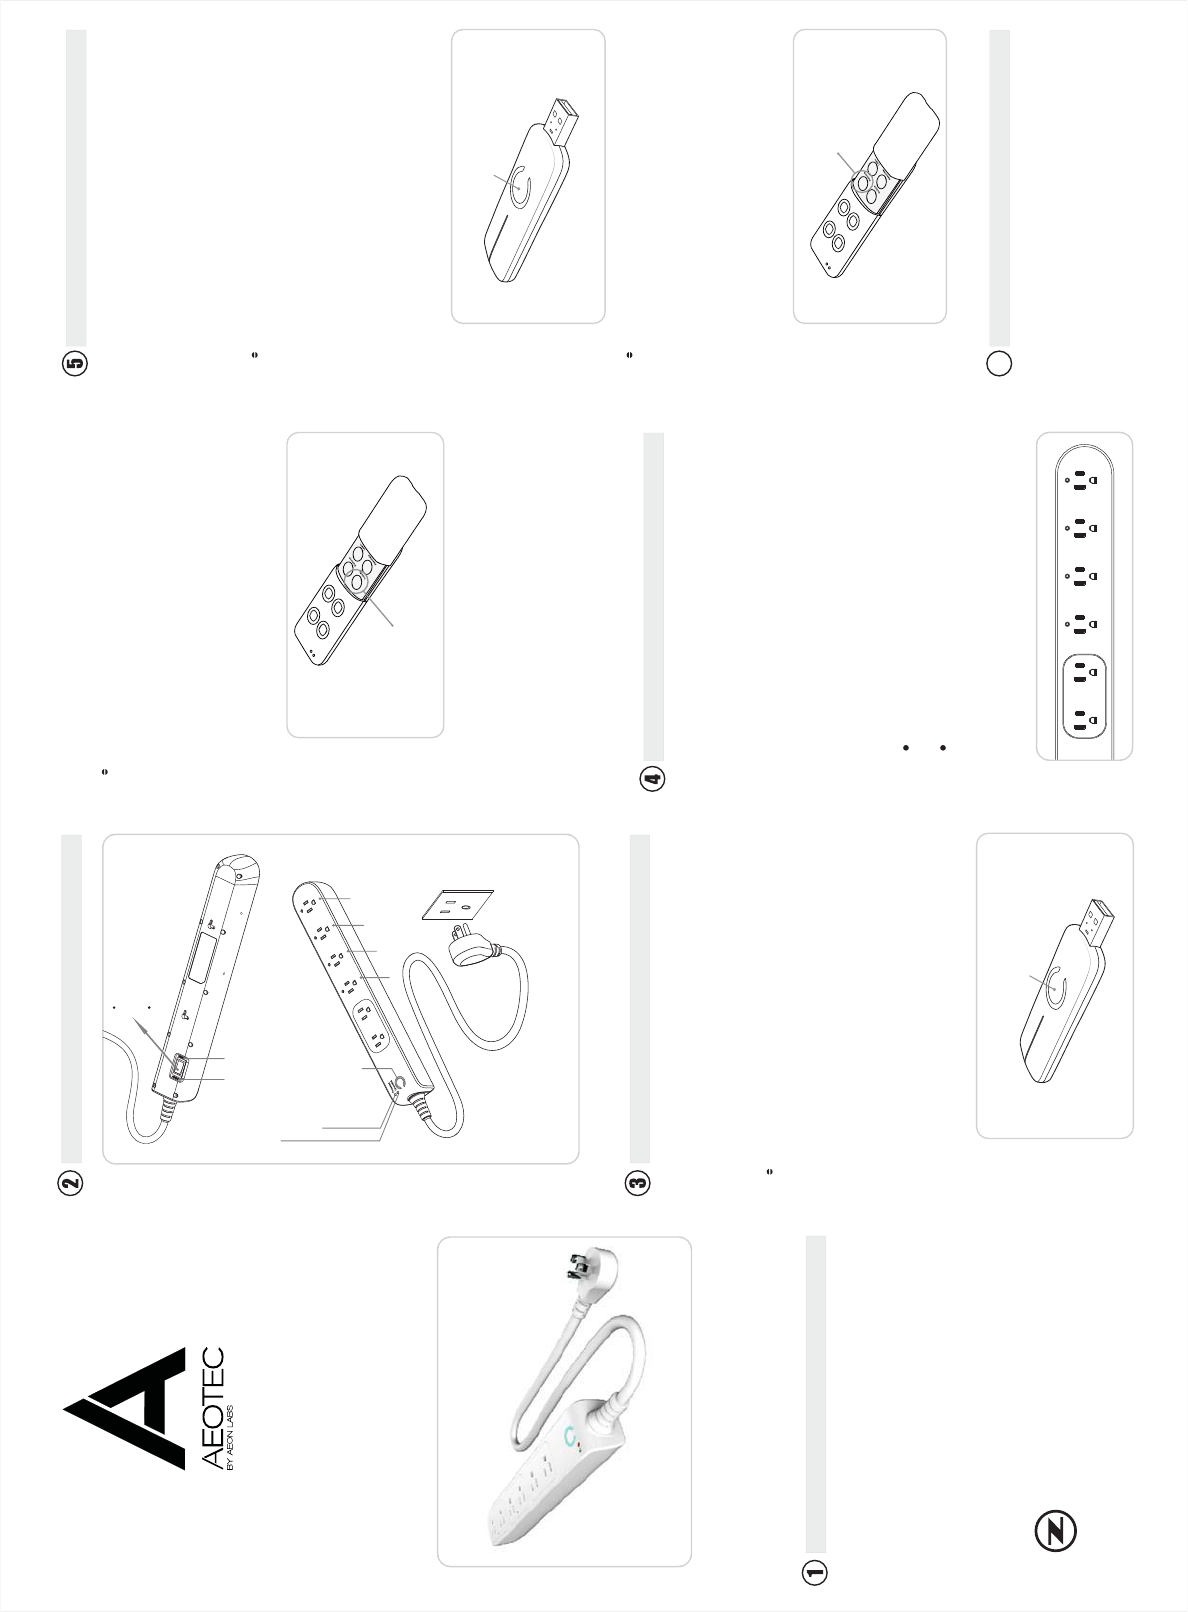
Quick Start
The following instructions describe how to install
Smart Strip to Z-Wave network with Aeotec's Z-Stick
or Minimote controllers. If using other products as
main Z-Wave controller, please refer to relevant unit
of its manuals that for how to adding new devices to
your z-wave network.
Action Button
Action Button
If you’re using a Z-Stick:
Its main light will begin to blink.
If your Z-Stick is plugged into a gateway or a
computer, unplug it.
Bring your Z-Stick near the Smart Strip.
Press the Action Button on the Z-Stick.
Press the Z-Wave Button on the Smart Strip.
If the Smart Strip has been successfully
included to your network, its light will no longer
blink, otherwise as unsuccessful, and the light
will continue to blink.
Press the Action Button on the Z-Stick to take it
out of installation mode.
1.
2.
3.
4.
5.
6.
7.
If you’re using a Minimote:
Its main light will begin to blink.
Bring Minimote near the Smart Strip.
Press the Include button on the Minimote.
Press the Z-Wave Button on the Smart Strip.
If the Smart Strip has been successfully included
to the Z-Wave network, its light will no longer
blink. Otherwise should be unsuccessful the light
will blink continuously.
Press any button on Minimote to get it out of
installation mode.
1.
2.
3.
4.
5.
6.
Include
The Smart Strip can be removed from Z-Wave
network at any time. You'll need to use a Z-Wave
network's main controller to do this. The following
instructions describe how to do this using Aeotec's
Z-Stick and Minimote controllers. If you are using
other products as main Z-Wave controller, please
refer to the part of their respective manuals that
tells you how to remove devices from Z-Wave
network.
Advanced Functions
Monitoring your energy usage
The Smart Strip could report the energy use of
whatever it is plugged, to the associated Z-Wave
gateway or controller within a Z-Wave network. the
switch can report wattage value or kilowatt-hour
(kWh) value.
With the main controller supports, the energy
consumption will be displayed within its
corresponding interface. Please refer to the manual
of your main controller for more detailed information
and instructions on monitoring, accessing and
interpreting the data collected by the Smart Strip.
If you’re using a Z-Stick:
If your Z-Stick is plugged into a gateway or a
computer, unplug it.
Bring Z-Stick near the Smart Strip.
Press the Action Button on your Z-Stick.
Press the Z-Wave Button on your Smart Strip.
If the Smart Strip has been successfully
removed from Z-Wave network, its light will
blink, otherwise the removal was unsuccessful
its light will not blink.
Press the Action Button on the Z-Stick to take it
out of removal mode.
1.
2.
3.
4.
5.
6.
If you’re using a Minimote:
Bring the Minimote near the Smart Strip.
Press the Remove Button on the Minimote.
Press the Z-Wave Button on the Smart Strip.
If the Smart Strip has been successfully
removed from network, its light will blink.
Otherwise the removal was unsuccessful and
its light will not blink.
Press any button on your Minimote to take it
out of removal mode.
1.
2.
3.
4.
5.
Remove
Now that the Smart Strip is up and running, you are
able to control the strip with the Minimote(Remoter)
or other compatible controllers in the Z-Wave
network.
You can also press the Z-Wave Button at the Smart
Strip to turn the power on and off. To control other Z-
Wave devices, please refer to the relevant part of
their respective manuals.
Removing your Strip from a Z-Wave network
Switchable 1
Switchable 1
Switchable 2 Switchable 3 Switchable 4
Switchable 2
Switchable 3
Switchable 4
Protected:
OFF RESET
When either single socket or the total
current exceed 10A,the load over current
protection switch will automatically cut off
the load.
When resuming, need manually press the
Over Current Protection Switch down to
“RESET” position.
Can measure the six sockets power capacity
separately and each power consumption.
Can measure total power capacity and
consumption of six sockets.
Keep on, present Lighting protection
function normally.
Keep off, present the lighting
protection invalid.
Grounded: Keep on, grounding normally
Keep off, grounding
abnormally
Action Button
Action Button: Tap(short pressing), for include / exclude
z-wave network. Hold for 20s, excluded and reset to
factory default.
Totally 6 sockets, two of them on open all time, the
other 4 sockets can be controlled separately.
Switchable 1 Switchable 2 Switchable 3 Switchable 4
6Technical Specifications
Model number: DSC11-ZWUS
Output: 125VAC Max:15A
Operating distance: Up to 100 feet / 30 meters
indoors and 300 feet / 100 meters outdoors
Operating temperature: 0℃ to 40℃
Input: 125VAC 60Hz
Relative humidity: 8~80%.
www.aeotec.com
Certifications (regional)
Version:501001100001
Aeon Labs warrants to the original
purchaser of Products that for the Warranty
Period (as defined below), the Products will
be free from material defects in materials
and workmanship. The foregoing warranty
is subject to the proper installation,
operation and maintenance of the Products
in accordance with installation instructions
and the operating manual supplied to
Customer. Warranty claims must be made
by Customer in writing within thirty (30)
days of the manifestation of a problem.
Aeon Labs' sole obligation under the
foregoing warranty is, at Aeon Labs' option,
to repair, replace or correct any such defect
that was present at the time of delivery, or to
remove the Products and to refund the
purchase price to Customer.
The "Warranty Period" begins on the date
the Products is delivered and continues for
12 months.
Any repairs under this warranty must be
conducted by an authorized Aeon Labs
service representative and under Aeon
Labs' RMA policy. Any repairs conducted
by unauthorized persons shall void this
warranty.
Excluded from the warranty are problems
due to accidents, acts of God, civil or
military authority, civil disturbance, war,
strikes, fires, other catastrophes, misuse,
misapplication, storage damage,
negligence, electrical power problems, or
modification to the Products or its
components.
Aeon Labs does not authorize any person
or party to assume or create for it any other
obligation or liability in connection with the
Products except as set forth herein.
Aeon Labs will pass on to Customer all
manufacturers' Material warranties to the
extent that they are transferable, but will
not independently warrant any Material.
Customer must prepay shipping and
transportation charges for returned
Products, and insure the shipment or
accept the risk of loss or damage during
such shipment and transportation. Aeon
Labs will ship the repaired or replacement
products to Customer freight prepaid.
Customer shall indemnify, defend, and hold
Aeon Labs and Aeon Labs' affiliates,
shareholders, directors, officers, employees,
contractors, agents and other representatives
harmless from all demands, claims, actions,
causes of action, proceedings, suits,
assessments, losses, damages, liabilities,
settlements, judgments, fines, penalties,
interest, costs and expenses (including fees
and disbursements of counsel) of every kind (i)
based upon personal injury or death or injury to
property to the extent any of the foregoing is
proximately caused either by a defective
product (including strict liability in tort) or by
the negligent or willful acts or omissions of
Customer or its officers, employees,
subcontractors or agents, and/or (ii) arising
from or relating to any actual or alleged
infringement or misappropriation of any
patent, trademark, mask work, copyright, trade
secret or any actual or alleged violation of any
other intellectual property rights arising from or
in connection with the products, except to the
extent that such infringement exists as a result
of Aeon Labs' manufacturing processes.
IN NO EVENT SHALL AEON LABS BE LIABLE
FOR ANY INDIRECT, INCIDENTAL,
PUNITIVE, SPECIAL OR CONSEQUENTIAL
DAMAGES, OR DAMAGES FOR LOSS OF
PROFITS, REVENUE, OR USE INCURRED BY
CUSTOMER OR ANY THIRD PARTY,
WHETHER IN AN ACTION IN CONTRACT, OR
TORT, OR OTHERWISE EVEN IF ADVISED
OF THE POSSIBILITY OF SUCH DAMAGES.
AEON LABS' LIABILITY AND CUSTOMER'S
EXCLUSIVE REMEDY FOR ANY CAUSE OF
ACTION ARISING IN CONNECTION WITH
THIS AGREEMENT OR THE SALE OR USE OF
THE PRODUCTS, WHETHER BASED ON
NEGLIGENCE, STRICT LIABILITY, BREACH
OF WARRANTY, BREACH OF AGREEMENT,
OR EQUITABLE PRINCIPLES, IS
EXPRESSLY LIMITED TO, AT AEON LABS'
OPTION, REPLACEMENT OF, OR
REPAYMENT OF THE PURCHASE PRICE
FOR THAT PORTION OF PRODUCTS WITH
RESPECT TO WHICH DAMAGES ARE
CLAIMED. ALL CLAIMS OF ANY KIND
ARISING IN CONNECTION WITH THIS
AGREEMENT OR THE SALE OR USE OF
PRODUCTS SHALL BE DEEMED WAIVED
UNLESS MADE IN WRITING WITHIN THIRTY
(30) DAYS FROM AEON LABS'S DELIVERY,
OR THE DATE FIXED FOR DELIVERY IN THE
EVENT OF NONDELIVERY.
THE INDEMNITY AND WARRANTY IN
ABOVE ARE EXCLUSIVE AND IN LIEU OF
ALL OTHER INDEMNITIES OR
WARRANTIES, WHETHER EXPRESS OR
IMPLIED, INCLUDING THE IMPLIED
WARRANTIES OF MERCHANTABILITY AND
FITNESS FOR A PARTICULAR PURPOSE.
THE MANUFACTURER IS NOT
RESPONSIBLE FOR ANY RADIO OR TV
INTERFERENCE CAUSED BY
UNAUTHORIZED MODIFICATIONS TO THIS
EQUIPMENT. SUCH MODIFICATIONS
COULD VOID THE USER'S AUTHORITY TO
OPERATE THE EQUIPMENT.
This device complies with Part 15 of the FCC
Rules. Operation is subject to the following
two conditions:
(1) This device may not cause harmful
interference, and
This device complies with part 15 of the FCC Rules.
Operation is subject to the following two conditions:
(1) This device may not cause harmful interference,
and (2) this device must accept any interference
received, including interference that may cause
undesired operation.
(2) This device must accept any interference
received, including interference that may
cause undesired operation.
THE MANUFACTURER IS NOT RESPONSIBLE
FOR ANY RADIO OR TV INTERFERENCE
CAUSED BY UNAUTHORIZED MODIFICATIONS
OR CHANGE TO THIS EQUIPMENT. SUCH MOD-
IFICATIONS OR CHANGE COULD VOID AND
CHANGE ANNTENA WHICH THE MANUFACTURER
PROVIDES. IT IS THE USER'S AUTHORITY TO
1.
2.
FCC NOTICE (for USA)
Certifications (regional)
OPERATE THE EQUIPMENT.
FCC NOTE:
This device complies with Part 15 of the FCC Rules.
Operation is subject to the following two conditions: (1) this device may not cause
harmful interference, and (2) this device must accept any interference received,
including interference that may cause undesired operation.
THE MANUFACTURER IS NOT RESPONSIBLE FOR ANY RADIO OR TV
INTERFERENCE CAUSED BY UNAUTHORIZED MODIFICATIONS OR CHANGE
TO THIS EQUIPMENT. SUCH MODIFICATIONS OR CHANGE COULD VOID AND
CHANGE ANNTENA WHICH THE MANUFACTURER PROVIDES.
IT IS THE USER'S AUTHORITY TO OPERATE THE EQUIPMENT.
This equipment has been tested and found to comply with the limits for a Class B
digital device, pursuant to part 15 of the FCC Rules. These limits are designed to
provide reasonable protection against harmful interference in a resi dential installation.
This equipment generates, uses and can radiate radio frequenc y energy and, if not
installed and used in accordance with the in structions, may cause harmful interference
to radio communications. However, there is no guarantee that interference will not
occur in a particular insta llation. If this equipment does cause harmful interference to
radio or television reception, which can be determined by turning the equipment off
and on, the user is encouraged to try to corr ect the interference by one or more of the
following measures:
-- Reorient or relocate the receiving antenna.
-- Increase the separation between the equipment and receiver.
-- Connect the equipment into an outlet on a circuit different from that to which the
receiver is connected.
-- Consult the dealer or an experien ced radio/TV technician for help.
To maintain compliance with FCC’s RF exposure guidelines, this equipment should be
installed and operated with a minimum distance of 20cm between the radiator and your
body.