AeroScout BS2030-0 AeroScout Tag User Manual AeroScout Tag Hardware Manual
AeroScout AeroScout Tag AeroScout Tag Hardware Manual
users manual

Page 1 of 8 ALS UG 081103 AKB
A
A
Ae
e
er
r
ro
o
oS
S
Sc
c
co
o
ou
u
ut
t
t™ T
T
Ta
a
ag
g
g
Model No.: BWH2000
User’s Guide
Version 2.0
Copyright 2003 BlueSoft Inc. All rights reserved.
AeroScout™ is a trademark of BlueSoft Inc. Other brand products and service names are trademarks or
registered trademarks of their respective holders.
The information and know-how included in this document are the exclusive property of BlueSoft Inc. and are
intended for the use of the addressee or the user alone. The addressees shall not forward to another their right of
using the information, know-how or document forwarded herewith, in whole or in part in all matters relating or
stemming from or involved therein, whether for consideration or without consideration, and shall not permit any
third party to utilize the information, know-how or the documents forwarded herewith or copies or duplicates
thereof, unless at the company’s consent in advance and in writing. Any distribution, advertisement, copying or
duplication in any form whatsoever is absolutely prohibited. The Company reserves the right to sue the
addressee, user and/or any one on their behalves, as well as third parties, in respect to breaching its rights
pertaining to the intellectual rights in particular and its rights of whatever kind or type in the information, know-how
or the documents forwarded by them herewith in general, whether by act or by omission.
This document is confidential and proprietary to Bluesoft Inc. and is not to be distributed to any persons other than
Bluesoft customers or other persons appointed in writing by Bluesoft Inc.
Bluesoft, Inc.
1450 Fashion Island Blvd., Suite 510
San Mateo, CA 94404
USA
(650) 571 0800
www.bluesoft-inc.com
Support
For support, contact Bluesoft at email support@bluesoft-inc.com or call +972 8 936 3136 x116.

Page 2 of 8 AT UG 081103 AKB
Contents
This document contains the following information:
Section Contains
Warranty Terms of limited hardware warranty
Safety and Warnings Safety and usage warnings
Introduction Introduction to the AeroScout Tag
AeroScout™ Tag
Configuration
Information about performing Tag configuration.
Replacing the Internal
Battery
Information and procedures for replacement of the Tag
battery
Radio Specifications Radio Specifications
Environmental
Specifications
Environmental Specifications
Warranty
Hardware. Bluesoft, Inc., ("Bluesoft") warrants that commencing from the date of delivery to Customer (but in
case of resale by a Bluesoft reseller, commencing not more than ninety (90) days after original shipment by
Bluesoft), and continuing for a period of one (1) year the Hardware will be free from defects in material and
workmanship under normal use. The date of shipment of a Product by Bluesoft is set forth on the packaging
material in which the Product is shipped. This limited warranty extends only to the original user of the Product.
Customer's sole and exclusive remedy and the entire liability of Bluesoft and its suppliers under this limited
warranty will be, at Bluesoft’s or its service center's option, shipment of a replacement within the period or a
refund of the purchase price if the Hardware is returned to the party supplying it to Customer, if different than
Bluesoft, freight and insurance prepaid. Bluesoft replacement parts used in Hardware repair may be new or
equivalent to new. Bluesoft’s obligations hereunder are conditioned upon the returned of affected articles in
accordance with Bluesoft’s then-current Return Material Authorization (RMA) procedures.
Restrictions. This warranty does not apply if the Product (a) has been altered, except by Bluesoft, (b) has not
been installed, operated, repaired, or maintained in accordance with instructions supplied by Bluesoft, (c) has
been subjected to abnormal physical or electrical stress, misuse, negligence, or accident; or (d) is sold for beta,
evaluation, testing, or demonstration purposes for which Bluesoft does not receive a payment of purchase price or
license fee.
DISCLAIMER OF WARRANTY. EXCEPT AS SPECIFIED IN THIS WARRANTY, ALL EXPRESS OR IMPLIED
CONDITIONS, REPRESENTATIONS, AND WARRANTIES INCLUDING, WITHOUT LIMITATION, ANY IMPLIED
WARRANTY OR CONDITION OF MERCHANTABILITY, FITNESS FOR A PARTICULAR PURPOSE,
NONINFRINGEMENT, SATISFACTORY QUALITY OR ARISING FROM A COURSE OF DEALING, LAW,
USAGE, OR TRADE PRACTICE, ARE HEREBY EXCLUDED TO THE EXTENT ALLOWED BY APPLICABLE
LAW. TO THE EXTENT AN IMPLIED WARRANTY CANNOT BE EXCLUDED, SUCH WARRANTY IS LIMITED
IN DURATION TO THE WARRANTY PERIOD. BECAUSE SOME STATES OR JURISDICTIONS DO NOT
ALLOW LIMITATIONS ON HOW LONG AN IMPLIED WARRANTY LASTS, THE ABOVE LIMITATION MAY NOT
APPLY TO YOU. THIS WARRANTY GIVES YOU SPECIFIC LEGAL RIGHTS, AND YOU MAY ALSO HAVE
OTHER RIGHTS, WHICH VARY FROM JURISDICTION TO JURISDICTION. This disclaimer and exclusion shall
apply even if the express warranty set forth above fails of its essential purpose.

Page 3 of 8 AT UG 081103 AKB
Safety and Warnings
FCC STATEMENT
This equipment has been tested and found to comply with the limits for a Class B digital
device, pursuant to Part 15 of the FCC rules. These limits are designed to provide
reasonable protection against harmful interference in a residential installation. This
equipment generates, uses and can radiate radio frequency energy and, if not installed
and used in accordance with the instructions, may cause harmful interference to radio
communications. However, there is no guarantee that interference will not occur in a
particular installation. If this equipment does cause harmful interference to radio or
television reception, which can be determined by turning the equipment off and on, the
user is encouraged to try to correct the interference by one or more of the following
measures:
a) Reorient or relocate the receiving antenna.
b) Increase the separation between the equipment and receiver.
c) Connect the equipment to an outlet on a circuit different from that to which
the receiver is connected.
d) Consult the dealer or an experienced radio/TV technician.
This device complies with Part 15 of the FCC Rules.
Operation is subject to the following two conditions:
(1) This device may not cause harmful interference and
(2) This device must accept any interference received, including interference that may
cause undesired operation.
FCC Warning
Modifications not expressly approved by the manufacturer could void
the user authority to operate the equipment under FCC Rules.
Instructions concerning human exposure to radio frequency electromagnetic fields.
To comply with FCC Section1.307 (b)(1) for human exposure to radio frequency electromagnetic fields,
implement the following instruction:
A distance of at least 20 cm between the equipment and all persons should maintain during operation of
the equipment.
Page 4 of 8 AT UG 081103 AKB
Introduction
The Aeroscout™ Tag is a key component of the AeroScout™ WLAN Location System.
These dedicated battery-powered Tags send Wi-Fi compatible messages at pre-defined
intervals and can be attached to non-Wi-Fi assets in order to locate them (such as
inventory/pallets, trailers, containers and much more). Tags send messages with their unique
ID number that are detected by Location Receivers and used to estimate the Tag’s location.
AeroScout™ Tag Configuration
The following procedure describes how to establish the communication link between the
AeroScout Manager workstation and an AeroScout Tag, specify a new configuration of the
Tag, and download the new configuration. A Tag can be re-configured manually or by loading
a Tag configuration file stored in your workstation or on the network.
The Tag housing must be opened in order to configure a Tag.
To configure a Tag
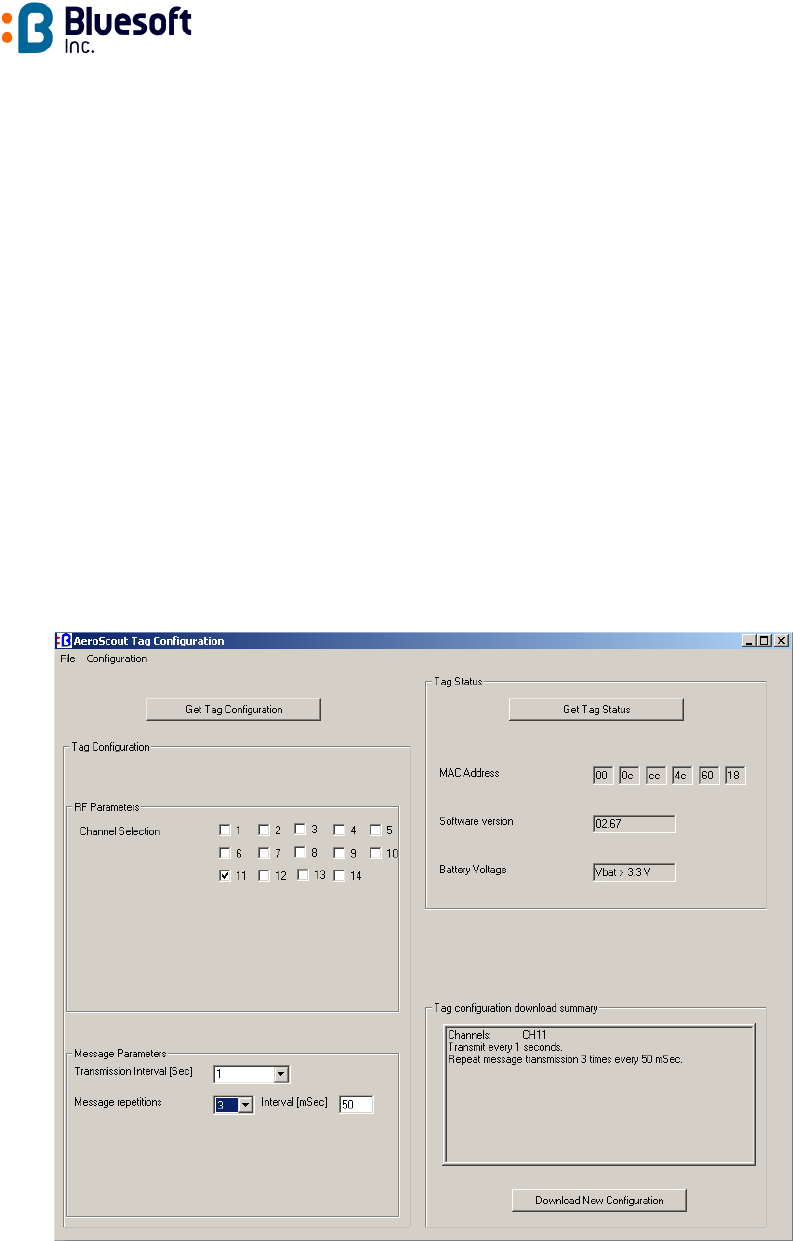
1. Select Configuration
Tag
Tag Configuration to open the Tag configuration
application. The window shown in Figure 1: Tag Configuration Dialog Box appears.
We need to update the picture
Figure 1: Tag Configuration Dialog Box
Page 5 of 8 AT UG 081103 AKB
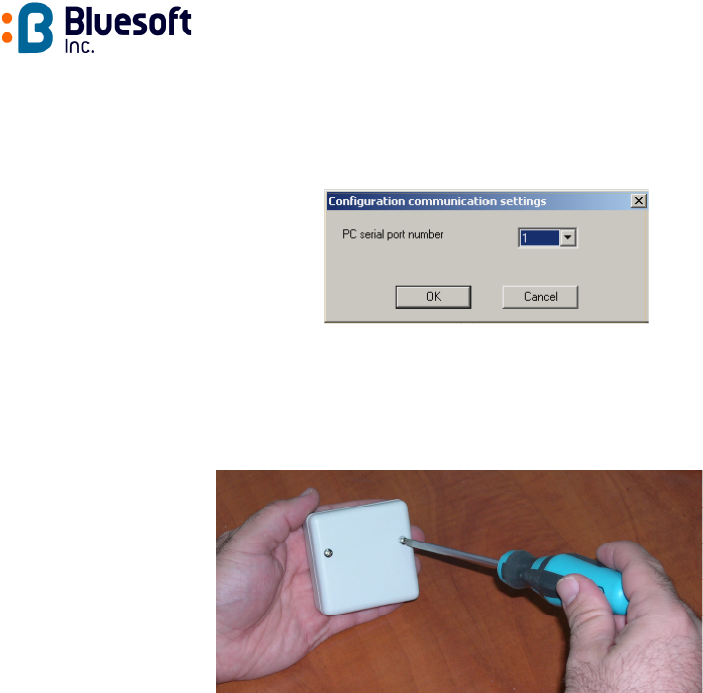
2. Select Configuration
Com setup from the menu bar. The serial communication
port dialog box appears (see Figure 2: Communication Port Settings).
Figure 2: Communication Port Settings
3. Enter the Serial Port to which the Tag is connected.
4. Remove both screws on the back of the tag with a Philips screwdriver (see Figure 3:
Opening the Tag Case) and open carefully the plastic case.
Figure 3: Opening the Tag Case
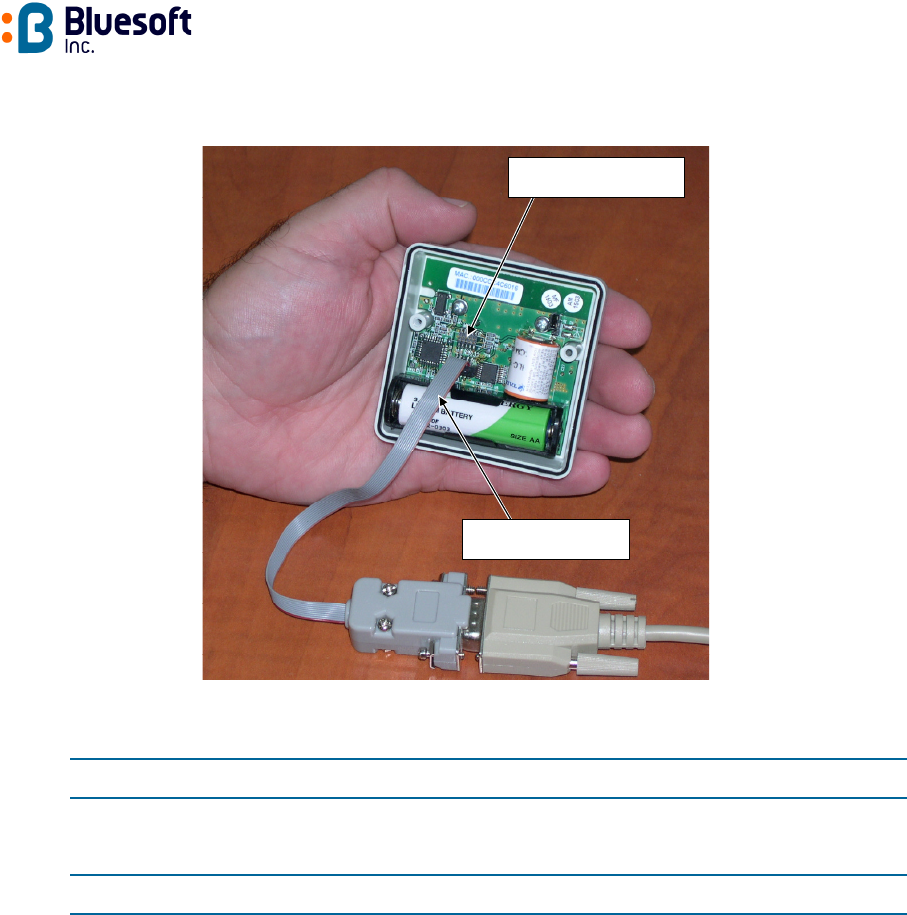
5. Connect the RS-232 cable (supplied) to the serial communication port of the PC in
which the configuration application is running on
6. Connect the other end of the RS-232 cable to the serial port socket inside the Tag
(see Figure 4: Connecting the RS-232 Cable to the Tag – make sure that the red wire
of the flat cable is on your right).
7. Press the Get Tag Status to check the connection.
8. Press Get Tag Configuration to upload the Tag configuration and edit it according to
the new configuration desired.
Alternatively, select a configuration file using the File
Restore command from the
menu bar and browse the available files to load the desired Tag configuration file for
editing or direct download to the Tag.
Page 6 of 8 AT UG 081103 AKB
Figure 4: Connecting the RS-232 Cable to the Tag
9. In the RF Parameters section, set the following options for Tag transmissions:
Option Used to
Channel frequency Select up to 3 Tag transmission channels.
10. In the Message Parameters section, set the transmission message mode as follows:
Set By
Transmission Interval Select the interval between successive messages [Sec]
Message Repetition Select the number of times the message is being
transmitted within a single burst.
Interval Select the interval between successive messages within
a burst.
11. When complete, review the configuration data in the Tag configuration download
summary section and press Download New Configuration to download the new
configuration to the Tag.
PC Card
Connect cable to the
connector labeled RS232.
Do not connect cable to the
connector labeled MCU.
Page 7 of 8 AT UG 081103 AKB
Replacing the Internal Battery
The AeroScout™ Tag uses one 3.6V Lithium Thionyl Chloride (LTC) AA size cell.
This internal battery can last for more than 5 years when using a transmit interval of 5
minutes.
Table 1 describes the steps for replacing the internal battery.
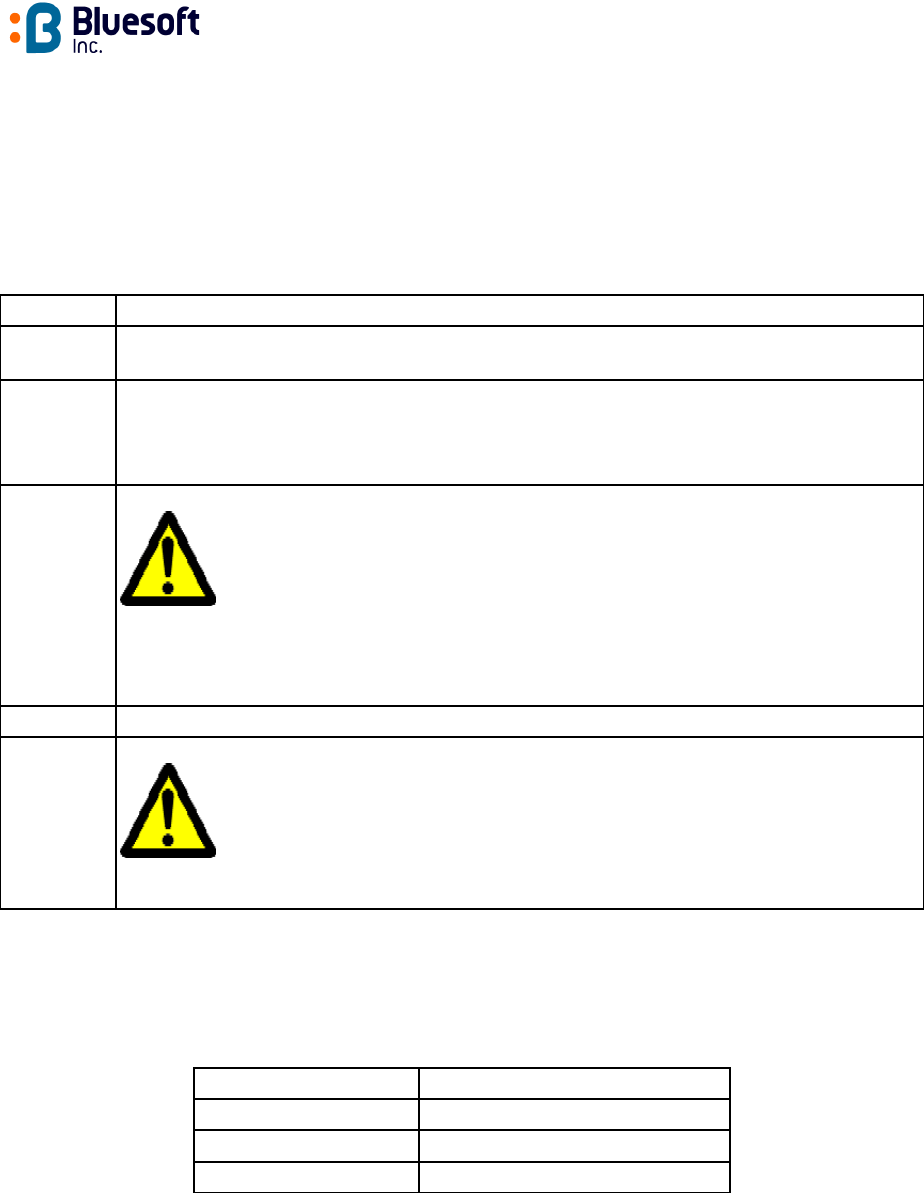
Step Instruction
1 Remove the rear panel by unscrewing the case screws (see Figure 3: Opening the Tag
Case)
2 Power off the tag
Carefully remove the old battery from the battery holder.
NOTE: Do not use a metallic object to remove the battery
3 Install new 3.6V lithium Thionyl Chloride 'AA' size battery in the battery holder.
WARNING:
Use only batteries from the battery replacement table (Table 2) or others that have been
approved by Bluesoft. Make sure that the battery is inserted with the proper polarity
otherwise damage to the Tag may occur. There is the danger of explosion if the
battery is replaced incorrectly.
4 Close the rear panel by screwing back the screws
5 Dispose of the old lithium Thionyl Chloride battery properly.
Local regulations vary. Federal regulations allow up to 100 kg./month of lithium
thionyl chloride batteries to be disposed in common landfill. All leads (the terminals) should be
taped to prevent short circuit. The user is responsible for safe disposal.
Table 1 - Replacing the internal batteries.
Manufacturer Battery part number
Tadiran TL5903
Xeno Energy XL-060F
Saft LS 14500
Table 2 - Battery replacement - part number.

Page 8 of 8 AT UG 081103 AKB
Radio Specifications
Standards compliance: IEEE 802.11b, Wi-Fi
Frequency range: 2.400 – 2.4835 GHz (Subject to local regulation)
Transmission Power: 0dBm to +15dBm
Regulatory Approvals: FCC Part 15, EN 300 328, EN 301 489-1 2001
Environmental Specifications
Dimensions: 63mm x 63mm x 25mm (2.48” x 2.48” x .984”)
Weight: 85g (3oz.)
Power: 3.6V Lithium Thionyl Chloride AA size cell
Certifications: FCC Class B, cTUVus, CE mark
Operating temp: -20°C to 65°C (-4°F to 158°F)
Storage temp: -30°C to 70°C (-22°F to 158°F)
Operating humidity: 0% to 95% Non-Condensing
Storage humidity: 0% to 95% Non-Condensing
PC Card