Agrident APR500 RFID Reader User Manual 15 APR500 UserMan
AGRIDENT GmbH RFID Reader 15 APR500 UserMan
Agrident >
15_APR500 UserMan
Agrident GmbH, Steinklippenstrasse 10, D-30890 Barsinghausen
Phone +49 5105 582573-10 - Fax +49 5105 582573-17
APR500 - Classic Mode
Operational Manual
V16/10/14
For Firmware Version 4.08 and higher

APR500 – Classic Mode
16.10.2014 Page 2 of 46
© Copyright 2014 by Agrident GmbH
All rights reserved. No portion of this publication may be reproduced, stored in a retrieval
system or transmitted in any form or by any means - electronic, mechanical, photocopying,
recording, scanning or other, without the prior written permission of Agrident GmbH.
Agrident GmbH reserves the right to make changes to any and all parts of this
documentation without obligation to notify any person or entity of such changes.
October 2014
Agrident GmbH
Steinklippenstrasse 10
30890 Barsinghausen
Germany
Phone +49 (0) 5105 582573-10
Fax +49 (0) 5105 582573-17
E-Mail: info@agrident.com
www.agrident.com

APR500 – Classic Mode
16.10.2014 Page 3 of 46
Contents
1.Introduction ......................................................................................................... 5
1.1Features .......................................................................................................... 5
1.2APR500 Kit ...................................................................................................... 6
2.Optional accessories ........................................................................................... 7
2.1APC510 RS232 cable ..................................................................................... 7
2.2ACC500 car charger ........................................................................................ 7
2.3AEA580 external antenna ............................................................................... 7
2.4AMA060 and AMA090 mountable antennas ................................................... 7
3.Security Advice ................................................................................................... 8
4.Basic Operations of the APR500 ........................................................................ 8
4.1Keys of Operation ............................................................................................ 8
4.2Getting Started ................................................................................................ 9
4.3Main Screen and Acoustic Signals ................................................................ 11
4.4Navigating through the menus ....................................................................... 12
4.5Communication interfaces of the APR500 ..................................................... 13
4.6Battery management ..................................................................................... 15
5.Advanced Features of the APR500 ................................................................... 16
5.1Alias .............................................................................................................. 16
5.2Action Codes ................................................................................................. 18
5.3Weight from Scale ......................................................................................... 20
5.4Group Separator ............................................................................................ 21
5.5Speed Mode .................................................................................................. 21
5.6Race Mode .................................................................................................... 21
6.The APR500 main menu ................................................................................... 22
6.1Operation menu ............................................................................................. 23
6.2Speed Mode menu ........................................................................................ 27
6.3Race Mode menu .......................................................................................... 27
6.4Data menu ..................................................................................................... 28
6.5Setup Menu ................................................................................................... 31
6.6Bluetooth Menu ............................................................................................. 37
6.7Menu Structure and Factory Defaults ............................................................ 38
7.Technical Data .................................................................................................. 40
8.Safety and Care ................................................................................................ 41

APR500 – Classic Mode
16.10.2014 Page 4 of 46
9.Warranty ........................................................................................................... 41
10.International approvals ...................................................................................... 42
11.Annex A – Online mode output formats ............................................................ 44
12.Glossary ............................................................................................................ 45
13.Index ................................................................................................................. 46

APR500 – Classic Mode
16.10.2014 Page 5 of 46
1. Introduction
This manual describes the basic functions, the advanced features and the menu structure
of the Agrident Portable Reader APR500.
Please read the manual carefully in order to get access to all features of the reader.
1.1 Features
Fully compatible with ISO standards 11784/11785
Reads FDX-B and HDX transponders
Up to 6000 datasets including transponder ID, time stamp, ALIAS, ACTION CODE
and ACTION CODE PLUS can be stored. The non-volatile memory of the reader
ensures that the data are protected from getting lost if the batteries run empty.
The two Hotkeys do not only initiate a reading process, they can be configured to
start several different operations, e.g. to record actions for read animal IDs.
The electronic ID can be linked to an alphanumeric string with up to 14 characters.
These strings are called ALIAS (please see chapter 5.1).
A preassembled list of ALIASES (Tag List) can be linked to scanned IDs with
the APR in the field.
The ALIASES can be assigned to IDs on the PC and the APR can display the
ALIAS instead of the ID in the field.
ALIASES can be entered manually after reading a transponder in the field
using the “Assign Ask” mode.
In combination with the SEARCH MODE feature the ALIAS allows to find
individual animals in a larger group of animals.
ACTION CODES allow assigning events to animals like sale, movement, disease,
treatment etc. (see chapter 5.2).
The ACTION CODES are free editable in the ACTION CODE LIST on the PC and
have to be uploaded before they are available in the APR.
The ACTION CODE PLUS offers the possibility to assign a numeric value in addition
to an ACTION CODE – e.g. the weight, pen number, etc. (see chapter 5.2.2).
The WEIGTH FROM SCALE feature enables the APR500 to import the weight from
electronic scales via RS232 or Bluetooth (see chapter 5.3).
Missing or defective transponder can be stored manually as an ALIAS using the NO
TAG MODE (see chapter 6.1.3)
GROUP separators allow the user to distinguish between groups of collected
datasets – e.g. operator, location, buyer or seller (please see chapter 5.4)

APR500 – Classic Mode
16.10.2014 Page 6 of 46
In the SPEED MODE the APR500 reads continuously without pressing the according
Hotkey again after a tag was read. This allows the fast reading of larger groups of
animals within a short time (see chapter 5.5).
The RACE MODE enables the APR to operate as a data collector for Agrident
Stationary Readers (see chapter 5.6). The EIDs from the stationary readers are
received via RS232 or Bluetooth, displayed and stored in the APRs memory.
Up to 5 different configurations can be uploaded into the Handheld. These custom
defined PRESETS allow the user to switch between different operation modes (see
chapter 6.1.2) easily.
The APR500 is equipped with an internal BLUETOOTH Class 1 module, configurable
as Bluetooth Master or Slave (see chapter 4.5.2)
The APR500 comes with the APR PC-Demo Software. This program can be used for
configuring the reader and for demonstrating all features – it is not suitable for
replacing comprehensive management software.
1.2 APR500 Kit
The APR500 is usually part of a kit. The kit consists of an APR500 reader, an APC500
USB cable, an APS500 USB power supply, a Quick Start Guide and a CD containing the
manuals, the APR demo software and an APR500 USB driver.
1.2.1 APC500 USB cable
The APC500 is an USB cable for the APR500 reader. It has to be connected to the top-
mounted plug on the APR side and to an USB-A port on the PC side. It allows data transfer
between reader and PC and the internal charging of the batteries, if the Agrident supplied
rechargeable batteries are used.
You can fast charge the batteries in less than 6 hours from a computers USB port (if
Agrident supplied rechargeable batteries are used). The APS500 USB power supply or the
ACC500 car charger might also be used as power source. In this case you can charge the
batteries in 5 hours maximum.
1.2.2 APS500 USB power supply
The APS500 is a power supply with wide input voltage range (100-240V AC) and
interchangeable plugs. This allows using the power supply in most countries of the world
without the need for additional mains adaptors. The power supply contains an USB-A plug
for connecting to the APR500 via the APC500 USB cable.

APR500 – Classic Mode
16.10.2014 Page 7 of 46
2. Optional accessories
The APR500 reader can be purchased with a wide range of optional accessories:
2.1 APC510 RS232 cable
The APC510 is an RS232 interface cable for the APR500 reader. It has to be connected to
the top-mounted plug on the APR side and to an RS232 port with a male 9pin D-Sub
connector on the other side. It allows the communication between the reader and other
devices with RS232 interface like computers or electronic weighing scales.
2.2 ACC500 car charger
The ACC500 offers the possibility to charge your APRs batteries from a cigarette lighter in
your car. The input voltage can be either 12V or 24V and thus it also might be used in
trucks with 24V battery voltage. The APC500 cable has to be used for connecting the
APR500 to the car charger.
2.3 AEA580 external antenna
The very robust AEA580 external stick antenna gives the user an extended physical read
range in order to obtain a transponder signal even from harder accessible tags. The
electrical reading distance is the same as for the internal antenna.
The APR automatically detects an external antenna. While using the AEA580, the internal
APR antenna will be deactivated. If the external antenna plug is removed, the reader will
automatically use the internal antenna again.
2.4 AMA060 and AMA090 mountable antennas
The AEA060/090 mountable antennas give the user an extended physical read range of 60
respectively 90cm. They are mounted directly to the APR500 housing and allow a one-
hand operation. The electrical reading distance is the same as for the internal antenna.
The APR automatically detects an external antenna. While using the AMA, the internal
APR antenna will be deactivated. If the external antenna plug is removed, the reader will
automatically use the internal antenna again.
APR500 – Classic Mode
16.10.2014 Page 8 of 46
3. Security Advice
Caution! Dispose of exhausted rechargeable and non-rechargeable
batteries must be compliant with your local laws. To ensure proper
compliance is entirely the responsibility of the owner and / or user of
the reader.
4. Basic Operations of the APR500
This chapter introduces the basic operations of the APR500.
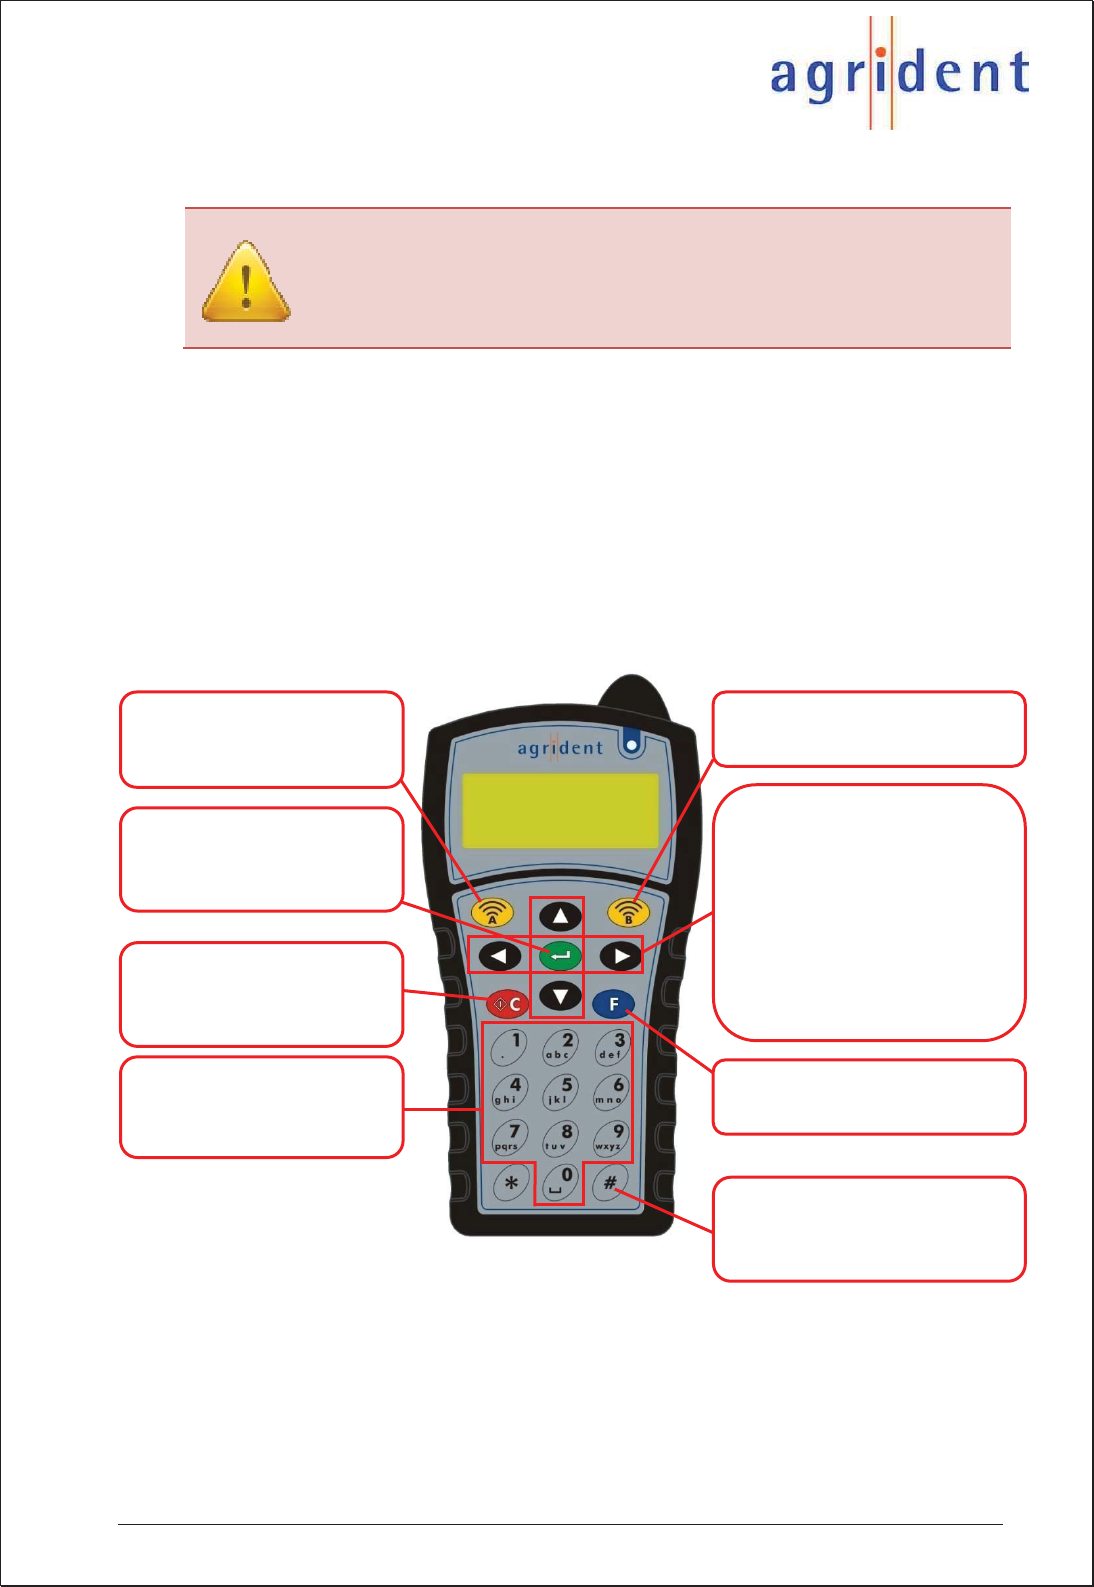
4.1 Keys of Operation
The APR500 has an ergonomic mobile phone style alphanumeric keyboard with 21 buttons
for easy operation. The function of the buttons is described below.
Hotkey A
Activates the reading function
as configured for Hotkey A
Hotkey B
Activates the reading function as
configured for Hotkey B
Enter button
Selects menu items, moves to
the next field during an
operation and confirms inputs
Arrow buttons
Move up/down/left/right
Up/Down: Scrolls through the
menu, alters selected
values, higher/lower
case letters for
alphanumeric input
C button
Switches the Handheld on/off.
Moves into the next higher
menu level, cancels the input
Left: Moves one digit back
in input fields
Right: Skips the input field
Alphanumeric keys
Are used in order to enter
numbers and / or characters
into input fields
F button
Opens the readers main menu
# button
Activates the alphanumeric
Keypad (No Tag mode, Assign
Mode)
APR500 – Classic Mode
16.10.2014 Page 9 of 46
4.2 Getting Started
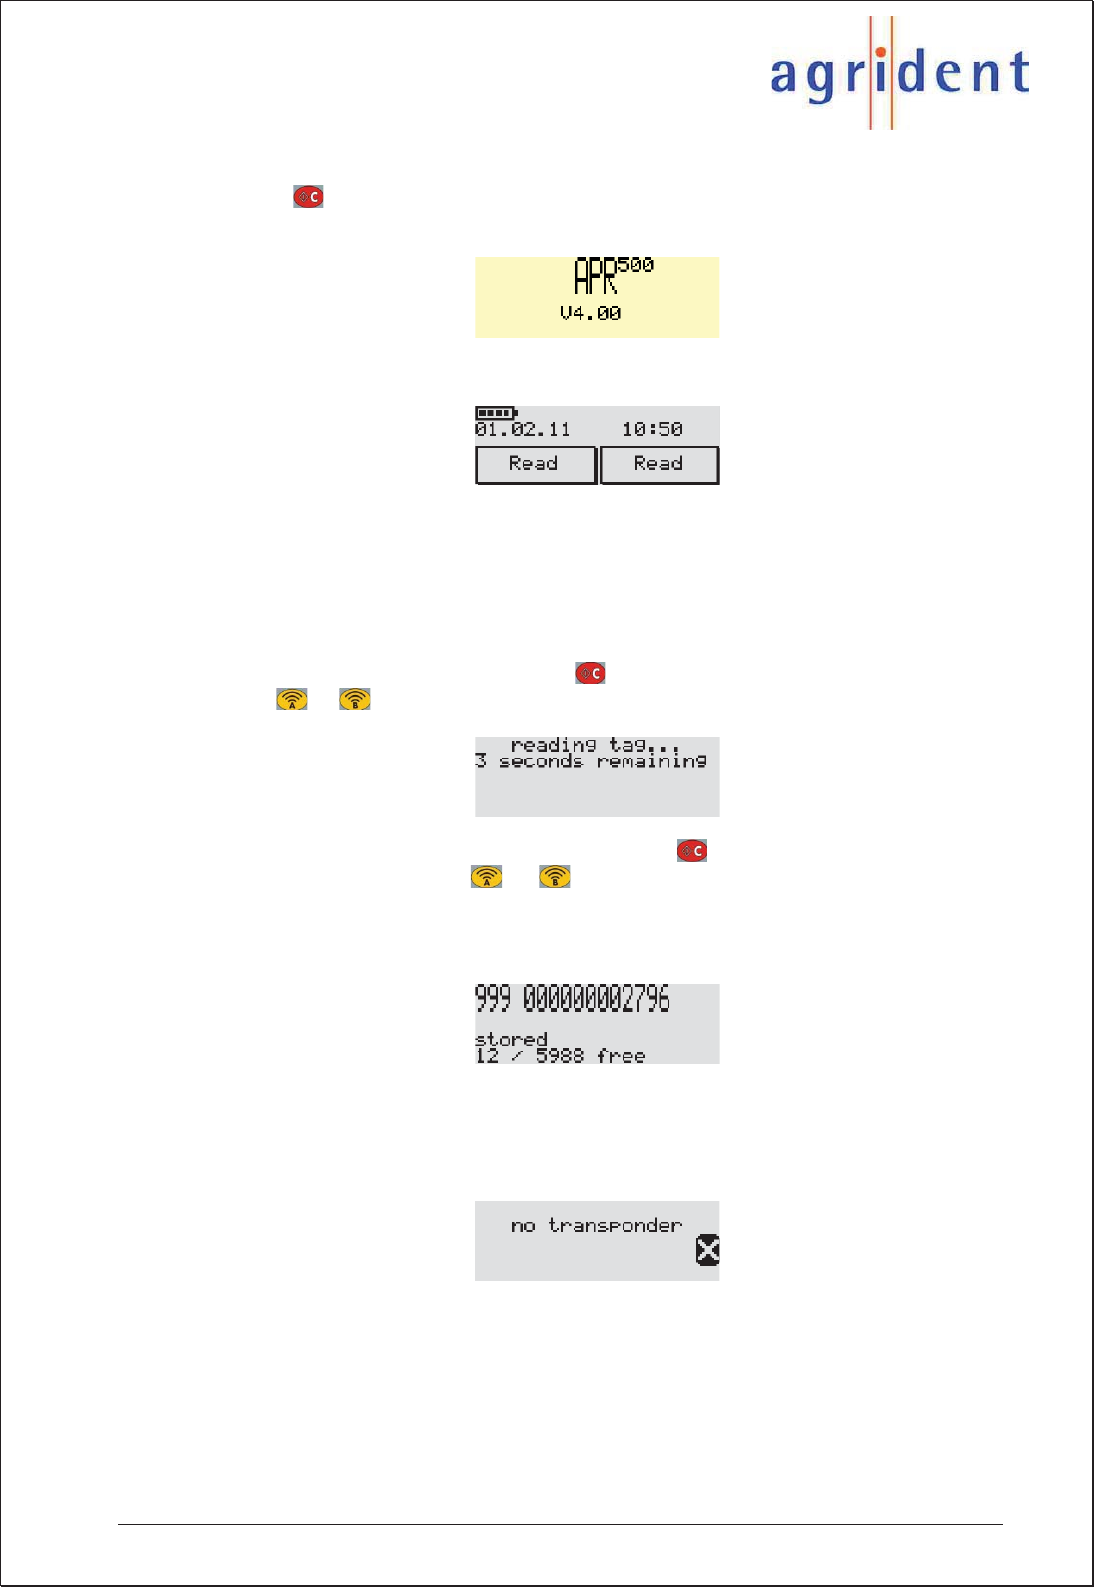
Press the button in order to activate the APR500. The display will show the APR
firmware version briefly…
…before the main screen appears.
In order to save battery capacity, the APR will switch off after a certain time – this is called
“Switch off time”. The default setting is 10 seconds but you can change this value in the
“Switch off time” submenu (please see chapter 6.5.1).
4.2.1 Reading a Transponder
After switching on your reader with the button, a reading attempt can be started
pressing or , per default the APR will try to read a transponder for 7 seconds.
You may also start reading directly without using the button. If the reader is switched
off and you press the Hotkey or , the reader is switched on and reading will be
started in one step.
A successful reading attempt shows…
…the EID (999 000000002796), the note “stored”, the number of stored data sets (here 12)
and the memory space which is left (here 5988).
If no transponder could be read the display will show the following status message:
Reasons might be that there was no transponder in range or the transponder could be
damaged. The “No Tag Mode” (see chapter 6.1.3) allows the user to enter an Alias (see
chapter 5.1) manually, if the reading attempt failed.
APR500 – Classic Mode
16.10.2014 Page 10 of 46
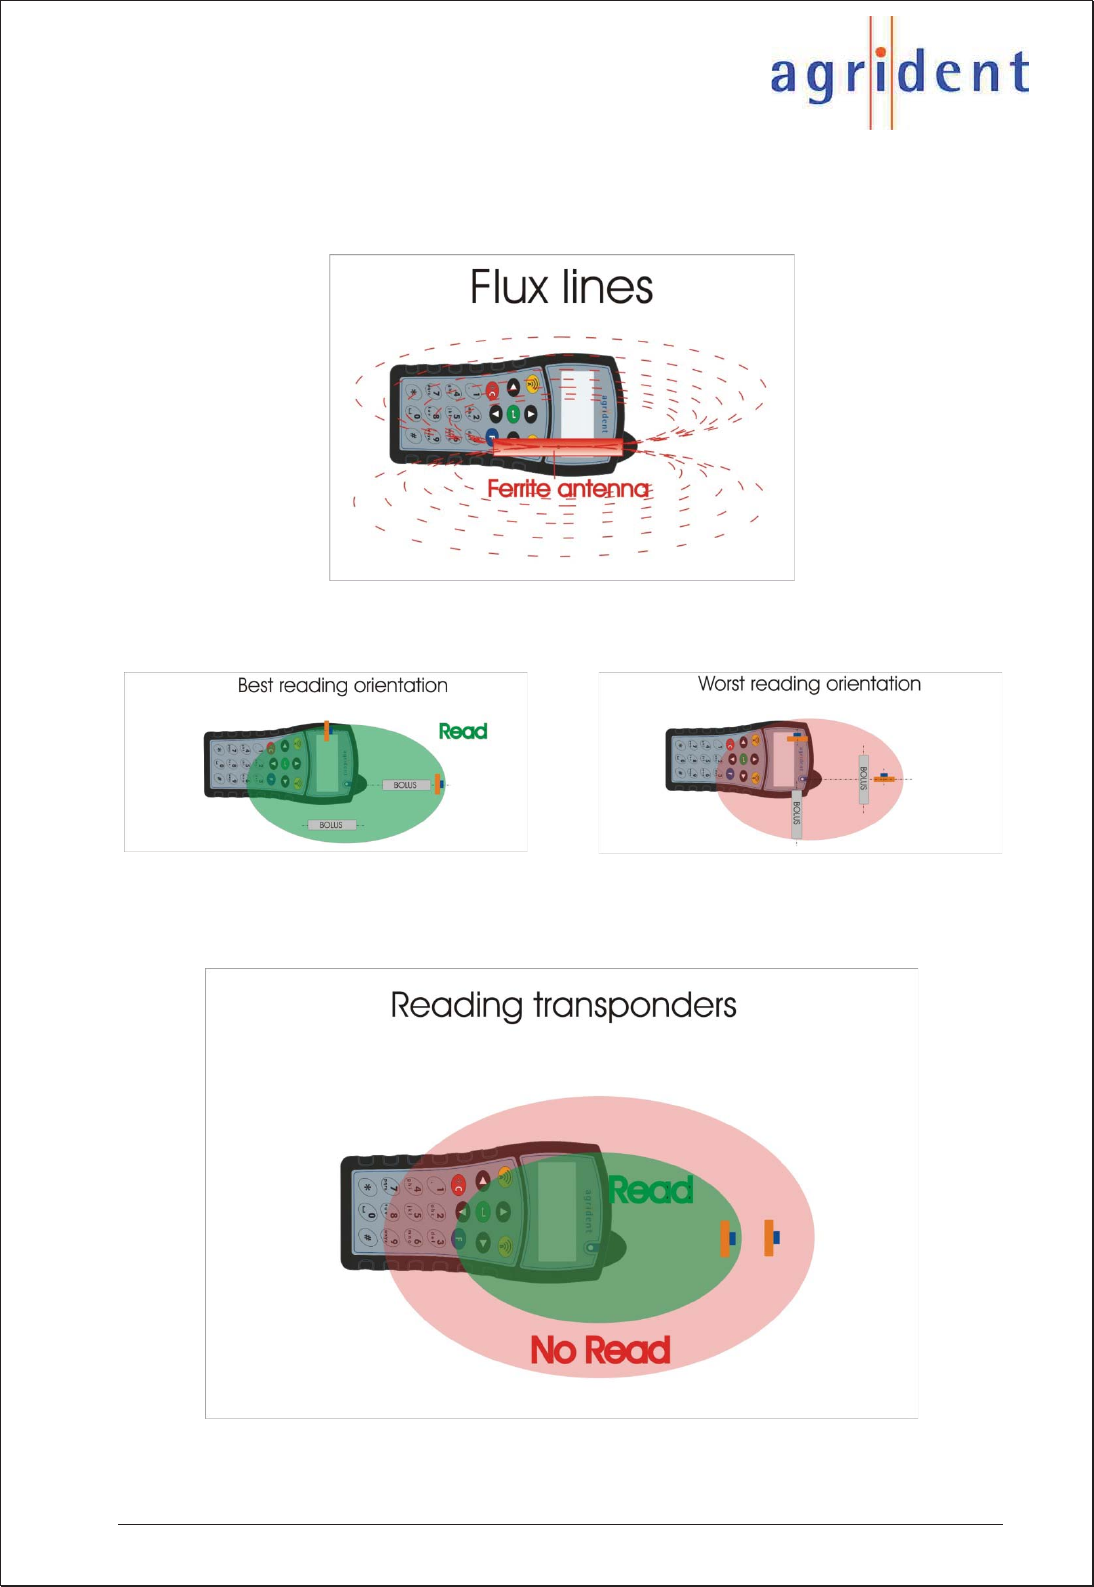
4.2.2 Transponder Orientation
The APR is using a ferrite antenna. Accordingly the flux lines of the electromagnetic field
have the following characteristics:
As a result of the flux line characteristics, there is a best reading orientation and a worst
reading orientation:
The reading range does not only depend on the transponder orientation but also on the
type of transponder. Transponders with a good performance have a better reading distance
than low performance tags.
Generally HDX transponders can be read up to 25cm, FDX-B up to 20cm.
APR500 – Classic Mode
16.10.2014 Page 11 of 46
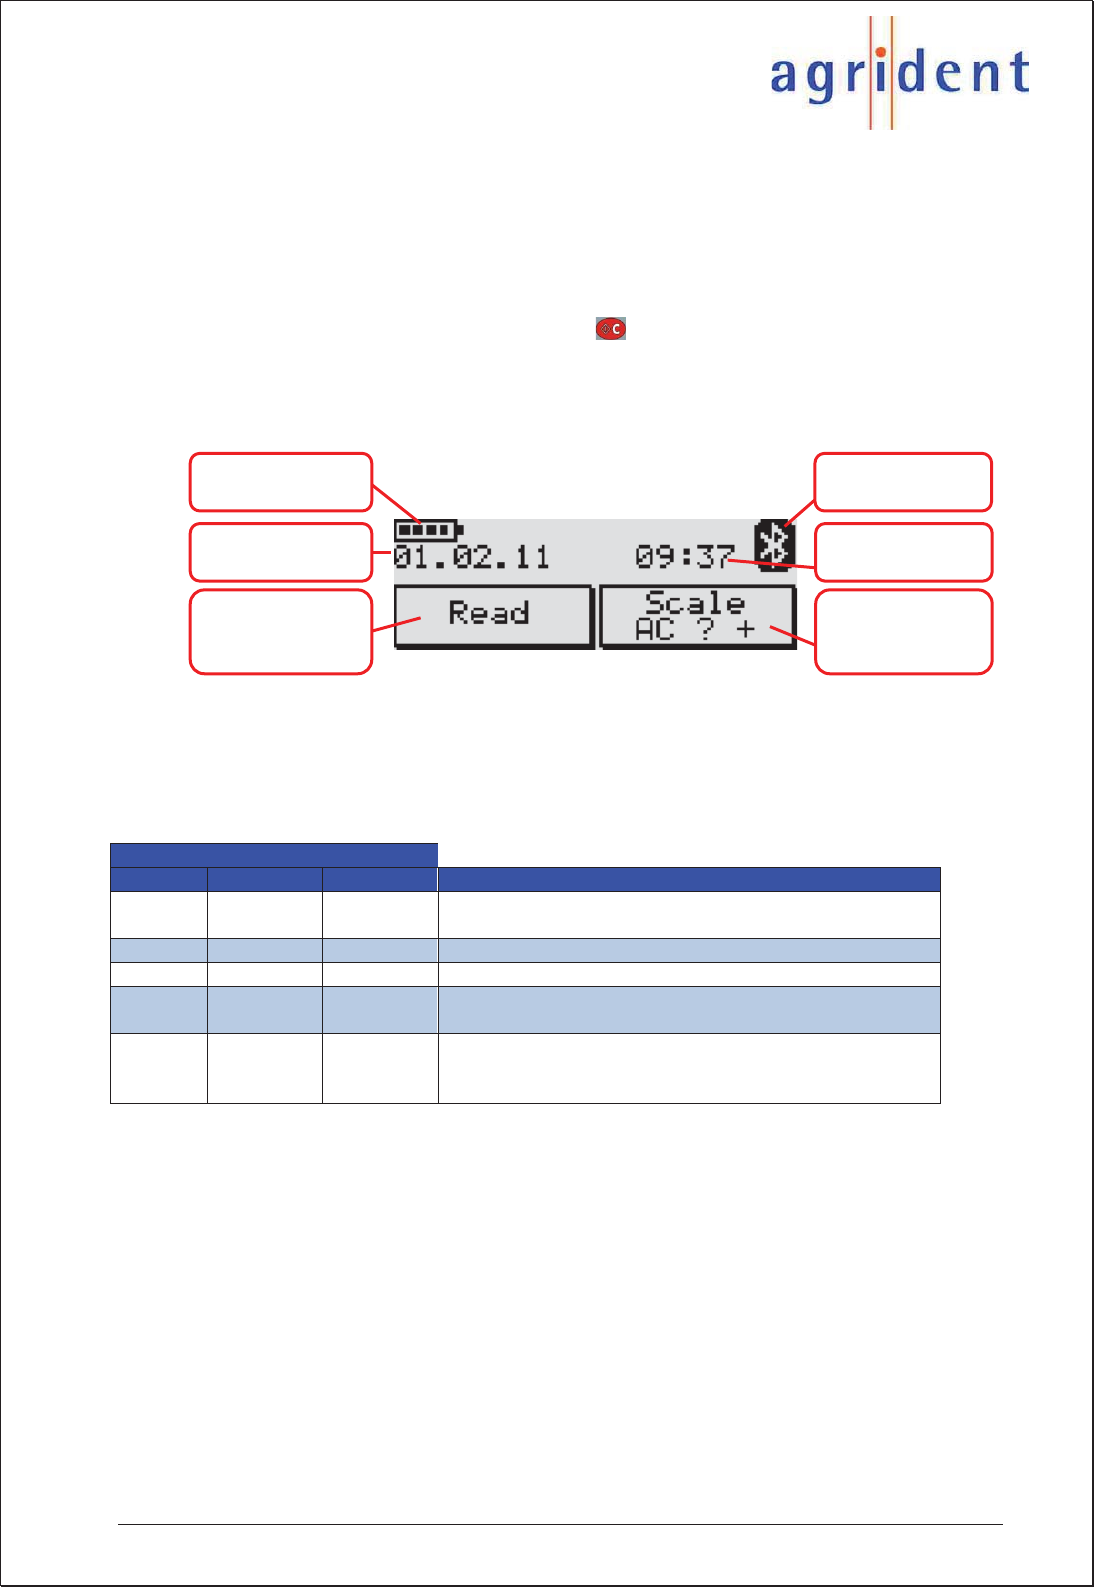
4.3 Main Screen and Acoustic Signals
The APR500 has a large backlit graphic display and a buzzer for acoustical signals which
can give a multitude of different information.
4.3.1 Main Screen
If you switch on the APR500 by pushing the button, the display will switch to the main
screen automatically. It displays the current date, time and the configuration of the
Hotkeys. It also informs the user about the battery status and the Bluetooth status.
Chapter 6.5.1 explains how to change the contrast level of the LCD.
Battery symbol
(chapter 4.6) Bluetooth symbol
(chapter 4.5.2)
Date
(chapter 6.5.2) Time
(chapter 6.5.2)
Hotkey A
Configuration
(chapter 6.1.1.1)
Hotkey B
Configuration
(chapter 6.1.1.2)
4.3.2 Acoustic Signals
The buzzer of the APR500 emits different acoustic signals to state different reader
conditions. For changing the volume of the beeper, please read chapter 6.5.3.
Acoustic signal
Number Length Tone Description
1 short high by pressing any button the keyboard a single short
BEEP is emitted
4short high good ID read
1 long high no ID read
1short low/high double read in an configured time (see chapter
6.5.8.1)
2 short high/low Transponder in the Tag List was found in search
mode (see chapter 6.1.1) The ID has to be assigned
to an Alias
APR500 – Classic Mode
16.10.2014 Page 12 of 46
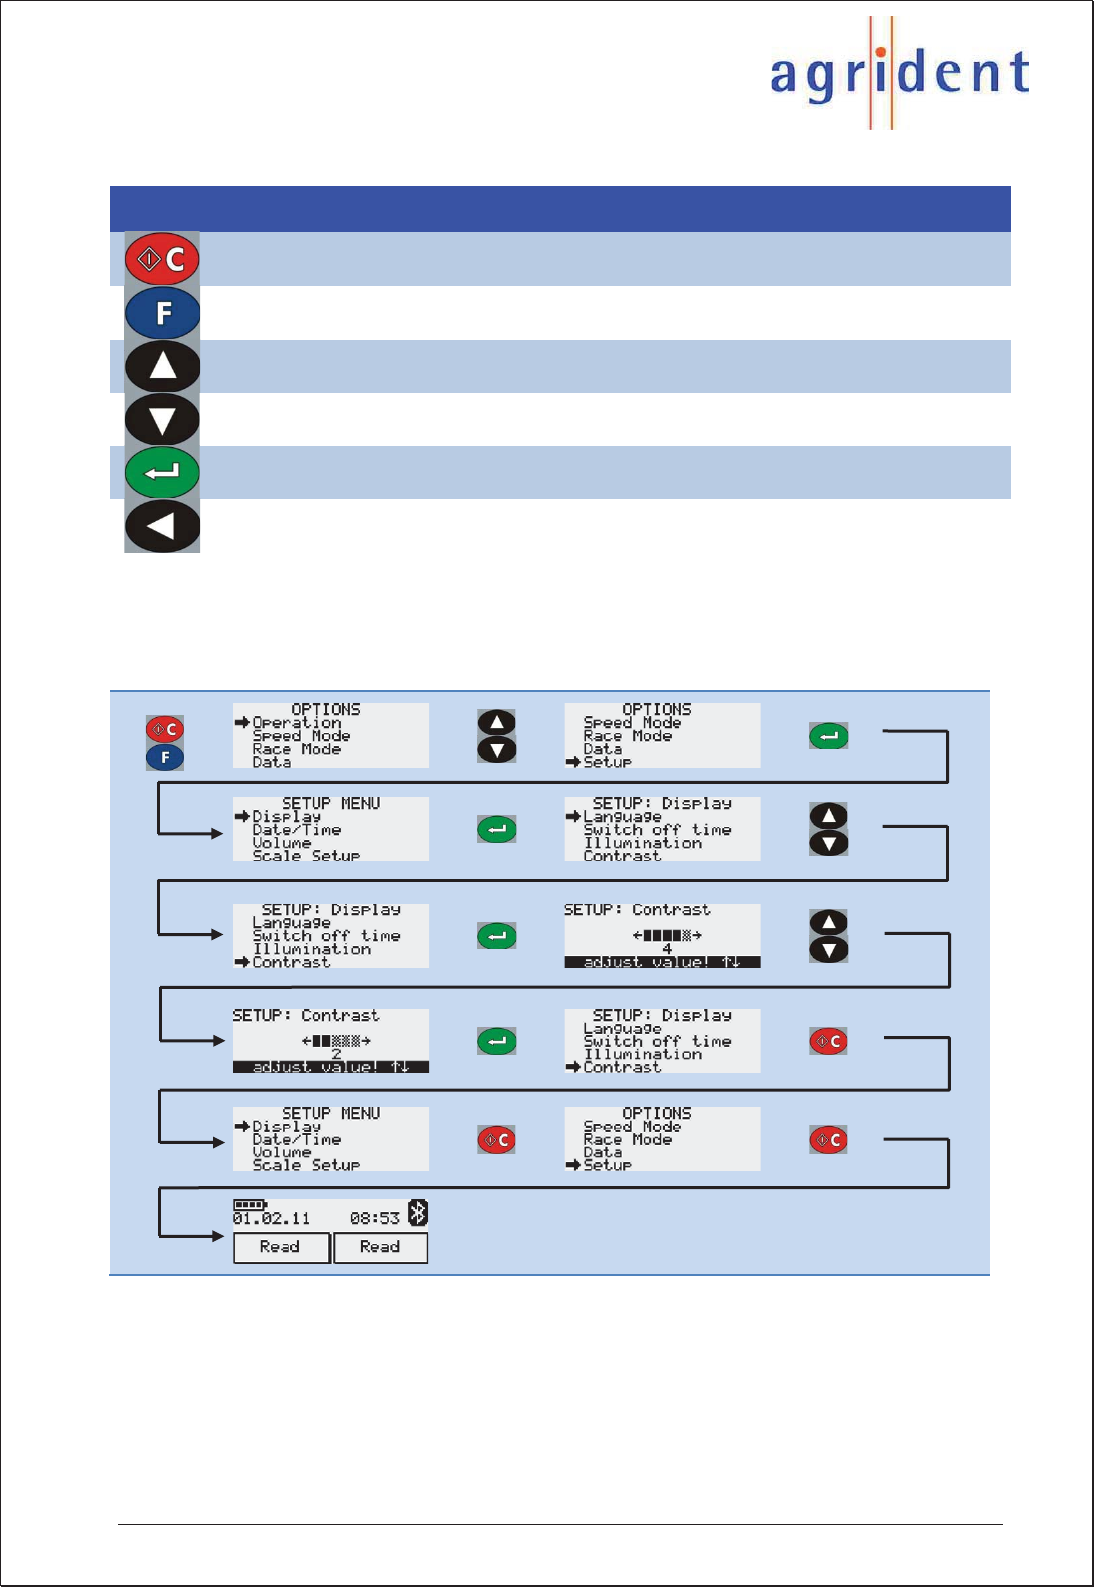
4.4 Navigating through the menus
Button Description
Switches the APR500 on and off, changes from a submenu to the next higher menu
item and leaves settings in the lowest menu level unaltered.
Enters the APRs menu.
Scrolls up in the menu, increases numeric values in particular submenus. Changes to
capital letters in text input fields.
Scrolls down in the menu, decreases numeric values in particular submenus. Changes
to lower case letters in text input fields.
Enters a submenu, confirms changes in the lowest menu level and leaves this submenu
to the next higher menu item.
Deletes the last character in text input fields.
Example:
You want to change the contrast level of the APRs display.
Chapter 6.7 provides an overview of the menu structure and the factory default settings.
APR500 – Classic Mode
16.10.2014 Page 13 of 46
4.5 Communication interfaces of the APR500
If you want to download collected data from the APR to your PC or upload lists to the
reader, you have to connect the APR to the PC via an interface.
The APR500 has an USB and an RS232 interface at the top plug, available via the
APC500 USB cable or the APC510 RS232 cable. At the bottom of the APR there are
contact pins for connecting via the ADS500 docking station. The APR500 is also equipped
with a Bluetooth class 1 module for wireless communication.
Beside the physical connection you need appropriate software on your PC which is able to
communicate with the APR. This can be either your management software or the APR PC-
Demo-Software.
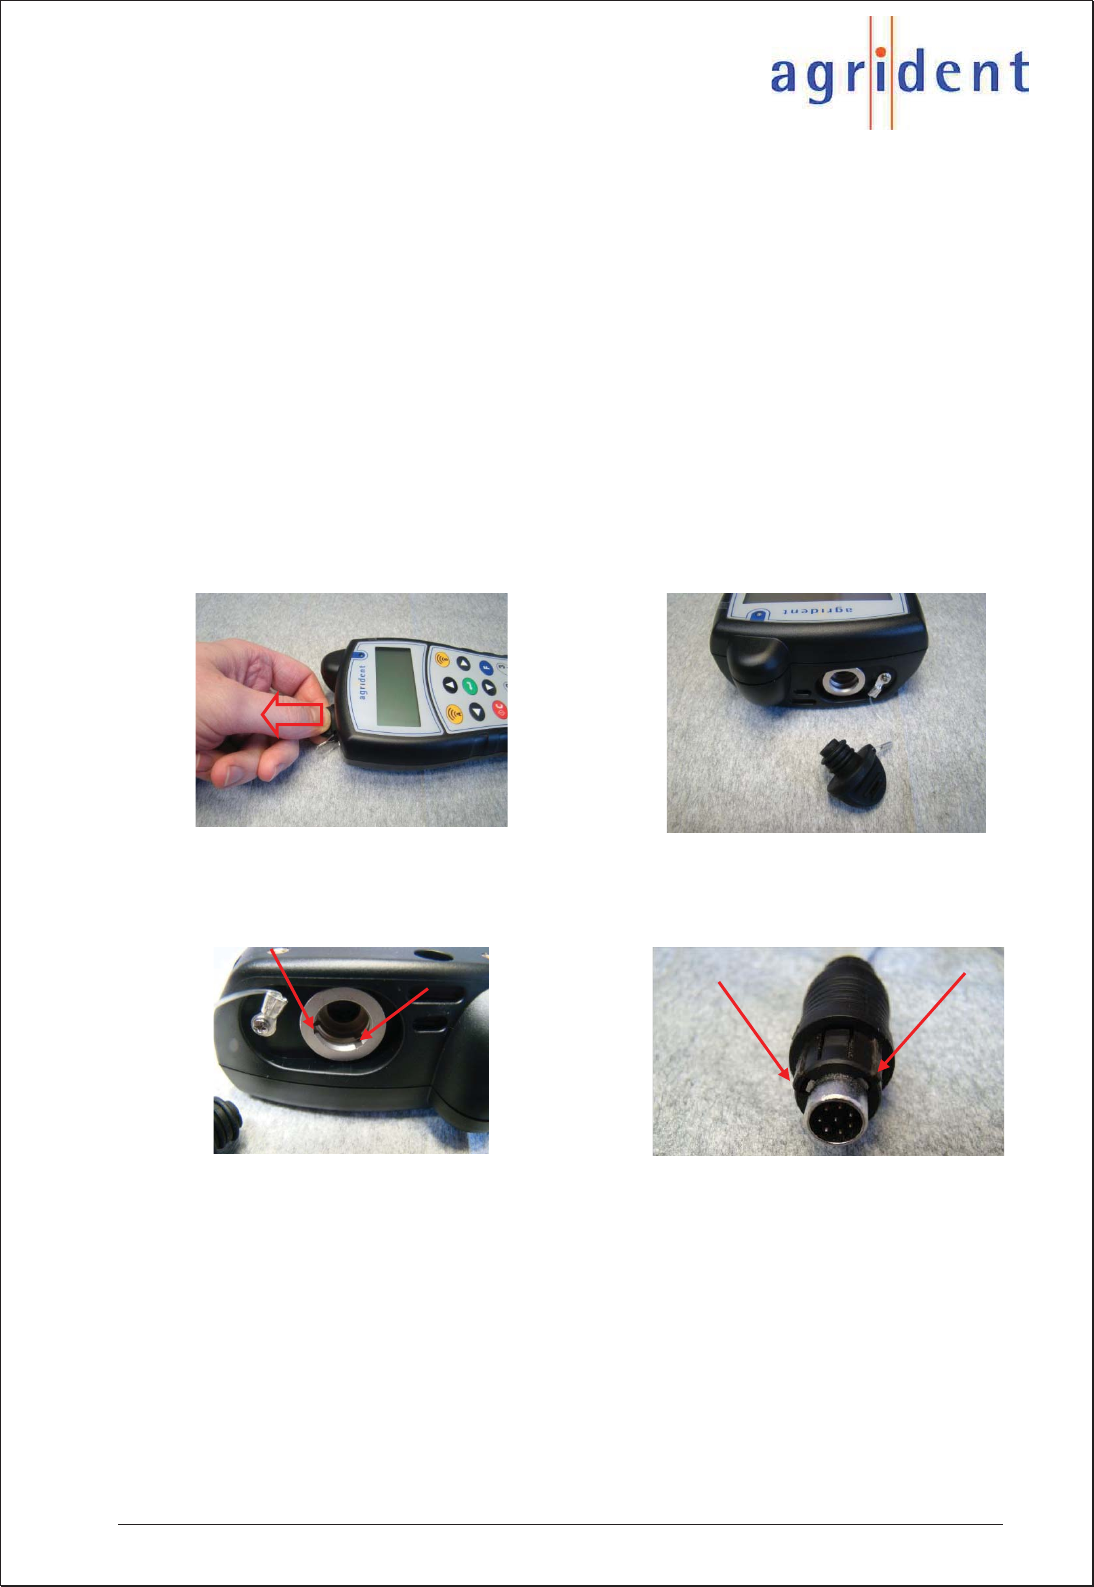
4.5.1 Connecting the APC cable
Before you can connect your APC interface cable, you have to remove the protection cap
from the APRs top plug first.
Please be aware that the male APC connector has two noses and the plug in the reader
has two notches, the position of both has to match.
If the connector of the APC and the plug in the APR are mated correctly, push the
connector until it snaps into place noticeably. Now connect the USB-A connector resp. the
9-pin RS232 connector into the corresponding plug of the device you want to communicate
with in order to complete the connection.
APR500 – Classic Mode
16.10.2014 Page 14 of 46
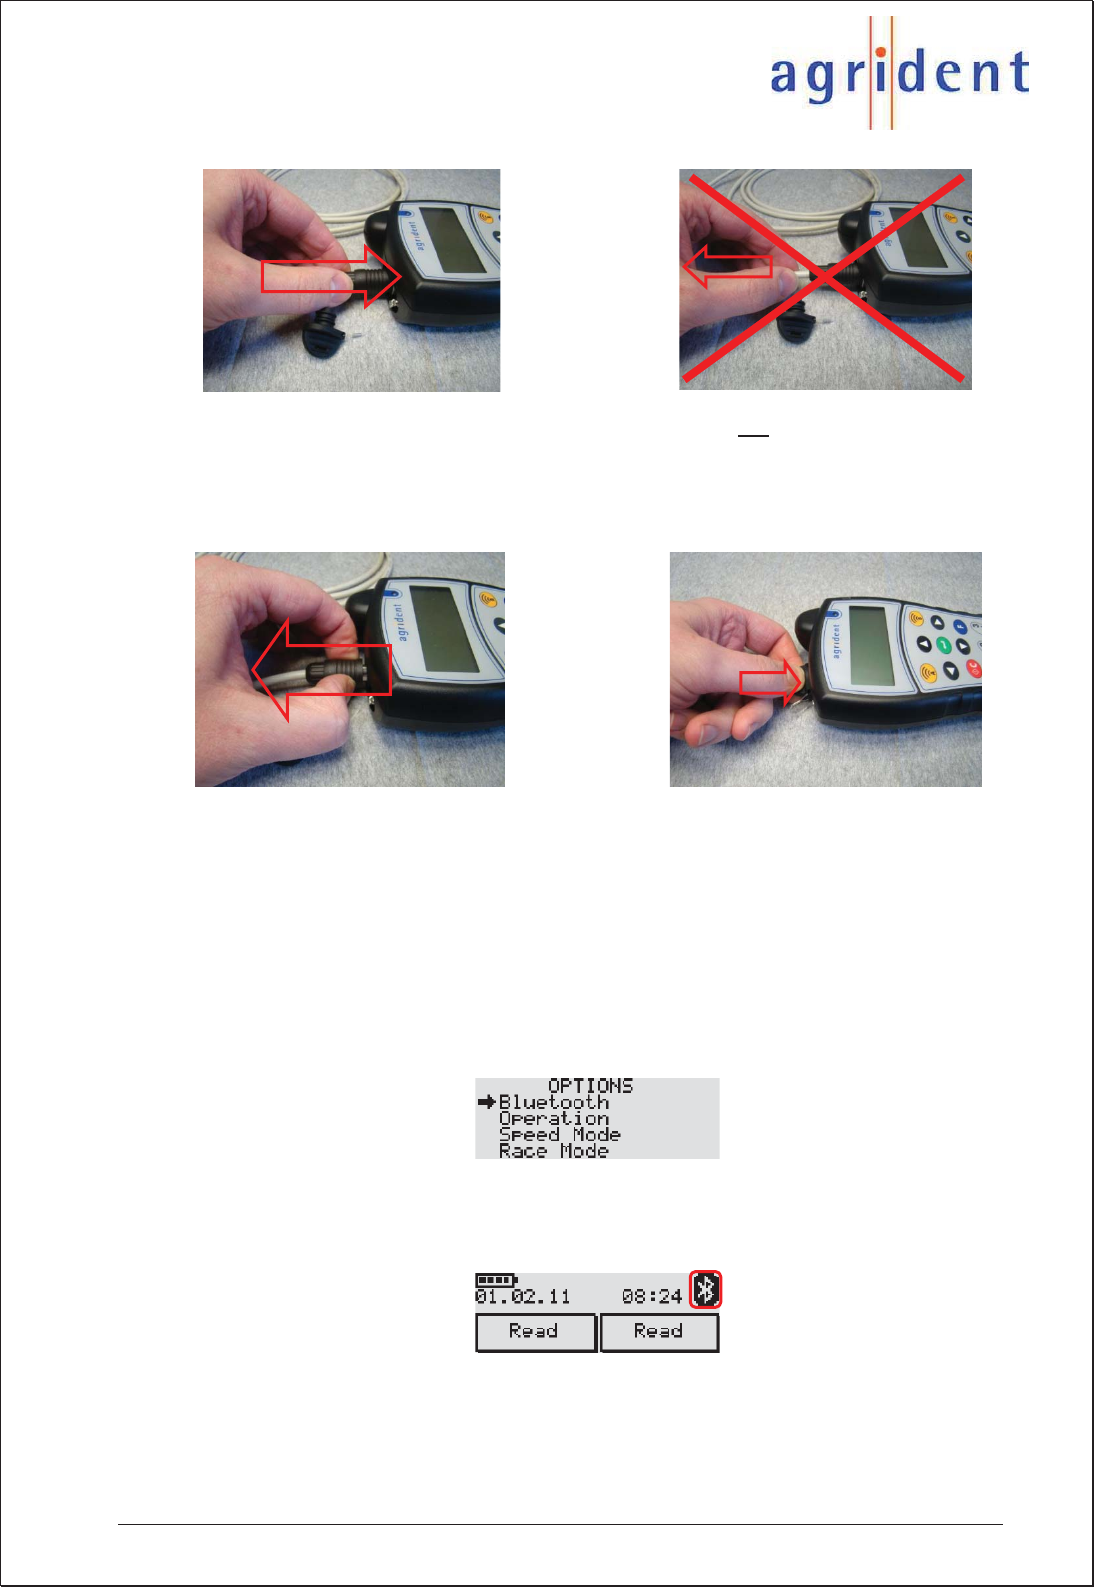
If you want to disconnect the APC from the reader, please do not pull the cable.
Take hold of the outer ring of the connector and you can remove the APC cable easily. In
order to ensure the readers protection class in the field, push the protection-cap back into
place.
When you connect the APR500 to a particular PC via USB the first time, Windows will
detect the new device automatically and ask for a driver. Please choose to install the
device manually and use the APR500.inf file from the APR product CD. For a more
detailed description please read the separate driver installation guide.
4.5.2 Bluetooth
The APR500 has an optional Class 1 Bluetooth module, for wireless communication with
other Bluetooth devices over a distance of up to 100m.
If the APR has established a Bluetooth connection to another Bluetooth device, a Bluetooth
icon will be shown in the upper right corner of the displays main screen and the green LED
of the APR will flash with regular intervals, as long as the connection remains active.
For further information regarding the Bluetooth option of the APR, please read the separate
APR500 – Bluetooth Manual.
APR500 – Classic Mode
16.10.2014 Page 15 of 46
4.6 Battery management
When the APR is connected to a power source via USB (e.g. a PC, APS500, ACC500), the
Agrident supplied rechargeable batteries are internally charged automatically. Fast
charging will take up to 6h. The external power options of the display backlight and the
Bluetooth module can shorten the fast charging period (see chapters 6.5.1 and 6.6).
Charging does only work in a temperature range between 0°C and 45°C.
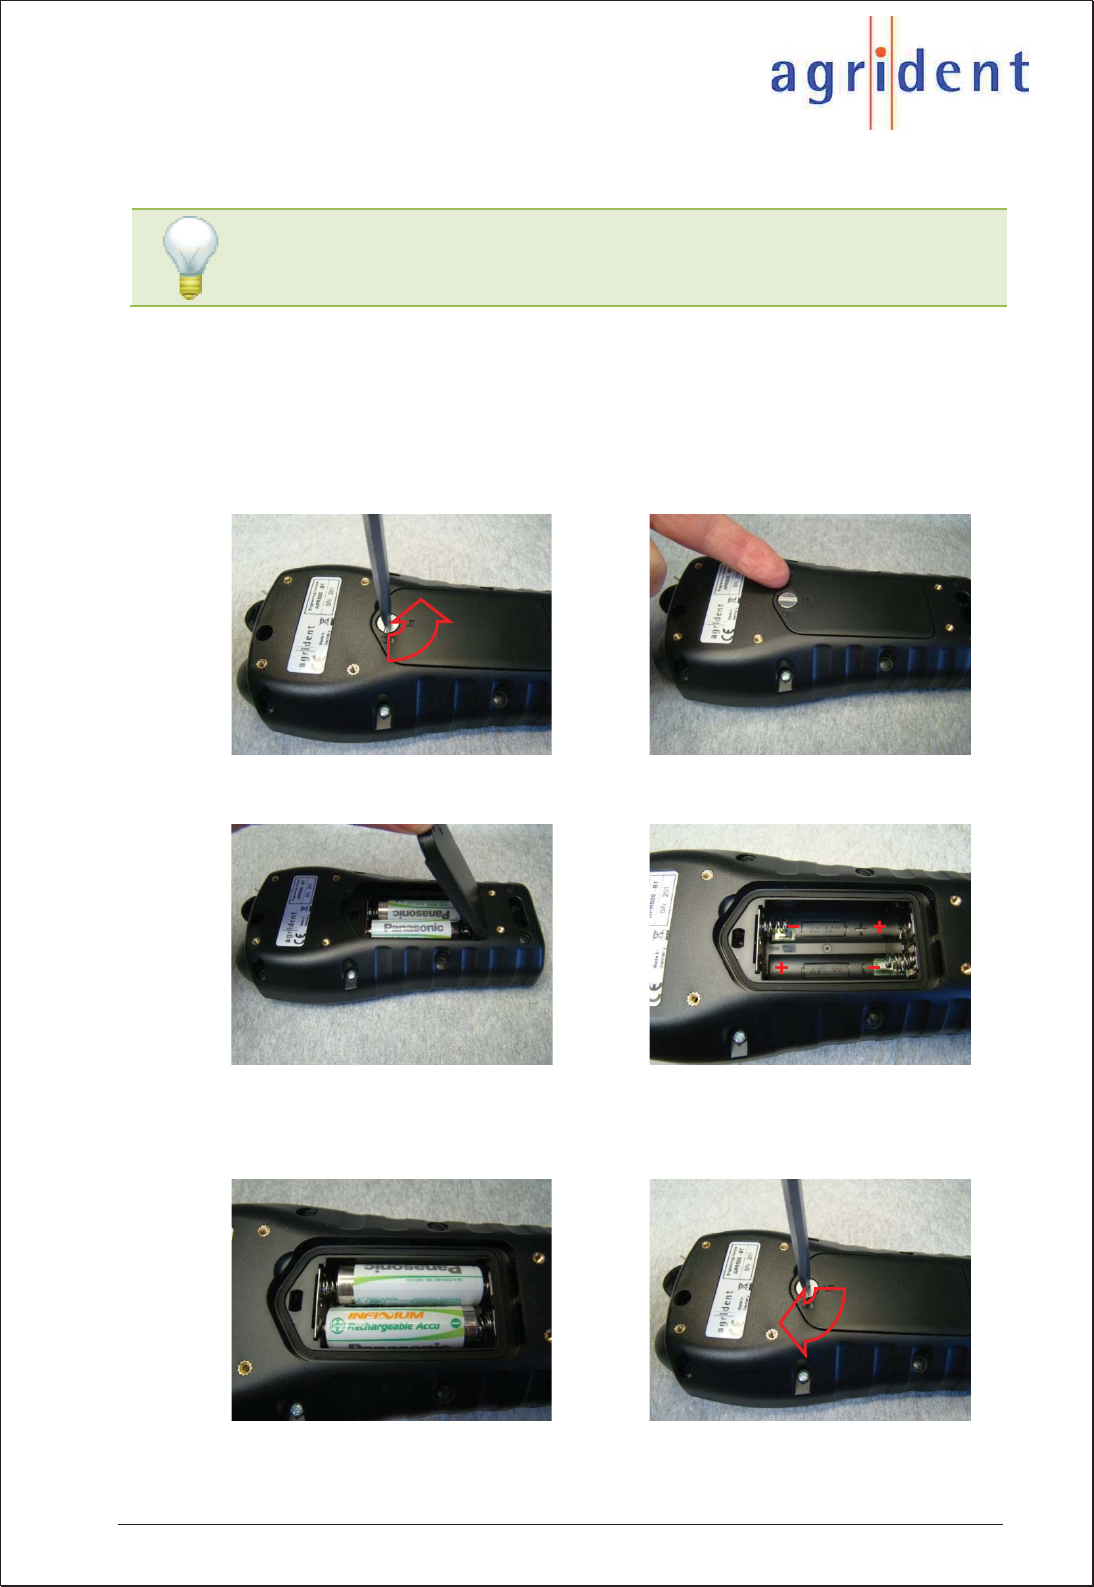
If you want to exchange the batteries of the APR500, please follow the instructions below:
Turn the screw of the battery cover 90° counter clockwise. You might use a screwdriver or a
small coin for that. Lift the lid by using your fingernail or an appropriate tool.
Remove the battery cover and then the batteries. Please pay attention on the imprinted
battery symbols in order to insert the batteries in the correct direction. Use only AA standard
or rechargeable NiMH cells, but note that only Agrident supplied rechargeable batteries can
be charged internally.
Put the battery cover back in place and turn the screw 90° clockwise. Be aware, that the
APR500 housing will only retain its protection class when the battery cover is properly
attached.
When charging for the first time after long-term storage, the battery
capacity might be decreased. Restore such batteries to original
performance by repeated cycles of charging and discharging.

APR500 – Classic Mode
16.10.2014 Page 16 of 46
5. Advanced Features of the APR500
The APR500 can do much more than just simply reading transponders and saving the ID.
This chapter explains the additional information that can be linked to the electronic ID.
With the Hotkeys A and B you can access functions like Alias, Action Code and Weight
from Scale fast and easy. The configuration of the Hotkeys can be changed in the APRs
menu (see chapter 6.1.1) or using the APR PC-Demo Software. Presets (see chapter
6.1.2) can be used to switch between different operation modes easily.
5.1 Alias
An Alias is an alphanumeric string of up to 14 characters. It can be linked to one ID. A list
of Aliases is called “Tag List”.
The Alias function can be used for multiple different operations, for example:
x Assignment of the visual ID or management number to the electronic ID.
x In combination with the Search Mode, particular animals can be identified in a
larger group of animals.
x Irregular conditions of animals can be recorded with the Alias function using the
Assign Ask mode or the Assign Ask Save mode.
5.1.1 Using a preassembled Tag List
A Tag List containing Aliases linked to transponder IDs can be created on the PC using
appropriate software. Instead of displaying the electronic ID after reading, the APR can be
set up to show the Alias on the display (see also chapter 6.5.8.5 “Alias if available”).
In this case, the assignment has already been made. So there is no additional Alias
assignment possible in the field and thus the Assign Ask mode or the Assign Ask Save
mode cannot be used here, at least for IDs which already have an Alias. If an ID is already
assigned and you are using the Assign Ask mode or the Assign Ask Save mode, the APR
will display “already assigned”.
5.1.2 The Search Mode with preassembled Tag List
In combination with the Search Mode (see chapter 6.1.1), particular animals can be
identified in a larger group of animals. If one of the searched animals was found in the Tag
List, the APR will indicate that using a different acoustic and visual signal.
An example: You want to sell some animals and you have to find them in a large flock. Just
create a Tag List with all animals you want to sell and add the corresponding Alias in the
list, e.g. “Sale”. Now upload the Tag List to the APR. Set up your APR in the following way:
x Alias if available = On
x Mode Hotkey A (or B) = No Actioncode
x Search Mode Hotkey A (or B) = On
Now the APR will indicate an assigned ID using a different acoustic signal and the LED will
flash green and red. Additionally your Alias will be displayed instead of the ID, for example
“Sale”.
APR500 – Classic Mode
16.10.2014 Page 17 of 46
5.1.3 Assignment with the APR using Null-Tags
You can also assign the Alias in the field after reading a transponder with the APR using
the Assign Ask mode or the Assign Ask Save mode. For this application you also have to
create a Tag List on the PC first but you have to leave the ID blank, this is done by creating
a Tag List with so called “Null-Tags”. Please see the APR PC-Demo Software manual or
your management software manual for information about how to create a Tag List with
Null-Tags. In such a Tag List you only create the Alias entries; the corresponding IDs are
left blank and are assigned in the field. After uploading the Tag List you can start to assign
the IDs using the APR.
Set up the APR like below for this operation mode:
x Mode Hotkey A (or B) = Assign Ask or Assign Ask Save
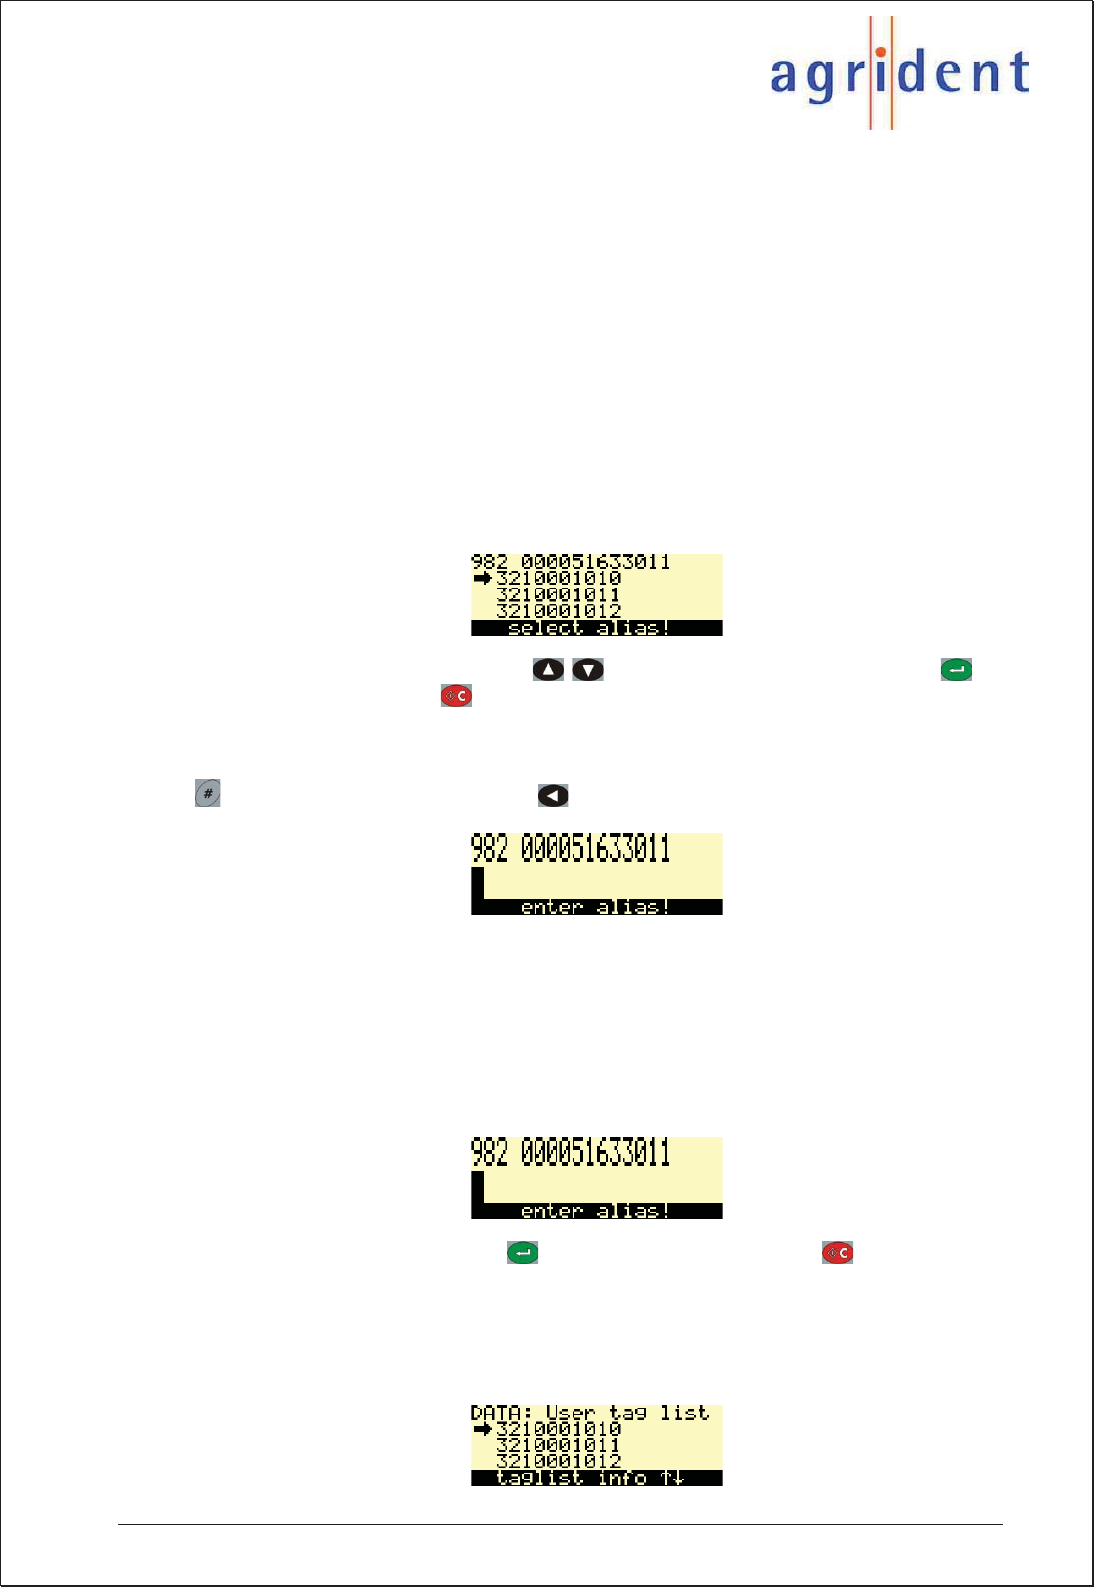
After you read a transponder with the corresponding Hotkey, the APR will open the list with
Aliases which are not assigned yet:
Choose the correct Alias using the / buttons. Confirm your choice with or
cancel the assignment with .
If you still have unassigned Aliases in the Tag List, but you want to use an Alias that is not
in the preassembled list, you can also enter it manually via the alphanumeric keys pressing
after reading the transponder. The deletes the last character of the input.
5.1.4 Assignment with the APR using the keypad
Another possibility to assign an Alias in the field is to enter the string using the alpha-
numeric keys. In this case it is not necessary to upload a preassembled Tag List to the
APR first, the APR will always ask for a manual input. One of the Hotkeys has to be
configured to Assign Ask or Assign Ask Save mode. After reading the transponder, the
APR will always display:
Type in the Alias and confirm with or cancel the assignment with . With this mode
you could record irregular conditions or any other remark. If you always want to type in the
Alias manually, make sure that there are no unassigned Aliases in the tag list.
Assignments which have been made like in the above described chapters 5.1.3 and 5.1.4
are visible in the User tag list of the Data menu:
APR500 – Classic Mode
16.10.2014 Page 18 of 46
If you select a specific assigned Alias within the User Tag list by pressing , you can
undo the user assignment by pressing . This Alias can be reassigned to any unassigned
transponder again as described in chapter 5.1.3.
5.2 Action Codes
Action Codes are used to link a predefined action (e.g. weight, fed, sick, examined) to a
scanned transponder and thus to the animal.
An Action Code is an alphanumeric string of up to 14 characters. It can be linked to all
transponders that are scanned. Compared to the Alias, the Action Code list always has to
be sent to the APR before you can work with Action Codes. If you do not upload the list
first, you can only link numbers of Actions to the ID, not the name of the Action.
The Action Code list has to be created and uploaded using the appropriate PC software
like your management program or the APR PC-Demo software. Up to 90 different Action
Codes can be uploaded to the APR.
In order to use the Action Code function with the APR, you have set one of the Hotkeys
into the desired mode first (see Hotkey Mode menu chapter 6.1.1).
5.2.1 AC Ask mode
In the AC Ask mode, the reader will always open the Action Code List and you have to
select an action manually using the / buttons for scrolling. Confirm your choice with
. The APR will always display the Action Code selected in the Action Code list menu
item first. If you want to have last linked Action after every reading, select “last used” in the
Action Code list menu – so if you have multiple animals with the same action in series, you
just need to confirm the Action Code with enter and you do not need to scroll to the same
action every time.
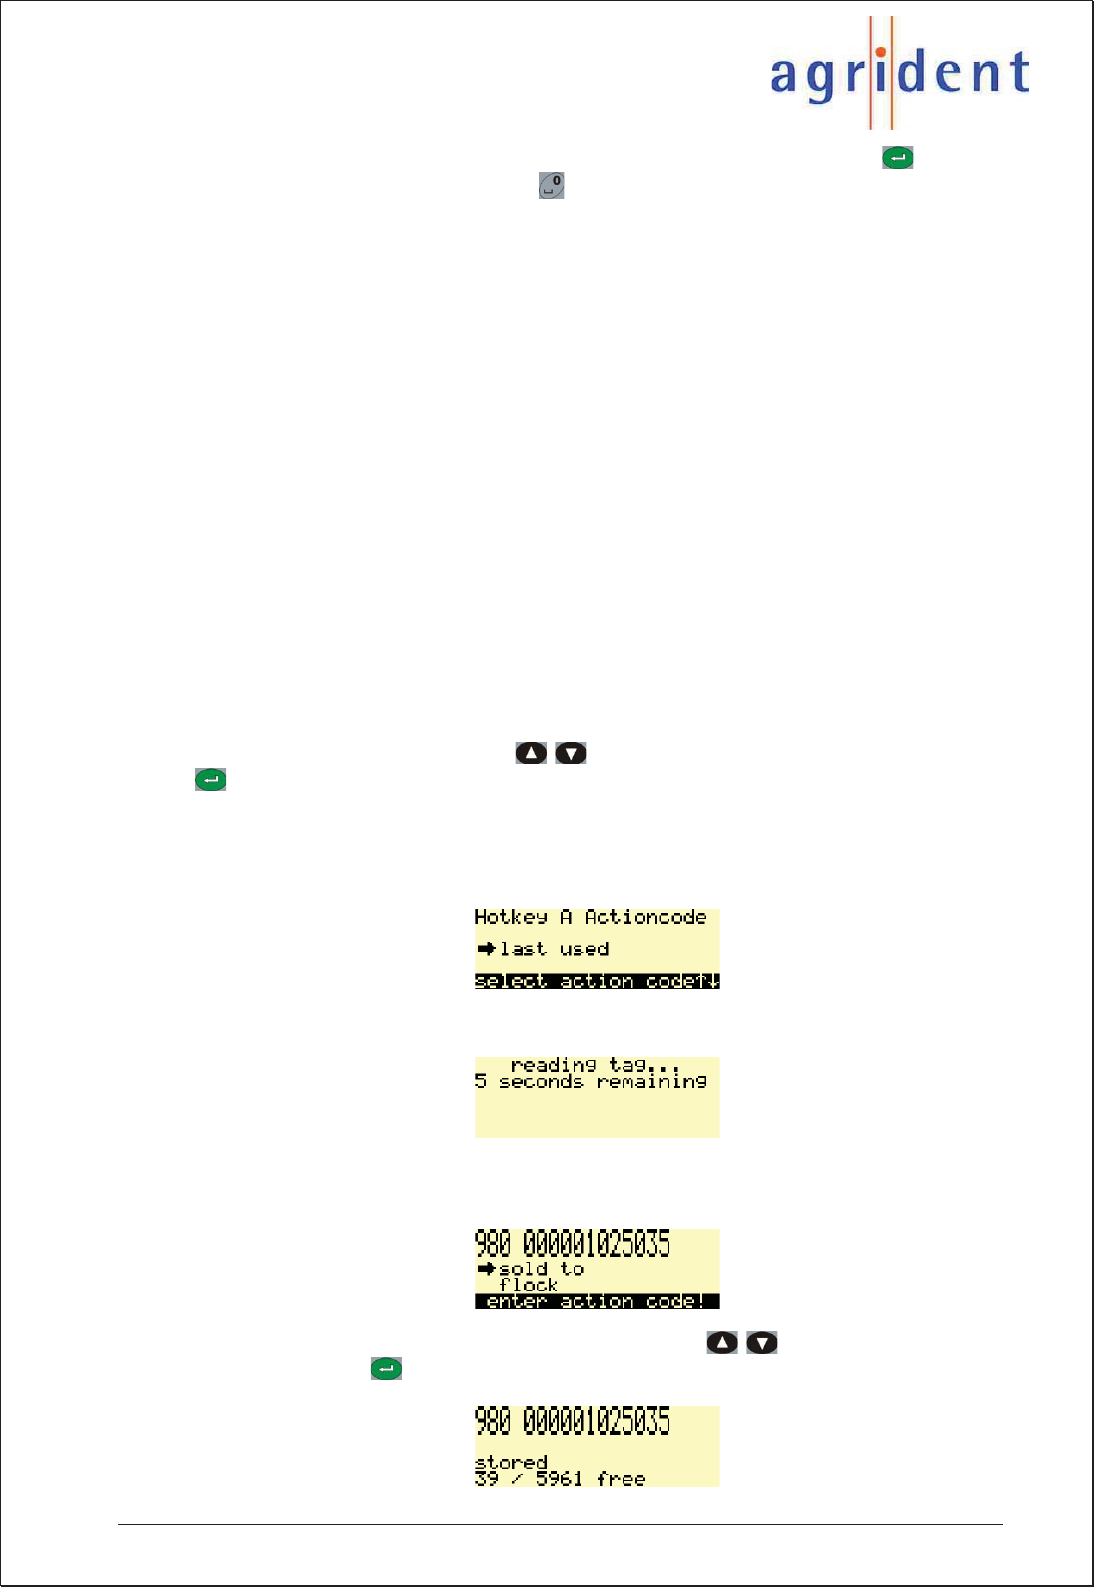
Initiate the operation using the corresponding Hotkey. The APR will start a reading cycle:
If a transponder was read successfully, you can see the ID in the first line of the display.
The second line shows the Action Code:
Choose the desired Action Code from the list using the / buttons. Link the Action
Code to the ID with . The APR will confirm that the dataset has been saved:
APR500 – Classic Mode
16.10.2014 Page 19 of 46
5.2.2 AC Ask Plus mode
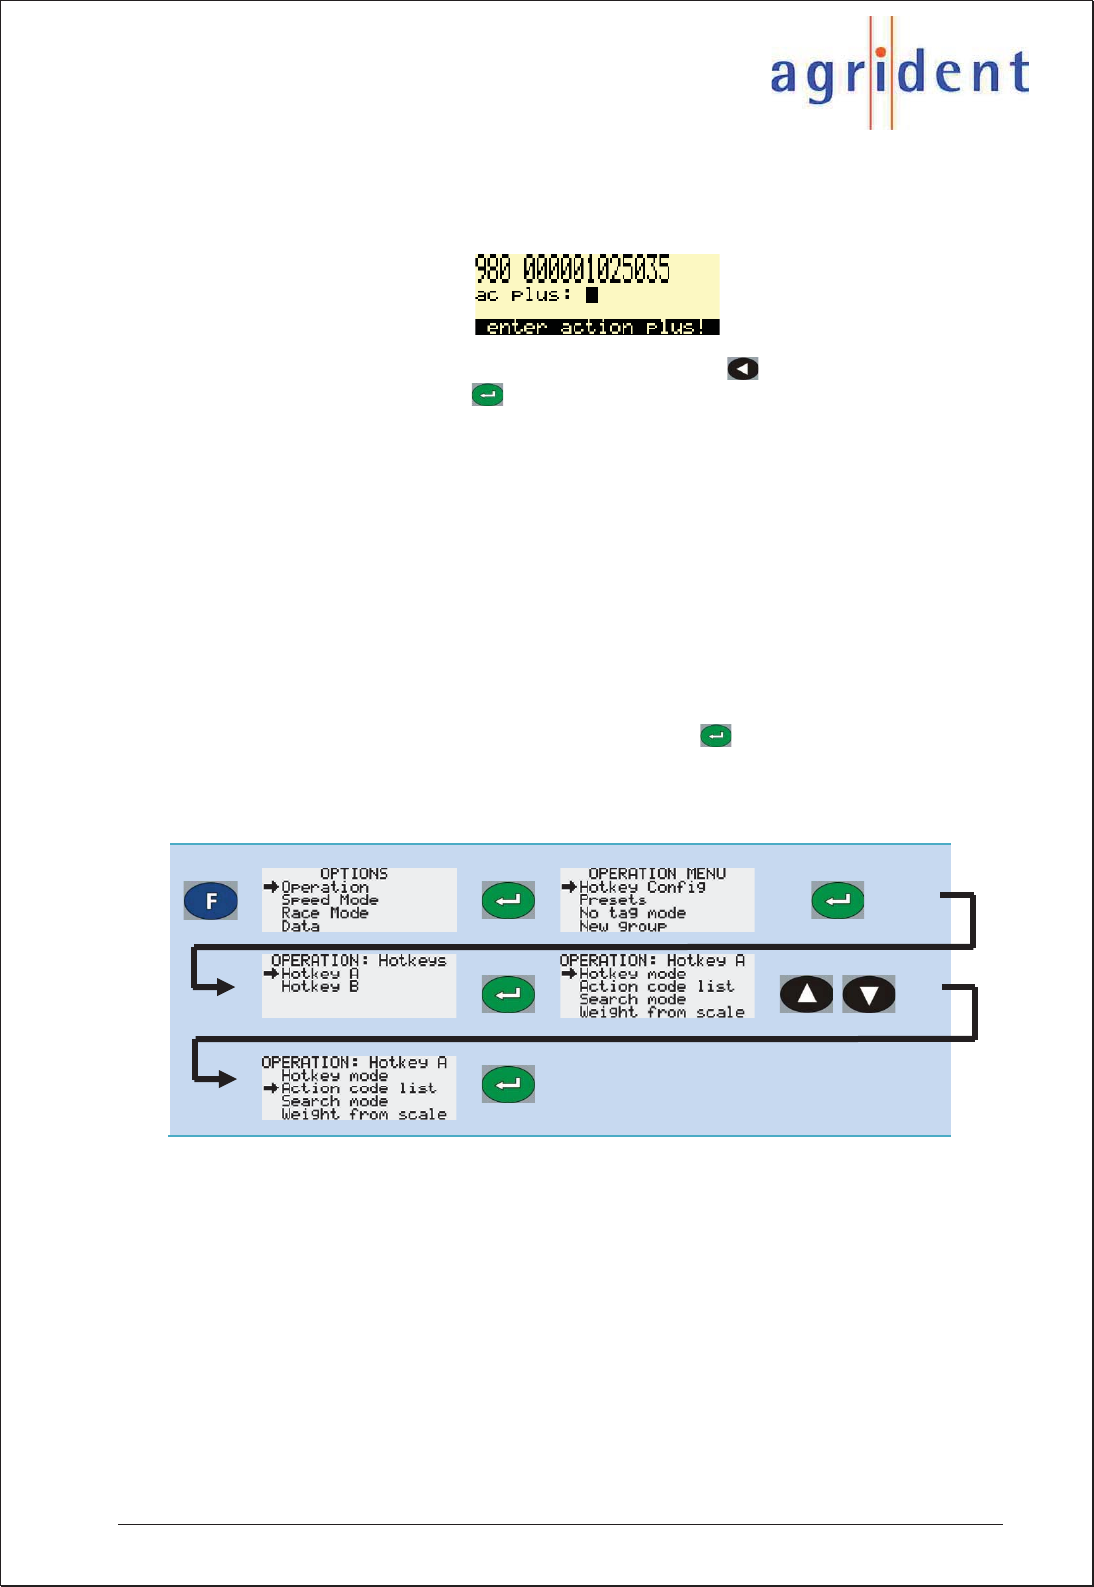
The same like AC Ask but additionally to the Action Code you have to enter a numeric
value:
Use the alphanumeric keys in order to enter the value, use in order to delete one digit
Confirm your input by pressing .
If the AC Plus format is set to “On” (see chapter 6.5.8.6) you can assign values of up to
65535, “Off” only allows values up to 255.
5.2.3 AC Auto mode
The APR will always assign the Action Code that is selected in the Action Code list menu
automatically. It is not possible to select a different Action Code after each reading. If you
want to change the Action Code, for example because you want to link a different action for
the next group of animals, you have to change the Action Code list value.
If you have one and the same action for only a few animals, it makes more sense to use
the AC Ask mode in combination with the Action Code list value “last used”. In that way you
only have to confirm the same Action Code by pressing for a few times. The AC Auto
mode is more intended to be used, if lots of IDs should be linked to the same Action Code.
The reason is that every time you want to change the Action Code, you have to go back to
the operation menu in order to change the Action Code list value:
5.2.4 AC Auto Plus mode
The same like AC Auto but additionally to the Action Code you have to enter a numeric
value. If the AC Plus format is set to “On” (see chapter 6.5.8.6) you can assign values of up
to 65535, “Off” only allows values up to 255.
APR500 – Classic Mode
16.10.2014 Page 20 of 46
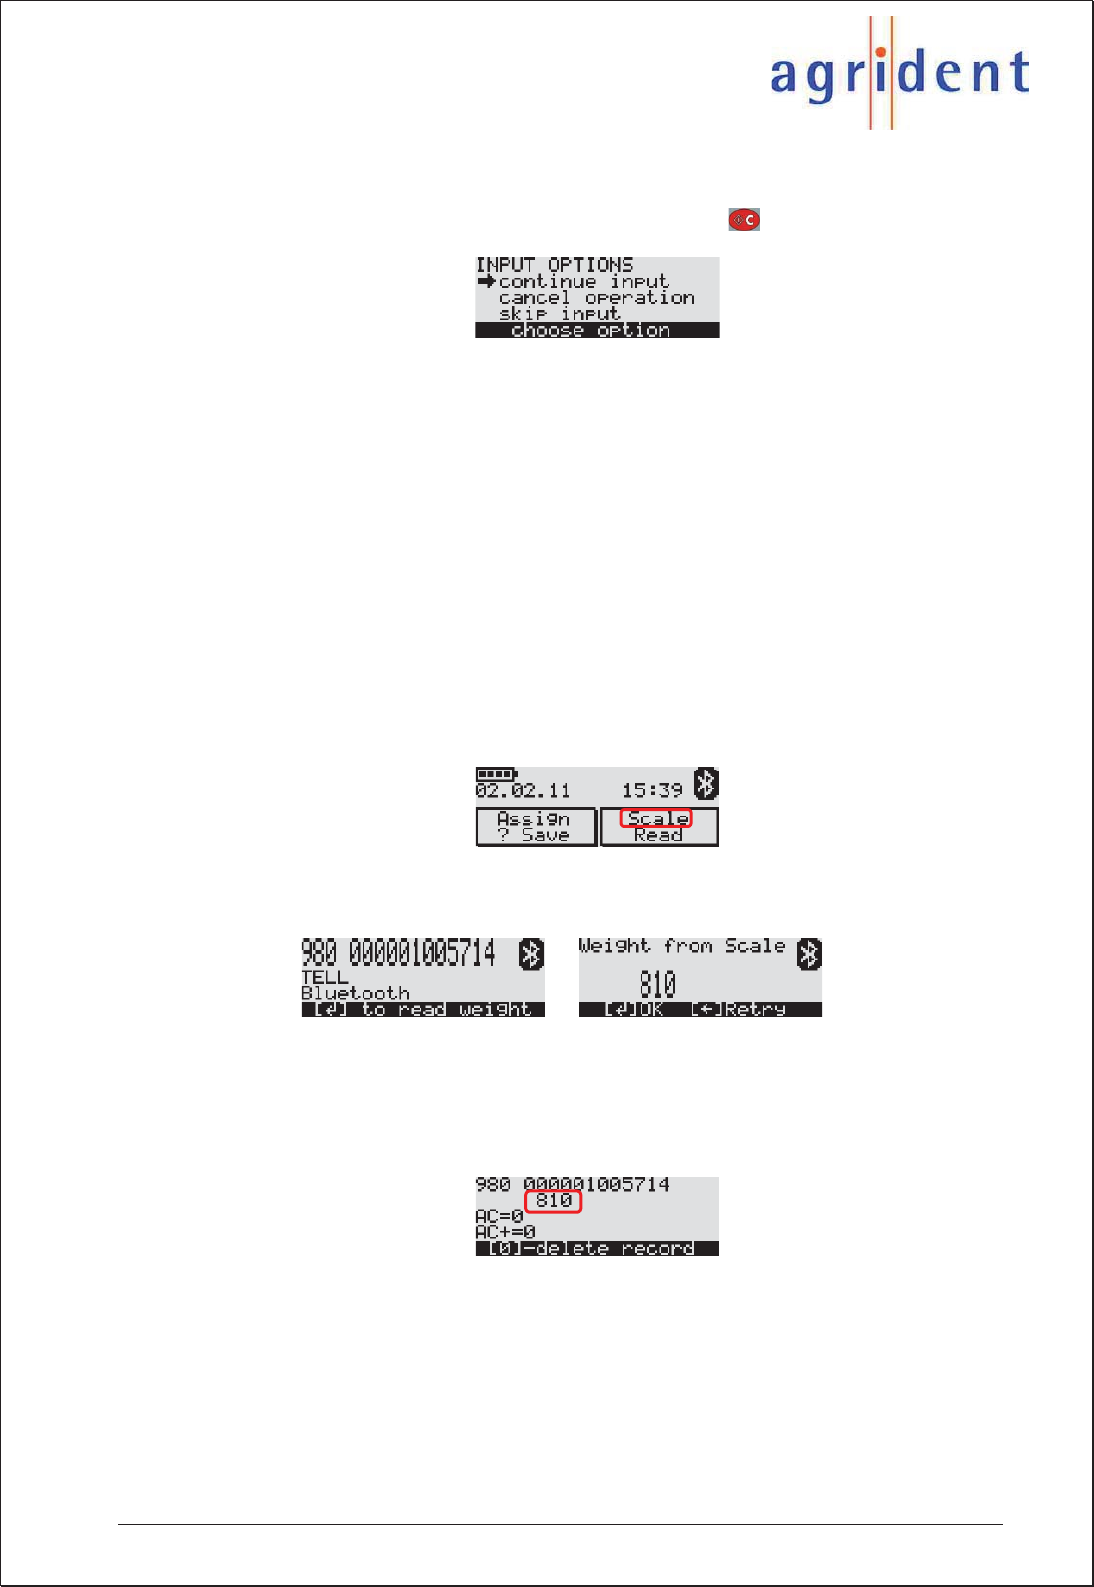
5.2.5 Cancelling the data record
If you have read the transponder and you do not want to link an Action Code or Action
Code Plus to this ID, you can cancel this record by pressing . The APR displays:
If you select continue input, you skip back to the according Action Code Ask or Action
Code Auto Mode. Cancel operation will abort the entire process and discard the read EID.
Skip input will store the EID normally but without an Action Code.
5.3 Weight from Scale
The Weight from Scale feature offers the great opportunity to combine the EID with the
electronic weight, even if non EID-ready scales are used. The APR500 can import the
weight from a scale and save it together with a scanned EID.
The APR500 needs a serial connection to the scale, either RS232 (see APC510 chapter
2.1) or via Bluetooth.
The APR500 has to be set up for the correct scale and interface (see chapter 6.5.4) and
the appropriate Hotkey needs to be configured accordingly (see chapter 6.1.1.1).
Pressing the corresponding Hotkey, the APR500 will first try to scan the EID and than
import the weight from the scale.
EID: 980 000001005714
Scale Type: Tell
Interface: Bluetooth
Weight: 81.0 kg
The weight will be stored into the Alias field of the data set.
Weight from Scale can be combined with any Action Code feature (see chapter 5.2) and
the Search Mode (see chapter 5.1.2), but is incompatible with the Assign Mode (see
chapter 5.1).
For more details, please read the separate APR500 – Weight from Scale Manual.

APR500 – Classic Mode
16.10.2014 Page 21 of 46
5.4 Group Separator
In order to divide stored transponder data sets into groups, you may insert separators. This
can help you to distinguish between different herds of animals, e.g. for different locations.
The group separator can also be used as a comment field if you want to add one and the
same remark for several animals.
Per default the first group will be named Group 1, the next Group 2 etc., but the user can
rename it with an alphanumeric string of up to 14 characters.
You can enter a group separator via the New Group menu item in the operation menu (see
chapter 6.1.4).
The group separator feature is also available in Speed Mode and Race Mode.
5.5 Speed Mode
If lots of animals have to be read within a short time, the APR500 Speed Mode is a useful
feature. If this mode is activated, the reader will initiate continuous reading, whereby
continuous means – until the timeout has elapsed or the Speed Mode is left manually.
The timeout can have a value between 1 and up to 90 minutes.
In order to save battery capacity, the reading speed can be decreased.
The Speed Mode has an ID counter and thus also eliminates double reads.
Additional data like an Action Code Auto and a fixed AC Plus value can be linked to the ID.
A group separator of up to 14 characters can be inserted, e.g. to distinguish between
different locations.
For more details, please read the separate APR500 – Speed Mode Manual.
5.6 Race Mode
The APR500 can be used as a data collector for an Agrident Stationary Reader. This is
especially valuable, when you need to capture lots of IDs within a short time period. IDs
which have been read with an ASR are sent to the APR500 via a Bluetooth or RS232
interface. The Race Mode has an ID counter and thus also eliminates double reads.
Additional data like an Action Code Auto and a fixed Action Code Plus value can be linked
to the ID. The collected IDs are stored in the APR500 memory including timestamp. A
group separator of up to 14 characters can be inserted, e.g. to distinguish between
different locations.
For further details, please read the separate APR500 – Race Mode Manual.

APR500 – Classic Mode
16.10.2014 Page 22 of 46
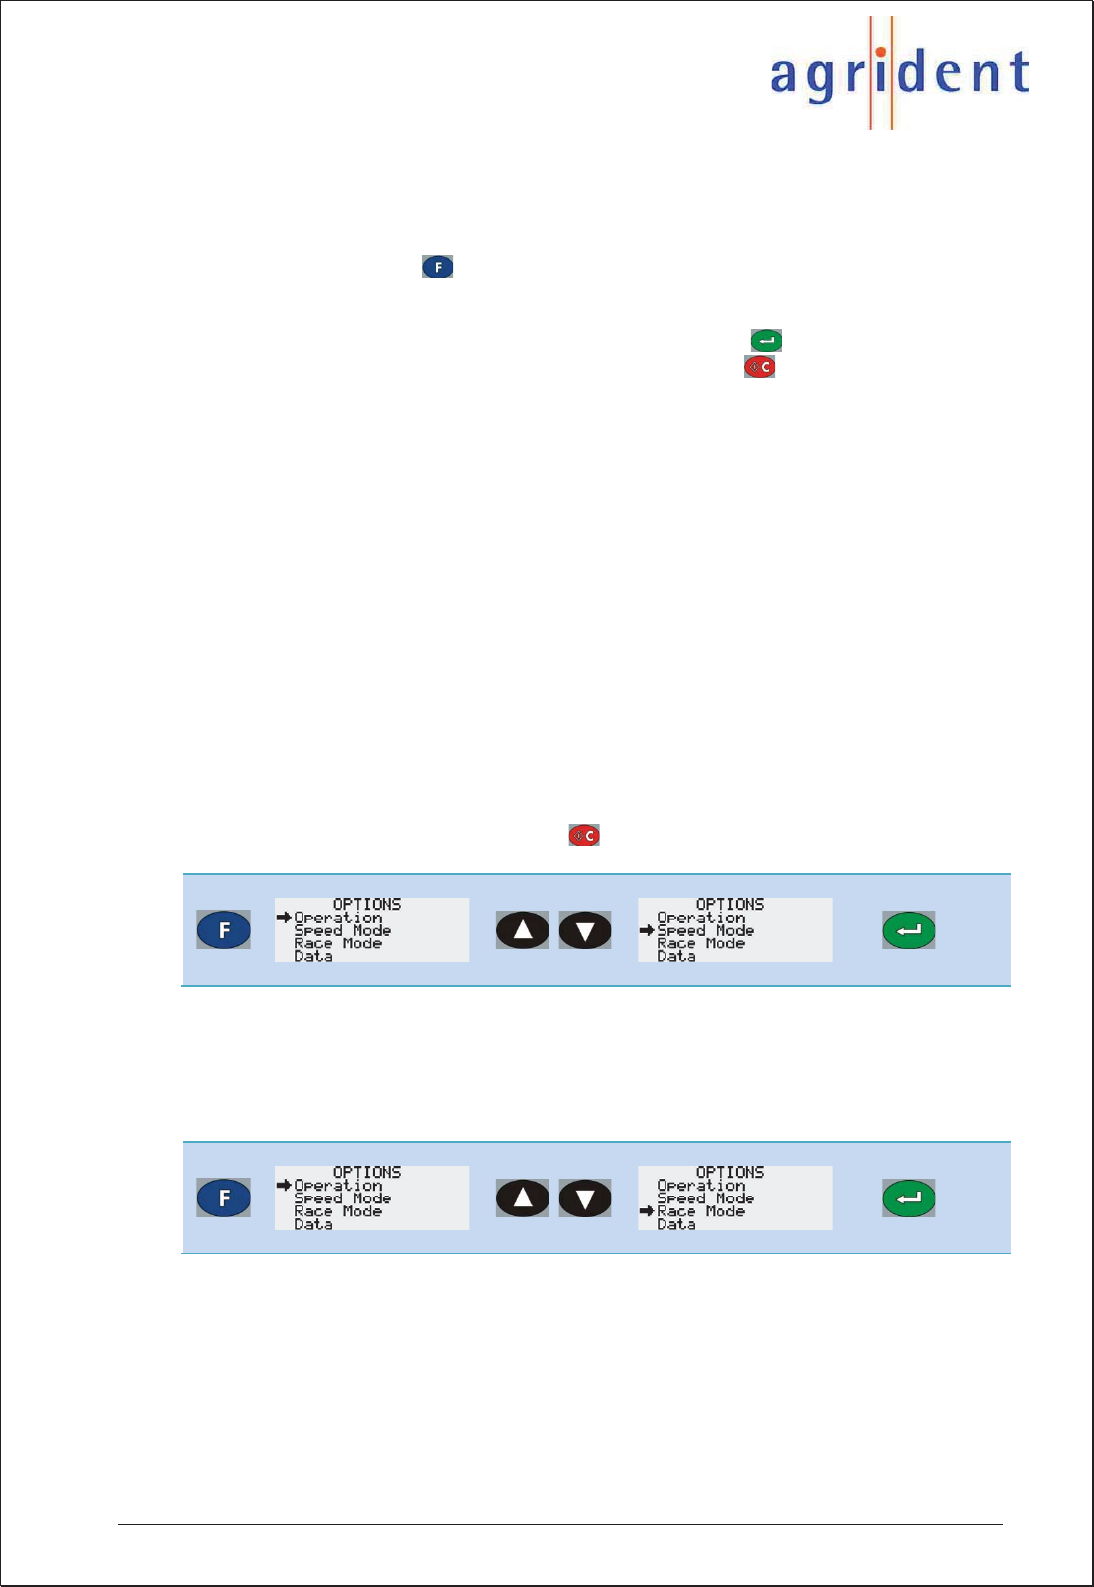
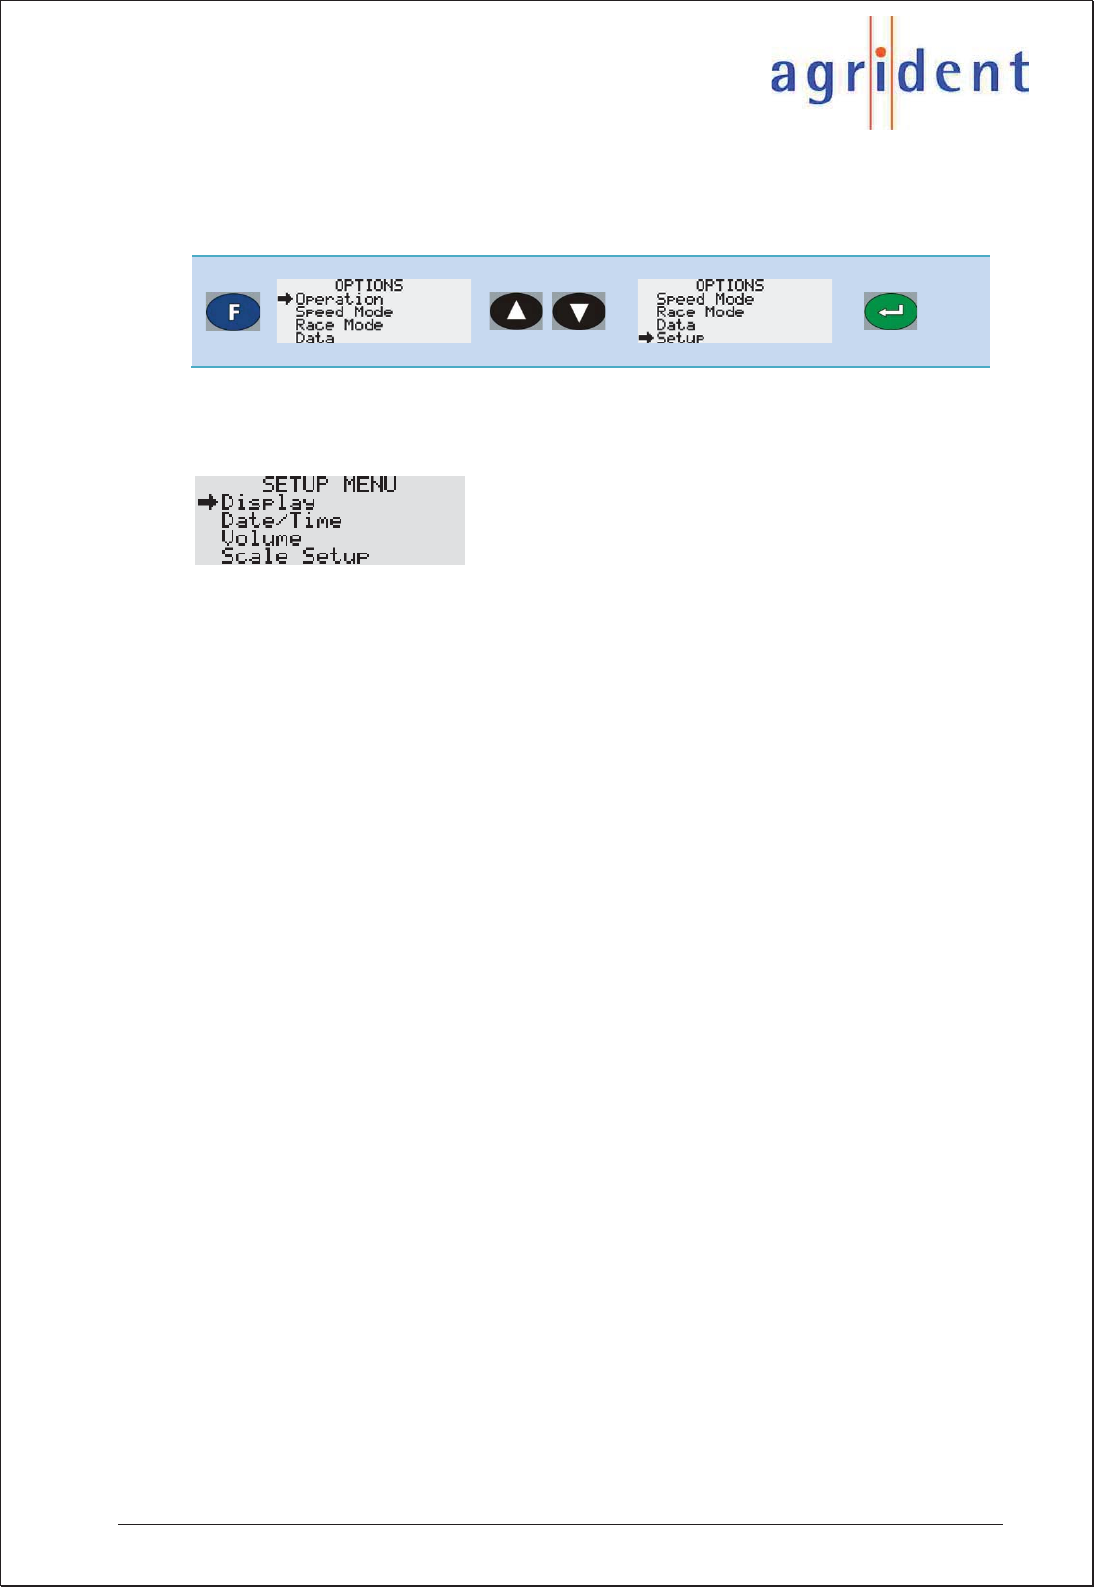
6. The APR500 main menu
Press the button in order to enter the APRs main menu. Scroll through the menu using
the / buttons. The main menu is divided into the categories Operation, Speed
Mode, Race Mode, Data, Setup and Bluetooth.
The Operation menu provides access to some of the advanced features as described in
chapter 5.
The Speed Mode menu enters the APR500 continuous reading mode.
The Race Mode menu item allows to use your Handheld as a data collector for an Agrident
Stationary Reader. This feature can only be used if you have an ASR connected to the
APR500 via RS232 or Bluetooth.
The Data menu gives you access to the stored data and lists.
In the Setup menu you can change the APRs settings concerning the hardware, display
and interface.
The Bluetooth menu contains all options related to the optional internal Bluetooth module.
In order to enter the submenus, press the button. You can now scroll through the
menu items of the next deeper menu level and access the settings you want to change.
Press to leave a submenu and to return to the next higher menu level.
For a complete overview of the menu structure and the factory default settings see chapter
6.7.
APR500 – Classic Mode
16.10.2014 Page 23 of 46
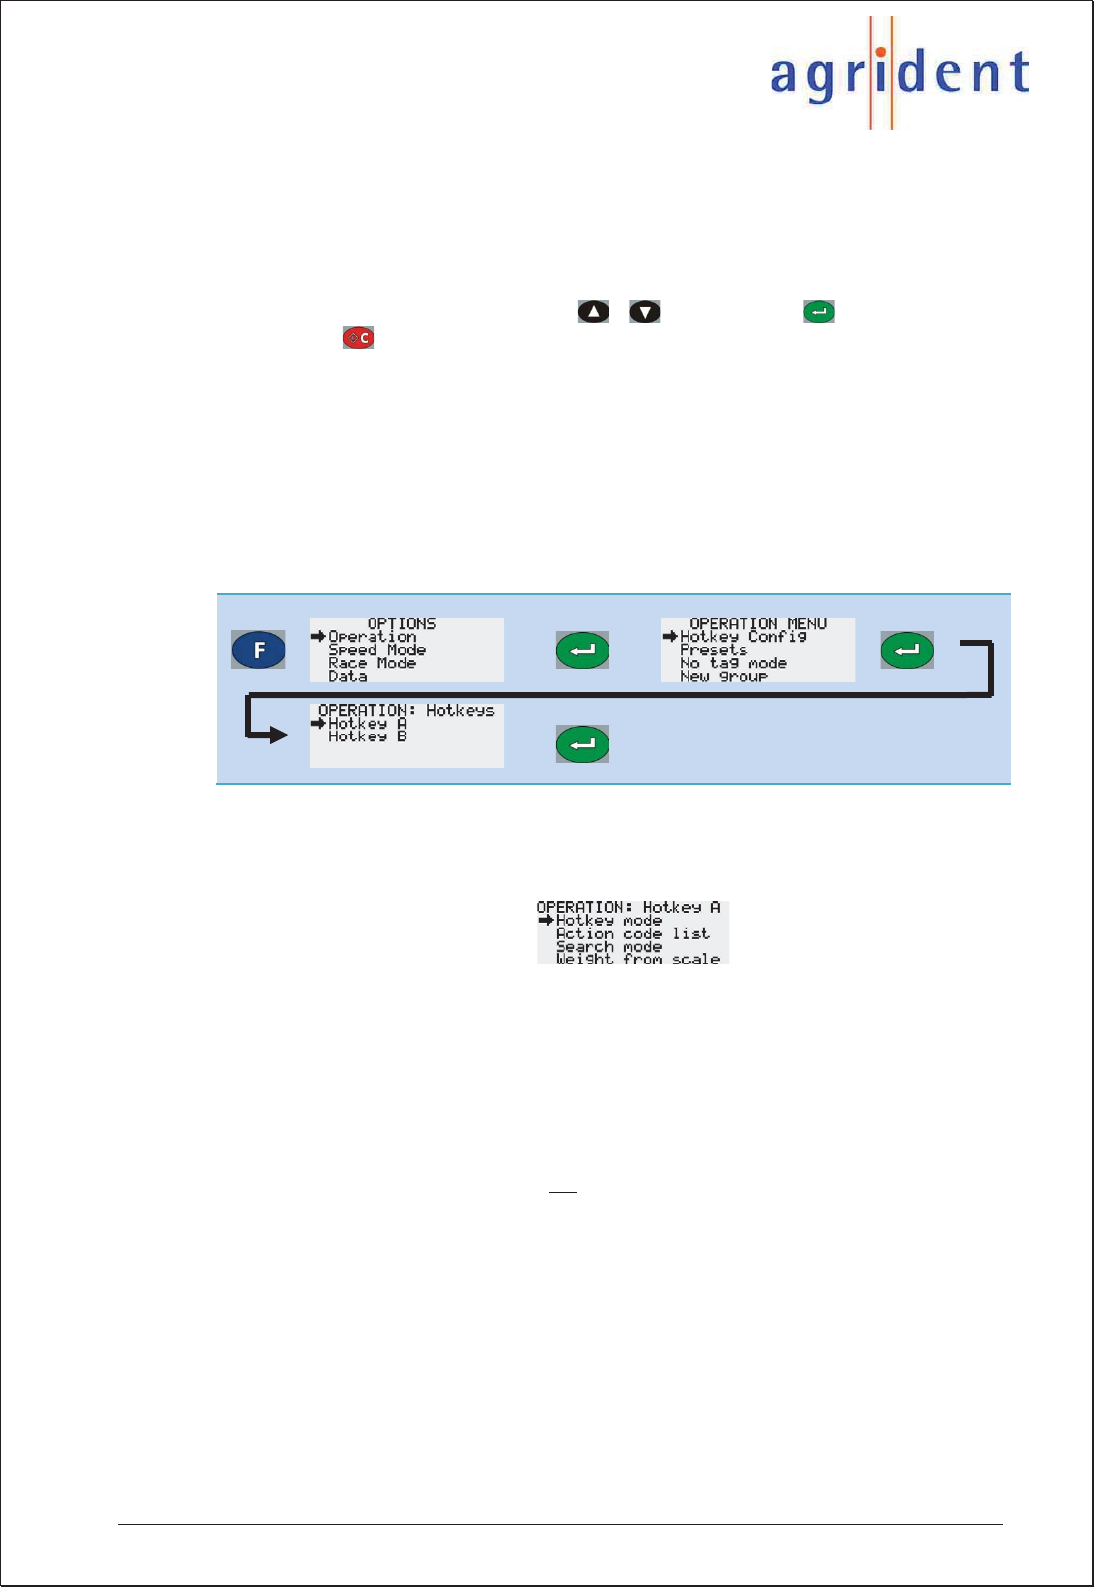
6.1 Operation menu
The Operation menu is mainly used for the configuration of the two Hotkeys. The Hotkeys
can be programmed for performing more complex operations than just reading the EID.
You can assign Aliases, Action Codes and weights from a scale to the EID after reading if
the Hotkeys are set up correspondingly.
Move through the operation menu with the / buttons. Press in order to enter a
submenu, press in order to leave a submenu and return to the operation menu.
6.1.1 Hotkey Configuration
This is the submenu wherein you can configure the Hotkeys A and B.
6.1.1.1 Hotkey A
This menu item is used to set up the functionality of Hotkey A.
xHotkey mode: The mode assigns the different operational options regarding Alias
or Action Code to the Hotkey.
oNo Action Code: No additional assignment, just the ID will be recorded. If
this operation mode is chosen, “Read” will be displayed in the main screen
above the according Hotkey.
oAssign ask: Aliases in the previously uploaded Tag List, which are not
already assigned can be linked to the scanned EIDs. You can also enter
the Alias manually using the APRs alphanumeric keys, if there is no
assignment in the Tag List or no Tag List has been uploaded. In the Assign
Ask mode the record is not saved in the data memory, just the assignment
between EID and Alias is saved in the Tag List. If the Assign ask mode is
selected, “Assign ?”will be displayed above the corresponding Hotkey in
the main screen.
oAssign ask save: The same like the Assign Ask mode but the IDs are
saved in the data memory as well. The information in the main screen for
the configured Hotkey is “Assign ? Save” in this case.

APR500 – Classic Mode
16.10.2014 Page 24 of 46
oAC ask: After reading a transponder, the APR will ask for an Action Code
that can be selected from a previously uploaded list. If no Action Code List
has been uploaded, you can only select an Action Code number. In the AC
Ask mode, the reader will always open the Action Code List and you have
to select an action manually using the / buttons for scrolling.
Confirm your choice with . The corresponding Hotkey configuration info
in the main screen is “AC ?”.
oAC ask plus: The same like AC Ask but additionally to the Action Code,
you have to enter a numeric value. If this mode is chosen, “AC ? +”will be
displayed in the main screen above the Hotkey.
oAC auto: The APR will always assign the Action Code that is selected in
the Action Code list menu automatically. If you want to change the Action
Code, you have to change it in the Action Code list submenu. “AC auto”
plus the first 10 characters of the selected Action Code will be displayed in
the main screen above the Hotkey in this operation mode.
oAC auto plus: The same like AC Auto but additionally to the Action Code,
you have to enter a numeric value. The info text above the Hotkey in the
APR500 main screen is “AC auto +”and the first 10 characters of the
selected Action Code in this case.
xAction Code list: For the AC Auto modes you have to select the intended Action
Code from this list. It will be linked to the ID automatically. For the AC Ask modes
you can set this value to “last used”. The result will be that the APR opens the list
of Action Codes with the last used Action Code at the top always. So if you want to
link the same action to multiple IDs in a row, you just need to confirm the Action
Code with enter and you do not need to scroll to the same action each and every
time.
xSearch mode: In combination with a Tag List, this option allows to find individual
animals in a larger group of animals. If the reader recognizes a valid assignment in
a previously uploaded Tag List, it will indicate that using a different acoustic signal
and a different LED signal. Select “On” in order to activate the Search mode, “Off”
in order to deactivate it.
xWeight from Scale: This mode enables the Handheld to import weighing data
from a scale. If activated, the corresponding Hotkey will first initiate an EID scan
and then request the weight from the scale. The weight will be displayed without
comma separation and saved to the Alias field of the data set. Weight from Scale
is incompatible to any Assign Ask mode, i.e. a Hotkey cannot be configured for
Assign Ask mode and Weight from Scale at the same time. If Weight from Scale is
activated, “Scale” will be displayed in addition to any selected AC mode in the main
screen above the according Hotkey. Please note that the APR500 has to be
connected to the scale via RS232 or Bluetooth – otherwise the Handheld will not
be able to receive the weight!
APR500 – Classic Mode
16.10.2014 Page 25 of 46
6.1.1.2 Hotkey B
The Hotkey B menu works according to Hotkey A but the settings apply to Hotkey B.
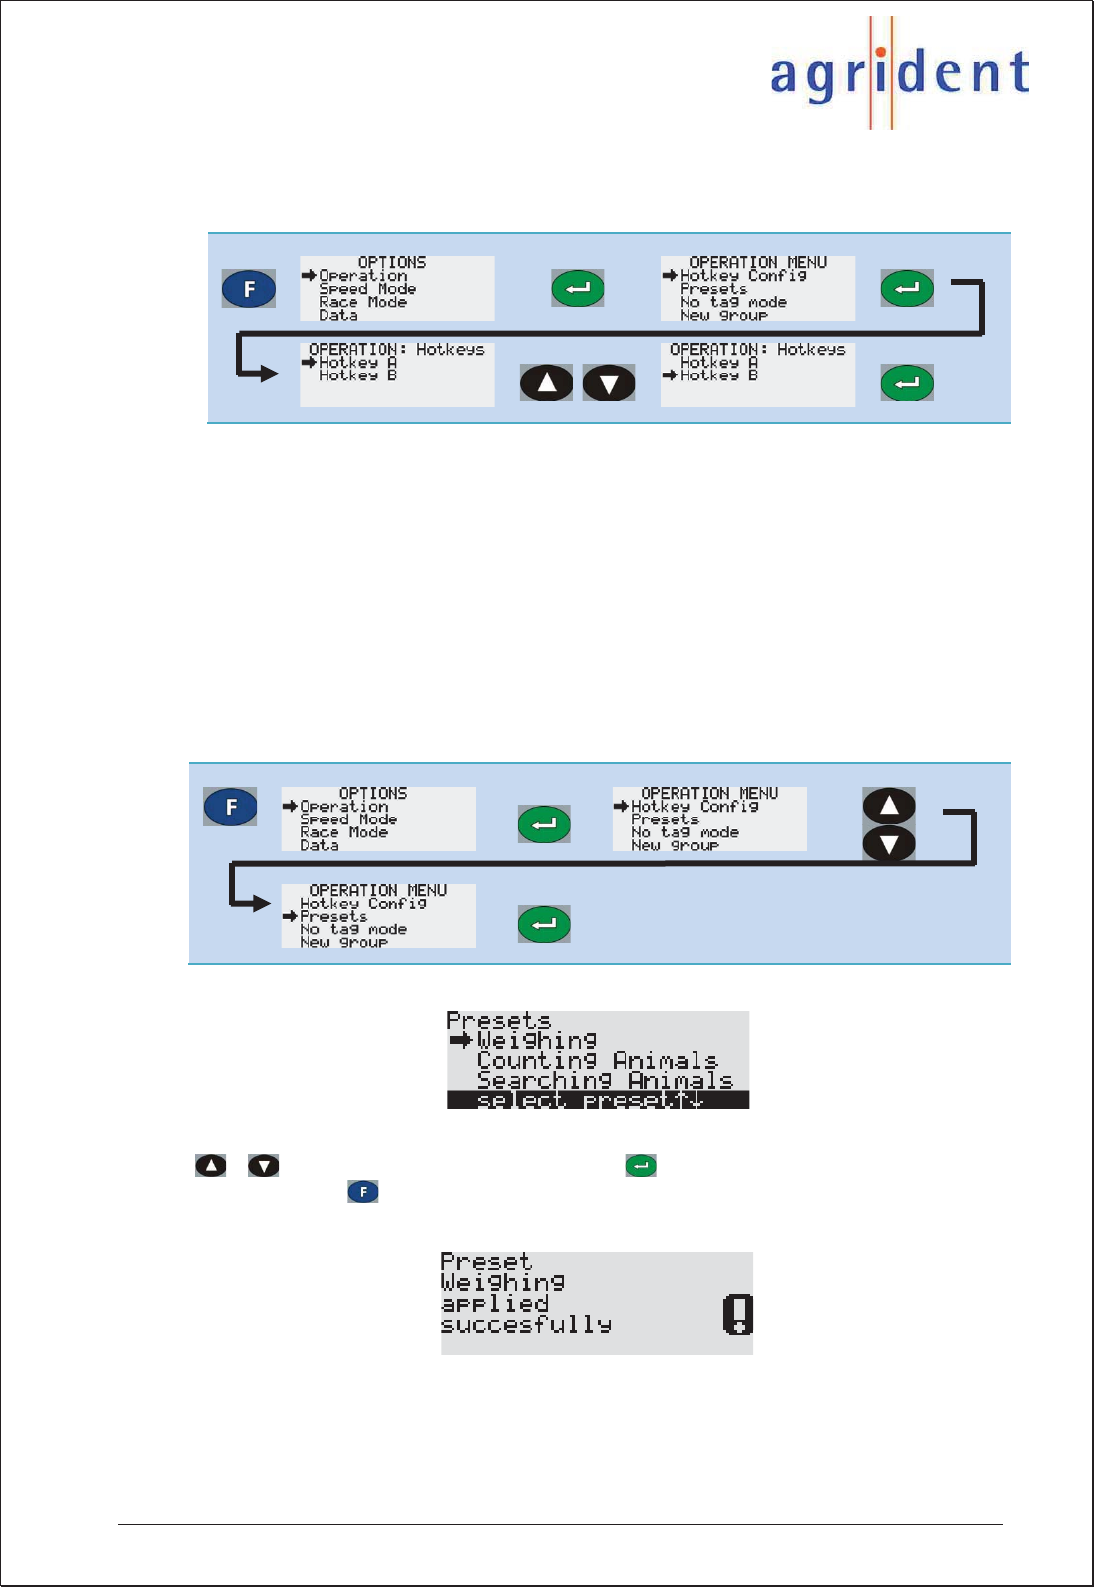
6.1.2 Presets
Presets offer the possibility to change multiple settings in one step according to previously
defined setups. These presets should be defined by the corresponding distributor
depending on the needs of his customers. They also offer a kind of fallback plan in case of
unintended change of single settings.
Up to 10 different custom defined presets can be defined in APR500 at the same time.
These are assembled and uploaded with the APR PC-Demo Software.
Once uploaded, you may select the desired Preset and the APR500 will be configured
accordingly.
The above list shows an example of possible Presets. Select the desired Preset using the
/ buttons and confirm your choice with . The APR will ask for a confirmation -
please press the button in order to continue. Now the reader should display:
APR500 – Classic Mode
16.10.2014 Page 26 of 46
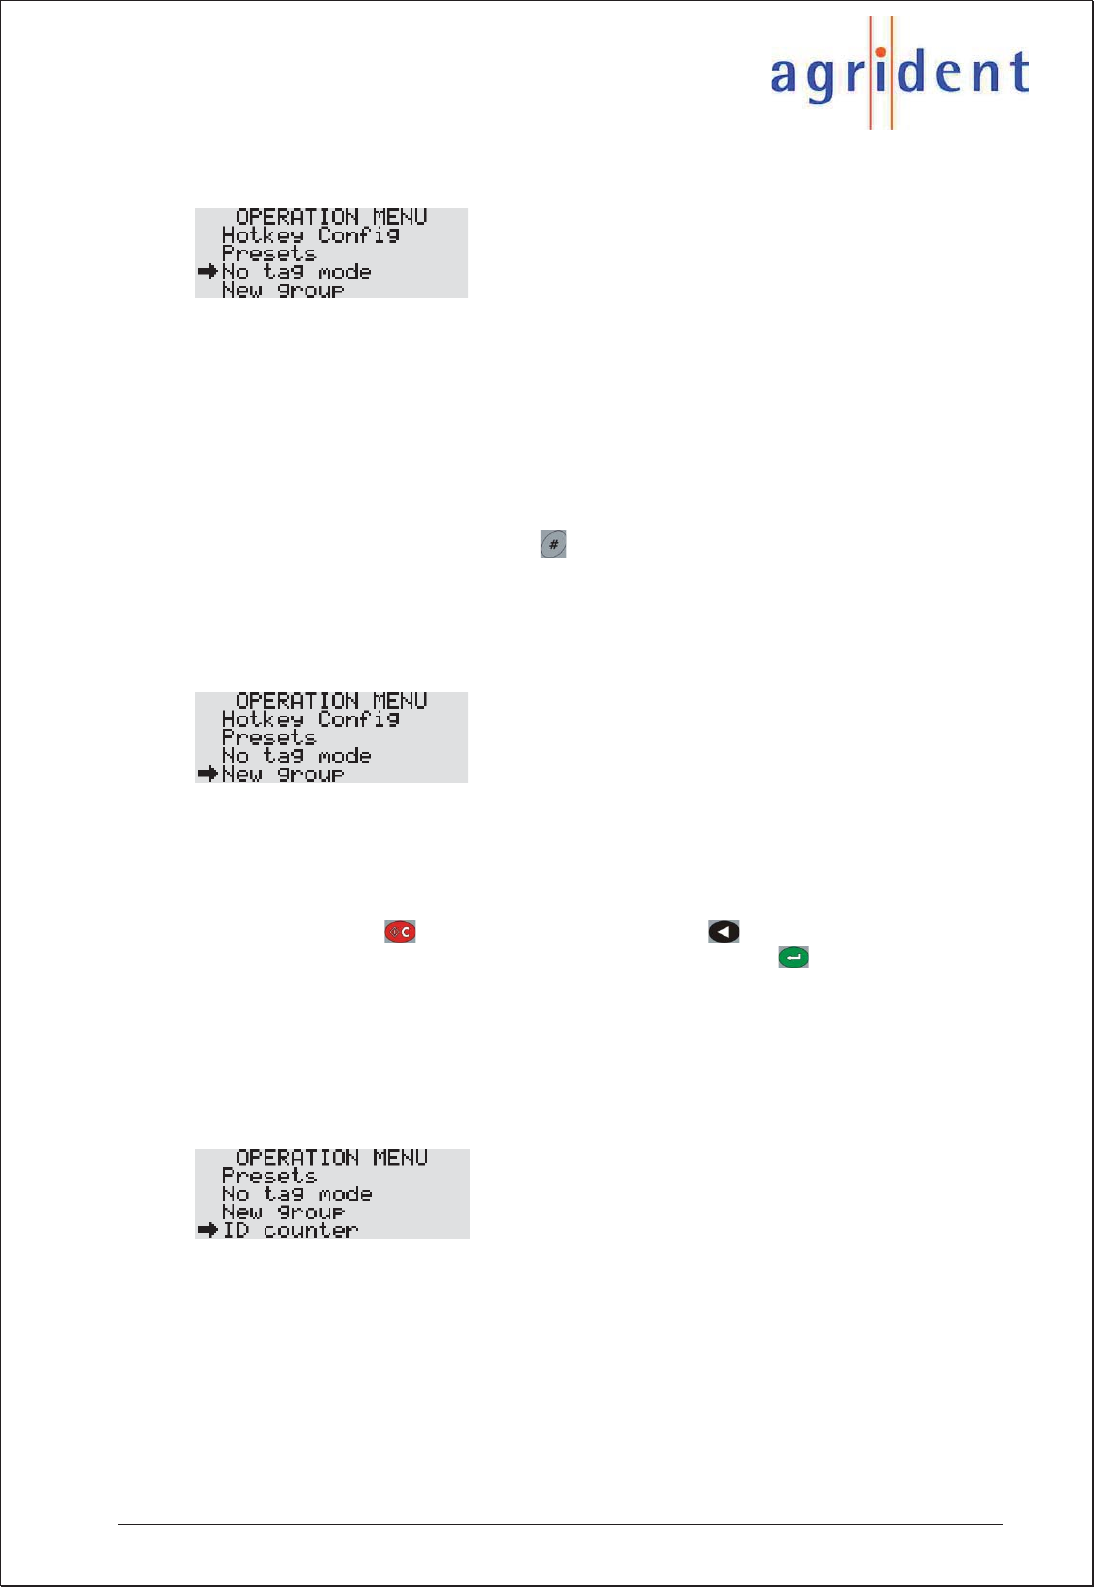
6.1.3 No Tag Mode menu
If the No Tag mode is activated, it is possible to enter data manually if a reading attempt
failed, e.g. in case of a lost or broken transponder or a transponder being out of reading
range. The No Tag mode has the following options:
xOff: The “Off” setting does not allow any data input after a failed reading attempt.
xAuto: The APR asks immediately for data input via keypad after a failed read
attempt.
xKey input: You have to press in order to enter data manually after the reading
failed.
6.1.4 New Group
Here you can enter a new group separator in order to distinguish between different groups
of collected IDs which can represent different locations, sellers, buyers etc.
Per default the groups are named Group 1, Group 2, Group 3 etc., but you can enter any
alphanumeric string of up to 14 characters via the keypad. Delete the entire default string
at once by pressing or character by character with . Type the desired separator
string. Confirm the name and set the group separator by pressing .
Group Separators are also available in the Speed Mode and Race Mode, but have to be
set by the New Group options in their corresponding submenus.
6.1.5 ID counter menu
If the ID Counter is activated, it counts the amount of read IDs since the last reset of the
counter. In this case no ID is saved in the memory twice or more often. If a transponder is
read more than once, the APR will display “Double Read” and won’t save the ID again.
If you choose “Counter reset” in this submenu, the counter is reset to zero.
APR500 – Classic Mode
16.10.2014 Page 27 of 46
6.2 Speed Mode menu
xStart Speed Mode: The Speed Mode will be started and the Speed Mode
window will be displayed automatically. You can return to the Speed Mode menu
by pressing the button.
xNew Group: Inserts a new group separator into the current Speed Mode session.
You can either confirm the default name by pressing or enter your own name
via the APRs keypad and confirm. By pressing the button twice, you cancel
the group entry and skip back to the Speed Mode.
xAction Code: With this menu item you can select an Action Code from a
previously uploaded list. This Action Code is linked to all scanned EIDs
automatically. It works like the Action Code Auto feature of the Hotkeys.
xAction Code Plus: Here you can enter a fixed numeric value that is added to the
chosen Action Code. It is also linked to all scanned IDs automatically.
xReading Speed: The reading speed defines the break time between each
‘reading burst’ of 300 milliseconds. The break time can be varied between 0ms
(value 10) and 500ms (value 0). The shorter the break time, the more reading
attempts are made per second. The longer the break time, the lower the energy
consumption and thus the operating time.
xReading Timeout: This setting defines timeout for continuous reading. Every
time you read a transponder successfully, the countdown will be reset. You can
choose a value between 1 minute and 90 minutes from a non-linear list.
If you want to exit the Speed Mode, press and follow the instructions.
For more detailed information regarding the Speed Mode, please read the separate Speed
Mode manual.
6.3 Race Mode menu
As already mentioned in this manual you require an Agrident Stationary Reader for using
this feature. Please read the separate Race Mode Manual for further details.
APR500 – Classic Mode
16.10.2014 Page 28 of 46
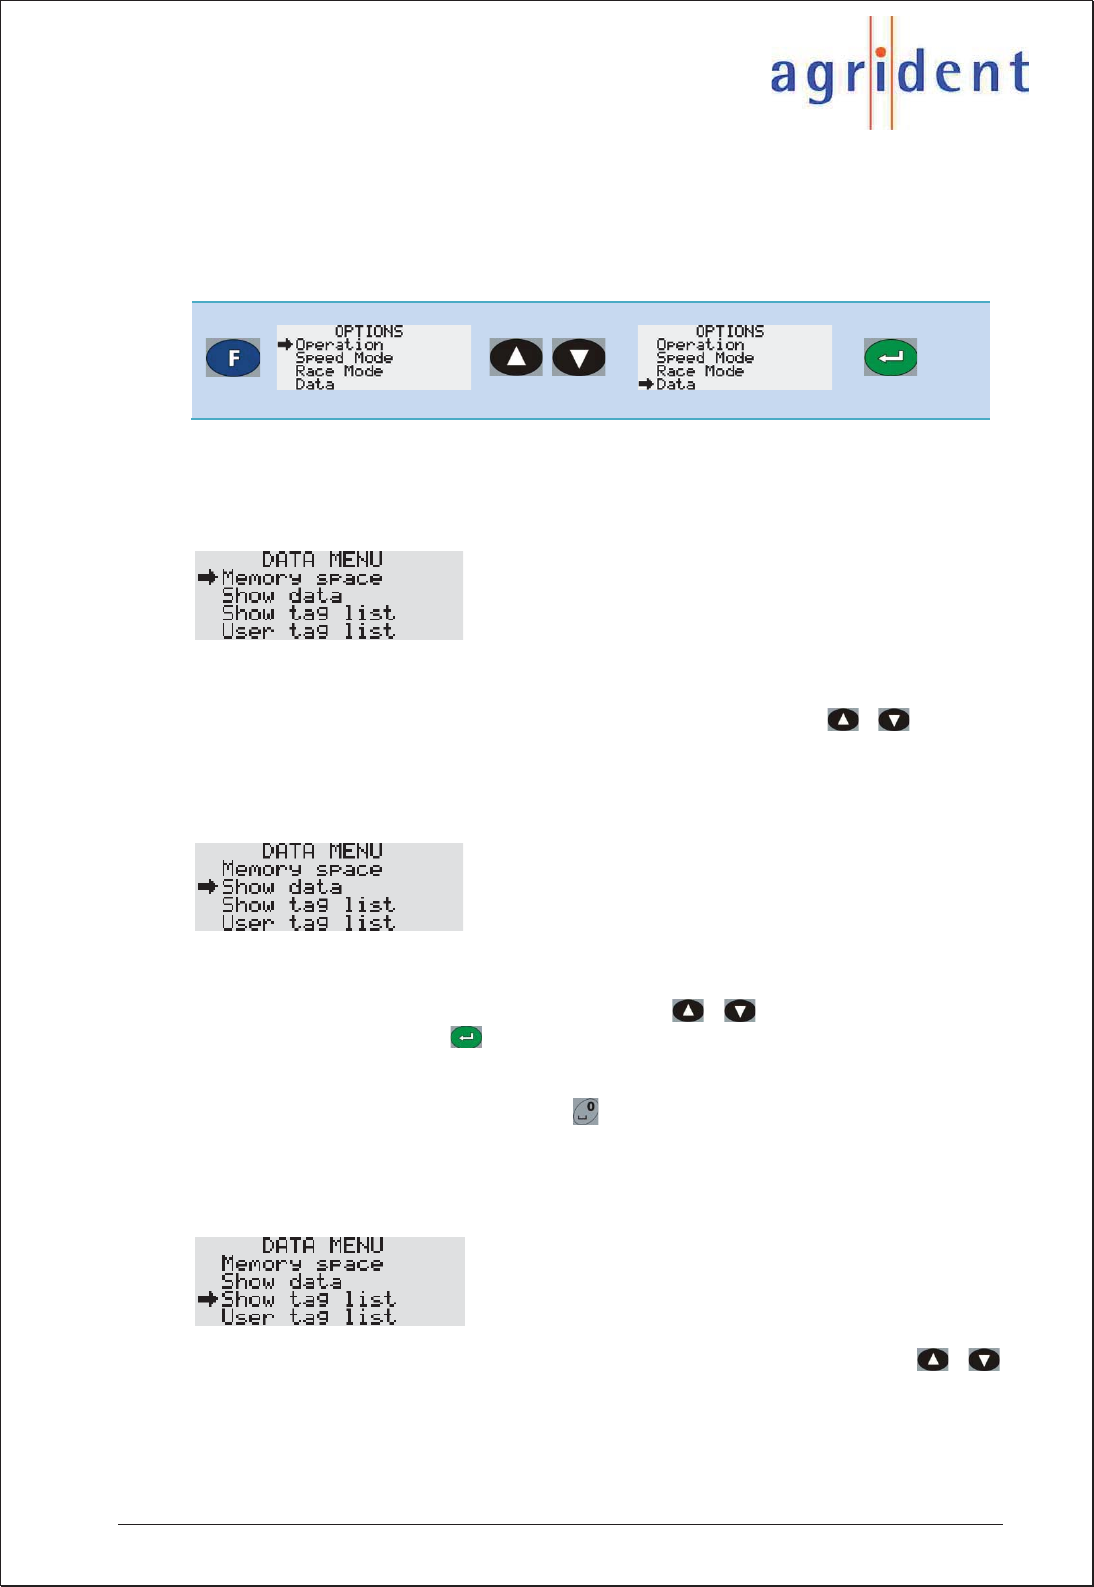
6.4 Data menu
The Data menu gives you access to the stored data and lists. You can watch the collected
data and the Tag List, clear single lists or the complete memory, send the memory content
directly to another device via the serial port and look for the remaining memory capacity.
6.4.1 Memory space menu
The Memory space menu shows the current amount of used memory and still available
memory in the different categories: Data, Action Codes and Tag Lists. Enter the menu item
Memory space and scroll through the different memory areas using the / buttons.
6.4.2 Show data menu
This submenu allows you to review the collected data in the data memory. If you enter the
Show data menu you will see a list of data sets. These entries contain the dataset number
and the EID. You can scroll through the list using the / buttons. When you choose
a particular dataset with the button, you can watch the dataset details. You can move
through the entire content of the dataset step by step. Beside the ID you can have a look at
the Alias, Action Code, Action Code Plus, timestamp and transponder type. You may also
delete the latest dataset here pressing the button.
6.4.3 Show tag list menu
In the Show tag list menu you can scroll through the uploaded Tag List using the /
buttons.
APR500 – Classic Mode
16.10.2014 Page 29 of 46
When you select an entry via the button you can see the number within the list, the
Alias, the assigned EID (unassigned Alias will display 000000000000000) and whether the
assignment of Alias and EID was made prior to the Tag List upload (‘PC assigned’),
assigned via the Hotkeys (‘User assigned’) or if it is still unassigned.
You can exit the information window for the Show tag list menu by pressing any button,
except the Hotkeys which would activate the configured Hotkey function.
6.4.4 User tag list menu
The User tag list menu shows all Tag List entries that have been user assigned with the
APR in the Assign Ask or the Assign Ask Save mode. That means the assignments were
not made on the PC previously. They could either have been typed in via the APRs
alphanumeric keypad or the assignment could have been made linking previously
uploaded “Null Tags” with the APR. For instructions how to create Tag Lists which contain
“Null Tags”, please see the APR PC-Demo Software manual or the manual of your
management software.
You can erase an assignment of an Alias to an EID by pressing the button. The EID is
discarded and the Alias will become a “Null Tag” in the Tag List.
When no assignments have been made with the APR yet, “no assign list” will be displayed.
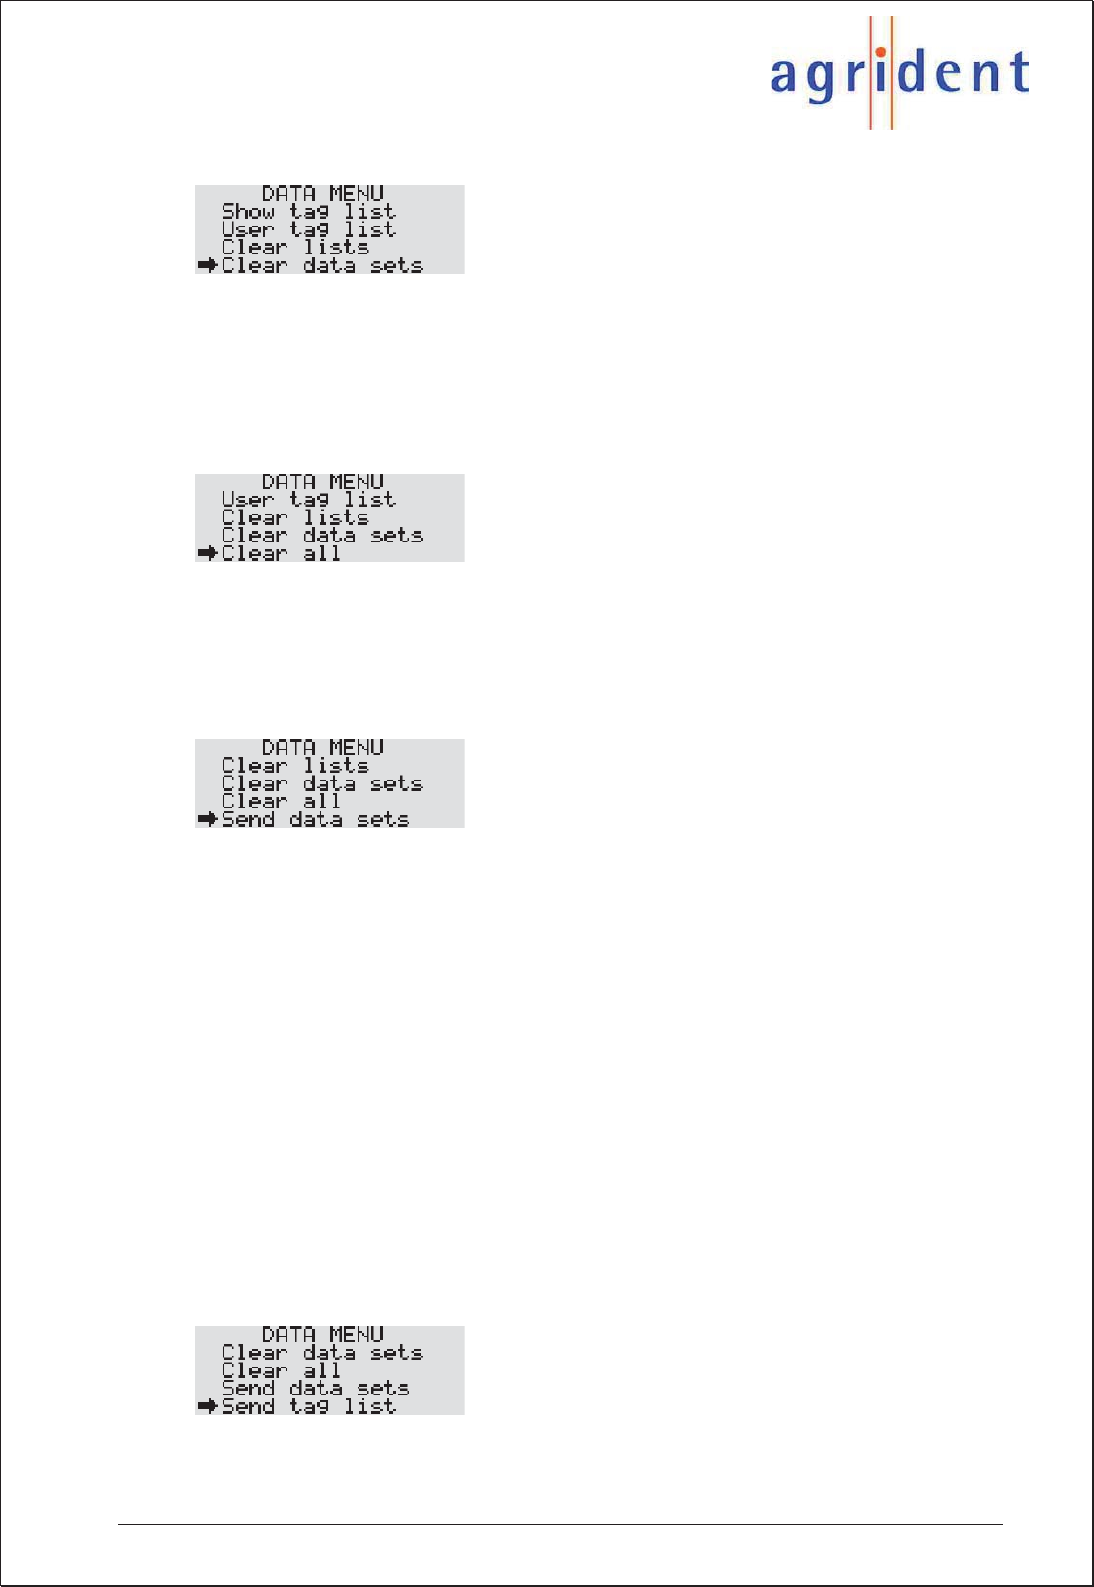
6.4.5 Clear lists menu
This menu item deletes the Tag List and the Action Codes List.
APR500 – Classic Mode
16.10.2014 Page 30 of 46
6.4.6 Clear data sets menu
The Clear data sets menu deletes the complete content of the data memory; this means all
collected transponder data.
6.4.7 Clear all menu
This item deletes all lists and collected data in the APRs memory.
6.4.8 Send data sets menu
The Send data sets menu instructs the APR to send the complete content of the data
memory, the collected IDs, to an interface. Therefore the reader has to be connected to the
desired target device and the correct comport has to be opened on that device. Such a
device might be a computer and the software for receiving the datasets could be any
customized software or a terminal program like Windows HyperTerminal.
If several different interfaces are available you have to select one before the datasets are
being sent. It is possible to send the data via RS232 (always available), via USB (only
available if the APR500 is connected via USB) or via Bluetooth (only available if there is an
active Bluetooth connection).
The format which is selected in the Online mode menu is also used for the data
transmission in the Send data sets function. If the Online mode is configured to “OFF”, the
datasets will be sent using the “Data long” format. Please see also chapter 6.5.8.3 “Online
mode menu” for the available formats.
6.4.9 Send tag list menu
This function is similar to “Send data sets” but instead of the collected data the Tag List is
sent to the selected interface.
APR500 – Classic Mode
16.10.2014 Page 31 of 46
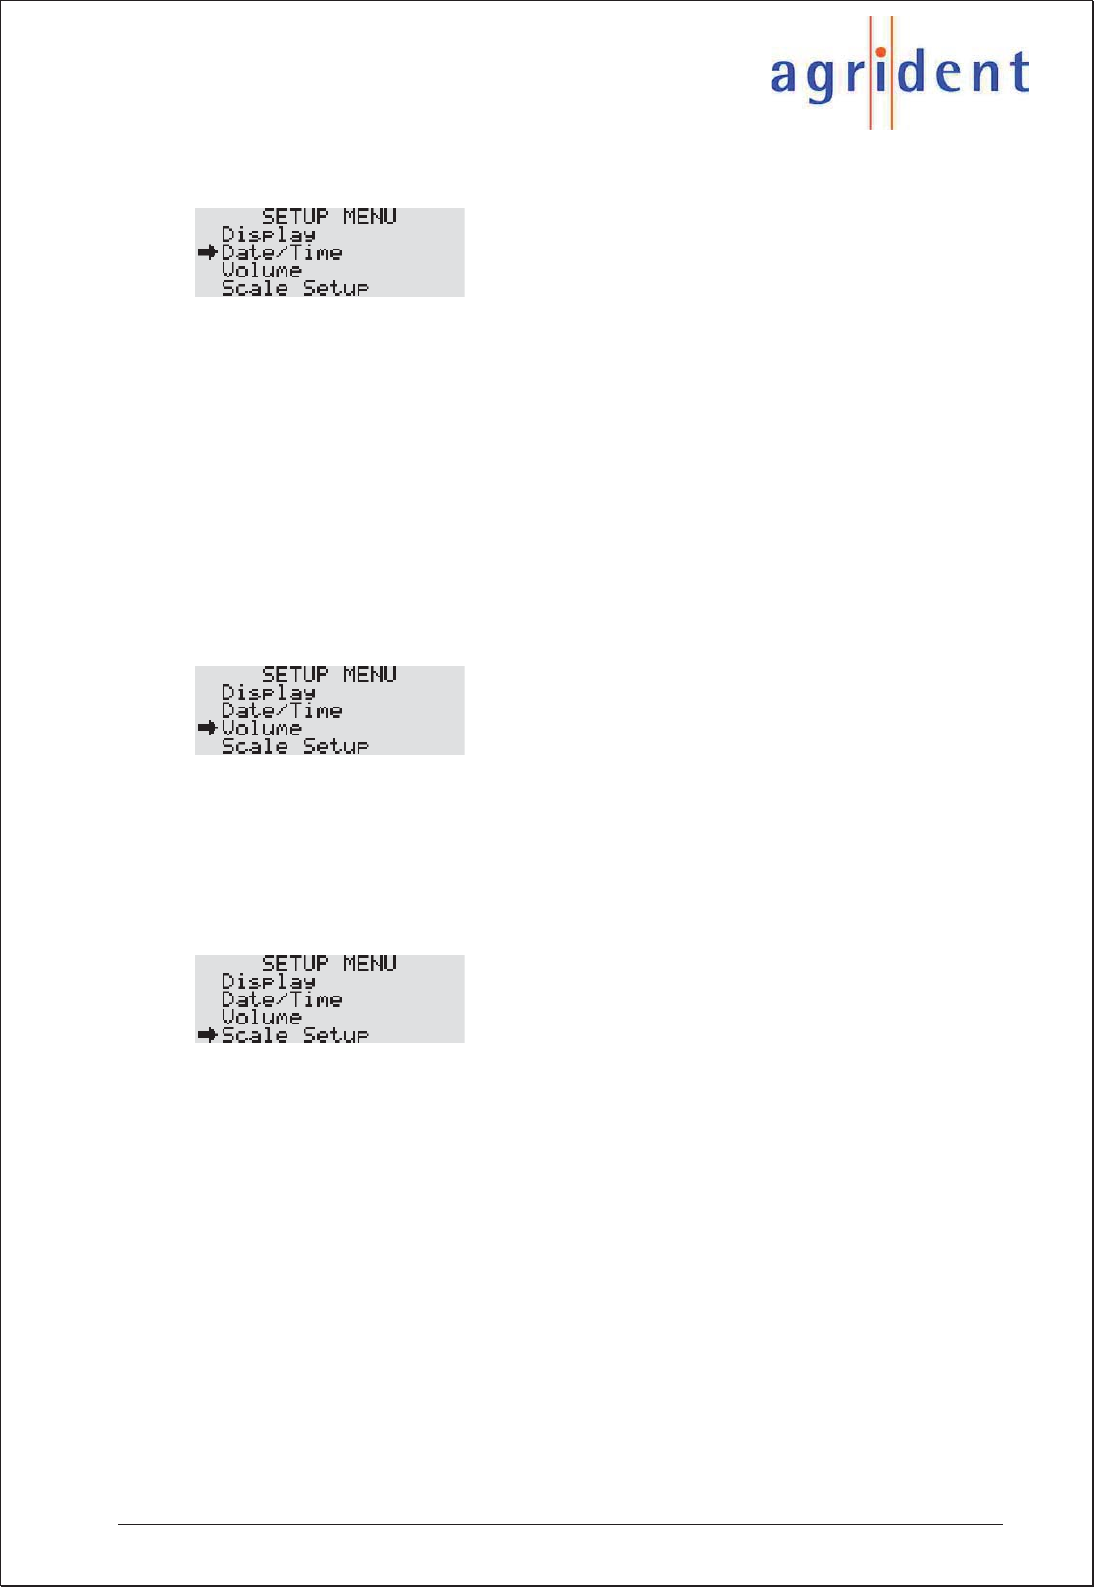
6.5 Setup Menu
The Setup menu basically contains all settings concerning hardware. Here you will find
configuration options for interface, display, time and date and the RFID module.
6.5.1 Display menu
In this submenu various display settings can be adjusted.
xLanguage: This menu shows which character set (Latin, Greek, Cyrillic) is active.
You can also see which language file is uploaded into the APR and reset the
language to English here.
xSwitch off time: In order to save battery capacity, the APR is switching off after
a certain time, if no action has taken place. The Switch off time can be configured
between 5 and 250 seconds.
xIllumination: In this submenu you can select different settings for the display
backlight.
oBacklight off Time: In order to save battery capacity, the APR will
switch off its display backlight after a certain time, if no button on the
keyboard is pushed. The Backlight off Time can be configured between 2
and 20 seconds.
oExt. power options: With this option enabled the display will be
illuminated when the APR is powered externally. Please be aware that
this will increase the time for battery charging.
xContrast: Select between five different display contrast levels.
APR500 – Classic Mode
16.10.2014 Page 32 of 46
6.5.2 Date/Time menu
In this submenu you can change time, time format, date and date format. This affects the
time and date on the display and the timestamp that is added to the EID.
xSet date and time: Change the date and the time value via the numeric keys.
xSet time format: Decide whether you want an AM/PM or a 24 hour format.
xSet date format: Selects between European (dd.mm.yy) or US (mm.dd.yy) date
standard.
6.5.3 Volume menu
The APR emits acoustical signals. In this submenu you can change the volume of these
signals within a range from 0 to 15.
6.5.4 Scale Setup
If you want to use the Weight from Scale feature (see chapter 5.3) you need to configure
the APR500 to the corresponding scale type and interface.
xScale Type: Here you can choose the scale type that you want to connect to for
weighing data import. Three scales are supported at the moment Iconix FX15,
TruTest XR3000 and TELL.
xInterface: Choose the intended interface for the data transfer, RS232 or
Bluetooth.
xBaud Rate: Depending on the interface parameters of the scale, select the same
baud rate. Values from 300 to 115200 bits/second are available.
xRS232 format: Some of the earlier Iconix FX15 scales expect different RS232
properties. For theses scales choose E, 7, 1, all other scales use the N, 8, 1.
APR500 – Classic Mode
16.10.2014 Page 33 of 46
6.5.5 Battery info menu
The Battery info menu displays the status of the APRs battery. You can see the batteries
voltage, the charge current (only while charging) and the batteries temperature. You can
also see the batteries charge status: fast charge, trickle charge or no charge.
All batteries are called “disposable”, except Agrident supplied NiMH batteries. Only these
can be charged internally (see chapter 4.6).
6.5.6 Software version menu
In the Software version menu you can find information about the APR500 Firmware
version, its serial number, boot loader version, the hardware revision and the version
information for the internal RFID and BT modules. Scroll from one information to the next
using the / buttons.
6.5.7 Factory Default menu
Here you can reset the APR to its factory default configuration (see chapter 6.7). Confirm
the reset with or cancel with .
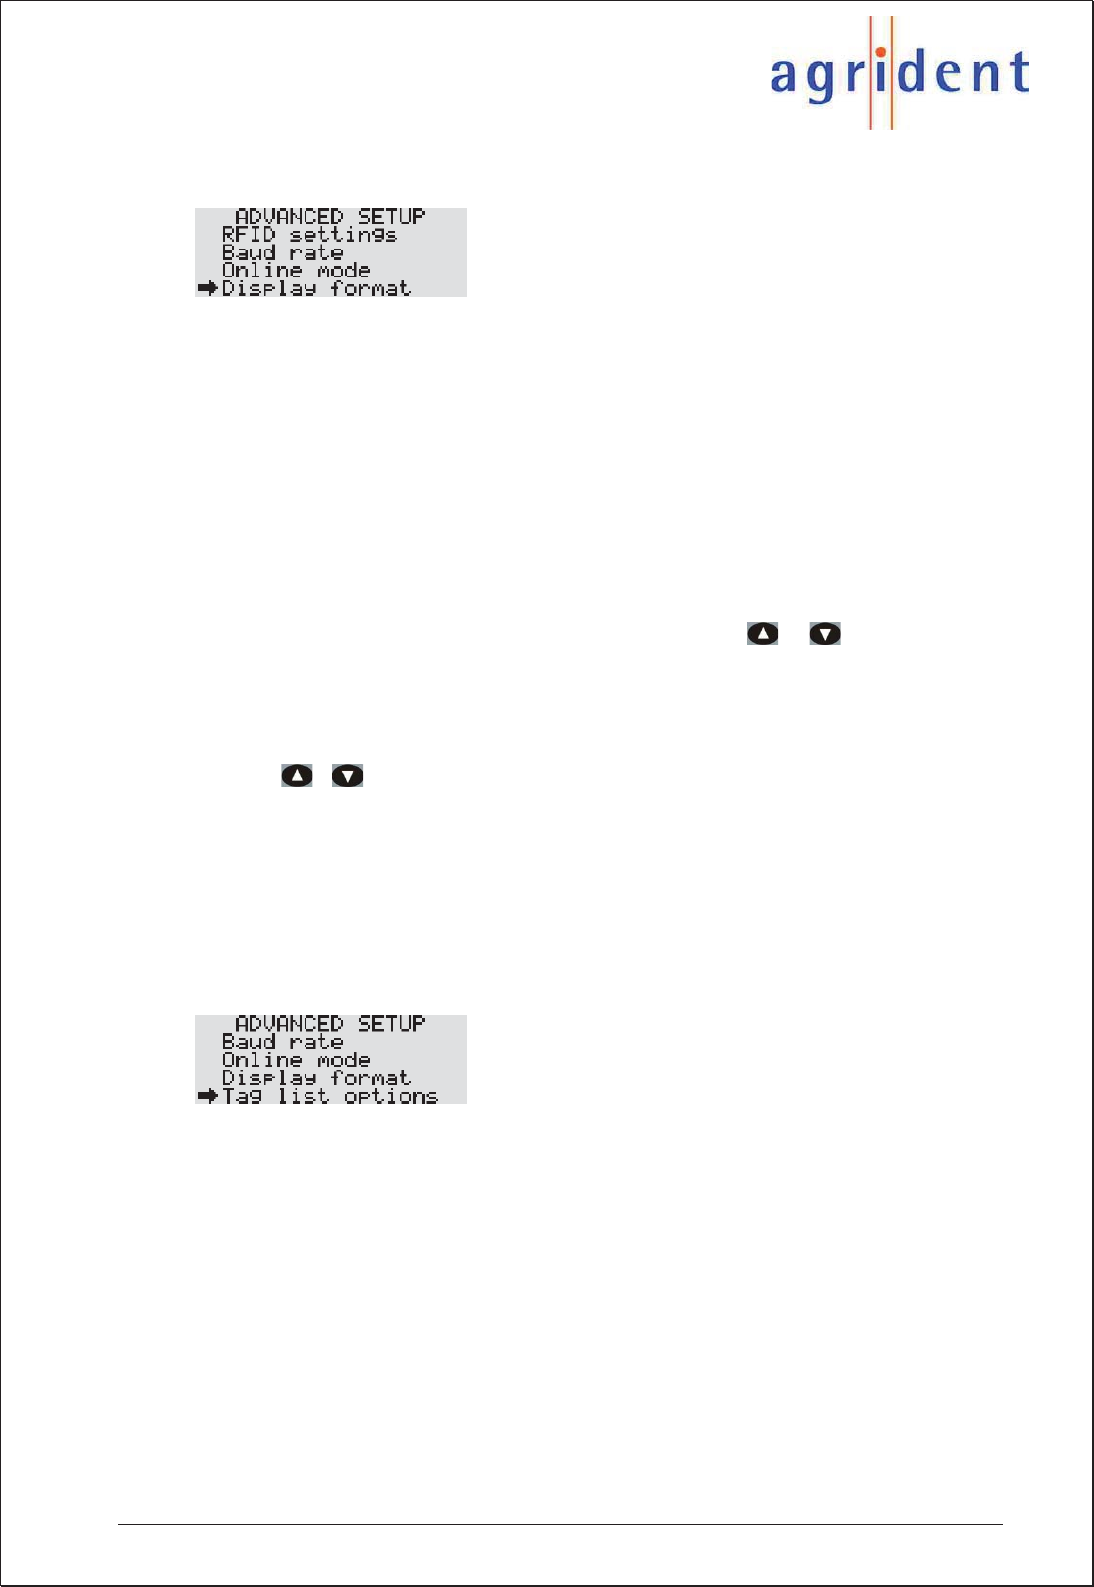
6.5.8 Advanced Setup Menu
The following submenus concern advanced reader settings.
Please do not change any of those settings without deeper knowledge
of their meaning. They refer to RFID module settings, the data format
and/or data transfer settings.

APR500 – Classic Mode
16.10.2014 Page 34 of 46
6.5.8.1 RFID settings
In the RFID submenu you can adjust all functions for reading a transponder.
xRead length: The read length determines the time for one reading attempt in
seconds. The values range from 1 to 10 seconds.
xTransponder types: With the transponder type setting, you can choose which
type of transponders the APR can read. If you enable H4002 only, no ISO tags
can be read. H4002 is a non ISO format and is incompatible with Wireless
Sync.
xWireless Sync: It activates or deactivates the wireless synchronization
concerning ISO11785 and thus improves the reading performance in an
environment with other activated ISO 11785 readers. H4002 is a non ISO
format and is incompatible with Wireless Sync.
xSync level: The synchronization level determines the level for the detection of
other readers in the environment. This level can be adjusted because the
correct operation of wireless synchronization depends on the noise level in the
environment – so the reader needs a threshold.
We recommend not to change that setting without previous
contact to Agrident in order to prevent reading problems.
xDouble read: With the Double Read function you define, that the same
transponder cannot be saved twice or more within a certain time. You can
select values between OFF (disabled), 15, 30, 45 and 60 seconds.
6.5.8.2 Baud Rate menu
The menu item Baud rate defines the communication speed of the RS232 interface. The
setting can be selected from a list of standardized rates between 9600 and 115200
bits/second. Please pay attention that the baud rate of the APR has to have the same
speed as the communication partner device in order to allow a successful communication.

APR500 – Classic Mode
16.10.2014 Page 35 of 46
6.5.8.3 Online Mode menu
The Online mode allows sending an ID to other devices (e.g. a PC, PDA, scale) over the
serial port immediately after it was saved. A PC or PDA requires corresponding software
which is able to collect incoming data on the serial port. The “Online window” of the APR
PC-Demo Software can be used for testing purposes.
There are several formats available, the ID can be sent in:
xOff: The APR will not send the ID after reading a transponder.
xSCP format: Only the last 10 digits of the ID will be sent.
xData long: The Data long-mode transmits the complete dataset including time,
date, Alias, Action Code and Action Code Plus value.
xData short: The 3-digit Country Code and the 12-digit ID will be transmitted.
xISO 24631: The data are sent according to the ISO 24631 format. If the ISO
24631 format is selected, the online mode menu will get an additional item “ISO
24631 options”. Here you can define the start character of the format and
whether the timestamp shall be included or not.
For detailed descriptions of the formats see Annex A: “Online mode output formats”.
If you want to send the EID to EID-ready scales you have to select the correct
Online format. Most scales accept the “Data short” format. Please also ensure
that you scale is configured correctly for receiving the EID via Bluetooth or
RS232. The manual of your scale should contain further details.
APR500 – Classic Mode
16.10.2014 Page 36 of 46
6.5.8.4 Display format menu
In this submenu you can choose how the EID is displayed and saved.
xID Format: Here you can determine how the transponder ID is displayed, either
in ISO-mode, which decodes the EID according to ISO 11784 or in HEX-mode
where the ID is displayed as a hexadecimal string.
xCountry Code: Decides whether the country code will be displayed numeric or
alphanumeric according to ISO3166. A manufacturer’s code will always be
displayed numeric.
xAnimal Tag Flag: If this option is enabled, “NO ANIMAL TAG” will be displayed
in case of reading a transponder, which is not intended to be used for animals
(Animal Bit =0). The EID will be saved nevertheless. You can watch the ID
scrolling through the display after reading using / . If the option is
disabled, the animal flag of the transponder will not be taken into account for
displaying the ID.
xISO Mode: If set to “advanced”, you can watch additional information Species
code and Retagging code after reading, if you scroll through the display with the
/ buttons. If the ISO mode option is set to standard, this is not possible.
xAction Code format: The Action Code format-setting decides whether to display
Action Codes numeric or alphanumeric. Alphanumeric does only work, if a list of
alphanumeric Action Codes has been uploaded to the APR.
6.5.8.5 Tag list options menu
This menu item contains options that influence the notification of Aliases.
xDisplay Alias: If this option set to “Show Alias”, the APR will show the Alias, if
one is assigned, in the upper line of the display in a larger font size, instead of the
EID. When this option is set to “Show Tag ID” the electronic ID will always be
shown and not the Alias – independently of a possible assignment.
xIgnore advanced ISO: This option decides about how the APR should proceed
when searching for assigned Aliases in the Tag List. “On” means, the reader will
only compare the 15-digit ISO number of the read transponder and the IDs in the
Tag List. Additional bits like retagging counter will be ignored. When set to “Off”
the APR will only recognize a valid assignment, if the complete content of the
transponder is identical – including the advanced ISO information.

APR500 – Classic Mode
16.10.2014 Page 37 of 46
6.5.8.6 AC Plus Format menu
In the AC Plus Format menu you can enable the extended format (16 bit) for the Action Code
Plus which allows using values of up to 65535. If it is turned off (8 bit), the dataset will be
compatible to the APR300 and the APR400 with Action Code Plus values of up to 255 only.
6.6 Bluetooth Menu
The Bluetooth menu contains all options concerning the internal Bluetooth module of the
APR500.
xBluetooth Mode: This option configures the Bluetooth operation mode.
oBluetooth disabled: BT module is switched off.
oSlave Mode: Another BT device that is able to be a BT master can
detect the APR500 and initiate a BT connection. If the Handheld is
turned off, the connection is lost - even if the Handheld is turned on
again. The BT master has to reinitialize the connection.
oMaster Mode: With the Master Mode enabled the APR500 can
connect to other BT devices. If either the APR or its communication
partner is turned off and on again the APR500 will try to re-establish
the connection automatically.
xExt. Power Options: If this option is turned on, the BT module is still enabled
even, if the APR is powered externally (e.g. through the APC500 USB cable). Be
aware that this will increase the battery charging time.
xStart BT Inquiry: Starts scanning for other BT devices. The discovered devices
can be selected as the remote device for the APR500 – this is called “Pairing”. In
Master Mode the APR500 will established the connection to the remote device
automatically.
xBT Device History: Shows a list of all former remote devices and allows to set a
particular device as new remote device. This saves you new inquiries if you
switch between several remote devices very often.
xBaud Rate: Selects the BT Baud rate (9600 up to 115200 bits/second)
xSet Pass Key: Sets a Bluetooth Pass Key in case the remote device requires
one. The APR500 does not require a Pass Key
For any further information regarding the APR500 Bluetooth options please read the
separate APR500 – Bluetooth Manual.

APR500 – Classic Mode
16.10.2014 Page 38 of 46
6.7 Menu Structure and Factory Defaults
For a detailed description of the menus, see the corresponding chapters 6.1 - 6.6.
Operation
Hotkey Configuration
Hotkey A Factory Default
Hotkey mode No Action Code
Action Code list 0
Search mode Off
Weight from Scale Off
Hotkey B Like Hotkey A Like Hotkey A
Presets
No Tag mode Off
New Group
ID Counter Off
Speed Mode
Start Speed Mode
New Group
Action Code No Action Code
Action Code Plus
Reading Speed 5
Reading Timeout 1 minutes
Race Mode
Start Race Mode
New Group
Action Code No Action Code
Action Code Plus
Data
Memory Space
Show Data
Show Tag List
User Tag List
Clear Lists
Clear Data Sets
Clear All
Send Data Sets
Send Tag Lists
Setup
Display
Language English*
Switch off Time 10 seconds
Illumination
Backlight off Time 3 seconds
Ext. Power Options Off while charging
Contrast 4
Date/Time
Set Date and Time
Set Time Format 0-24
Set Date Format EUR (dd.mm.yy)
Volume 7
Scale Setup
Scale Type Tell
Interface RS232
Baud Rate 9600
RS232 format N,8,1
Battery Info
Software Version
Factory Default

APR500 – Classic Mode
16.10.2014 Page 39 of 46
Factory Default
Advanced Setup
RFID Settings
Read Length 7 seconds
Transponder Types FDX+HDX
Wireless Sync Off
Sync Level 1600 mV
Double Read No double check
Baud Rate 9600
Online Mode Data short
Display format
ID Format ISO
Country Code Show numeric
Animal Tag Flag Warn if not set
ISO Mode Standard
Action Code Format Show alphanumeric
Taglist Options
Display Alias Show Alias
Ignore adv. ISO On
AC Plus Format Off (AC+=8Bit)
Bluetooth
Bluetooth Mode Bluetooth disabled
Ext. Power Options Off while charging
Start BT Inquiry
BT Device History
Baud Rate 115200
Set Pass Key 1234 *
* … These settings are not affected by a reset to factory defaults.

APR500 – Classic Mode
16.10.2014 Page 40 of 46
7. Technical Data
Frequency 134.2 kHz
Transponder types HDX (ISO 11784/5)
FDX-B (ISO 11784/5)
Optional H4002 and compatible
Reading range Approx. 25 cm with HDX transponder of a 30 mm
Up to 20 cm with FDX-B transponder 30 mm
Interfaces USB with the APC500 or the optional docking
station ADS500
RS232 using the optional APC510 cable
Plug for external antenna
Bluetooth Class 1 module, according to Bluetooth
standard 2.0, configurable as Bluetooth Master or
Slave
Memory Nonvolatile Flash for 6000 data sets
Power supply 2 x 1.2V AA Batteries
Internal charging of supplied NiMH batteries via
USB in 6 hours maximum
Protection IP 64
Temperature range -10° to 60°C
Dimensions L x W x H 175 x 92 x 40 mm
Weight approx. 350g

APR500 – Classic Mode
16.10.2014 Page 41 of 46
8. Safety and Care
The manufacturer accepts no liability for damage resulting from improper use or use not
consistent with that described in these operating instructions.
x The APR500 Reader contains no parts that can be repaired by the user. For this reason
the Reader Electronic may only be repaired by authorized customer service personnel.
x In both operation and storage of the reader please secure to comply with the environment
conditions specified in the technical data.
x Clean the APR500 Reader only with a damp cloth. Use only water and any commercially
available cleaning agent.
Any modification to the APR500 Reader Electronic will render the warranty null and void.
9. Warranty
The manufacturer of the APR500 Reader Electronic will provide a warranty of
12 months
from the day the device is shipped and subject to the following conditions:
1. Without submission of proof of purchase no warranty can be given.
2. In the event that defects are detected the manufacturer is entitled to choose
between up to two attempts at repair or supplying a replacement device on one
occasion. The warranty period for the repaired item or for a replacement item is 3
months but will always extend to the end of the original warranty period. No further
claims can be entertained, especially claims for compensation for consequential
losses. This exclusion of liability does not apply to claims made on the basis of the
Product Liability Act.
3. Warranty claims cannot be entertained unless the Agrident system was installed
properly and used properly and for the purpose intended.
No warranty obligations exist in particular when:
1. Damage is attributable to improper use of the device, to a incorrect connection or
incorrect operator action;
2. The device was not cared for and maintained in accordance with the
manufacturer's recommendations and this is the cause of the damage;
3. The damage is due to any modification to the device;
The damage is due to force majeure, for example lightning strike;
The damage is due to wear, resulting from overstressing mechanical parts.

APR500 – Classic Mode
16.10.2014 Page 42 of 46
10. International approvals
CE marking
Hereby, Agrident BV declares that this equipment, if used according to the instructions, is
in compliance with the essential requirements and other relevant provisions of the RTTE
Directive 1999/5/EC. For use in all countries of the EU.
To obtain a copy, contact Agrident GmbH and request the “Declaration of Conformity”
document.
mail@agrident.com
In case of alteration of the product, not agreed to by us, this declaration will lose its validity.
This symbol indicates proof of conformity to applicable European
Economic Community Council directives and harmonized standards
published in the official journal of the European Communities.
FCC § 15.19
This device complies with Part 15 of the FCC rules. Operation is subject to the following
two conditions: (1) This device may not cause harmful interference, and (2) this device
must accept any interference received, including interference that may cause undesired
operation.
Canada CNR-Gen Section 7.1.3
This device complies with Industry Canada license-exempt RSS standard(s). Operation is
subject to the following two conditions: (1) this device may not cause interference, and (2)
this device must accept any interference, including interference that may cause undesired
operation of the device.
Le présent appareil est conforme aux CNR d'Industrie Canada applicables aux appareils
radio exempts de licence. L'exploitation est autorisée aux deux conditions suivantes : (1)
l'appareil ne doit pas produire de brouillage, et (2) l'utilisateur de l'appareil doit accepter
tout brouillage radioélectrique subi, même si le brouillage est susceptible d'en
compromettre le fonctionnement.
FCC § 15.21 (Warning Statement)
[Any] changes or modifications not expressly approved by the party responsible for
compliance could void the user’s authority to operate the equipment.
Section 7.1.3

APR500 – Classic Mode
16.10.2014 Page 43 of 46
FCC § 15.105
Note: This equipment has been tested and found to comply with the limits for a Class B
digital device, pursuant to part 15 of the FCC Rules. These limits are designed to provide
reasonable protection against harmful interference in a residential installation. This
equipment generates, uses and can radiate radio frequency energy and, if not installed and
used in accordance with the instructions, may cause harmful interference to radio
communications. However, there is no guarantee that interference will not occur in a
particular installation. If this equipment does cause harmful interference to radio or
television reception, which can be determined by turning the equipment off and on, the
user is encouraged to try to correct the interference by one or more of the following
measures:
—Reorient or relocate the receiving antenna.
—Increase the separation between the equipment and receiver.
—Connect the equipment into an outlet on a circuit different from that to which the receiver
is connected.
—Consult the dealer or an experienced radio/TV technician for help.
ICES-003
This Class B digital apparatus complies with Canadian ICES-003.
Cet appareil numérique de la classe B est conforme à la norme NMB-003 du Canada.
Compliance Information Statement
(Declaration of Conformity)
Responsible Party: Agrident Corp.
Address: 9303 Grant Avenue, Manassas, VA 20110, USA
Telephone: 001 703 659 9507 (Diane Smith)
ICAR
The APR500 has also passed the ICAR approval for synchronizing transceivers according
to ISO11784/11785 and ISO24631-2 successfully.
This radio transmitter has been approved by Industry Canada to operate with the antenna types
listed below with the maximum permissible gain and required antenna impedance for each
antenna type indicated. Antenna typs not included in this list, having a gain greater than the
maximum gain indicated for that type, are strictly prohibited for use with this device.
External Antenna
Type: AEA 580
A
ntenna gain: 0 dBi, Impedance: 50 Ohms
Co-located statement
To comply with FCC RF exposure compliance requirement, the antenna used for this
transmitter must not be co-located or operating in conjunction with any other transmitter/
antenna except those already approved in this filing.
Handheld Devices
This device was tested for typical handheld operation. Use only Agrident tested and approved
accessories to ensure FCC Compliance. The use of third-party accessories may not comply
with FCC RF exposure compliance requirements, and should be avoided.
The APR500 should only be worn on the body when switched off.
APR500 – Classic Mode
16.10.2014 Page 44 of 46
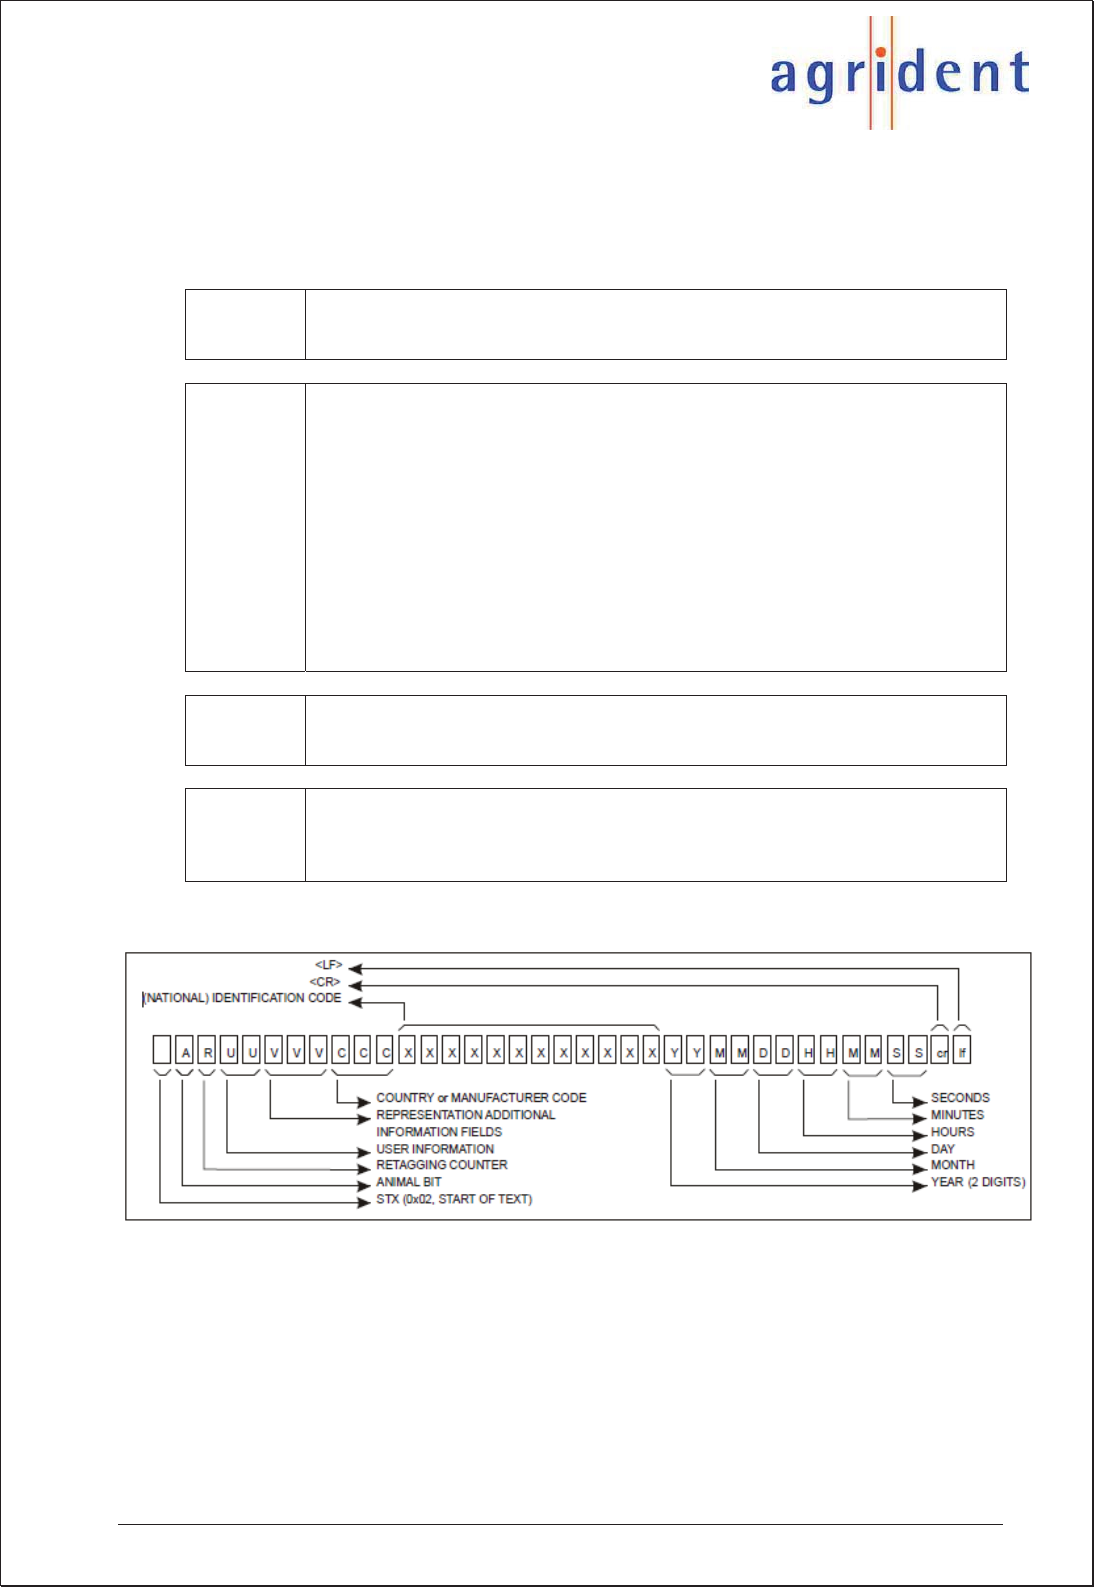
11. Annex A – Online mode output formats
This annex shows the Online mode output formats in detail.
Data short 3-digit country code followed by <space> the 12-digit ID and <CR><LF>
Example: 980 123456789012
Data long x Number of the dataset in the memory
x Date
x Time
x Transponder type
x Action Code (numeric=alphanumeric)
x Action Code Plus value
x 3-digit country code and 12-digit ID
x Alias
Example:
20 ,03.09.09 ,15:15:26 ,FDXB , 1=Treat ,545 ,942 000000598917 ,No Alias
SCP-
Format Last 10 digits of the ID followed by <CR><LF>
Example: 3456789012
ISO 24631
format The ISO 24631 format contains additional information, like animal flag,
retagging counter, time stamp and so on. The last characters of the telegram
will be <CR> (0x0D) <LF> (0x0A). This format is similar to the former “French
format”.
The structure of the ISO 24631 format:
The ISO 24631 uses “0x02” as the start character of the telegram. That´s why the APR500
is using this start character as factory default. Anyway you might also change for another
start character.

APR500 – Classic Mode
16.10.2014 Page 45 of 46
12. Glossary
xAction Code (AC)
An Action Code is a string of up to 14 alphanumeric characters. Action Codes allow
to assign events like sale, movement, disease or treatment to animal IDs. An
Action Code can be combined with the transponder ID after reading. It can only be
assembled and uploaded to the APR using appropriate software. The Action Code
Plus allows assigning a numeric value in addition to the Action Code, e.g. the
weight of an animal.
xAlias
An Alias is a string of up to 14 alphanumeric characters, e.g. a visual ID, the
management number or just a remark. It can be assigned to an EID. A list of
Aliases is called Tag List. It can either be uploaded into the APR or it can be
created manually in the field using the APRs keypad.
xFDX-B
Transponder type (full duplex), which transmits its data while the RF field is active
using Amplitude Modulation (AM). FDX transponders contain 128 bits of raw data;
the ID notation is in compliance with ISO 11784/11785.
xHDX
Transponder type (half duplex), which transmits its data directly after RF field is
deactivated using Frequency Shift Keying (FSK). HDX transponders have 104 bits
of raw data; the ID notation is in compliance with ISO 11784/11785.
xEID/ID
Electronic IDentification number of a transponder
xISO 11784/11785
International standard concerning the use of RFID technology in the identification
of animals; it defines the transponder types to be supported and the ID notation.
xReader
A device which is able to communicate with transponders via an internal or
external antenna. The reader generates a radio frequency field (RF) in order to
supply the transponder with energy and to receive the data of a transponder. The
received data can either be stored in an internal memory or it is transmitted to an
external controller via an interface.
xRFID
Radio Frequency IDentification. Method to transmit identification data contactless
using transponders.
xTag List
List containing Aliases
xTransponder or Tag
Data carrier for RFID applications, available in various models and types.

APR500 – Classic Mode
16.10.2014 Page 46 of 46
13. Index
x AC Ask ........................................ 23
x AC Ask Plus ................................ 23
x AC Auto ................................. 23, 26
x AC Auto Plus ......................... 23, 26
x AC Plus format ...................... 18, 36
x Accessories ............................... 5, 6
x Acoustic Signals .................... 10, 31
x Action Code ................. 4, 17, 35, 43
x Action Code list ........................... 23
x Action Code Plus .......................... 4
x Advanced Features ..................... 15
x Alias ............................ 4, 15, 35, 43
x Animal Tag Flag .......................... 35
x APC500 USB cable ................. 5, 12
x Assign Ask .................................. 22
x Backlight off Time ....................... 30
x Basic operations ........................... 7
x Battery charging .......................... 14
x Battery info .................................. 32
x Baud Rate ....................... 31, 33, 36
x Bluetooth ........................... 5, 13, 36
x Bluetooth Mode ........................... 36
x BT Device History ....................... 36
x Clear all ....................................... 29
x Clear data sets ............................ 29
x Clear lists .................................... 28
x Contrast ....................................... 30
x Country Code .............................. 35
x Data long ..................................... 34
x Data short .................................... 34
x Date/Time menu ......................... 31
x Display ........................................ 30
x Display format ............................. 35
x Double read ........................... 10, 33
x External Power Options ........ 30, 36
x Factory Default ...................... 32, 37
x FDX-B ................................. 4, 9, 43
x Features ........................................ 4
x Glossary ...................................... 43
x Group Separator ......... 4, 20, 25, 26
x HDX ......................................... 9, 43
x Hotkey ............................... 7, 15, 22
x ID counter .................................... 25
x ID format ..................................... 35
x Ignore advanced ISO .................. 35
x Interface .............................. 5, 6, 12
x International approvals ................ 41
x ISO 24631 format .................. 34, 42
x ISO Mode .................................... 35
x Keypad .......................................... 7
x Language .................................... 30
x Main menu .................................. 21
x Main Screen ................................ 10
x Memory space ............................ 27
x Menu structure ............................ 37
x No Action Code ........................... 22
x No Tag Mode ...................... 4, 8, 25
x Online Mode ................................ 34
x Presets .............................. 5, 15, 24
x Protection .................................... 39
x Race Mode ........................ 5, 20, 26
x Read length ................................. 33
x Reading a Transponder ................ 8
x Reading orientation ....................... 9
x Reading range .............................. 9
x Reading Speed ........................... 26
x Reading Timeout ......................... 26
x RFID menu .................................. 33
x Safety and Care .......................... 40
x Scale Interface ............................ 31
x Scale Setup ................................. 31
x Scale Type .................................. 31
x SCP format ................................. 34
x Search mode ................... 10, 15, 23
x Security Advice ............................. 7
x Send data sets ............................ 29
x Send tag list ................................ 29
x Set Pass Key .............................. 36
x Show data ................................... 27
x Software version ......................... 32
x Speed Mode ...................... 5, 20, 26
x Start BT Inquiry ........................... 36
x Start Speed Mode ....................... 26
x Switch off time ............................. 30
x Sync level .................................... 33
x Tag list................................... 27, 28
x Tag list options ............................ 35
x Technical data ............................. 39
x Temperature range ..................... 39
x Transponder orientation ................ 9
x Transponder types ...................... 33
x Volume menu .............................. 31
x Warranty ..................................... 40
x Weight from Scale
....... 4, 19, 23, 31
x Wireless sync .............................. 33