Agrident AWR100 Proximity Reader User Manual AWR100 man e
AGRIDENT GmbH Proximity Reader AWR100 man e
Agrident >
User Manual

Agrident GmbH, Steinklippen Str. 11, D-30890 Barsinghausen
Phone +49 5105 582573-10 - Fax +49 5105 582573-17
AWR 100
Stick Reader
V08/10/07

08/10/2007 Vertraulich / Confidential Page 2 of 31
AWR100
© Copyright 2007 by Agrident GmbH
All rights reserved. No part of this publication may be reproduced, stored in a retrieval system,
or transmitted, in any form or by any means, electronic, mechanical, photocopying, recording or
otherwise, without prior written permission of Agrident GmbH.
Agrident GmbH reserves the right to make changes to any and all parts of this documentation
without obligation to notify any person or entity of such changes.
October 2007
Agrident GmbH
Steinklippen Str. 11 (TB, BB)
30890 Barsinghausen
Germany
Phone +49 (0) 51 05 582573-10
Fax +49 (0) 51 05 582573-17
E-Mail: info@agrident.com
www.agrident.com

08/10/2007 Vertraulich / Confidential Page 3 of 31
AWR100
Content
1. Preparing for Use ................................................................................................ 5
1.1 Accessories.................................................................................................. 6
1.2 Stick Reader Interface and signalling ........................................................... 7
1.3 Installing or changing the battery pack ......................................................... 8
2. Trickle charging the battery pack....................................................................... 10
3. Battery pack fast charger .................................................................................. 11
4. Controlling the Stick Reader.............................................................................. 12
4.1 Switching on the Stick Reader.................................................................... 12
4.2 Reading transponders ................................................................................ 13
4.2.1 Reading transponders after Stick Reader is ready.............................. 13
4.2.2 Reading transponder immediately....................................................... 14
4.3 Using the function menu............................................................................. 14
4.3.1 Version................................................................................................ 15
4.3.2 Date/Time............................................................................................ 15
4.3.3 Battery................................................................................................. 15
4.3.4 Stored datasets ................................................................................... 15
4.3.5 Bluetooth............................................................................................. 16
4.3.6 Pairing................................................................................................. 16
4.3.7 Reset Config ....................................................................................... 17
4.3.8 Online / offline ..................................................................................... 18
4.3.9 Next Group.......................................................................................... 18
4.3.10 Show last IDs ...................................................................................... 18
4.4 Permanent Read ........................................................................................ 19
4.5 Switch off time............................................................................................ 19
4.6 Battery management .................................................................................. 19
5. Configuration ..................................................................................................... 20
5.1 Comport settings ........................................................................................ 20
5.1.1 Synchronising the real time clock........................................................ 22
5.1.2 Configuring the reading time ............................................................... 23
5.1.3 Configuring the switch off time ............................................................ 24
5.1.4 Configuring IO ..................................................................................... 25
5.1.5 Configuring Permanent read ............................................................... 26
5.2 Events ........................................................................................................ 27
6. Database ........................................................................................................... 27

08/10/2007 Vertraulich / Confidential Page 4 of 31
AWR100
6.1 Reading the database ................................................................................ 28
6.2 Clearing the database ................................................................................ 29
7. Safety and care ................................................................................................. 30
8. Warranty............................................................................................................ 30
9. FCC digital device limitations ............................................................................ 31
10. CE MARKING ................................................................................................ 31
11. Trouble shooting ............................................................................................ 31
08/10/2007 Vertraulich / Confidential Page 5 of 31
AWR100
1. Preparing for Use
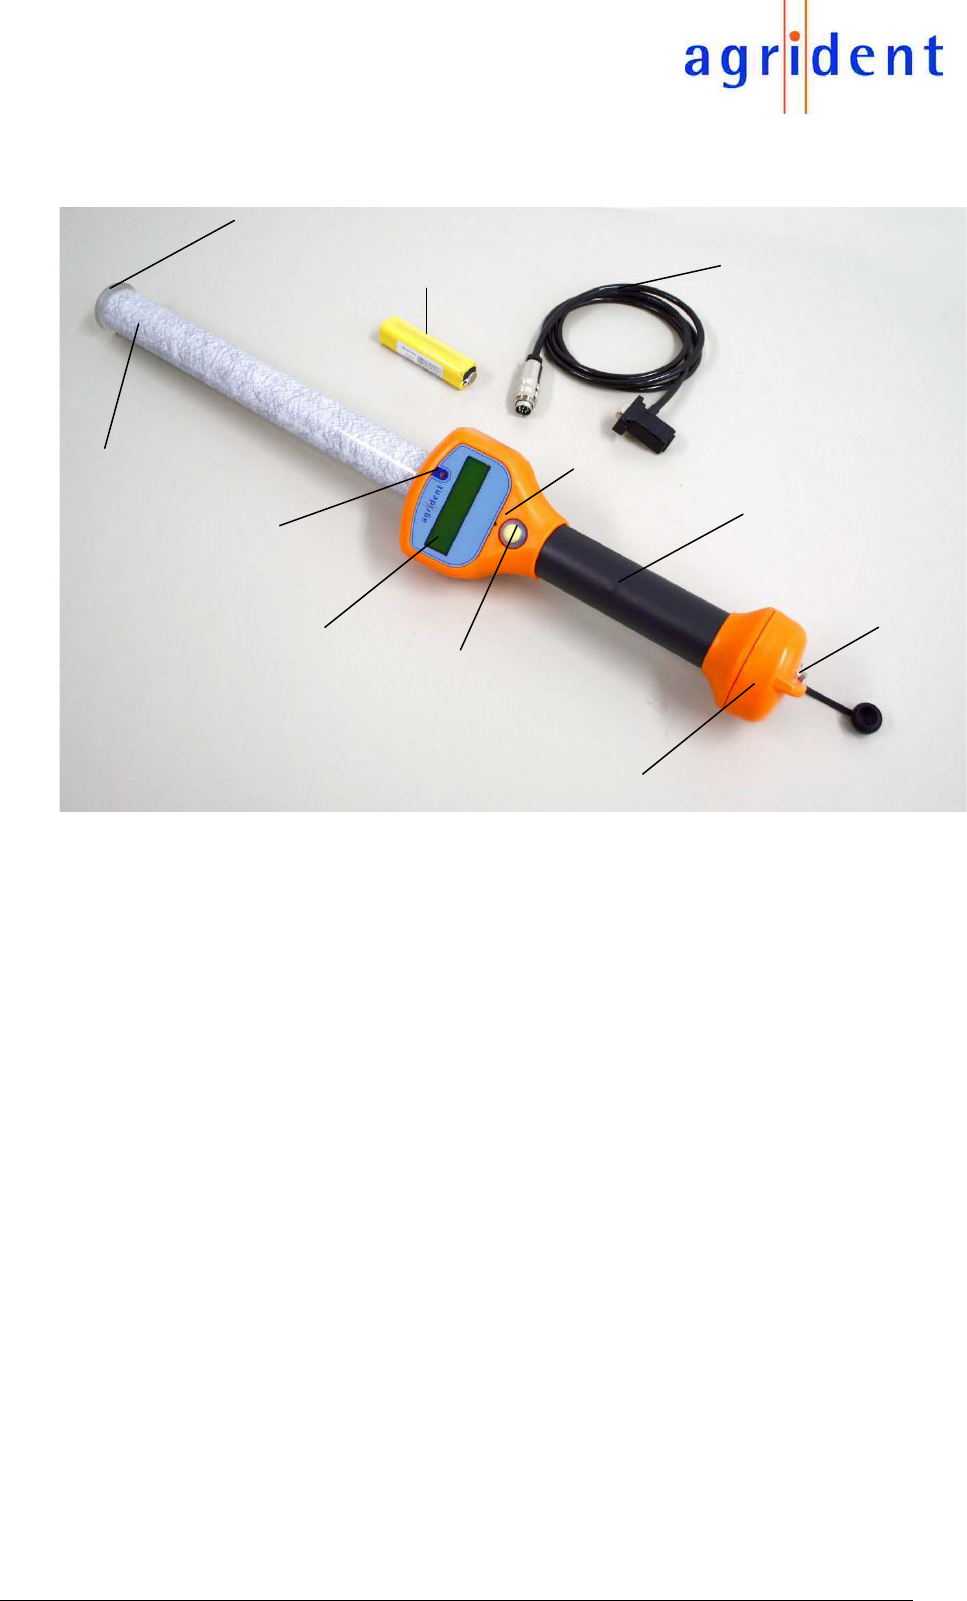
Figure 1: AWR100 Stick Reader
The AWR100 Stick Reader is shipped with one rechargeable battery pack, one RS232 cable
(1,5m), one power supply for trickle charging, two eartag transponders (one FDX-B and one
HDX) and AWR100 demo software.
Before starting it is recommended to charge the battery pack completely. This can be done by
using the power supply for trickle charging (takes min. 16 hours) or the external fast-charging
station (see chapter 1.1).
Antenna
RS232 cable Battery pack
Read button
Handle grip
Cable connector
Beeper
LCD Display
Blue LED
End cap with RS232 and power interface
Red and green LED
08/10/2007 Vertraulich / Confidential Page 6 of 31
AWR100
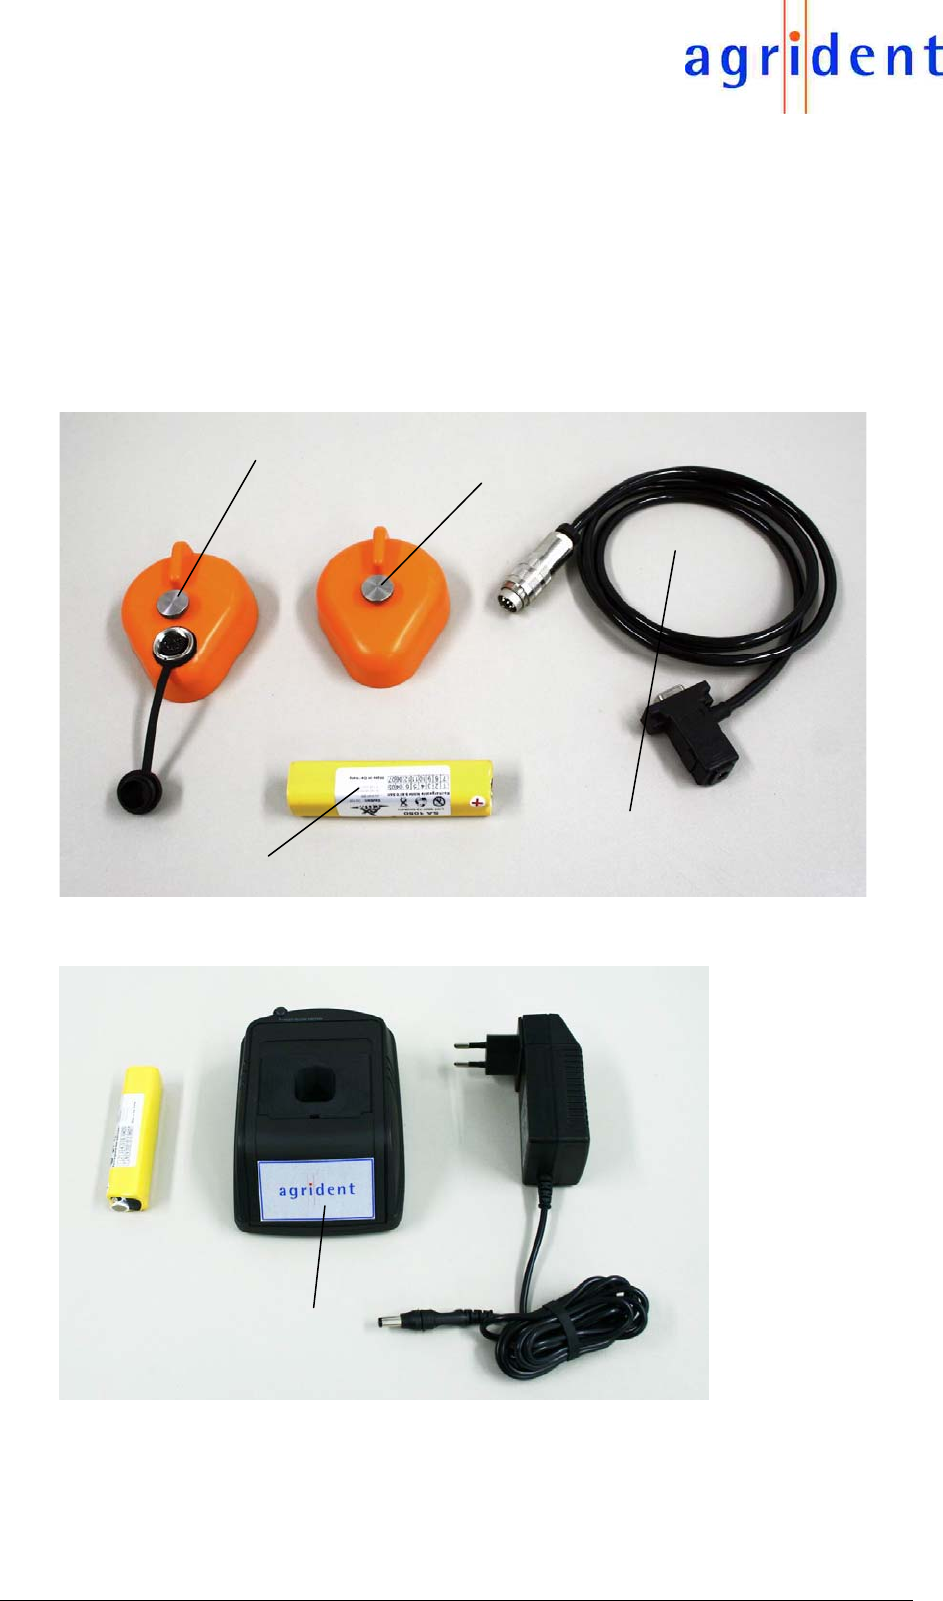
1.1 Accessories
Bluetooth end cap
Bluetooth USB dongle (CD with drivers included)
External fast-charging station plus one battery pack
Battery pack
RS232 end cap
RS232 cable (1.5m)
RS232 cable (3m)
Power supply for trickle charging
Cigarette lighter charging cable (for trickle charging only, 12V with voltage limiter)
Figure 2: Accessories
Figure 3: External charging station plus one battery pack
End cap with RS232 and power interface
Battery pack
Bluetooth end cap
RS232 cable (1.5m or 3m)
External charging station

08/10/2007 Vertraulich / Confidential Page 7 of 31
AWR100
1.2 Stick Reader Interface and signalling
Parameter Setting
Red LED The red LED is flashing during the Stick Reader tries
to read transponders. This behaviour can be disabled
or enabled by AWR100 demo software.
Green LED The Green LED is flashing after a transponder was
read.
This behaviour can be disabled or enabled by
AWR100 demo software.
Beeper The Beeper is beeping after a transponder was read.
This behaviour can be disabled or enabled by
AWR100 demo software.
Blue LED The blue LED is used for several events (e.g. trans-
ponder was read, low battery warning).
LCD display On the LCD display all necessary information's are
displayed (e.g. data of read transponder, ready to
work, menu items).
Read button Switches the reader on
Starts reading
Enters the menu by a double clicking after press key
appears on the LCD display.
Screw on end cap Changing battery pack and or end cap
Cable connector Interface for transferring data between Stick Reader
and PC and for trickle charging via RS232 cable
08/10/2007 Vertraulich / Confidential Page 8 of 31
AWR100
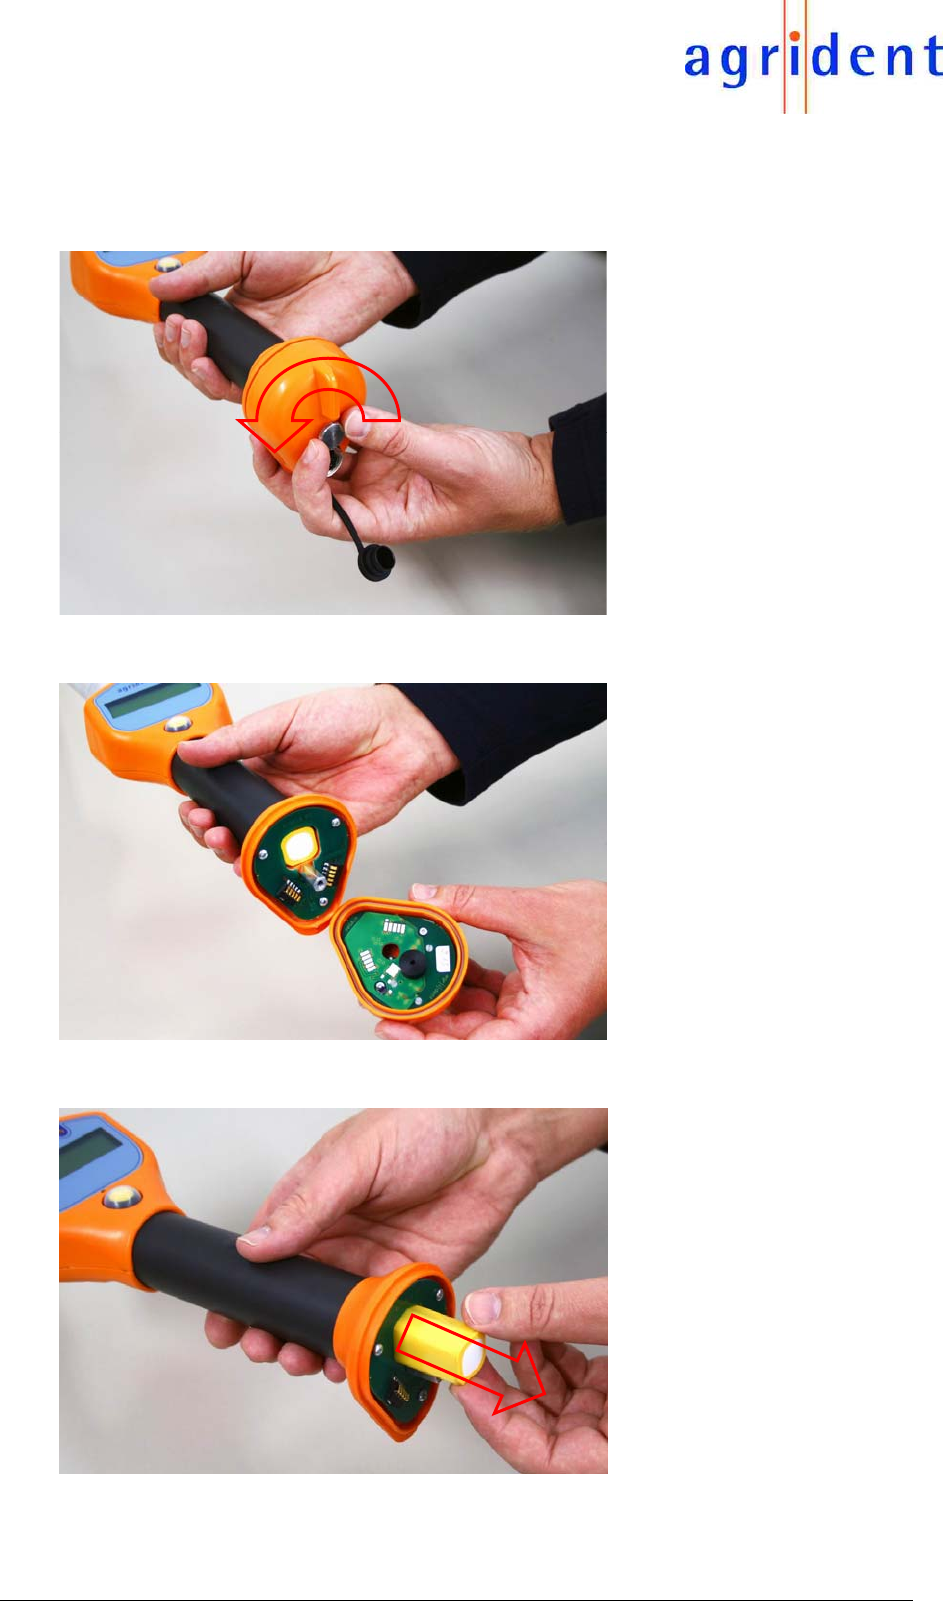
1.3 Installing or changing the battery pack
If using the Stick Reader for the first time, the battery pack has to be installed first.
Turn screw of end cap anti clockwise.
Remove end cap.
Remove old battery pack.
08/10/2007 Vertraulich / Confidential Page 9 of 31
AWR100
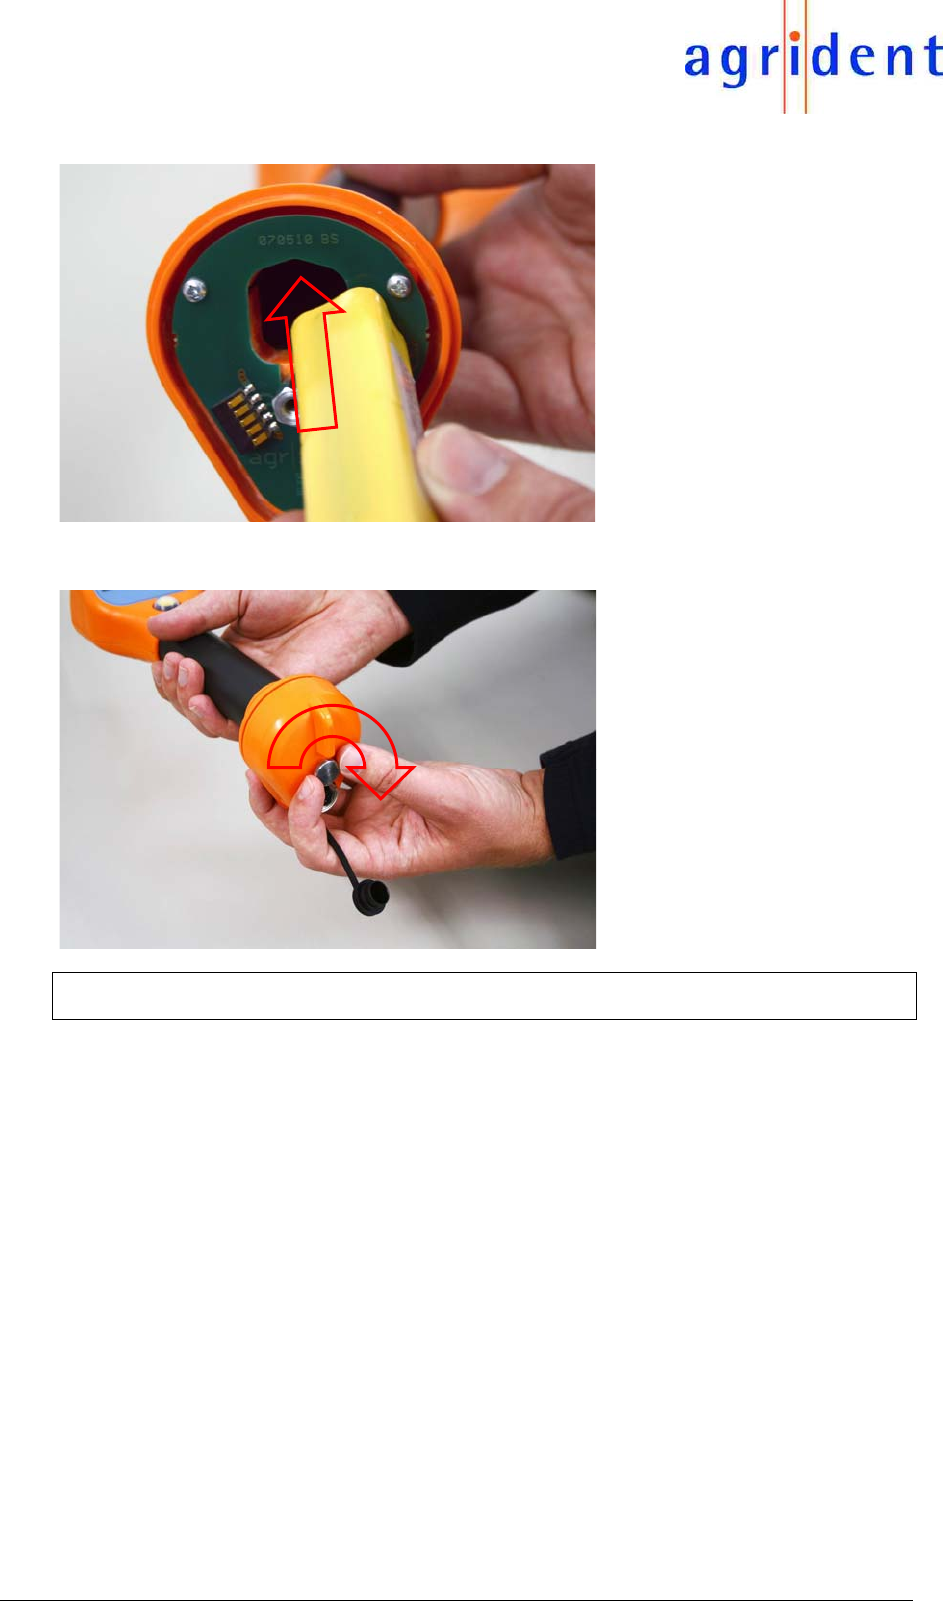
Install new battery pack.
Mount end cap and turn screw of end cap clockwise.
Important!
The screw has to be fastened completely, otherwise contact problems can occur.
08/10/2007 Vertraulich / Confidential Page 10 of 31
AWR100
2. Trickle charging the battery pack
Full charging takes at least 16 hours up to 20 hours (longer charge time is allowed).
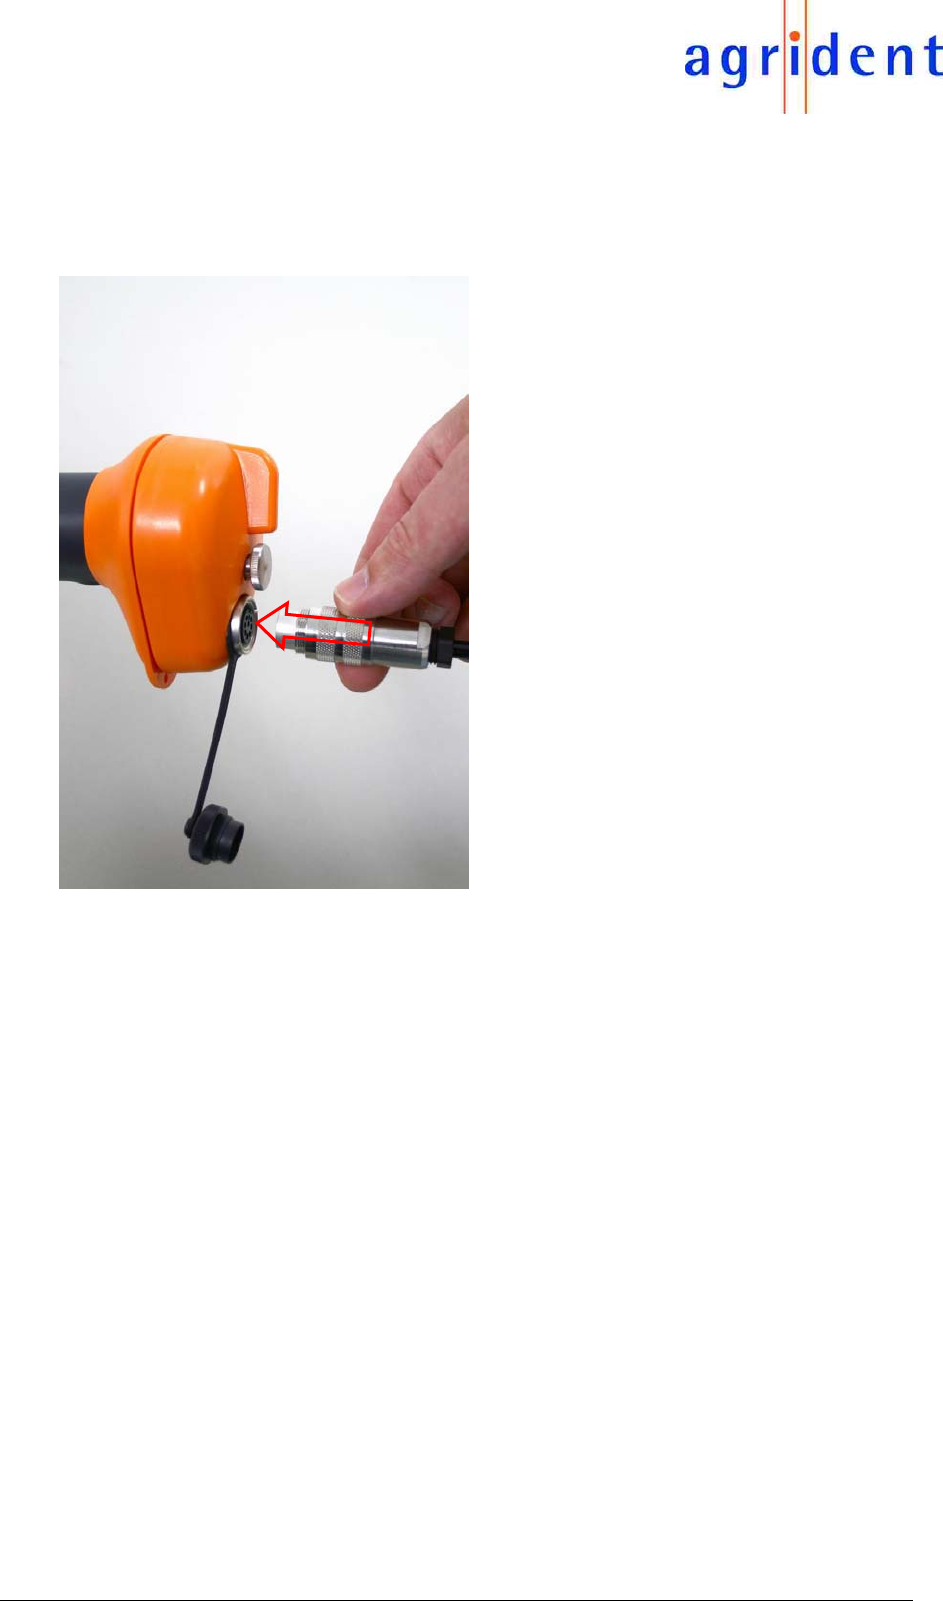
Connect RS232 cable to RS232 end cap.
Figure 4: RS232 connection RS232 cable to end cap
Plug in RS232 connector into RS232 jack of RS232 end cap and turn connector clockwise.

08/10/2007 Vertraulich / Confidential Page 11 of 31
AWR100
Connect the power jack of the RS232 cable to the power supply for trickle charging.
Figure 5: Connections and accessories for trickle charging
3. Battery pack fast charger
For faster battery charging an external charging station is available.
Figure 6: Battery pack fast charger
Power supply for trickle charging
RS232 cable

08/10/2007 Vertraulich / Confidential Page 12 of 31
AWR100
Figure 7: Battery pack fast charger with battery pack
4. Controlling the Stick Reader
4.1 Switching on the Stick Reader
In the off state, the Stick Reader is separated from the battery. Only a few parts (e.g. the inter-
nal real time clock) are supplied by the battery.
Nothing is displayed on the LCD display in this case.
In order to activate the Stick Reader, the Read button must be pressed for a short time.
Figure 8: Activate Stick Reader by pressing the read button
08/10/2007 Vertraulich / Confidential Page 13 of 31
AWR100
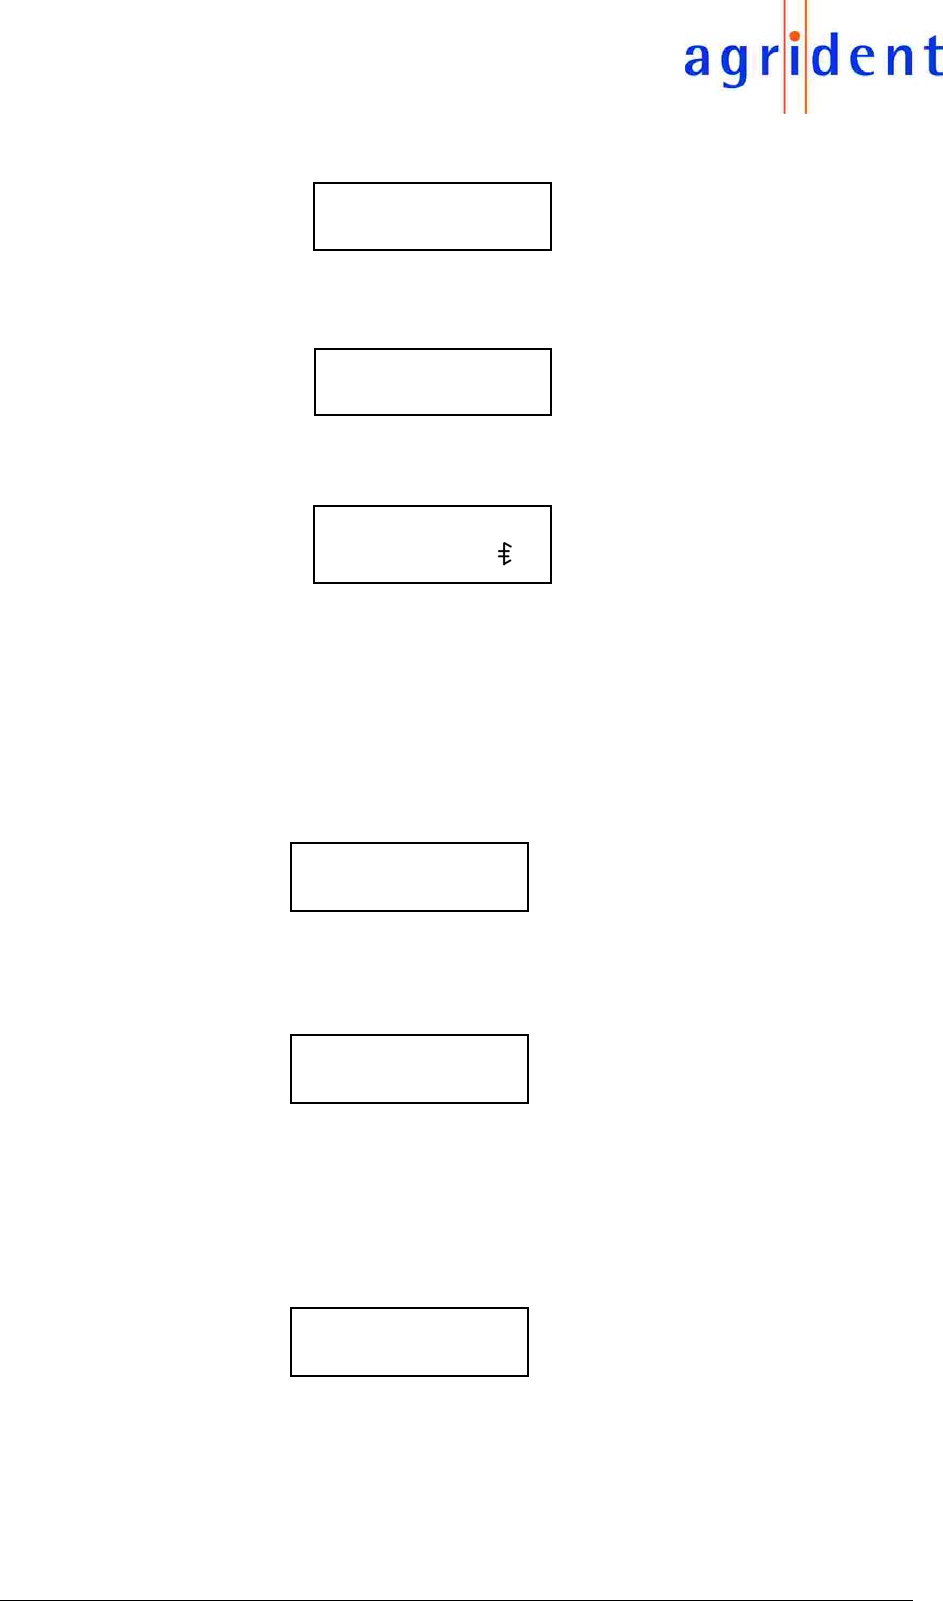
If Bluetooth is activated, the internal Bluetooth adapter is initialised first.
In this case the following dialog appears on the LCD display:
After Stick Reader is ready to work, the following text appears on the top left side of the LCD
display:
If Bluetooth is activated and connected, a Bluetooth symbol appears on the right side of the
second line.
The backlight of the LCD display is off.
If no actions take place, the Stick Reader will be deactivated after a certain time
(5s…600s configurable).
4.2 Reading transponders
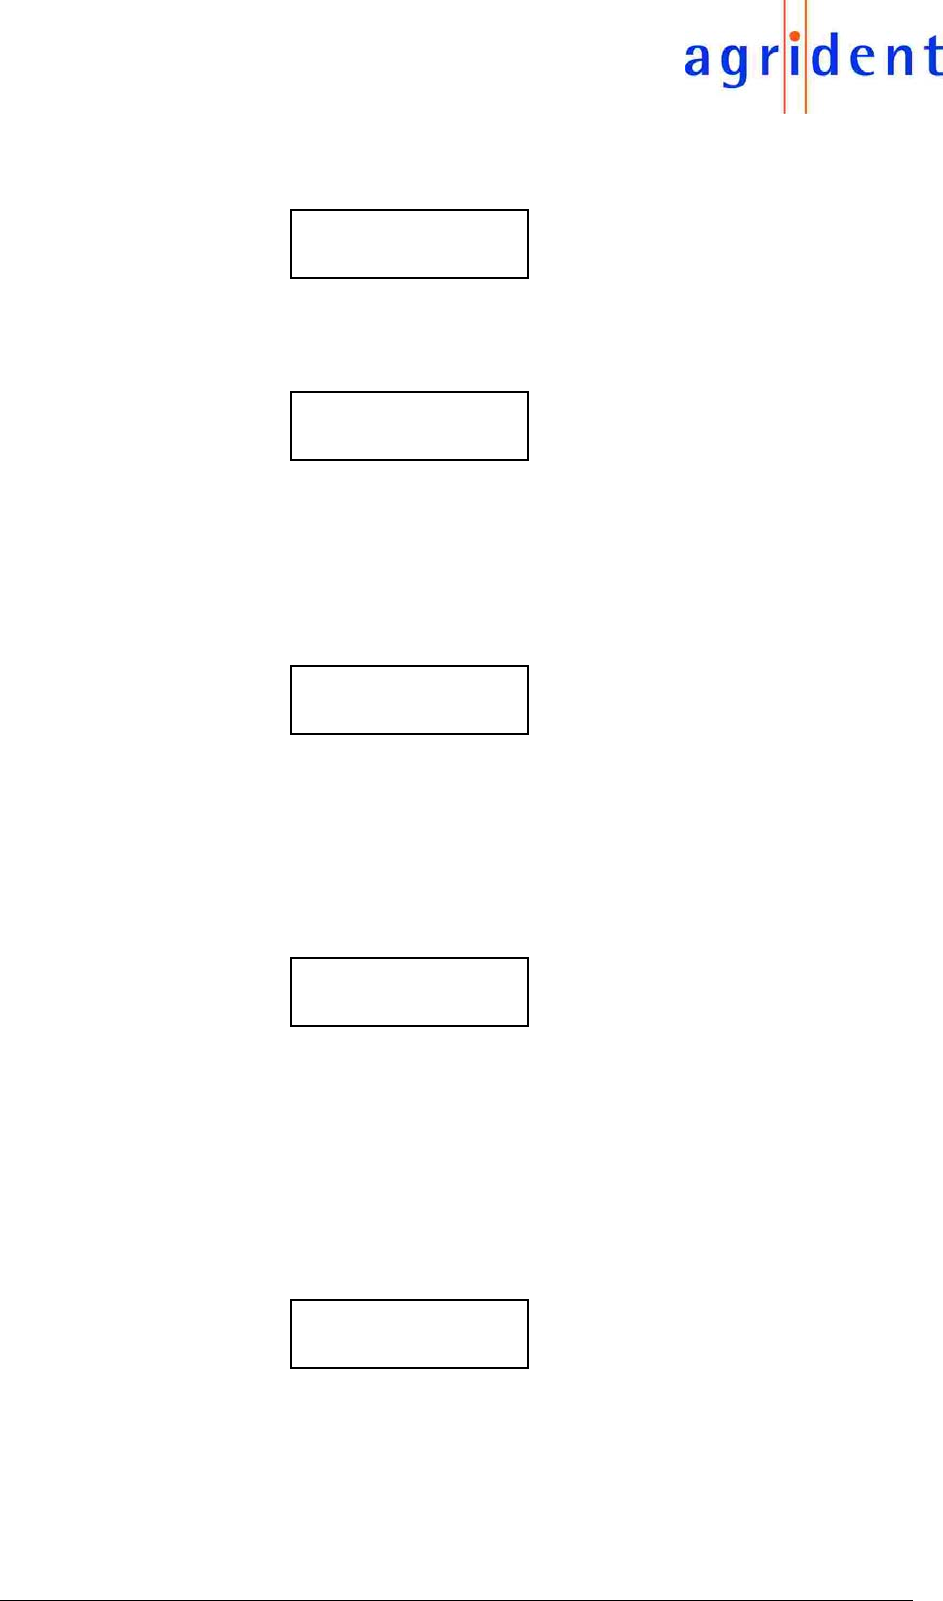
4.2.1 Reading transponders after Stick Reader is ready
Wait until
appears on the LCD display.
Press key until
appears on the LCD display. Release key.
Now the Stick Reader starts to read transponders for a certain time (configurable).
The reading procedure is signalled by a red flashing LED. Furthermore a progress bar appears
in the second line of the LCD display.
The flashing of the red LED can enabled and disabled by configuration software.
If no transponder has been read, the following message appears on the first line of the LCD
display:
During displaying this message the backlight of the LCD display is on.
If a transponder has been read, the reading procedure is aborted immediately.
A successful reading is signalled by a green flashing LED at the top of the Stick Reader, a
flashing blue LED above the LCD display, and the beeper.
The flashing of the green LED and the BEEPER can be enabled and disabled by configuration
software.
Press key
Read tag
No transponder
Press key
Init Bluetooth
Press key

08/10/2007 Vertraulich / Confidential Page 14 of 31
AWR100
On the first Line of the LCD display, the transponder number is displayed in decimal format.
On the second Line of the LCD display, time and transponder type are displayed.
If an event is assigned to the read transponder (at this time only 30 transponders can be as-
signed to an event), the event and the time are displayed alternating in the second line of the
LCD display.
Transponder data plus time and event will be transmitted to the PC via serial interface or Blue-
tooth and can be displayed there.
Simultaneously transponder ID and time are stored in the internal database of the Stick Reader
(without event).
If the key is pressed, while an event is detected, the string "ok" appears after the event string.
Data will be transmitted to the PC again.
If no event is assigned, the data are displayed for approximately seven seconds if the key is not
pressed.
After displaying transponder data the ready to work text appears again:
4.2.2 Reading transponder immediately
Press key until text
appears on the LCD display.
Reading procedure is similar to chapter 4.2.1.
4.3 Using the function menu
After message
appears on the LCD display, the menu of the Stick Reader can be entered by double pressing
the read button. At first the status information's of the Stick Reader are displayed.
Read tag
Press key
984 010900316360
Selection ok
984 010900316360
12:41:26 F
984 010900316360
Selection
984 010900316360
12:41:26 F
Press key
08/10/2007 Vertraulich / Confidential Page 15 of 31
AWR100
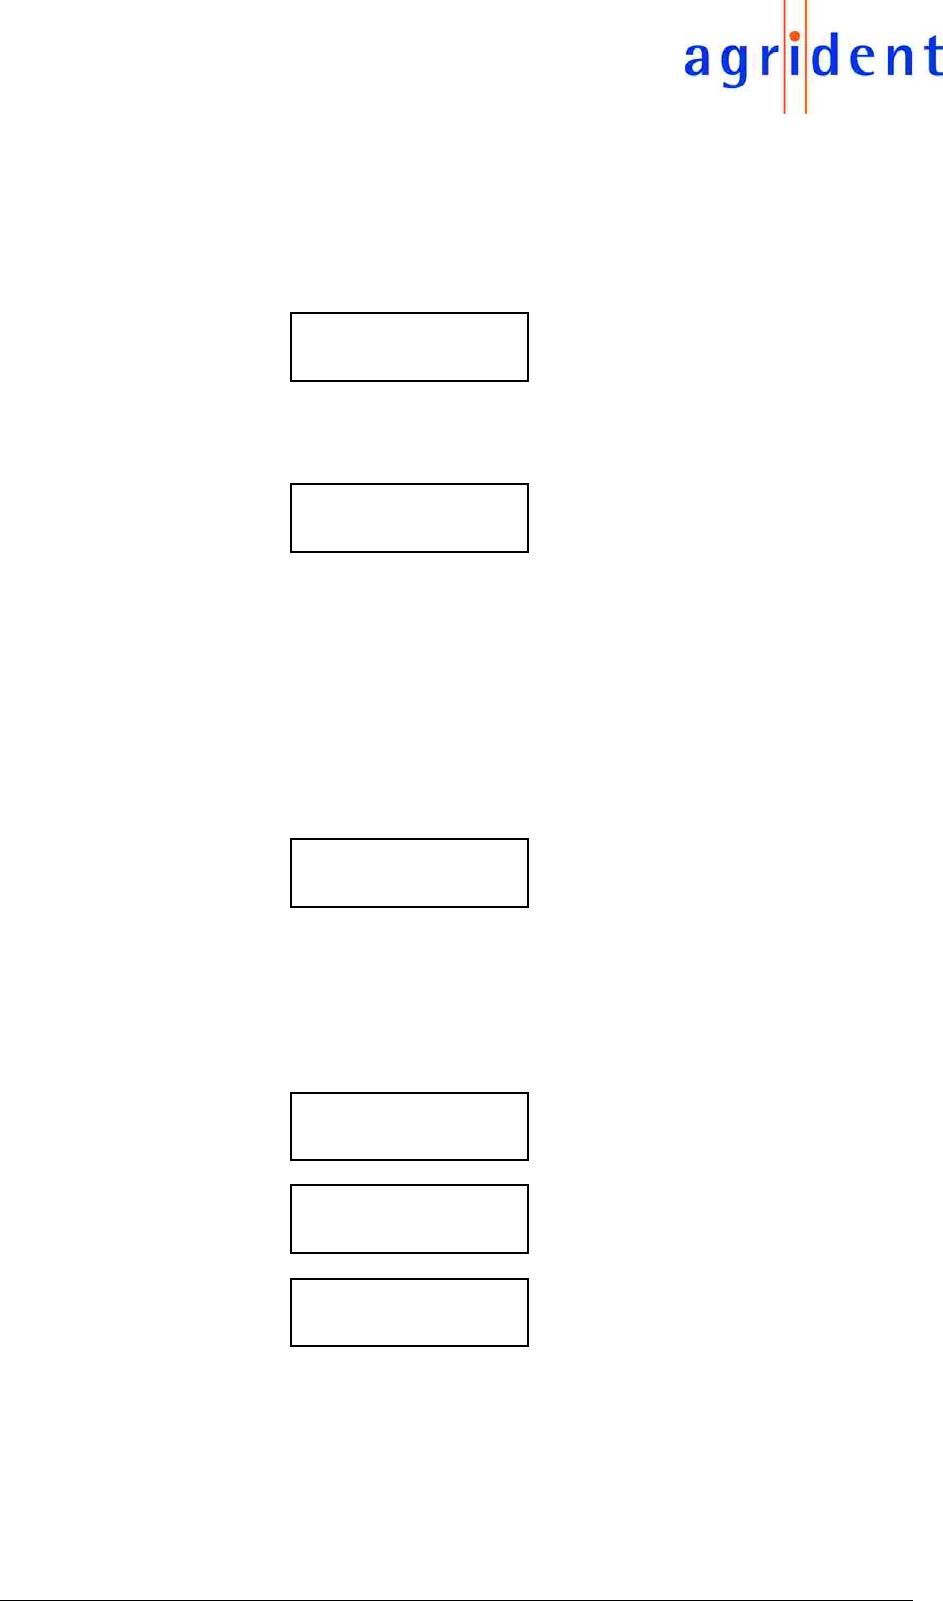
4.3.1 Version
On the first line of the LCD display the current software version of the Stick Reader appears:
4.3.2 Date/Time
On the second line of the LCD display the current date and time is displayed first:
If the time does not correspond with the current time, the real time clock has to be synchronised
(see chapter 5.1.1).
4.3.3 Battery
Now the status of the battery is displayed in the second line of the LCD display. The status of
the battery is not an absolute value.
The amount of displayed points is an information about the status of the battery. One point up to
six points are possible. If only one point is displayed, the battery is almost empty. This informa-
tion means, that the battery should be replaced soon or has to be recharged.
4.3.4 Stored datasets
Now the number of read transponders is displayed:
The first number represents the animal counter of the current group (in this example 5). The
second number represents the sum of all stored datasets including group separators (in this
example 138). The last number represents the amount of datasets which can be stored on the
Stick Reader (5000).
Hind!!!
5000 datasets are possible. If 5000 transponders and separators were stored, the
datasets must be cleared before new transponders can be read.
If 5000 datasets already stored, and a new transponder is read, the following information ap-
pears on the LCD display:
Any transponder number, which is read after this message appeared, will not be stored. Before
the work can be continued, the dataset has to be downloaded to the computer and to be
cleared on the AWR100 afterwards.
Agrident V1.04
Agrident V1.04
13.11.06 12:30
Agrident V1.04
Battery ...
Stored datasets
5/ 138/5000
Database
Out of memory
08/10/2007 Vertraulich / Confidential Page 16 of 31
AWR100
4.3.5 Bluetooth
This option is only available, if the corresponding Bluetooth adapter is connected to the Stick
Reader.
The status of the Bluetooth interface appears on the second line of the LCD interface (on or off):
The arrow in front of the status is a hind, that this status can be changed by pressing the key.
In this case the Bluetooth interface is deactivated by pressing the key and the following mes-
sage appears:
If the key is pressed again, the Bluetooth interface is activated again.
Switching off the Bluetooth module minimizes power consumption and increases life time of the
used battery.
This option is useful if the Stick Reader is only used for sampling transponders, and the stored
datasets will be read out later in the office.
4.3.6 Pairing
This option is only available, if the corresponding Bluetooth adapter is connected to the Stick
Reader and Bluetooth is activated (see chapter 4.3.5).
The following text appears on the second line of the LCD interface:
Before the Stick Reader is able to communicate via Bluetooth, both Bluetooth devices have to
be paired.
Press the read button if ->Start pairing appears on the LCD display, to start the pairing
process.
After pairing process was started some information's appear on the LCD display:
These informations are only status informations of the Bluetooth module.
After starting the pairing process on the Stick Reader, the Bluetooth environment of the PC has
to be used to scan for Bluetooth modules in range.
Agrident V1.04
->Bluetooth on
Agrident V1.04
->Bluetooth off
Agrident V1.04
->Start pairing
Pairing mode
Enter cmd mode
Pairing mode
Drop connection
Pairing mode
Reset device
08/10/2007 Vertraulich / Confidential Page 17 of 31
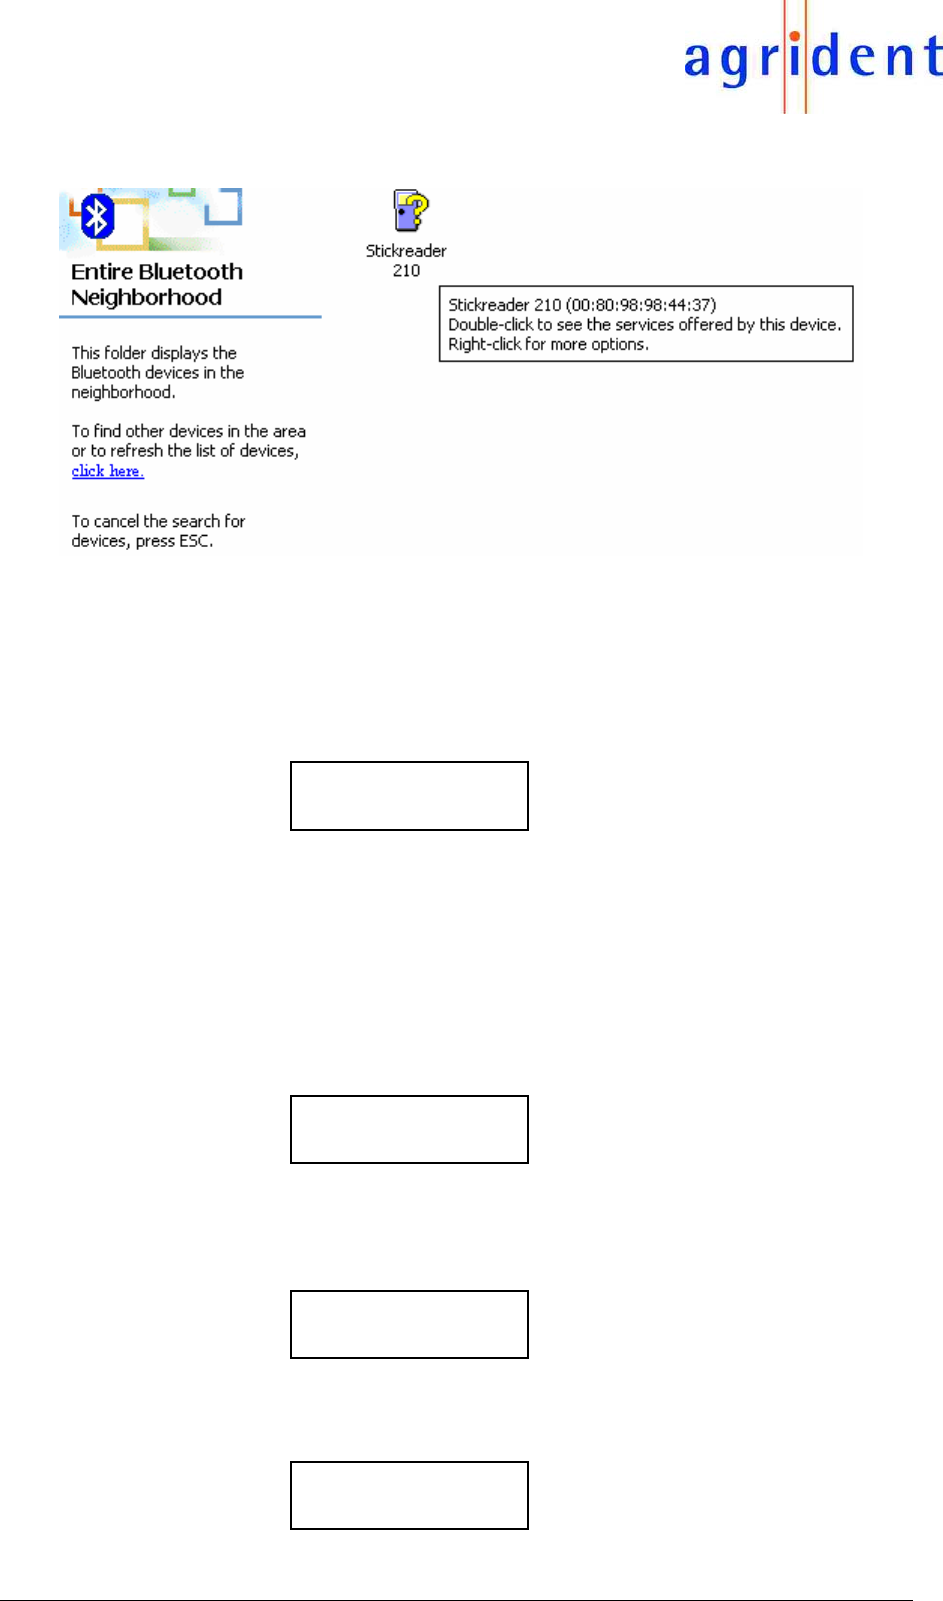
AWR100
After a certain time the symbol of the Bluetooth module appears on the screen of the Bluetooth
manager.
The representation of the symbol depends on the Bluetooth environment that is used.
The description of the Bluetooth module consists of the name Stickreader and the serial number
of the Stick Reader (in this example 210).
Now the Bluetooth module of the Stick Reader is waiting for incoming data of the opposite Blue-
tooth module.
On first line of the LCD display the following string is displayed:
On second line a changing number of dots shows that the pairing process is still in progress.
To start the pairing process on the PC click on the found Bluetooth module with the right mouse
button. The appearing dialog normally offers an option to start the pairing process.
After a certain time the Bluetooth module of the Stick Reader will ask for a password.
Type in four zeros (0000) and press OK.
If pairing was successful, the address of the opposite Bluetooth module is displayed on the sec-
ond line of the LCD display.
Shortly after displaying the address of the opposite Bluetooth module, the following information
is displayed on the first line of the LCD display:
The Stick Reader is now available to communicate via Bluetooth.
If the pairing failed, the following information is displayed on the second line of the LCD display:
4.3.7 Reset Config
The following text appears on the second line of the LCD display:
Wait for data
..
Pairing success
Pairing failed
Agrident V1.04
-> Reset config
08/10/2007 Vertraulich / Confidential Page 18 of 31
AWR100
The configuration of the Stick Reader can be reset to the factory settings by pressing the read
button.
After a successful resetting of the configuration
appears on the second line of the LCD display for a certain time.
4.3.8 Online / offline
The Stick Reader provides an online- and an offline mode. In online mode transponder data are
transmitted immediately via RS232 interface or Bluetooth. In offline mode transponder data are
only stored in the database of the Stick Reader but not transmitted.
If the Stick Reader is in online mode, the following text appears on the second line of the LCD
display:
If the Stick Reader is in offline mode, the following text appears on the second line of the LCD
display:
The mode could be changed by pressing the read button.
4.3.9 Next Group
It is possible to separate groups of transponders by inserting a new group pattern in the data-
base of the Stick Reader. In this case the Stick Reader stores a zero transponder at the current
position of the database and the animal counter is automatically reset to zero.
For this option the following text appears on the second line of the LCD display:
A new group is inserted by pressing the read button.
4.3.10 Show last IDs
With this option it is possible to show up to three last read transponders after Stick Reader was
switched on.
For this option the following text appears on the second line of the LCD display:
The feature is started by pressing the read button.
If no transponders were read after switching on the Stick Reader the following text appears on
the second line of the LCD display:
Agrident V1.04
Done
Agrident V1.04
->Online mode
Agrident V1.04
->Offline mode
Agrident V1.04
->Next group
Agrident V1.04
-> Show last IDs
Agrident V1.04
No IDs available
08/10/2007 Vertraulich / Confidential Page 19 of 31
AWR100
Otherwise the last read transponders are displayed in the same format described in chapter
4.2.1:
4.4 Permanent Read
If lots of transponders have to be read in a short distance or time, the Stick reader offers the
permanent read mode. In this mode the reading of transponders goes on for a certain time in-
dependent of the successful reading of transponders. This mode is configurable by using the
configuration software.
4.5 Switch off time
The Stick Reader is switched off automatically a certain time after last action (e.g. transponder
read or menu access). The switch off time is configurable between 5 and 600 seconds by using
the configuration software.
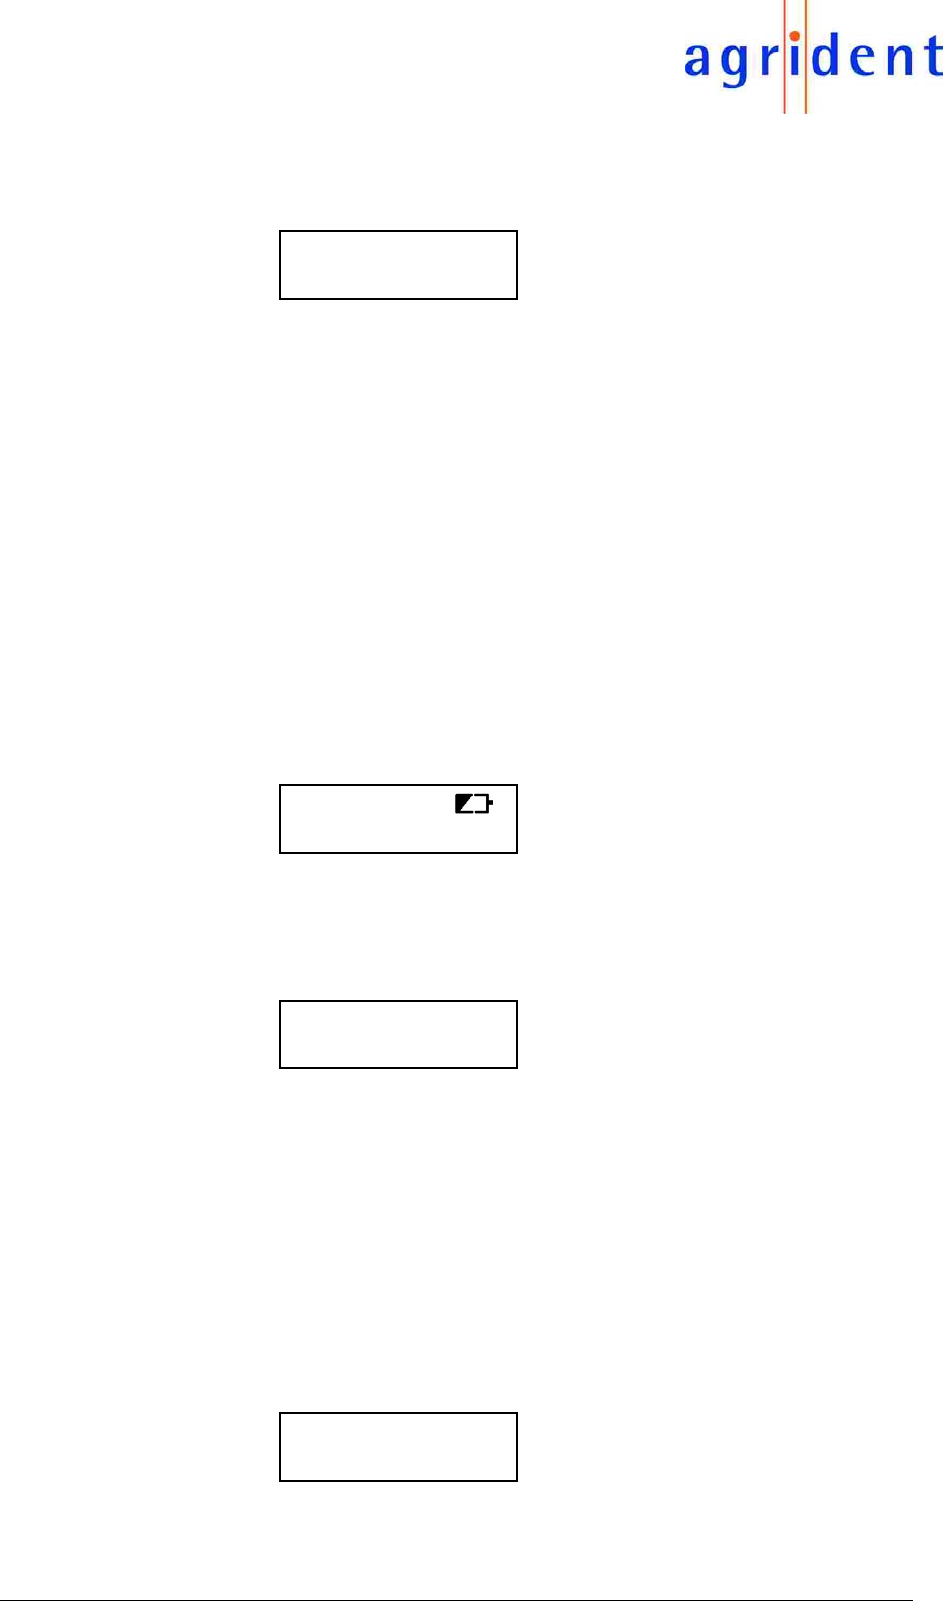
4.6 Battery management
If the battery is running low, a warning symbol (battery) appears after reading, right from the
string.
This symbol is telling the user, that it is time to replace or recharge the battery soon.
If the Stick Reader detects a low battery directly after power on, the following information
appears on the LCD display directly after power on:
After displaying the information the Stick Reader is switched off automatically.
The Stick Reader offers internal trickle charging for chargeable batteries. That means a com-
plete charging cycle takes min. 16 hours up to 20 hours (longer charging time is allowed). If the
battery is charged completely, the charging will be stopped automatically.
For faster charging cycles an external battery charger is available.
For normal operation and internal trickle charge only the delivered 12V power supply has to be
used.
If the voltage of the used power supply is too high, the following information appears on the
LCD display directly after start:
After displaying the information the Stick Reader is switched off automatically.
984 010900316360
12:41:26 F
Press key
Low battery
Warning
High voltage!
08/10/2007 Vertraulich / Confidential Page 20 of 31
AWR100
5. Configuration
For configure the Stick Reader, the program Stickreader.exe is available.
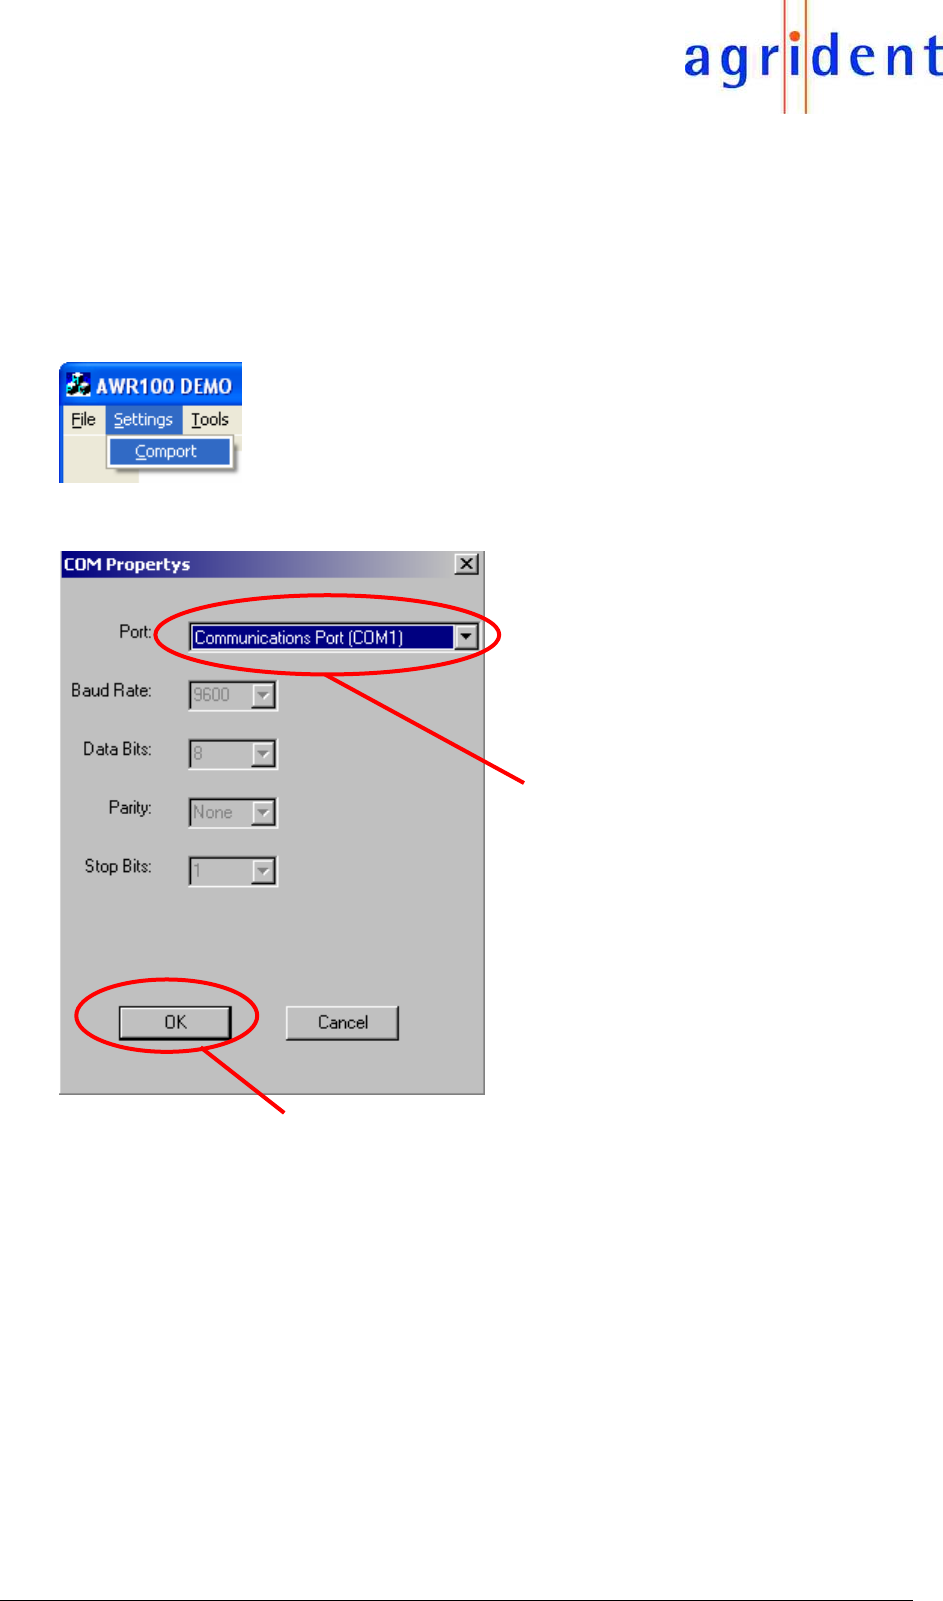
5.1 Comport settings
After first start of the program a comport has to be set. Therefore chose Comport in the menu
Settings:
The following dialog appears:
Select Comport and press OK.
Chosen
Comport
08/10/2007 Vertraulich / Confidential Page 21 of 31
AWR100
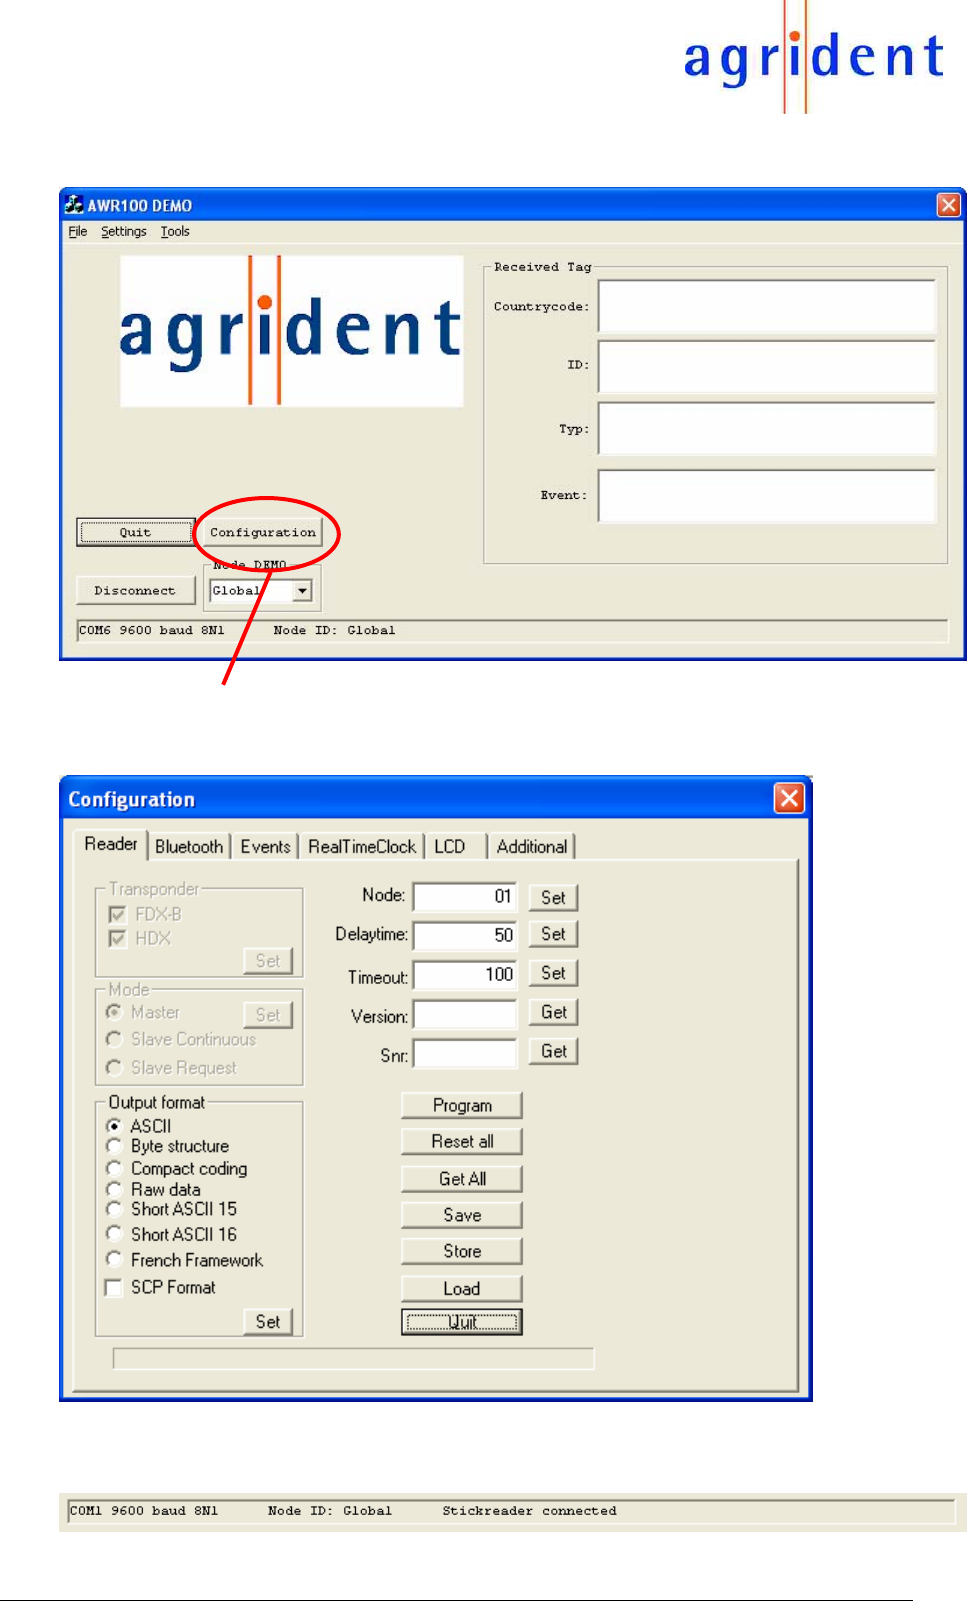
In order to configure the Stick Reader, the AWR100 demo software has to be activated first.
The following start screen appears:
Press Pushbutton Configuration:
The following dialog appears:
Activate Stick Reader and wait until message "Stick Reader connected" appears in the status
line of the main dialog.
08/10/2007 Vertraulich / Confidential Page 22 of 31
AWR100
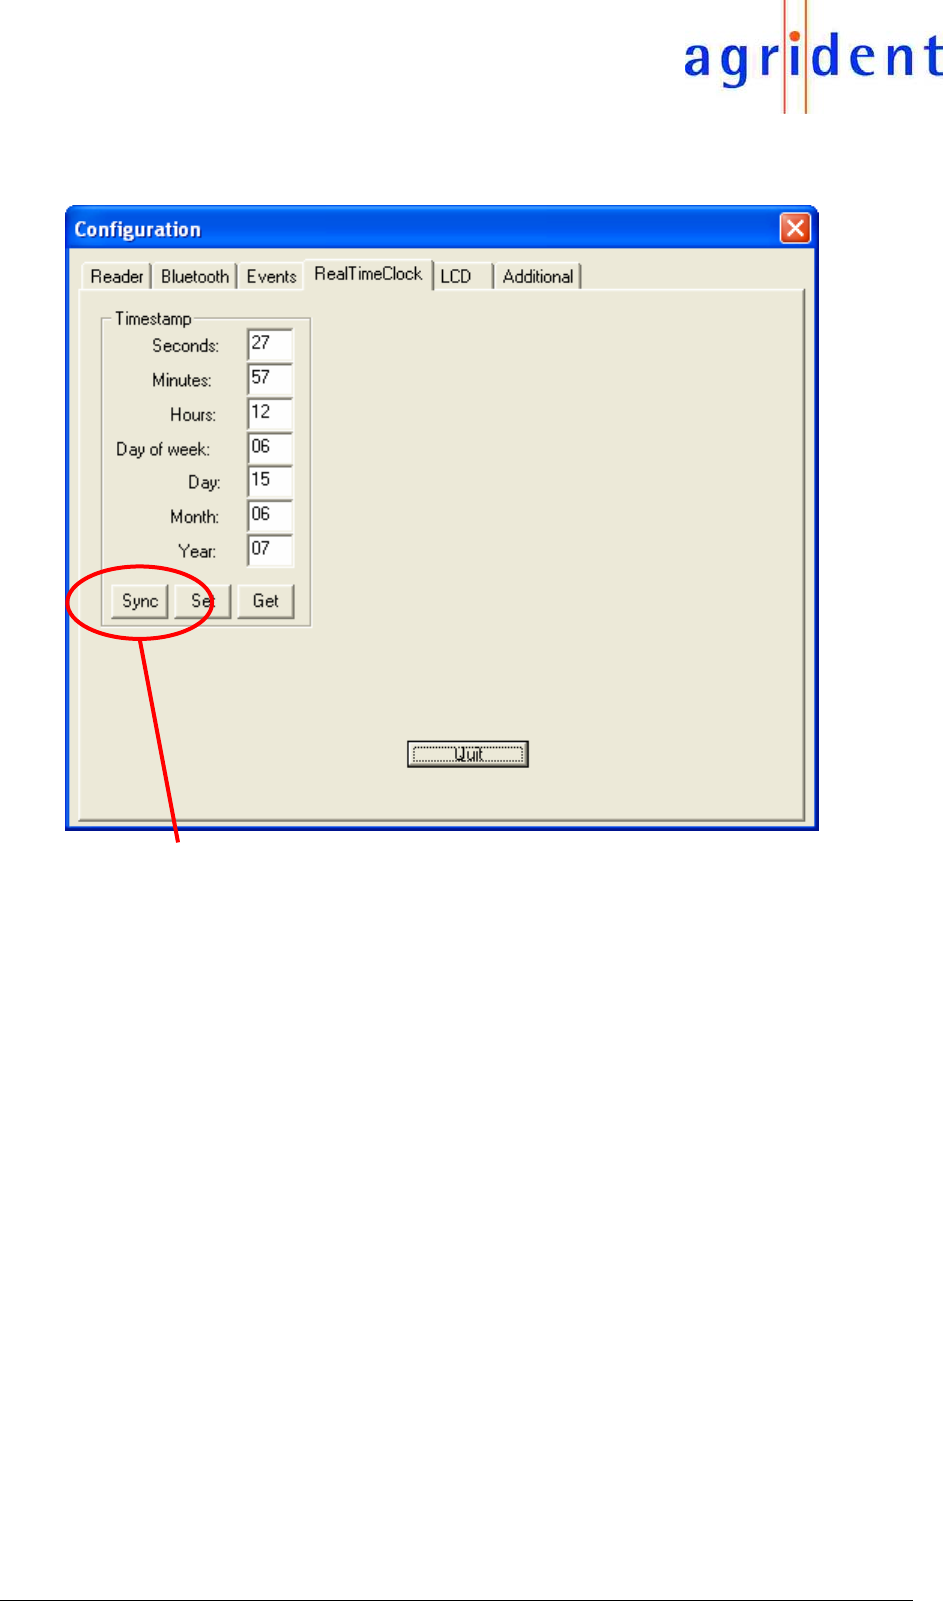
5.1.1 Synchronising the real time clock
Chose register RealTimeClock:
Press pushbutton Sync. The current PC time is transmitted to the Stick Reader.
The current time of the Stick Reader can be requested by pressing the pushbutton Get.
08/10/2007 Vertraulich / Confidential Page 23 of 31
AWR100
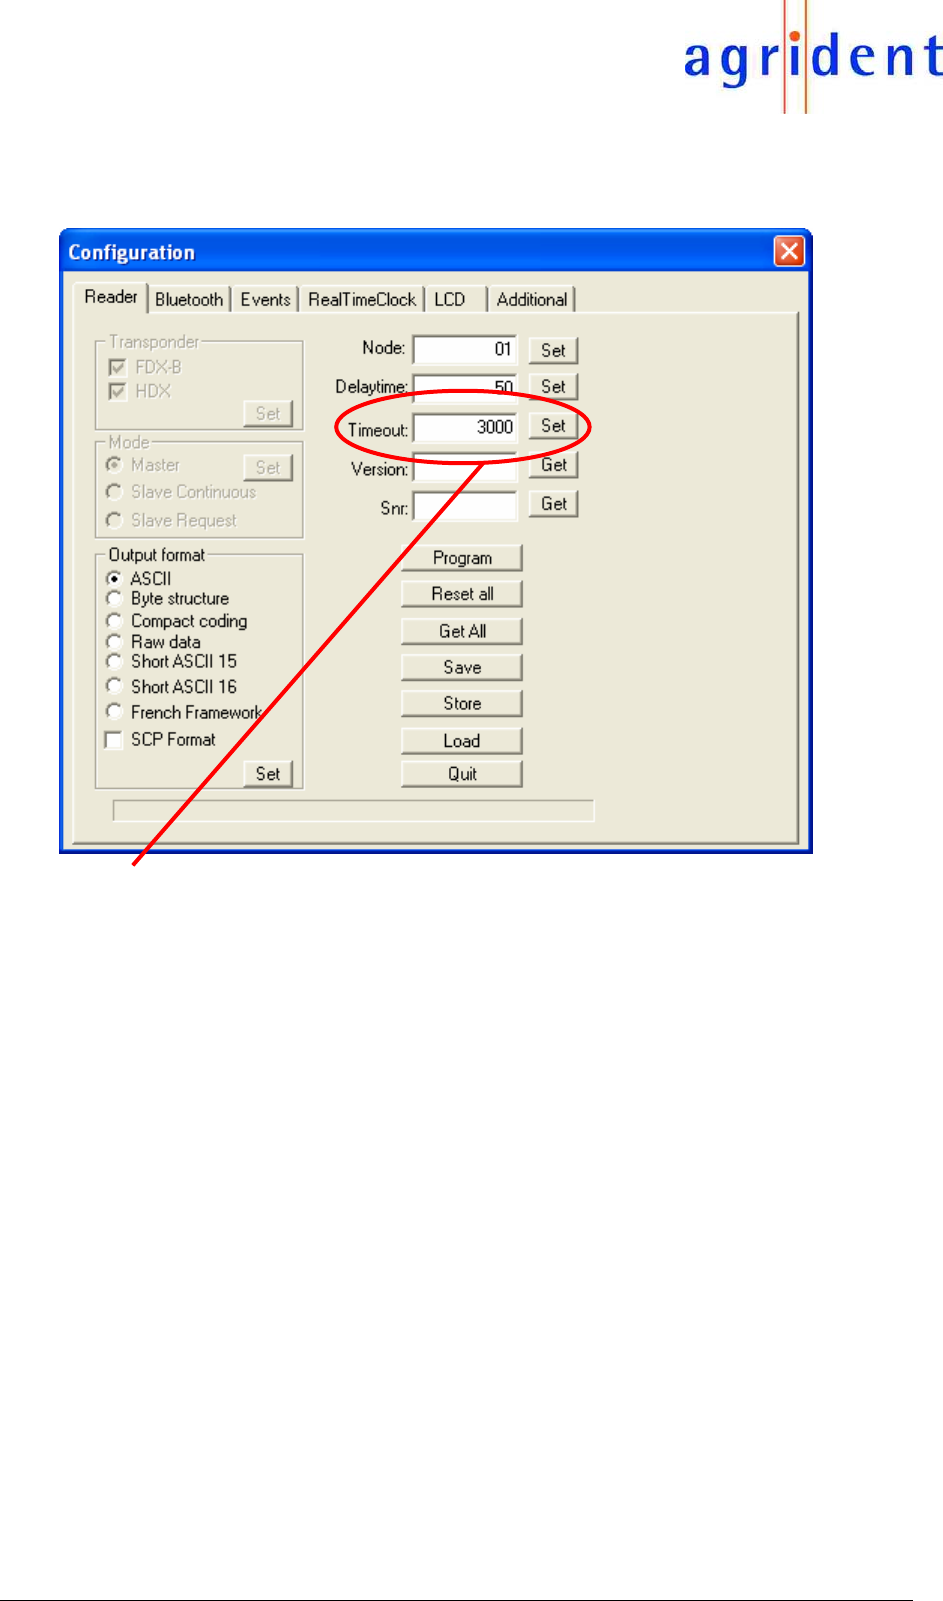
5.1.2 Configuring the reading time
The amount off read cycles is configurable.
Therefore choose the index Reader:
Set Timeout in ms (only 100ms Steps possible), press pushbutton Set.
In order to store new timeout value permanently press pushbutton Save.
In this example a timeout value of 3000ms is set.
08/10/2007 Vertraulich / Confidential Page 24 of 31
AWR100
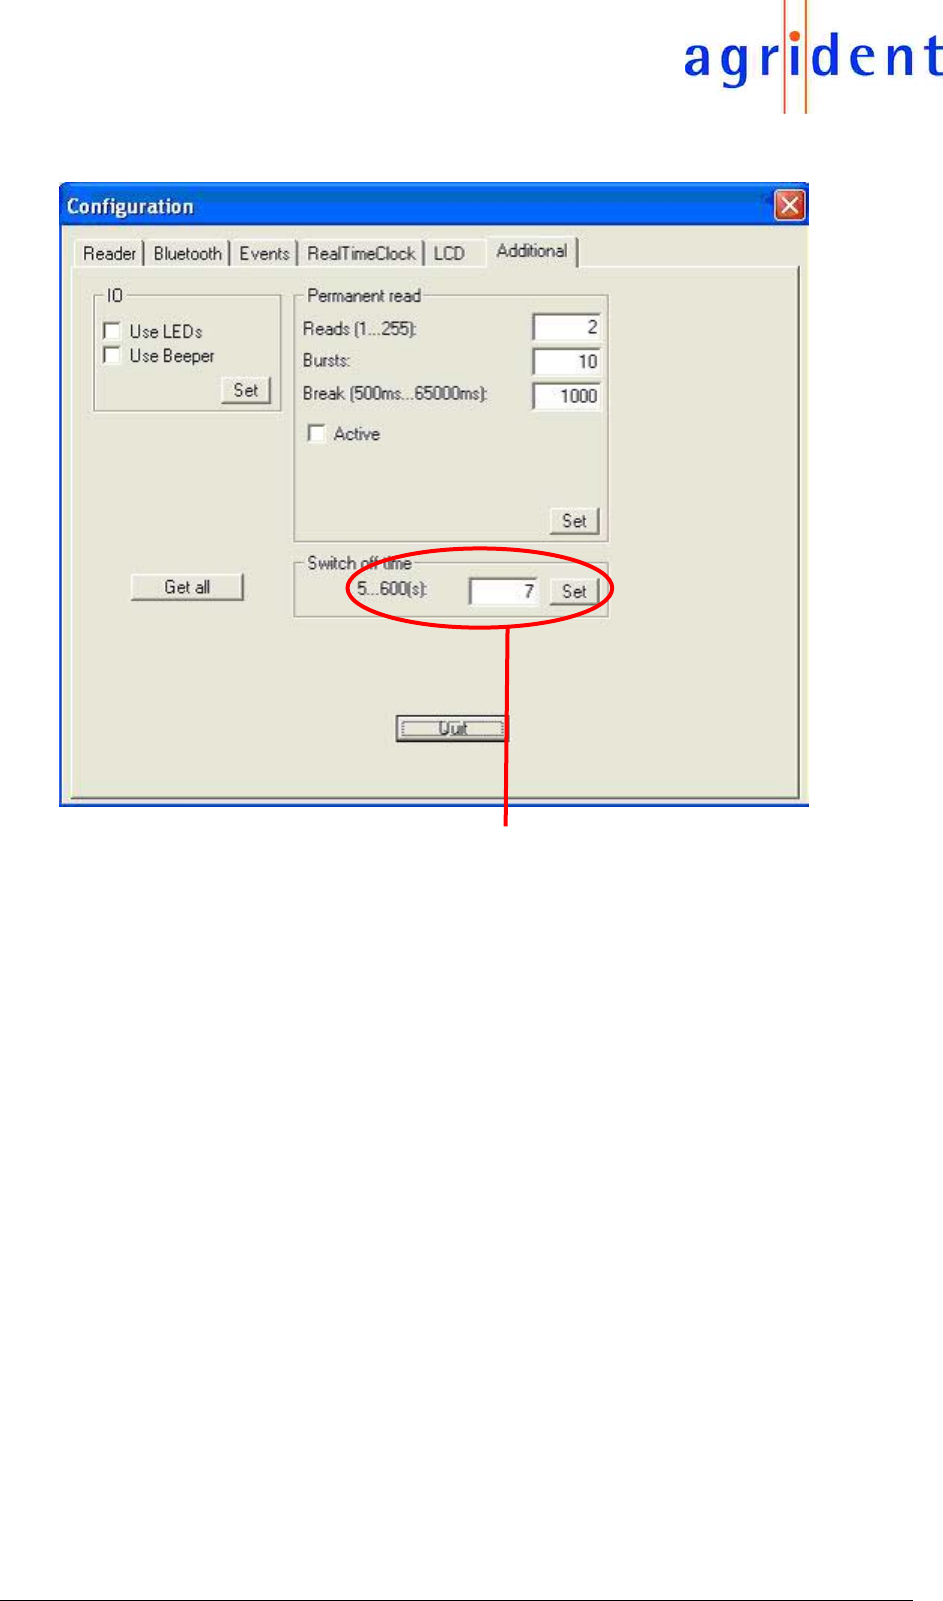
5.1.3 Configuring the switch off time
The Stick Reader is switched off automatically a certain time after last action (e.g. transponder
read or menu access). The switch off time is configurable between 5 and 600 seconds.
Type in the number of seconds in the corresponding input field and press the Set pushbutton.
Current switch off time can be read out by pressing the Get all pushbutton.
In this example switch off time is set to seven seconds.
08/10/2007 Vertraulich / Confidential Page 25 of 31
AWR100
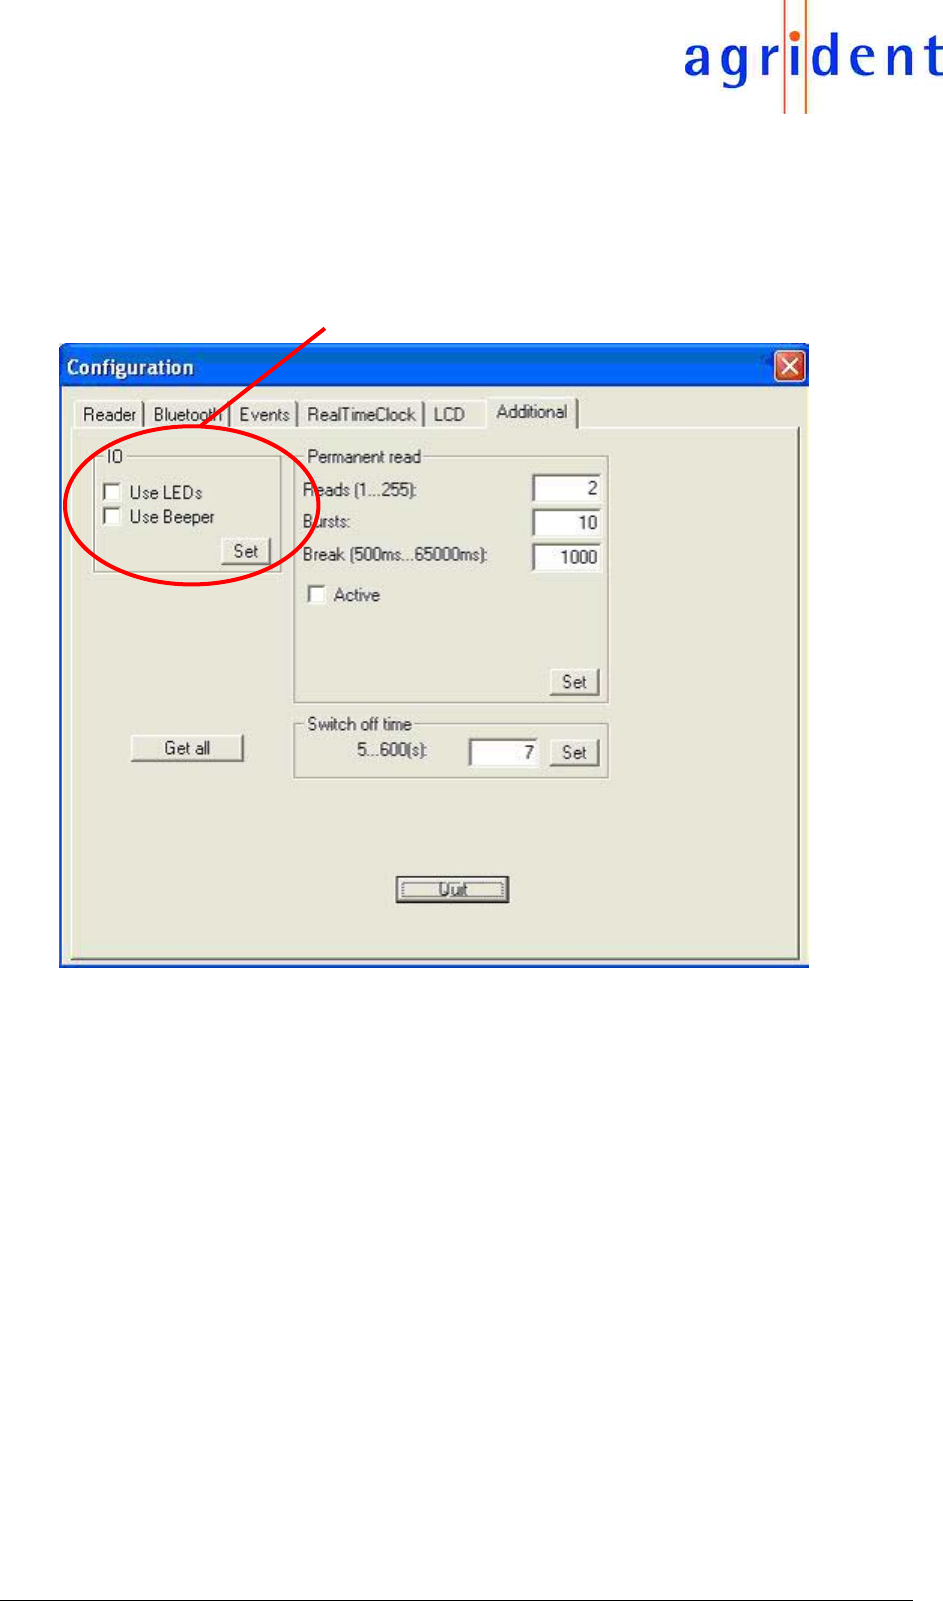
5.1.4 Configuring IO
During the RF field is on, the red LED in front of the Stick Reader is flashing. After a successful
reading the green LED in front of the Stick Reader is flashing and the beeper is beeping.
Both can be enabled or disabled by marking or unmarking the corresponding checkboxes and
pressing the corresponding Set pushbutton.
Current IO configuration can be read out by pressing the Get all pushbutton.
In this example beeper and LED's are disabled.
08/10/2007 Vertraulich / Confidential Page 26 of 31
AWR100
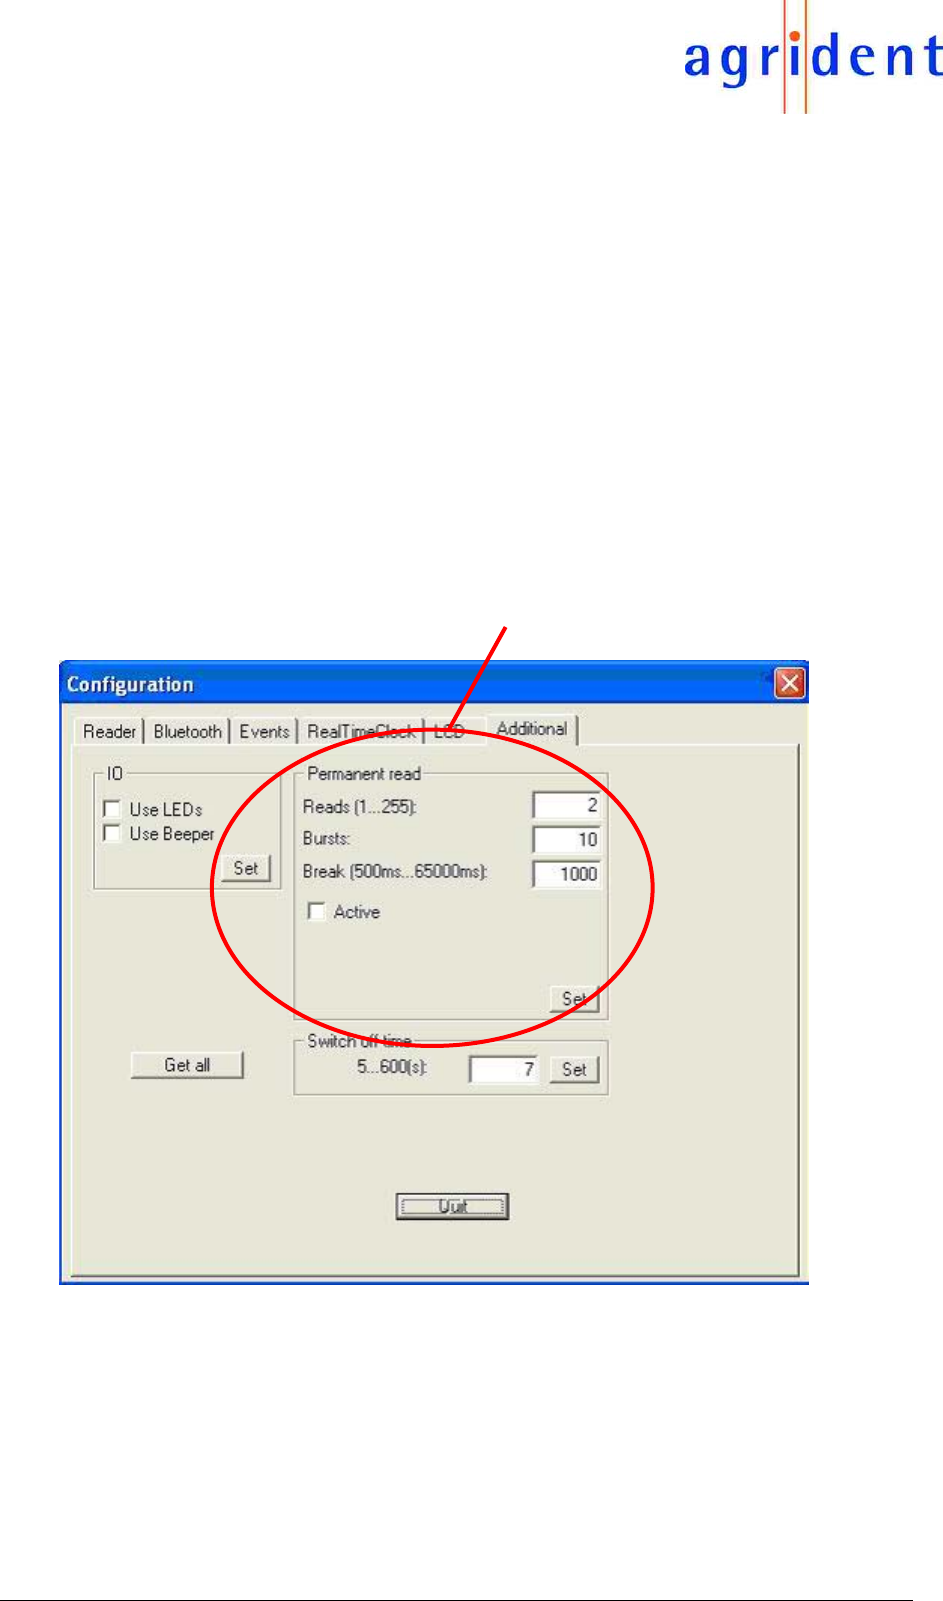
5.1.5 Configuring Permanent read
If lots of transponders have to be read in a short time, permanent read mode is a useful tool.
In this mode reading transponders takes place until timeout reached or read button is pressed.
After successful read of a transponder, timeout will be reset.
To prevent parts of the Stick Reader from overheating break time must be greater than 450
times number of reads.
Reads is the number of reads in one burst. The number of bursts is the timeout before perma-
nent reading stops. Break is the break time in ms between two burst.
In this example two reads are in one burst. That means a minimum break time of 900 ms is
necessary (in this example 1000 ms is chosen).
The number of burst is 10.
Timeout is calculated as follows:
Timeout = (Number of reads * reading time + break time) * number of bursts
One read takes approximately 90ms.
Timeout = (2 * 90ms + 1000ms) * 10 = 11800 ms
In this case timeout is approximately 12 seconds.
To configure and enable permanent reading mode fill in the values into the corresponding input
fields, mark the checkbox Active and press the corresponding Set pushbutton.
08/10/2007 Vertraulich / Confidential Page 27 of 31
AWR100
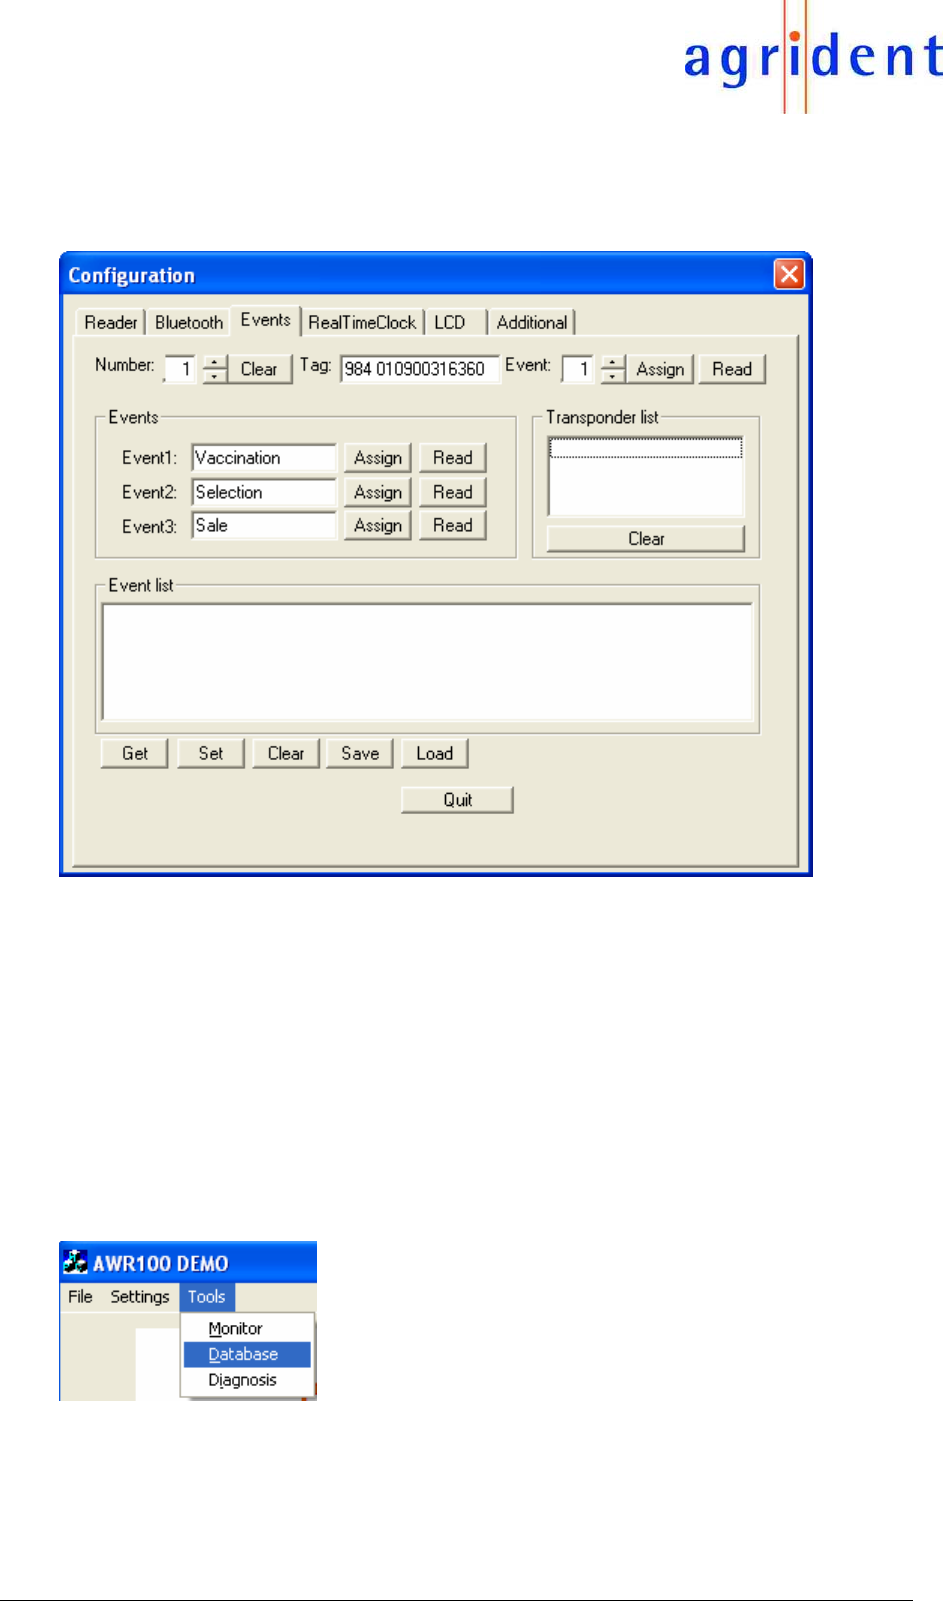
5.2 Events
In a second database up to 30 transponders can be assigned to one of three possible events.
The text of an event can be set to any value, but the length of the text must not exceed 13 char-
acters.
By pressing the pushbutton Get a list of all assigned transponders is generated.
In order to assign a transponder to an event, a free entry must be chosen in field Number
(1…30). In the field tag the complete transponder ID inclusive country code must be filled in.
In field event one of the possible events has to be chosen.
If all parameters were set, the input will be set by pressing the pushbutton Assign.
The text of the events can be read by pressing the corresponding pushbutton Read and can be
assigned by pressing the corresponding pushbutton assign.
By pressing the pushbutton Clear, all assigned events will be cleared.
6. Database
The Stick Reader consists of a database, in which up to 5000 transponder reads can be stored.
In order to work with the database chose Database from the menu Tools:
08/10/2007 Vertraulich / Confidential Page 28 of 31
AWR100
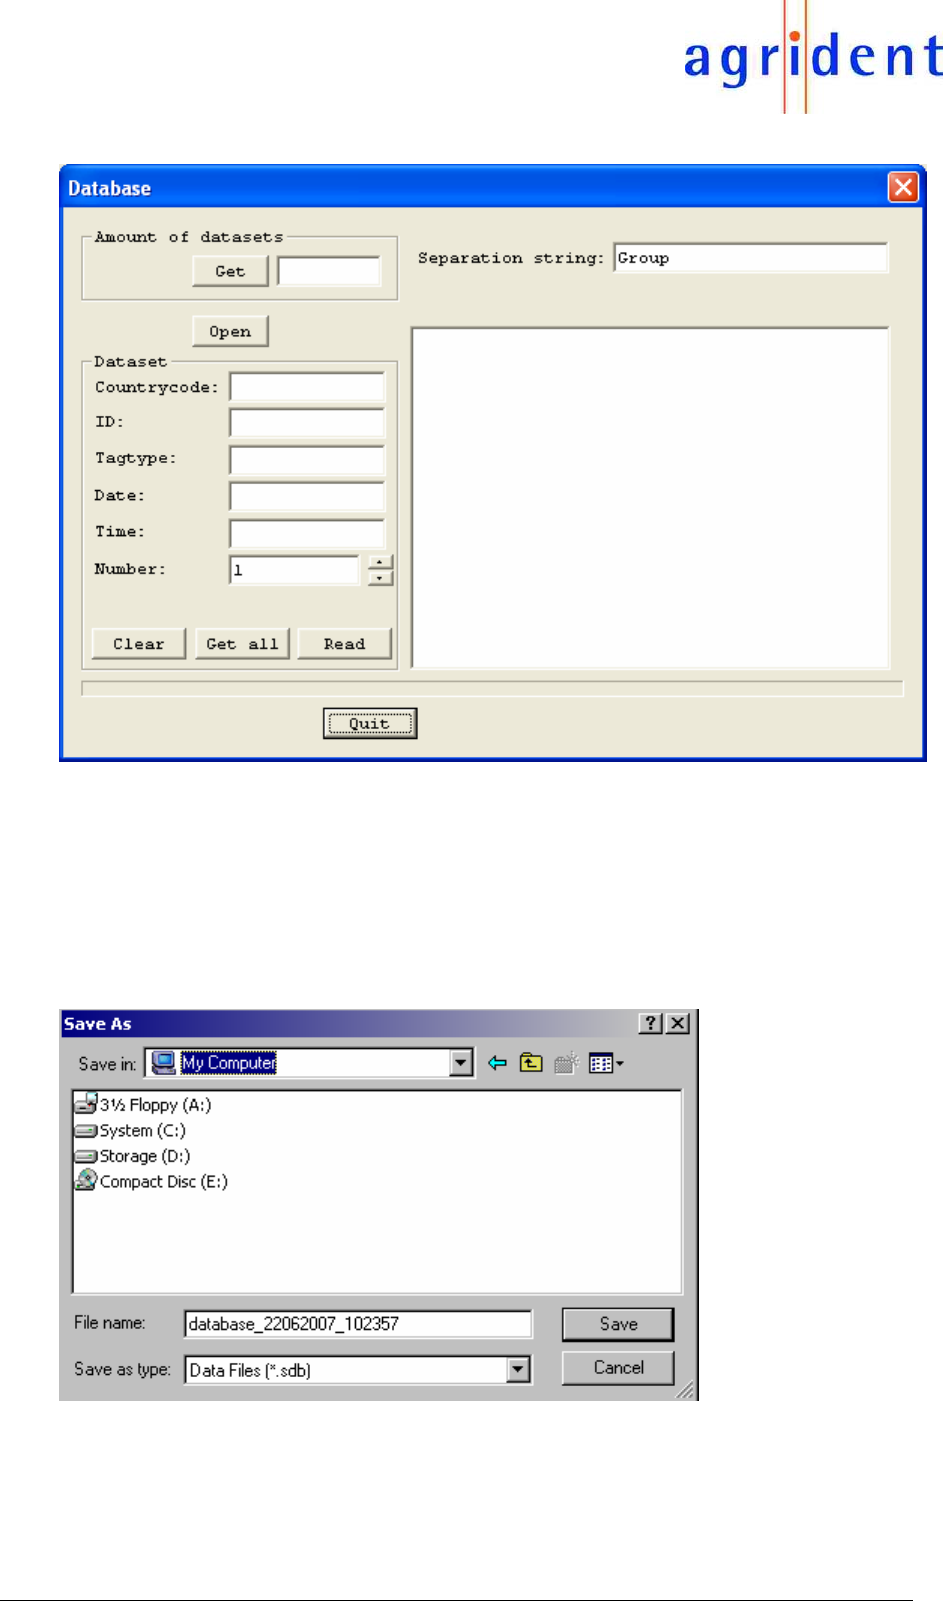
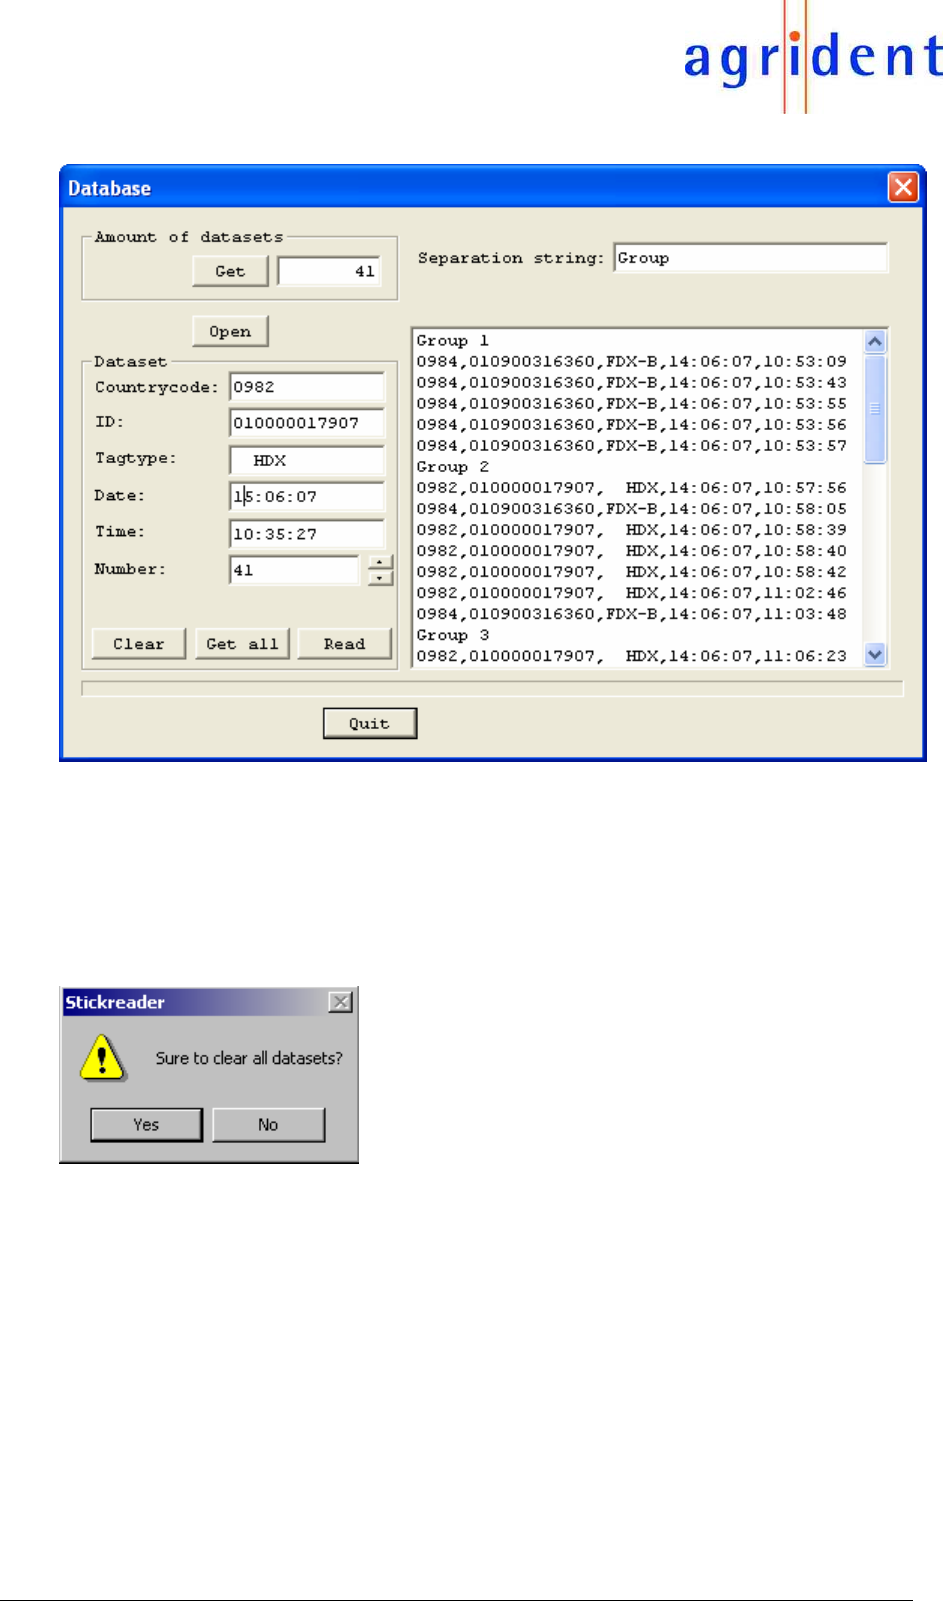
The following dialog appears:
The amount of currently stored entries can be requested by pressing the pushbutton Get.
A certain dataset can be read by setting the number of the dataset in field Number and pressing
the pushbutton Read. A stored database file can be read by pressing the pushbutton Open.
6.1 Reading the database
By pressing the pushbutton Get all, all stored datasets will be downloaded and displayed in the
list box. Before the datasets are transferred, a dialog appears which is asking for a file where all
datasets should be stored on the PC:
If pushbutton Cancel is pressed, the datasets are only displayed in the list box but not stored on
the PC.
08/10/2007 Vertraulich / Confidential Page 29 of 31
AWR100
In this example the database consists of 41 datasets:
The first separator (Group 1) is automatically set by the PC.
All other separators are part of the database of the Stick Reader.
By pressing the pushbutton Open, stored datasets can be watched in the list box.
6.2 Clearing the database
By pressing the pushbutton Clear, the complete contents of the database will be erased if the
following dialog is answered with Yes.
The clearing procedure is also displayed on the LCD display of the Stick Reader

08/10/2007 Vertraulich / Confidential Page 30 of 31
AWR100
7. Safety and care
The manufacturer accepts no liability for damage resulting from improper use or use not consis-
tent with that described in these operating instructions.
• The AWR100 Reader contains no parts that can be repaired by the user. For this reason the
Reader Electronic may only be repaired by authorised customer service personnel.
• In both operation and storage of the reader please secure to comply with the environment
conditions specified in the technical data.
• Clean the AWR100 Reader only with a damp cloth. Use only water and any commercially
available cleaning agent.
• If the stickreader is not used for a longer time, the battery should be taken out of the Stick-
reader. The battery should be stored dry and cool separately.
Any modification to the AWR100 Reader will render the warranty null and void.
8. Warranty
The manufacturer of the AWR100 Reader will provide a warranty of
12 months
from the day the device is shipped and subject to the following conditions:
a. Without submission of proof of purchase no warranty can be given.
b. In the event that defects are detected the manufacturer is entitled to choose between up to
two attempts at repair or supplying a replacement device on one occasion. The warranty pe-
riod for the repaired item or for a replacement item is 3 months but will always extend to the
end of the original warranty period. No further claims can be entertained, especially claims
for compensation for consequential losses. This exclusion of liability does not apply to claims
made on the basis of the Product Liability Act.
c. Warranty claims cannot be entertained unless the Agrident system was installed properly
and used properly and for the purpose intended.
No warranty obligations exist in particular when:
1. Damage is attributable to improper use of the device, to a incorrect connection or incorrect
operator action;
2. The device was not cared for and maintained in accordance with the manufacturer's recom-
mendations and this is the cause of the damage;
3. The damage is due to any modification to the device;
4. The damage is due to force majeure, for example, lightning strike;
5. The damage is due to wear resulting from overstressing mechanical parts.

08/10/2007 Vertraulich / Confidential Page 31 of 31
AWR100
9. FCC digital device limitations
Radio and Television Interference
Note: This equipment has been tested and found to comply with the limits for a Class B digital device,
pursuant to part 15 of the FCC Rules. These limits are designed to provide reasonable protection
against harmful interference in a residential installation. This equipment generates, uses and can radi-
ate radio frequency energy and, if not installed and used in accordance with the instructions, may
cause harmful interference to radio communications. However, there is no guarantee that interference
will not occur in a particular installation.
If this equipment does cause harmful interference to radio or television reception, which can be de-
termined by turning the equipment off and on, the user is encouraged to try to correct the interference
by one or more of the following measures:
- Reorient or relocate the receiving antenna.
- Increase the separation between the equipment and receiver.
- Connect the equipment into an outlet on a circuit different from that to which the receiver is con-
nected.
- Consult the dealer or an experienced radio/TV technician for help.
Caution! Changes or modifications not expressly approved by the manufacturer could void the user’s
authority to operate this equipment.
10. CE MARKING
Hereby, Agrident BV declares that this equipment, if used according to the instructions, is in compli-
ance with the essential requirements and other relevant provisions of the RTTE Directive 1999/5/EC.
For use in all countries of the EU.
To obtain a copy, contact Agrident BV and request the “Declaration of Conformity” document for Multi-
technology readers.
Agrident BV
mail@agrident.com
In case of alteration of the product, not agreed to by us, this declaration will lose its validity.
This symbol indicates proof of conformity to applicable European Economic
Community Council directives and harmonized standards published in the
official journal of the European Communities.
11. Trouble shooting
For any problem please contact us:
Agrident GmbH
Steinklippenstr. 10
30890 Barsinghausen
Germany
Telephone +49 5105 582573-10
FAX +49 5105 582573-17
e-mail info@agrident.com