AiRISTA Flow T201-2 WiFi Wireless Location Tag User Manual T201 User Guide Text
Ekahau Inc. WiFi Wireless Location Tag T201 User Guide Text
UserManual.wiki
>
AiRISTA Flow
>
T201-2 User Manual
>
User Manual
Contents
1.
User Manual
2.
User Guide
User Manual
Navigation menu
Upload a User Manual
Namespaces
Wiki Guide
HTML
PDF
Info
Views
User Manual
Discussion / Help
Navigation

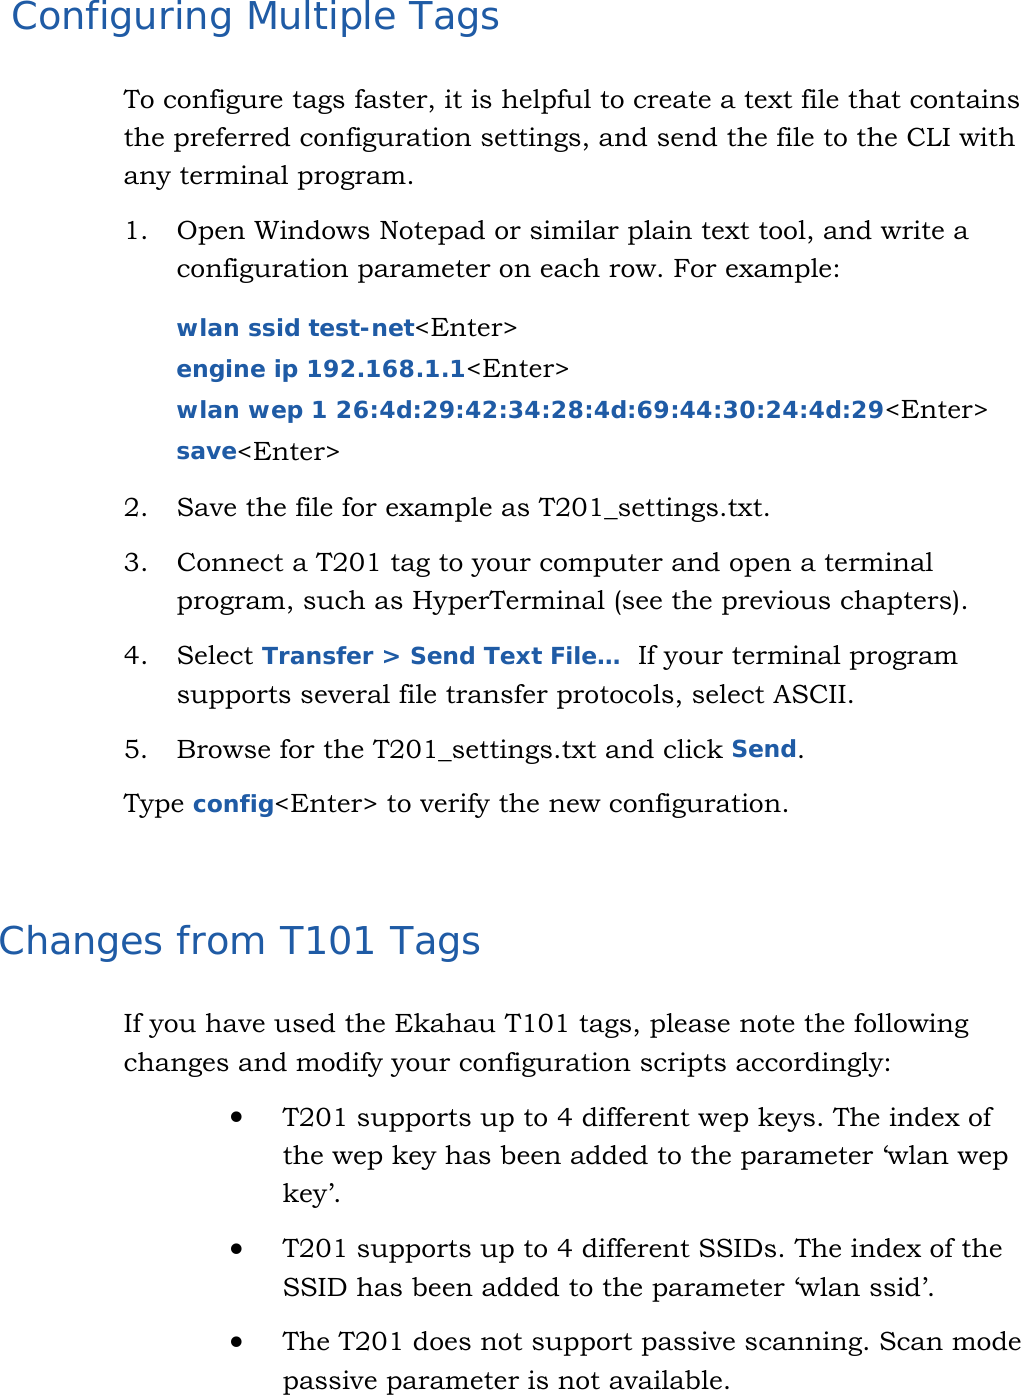
![10 The CLI prompt displays the Ekahau tag software version and serial number (or friendly name). Using the Configuration Interface Execute CLI commands with the Enter key. When you execute CLI commands, they are activated immediately without asking for confirmation. List all configuration parameters by typing config<Enter>. Save the configuration changes to permanent memory by typing save<Enter>. Any unsaved changes will be lost during the next tag sleep or power-off period. The command line is editable. You can move the cursor freely left and right and delete single characters from the line. The command history is 10 previous input lines. You can scroll through the command history with up and down arrow keys You can complete commands with the Tab key. Type help<Enter> to display the list of available commands. Successfully executed commands will not generate any output. Invalid commands will display an error message. The command prompt format is tag[serial number OR name]#](https://usermanual.wiki/AiRISTA-Flow/T201-2.User-Manual/User-Guide-555845-Page-9.png)
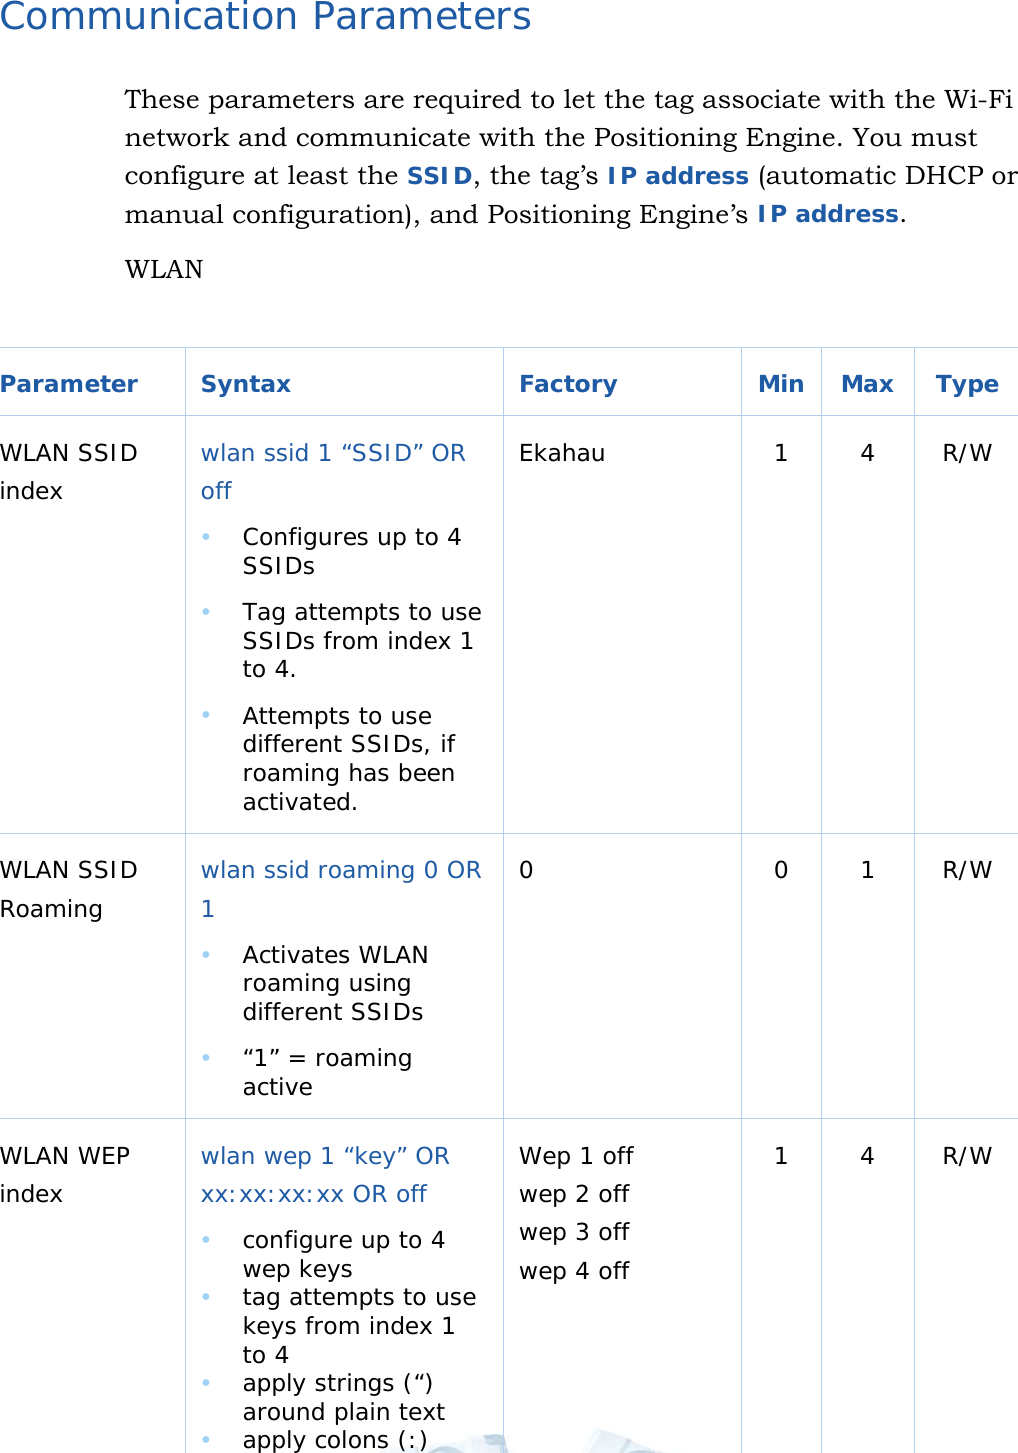
![11 Setting Parameter Value Parameter values are set by typing the full parameter string and its value to the command line. E.g. setting the associated network’s name (SSID) to “test-wlan” and saving it to tag’s permanent memory: tag[00001]# wlan ssid ”test-wlan”<Enter> tag[00001](unsaved)# save<Enter> Any unsaved changes will be lost during the next tag sleep or power-off period. Successful execution gives no feedback to the user. Most text parameters such as SSID and Engine password can be set without double quotes (“ “) if the text does not contain empty spaces. WEP key however always requires the double quotes, when typed in as plain text. The text itself cannot contain double quotes (“). Displaying Parameter Value Parameter values are displayed by typing the full parameter name string to the command line. E.g. displaying the motion scan rate: tag[00001]# motion scan rate<Enter> tag[00001]# motion scan rate = 2 seconds Error Messages If the user enters an invalid command, one of the two error messages may appear: Parameter name not valid Invalid parameter value E.g. setting an invalid parameter value tag[00001]# periodic scan interval -1<Enter> Error: Invalid parameter value](https://usermanual.wiki/AiRISTA-Flow/T201-2.User-Manual/User-Guide-555845-Page-10.png)
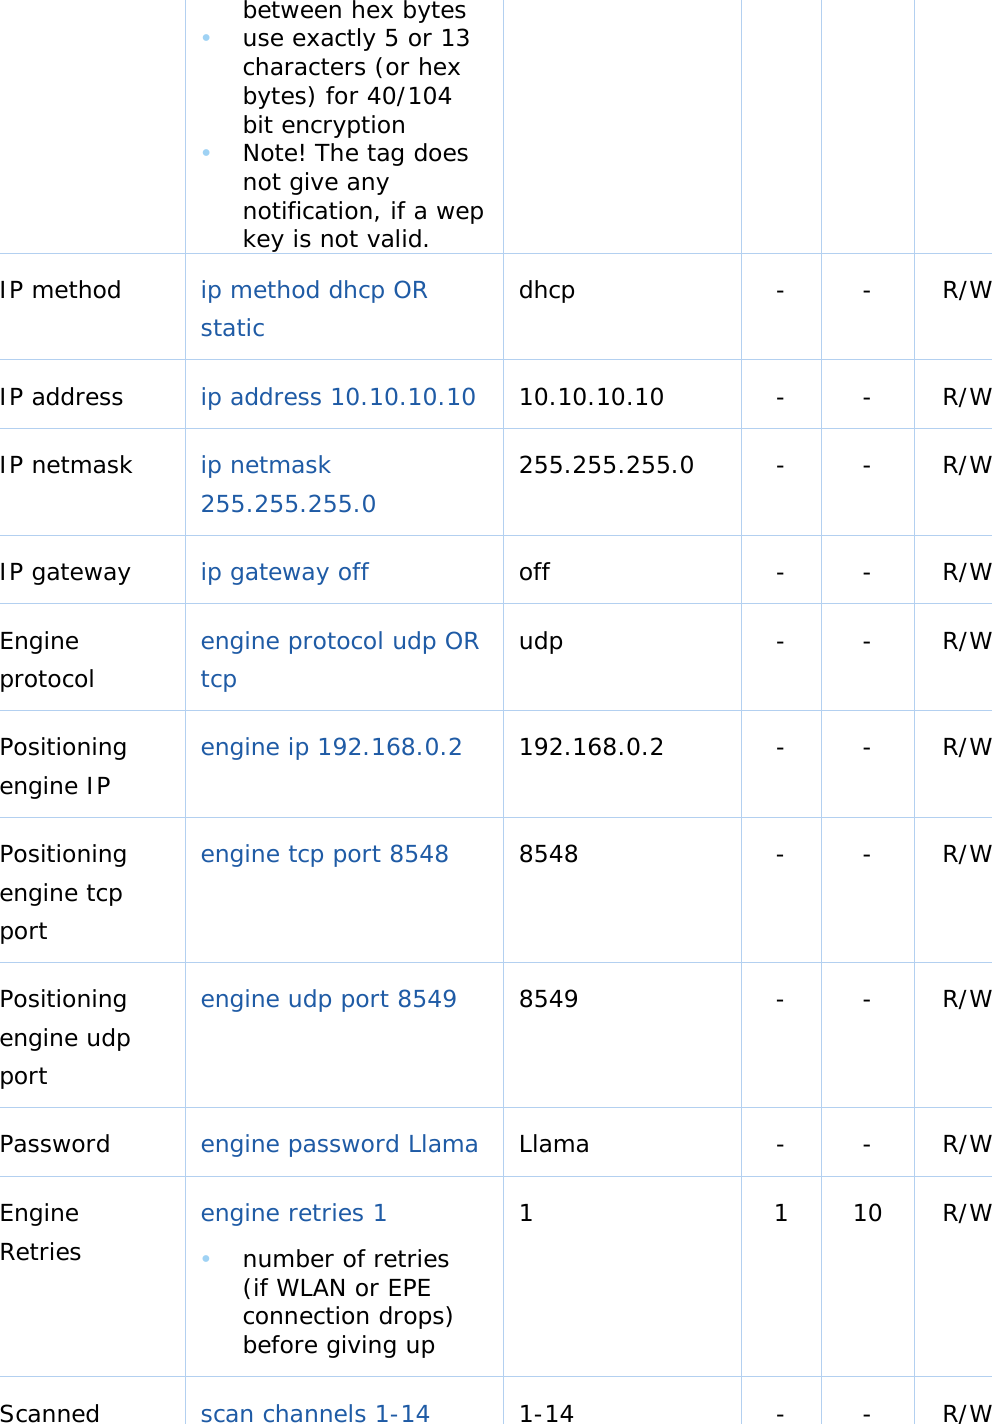
![12 Minimum Configuration To allow T201 associate with your Wi-Fi network and communicate with the Positioning Engine, you must configure at least: SSID (network name is always required) Positioning Engine IP address (always required) WEP key as a string or hex bytes (if WEP is enabled) T201 IP address or method (if DHCP service is not available)) T201 friendly name (optional but recommended) It is recommended to name each T201. The name will be displayed in Ekahau Manager instead of IP address, and developers can read the names via Ekahau SDK and YAX device property GENERAL.NAME. Minimum configuration with example values: tag[00001]# wlan ssid 1 MyNetworkName<Enter> tag[00001]# wlan wep 1 “HaRdeR2HackeR”<Enter> (if WEP enabled) tag[00001]# engine ip 192.168.1.1<Enter> tag[00001]# ip method static<Enter> (if DHCP is not available) tag[00001]# ip address 192.168.1.2<Enter> (if DHCP is not available) tag[00001]# name Robert<Enter> (optional but recommended) tag[00001]# save<Enter> The simplest configuration with SSID and Engine IP address if DHCP is available and there is no WEP.](https://usermanual.wiki/AiRISTA-Flow/T201-2.User-Manual/User-Guide-555845-Page-11.png)
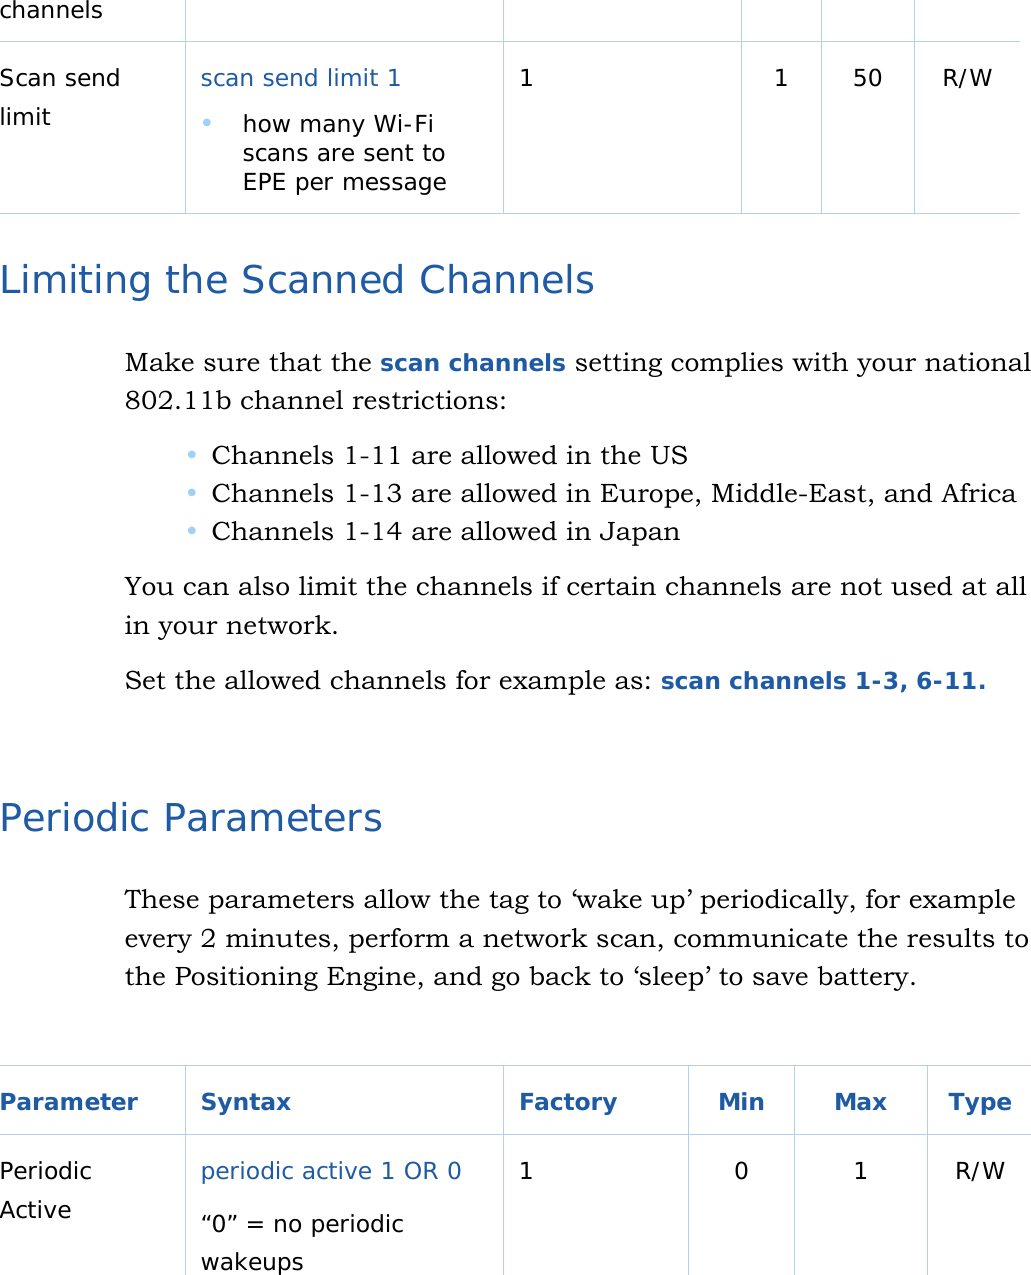
![26 T201 gives mistaken status "Associated" even if the WEP key is not correct. This is because WLAN driver gives correct response that it has "associated" to access point, but it does not inform if "Authentication" was successful. To avoid problems with the authentication make sure that the WEP key(s) are set correctly. T201 supports roaming between different SSIDs. This is implemented by scanning all audible networks and selecting the SSID in index 1. If that is not audible then index 2 and so on. How ever, if the signal of SSID index 1 is low enough, lower than -80dBm, the index 2 is tried to use and so on. This way T201 ensures that it establishes good connection to network even when the prior (index 1) network is audible with too low signal strength. Following settings have proven to work well with the motion sensor: motion sensitivity = 3 motion poll interval = 0.200 seconds motion threshold = 5 motion dead time = 5.000 seconds CHAPTER 3: Technical Specifications Enclosure Outside Dimensions (mm): 49 x 56 x 23 Weight (g): 85 Power switch with configurable Call button function Tag and battery status indication with two 2-color LED Buzzer for voice signals Operating Temperature: 0 to 50 ºC [32…140ºF] Storage Temperature: -10 to 70 ºC[-4…158ºF] Humidity: From 20% to 90 % non-condensing, relative humidity Environmental Protection: IP53/NEMA12, protected against dust and spraying water Wi-Fi Supported Wi-Fi Specification: v1.1 Supported IEEE Standards: 802.11b/g/d](https://usermanual.wiki/AiRISTA-Flow/T201-2.User-Manual/User-Guide-555845-Page-25.png)