Alarm com orporated 143600T Z-Wave adds remote control to home automation and security systems User Manual
Alarm.com Incorporated Z-Wave adds remote control to home automation and security systems
User Manual

Rhein Tech Laboratories, Inc. Client: Alarm.com
360 Herndon Parkway Model: ADC-600T
Suite 1400 Standards: FCC 15.249/IC RSS-210
Herndon, VA 20170 IDs: YL6-143600T/9111A-143600T
http://www.rheintech.com Report #: 2013303
Page 31 of 37
Appendix M: Manual
Please refer to the following pages.

Copyright © 2014 Alarm.com | www.alarm.com | v1.0
1
Impassa Broadband Module| Installation Guide
Impassa Broadband Module
INSTALLATION GUIDE
Introduction
The Alarm.com Broadband Module for DSC Impassa allows the Impassa panel to
be connected to Alarm.com via an Ethernet connection for customers in poor
cellular reception areas. This module is designed to be easy to install and use,
and it offers support for Alarm.com’s extensive set of security, monitoring,
signaling, and control features.
Contact Information
For additional information and support on Alarm.com products and services,
please visit www.alarm.com/dealer or contact Alarm.com technical support
at 1-866-834-0470.
Copyright © 2012 Alarm.com. All rights reserved.
Overview
• The broadband module is compatible ONLY with the Impassa panels.
• All of the customer features are identical to the features your
customers are used to with their cellular modules with the exception of
two-way voice over GSM. Two-way voice over GSM is not supported
on the broadband module.
• Your customer’s cable/DSL internet modem and router must have
power in order for the broadband module to send signals. Unlike
Alarm.com’s module, these devices cannot run off the control panel’s
battery backup. Note that if the router is connected to a backup
battery, powersave mode will not go into effect if power is lost.
• The broadband module must be installed behind a router. The
customer’s router must have DHCP enabled and MAC filtering disabled
for the broadband module to connect to Alarm.com’s backend. (Note:
These are the default settings on most routers.)
Account Creation
Before installing an Alarm.com Broadband Module in an Impassa system,
a new customer account needs to be created with Alarm.com. We
recommend creating the account at least 24 hours in advance of installation
to ensure that the radio is activated prior to installation.
To activate an account go to www.alarm.com/dealer and login. Under the
“Customers” heading at the top left of the page click on “Create New
Customer”. You will need the following customer information to create the
account:
• Customer Address
• Customer Phone Number
• Customer E-mail
• Preferred login name for the customer
• Alarm.com Radio Serial Number
At the end of the account creation process you will be able to print a
Welcome Letter for the customer that has their login information and
temporary password for the Alarm.com website.
Installation
Follow these guidelines during installation:
• Do not exceed the panel total output power when using panel power
for the Broadband Module, hardwired sensors, and /or sirens. Refer to
the specific panel installation instructions for details. Only one
Alarm.com Broadband Module can be used per Impassa panel.
Tools and supplies needed
You will need the following tools and supplies:
• Small flat-head and Phillips screwdrivers
• Screws (included)
• 16 pin ribbon cable (included)
Module Insertion and Antenna Installation
Note: Refer to this section only if the panel did not come pre-installed with
the module.
Before installing the module, disconnect the battery and AC power from the
panel.
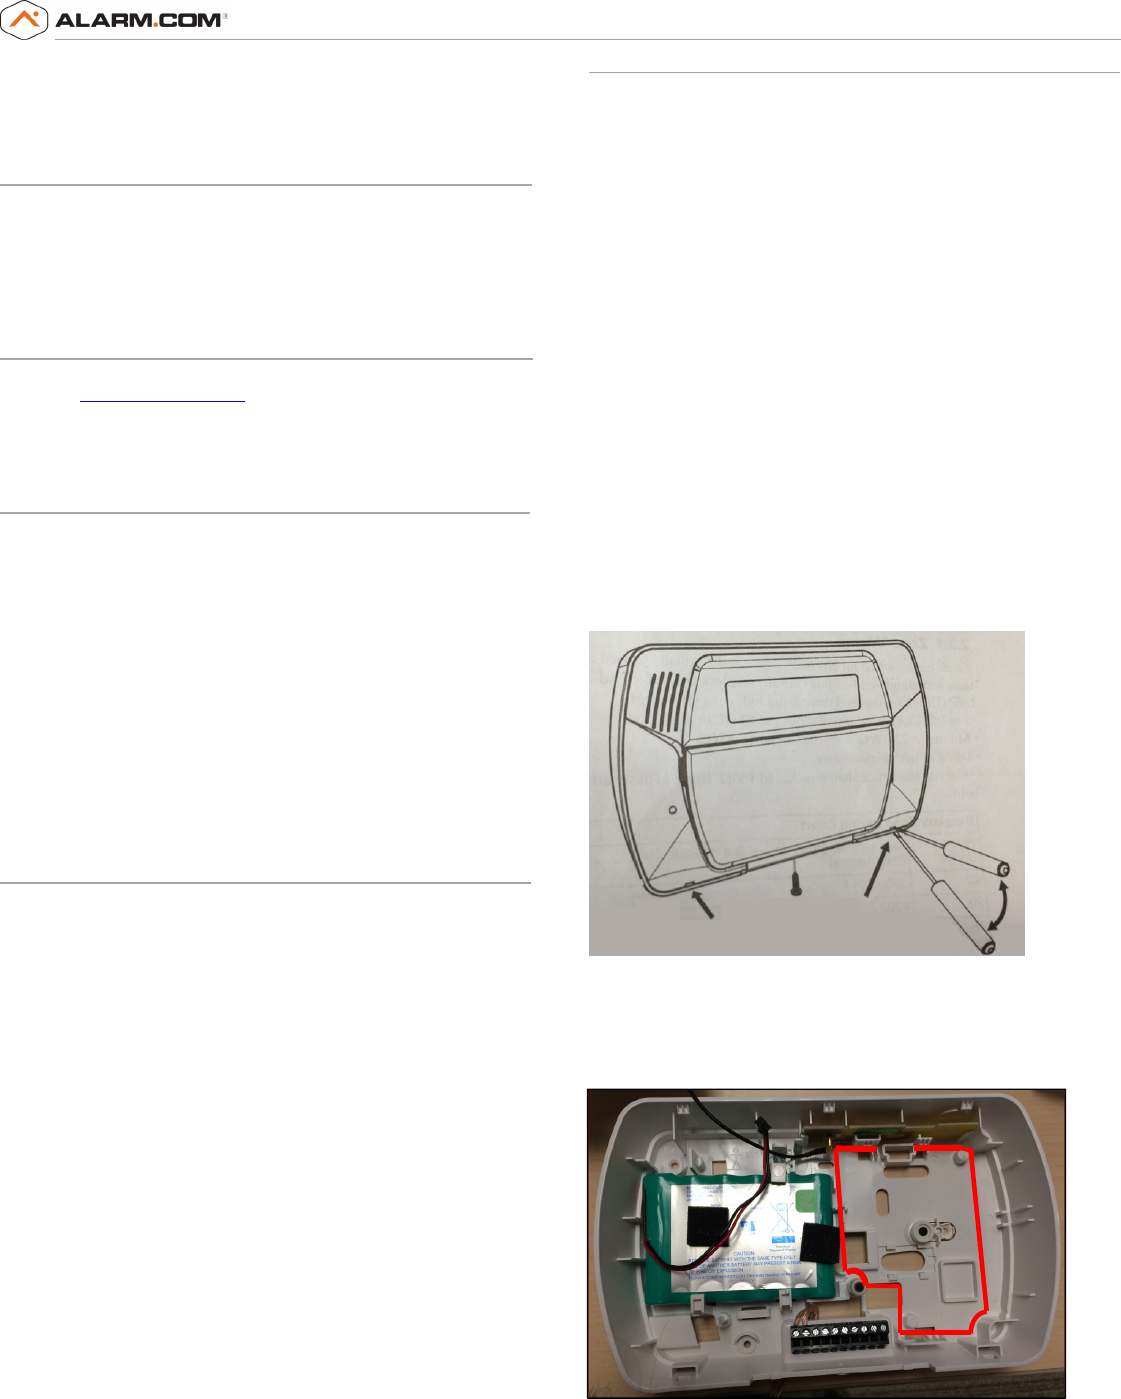
1) Open the panel by removing the cover screw then insterting a small
slotted screwdriver between the front and back covers and gently twisting to
separate.
Figure 1: Front View of Impassa Panel
2) The module compartment can be found behind the front panel that
swings down, to the right of the battery compartment as seen in Fig. 2
below.
Figure 2: Module Compartment for Impassa Panel
3) Insert the module by angling the end of the module downwards, making

Copyright © 2014 Alarm.com | www.alarm.com | v1.0
2
Impassa Broadband Module| Installation Guide
sure that the edge of the module sits below the plastic tabs located at the
top of the panel. Push the other end of the module downwards, until it sits
below the plastic tab located at the bottom of the panel.
4) Connect the module to the panel via the 16 pin ribbon cable. The ribbon
connector is located at the top of the module. On the panel the ribbon
connector is located directly across from the connector on the module.
5) Connect the Broadband-enabled Alarm.com system to the Internet using
a standard Ethernet (RJ-45) cable. The cable should be connected at one end
to the local Internet access point (network router), and at the other end to
the RJ-45 jack on the Alarm.com module.
Power Up
Reconnect panel battery and AC power. When a broadband module is
connected to a powered control panel, the LEDs at the bottom of the module
will become active (see Table 1 on page 4). It may take a few moments after
power up for the LEDs to become active. If the LEDs do not light up at all,
ensure that the module has been fully connected to the panel via the ribbon
cable then perform a full power cycle by following these steps:
1. Disconnect the battery leads and unplug the panel power
transformer from AC power.
2. Verify that the module is inserted securely.
3. Connect battery leads to the battery. Make sure to observe
polarity (red to + and black to –) and to keep the wires outside of
the tab holding them in place.
4. Plug the panel power transformer into the AC outlet.
It is important to plug the battery in before plugging in the transformer,
otherwise the panel will issue a “System Low Battery” message regardless of
the battery voltage level.
Note that power cycling will clear existing banners.
Comm Test (Module Registration)
To initiate module communication with Alarm.com the first time, perform a
“Comm test”.
To perform the comm test on an Impassa press [*][6] followed by the master
code and [4].
The Impassa panel will let you know when the comm test has completed by
activating the siren output on medium volume for 2 seconds followed by full
volume alarm for 2 seconds. All display lights and LCD pixels turn on. This
indicates that Alarm.com has received and acknowledged the signal. This
does not guarantee that the signal went through to a central station; it
confirms that the Alarm.com Operations Center received the signal. The
central station should be contacted directly to verify that the signal was
received on the correct account and that the Central Station routing settings
have been set up correctly. The signal may not go through to the central
station if (a) the Central Station Account settings were entered incorrectly on
the Alarm.com Dealer Site or (b) if Alarm.com was unable to send the signal
successfully to the Central Station receivers.
Panel Settings
Night Arming
The Impassa panel has the ability to night arm, which arms the perimeter
and restricts movement to designated interior areas. Night arming via the
panel should be restricted to one of the five function keys. For more
information on Night Arming and how to program the function keys see the
installation guide provided with the panel.
Panel Settings Automatically Change
Some panel settings are changed automatically when the broadband module
is connected to the control panel. These settings should not be altered. They
are:
Clock: The broadband module sets the panel clock when it connects to
Alarm.com and then updates it every 18 hours. It is important to select the
correct panel time zone on the Alarm.com website, or the panel time will not
be accurate. If a system is powered up before the customer account has
been created, the time zone will default to Eastern Time
Specifications
Compatibility
Impassa
panels
Power requirements
3.9V
Standby
current
3.9mA
Peak current
325mA
Operating temperature
14 to 131°F (
-
10 to 55°C)
Storage temperature
-
30 to 140°F (
-
34 to 60°C)
Max. relative humidity
90% non
-
condensing
N
etwork
Broadband
Dimensions
(H x W) 3.25 x 4.25 in.
(8.23 x 10.80
cm.)
Regulatory Information
Changes or modifications not expressly approved by Alarm.com can void the
user’s authority to operate the equipment.
This equipment has been tested and found to comply with the limits for a
Class B digital device, pursuant to part 15 of the FCC Rules. These limits are
designed to provide reasonable protection against harmful interference in a
residential installation. This equipment generates, uses, and can radiate
radio frequency energy and, if not installed and used in accordance with the
instructions, may cause harmful interference to radio communications.
However, there is no guarantee that interference will not occur in a
particular installation. If this equipment does cause harmful interference to
radio or television reception, which can be determined by turning the
equipment off and on, the user is encouraged to try to correct the
interference by one or more of the following measures:
• Reorient or relocate the receiving antenna.
• Increase the separation between the equipment and receiver.
• Connect the equipment in to an outlet on a circuit different from
that which the receiver is connected
• Consult the dealer or an experienced radio/TV technician for help.
This equipment complies with the FCC RF radiation exposure limits set forth
for an uncontrolled environment. This equipment should be installed and
operated with a minimum distance of 20 centimeters between the radiator
and your body.
Under Industry Canada regulations, this radio transmitter may only operate
using an antenna of a type and maximum (or lesser) gain approved for the
transmitter by Industry Canada. To reduce potential radio interference to
other users, the antenna type and its gain should be so chosen that the
equivalent isotropically radiated power (e.i.r.p.) is not more than that
necessary for successful communication.
Conformément à la réglementation d'Industrie Canada, le présent émetteur
radio peut fonctionner avec une antenne d'un type et d'un gain maximal (ou
inférieur) approuvé pour l'émetteur par Industrie Canada. Dans le but de
réduire les risques de brouillage radioélectrique à l'intention des autres

Copyright © 2014 Alarm.com | www.alarm.com | v1.0
3
Impassa Broadband Module| Installation Guide
utilisateurs, il faut choisir le type d'antenne et son gain de sorte que la
puissance isotrope rayonnée équivalente (p.i.r.e.) ne dépasse pas l'intensité
nécessaire à l'établissement d'une communication satisfaisante.
This device complies with Industry Canada licence-exempt RSS standard(s).
Operation is subject to the following two conditions: (1) this device may not
cause interference, and (2) this device must accept any interference,
including interference that may cause undesired operation of the device.
Le présent appareil est conforme aux CNR d'Industrie Canada applicables aux
appareils radio exempts de licence. L'exploitation est autorisée aux deux
conditions suivantes : (1) l'appareil ne doit pas produire de brouillage, et (2)
l'utilisateur de l'appareil doit accepter tout brouillage radioélectrique subi,
même si le brouillage est susceptible d'en compromettre le fonctionnement.
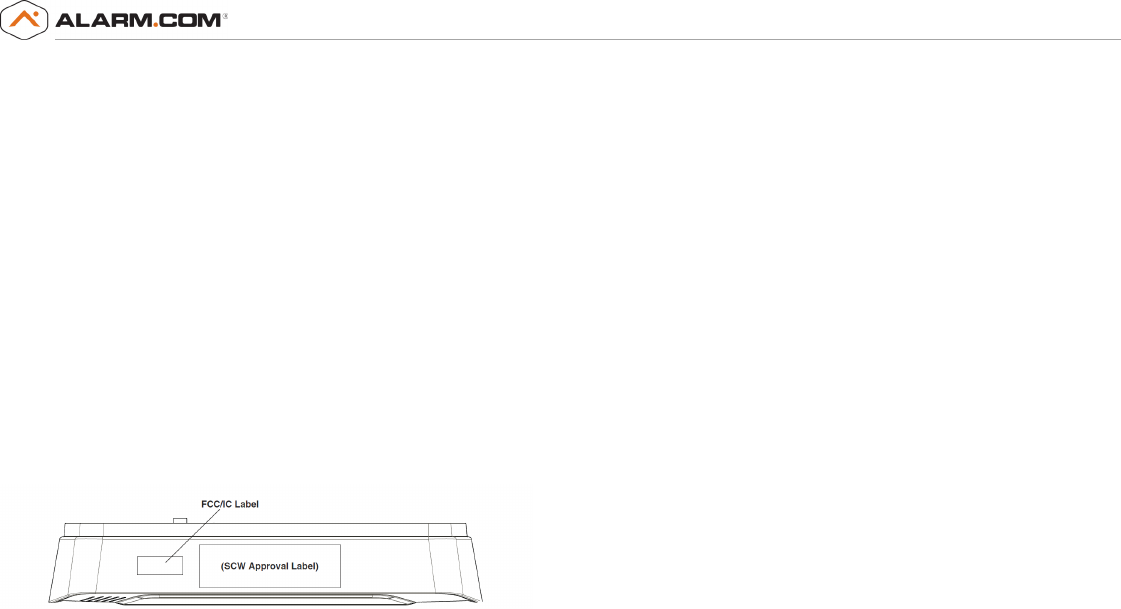
This modular transmitter is labeled with its own FCC ID and IC number. When
the module is installed inside the host device and the FCC ID/IC of the
module is not visible the host device shall display the provided label referring
to the FCC ID and IC of the enclosed module. This label is shipped together
with the module and it is the responsibility of the integrator to apply it to the
exterior of the enclosure as indicated below.
FCC ID: YL6-143600T, IC: 9111A-143600T