Alco Electronics RCT6077W2 7 inch Tablet User Manual 1
Alco Electronics Ltd 7 inch Tablet 1
Contents
- 1. User Manual 1
- 2. User Manual 2
User Manual 1
RCT6077W2
User Manual
It's important to read this instruction prior to using your new
product for the first time.
7” Tablet
Scan for more user manual details

SAFETY PRECAUTIONS
EN - 1
RCT6077W2
Equipment tested for
compliance as a
complete unit
This device complies with Part 15 of the FCC Rules. Operation is subject to the
following two conditions: (1) This device may not cause harmful interference, and (2)
this device must accept any interference received, including interference that may
cause undesired operation.
This equipment has been tested and found to comply with the limits for a Class B
digital device, pursuant to Part 15 of FCC Rules. These limits are designed to
provide reasonable protection against harmful interference in a residential
installation. This equipment generates, uses, and can radiate radio frequency energy
and, if not installed and used in accordance with the instructions, may cause harmful
interference to radio communications.
However, there is no guarantee that interference will not occur in a particular
installation. If this equipment does cause harmful interference to radio or television
reception, which can be determined by turning the equipment off and on, the user
is encouraged to try to correct the interference by one or more of the following
measures:
• Reorient or relocate the receiving antenna.
• Increase the separation between the equipment and receiver.
• Connect the equipment into an outlet on a circuit different from that to which the
receiver is connected.
• Consult the dealer or an experienced radio/TV technician for help.
Warning: Changes or modifications not expressly approved by the party responsible
for compliance (MLB International Inc., P.O. Box 1535, Buffalo, NY 14226, Tel: 516-
236-4556) could void the user’s authority to operate the equipment.
Caution: Use of controls or adjustments or performance of procedures other than
those specified may result in hazardous radiation exposure.
Warning: The AC/DC adaptor is used as disconnect device.
The AC/DC adaptor of apparatus should not be obstructed OR should be easily
accessed during intended used. To be completely disconnect the power input, the
AC/DC adaptor of apparatus shall be disconnected from the mains.
Trademark Information
Google Play, YouTube and other marks are trademarks of Google Inc.
The Android robot is reproduced or modied from work created and shared by Google
and used according to terms described in the Creative Commons 3.0 Attribution License.
The Wi-Fi CERTIFIED Logo is a certication mark of the Wi-Fi Alliance. The Wi-Fi
Protected Setup Mark is a mark of the Wi-Fi Alliance.
For Your Safety
The AC power plug is polarized and only fits into AC power outlets one way. If the plug
won’t go into the outlet completely, turn the plug over and try to insert it the other way.
If it still won’t fit, contact a qualified electrician to change the outlet, or use a different
one. Do not attempt to bypass this safety feature.
Service Information
This product should be serviced only by those specially trained in appropriate servicing
techniques. For instructions on how to obtain service, refer to the warranty included in this
guide.

Some of the following information may not apply to your particular product; however, as
with any electronic product, precautions should be observed during handling and use.
• Read these instructions.
• Keep these instructions.
• Heed all warnings.
• Follow all instructions.
• Do not use this apparatus near water.
• Clean only with dry cloth.
• Do not block any ventilation openings. Install in accordance with the
manufacturer’s instructions.
• Do not install near any heat sources such as radiators, heat registers, stoves, or
other apparatus (including amplifiers) that produce heat.
• The AC power plug is polarized and only fits into AC power outlets one way. If the
plug won’t go into the outlet completely, turn the plug over and try to insert it the
other way. If it still won’t fit, contact a qualified electrician to change the outlet, or
use a different one. Do not attempt to bypass this safety feature.
• Protect the power cord from being walked on or pinched particularly at plugs,
convenience receptacles, and the point where they exit from the apparatus.
• Only use attachments / accessories specied by the manufacturer.
• Unplug this apparatus during lightning storms or when unused for long periods of
time.
• Refer all servicing to qualied service personnel. Servicing is required when the
apparatus has been damaged in any way, such as power-supply cord or plug is
damaged, liquid has been spilled or objects have fallen into the apparatus, the
apparatus has been exposed to rain or moisture, does not operate normally, or
has been dropped.
ADDITIONAL SAFETY INFORMATION
• The AC/DC adaptor and apparatus shall not be exposed to dripping or splashing
and no objects filled with liquids, such as vases, shall be placed on the apparatus.
• Always leave sufficient space around the product for ventilation. Do not place
product in or on a bed, rug, in a bookcase or cabinet that may prevent air flow
through vent openings.
• Do not place lighted candles, cigarettes, cigars, etc. on the product.
• Connect power cord only to AC power source as marked on the product.
• Care should be taken so that objects do not fall into the product.
• Do not attempt to disassemble the cabinet. This product does not contain
customer serviceable components.
• To reduce the risk of re or electric shock, do not expose this apparatus to rain
or moisture.
• Do not play your headset at high volume. Hearing experts warn against extended
high-volume play.
IMPORTANT SAFETY INSTRUCTIONS
PLEASE READ AND SAVE THIS FOR FUTURE REFERENCE
EN - 2
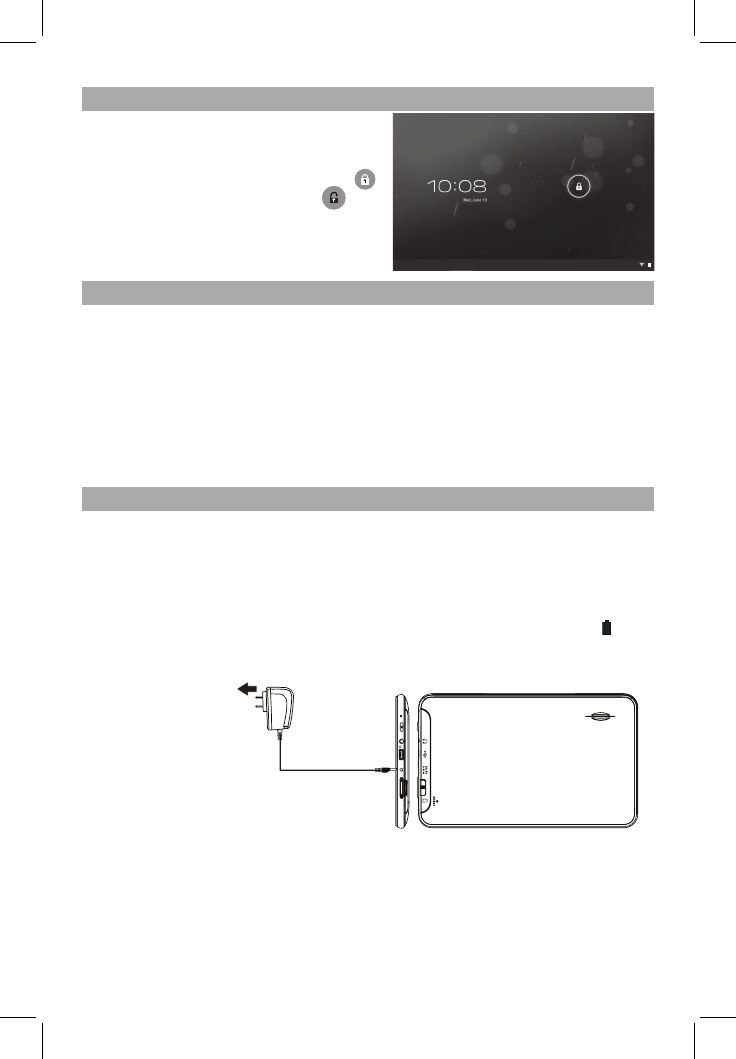
Switch On/Unlock
Switch on and unlock: When the device is in
the OFF mode, press and hold “POWER” key
to enter the startup screen, then the screen
is in locked mode. And press and pull the
icon to the unlocked position(the icon
appears), then the screen will unlock.
Power Save Mode/Lock Screen/Switch OFF
Press the “POWER” key shortly after starting up, the unit will enter power save and
locked mode.
Switch OFF: When the device is in Home menu, press and hold the “POWER” key for
about 2 seconds, and the screen will display the Power off interface, choose the "OK"
to confirm, the system will shut down.
Note: When the device has low battery, it will alarm continuously and shut down
automatically if the device is not being charged and the device cannot start up. Please
check if the battery is low, and try it again after the battery is charged.
Battery Management and Charging
Charge the battery for about 4 hours to make sure the battery is fully charged before
the first time of use.
Insert the micro port of the battery adapter into DC slot on the device, and connect the
other side with the power socket. The desktop icon of the battery will keep rolling, which
shows it is charging, please wait until the battery is fully charged, and do not disconnect
the power while charging. Once the battery is fully charged, the fully charged icon on the
desktop will apear. When the battery is exhausted completely, please charge at least one
minute before starting up.
Note: In order to keep the battery working in best condition, please pay attention to
the following:
• Please do not charge the battery in high temperatures.
• Do not wait for the batter to be fully depleted before charging again. Keep the battery
charged as needed.
• The included AC adaptor is for use with this unit only. Do not use it with other equipment.
To wall outlet
AC adaptor
EN - 3
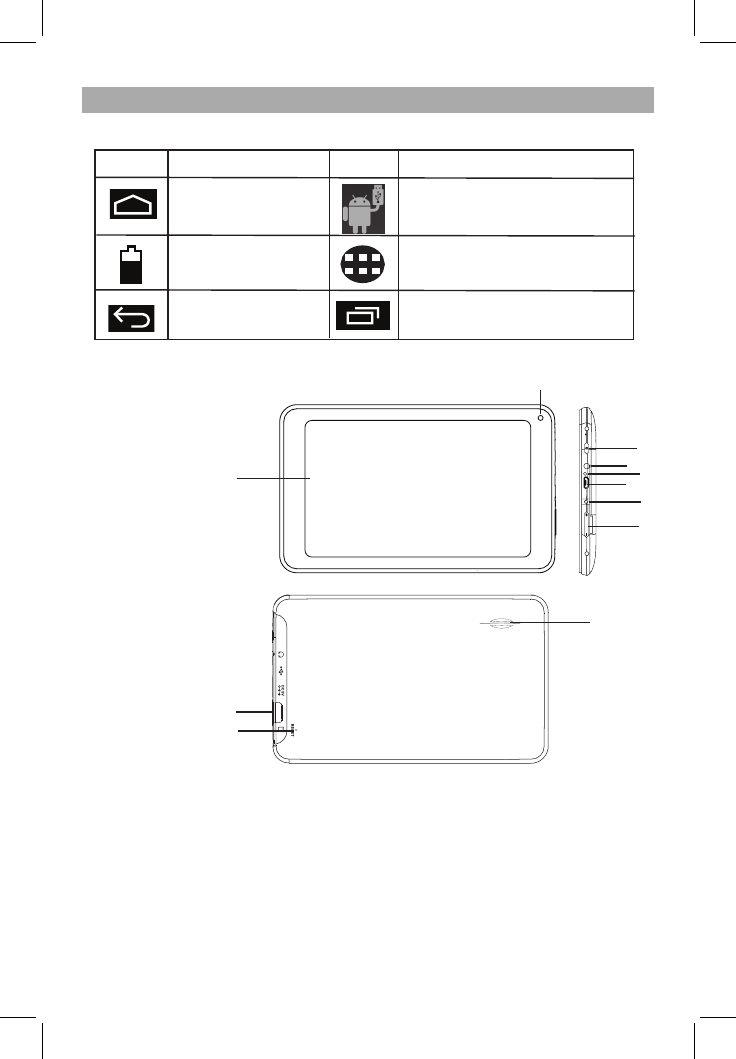
Operation of the Function Icons
Function Icon Definitions:
EN - 4
Icon Function Instruction
Note when connect with PC via
USB.
Back to Home menu
Show current power
status
Return
App menu
Open the list of apps that you
have used recently.
Icon Function Instruction
1. Display
2. Front Camera
3 POWER Button: Press the button shortly to enter standby/wake up mode,
press for a few seconds to switch On/Off the unit.
4. Earphone Jack: Stereo earpiece jack.
5. Microphone Jack
6. USB Slot: MINI USB Port, connect to a PC.
7. DC Socket: Connect with 5V DC charger.
8. Volume+/- Key: Press to adjust the volume.
9. Card Slot: TF card slot (Micro SD Card Slot).
10. Reset
11. Speaker
9
10
11
1
2
3
45
7
8
Overview of Controls
6
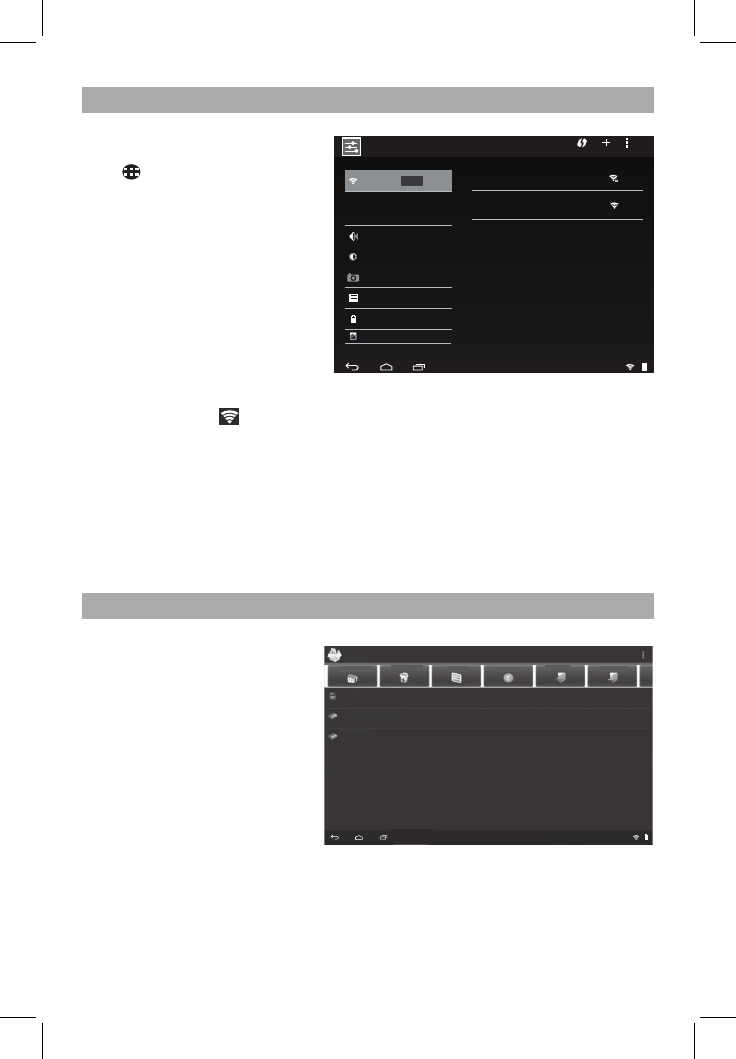
Connecting to Wireless Networks
Wi-Fi
Turn on the Wi-Fi: Tap the App
menu to enter, then tap “Settings”
to enter the setting interface. Under
WIRELESS & NETWORKS make
sure slide the option to ON.
Connect to a network: If the Wi-
Fi is set to ON, the system will find
the available Wi-Fi automatically.
Please refer to the right picture,
the available Wi-Fi will be shown
on the right, then you can select an
available one to connect(if required,
you need input password).
You can see the network connection status when you press the network name. There
will be a Wi-Fi icon “ ” to showing the level of signal.
VPN Virtual Private Network
You can create virtual private network (VPN) and connect to your private network
securely through a public network, such as the internet. You must set a lock screen
PIN or password before you can use credential storage.
Add VPN network and follow the instructions on the screen.
USB Function
Read USB
Insert the USB into the Mini USB
port and press the Explorer in
the App menu, maybe you will
need an additional adapter cable
to connect between the USB and
the device, press “USB” and enter
USB.
Settings
Wi-Fi
More...
Sound
Display
ScreenshotSetting
Storage
Battery
VODTE S T - E L E
Conne c t e d
ALCOSZELE
WPS available
DEVICE
WIRELESS & NETWORKS
ON
Apps
PERSONAL
1:35
SD Card
Internal Memory
USB
Explorer
Home LevelUp Multi Editor NewFolder Back
MANAGE APPLICA T IONS
10:20
EN - 5
App Menu
App icons are shortcuts placed on the screen and used to open applications installed
on your tablet.
To see all apps, touch the Apps menu icon.
To open an app, touch the icon.
Camera Function
You can use camera to take videos, pictures.
Select the Camera icon to use the functionality.
Multimedia
Music /Video
In the App menu tap the icon to play audio. When no music files are in the playlists,
the system will automatically load the music files from the card to the playlists after
turning on the unit (the device supports the following audio file format: MP3, WAV,
AAC, OGG & WMA).
If two or more songs are in the music play list area, slide up/down on the touch screen
to go page up/down.
Tap video icon to play video.
Note: Audio player can play WAV recorded files.
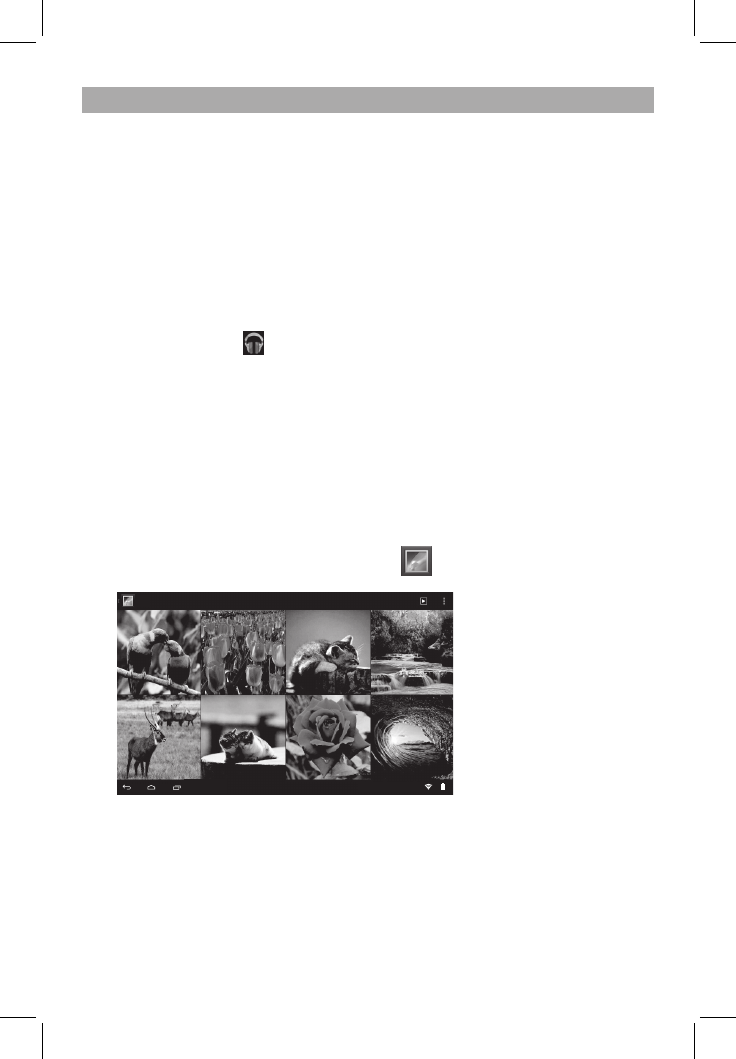
Photos
In the App menu, tap the picture browsing icon:
Photo
Grid view
10:20
EN - 6
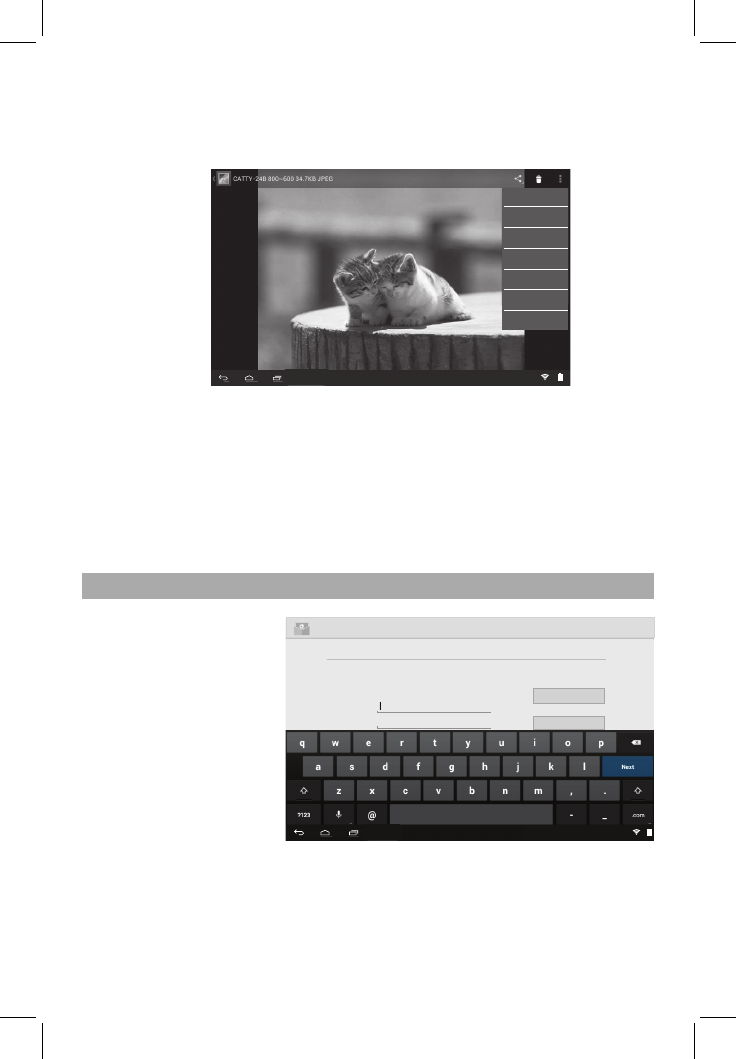
Photo Browser Button Descriptions
Add Pictures (This device supports BMP, JPEG, PNG & GIF format). Open the
corresponding folder to find the image file and add the picture you want. Tap the photo
setting, and the photo can be set as your wallpaper:
Explorer
In the App menu, tap the Explorer icon to enter the Management Interface, you can
copy, delete, move, rename etc. file or folder.
For example, to copy a file, select the file, then press and hold it. A operation menu will
appear, and select "Copy", then enter the folder you want to paste. Tap Editor in the
top of Management Interface, a operation menu will appear, select "Paste" to paste.
To store additional files, you must insert a memory card. Your device accepts micro
SD™ or micro SDHC™ memory cards with maximum capacities of 32 GB (depending
on memory card manufacturer and type).
App Menu (Network Applications)
Email
When Wi-Fi connection is
in normal (for details refer
to the Wi-Fi setting section),
tap the Email icon in App
menu to enter Email and
you can send or receive
Emai.
Google
When the Wi-Fi connection is in normal (for details refer to the Wi-Fi setting section),
tap the Google SearchTM icon to enter the interface, and click the address bar and
input the website and click “Go” to enter a corresponding website.
Note: The Explorer uses the popular third-party explorer software, please follow the
explorer’s standard operating mode to operate.
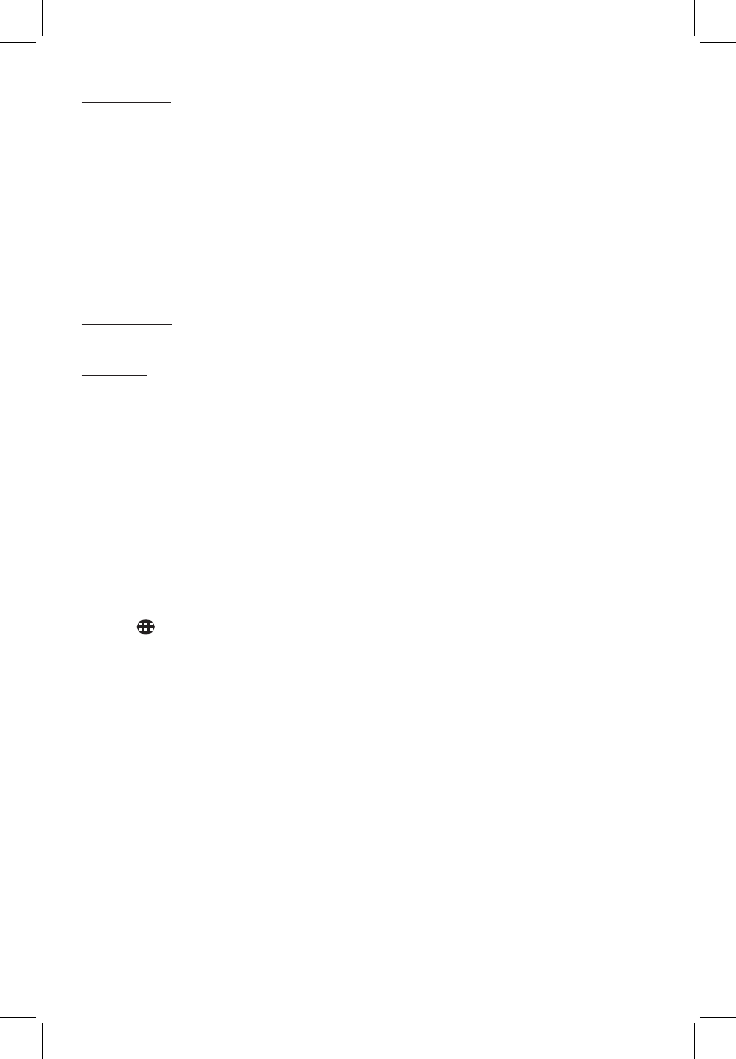
Manual setup
Next
Email account
You can setup email for most accoupnts in just a few steps.
Email address
Password
Account setup
10:20
EN - 7
Slideshow
Edit
Rotate left
Rotate right
Crop
Set picture as
Details
10:20

Note: Other items like YouTubeTM, Google MapsTM etc., you can tap the relevant icon to
enter, and then follow the on-screen instructions and apply them.
Download apps on Google PlayTM
The Play Store provides many apps that you can download and install in your tablet.
1. On the App menu, touch the Play Store icon.
2. To search for an app, touch the Google SearchTM icon, and then type a keyword to
search.
3. Touch an available app to select it and then touch Install to download and install
the app.
Using the Calendar
1. Tap the App menu icon, and then tap the Calendar icon.
2. To add the Calendar to the Home screen, tap and hold the Calendar icon until it
appears on the Home screen.
3. To access the calendar, tap the Calendar icon, and then follow the on-screen
instructions.
Note: for other apps, please refer to the Calendar and follow the on-screen
instructions.
Settings
WIRELESS & NETWORKS
Wi-Fi—Enable or disable Wi-Fi, and connect to a wireless network so that you can
check email, search the Web, or access social media websites.
More...—Enable or disable VPN.
DEVICE
Sound—Set Volumes, Default notification, and enable or disable Touch sounds
and Screen lock sound.
Display—Set Brightness, Wallpaper, Sleep and Font size.
ScreenshotSetting—Set Select delay time to capture the screen, Set the location
of screenshot storage and enable or disable Show the screenshot button in the
statusbar.
Storage—View available space in INTERNAL STORAGE, NAND FLASH, SD CARD
and USB STORAGE /set the related items.
Battery—View battery status.
Apps—View downloaded apps and running apps. To view information or uninstall an
app, tap the relevant app.
EN - 8
App Menu (Other Function)
PERSONAL
Location services—Enable or disable Google's location service, Location &
Google search.
Security—Set preferences for SCREEN SECURITY, PASSWORDS, DEVICE
ADMINISTRATION, and CREDENTIAL STORAGE.
Language & input—Set preferences for Language, KEYBOARD & INPUT
METHODS, SPEECH, and MOUSE/TRACKPAD.
Backup & reset—Set preferences for BACKUP & RESTORE, and PERSONAL
DATA.
ACCOUNTS
You can add an email account or another type of account.
SYSTEM
Date & time—Enable or disable Automatic date & time, and select preferences for
date, time, time zone, time format, and date format.
Accessibility—Select preferences for SERVICE and SYSTEM.
Developer options—Enable or disable various Developer options.
About tablet
Check System updates, Status, Legal information etc.
Desktop Function Icon Settings
Add, Move or Delete Desktop Icon
Tap the icon in home menu to enter App menu, then display the whole application
icons by page.
To add an app to the Home menu, touch and hold the app until the Home menu
appears, and then slide it to the location where you want it to be.
To remove an app from the Home menu, touch and hold the app, and then drag it to
the "X Remove" icon at the top of the screen.
PC Connectivity
Connect your device to a PC with a USB cable in various USB connection modes. By
connecting the device to a PC, you can transfer files or transfer data to or from your
device directly.
Note: When you copy file into tablet from your PC, you should set the Storage to
"Mass Storage" in Setting.
EN - 9