Alco Electronics RTS7131B Home Theater Sound Bar User Manual
Alco Electronics Ltd Home Theater Sound Bar
User Manual
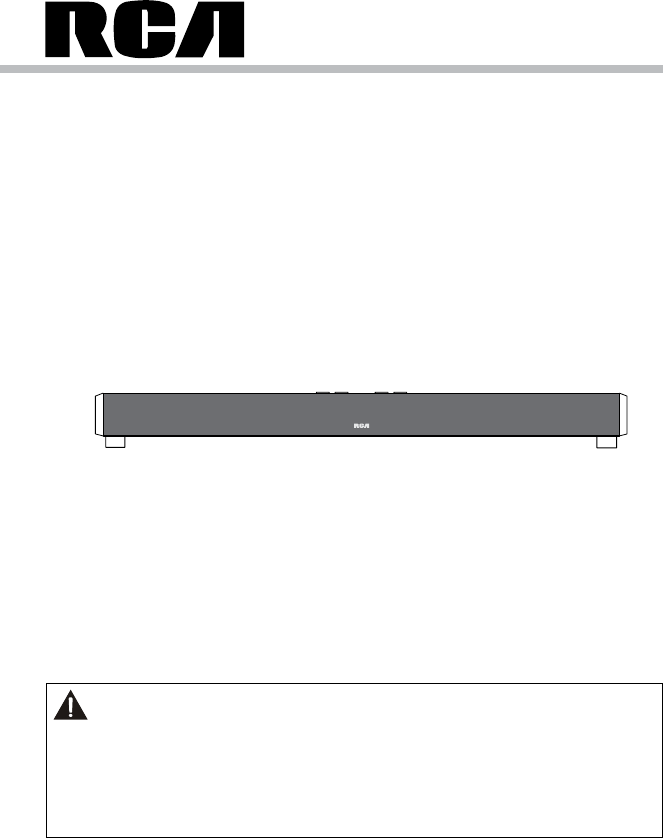
RTS7131B
User manual
It is important to read this instruction book prior to using your new product for the first time.
WARNING
DO NOT INGEST BATTERY. CHEMICAL BURN HAZARD.
• Theremotecontrolsuppliedwiththisproductcontainsacoin/buttoncellbattery.Ifthecoin/buttoncell
batteryisswallowed,itcancausesevereinternalburnsinjust2hoursandcanleadtodeath.
• Keepnewandusedbatteriesawayfromchildren.Ifthebatterycompartmentdoesnotclosesecurely,
stopusingtheproductandkeepitawayfromchildren.
• Ifyouthinkbatteriesmighthavebeenswallowedorplacedinsideanypartofthebody,seekimmediate
medicalattention.

2
EN
SAFETY INSTRUCTIONS
pOWER SUppLY
FCC INFORMATION
ThisdevicecomplieswithPart15oftheFCCrules.
Operationissubjecttothefollowingtwoconditions:
(1)Thisdevicemaynotcauseharmfulinterference,
and
(2)This device must accept any interference
received, including interference that may cause
undesired operation.
NOTE:Thisequipmenthasbeentestedandfoundto
comply with the limits for a Class B digital device,
pursuant to part 15 of the FCC Rules. These limits
aredesignedtoprovidereasonableprotectionagainst
harmfulinterferenceinaresidentialinstallation.This
equipment generates, uses, and can radiate radio
frequency energy and, if not installed and used in
accordancewiththeinstructions,maycauseharmful
interferencetoradiocommunications.However,there
isnoguaranteethat interference willnot occurin a
particular installation. If this equipment does cause
harmfulinterferencetoradioortelevisionreception,
which can be determined by turning the equipment
offand on,the useris encouragedtotrytocorrect
the interference by one or more of the following
measures:
• Reorientorrelocatethereceivingantenna.
• Increasethe separationbetween theequipment
andreceiver.
• Connecttheequipmentintoanoutletonacircuit
different from that to which the receiver is
connected.
• Consult the dealer or an experienced radio/TV
technicianforhelp.
WARNING:
• Changesormodicationstothisunitnotexpressly
approvedbythepartyresponsibleforcompliance
could void the user’s authority to operate the
equipment.
• TheACadapterisusedasdisconnectdeviceand
itshouldremainreadilyoperableduringintended
used. In order to disconnect the unit from the
mains completely, the AC adapter should be
disconnected from the mains socket outlet
completely.
• TheACadapterofunitshouldnotbeobstructed
OR should be easily accessed during intended
use.
• Minimum10cm(4inches)distancesaroundthe
unitforsufcientventilations.
• The ventilation should not be impeded by
covering the ventilation openings with items
suchasnewspaper,table-cloths,curtains,etc.
• Nonakedamesourcessuchaslightedcandles
shouldbeplacedontheunit.
ON SAFETY
• Should any objects or liquids fall into the unit,
disconnect the power supply and have the
unit checked by qualied personnel before any
further operation.
• The unit shall not be exposed to dripping or
splashingandthatno objects lled with liquid,
suchasvases,shallbeplacedontheunit.
ON USE
Neverusetheunitwhereitwouldbesubjectto:
- Heatsourcessuchasradiatorsorairducts.
- Directsunlight.
USING THE AC ADApTER
UsinganACadapterotherthantheonesuppliedwith
the unit may damage the unit.
Caution:
• Beforeuse,ensuretheratedvoltageoftheadapter
matchesyourlocalvoltage.
• TheincludedAC adapterisfor usewiththisunit
only.Donotuseitwithotherequipment.
• Ifyouarenotgoingtousetheunitforalongtime,
disconnecttheACadapterfromthewalloutlet.
• WhenevertheACadapterispluggedintoawall
outlet,theACadapterwilldrawsomepower,even
whentheSoundBaristurnedoff.
ACCESSORIES
Please locate the included accessories. To order
replacementunits,visithttp://www.RCAav.com
Remotecontrol .......................................x1
ACpoweradapter .....................................x1
WallMountBracket(withscrewsx2) ......x2
3
EN
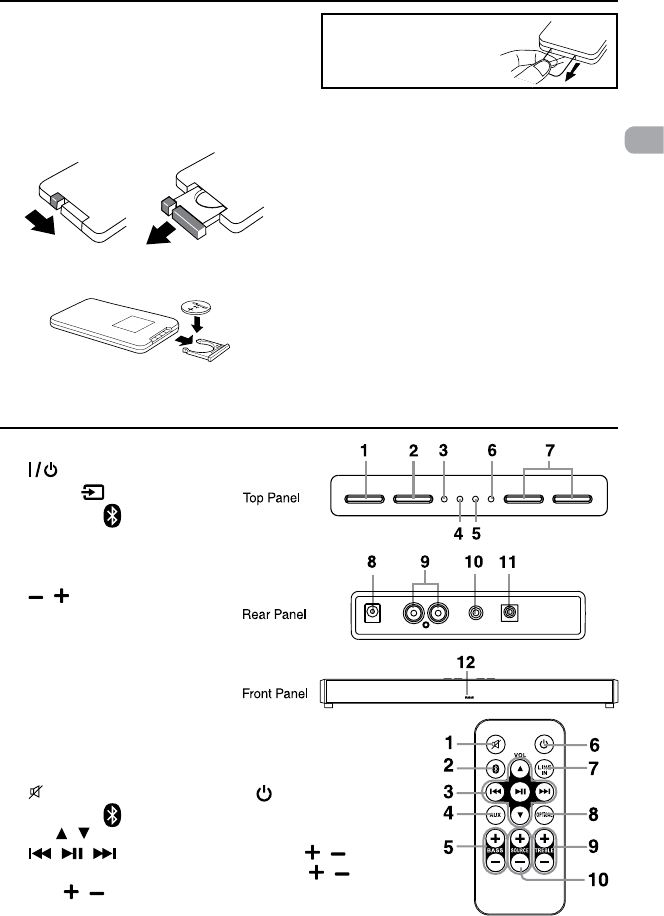
LOCATION OF CONTROLS
1. MUTEbutton
2. BLUETOOTH button
3. VOL / button
/ / button
4. AUXbutton
5. BASS / button
6. button
7. LINEINbutton
8. OPTICALbutton
9. TREBLE / button
10 SOURCE / button
REMOTE CONTROL
REMOTE CONTROL
1. Standby/ONbutton
2. SOURCE button
3. BLUETOOTH /LEVELindicator
4. AUXIN/LEVELindicator
5. OPTICALIN/LEVELindicator
6. LINEIN/LEVELindicator
7. / VOLUMEbutton
8. DCINjack
9. AUXINR/Ljack
10. LINEIN3.5mmjack
11. OPTICALINjack
12. RemoteSensor
SOUNDBASE
1.Openthebatterydoor.
2. InsertoneCR2025(3V)sizebattery.
TO CHANGE REMOTE BATTERY
Removetheplasticsheet
before operating the
remotecontrol.
USING THE REMOTE CONTROL
• PointtheremotecontrolattheREMOTESENSOR
locatedontheunit.
• When using this unit in very bright light, the
infraredREMOTESENSORmaynotworkproperly.
BATTERY REpLACEMENT
When the battery becomes weak, the operating
distanceoftheremotecontrolwillbegreatlyreduced
andyouwillneedtoreplacethebattery.
Note:Iftheremotecontrolisnotgoingtobeused
foralongtime,removethebattery.
WARNING:
• Donot disposeof thebatteryinareor itmay
leakand/orexplode.
• Batteriesshouldnotbeexposedtoexcessiveheat
suchassunshine,reorthelike.
CAUTION:
• Danger of explosion if battery is incorrectly
replaced.Replaceonlywiththesameorequivalent
type.
4
EN
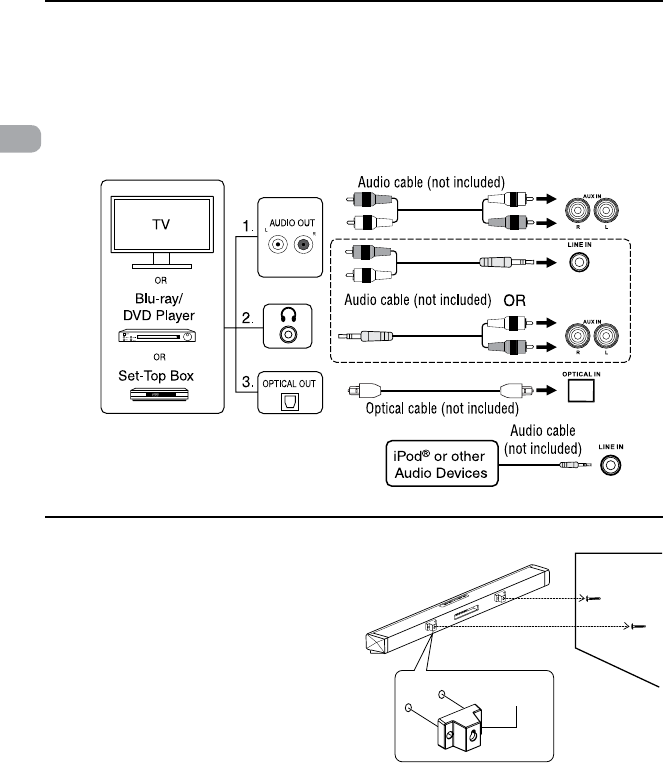
CONNECTIONS
CONNECT AUDIO THROUGH AN ANALOG AUDIO CABLE
1. ConnectanAudioCable(notincluded)fromtheAUXINjackstotheAUDIOOUTjacksofyourTV,Set-Top
BoxorBlu-ray/DVDPlayer.
2. Connecta3.5mmAudioCable(notincluded)fromtheLINEINjacktotheAUDIOOUTjacksorfromtheAUX
INjackstotheHeadphoneOutjackofyourTV,Set-TopBoxorBlu-ray/DVDPlayer.
CONNECT AUDIO THROUGH A DIGITAL OpTICAL CABLE
3.ConnectanOpticalCable(notincluded)fromtheOPTICALINjacktotheOPTICALOUTjackofyourTV,Set-
TopBoxorBlu-ray/DVDPlayer.
Note:OPTICALINonlysupportsPCMsignal.YoumayneedtoactivatePCM(Downmix)onyoursourcedevice,
e.g.TV,Set-TopBoxorBlu-ray/DVDPlayer.
Plugoneendofa3.5mmAudioCable(notincluded)
intotheLINEINjackandotherendintoyouriPad®,
iPhone®,iPod®orotheraudiodevices.
pLACEMENT
TheSoundbarcanbeplacedfreestandingonatableormountedonawall.
pLACING THE SOUNDBAR ON A WALL
TheSoundbarrequiresadditionalmountinghardware
thatmustbepurchasedseparately.
1. InstalltheWallMountBracketstotheSoundbaras
shown.
2.PlacetheWallMountTemplate(included)onthe
wall and then mark the locations of the screw
holes.
3.Drill the screws (not supplied) into the wall
carefully.
4.GentlyhangtheSoundbarontothescrewsinthe
wall.
Note:Allow2mmspacebetweenscrewandthewall
forttingthewallmountbracket.
CAUTION:
• WerecommendthatWall-mountingbecarriedout
by a professional. The wall mount bracket “key-
holes”areintendedforusewith#8(Imperial)or
M4 (Metric) with head size: Diameter 7.5 - 9.4
mm.Additionaloralternativepartsmaybeneeded
forcertaintypesofwallconstructions.
• Make sure that the wall-mount is xed securely
enough so that it meets safety standards.
• Allowatleast2”(5cm)separationinalldirections
betweenthe Sound BarandotherAVequipment
(suchasyourTVorSet-TopBox).
• It is recommended that all cables (AC adapter
andAudiocables)beconnectedtotheSoundBar
beforeplacingitonthewall.
Wall Mount
Bracket
5
EN
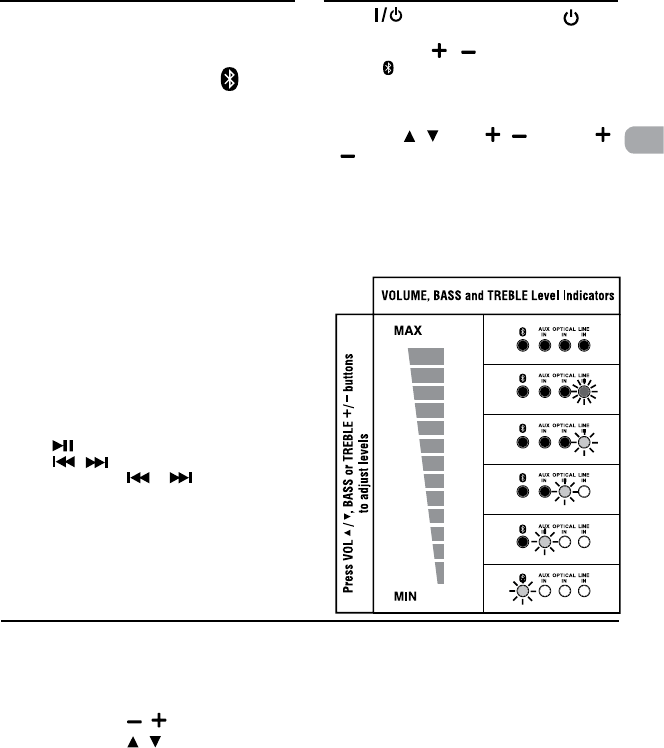
Before Bluetooth pairing, you should turn on the
Bluetooth function of your other device (such as,
mobilephonewithBluetoothfunction).
1.PressSOURCEbuttonontheunitor button on
theremotecontroltoselectBT(Bluetooth)mode.
The Bluetooth indicator light on the soundbase
willblink.
2.Onyourdevice(mobilephone,MP3player,etc.),
select RCA RTS7131B from the list of available
Bluetoothconnections.
Note: If your Bluetooth device (such as, mobile
phone)requiresapasswordwhilepairing,please
enter4-digitnumber:0000.
• If the Bluetooth pairing is successful, the
Bluetoothindicatorwillilluminate.
• If the Bluetooth pairing is unsuccessful, the
Bluetooth indicator will blink at slow speed.
Pleasetryagain.
TO DISCONNECT THE CURRENTLY pAIRED
DEvICE
1. On your currently paired and connected device,
selectRCARTS7131Bfromthelistanddisconnect
it. Or
2.Turnofftheconnecteddevice.
ENjOY THE MUSIC THROUGH BLUETOOTH
• Press tobeginorpauseplayback
• Press / toselectaspecictrack
• Press and hold / to start moving
backward/forwardathighspeed.
BLUETOOTH pAIRING BASIC OpERATION
1. Press buttonontheSoundbaseor button
on the remote to turn on the unit.
2. Press SOURCE / or AUX, OPTICAL, LINE
IN and buttondirectlyontheremotetoselect
AUXIN,OPTICALIN,LINEINorBluetoothsource
(input). TheLEDs locatedon topof Soundbase
willindicatethecurrently-selectedsource.
3. PressVOL / ,BASS / orTREBLE /
ontheremotetoadjustVolume,BassorTreble
levels.Whenadjusting Volume, Bass orTreble,
thefourLEDswilltemporarilydisplaythecurrent
levelsetting(seeillustration).
Note:Whenmuteisenabled,the4LEDindicators
will ash. Press the MUTE button on the remote
controltodisablethemutefunctionandLEDashing
stop.
Specicationsandexternalappearancearesubjecttochangewithoutnotice.
TROUBLESHOOTING
Theunitdoesnotswitchon.
• Makesureitispluggedin.
• Press STANDBY/ON button to turn on the
Soundbase.
Ihavenosound.
• PresstheVOLUME / button on the top of the
SoundbaseorVOL / button on the remote.
• Ensure the source you’ve selected is outputting
audio.Ifyou’reusing“audioout”fromyourTV,
ensureyourTVisconguredtooutputaudio(see
TV’smenusettings).
• Ensure your AV connections are properly made
(ensureyoudon’thaveanylooseconnections).
• Ensureyou’veselectedthecorrectsource(input)
-theLEDslocatedonthetopoftheSoundbase
willindicatethecurrently-selectedsource(input).
• Mute is activated (the 4 LEDs on top of the
Soundbaseashes).Pressthemutebuttononthe
remotecontrol.
• EnsuretheinputsourceisselectedPCMoutputon
thesetupmenuoftheinputdevice.
CannotsetupBluetoothpairing
• Resetthebluetoothconnectionbyturningoffand
onyourconnectinddevice,orthisSoundbase,or
selectotherSOURCEonthisSoundbasethenback
toBTmodeagain.
Theremotecontroldoesn’twork
• Ifbatteryisweak,pleasereplacethe batteryand
ensurethenewbatteryisinstalledcorrectly.
• Pleaseensurethereisnothingblockingtheremote
sensoronthefrontoftheSoundbase.