Alco Electronics RTS7340SB Home Theater Sound Bar with Subwoofer User Manual
Alco Electronics Ltd Home Theater Sound Bar with Subwoofer
User Manual
Home Theater Sound Bar
with Subwoofer
It is important to read this user manual prior to using your new product for
the first time.
FCC INFORMATION
This device complies with Part 15 of the FCC rules. Operation is subject to the
following two conditions:
(1) This device may not cause harmful interference, and
(2) This device must accept any interference received, including interference
that may cause undesired operation.
NOTE: This equipment has been tested and found to comply with the limits for
a Class B digital device, pursuant to part 15 of the FCC Rules. These limits
are designed to provide reasonable protection against harmful interference
in a residential installation. This equipment generates, uses, and can radiate
radio frequency energy and, if not installed and used in accordance with
the instructions, may cause harmful interference to radio communications.
However, there is no guarantee that interference will not occur in a particular
installation. If this equipment does cause harmful interference to radio or
television reception, which can be determined by turning the equipment off
and on, the user is encouraged to try to correct the interference by one or
more of the following measures:
• Reorientorrelocatethereceivingantenna.
• Increasetheseparationbetweentheequipmentandreceiver.
• Connecttheequipmentintoanoutletonacircuitdifferentfromthattowhich
the receiver is connected.
• Consultthedealeroranexperiencedradio/TVtechnicianforhelp.
WARNING:Changesormodicationstothisunitnotexpresslyapprovedby
the party responsible for compliance could void the user’s authority to operate
the equipment.
FOR CUSTOMERS IN CANADA
This apparatus complies with the Class B limits for radio noise emission set
out in radio interference regulations.
CANICES-3(B)/NMB-3(B)
Warning:
• TheACadapterisusedasdisconnectdeviceanditshouldremainreadily
operable during intended used. In order to disconnect the unit from the
mains completely, the AC adapter should be disconnected from the mains
socket outlet completely.
• The AC adapter of unit should not be obstructed OR should be easily
accessed during intended use.
• Minimum 10 cm (4 inches) distances around the unit for sufcient
ventilations.
• Theventilationshouldnotbeimpededbycoveringtheventilationopenings
with items such as newspaper, table-cloths, curtains, etc.
• Nonakedamesourcessuchaslightedcandlesshouldbeplacedonthe
unit.
ON SAFETY
• Shouldanyobjectsorliquidsfallintotheunit,disconnectthepowersupply
and have the unit checked by qualified personnel before any further
operation.
• Theunitshallnotbeexposedtodrippingorsplashingandthatnoobjects
filled with liquid, such as vases, shall be placed on the unit.
ON USE
Never use the unit where it would be subject to:
- Heat sources such as radiators or air ducts.
- Direct sunlight.
1. MUTEbutton
2. BLUETOOTH button
3. VOL / button
/ / button
4. AUXbutton
5. BASS / button
6. button
7. LINE IN button
8. OPTICAL button
9. TREBLE / button
10 SOURCE / button
Remotecontrol(with2xAAAbatteries)........................................... x1
AC power adapter ............................................................................. x1
Audio Cable ..................................................................................... x1
Please locate the included accessories.
Toorderreplacementunits,visithttp://www.RCAav.com
REMOTE CONTROL
1. STANDBY/ONbutton
2. SOURCE button
3. BLUETOOTH / LEVEL
indicator
4. AUXIN/LEVELindicator
5. OPTICALIN/LEVELindicator
6. LINEIN/LEVELindicator
7. VOLUME / button
8. LINE IN 3.5mm jack
9. OPTICAL IN jack
10.AUXINL/Rjack
11. DC IN jack
12. Subwoofer speaker terminal
13. Remote Sensor
AVC MULTIMEDIA (“AVC”) makes the following limited warranty. This limited
warranty extend to the original consumer purchaser and is limited to non-
commercial use of the product.
ONE YEAR PARTS & LABOR WARRANTY
AVC products purchased in the United States are warranted to be free from
defects in materials or workmanship for a period of one year from the date of their
original retail purchase. If the unit fails to conform to this warranty, we will service
theproductusingneworrefurbishedpartsandproducts,atAVC’ssolediscretion.
Duringaperiodofone yearfromthe effectivewarrantydate,AVCwillprovide,
when needed, service labor to repair a manufacturing defect at its designated
ServiceCenter.ToobtainwarrantyserviceintheUnitedStates,youmustrstcall
ourCustomerSupportCenterat1-800-506-5746or1-877-252-6873,duringthe
hourslistedintheboxbelow.ThedeterminationofservicewillbemadebyAVC
CustomerSupport.PLEASEDONOTRETURNYOURUNITTOAVCWITHOUT
PRIOR AUTHORIZATION. New or remanufactured replacements for defective
partsorproductswillbeusedforrepairsbyAVCatitsdesignatedServiceCenter
for one year from the effective warranty date. Such replacement parts or products
are warranted for an additional one year from the date of repair or replacement.
The Customer will be required to ship the unit to the Service Center indicated
at the time Customer Support is contacted to make the necessary repairs. The
customer is responsible for all transportation charges to the service facility.
PACKAGING AND SHIPPING INSTRUCTION
WhenyousendtheproducttotheAVCservicefacilityyoumustusetheoriginal
cartonboxandpackingmaterialoranequivalentasdesignatedbyAVC.
LIMITED WARRANTY
YOUR RESPONSIBILITY
(1) You must retain the original sale receipt to provide proof of purchase.
(2) These warranties are effective only if the product is purchased and operated
intheU.S.A.orCanada.
(3)Warranties extend only to defects in material or workmanship, and do not
extendtoanyproductorpartswhichhavebeenlostordiscarded,ordamageto
product or parts caused by misuse, accident, improper operation or maintenance,
or use in violation of instructions provided with the product, or to product which
hasbeenalteredormodiedwithoutauthorizationofAVC,ortoproductsorparts
thereof which have had the serial number removed or changed.
1.PressSTANDBY/ONbuttonontheSoundbaror button on the remote
to turn on the unit.
2.PressSOURCE / ontheremotetoselectAUXIN,OPTICALIN,
LINE IN or Bluetooth source (input). The LEDs located on top of Sound
Bar will indicate the currently-selected source.
3.PressVOLUME / , BASS / or TREBLE / on the remote
toadjustVolume,BassorTreblelevels.WhenadjustingVolume,Bassor
Treble, the four LEDs will temporarily display the current level setting (see
illustration below).
Note: When mute is enabled, the 4 LED indicators will ash. Press the
MUTEbuttonontheremotecontroltodisablethemutefunctionandLED
ashingstop. Before Bluetooth pairing, you should turn on the Bluetooth function of your
other device (such as, mobile phone with Bluetooth function).
1.PressSOURCEbuttonontheunitor button on the remote control to
select BT (Bluetooth) mode. The Bluetooth indicator light on the soundbar
will blink.
2.Onyourdevice(mobilephone,MP3player,etc.),selectRCA RTS7220B-2
from the list of available Bluetooth connections.
Note: If your Bluetooth device (such as, mobile phone) requires a password
whilepairing,pleaseenter4-digitnumber:0000.
• IftheBluetoothpairingissuccessful,theBluetoothindicatorwillilluminate.
• IftheBluetoothpairingisunsuccessful,theBluetoothindicatorwillblinkat
slow speed. Please try again.
ENJOY THE MUSIC THROUGH BLUETOOTH
• Press to begin or pause playback
• Press / to select a specific track
• Pressandhold / tostartmovingbackward/forwardathighspeed.
Caution:
• WerecommendthatWall-mountingbecarriedoutbyaprofessional.The
wallmountbracket“key-holes”areintendedforusewith#8(Imperial)or
M4(Metric)withheadsize:Diameter7.5-9.4mm.Additionaloralternative
parts may be needed for certain types of wall constructions.
• Makesurethatthewall-mountisxedsecurelyenoughsothatitmeets
safety standards.
• Allowatleast2”(5cm)separationinalldirectionsbetweentheSoundBar
andotherAVequipment(suchasyourTVorSet-TopBox).
• It is recommended that all cables (AC adapter and Audio cables) be
connected to the Sound Bar before placing it on the wall.
Specifications and external appearance are subject to change without notice.
Need more help?
Please visit online help at www.RCAav.com
SOLUTIONS
• Makesureitispluggedin.
• PressSTANDBY/ONbuttontoturnontheSoundBar.
• Pressthe
VOLUME / button
on the top of the Sound
BarorVOL
/
button on the remote.
• Ensurethesourceyou’veselectedisoutputtingaudio.If
you’re using“audioout”from yourTV, ensureyourTV is
conguredtooutputaudio(seeTV’smenusettings).
• Ensure your AV connections are properly made (ensure
you don’t have any loose connections).
• Ensure you’ve selected the correct source (input) - the
LEDs located on the top of the Sound Bar will indicate the
currently-selected source (input).
• Mute is activated (the 4 LEDs on top of the Sound Bar
ashes).Pressthemutebuttonontheremotecontrol.
• Ensure the input source is selected PCM output on the
setup menu of the input device.
• Reset the bluetooth connection by turning off and on
your connectind device, or this Sound Bar, or select other
SOURCEonthisSoundbarthenbacktoBTmodeagain.
• Ifbatteryisweak,pleasereplacethebatteryandensure
the new battery is installed correctly.
• Pleaseensurethereisnothingblockingtheremotesensor
on the front of the Sound Bar.
PROBLEMS
The unit does
not switch on.
I have no
sound.
Cannot setup
Bluetooth
pairing
The remote
control doesn’t
work
USING THE AC ADAPTER
UsinganACadapterotherthantheonesuppliedwiththeunitmaydamage
the unit.
Caution:
• Beforeuse,ensuretheratedvoltageoftheadapter matchesyourlocal
voltage.
• TheincludedACadapterisforusewiththisunitonly.Donotuseitwith
other equipment.
• If you are not going to use the unit for a long time, disconnect the AC
adapter from the wall outlet.
• WhenevertheACadapterispluggedintoawalloutlet,theACadapterwill
draw some power, even when the Sound Bar is turned off.
Printed in China
The Soundbar can be placed freestanding on a table or mounted on a wall.
PLACING THE SOUNDBAR ON A WALL
The Soundbar requires additional mounting hardware that must be
purchased separately.
1.PlacetheWallMountTemplate(supplied)onthewallandthenmarkthe
locations of the screw holes.
2. Drill the screws (not supplied) into the wall carefully.
3. Gently hang the Soundbar onto the screws in the wall.
Note:
Allow 2mm space between screw and
the wall for fitting the wall mount bracket.
USING THE REMOTE CONTROL
• Point the remote control at the REMOTE SENSOR located on the unit
(see Front Panel illustration for precise location).
• When there is a strong ambient light source, the performance of the
infrared REMOTE SENSOR may be degraded, causing unreliable
operation.
• Therecommendedeffectivedistanceforremoteoperationisabout16feet
(5 meters).
TO CHANGE REMOTE BATTERIES
1. Open the battery door. 2. Insert two AAA batteries.
BATTERY REPLACEMENT
When the batteries become weak, the operating distance of the remote
control is greatly reduced and you will need to replace them.
Notes:
• Iftheremotecontrolisnotgoingtobeusedforalongtime,removethe
batteries to avoid corrosion damage caused by battery leakage.
• Do not mix old and new batteries. Do not mix ALKALINE, standard
(CARBON-ZINC)orrechargeable(NICKEL-CADMIUM)batteries.
• Alwaysremovebatteriesassoonastheybecomeweak.
• Weakbatteriescanleakandseverelydamagetheremotecontrol.
• WARNING:Donotdisposeofbatteriesinare.batteriesmayexplodeor
leak.
CAUTION:
Dangerofexplosionifbatteryisincorrectlyreplaced.Replaceonlywiththe
same or equivalent type.
Connect an Audio Cable (not supplied) from the
AUXINjacksontheSoundBartotheAUDIOOUT
jacksofyourTV,Set-TopBoxorBlu-ray/DVDPlayer.
Plug one end of a 3.5mm Audio Cable (not
included) into the LINE IN jack (top panel)
on the Sound Bar and other end into your
iPad®, iPhone®, iPod® or other audio
devices.
LOCATION OF CONTROLS
CONNECTIONS
BASIC OPERATION
BLUETOOTH PAIRING
POWER SUPPLY
REMOTE CONTROL
TROUBLESHOOTING
PLACEMENT
ACCESSORIES
SAFETY PRECAUTIONS
LIMITED WARRANTY
OUT OF WARRANTY
In the event your product requires repair after the limited warranty period has
expired, please contact our Customer Support Center at 1-800-506-5746,
1-877-252-6873 or www.RCAav.com
Hours:Monday–Thursday:9am–7pm,Friday:9am–5pm,
Saturday:9am–NOONEasterntime.
Important: You are responsible for any transportation, shipping or insurance
relative to the return of product to our Product Returns Center.
All warranties implied by state law, including the implied warranties of
merchantability and tness for a particular purpose, are expressly limited
to the duration of the limited warranties set forth above.With the exception of
any warranties implied by state law as hereby limited, the foregoing warranty is
exclusiveandinlieuofallotherwarranties,guarantees,agreementsandsimilar
obligations of manufacturer or seller with respect to the repair or replacement of
anyparts.InnoeventshallAVCbeliableforconsequentialorincidentaldamages.
No person, agent, distributor, dealer or company is authorized to change, modify
or extend the terms of these warranties in any manner whatsoever.The time
withinactionmustbecommencedtoenforceanyobligationofAVCarisingunder
thewarrantyorunderanystatute,orlawoftheUnitedStatesoranystatethereof,
is hereby limited to one year from the date of purchase. This limitation does not
apply to implied warranties arising under state law.
This warranty gives you specific legal rights and you may also have other rights,
which may vary, from state to state. Some states do not allow limitation on how
longanimpliedwarrantylasts,whenanactionmaybebrought,ortheexclusion
or limitation of incidental or consequential damages, so the above provisions may
not apply to you.
For more information on other products and services, please visit our web site at
www.RCAav.com.
Important:Alsokeepyour“BillofSale”asproofofpurchase.
Serial no ......................................................Invoice no .........................................
Date purchased ...........................................Dealer name .....................................
FORSERVICEANDREPAIR,PLEASEVISITwww.RCAav.com.
CONNECT AUDIO THROUGH A DIGITAL OPTICAL CABLE
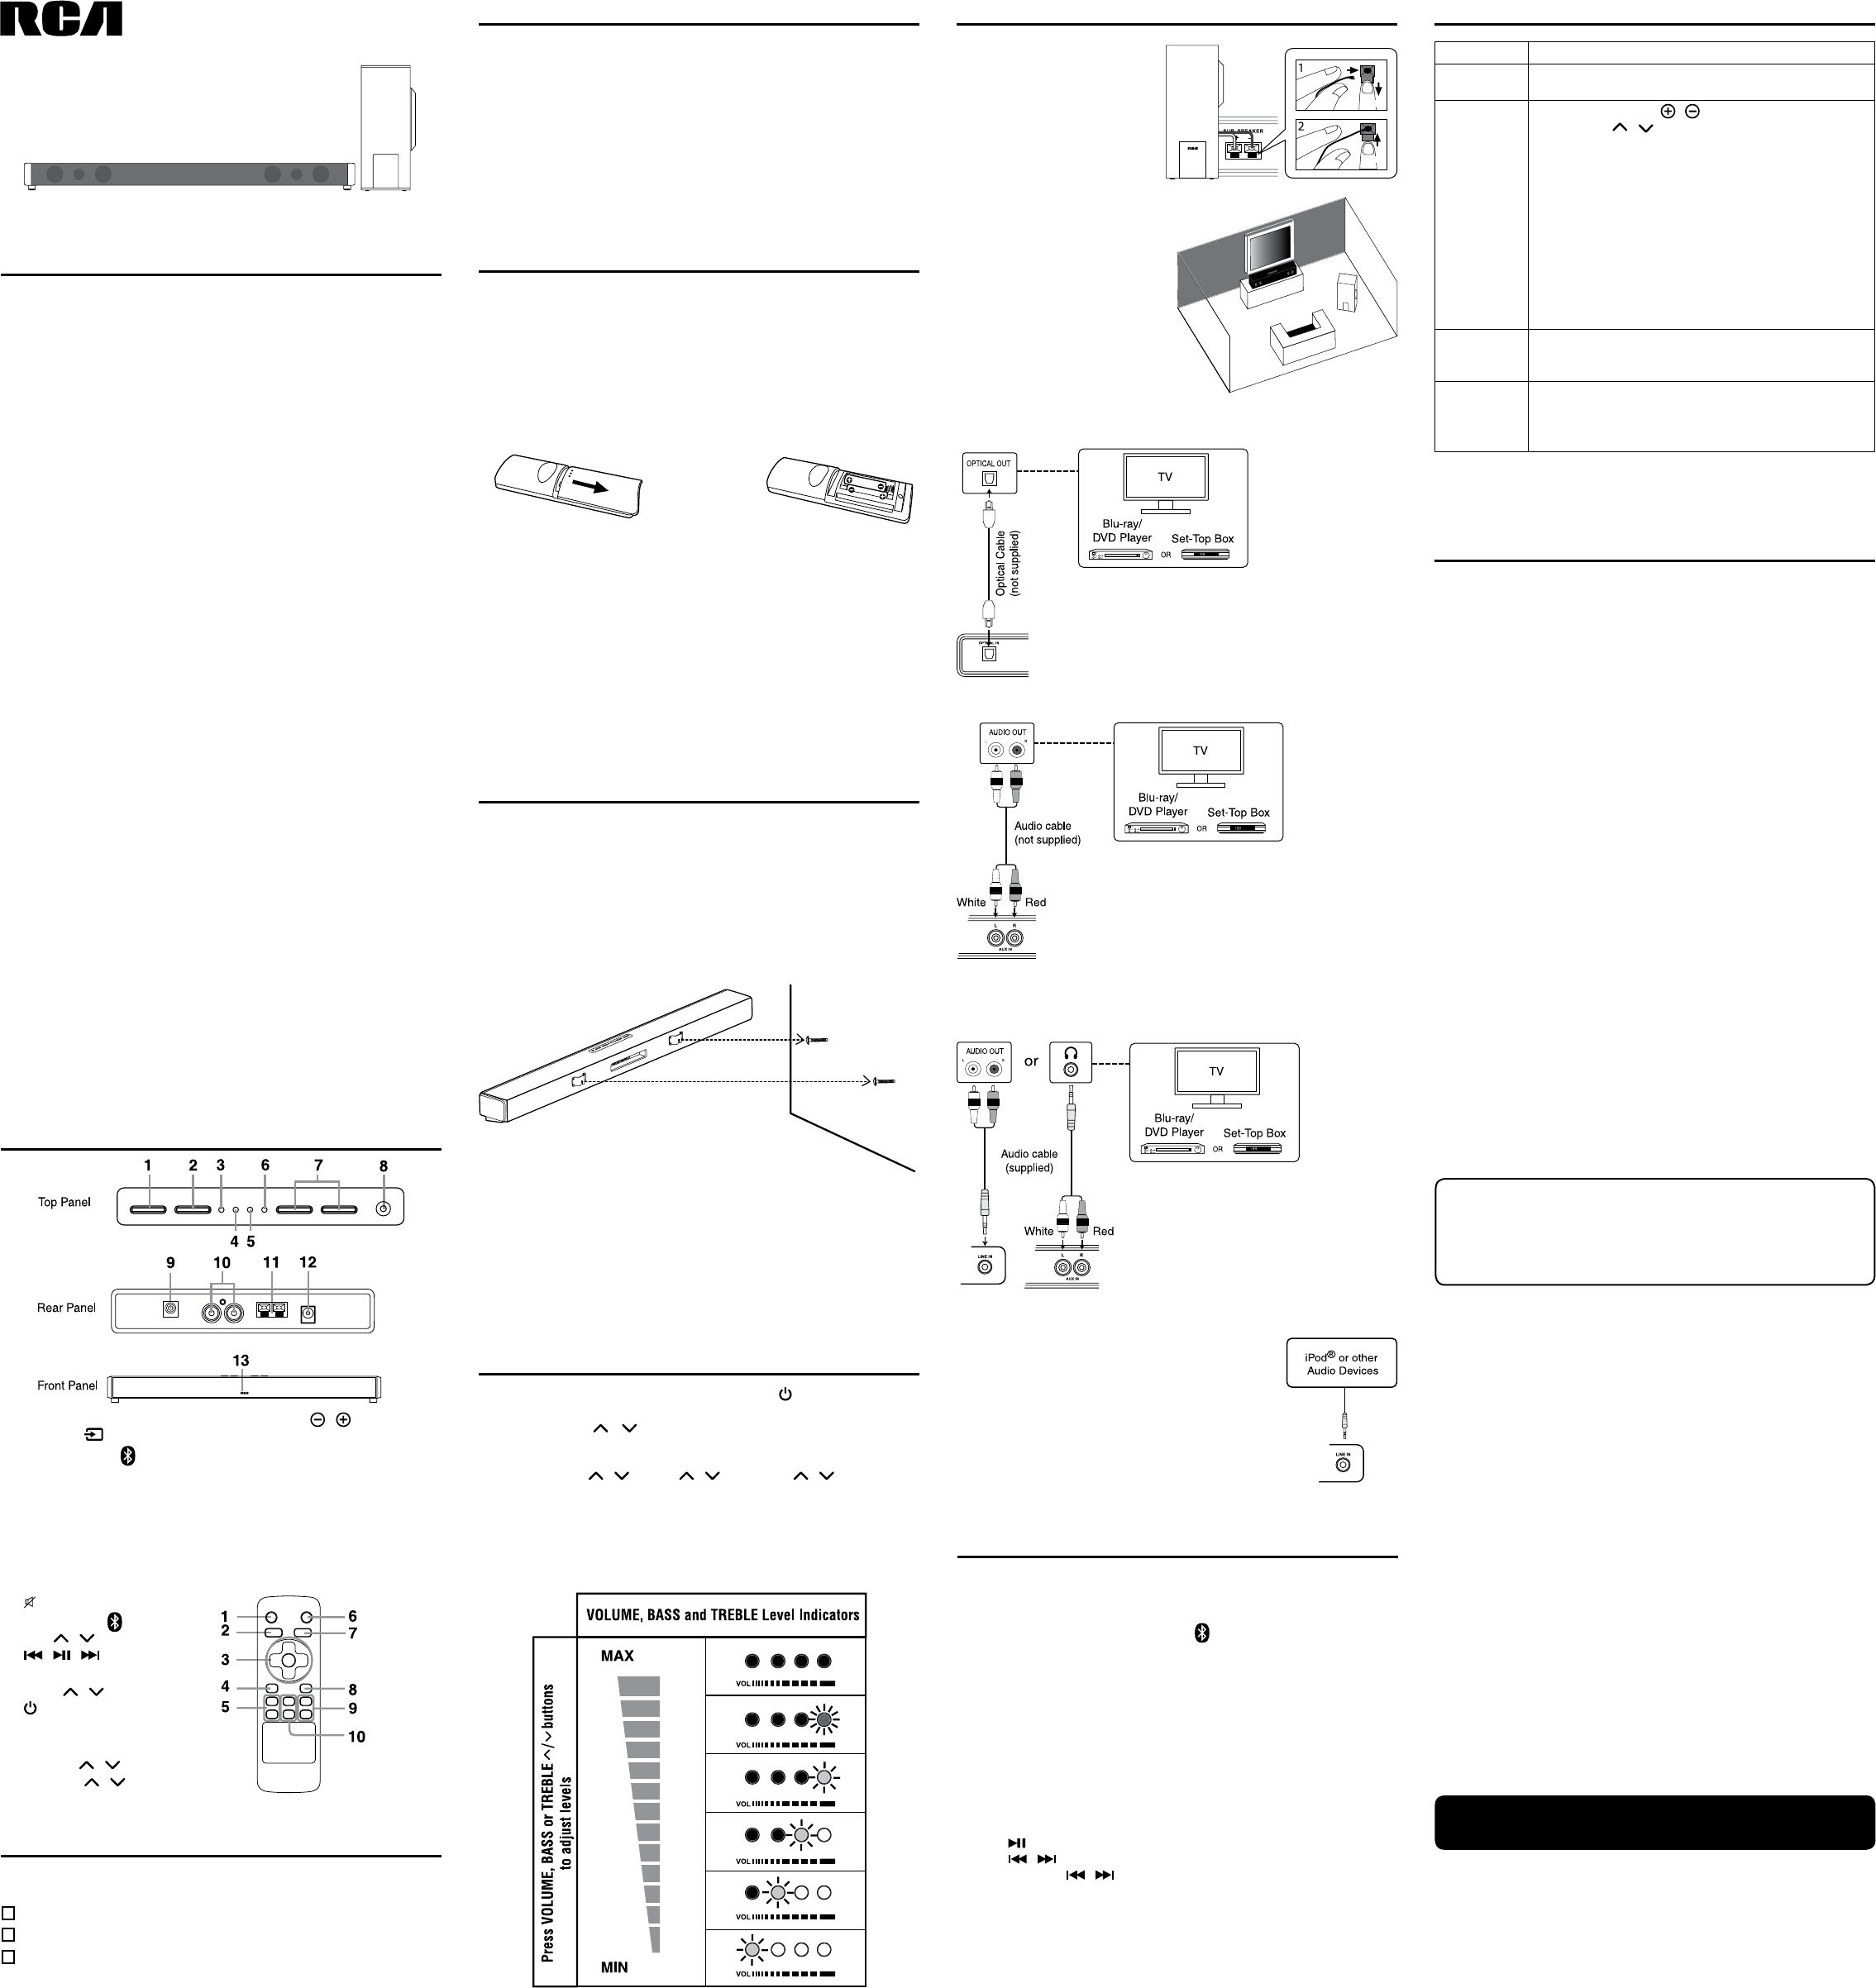
CONNECT THE
SUBWOOFER
Press down the tab to open the
terminal and insert the wire.
Release the tab to lock on the
uninsulated part of the wire in
the terminal. Be sure to match
connector colors.
POSITIONING THE
SUBWOOFER
It is not recommended to place
the subwoofer near theTV set.
Placethesubwooferatleast12”
awayfromtheTV.
CONNECT AUDIO THROUGH AN ANALOG AUDIO CABLE
Connect the supplied Audio Cable:
1. from the LINE IN jack on the Sound Bar to
theAUDIOOUTjacksofyourTV,Set-Top
BoxorBlu-ray/DVDPlayer.
or
2.from the AUX IN jacks to the Headphone
OutjackofyourTV,Set-TopBoxorBlu-ray/
DVDPlayer.
Connect an Optical Cable (not supplied) from the
OPTICAL IN jack on the Sound Bar to the OPTICAL
OUT jack of your TV, Set-Top Box or Blu-ray/DVD
Player.
Note: OPTICAL IN only supports PCM signal. You
mayneedtoactivatePCM(Downmix)onyoursource
device,e.g.TV,Set-TopBoxorBlu-ray/DVDPlayer.
RTS7340SB
UserManual