Aleis AABM001 HPR SERIES RFID READER User Manual Appendix G HPR
Aleis Pty Ltd HPR SERIES RFID READER Appendix G HPR
Aleis >
User Manual

Page 1 of 11
HPR Series Usage Instructions

Page 2 of 11
Regularity Notices and Conformity
USA – FCC
Information to the user (FCC Part 15.105)
This equipment has been tested and found to comply with the limits for a Class B digital
device, pursuant to Part 15 of the FCC Rules. These limits are designed to provide reasonable
protection against harmful interference in a residential installation. This equipment generates,
uses and can radiate radio frequency energy and, if not installed and used in accordance with
the instructions, may cause harmful interference to radio communications. However, there is
no guarantee that interference will not occur in a particular installation. If this equipment does
cause harmful interference to radio or television reception, which can be determined by
turning the equipment off and on, the user is encourage to try to correct the interference by
one or more of the following measures:
Reorient or relocate the receiving antenna
Increase the separation between the equipment and receiver
Connect the equipment into an outlet on a circuit different from that to which the
receiver is connected
Consult the dealer or an experienced radio/TV technician for help
Modification warning (FCC Part 15.21)
Warning: Any changes or modifications not expressively approved by Aleis could void the
user's authority to operate this equipment.
The following antennas are approved to be used with this device:
Biomark Handheld 7" Loop Antenna, Model number HPR-ANT
Canada
This Class B digital apparatus complies with Canadian ICES-003.
Cet appareil numérique de la classe B est conforme à la norme NMB-003 du Canada.

Page 3 of 11
Contents
The Reader ..............................................................Page 4
Equipment Supplied .................................................Page 6
Charging the Reader ................................................Page 6
Connecting the Accessories ....................................Page 6
Switching the Reader On/Off ...................................Page 6
Reading RFID Tags .................................................Page 7
Testing the Unit ........................................................Page 7
Customizing the Reader ..........................................Page 8
Viewing Tag Numbers .............................................Page 10
Deleting Tags ..........................................................Page 11
Coping Tag Numbers ..............................................Page 11
Using Bluetooth .......................................................Page 11
Page 4 of 11
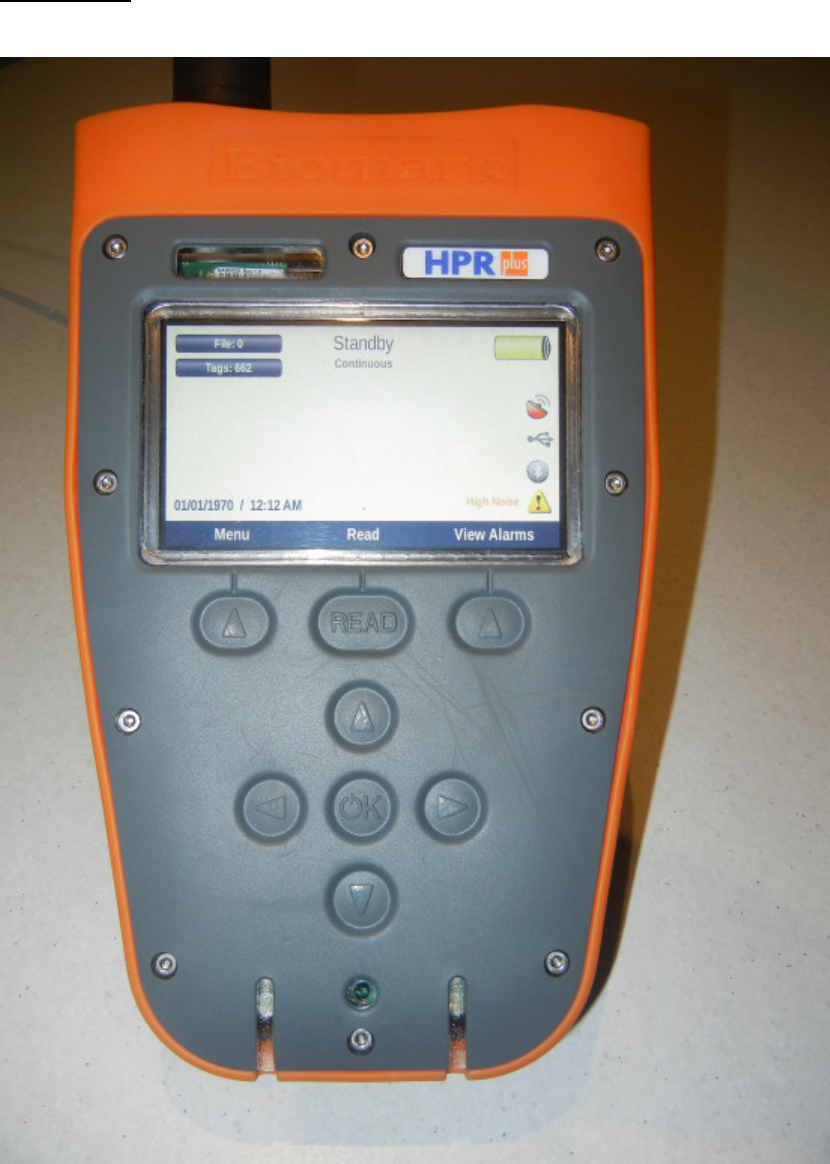
The Reader
Reader
Read Button
Power Button
Battery Charging
Indicator
Tag Read
Indicator
Page 5 of 11
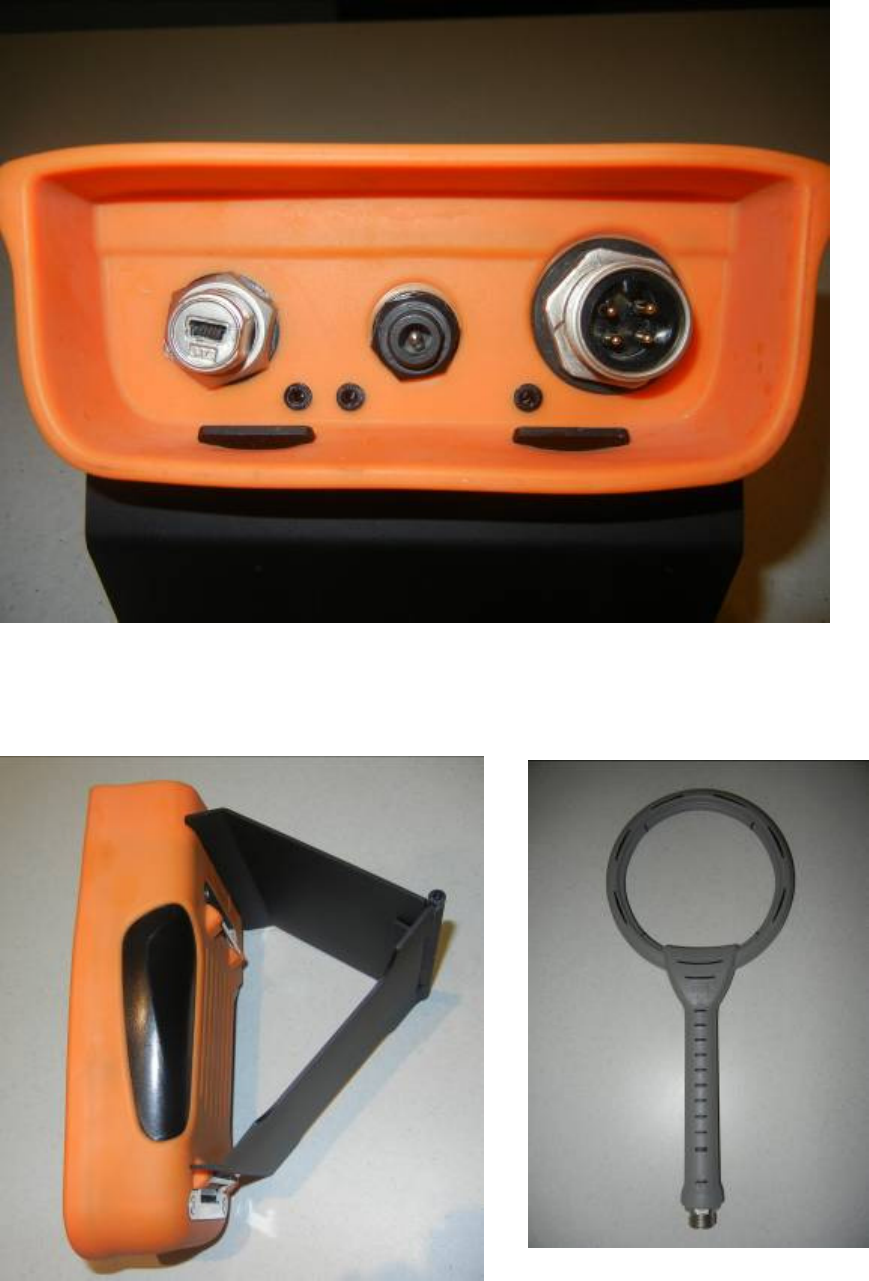
Reader End
Desk Stand Attached
USB Connector Battery Charger Plug
Antenna Cable Connector
Antenna

Page 6 of 11
Equipment Supplied
1. Biomark HPR Unit, (the Reader)
2. Biomark HPR Loop Antenna
3. Fish-Shaped FDX RFID Test Tag
4. AC to DC Adapter (Elpac Power Systems)
5. 2m Antenna Cable
6. 2m USB Cable
7. USB Stick with PC Application
8. Desk Stand
9. 0.5m USB Cable for Memory Stick
Charging the Reader
Plug the AC charger into the center plug on the end of the Reader.
Connect to AC power.
The battery charge indicator will light orange while the battery is charging, and
change to green once the battery is charged.
Connecting the Accessories
The unit should be connected to the loop antenna with the supplied cable.
The threaded locking collets should be fully screwed onto their mating
connectors. Depending on what is required, the unit can also be connected to
a USB port on a PC, or USB Flash Drive.
Switching the Reader On and Off
The unit can be powered on by any of the following methods:
1. Connecting the unit to the AC Adapter
2. Connecting the unit to the USB Port on a PC
3. Holding the OK button for more than 1 second.
NOTE: Once the unit has been powered up, it will take around 30 seconds to
boot into the software.
The unit can be powered off by holding the OK button for more than 1 second.
A menu will pop up asking the user to confirm the shutdown. In the event of a
software crash, the unit can be forced off by holding the OK button down for
longer than 10 seconds.
Page 7 of 11
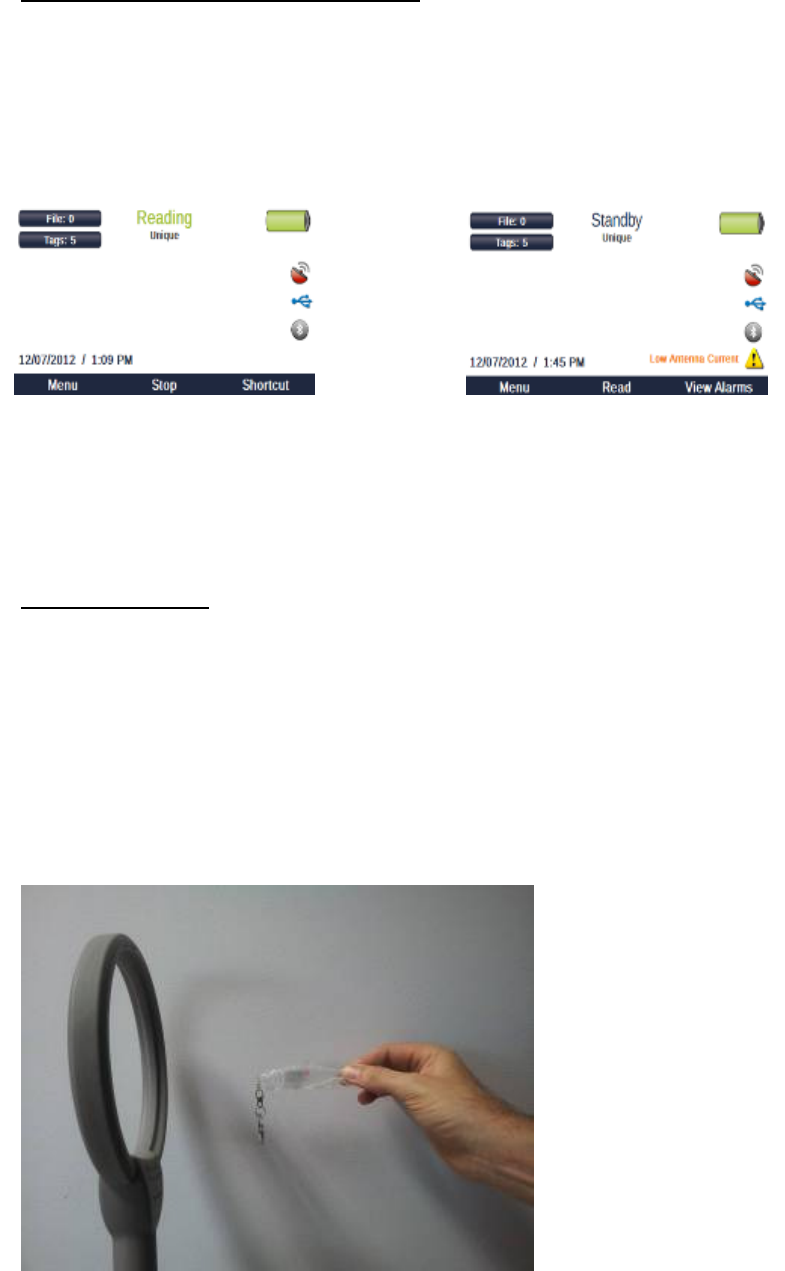
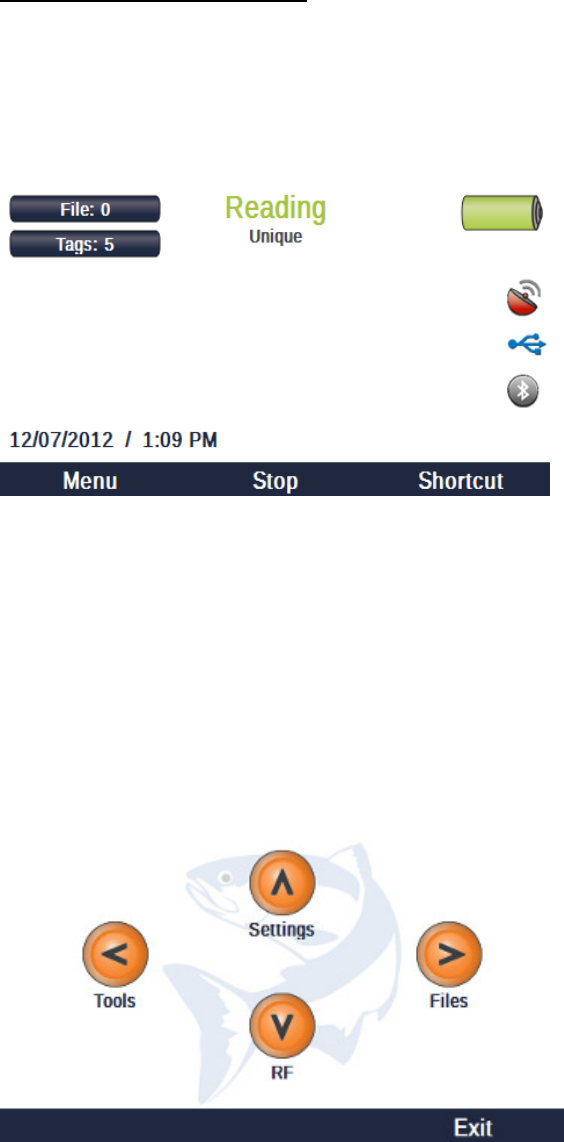
Reading RFID tags with the Reader
The reading is automatically started when the unit is powered up and stopped
by pushing the "Stop" button on the device. The text at the top of the display
will toggle between "Reading" and "Standby" when the " Stop/Read" button is
pressed.
NOTE: If the AC Adapter isn't connected to the unit, a fully charged battery
will run flat after approximately 3 hours of continuously being in READING
mode.
Testing The Unit
The supplied Fish RFID Test Tag can be placed near the loop antenna to
verify correct operation of the unit. When the RFID tag is placed on-axis (fish
pointing into the loop), the tag should have read range of approximately 10cm
from the centre of the loop. The unit will beep and the tag read indicator will
flash blue while the tag is being read.
NOTE: The antenna and tag must not be placed on or near any metallic
object while reading, as this will significantly reduce the tag read range.
Page 8 of 11
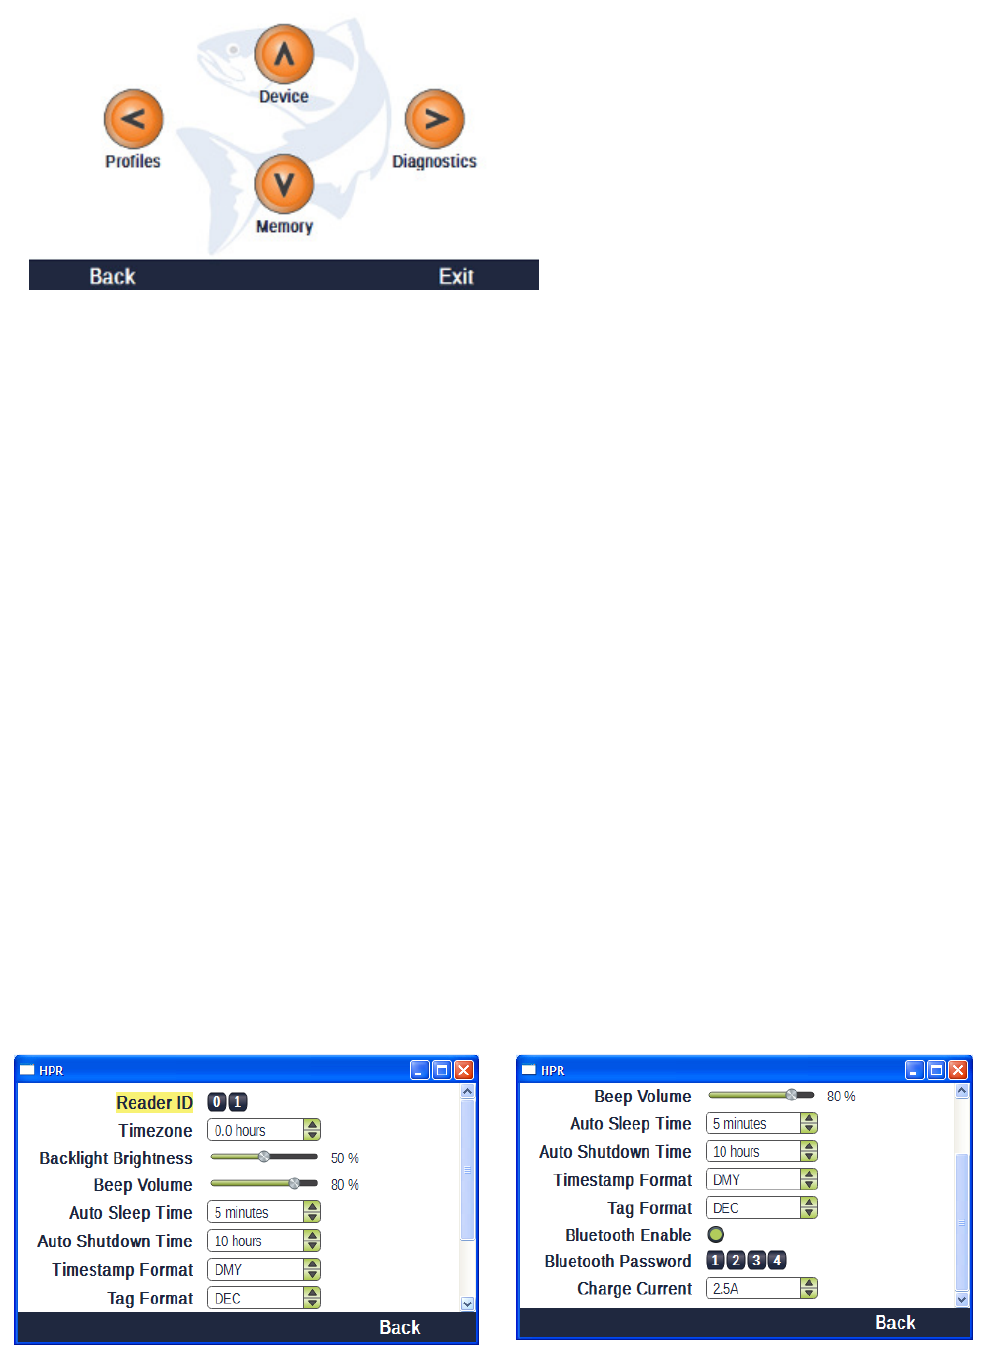
To Customize Your Reader
• Press Stop Key if Reader is in “Reading” mode.
• Press Menu key.
• Press Up Arrow for Settings.
Page 9 of 11
• Press Up Arrow for Device.
Areas which can be customized are:
• Reader ID
• Time zone
• Backlight Brightness
• Beep Volume
• Auto Sleep Time
• Auto Shutdown Time
• Timestamp Format
• Tag Format
• Bluetooth Enable
• Bluetooth Password
• Charge Current
Page 10 of 11
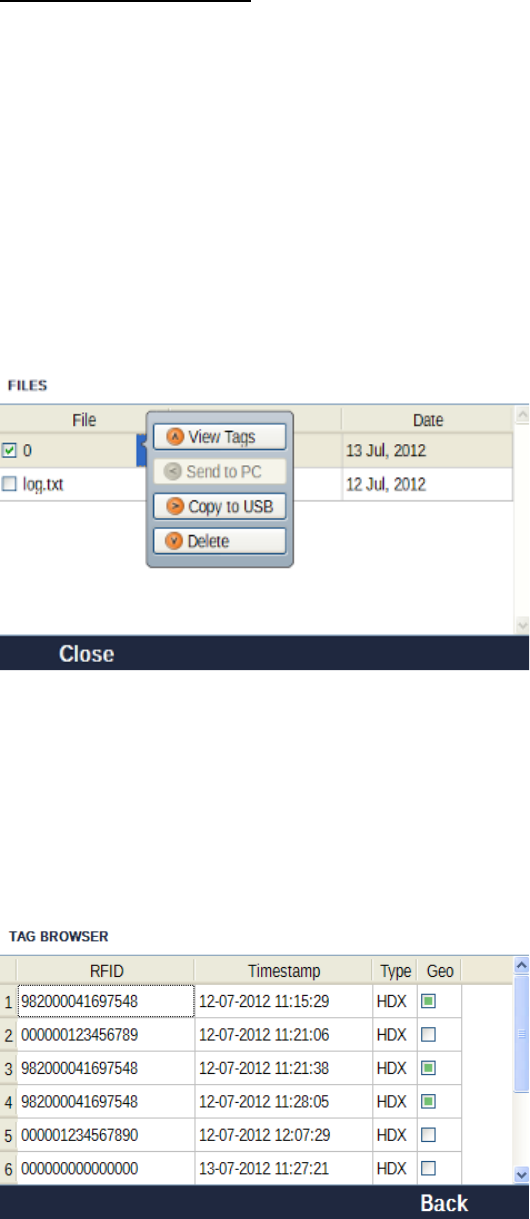
To View Tag Numbers
• Goto Menu.
• Files.
• Use Up/Down Arrows to Select File.
• Press Actions.
• Pop Box will appear.
Using arrow keys select View Tags
All Tags in this file will be displayed.

Page 11 of 11
To Delete Tags
Use down arrow “Delete”. A message “Are you sure you want to delete Tag
File ##?” will appear. This will delete ALL tag numbers in this file.
To Copy Tag Numbers to USB
Plug USB into cable then plug cable into Reader. Use right arrow to select
“Copy to USB”. This will copy all tags in this file to USB.
To Copy Tag Numbers to Computer
Run the HPR-PC software.
Plug Reader into computer via USB port (or Bluetooth). Use left arrow to
select “Copy to Computer”. This will copy all tags in this file to computer.
Using the Bluetooth
1. Use whatever Bluetooth software is installed in the PC to pair with the
device. It will be named "HPR-ID", where ID is the Reader’s ID. The
password is the number set in “Menu/Settings/Device” on the Reader.
2. Ensure that the Bluetooth software has assigned a COM port to the
device and note the number.
3. Run the HPR-PC software.
4. Select the appropriate COM port from the listed ports under the
"Bluetooth" heading.
5. When a tag is read with the device, the tag number will be displayed.