Alesis Photon 25 Owners Manual 7 51 0192 C_GERMAN
photon25 e6372185-8cac-f154-e9cd-9949c7ec277b Alesis Musical Instrument Photon 25 User Guide |
2015-01-05
: Alesis Alesis-Photon-25-Owners-Manual-163345 alesis-photon-25-owners-manual-163345 alesis pdf
Open the PDF directly: View PDF ![]() .
.
Page Count: 61
USB MIDI Controller Keyboard
Quick Start Owner’s Manual
Manual de inicio rápido para el usuario
Manuel d’utilisation du propriétaire
Kurzbedienungsanleitung
Manuale rapido di utilizzazione
CONTENIDO DE LA CAJA
• CONTROLADOR MIDI USB PHOTON 25
• CABLE USB
• MANUAL DE INICIO RÁPIDO DEL USUARIO
• INSTRUCCIONES DE SEGURIDAD IMPORTANTES
INHALT DER VERPACKUNG
• PHOTON 25 USB MIDI-KEYBOARD
• USB-KABEL
• KURZBEDIENUNGSANLEITUNG
• WICHTIGE SICHERHEITSHINWEISE
CONTENU DE LA BOÎTE
• CONTRÔLEUR MIDI USB PHOTON 25
• CABLE USB
• GUIDE D’UTILISATION SIMPLIFIÉ
• CONSIGNES DE SÉCURITÉ IMPORTANTES
BOX CONTENTS
• PHOTON 25 USB MIDI CONTROLLER
• USB CABLE
• QUICK START OWNER'S MANUAL
• IMPORTANT SAFETY INSTRUCTIONS
CONTENUTO DELLA CONFEZIONE
• PHOTON 25 MIDI CONTROLLER USB
• CAVO USB
• MANUALE RAPIDO DI UTILIZZAZIONE
• IMPORTANTI ISTRUZIONI DI SICUREZZA

This page intentionally left blank.

1
PHOTON 25 QUICK START OWNER’S
MANUAL
(ENGLISH)
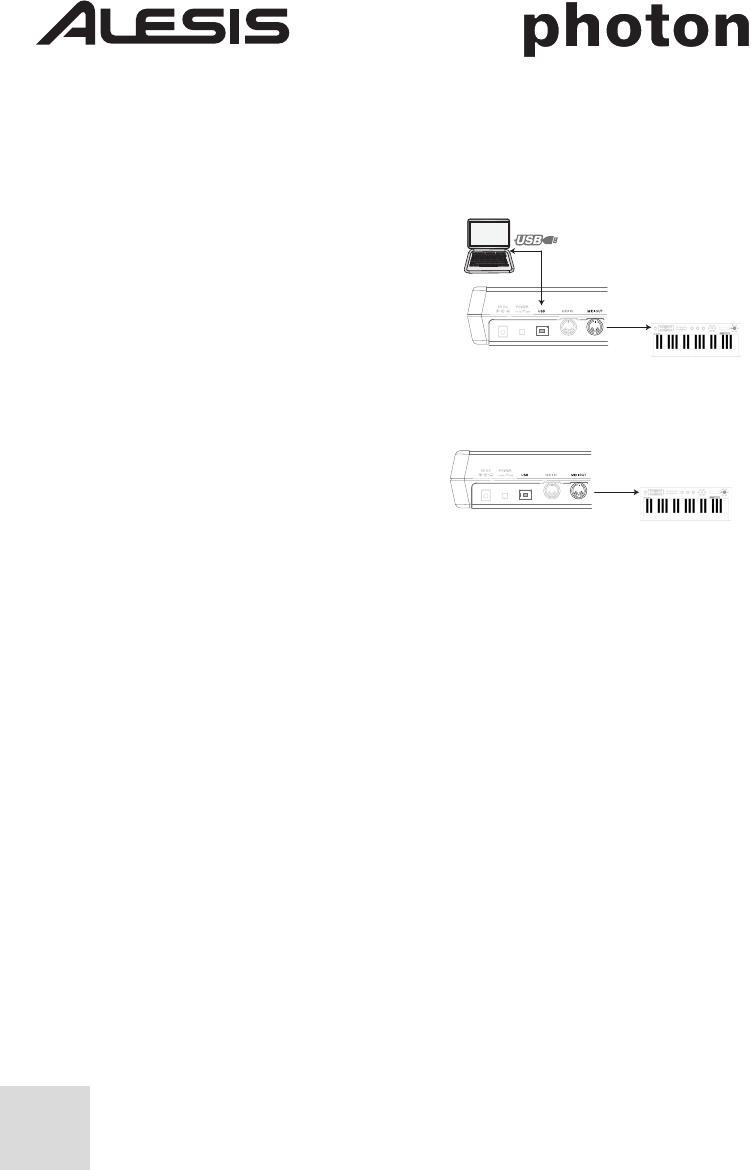
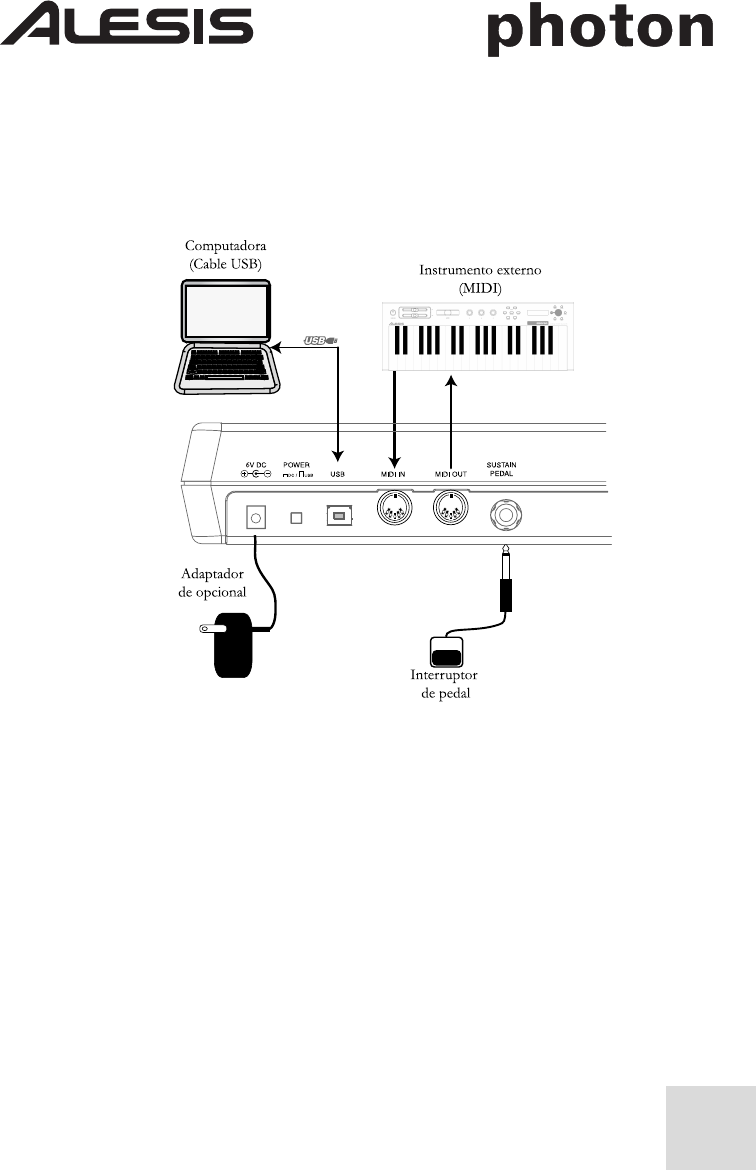
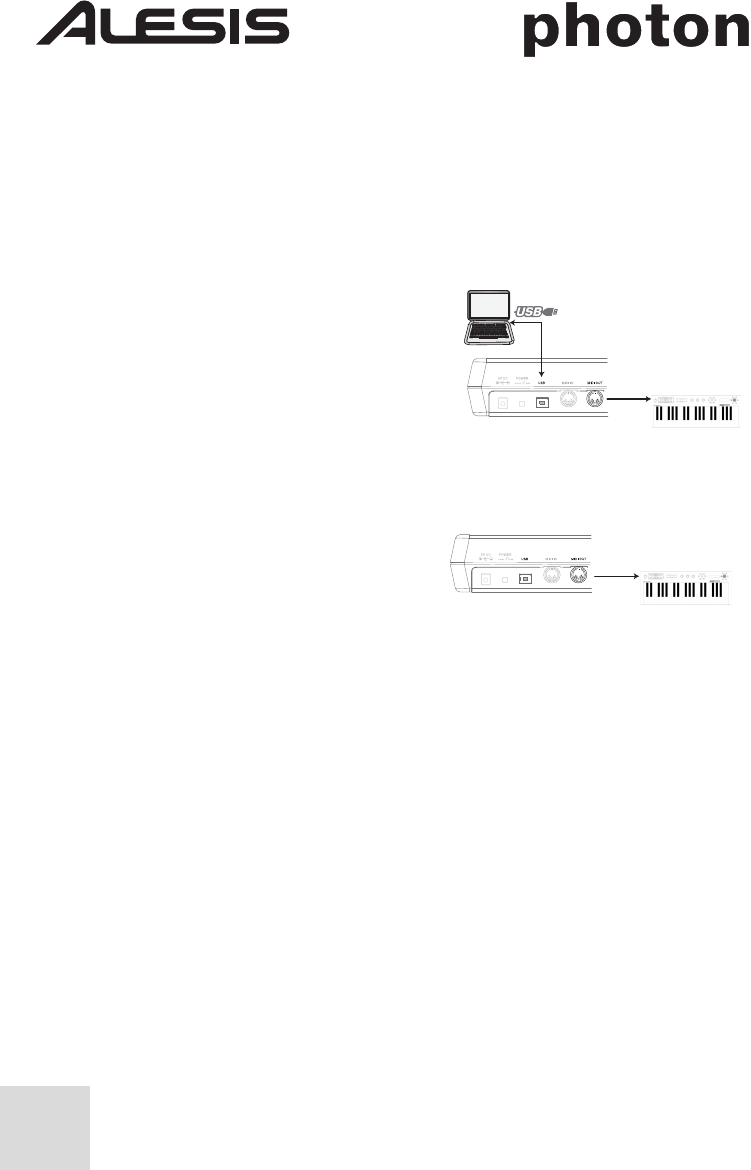
Connection Diagram
Introduction
Congratulations on your purchase of the Alesis Photon 25 MIDI controller!
The Photon 25 combines portability with a host of cutting-edge features:
• 25 full-size keys and easily accessible octave shift buttons provide maximum
playability with a minimal footprint.
• 270º assignable knobs. Three layers of twelve knobs each provide the
equivalent of 36 knobs per preset.
• Simultaneously active USB and 5-pin MIDI connections allow the Photon to
interface easily with both computers and standalone audio hardware.
• Pre-programmed setups and templates work with popular software right out of
the box. You can easily design your own custom setups and templates, too. Up
to 20 complete setups can be stored.

2
Product Registration
Please go to http://www.alesis.com to register your new Photon 25. Registration
helps you by ensuring that we can keep you up to date on any last-minute product
issues. If you want, Alesis can also send you information on other products that
might interest you.
Registration helps us, too. When you let us know the types of music products you
use and dream about, you help us bring you cutting-edge products like the Photon
25.
Minimum Computer Requirements
The Photon 25 requires either Windows XP or Mac OS X and a USB 1.1 or
higher connection. Earlier operating systems are not supported.
Any MIDI application which allows you to select your MIDI device should be
compatible with the Photon 25. Very basic MIDI programs will not allow you to
take advantage of the Photon 25's joystick and knobs.

3
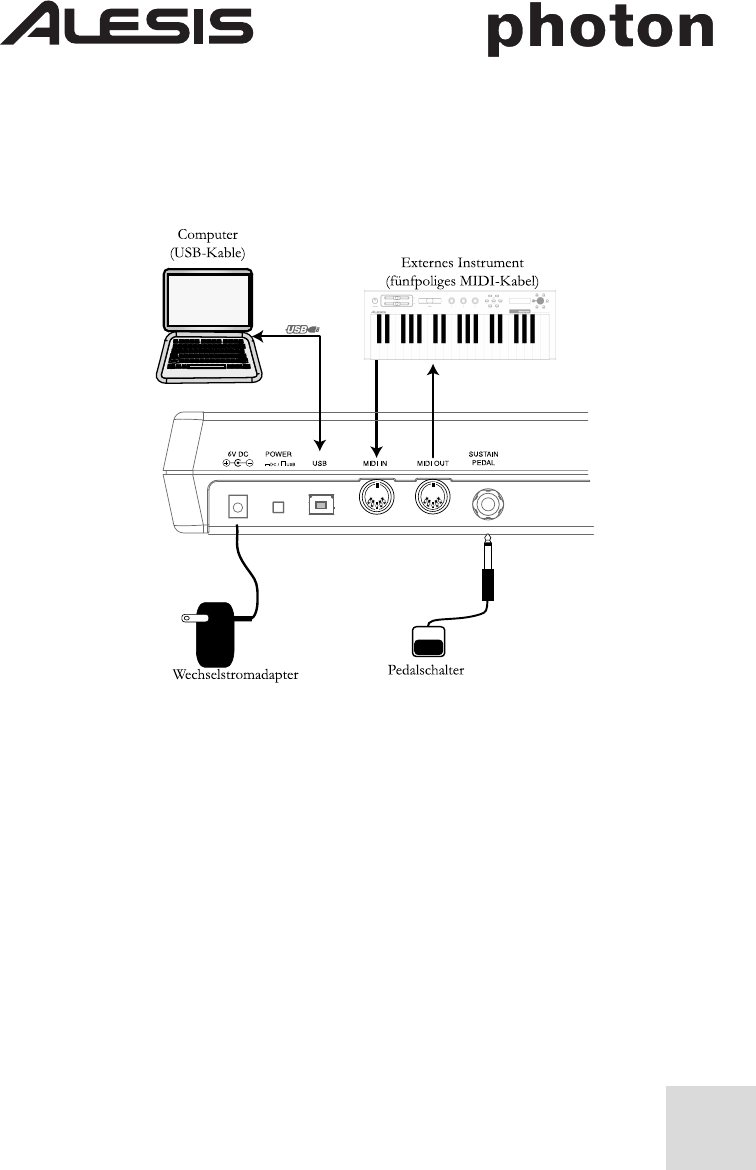
Rear-Panel Connections
1.
External Adapter Jack
– Plug in the AC adapter if you don't want to power
the Photon 25 through either the USB connection or four "C"-size batteries. (Use
a 6VDC, negative tip, 1000mA device.)
2.
Power Source Selector
– Press this switch IN to power the Photon 25 from
either four "C"-size batteries or an optional external power adapter. If both an
AC adapter and batteries are present, the AC adapter will be used rather than the
batteries.
Leave this switch OUT to power the Photon 25 from a computer's USB
connection or to turn off the unit when USB power is not present.
Notes: When using a laptop computer, consider using batteries to prolong the
laptop's operating time between charges.
Load batteries on the bottom of the Photon 25.
3.
USB Connector
– Plug a standard USB cable into this outlet and into a USB
1.1 or higher connector on your computer.
4.
MIDI IN Connector
– Use a five-pin MIDI cable to connect the OUTPUT
of an external MIDI controller to the MIDI IN of the Photon 25.
If you use an external MIDI IN device, your computer will recognize it as a
second MIDI IN controller.
4
5.
MIDI OUT Connector
– Use a five-pin MIDI cable to connect the MIDI
OUT of the Photon 25 to the INPUT of an external MIDI device.
The operation of the MIDI OUT port changes depending on whether or not a
USB cable is connected to the Photon.
● USB cable connected:
MIDI data from your computer is
passed to the MIDI OUT port.
Note: When a USB cable is
connected, you should activate
"MIDI echo" in your sequencer if
you want the Photon to control
another MIDI device.
● USB cable not connected:
Whatever you play on the
Photon is sent to the
MIDI OUT port.
Note: If you have another device
connected to the Photon's MIDI IN port, that device's MIDI
information will be ignored.
6.
Sustain Pedal Input
– Connect a keyboard sustain pedal (not included). Use
any manufacturer's sustain pedal: when you turn on the Photon 25, it will
automatically calibrate itself to the pedal.
MIDI data from the
Photon (or an external
controller connected
to the Photon's
MIDI IN port)
USB data from
the computer

5
Top Panel Controls
1.
Keyboard
– A full-size, 25-note, velocity-sensitive keyboard.
2.
Octave Up/Down Buttons
– Transpose the keyboard in octaves using these
buttons. Press them both at the same time to reset the keyboard range.
3.
X/Y Joystick
– Control pitch bend, modulation, and other functions with this
2-way joystick. The X axis and Y axis can be assigned independently.
4.
270º Knobs
– 12 knobs each transmit MIDI values from 0 to 127. The knobs
can be assigned to various MIDI parameters.
5.
Layer Button
– Press the LAYER button to cycle through the Photon 25's
three independent knob layers. The lights above the LAYER button indicate
which one of the three available layers is currently active.
Knob assignments can be made on each layer for a total of 36 knob assignments
per preset.
6.
Display
– The display shows current status information.
7.
Configuration buttons
– Call up and save presets, set global parameters and
more using the configuration buttons. See below for additional detail.
8.
Encoder
– Twirl the encoder to select various parameters and values. Press
the encoder to toggle between parameter and value assignments and to accept
your entries.

6
Plug-and-Play Connection to a Computer
Both Windows XP and Mac OS X see the Photon as a plug-and play MIDI
controller. Simply plug the Photon into your computer using a USB cable and
allow the operating system to install it automatically.
Depending on your operating system, the Photon 25 may be identified by your
MIDI software applications as either a "Photon" controller or a "USB Audio
Device." No need to worry: the Photon will work regardless of its designation.
The Photon is not compatible with earlier versions of Windows or Mac OS.
Operation:
1. Using the Keyboard with your MIDI software
Once you're plugged in and powered up, go to your sound module or software
application and set the incoming MIDI channel.
If you're using software, you will probably need to configure it to use the Photon
or "USB" device. Look for the MIDI device setup menu in your application and
ensure that the Photon is designated as an active MIDI device before proceeding.
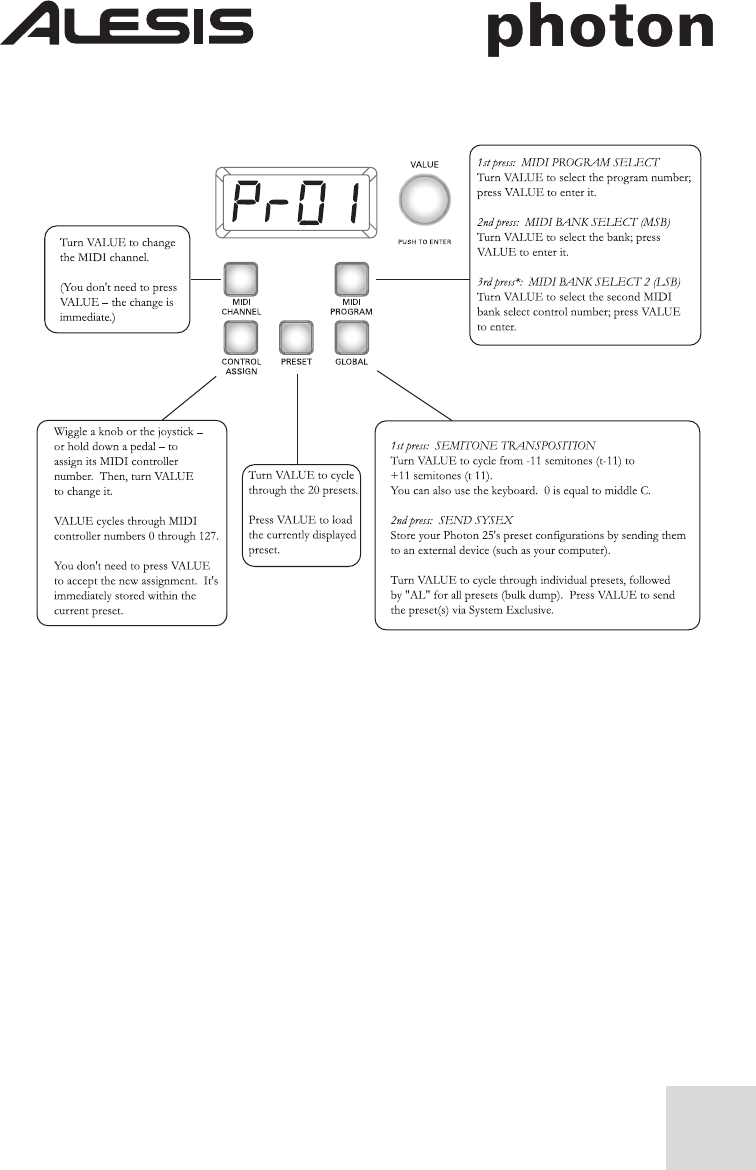
On the Photon, press MIDI CHANNEL and turn the clear encoder knob to
select the MIDI channel you specified in your sound module or software.
Play the keyboard. Your sound module or software should respond to the Photon
25's MIDI data. If not, refer to the troubleshooting instructions later in this guide.
Experiment with the Photon 25's OCTAVE buttons and X/Y joystick. Since the
joystick is mapped by default to MIDI's standard pitch and modulation
commands, it should work as expected in most cases right off the bat.
2. Using the Knobs with the Supplied
Controller Templates
If one of the supplied template sets matches your MIDI software, lift the plastic
template covers with your fingernail, position the templates, and then replace the
covers.
Press the PRESET button and turn the clear cursor knob to
reach the program number indicated on the templates.
Press the cursor knob to enter this program. You
should now be able to control the software according to
the templates.
Press the LAYER button as needed to cycle through
the three knob layers. Each layer is independent (though a
knob can be assigned to the same controller value on two or
three of the layers).
The lights on the top and
bottom rows are simply
duplicates of one another.
It's not possible to have, say,
Layer 1 on the top row and
Layer 2 on the bottom row.
7
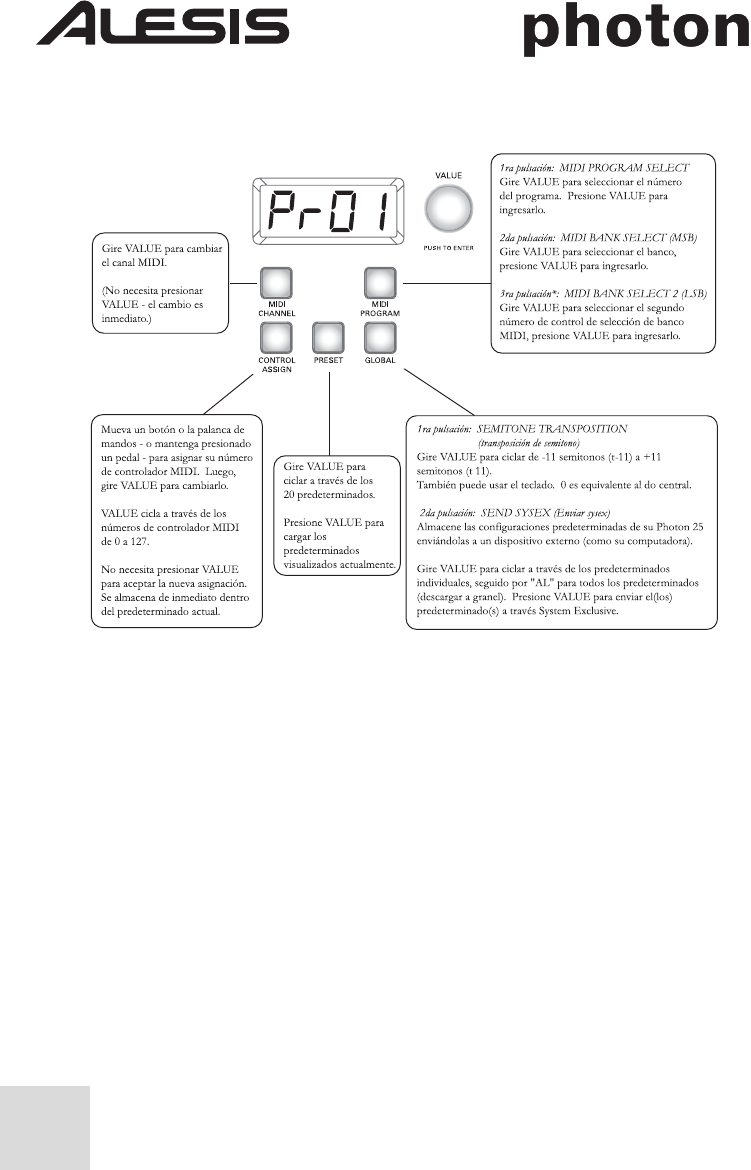
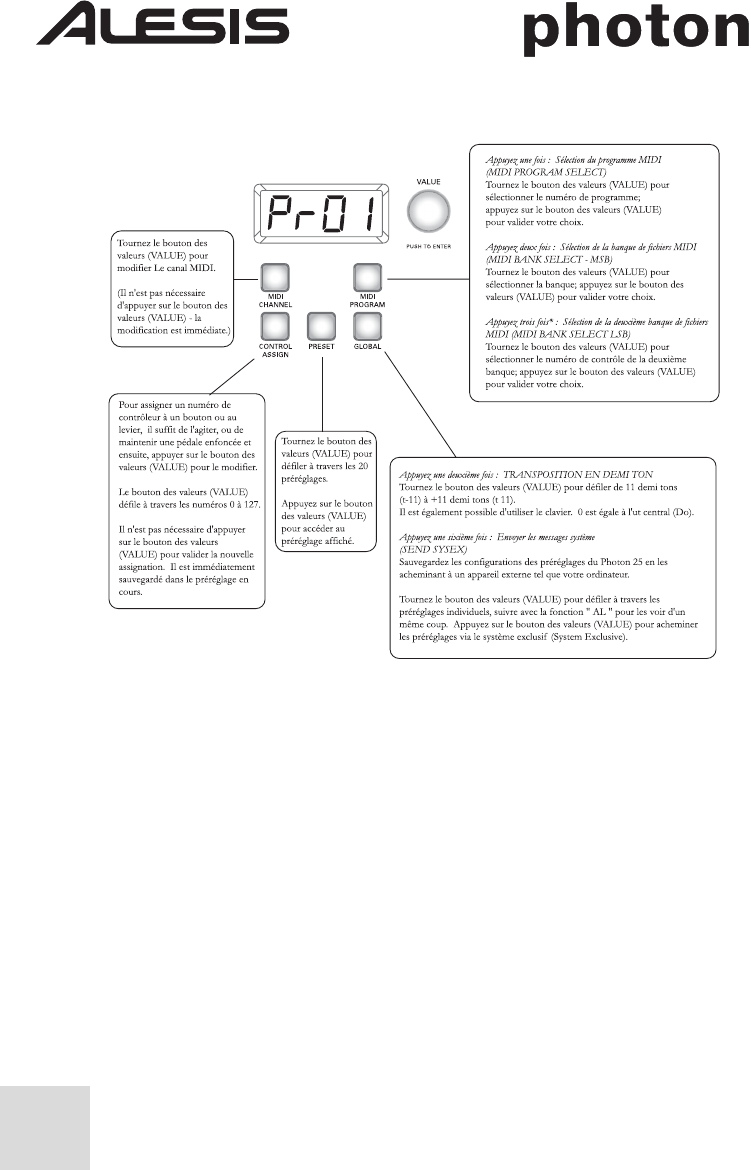
3. Using the Configuration Controls
4. Panic Command (All Notes Off)
Press MIDI CHANNEL and MIDI PROGRAM at the same time to send the
ALL NOTES OFF command to your computer and external devices.
8
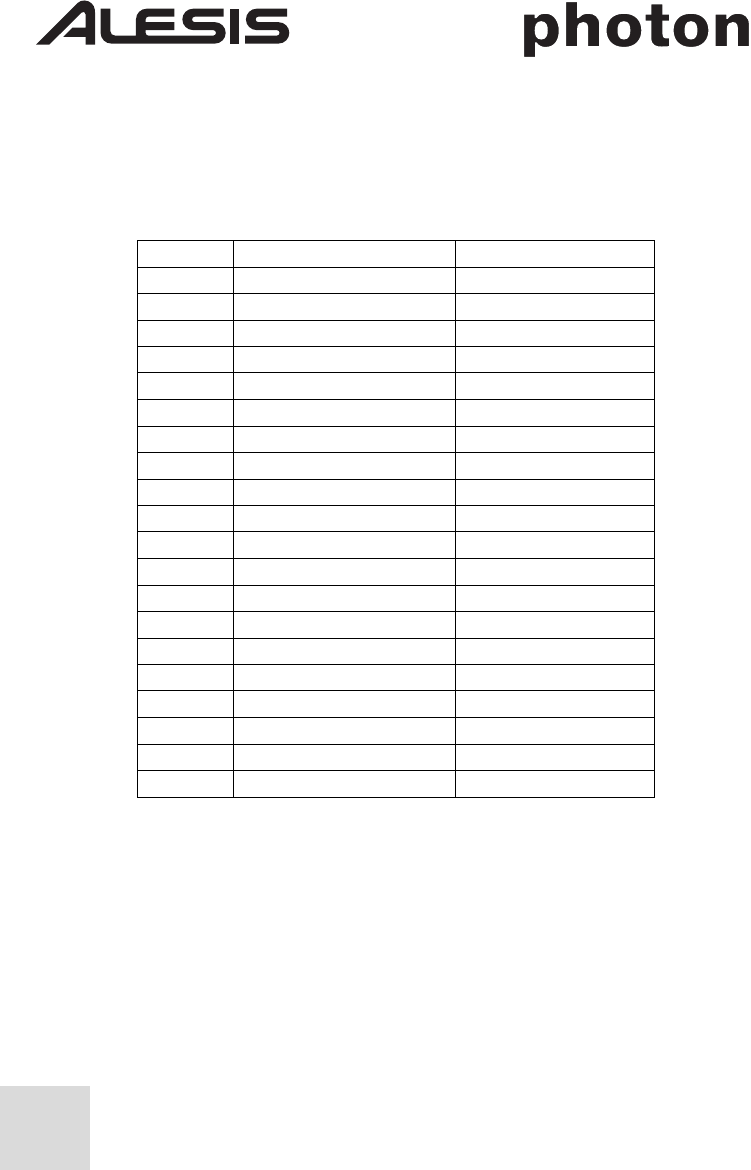
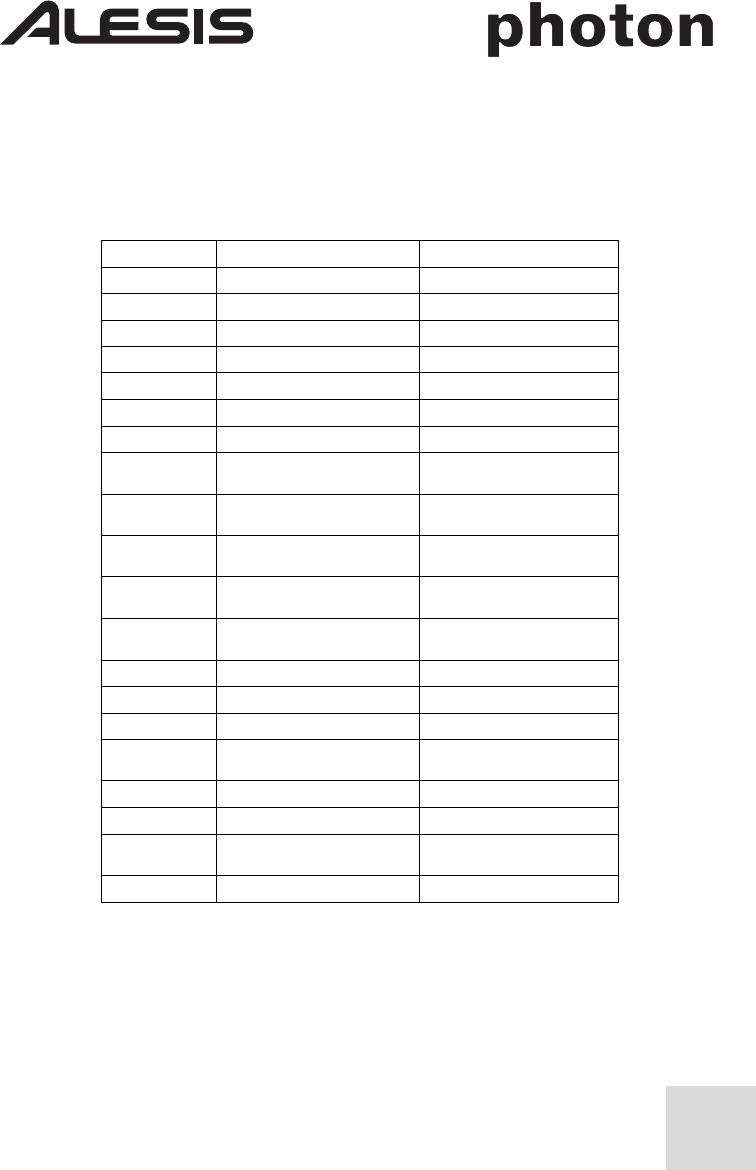
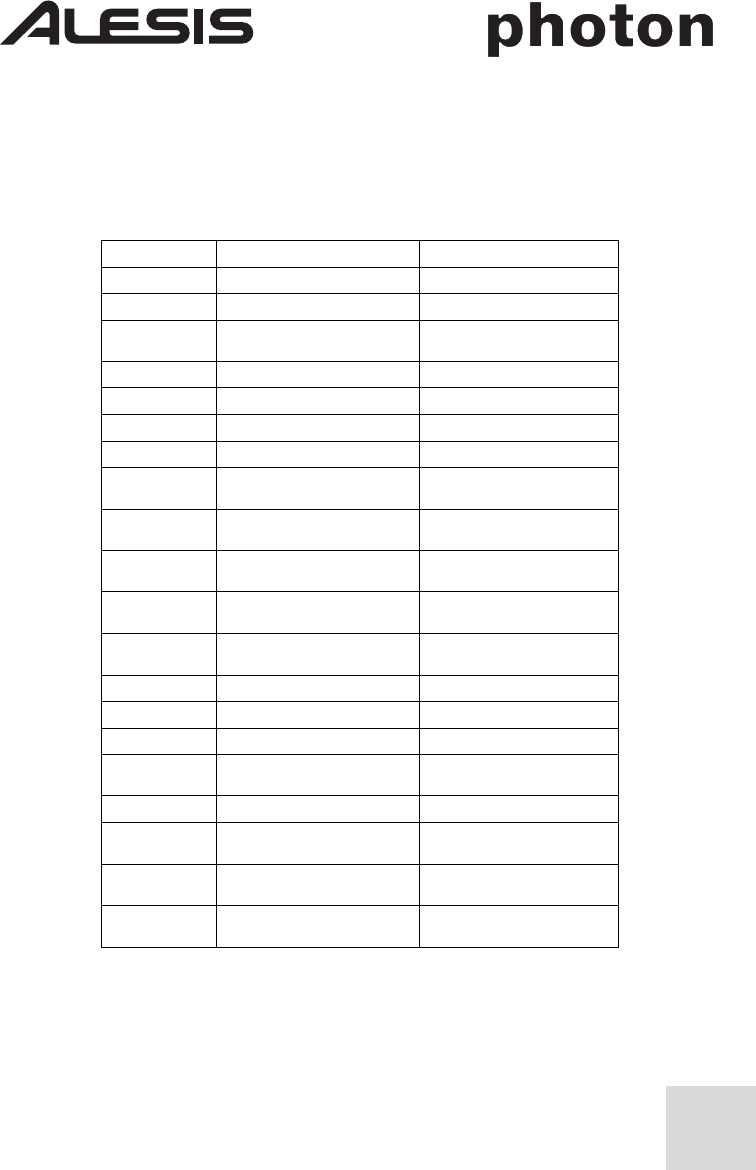
Reference:
List of Common MIDI Controller Values
Use this table for reference as you configure the Photon 25.
Controller Description Range of Values
1 Modulation Wheel 0 through 127
2 Breath Controller 0 through 127
4 Foot Controller 0 through 127
5 Portamento Time 0 through 127
7 Master Volume 0 through 127
8 Balance 0 through 127
10 Pan 0 through 127
11 Channel Volume 0 through 127
64 Sustain Pedal 0-63 = off. 64-127 = on.
65 Portamento Pedal 0-63 = off. 64-127 = on.
66 Sostenuto Pedal 0-63 = off. 64-127 = on.
67 Soft Pedal 0-63 = off. 64-127 = on.
67 Hold 2 Pedal 0-63 = off. 64-127 = on.
91 External Effects 0 through 127
92 Tremolo Depth 0 through 127
93 Chorus Depth 0 through 127
94 Detune Depth 0 through 127
95 Phaser Depth 0 through 127
123 All Notes Off 0
126 Monophonic Mode On 1 = on
127 Polyphonic Mode On 0 = on

9
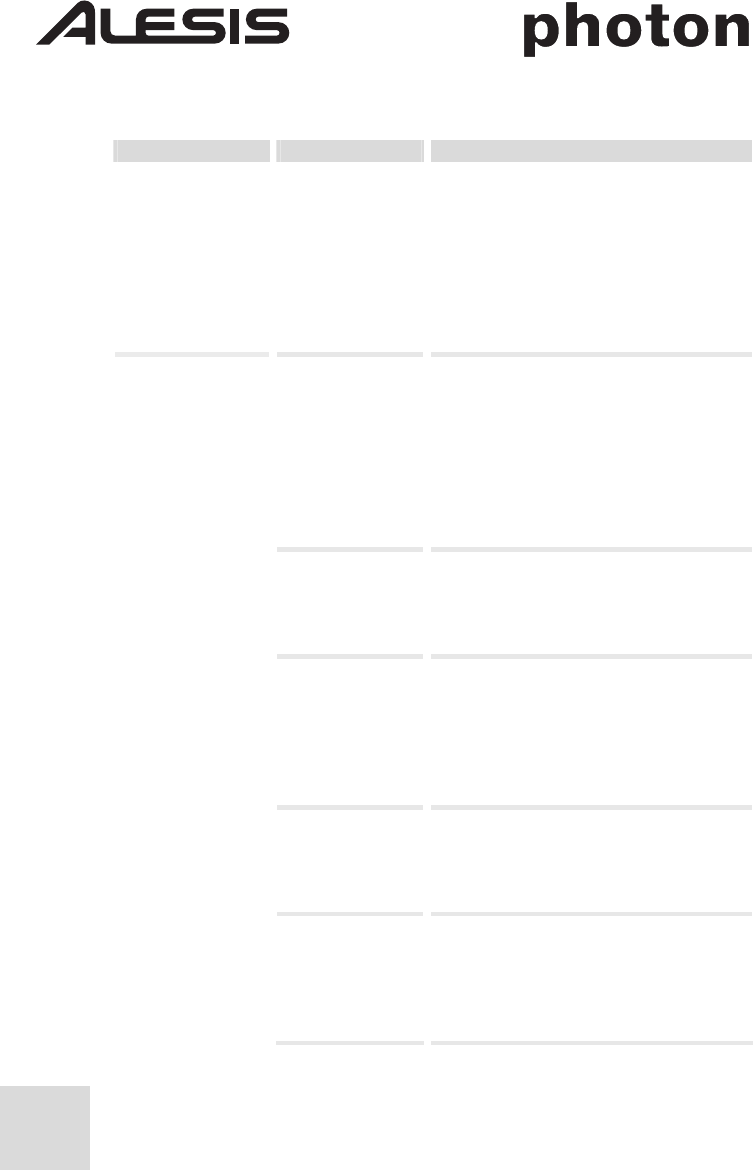
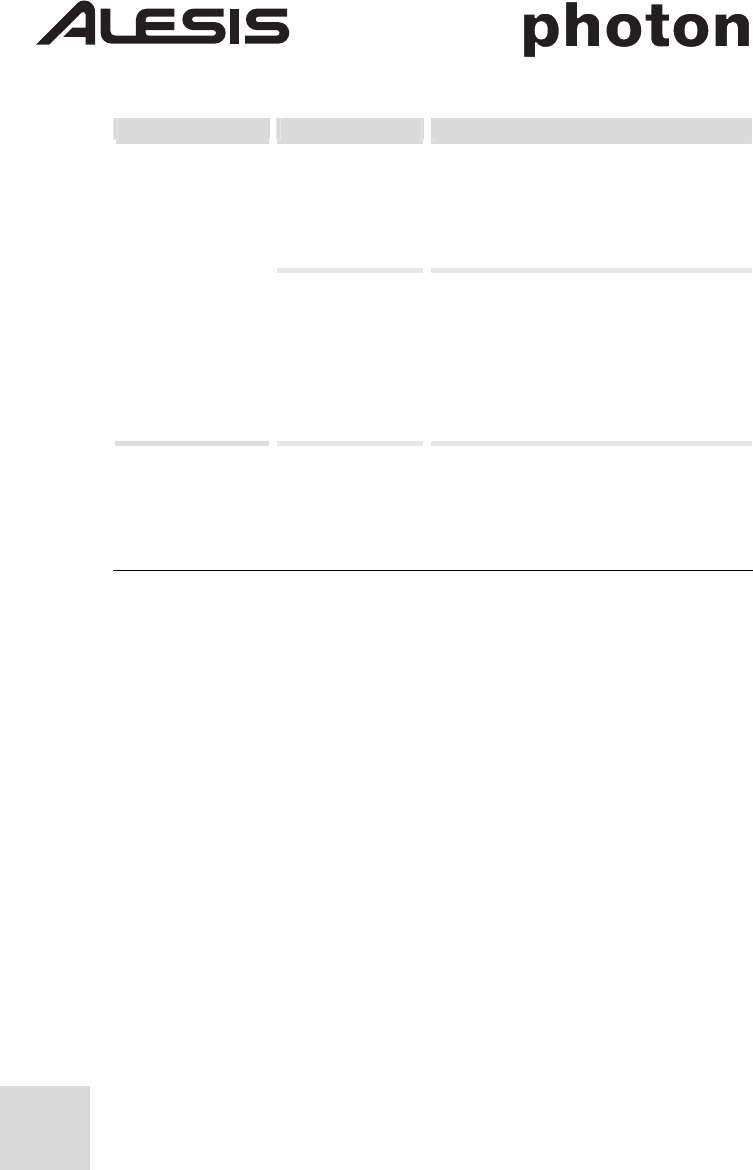
Troubleshooting:
Symptom Cause Solution
The display does not
light up.
No power. If you are using USB power, check that the
USB power switch on the back of the Photon
is OUT. If you are using batteries or an AC
adpater, check to see that the batteries are not
drained or that the adapter is plugged in to a
live power outlet and that the power switch is
IN.
No sound from target
device.
Photon USB not
properly connected.
Check your computer's USB connections to
confirm that the Photon is recognized and
installed. Turn you computer off and then on
again if necessary. (Choose "shut down" rather
than "restart" to ensure that the USB devices
are properly reset.)
Problems caused by
use of a USB hub.
Try unplugging the Photon from any USB
hubs and connecting directly to the computer.
Software application
not set up to receive
MIDI data from
Photon controller.
Ensure that the Photon or "USB" MIDI device
is listed as an active MIDI source in your
application.
Software application
not receiving MIDI
data.
Many software applications have MIDI IN and
OUT indicator lights. Play some keys and look
for the MIDI IN light to indicate activity.
Photon's MIDI
channel not the same
as application's
incoming MIDI
channel.
Be sure that the Photon is sending MIDI data
on the channel that the target device expects.
Sound source's notes
out of range of
Photon's keyboard.
Try using a piano sound as you're first getting
connected. Drums and basses and some other
instruments may have a limited MIDI note
range or other idiosyncracies. Use "easier"
instruments like pianos when you're setting up
the Photon for the first time.

10
Symptom Cause Solution
Sound source not
active or volume set
to 0.
Try using an instrument that has a virtual
keyboard built in. Will the instrument sound
when you use that virtual keyboard? If not, the
problem may be with the software synthesizer,
not the Photon connection.
MIDI Echo not
enabled in sequencer
software.
If the Photon is both (a) connected to a
computer via USB and (b) connected to an
external sound source via MIDI OUT, be sure
that a computer sequencer program is active
and that it is set to "MIDI Echo."
An external MIDI
IN device is present.
If you are using the 5-pin MIDI OUT port to
connect to another MIDI device and another
device is connected to the Photon's MIDI IN,
the MIDI OUT port only sends information
from the MIDI IN device, not the Photon.
Photon's 5-pin
MIDI OUT not
connected to sound
source's MIDI IN.
Ensure that any 5-pin cables are connected to
the proper inputs and outputs.
Sustain pedal was
plugged in after
power was turned
on.
Turn the unit’s power off, wait a moment, and
then turn it on again.
Notes sustain
continuously.
Stuck notes due to
incomplete MIDI
data.
Try sending the Panic command by pressing
MIDI CHANNEL and MIDI PROGRAM
at the same time. If that does not solve the
problem, turn the unit’s power off, wait a
moment, and then turn it on again.
Sustain pedal works in
reverse.
Sustain pedal was
plugged in after
power was turned
on.
Turn the unit’s power off, wait a moment, and
then turn it on again.

11
Specifications
Keyboard: 25-note, full-size, velocity sensitive.
MIDI Controllers: X/Y joystick, Octave Up and Down buttons,
12 270º knobs (3 layers)
Master control section: MIDI Channel, MIDI Program, Control Assign,
Preset, and Global buttons.
360º turn-and-push encoder.
4-position, 7-segment display.
Power options: USB bus power, 4 "C"-size batteries, or
external adapter (6VDC, negative tip, 1000mA).
Dimensions: 18" x 9.75" x 3.75" / 45.5 cm x 24.75 cm x 9.5 cm
Weight (net): 4.5 lbs / 2.0 kg

12
This page intentionally left blank.
13
PHOTON – MANUAL DE INICIO RÁPIDO
DEL USUARIO
(ESPAÑOL)
Diagrama de conexión
Introducción
¡Felicitaciones por su compra del Controlador Midi Photon 25 de Alesis!
El Photon 25 combina la portabilidad con un sinnúmero de funciones de
vanguardia:
• 25 teclas de tamaño normal y botones de cambio de octavas fácilmente
accesibles dan máxima capacidad de reproducción con mínimo tamaño.
• Perillas asignables de 270º. Tres capas de doce perillas proporcionan cada una
el equivalente de 36 perillas por predeterminado.
• Una conexión USB y conexiones MIDI de 5 pines activas simultáneamente le
permiten al Photon comunicarse fácilmente tanto con la computadora como con
el hardware autónomo de audio.
• Los ajustes y las plantillas preprogramadas funcionan con software popular
ampliamente disponible en el comercio. También puede diseñar fácilmente sus
propios ajustes y plantillas. Puede almacenar hasta 20 ajustes completos.

14
Registración del producto
Por favor visite http://www.alesis.com para registrar su nuevo Photon 25.
Registrarse le permite asegurarse de que lo podamos mantener al tanto de
cualquier asunto de último momento relacionado con el producto. Si desea, Alesis
también le puede enviar información de otros productos que le puedan interesar.
La registración nos ayuda a nosotros también. Cuando nos informa sobre los
tipos de productos de música que usa y con los que sueña, nos ayuda a presentarle
productos de vanguardia como Photon 25.
Requisitos mínimos de computadora
Photon 25 requiere Windows XP o Mac OS X y una conexión USB 1.1 o
superior. No se soportan los sistemas operativos más antiguos.
Cualquier aplicación MIDI que le permita seleccionar su dispositivo MIDI debería
ser compatible con Photon 25. Los programas MIDI muy básicos no le permitirán
aprovechar la palanca de mando y las perillas de Photon 25.

15
Conexiones del panel trasero
1.
Conector del adaptador extern
– Enchufe el adaptador de CA si no desea
alimentar el Photon X 25 a través de la conexión USB o con cuatro pilas de
tamaño “C”. (Use un aparato de 6 VCC, con punta negativa, de 1000 mA).
2.
Selector de fuente de alimentación
– Presione este interruptor para alimentar
el Photon 25 con cuatro pilas tamaño “C”, o un adaptador de alimentación
externo opcional. Si cuenta tanto con un adaptador de corriente alterna como con
pilas, se usará el adaptador en vez de las pilas.
Mantenga este interruptor sin presionar para alimentar el Photon 25 desde una
conexión USB de la computadora o para apagar la unidad cuando no haya
alimentación del USB.
Notas: Cuando use una computadora portátil, considere usar pilas para alargar el
tiempo de funcionamiento de la computadora entre cargas.
Cargue las pilas en la parte inferior del Photon 25.
3.
Conector USB
– Para enchufar un cable de USB estándar en este
tomacorriente y en un conector USB 1.1 o superior de su computadora.
4.
Conector MIDI IN
– Use un cable MIDI de cinco pines para conectar la
salida (OUTPUT) de un controlador MIDI externo a la entrada MIDI IN del
Photon 25.
Si usa un dispositivo externo en MIDI IN, su computadora lo reconocerá como
un segundo controlador MIDI IN.

16
5.
Conector MIDI OUT
– Use un cable MIDI de cinco pines para conectar la
salida MIDI OUT del Photon 25 a la entrada (INPUT) de un dispositivo MIDI
externo.
El funcionamiento del puerto MIDI OUT cambia dependiendo de que haya o no
un cable USB conectado al Photon.
● Cable USB conectado:
Los datos MIDI de su computadora
se envían al puerto MIDI OUT.
Nota: Cuando se conecta un cable
USB, usted debe activar el “MIDI
echo” en su secuenciador si desea
que el Photon controle otro
dispositivo MIDI.
● Cable USB sin conectar:
Lo que toque en el
Photon se envía al puerto
MIDI OUT.
Nota: Si tiene otro dispositivo
conectado al puerto de entrada del MIDI del Photon, se ignorará la
información MIDI de ese dispositivo.
6.
Entrada del pedal de sostenido
– Para conectar un pedal de sostenido de
teclado (no incluido). Use un pedal de sostenido de cualquier fabricante: cuando
enciende el Photon 25, se calibrará automáticamente con el pedal.
Los datos MIDI del
Photon (o de un
controlador externo
conectado al puerto
MIDI IN del Photon)
Datos del USB de
la computadora

17
Controles del panel superior
1.
Teclado
– Un teclado de tamaño completo, 25 notas y sensible a la velocidad.
2.
Botones de subir/bajar octavas
– Transponga el teclado en octavas usando
estos botones. Presione ambos botones al mismo tiempo para reinicializar el
rango del teclado.
3.
Joystick X/Y
– Para controlar pitch bend, modulación y otras funciones con
esta palanca de mandos de 2 vías. El eje X y el eje Y pueden ser asignados de
manera independiente.
4.
Perillas de 270º
– 12 perillas que transmiten valores MIDI de 0 a 127. Las
perillas pueden asignarse a varios parámetros MIDI.
5.
Botón de capas
– Presione el botón de capas LAYER para ciclar a través de
las tres capas independientes de perillas del Photon 25. Las luces sobre el botón
LAYER indican cuál de las tres capas disponibles está actualmente activa.
Se pueden asignar perillas para cada capa por un total de 36 asignaciones de
perillas por función predeterminada.
6.
Pantalla
– La pantalla muestra la información del estado actual.
7.
Botones de configuración
– Para llamar y guardar funciones
predeterminadas, ajustar parámetros globales y más funciones usando los botones
de configuración. Vea abajo para más detalles.
8.
Codificador
– Gire el codificador para seleccionar diversos parámetros y
valores. Presione el codificador para conmutar entre las asignaciones de
parámetros y valores y para aceptar sus entradas.

18
Conexión plug-and-play a una computadora
Tanto Windows XP como Mac OS X reconocen al Photon como un controlador
MIDI tipo plug-and-play. Simplemente enchufe el Photon a su computadora
usando un cable USB y permita que el sistema operativo lo instale
automáticamente.
Según su sistema operativo, el Photon 25 puede ser identificado por sus
aplicaciones de software MIDI sea como un controlador “Photon” o un
“dispositivo de audio USB”. No debe preocuparse: el Photon funcionará sin
importar su designación.
El Photon no es compatible con las versiones anteriores de Windows o de Mac
OS.

19
Funcionamiento:
1. Usando el teclado con su software MIDI
Después de enchufar y encender el equipo, vaya a su módulo de sonido o
aplicación de software y seleccione el canal MIDI de entrada.
Si está usando software, es posible que deba configurarlo para usar el Photon o el
dispositivo de USB. Busque el menú de configuración del dispositivo MIDI de su
aplicación y asegúrese que el Photón esté designado como un dispositivo activo
antes de proceder.
En el Photon, presione MIDI CHANNEL y gire la perilla transparente del
codificador para seleccionar el canal MIDI que especificó en su módulo de sonido
o en su software.
Toque el teclado. Su módulo de sonido o software debe responder a los datos
MIDI del Photon 25. De lo contrario, consulte las instrucciones de solución de
problemas más adelante en este manual.
Experimente con los botones de octavas del Photon 25 y con la palanca de mando
X/Y. Ya que la palanca de mando está designada de manera predeterminada a los
comandos estándar de pitch y modulación del MIDI, debe funcionar normalmente
en la mayoría de los casos, de inmediato.
2. Usando las perillas con las plantillas
del controlador suministradas
Si uno de los juegos de plantillas suministradas coincide con su software MIDI,
levante las tapas plásticas de las plantillas con la uña, coloque las plantillas y
reponga las tapas.
Presione el botón PRESET y gire la perilla transparente del
cursor para llegar al número de programa indicado en las
plantillas. Presione la perilla del cursor para entrar a este
programa Debe poder controlar el software según las
plantillas.
Presione el botón LAYER cuando lo necesite para ciclar a
través de las tres capas de perillas. Cada capa es
independiente (aunque se puede asignar una perilla al mismo
valor de controlador de dos o tres de las capas).
Las luces de las filas
superiores e inferiores son
simplemente duplicadas. No
es posible tener, por ejemplo,
la Capa 1 en la fila superior y
la Capa 2 en la fila inferior.
20
3. Usando los controles de configuración
4. Comando de pánico (Todas las notas apagadas)
Presione MIDI CHANNEL y MIDI PROGRAM al mismo tiempo para enviar
el comando de APAGAR TODAS LAS NOTAS a su computadora y dispositivos
externos.
21
Referencia:
Lista de valores comunes del controlador MIDI
Use esta tabla como referencia mientras configura el Photon 25.
Controlador Descripción Rango de valores
1 Rueda de modulación 0 a 127
2 Controlador de soplido 0 a 127
4 Controlador de pedal 0 a 127
5 Tiempo de portamento 0 a 127
7 Volumen master 0 a 127
8 Balance 0 a 127
10 Pan 0 a 127
11 Volumen del canal 0 a 127
64 Pedal de sostenido 0-63 = off (desactivado).
64-127 = on (activado).
65 Pedal de portamento 0-63 = off (desactivado).
64-127 = on (activado).
66 Pedal de sostenido 0-63 = off (desactivado).
64-127 = on (activado).
67 Pedal suave 0-63 = off (desactivado).
64-127 = on (activado).
67 Pedal Hold 2 0-63 = off (desactivado).
64-127 = on (activado).
91 Efectos externos 0 a 127
92 Profundidad del trémolo 0 a 127
93 Profundidad del coro 0 a 127
94 Profundidad de
desafinación
0 a 127
95 Profundidad del phaser 0 a 127
123 Todas las notas apagadas 0
126 Modo monofónico
activado
1 = on
127 Modo polifónico activado 0 = on
22
Solución de problemas:
Síntoma Causa Solución
La pantalla no se
ilumina.
No hay
alimentación.
Se está usando alimentación por USB, verifique
que el interruptor de alimentación USB en la
parte de atrás del Photon esté hacia fuera. Si
está usando pilas o un adaptador de corriente
alterna, verifique que las pilas no estén agotadas
o que el adaptador esté enchufado a un
tomacorriente de alimentación eléctrica y que el
interruptor de alimentación esté hacia adentro.
No hay sonido del
dispositivo
destinatario.
El USB del Photon
no está conectado
correctamente.
Verifique las conexiones del USB de su
computadora para confirmar que el Photon sea
reconocido e instalado. Apague su
computadora y enciéndala otra vez si es
necesario. (Elija apagar “shut down” en vez de
reiniciar “restart” para asegurarse de que los
dispositivos USB estén reseteados
correctamente)
Problemas causados
por usar un
concentrador(hub)
USB.
Intente desenchufar el Photon de los hubs USB
que hubiera y conectarlo directamente a la
computadora.
La aplicación de
software no está
programada para
recibir datos MIDI
desde el controlador
Photon.
Asegúrese de que el Photon o el dispositivo
MIDI USB esté clasificado como una fuente de
MIDI activa en su aplicación.
La aplicación de
software no recibe
datos MIDI.
Varias aplicaciones de software cuentan con
luces indicadoras de MIDI IN y MIDI OUT.
Toque algunas teclas y busque que la luz MIDI
IN indique actividad.
El canal MIDI del
Photon no es igual al
canal MIDI de
entrada de la
aplicación.
Asegúrese de que el Photon esté enviando
datos MIDI en el canal esperado por el
dispositivo destinatario.
23
Síntoma Causa Solución
Las notas de la
fuente de sonido
están fuera del rango
del teclado del
Photon.
Intente usar un sonido de piano cuando se
conecta por primera vez. Las baterías,
contrabajos y otros instrumentos pueden tener
un rango de notas MIDI limitado u otras
características. Use instrumentos más “fáciles”
como los pianos cuando instale el Photon por
primera vez.
La fuente de sonido
no está activa o el
volumen está
ajustado a 0.
Intente usar un instrumento que cuenta con un
teclado virtual instalado. ¿Suena el instrumento
cuando usa ese teclado virtual? Si no suena, es
posible que el sintetizador de software tenga
problemas, no la conexión del Photon.
El eco MIDI no está
activado en el
software del
secuenciador.
Si el Photon está conectado (a) a una
computadora por un USB y (b) a una fuente de
sonido externa vía MIDI OUT, asegúrese de
que haya un programa secuenciador activo en la
computadora y que esté configurado a “MIDI
Echo”.
Hay un dispositivo
MIDI IN externo
presente.
Si está usando el puerto MIDI OUT de 5 pines
para conectar otro dispositivo MIDI y otro
dispositivo está conectado al MIDI IN del
Photon, el puerto de MIDI OUT sólo envía
información desde el dispositivo MIDI IN, no
desde el Photon.
El MIDI OUT con
5 pines del Photon
no está conectado al
MIDI IN de la
fuente de sonido.
Asegúrese de que si hay un cable de 5 pines,
esté conectado a las entradas y salidas
adecuadas.

24
Síntoma Causa Solución
El pedal de
sostenido fue
enchufado después
de encender la
unidad.
Apague la unidad, espere un momento y
enciéndela otra vez.
Las notas se sostienen
de manera constante.
Notas pegadas
debido a datos MIDI
incompletos.
Intente enviar el comando de pánico
presionando MIDI CHANNEL y MIDI
PROGRAM al mismo tiempo. Si esto no
resuelve el problema, apague la unidad, espere
un momento y enciéndela otra vez.
El pedal de sostenido
funciona de manera
inversa.
El pedal de
sostenido fue
enchufado después
de encender la
unidad.
Apague la unidad, espere un momento y
enciéndela otra vez.
Datos técnicos
Teclado: sensible a la velocidad, de tamaño completo y 25
notas.
Controladores MIDI: palanca de mandos X/Y, botones de subir/bajar
octavas, 12 perillas de 270º (3 capas)
Sección de control master: Canal MIDI, Programa MIDI, Asignar Control,
Predeterminados, y botones Globales.
Codificador de 360º para girar y presionar.
Pantalla de 4 posiciones y 7 segmentos.
Opciones de alimentación: Alimentación por bus USB, 4 pilas de tamaño “C”,
adaptador externo (6 VCC, punta negativa, 1000
mA).
Dimensiones: 18" x 9.75" x 3.75" / 45.5 cm x 24.75 cm x 9.5 cm
Peso (neto): 4.5 lbs / 2.0 kg
25
GUIDE D'UTILISATION RAPIDE POUR LE
PHOTON 25
(FRANÇAIS)
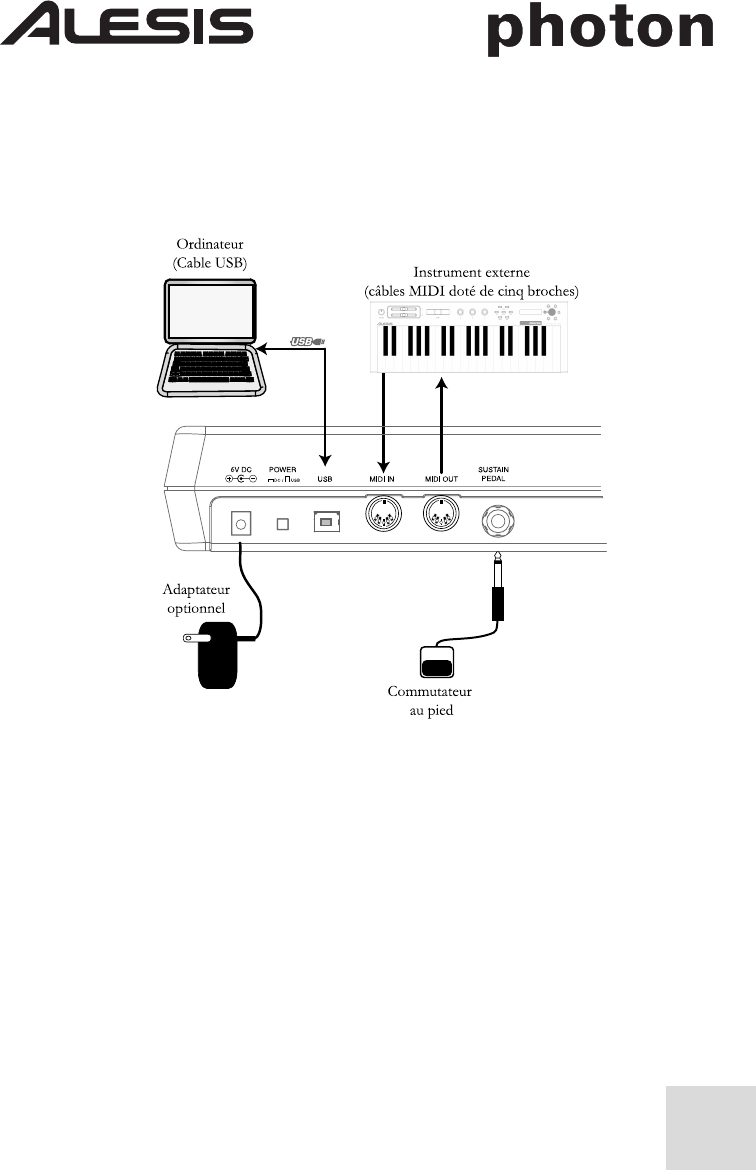
Schéma de connexion
Introduction
Félicitations pour l'achat de votre Contrôleur MIDI Photon 25 Alesis.
Le Photon 25 jumelle la portabilité avec une multitude de caractéristiques d’avant
garde :
• Doté de 25 touches pleine taille en plus des touches pour le changement
d’octave, il offre une jouabilité maximale tout en ayant un encombrement minimal.
• 270 : Boutons assignables. Douze boutons dotés de trois niveaux chacun
procurent l’équivalent de 36 boutons par préréglage.
• Connexions simultanées USB actives et MIDI à 5 broches de raccordement
permettent au Photon d’interagir facilement avec ordinateurs et appareils audio
autonomes.
• Configurations et réglettes de clavier préréglées compatibles avec logiciels
populaires Il est également possible de créer ses propres configurations et
réglettes. Il est possible de sauvegarder jusqu'à 20 configurations complètes.

26
Enregistrement du produit
Veuillez visiter le site internet http://www.alesis.com pour enregistrer votre
nouveau Photon 25.L'enregistrement des produits vous permet d'être informé sur
les toutes dernières nouveautés concernant les produits.
Si vous le désirez, Alesis peut également vous faire parvenir de l’information sur
d’autres produits qui pourraient vous intéresser.
L'enregistrement nous est très utile également. Lorsque vous nous laisser savoir le
type de produit pour la musique que vous utilisez et ceux que vous aimeriez
utiliser, cela nous permet de vous présenter des produits tel le Photon 25.
Configuration minimale requise
Le Photon 25 fonctionne sous Windows XP ou Mac OS X doté d’une connexion
sur port USB 1.1 ou supérieur. Les versions précédentes de ces systèmes
d’exploitation ne sont pas supportées.
Toute application MIDI qui permet de sélectionner l’appareil MIDI devrait être
compatible avec le Photon 25. Les programmes MIDI de base ne vous
permettront pas l’utilisation du levier et des boutons du Photon 25.
27
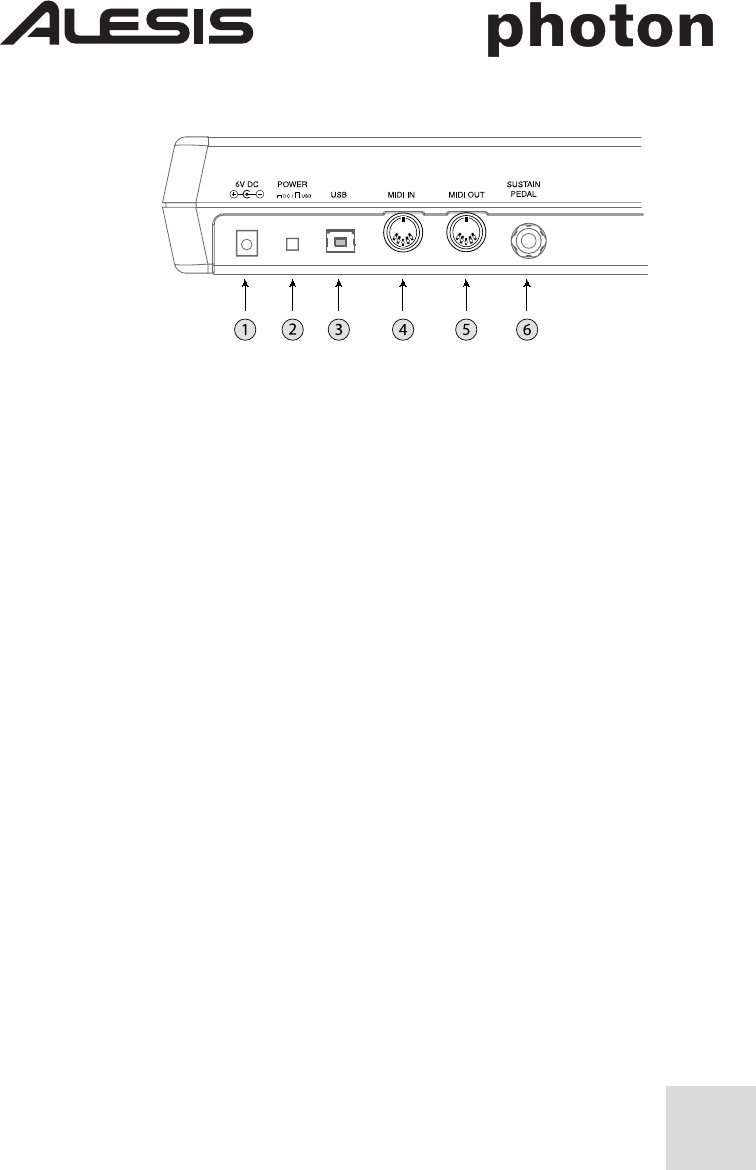
Connexions du panneau arrière
1.
Prise pour adaptateur externe
– Si vous ne désirez pas utiliser la connexion
USB ou les 4 piles de format « C » pour alimenter le Photon 25 il est possible
d’utiliser l’adaptateur CA. (Utilisez un adaptateur 6 V CC, borne négative 1000
mA.)
2.
Sélecteur de source d’alimentation
– Appuyez sur le sélecteur pour mettre
en position « IN » pour alimenter le Photon 25 à partir de quatre piles de format «
C » ou d’un adaptateur d’alimentation externe optionnel. Si un adaptateur CA est
branché et que des piles sont en place, c’est l’adaptateur CA qui sera utilisé.
Laissez le sélecteur en position « OUT » pour alimenter le Photon 25 à partir de la
connexion sur port USB d'un ordinateur ou pour mettre l’appareil hors tension
lorsque l’alimentation via un port USB n’est pas disponible.
Remarque : Lorsqu’un ordinateur portable est utilisé, il est recommandé d’utiliser
les piles pour prolonger la durée d’utilisation du portable entre les recharges.
Insérez les piles dans le compartiment à pile situé en dessous du Photon 25.
3.
Connexion USB
– Permet de brancher un câble USB standard dans cette
prise et dans le port USB 1.1 ou supérieur d’un ordinateur.
4.
Entrée MIDI IN
– Branchez un câble MIDI doté de cinq broches de
raccordement à la sortie « OUTPUT » d’un contrôleur MIDI externe et l’extrémité
du câble à l’entrée « MIDI IN » du Photon 25.
Si vous utilisez un appareil MIDI externe, l’ordinateur le reconnaîtra comme un
second contrôleur MIDI.
28
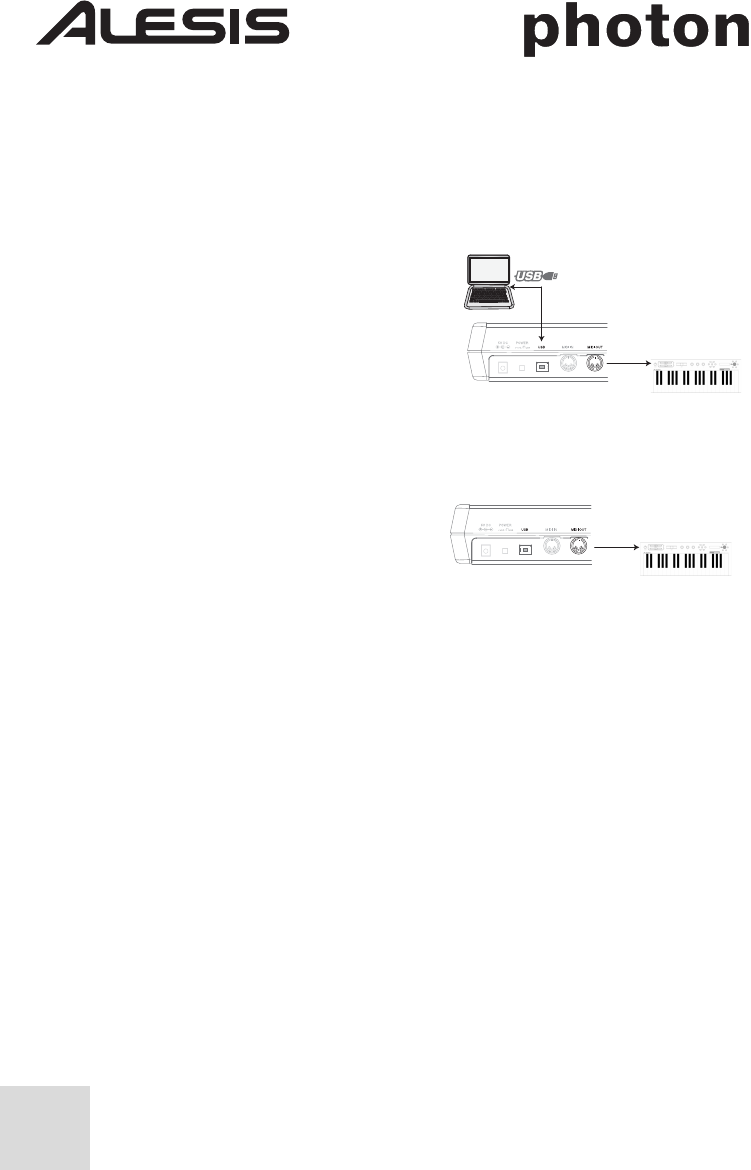
5.
Sortie MIDI
– Branchez un câble MIDI doté de cinq broches de
raccordement à la sortie « MIDI OUT » du Photon 25 et l’extrémité du câble à
l’entrée « INPUT » d’un appareil MIDI externe.
Le fonctionnement du port « MIDI OUT » change selon si un câble USB est
branché ou non au Photon.
● Câble USB branché:
Les données MIDI sont transmises
de l’ordinateur vers le port « MIDI
OUT ».
Note: Lorsqu’un câble
USB est branché, vous
devez activer la fonction
« MIDI ECHO » de
votre séquenceur si vous désirez
commander un autre appareil MIDI du Photon.
● Câble USB non branché:
Tous ce que vous jouerez
sera acheminé vers le
port « MIDI OUT »
Note: Si un autre appareil est branché au port « MIDI IN » du Photon,
l'information MIDI provenantde ce dispositif sera non reconnue.
6.
Entrée pédale de soutien (Sustain)
– Permet de brancher une pédale de
soutien (non incluse). Vous pouvez utiliser une pédale de soutien peu importe le
fabriquant : Dès qu’il est mis sous tension, le Photon 25 détecte automatiquement
la pédale et procède au calibrage.
Données USB
provenant de
l’ordinateur
Données MIDI
provenant du Photon (ou
d’un contrôleur externe
branché au port « MIDI
IN » du Photon).

29
Commandes du panneau supérieur
1.
Clavier
– Clavier pleine taille doté de touches sensibles à la dynamique et de 25
notes.
2.
Touches de sélection d’octave
– Permet de transposer le clavier en octaves.
Appuyez sur les deux touches simultanément pour réinitialiser le clavier.
3.
Levier X/Y
– Ce levier à double sens permet de régler la vitesse de lecture, la
modulation et autres fonctions. L’axe X et Y peuvent être assignés
indépendamment.
4.
270º Boutons
– 12 boutons qui transmettent chacun des valeurs MIDI de 0 à
127.Les boutons peuvent être assignés à plusieurs paramètres MIDI..
5.
Touche de niveau (LAYER)
– Appuyer sur la touche de niveau (LAYER)
pour passer en revue les trois niveaux indépendants des boutons du Photon 25.
Les témoins au dessus de la touche de niveau (LAYER) indiquent lequel des trois
niveaux disponibles est présentement actif.
L’assignation des boutons peut être effectuée sur les trois niveaux jusqu’à un total
de 36 assignations par préréglage.
6.
Écran d’affichage
– L'écran affiche toute l’information concernant l’activité
en cours.
7.
Touches de configuration
– Permet d'appeler et de sauvagarder des réglages,
de régler des paramètres généraux, et plus encore. Voir ci dessous plus de plus
amples détails.
8.
Encodeur
– Tourner l’encodeur permet de sélectionner plusieurs paramètres
et valeurs. Appuyer sur l’encodeur permet de commuter entre les assignations des
paramètres et des valeurs et de valider vos choix.

30
Branchement à un ordinateur prêt à l’utilisation
Les systèmes d’exploitation Windows XP et Mac OS X perçoivent le Photon
comme un contrôleur MIDI prêt à l’utilisation. Branchez tout simplement le
Photon à votre ordinateur à l’aide d’un câble USB et laissez le système
d’exploitation faire l’installation de façon automatique.
Le Photon 25 peut être identifié comme « Photon » ou « Appareil audio USB
(USB Audio Device) » selon les logiciels MIDI. Ne craigniez rien : Le Photon
fonctionne peu importe sa désignation.
Le Photon n'est pas compatible avec les versions antérieures de Windows ou Mac
OS..

31
Fonctionnement:
1. L’utilisation du clavier avec votre logiciel MIDI
Une fois branché et sous tension, réglez le canal entrant pour les données MIDI
sur le module de son ou dans le logiciel.
Si vous utilisez un logiciel, vous devrez probablement le configurer pour qu'il
puisse utiliser le Photon ou encore l’appareil USB selon la désignation.
Recherchez le menu d'installation du dispositif MIDI dans votre application et
assurez-vous que le photon est indiqué comme dispositif actif du MIDI avant de
procéder à la prochaine étape.
Sur le Photon, appuyez sur la touche de canal MIDI (MIDI CHANNEL) et
tournez le bouton transparent de l’encodeur pour sélectionner le canal MIDI
correspondant à celui spécifié sur votre module de son ou votre logiciel.
Jouez sur le clavier. Votre module de son ou logiciel devrait répondre aux
données MIDI transmises par le Photon 25. S'il ne répond pas, veuillez vous
référez à la section de dépannage de ce guide.
Amusez vous à essayer les touches OCTAVE et le levier X/Y du Photon 25. Le
levier est mappé par défault au commande de vitesse de lecture et de modulation
standard, il devrait donc est prêt à fonctionner tel que prévu dans la plupart des
cas.
2. L'utilisation des boutons avec les
réglettes du contrôleur fournies
Si une des réglettes fournies correspond à votre logiciel MIDI, soulevez les
couvercles des réglettes de plastique avec vos ongles, positionnez les réglettes et
replacez ensuite les couvercles.
Appuyez sur la touche de préréglage (PRESET) et tournez le
bouton transparent du curseur pour atteindre le numéro de
programme indiqué sur les réglettes. Appuyez sur le
bouton du curseur pour entrer dans le programme.
Vous devriez maintenant pouvoir commander le logiciel
en fonction des réglettes.
Appuyer sur la touche de niveau (LAYER) autant de
fois que nécessaire pour faire défiler les trois
niveaux des boutons. Chaque niveau est indépendant (un
bouton peut être assigné à la même valeur sur deux ou trois niveaux).
Les témoins sur les rangées
du haut et du bas ne sont que
des copies l’une de l’autre. Il
n'est pas impossible d’avoir,
disons, le niveau 1 sur la
rangée du haut et le niveau 2
sur la rangée du bas.
32
3. L'utilisation des commandes de configuration
4. Commande de panique (Toutes notes fermées)
Appuyez simultanément sur le touches de sélection de canal MIDI (MIDI
CHANNEL) et de programme MIDI (MIDI PROGRAM) pour envoyer la
commande « Toutes notes fermées » (ALL NOTES OFF) à l’ordinateur et aux
appareils externes.
33
Référence :
Liste des valeurs principales du Contrôleur MIDI
Utilisez ce tableau à titre de référence pour configurer le Photon 25.
Contrôleur Description Variation des valeurs
1 Molette de modulation 0 à 127
2 Commande par le souffle 0 à 127
4 Commande au pied 0 à 127
5 Temps de ramollissement
(Portamento)
0 à 127
7 Volume général 0 à 127
8 Balance 0 à 127
10 Pan 0 à 127
11 Niveau du canal 0 à 127
64 Pédale de soutien
(Sustain)
0 à 63 = désactivé (off).
64 à 127 = activé (on).
65 Pédale du Portamento 0 à 63 = désactivé (off).
64 à 127 = activé (on).
66 Pédale de soutien pour
piano (Sostenuto)
0 à 63 = désactivé (off).
64 à 127 = activé (on).
67 Pédale de sourdine pour
piano (Soft)
0 à 63 = désactivé (off).
64 à 127 = activé (on).
67 Pédale de maintien nº 2 0 à 63 = désactivé (off).
64 à 127 = activé (on).
91 Effets externes 0 à 127
92 Profondeur du tremolo 0 à 127
93 Profondeur du chorus 0 à 127
94 Profondeur du
désaccordage
0 à 127
95 Profondeur du déphasage 0 à 127
123 Toutes notes fermées (All
Notes Off)
0
126 Mode monophonique
activé
1 = activé (on)
127 Mode polyphonique
activé
0 = activé (on)

34
Dépannage:
Symptômes Cause Solution
L’écran d’affichage ne
s’allume pas.
Aucune
alimentation.
Si vous utilisez l'alimentation CA, vérifiez que
l’interrupteur d’alimentation USB à l’arrière du
Photon est à la position « OUT ». Si vous
utilisez des piles ou un adaptateur CA, vérifiez
que les piles ne sont pas déchargées ou que
l’adaptateur est bien branché à une prise de
courant active et que l’appareil est sous tension.
Aucun son provenant
de l’appareil cible.
Le câble USB du
Photon est mal
branché..
Vérifiez les connexions USB de votre
ordinateur pour vous assurez que le Photo est
reconnu par votre ordinateur et correctement
installé. Mettre votre ordinateur hors tension et
de nouveau sous tension si nécessaire. Veuillez
chosir l’option fermer (shut down) plutôt que
de redémarrer (restart) afin de vous assurer que
les dispositifs USB soient correctement
réinitialisés.
Problèmes causés
par l’utilisation d’un
répéteur USB.
Essayez de débrancher le Photon des tous les
répéteurs USB et de les brancher directement à
l’ordinateur.
L’application
logicielle n’est pas
configurée pour
recevoir des données
MIDI provenant du
contrôleur Photon.
Assurez vous que le Photon, ou dispositif USB
MIDI, est inscrit comme source active dans
votre application.
L’application
logicielle ne reçoit
pas les données
MIDI.
Plusieurs applications logicielles sont dotées de
témoins lumineux pour l'entrée MIDI (MIDI
IN) et la sortie MIDI (MIDI OUT). Jouez
quelques notes et vérifiez si le témoin de l’entre
MIDI (MIDI IN) indique de l'activité.
Le canal MIDI du
Photon n’est pas le
même que celui de
l’application.
Assurez vous que le Photon achemine les
données MIDI par le canal d’arrivée de
l’appareil cible.

35
Symptômes Cause Solution
Les notes de la
source audio sont
hors bande pour le
clavier du Photon.
Essayez d’utiliser un son de piano pour vérifier
votre installation. Les sons de batteries, des
basses et de certains autres instruments peuvent
avoir une portée de notes MIDI plus limitée ou
autres particularités. Lorsque que vous utilisez
le Photon pour la première fois, il est préférable
d’utiliser des instruments tels que le piano.
Source audio inactive
ou volume réglé à 0.
Essayez d'utiliser un instrument doté d’un
clavier virtuel intégré. L'instrument produit il
un son lorsque vous utilisez son clavier virtuel?
Si non, le problème peut être lié avec le
synthétiseur logiciel, et non avec la connexion
du Photon.
La fonction MIDI
echo est inactivée
dans le logiciel du
séquenceur.
Si le Photon est (a) branché à un ordinateur via
le port USB et (b) branché à une source audio
externe via la sortie MIDI (MIDI OUT),
assurez vous qu’un programme séquenceur
pour ordinateur est actif est qu’il est réglé à «
MIDI echo ».
Un dispositif MIDI
IN externe est
présent.
Si vous utilisez le port de sortie MIDI (MIDI
OUT) à cinq broches de raccordement pour
brancher à un autre appareil et qu’un autre
appareil est branché à l’entrée MIDI (MIDI
IN) du Photon, le port de sortie MIDI (MIDI
OUT) achemine seulement les données
provenant de l’appareil branché à l’entrée MIDI
(MIDI IN) et non du Photon.
Le port de sortie
MIDI (MIDI OUT)
à cinq broches de
raccordement du
Photon n’est pas
branché à l’entrée
MIDI (MIDI IN) de
la source audio.
Assurez vous que tous les câbles à cinq broches
de raccordement sont correctement branchés
aux entrées et sorties.
36
Symptômes Cause Solution
La pédale de soutien
(Sustain) a été
branchée après que
l’appareil a été mis
sous tension.
Mettez l’appareil hors tension, attendez
quelques secondes et remettez le sous tension.
Les notes sont
maintenues de façon
continue.
Certaines notes sont
bloquées parce que
les données MIDI
sont incomplètes..
Essayez la commande panique en appuyant
simultanément sur la touche de sélection de
canal MIDI (MIDI CHANNEL) et de
programme MIDI (MIDI PROGRAM). Si
cela ne fonctionne pas, mettez l’appareil hors
tension, attendez quelques secondes et remettez
le sous tension.
La pédale de soutien
(sustain) fonction à
l’envers.
La pédale de soutien
(Sustain) a été
branchée après que
l’appareil a été mis
sous tension.
Mettez l’appareil hors tension, attendez
quelques secondes et remettez le sous tension.
Fiche technique
Contrôleurs MIDI : levier X/Y, touches de sélection d’octave,
12 270º Boutons (3 niveaux).
Section des commandes Canal MIDI, programme MIDI, commande
principales : d’assignation, préréglage et touches générales.
360º encodeur tourne et pousse.
Écran d’affichage à 4 positions et 7 groupes
graphiques.
Alimentation : Alimentation par port USB, 4 piles de format C,
adaptateur externe (6 V CC, borne négative 1000
mA).
Dimensions : 18" x 9.75" x 3.75" / 45.5 cm x 24.75 cm x 9.5 cm
Poids (net) : 4.5 lbs / 2.0 kg
37
PHOTON 25
KURZBEDIENUNGSANLEITUNG
(DEUTSCH)
Anschlußübersicht
Einleitung
Herzlichen Glückwunsch zu Ihrem Alesis Photon 25 MIDI-Keyboards!
Obwohl das Photon 25 transportabel ist, bietet es eine Reihe von Eigenschaften,
die auf dem neuesten Stand der Technik sind:
• 25 Tasten in Normalgröße und leicht bedienbare Tasten zur
Oktavenumschaltung bieten maximalen Spielkomfort auf kleinstem Raum.
• 270º-zuweisbare Drehregler in drei Ebenen von jeweils 12 Drehreglern
entsprechen 36 Drehreglern pro voreingestelltes Programm.
• Gleichzeitig aktivierte USB- und MIDI-Anschlüsse ermöglichen die Verbindung
des Photon sowohl mit Computern als auch mit einzelnen MIDI-Geräten.
• Vorprogrammierte Setups und Templates ermöglichen es, sofort mit populärer
Software zu arbeiten. Sie können auch schnell und einfach eigene Setups und
Templates erstellen. Bis zu 20 vollständige Setups können abgespeichert werden.
Registrierung des Produkts

38
Um Ihren neuen Photon 25 zu registrieren, besuchen Sie bitte die Webseite
http://www.alesis.de. Durch Ihre Registrierung können wir Sie über
Produktneuheiten auf dem Laufenden halten. Auf Wunsch kann Ihnen Alesis
auch Informationen über andere, für Sie interessante Produkte, zusenden.
Ihre Registrierung ist auch für uns hilfreich. Wenn Sie uns mitteilen, welches
Equipment Sie verwenden und was für Geräte Sie noch benötigen, können wir
zukünftig Produkte, wie den Photon 25, entwickeln.
Mindestanforderungen des Computers
Der Photon 25 benötigt die Betriebssysteme Windows XP oder Mac OS X und
einen USB 1.1- oder höherwertigen Anschluss. Ältere Betriebssysteme werden
nicht unterstützt.
MIDI-Anwendungen, welche die Auswahl des MIDI-Geräts gestatten, sollten mit
dem Photon 25 kompatibel sein. Leider können Sie die Vorzüge des Photon 25-
Joysticks und des Drehreglers mit sehr einfachen MIDI-Programmen nicht
genießen.

39
Anschlüsse der Rückseite
1.
Anschluss für externen Adapter
– Verwenden Sie den Adapter, falls Sie den
Photon 25 nicht über die USB-Verbindung oder die vier Batterien der Größe "C"
mit Strom versorgen wollen. (Benutzen Sie hierzu ein 6V Gleichnetzteil mit
1000mA und negativer Spannung.)
2.
Auswahlschalter Stromquelle
– Drücken Sie diesen Schalter EIN, um den
Photon 25 entweder von 4 Batterien der Größe "C" oder wahlweise einem
externen Netzadapter zu speisen. Falls sowohl ein Netzteil als auch Batterien
vorhanden sind, wird in dieser Schalterstellung der Adapter den Batterien als
primäre Stromquelle vorgezogen.
Lassen Sie diesen Schalter auf AUS, um den Photon 25 über den USB-Anschluss
eines Computers mit Strom zu versorgen oder schalten Sie das Gerät hier aus, falls
kein Strom über die USB-Verbindung vorhanden ist.
Hinweis: Bei Verwendung eines Laptops ist es unter Umständen besser, Batterien
zu verwenden, um die Betriebszeit des Laptops zwischen den Aufladevorgängen
zu verlängern.
Legen Sie die Batterien in den Photon 25 unten ein.
3.
USB-Anschluss
– Schließen Sie ein herkömmliches USB-Kabel an diesen
Anschluss und dessen anderes Ende an einen USB 1.1- oder höherwertigen
Anschluss an Ihrem Computer an.
4.
MIDI IN-Anschluss
– Verwenden Sie ein normales MIDI-Kabel, um den
MIDI OUT eines externen MIDI-Geräts mit dem MIDI IN des Photon 25 zu
verbinden.
Falls Sie ein externes MIDI IN-Gerät verwenden, wird dies von Ihrem Computer
als zweites MIDI IN-Gerät erkannt.
40
5.
MIDI OUT-Anschluss
– Verwenden Sie ein normales MIDI-Kabel um den
MIDI OUT-Anschluss des Photon 25 mit dem MIDI IN-Anschluss eines
externen MIDI-Geräts zu verbinden.
Die Betriebsart des MIDI Out ändert sich je nachdem, ob ein USB-Kabel an den
Photon angeschlossen ist oder nicht.
● Falls das USB-Kabel angeschlossen ist:
MIDI-Daten Ihres Computers
werden an den MIDI Out geleitet.
Hinweis: Wenn das USB-Kabel
angeschlossen ist, sollten Sie in
Ihrem Sequenzer "MIDI THRU"
einschalten, falls gewünscht ist, dass
der Photon ein anderes MIDI-
Gerät steuert.
● Wenn das USB-Kabel
nicht angeschlossen ist:
Was Sie auf dem Photon abspielen
wird an den MIDI Out geleitet.
Hinweis: Falls ein anderes Gerät an den MIDI In des Photon
angeschlossen ist, werden die Daten dieses MIDI-Geräts ignoriert.
6.
Eingang Sustain-Pedal
– Schließen Sie hier ein Keyboard-Sustain-Pedal an
(nicht mitgeliefert). Verwenden Sie ein Sustain-Pedal eines beliebigen Herstellers:
Beim Einschalten des Photon 25 wird sich dieser automatisch auf das Pedal
kalibrieren.
USB-Daten vom
Computer
MIDI-Daten des Photon
(oder eines an den MIDI-
EINGANG des Photon
angeschlossenen externen
Steuergeräts)

41
Bedienelemente der Frontseite
1.
Tastatur
– Eine anschlagdynamische Tastatur in Normalgröße mit 25 Tasten.
2.
Oktave Up/Down-Tasten
– Über diese Tasten erfolgt die Umschaltung der
Tastatur um Oktaven. Werden beide Tasten gleichzeitig gedrückt, wird die
Tastatur wieder auf die normale Lage zurückgesetzt.
3.
X/Y-Joystick
– Steuerung des Pitch Bends, der Modulation und anderer
Funktionen. Die X- und Y-Achsen können unabhängig voneinander zugeordnet
werden.
4.
270º-Drehregler
– Jeweils 12 Drehregler übertragen MIDI-Werte zwischen 0
und 127. Die Regler können verschiedenen MIDI-Parametern zugeordnet
werden.
5.
Taste für Ebenen
– Drücken Sie die LAYER-Taste um die drei voneinander
unabhängigen Drehreglerebenen des Photon 25 zu durchlaufen. Die LEDs über
der LAYER-Taste geben an, welche der drei Ebenen im Moment gewählt ist.
Regler können in jeder Ebene bis zu 36 Zuordnungen pro Voreingabe bestimmt
werden.
6.
Anzeige
– Hier werden die gegenwärtigen Betriebsinformationen angezeigt.
7.
Konfigurationstasten
– Zum Abruf und Speichern von Voreinstellungen,
Einstellung von globalen Parametern und weiteren Funktionen. Nachstehend
finden Sie weitere Einzelheiten hierüber.
8.
Encoder
– Drehen Sie den Encoder, um verschiedene Parameter und Werte
einzustellen. Drücken Sie den Encoder, um zwischen Parametern, Zuordnungen
von Werten und zur Bestätigung Ihrer Eingaben umzuschalten.

42
Plug’n-Play-Anschluss an einen Computer
Sowohl Windows XP als auch Mac OS X erkennen den Photon als einen Plug’n
Play MIDI-Contoller. Schließen Sie den Photon einfach mit einem USB-Kabel an
Ihren Computer an und lassen Sie das Betriebssystem die automatische
Installation durchführen.
Abhängig von Ihrem Betriebssystem wird der Photon 25 von Ihrer MIDI-
Software als "Photon"-Keyboard oder als "USB Audiogerät" erkannt. Keine
Ursache zur Beunruhigung: der Photon funktioniert ungeachtet dieser
Zuordnung.
Der Photon ist mit älteren Versionen von Windows- oder Mac-Betriebssystemen
nicht kompatibel.

43
Anwendungen:
1. Bei Verwendung der Tastatur mit Ihrer MIDI-Software
Sobald alle Geräte miteinander verbunden und an das Stromnetz angeschlossen
sind, rufen Sie Ihr Sound-Modul oder Ihr Softwareprogramm auf und setzen den
Kanal für den MIDI-Eingang.
Falls Sie ein Softwareprogramm verwenden, muss dies unter Umständen
konfiguriert werden, den Photon oder das "USB"-Gerät zu verwenden. Finden
Sie das Setup-Menü in Ihrem Programm und stellen Sie sicher, dass der Photon
als aktives MIDI-Gerät eingestellt ist, bevor Sie fortfahren.
Beim Photon drücken Sie MIDI CHANNEL und drehen den durchsichtigen
Encoderregler, um den MIDI-Kanal, welchen Sie in Ihrem Sound-Modul oder
Ihrer Software bestimmt haben.
Spielen Sie auf der Tastatur. Ihr Sound-Modul oder Ihre Software sollte auf die
Daten des Photon 25 reagieren. Ist dies nicht der Fall, sehen Sie in den
Informationen zur Beseitigung von Problemen weiter hinten in dieser Anleitung
nach.
Experimentieren Sie mit den OCTAVE-Tasten des Photon 25 und dem X/Y-
Joystick. Da der Joystick vom Werk auf die normalen MIDI Pitch Bend- und
Modulationsbefehle programmiert ist, sollte dieser in den meisten Fällen
erwartungsgemäß funktionieren.
2. Einsatz der mitgelieferten Controller Templates
Falls eines der mitgelieferten Templates zu Ihrer MIDI-Software passt, heben Sie
die Plastikabdeckungen des Templates mit Ihrem Fingernagel an, positionieren die
Templates und legen die Abdeckung wieder auf.
Drücken Sie die PRESET Taste und drehen Sie den durchsichtigen Regler bis auf
die Programmnummer, welche auf den Templates angezeigt
wird. Drücken Sie den Cursor, um das Programm abzurufen.
Es sollte nun möglich sein, die Software entsprechend der
Templates zu steuern.
Drücken Sie die LAYER Taste, um die drei Drehregler-
Ebenen zu durchlaufen. Alle Ebenen sind voneinander
unabhängig (es kann aber ein Drehknopf demselben
Steuerungswert auf zwei oder drei Ebenen zugeordnet
werden).
Die oberen und unteren
Lichter sind lediglich eine
spiegelbildliche Darstellung
ihrer selbst. So ist es z. B.
nicht möglich, Ebene 1 in der
oberen Reihe und Ebene zwei
in der unteren Reihe
darzustellen.
44
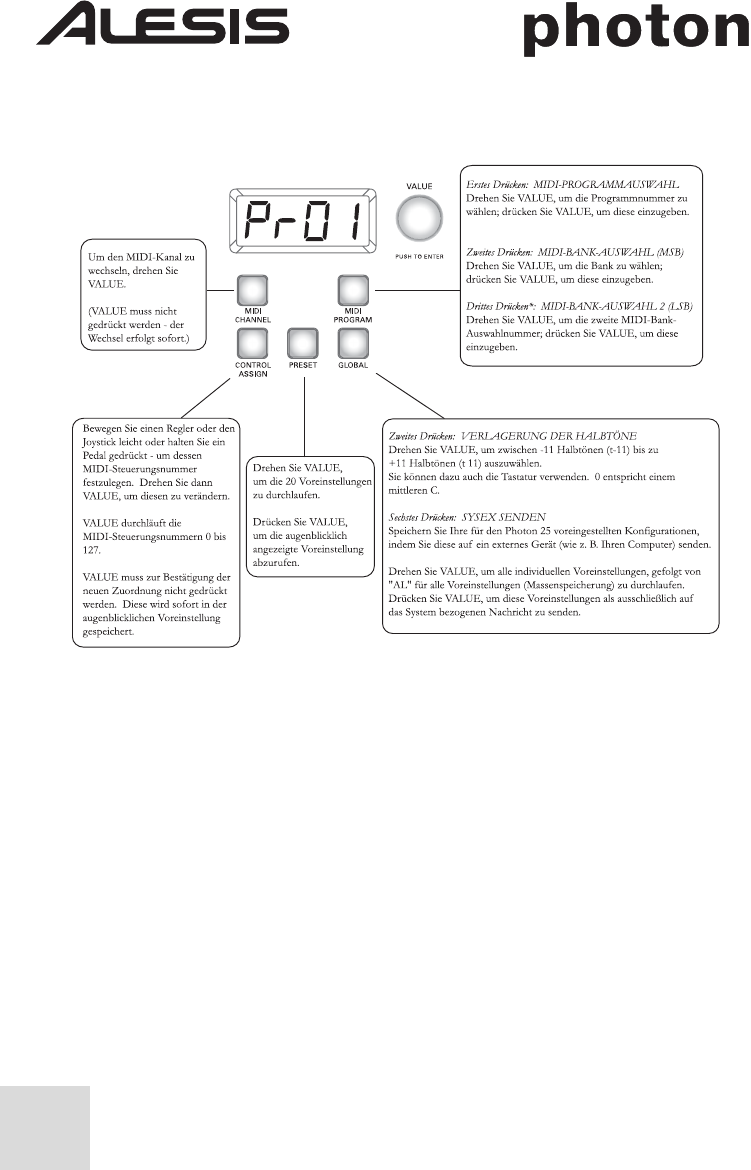
3. Verwendung der Konfigurationselemente
4. Panik-Befehl (All Notes Off)
Drücken Sie die Tasten MIDI CHANNEL und MIDI PROGRAM gleichzeitig,
um den Befehl ALL NOTES OFF an Ihren Computer und die externen Geräte
zu senden.

45
Referenz:
Übersicht gebräuchlicher MIDI-Controller
Verwenden Sie diese Tabelle bei der Konfiguration des Photon 25.
Controller Beschreibung Wertbereich
1 Modulationsrad 0 bis 127
2 Breath Controller 0 bis 127
4 Fuß-Controller 0 bis 127
5 Portamento-Zeit 0 bis 127
7 Master-Lautstärke 0 bis 127
8 Balance 0 bis 127
10 Pan 0 bis 127
11 Kanal-Lautstärke 0 bis 127
64 Sustain-Pedal 0-63 = aus. 64-127 = ein.
65 Portamento-Pedal 0-63 = aus. 64-127 = ein.
66 Sostenuto-Pedal 0-63 = aus. 64-127 = ein.
67 Soft-Pedal 0-63 = aus. 64-127 = ein.
67 Hold-2-Pedal 0-63 = aus. 64-127 = ein.
91 Externe Effekte 0 bis 127
92 Tremolo-Tiefe 0 bis 127
93 Chorus-Tiefe 0 bis 127
94 Detune-Tiefe 0 bis 127
95 Phaser-Tiefe 0 bis 127
123 Alle Noten Aus 0
126 Monophoner Betrieb Ein 1 = ein
127 Polyphoner Betrieb Ein 0 = ein

46
Beseitigung von Problemen:
Symptom Ursache Lösung
Die Anzeige leuchtet
nicht auf.
Kein Strom. Falls die Stromversorgung über den USB-
Anschluss erfolgt, überprüfen Sie, ob der
Netzschalter auf der Rückseite des Photons auf
AUS steht. Falls Sie Batterien oder ein Netzteil
benutzen, stellen Sie fest, ob die Batterien
geladen sind oder ob der Adapter an eine
Steckdose angeschlossen ist und dass der
Schalter auf EIN steht.
Kein Ton am
Ausgabegerät.
Photon USB ist
nicht richtig
angeschlossen.
Überprüfen Sie die USB-Anschlüsse Ihres
Computers und stellen Sie fest, ob der Photon
vom Computer erkannt und installiert worden
ist. Falls notwendig, schalten Sie Ihren
Computer aus und dann wieder ein. (Wählen
Sie "Beenden " anstelle von "Neu starten" um
sicherzustellen, dass die USB-Geräte
ordnungsgemäß zurückgesetzt werden.)
Probleme beim
Gebrauch eines
USB-Hubs.
Probieren Sie, ob der Photon direkt am
Computer angeschlossen werden kann.
Das Software-
programm ist nicht
konfiguriert, MIDI-
Daten vom Photon
zu empfangen.
Überprüfen Sie, dass der Photon oder das
"USB"-MIDI-Gerät in Ihrem Programm als
aktive MIDI-Quelle aufgeführt.
Softwareprogramm
empfängt keine
MIDI-Daten.
Viele Softwareprogramme verfügen über
MIDI-EIN- und AUS-Indikatorlämpchen.
Spielen Sie einige Tasten und beobachten Sie,
ob das MIDI-EIN-Lämpchen Aktivität anzeigt.
Der MIDI-Kanal
des Photon stimmt
nicht mit dem
MIDI-
Eingangskanal des
Programms überein.
Stellen Sie sicher, dass der Photon die MIDI-
Daten auf dem vom Zielgerät erwarteten Kanal
sendet.
Die Noten der
Klangquelle
Testen Sie einen Pianosound. Drum- und Bass-
Sounds sowie einige andere Instrumente

47
Symptom Ursache Lösung
befinden sich
außerhalb des
Bereichs der
Photon-Tastatur.
besitzen unter Umständen einem begrenzten
MIDI-Notenbereich oder besitzen andere
Eigenheiten. Probieren Sie "einfache"
Instrumente wie das Klavier, wenn Sie den
Photon zum ersten Mal einstellen.
Soundquelle ist nicht
aktiv oder Lautstärke
ist auf 0 gestellt.
Versuchen Sie es mit einem Instrument mit
einer virtuellen Tastatur. Werden vom
Instrument Töne erzeugt, wenn Sie die virtuelle
Tastatur benutzen? Ist dies nicht der Fall,
besteht ein Problem mit dem Softsynthesizer
und nicht in der Verbindung mit dem Photon.
MIDI-Echo im
Sequenzer-
Programm ist nicht
eingeschaltet.
Falls der Photon sowohl (a) über einen USB-
Anschluss mit dem Computer verbunden ist
und (b) über einen MIDI-Out an eine externe
Klangquelle angeschlossen ist, stellen Sie sicher,
dass ein Sequenzer-Programm auf dem
Computer aktiv ist und dass dieses auf "MIDI
Echo"-Betrieb eingestellt ist.
Es ist ein externes
MIDI-EIN-Gerät
vorhanden.
Falls Sie den MIDI-Out zum Anschluss an ein
anderes MIDI-Gerät verwenden und ein
weiteres Gerät an den MIDI IN des Photon
angeschlossen ist, sendet der MIDI OUT
Daten lediglich von dem an den MIDI IN
angeschlossenen Gerät, nicht vom Photon.
Der MIDI-Out des
Photon ist nicht an
den MIDI-In des
Gerätes
angeschlossen.
Überprüfen Sie, dass alle Kabel an die richtigen
Ein- und Ausgänge angeschlossen sind.

48
Symptom Ursache Lösung
Das Sustain-Pedal
wurde
angeschlossen,
nachdem das Gerät
eingeschaltet wurde.
Schalten Sie das Gerät aus, warten Sie einen
Moment und schalten Sie es dann wieder ein.
Noten werden
fortlaufend gehalten.
Noten bleiben
aufgrund von
unvollständigen
MIDI-Daten
stecken.
Versuchen Sie, den Panik-Befehl zu senden,
indem Sie die Tasten MIDI CHANNEL und
MIDI PROGRAM gleichzeitig drücken. Falls
dies nicht hilft, schalten Sie das Gerät aus,
warten Sie einen Moment und schalten Sie es
dann wieder ein.
Sustain-Pedal arbeitet
im Umkehrmodus.
Das Sustain-Pedal
wurde
angeschlossen,
nachdem das Gerät
eingeschaltet wurde.
Schalten Sie das Gerät aus, warten Sie einen
Moment und schalten Sie es dann wieder ein.
Technische Spezifikationen
Tastatur: 25 Noten, Normalgröße, anschlagdynamisch.
MIDI-Steuerungen: X/Y-Joystick, Oktave-Auf- und –Ab-Tasten,
12 270º Drehregler (3 Ebenen)
Master-Controller: Tasten für MIDI-Kanal, MIDI-Programm,
Steuerungszuordnung, Voreinstellung und globale
Funktionen.
360º Encoder mit Dreh- und Drückfunktion.
Anzeige mit 4 Positionen und 7 Unterteilungen.
Stromversorung: USB-Bus-Netzanschluss, 4 Batterien der Größe
"C", Externer Adapter (6V Gleichstrom, negative
Spannung, 1000mA).
Abmessungen: 45.5 cm x 24.75 cm x 9.5 cm
Gewicht (netto): 2.0 kg
49
MANUALE RAPIDO DI UTILIZZAZIONE
PHOTON 25
(ITALIANO)
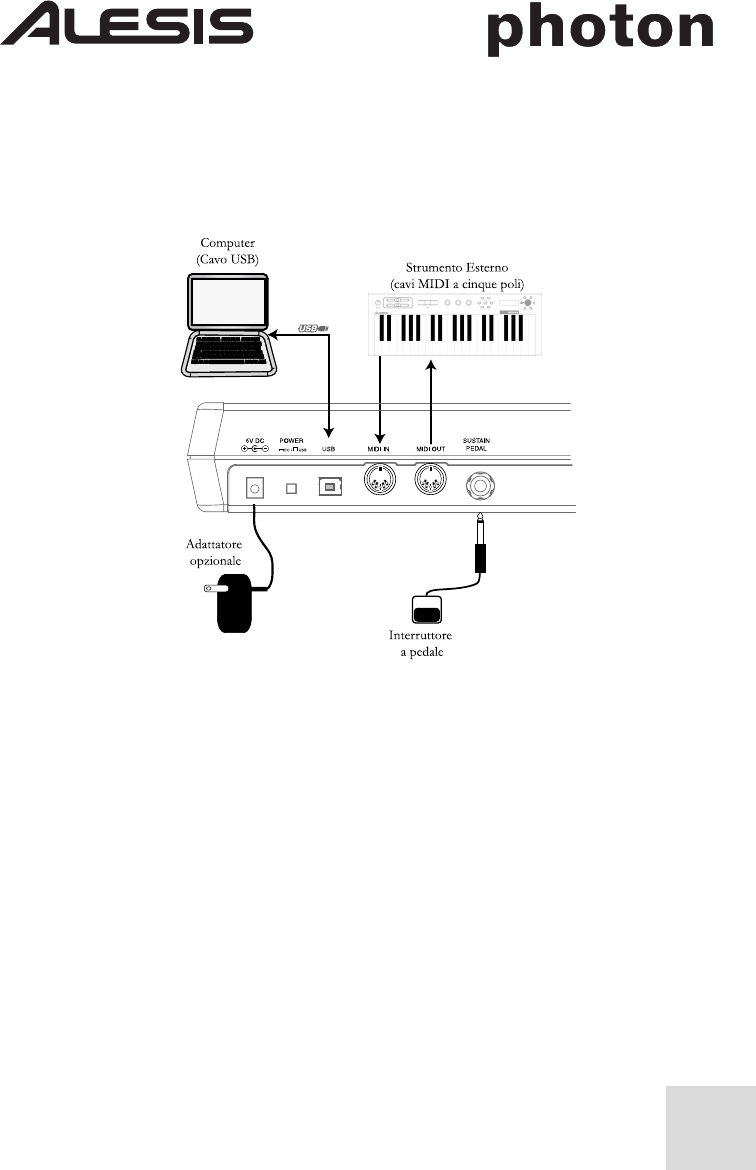
Schema dei collegamenti
Introduzione
Congratulazioni per aver acquistato il Photon 25 MIDI controller di Alesis!
Il Photon 25 abbina la portatilità a tutta una serie di funzioni ai massimi livelli nel
campo:
• 25 tasti a dimensioni naturali e tasti per lo spostamento delle ottave facile da
raggiungere garantiscono il massimo della giocabilità con il minimo sforzo.
• manopole a 270º assegnabili. Tre file da dodici manopole ciascuna garantiscono
l´equivalente di 36 manopole per preimpostazione.
• Collegamenti USB e a 5 poli MIDI attivi simultaneamente consentono al
Photon di interfacciarsi in maniera molto semplice sia con i computer che con
l´hardware audio indipendente.
• Impostazioni pre-programmate e lavoro predisposto con software popolare
direttamente fuori dalla confezione. È altresí possibile progettare facilmente le
proprie impostazioni personalizzate e i propri schemi. È possibile salvare fino a 20
impostazioni complete.

50
Registrazione prodotto
Recarsi alla pagina http://www.alesis.com per registrare il Photon 25. La
registrazione vi aiuta garantendovi aggiornamenti in materia di qualsiasi
aggiornamento del prodotto dell´ultimo minuto. Se desiderate, Alesis può inoltre
inviarvi informazioni riguardo ad altri prodotti di vostro interesse.
La registrazione aiuta anche noi. Quando ci comunicate i tipi di prodotti musicali
di cui vi servite o di cui sognate, ci aiutate a fornirvi prodotti sempre aggiornati
quali il Photon 25.
Requisiti minimi computer
Il Photon 25 necessita di Windows XP o Mac OS X ed una porta USB 1.1 o
superiore. Sistemi operativi precedenti non sono supportati.
Qualsiasi programma MIDI che vi consenta di selezionare il dispositivo MIDI
dovrebbe essere compatibile con il Photon 25. Programmi MIDI molto elementari
non vi consentiranno di usufruire del joystick e delle manopole del Photon 25.

51
Connessioni pannello posteriore
1.
Jack adattatore esterno
– Inserire l´adattatore CA nel caso in cui non si
desideri alimentare il Photon 25 tramite la porta USB oppure per mezzo di quattro
batterie di tipo "C". (Servirsi di un dispositivo 6VDC, a polo negativo da
1000mA).
2.
Selettore sorgente di alimentazione
– premere questo interruttore (IN) per
alimentare il Photon 25 o tramite le quattro batterie "C" oppure tramite un
adattatore esterno di alimentazione. Nel caso in cui fossero presenti sia le batterie
che l´adattatore CA, quest´ultimo verrà preferito alle batterie.
Lasciare questo interruttore su OUT per alimentare il Photon 25 tramite la porta
USB di un computer o per spegnere l´apparecchio quando l´alimentazione USB
non è presente.
Note: servendosi di un laptop, considerare l´idea di servirsi di batterie per
prolungare il funzionamento del laptop tra una carica e l´altra.
Caricare le batterie situate a livello della parte inferiore del Photon 25.
3.
Connettore USB
– inserire un cavo USB standard in questa uscita ed in una
porta USB 1.1 o superiore a livello del computer.
4.
Connettore MIDI IN
– servirsi di un cavo MIDI a cinque poli per collegare
l´USCITA del controller MIDI esterno all´ingresso MIDI IN del Photon 25.
Servendosi di un dispositivo esterno MIDI IN, il computer lo riconoscerà come
un secondo controller MIDI IN.

52
5.
Connettore MIDI OUT
– servirsi di un cavo MIDI a cinque poli per collegare
l´uscita MIDI OUT del Photon 25 all´ingresso INPUT di un dispositivo MIDI
esterno.
Il funzionamento della porta MIDI OUT cambia a seconda se un cavo USB sia
collegato al Photon oppure no.
● Cavo USB collegato:
I dati MIDI provenienti dal
computer sono trasferiti alla porta
MIDI OUT.
Nota: al momento di collegare un
cavo USB, è necessario attivare il
"MIDI echo" nel sequenziatore nel
caso in cui si desideri che il Photon
controlli un altro dispositivo MIDI.
● Cavo USB non collegato:
Qualsiasi cosa venga
riprodotta sul Photon
viene inviata alla porta
MIDI OUT.
Nota: nel caso in cui un altro dispositivo sia collegato alla porta MIDI
IN del Photon, le informazioni MIDI di tale dispositivo verranno
ignorate.
6.
Ingresso pedale di sostegno
– collegare un pedale di sostegno per tastiera
(non incluso).Servirsi di un pedale di sostegno di qualsiasi produttore: al momento
di accendere il Photon 25, questo si calibrerà automaticamente sul pedale.
Dati MIDI provenienti
dal Photon (o da un
controller esterno
collegato alla porta MIDI
IN del Photon)
Dati USB provenienti
dal computer

53
Comandi pannello superiore
1.
Tastiera
– una tastiera a dimensione naturale, a 25 note, sensibile alla velocità.
2.
Tasti ottave Up/Down
– servirsi di questi tasti per trasporre la tastiera in
ottave. Premerli contemporaneamente per impostare nuovamente la gamma della
tastiera.
3.
Joystick X/Y
– servirsi di questo joystick a 2 vie per controllare il bend del
pitch, la modulazione ed altre funzioni. L´asse X e l´asse Y possono essere
assegnati indipendentemente.
4.
Manopole a 270º
– 12 manopole, ciascuna delle quali trasmette valori MIDI
che vanno da 0 a 127. Le manopole possono essere assegnate a vari parametri
MIDI.
5.
Tasto Layer
– premere il tasto LAYER per passare attraverso i tre strati
indipendenti di manopole del Photon 25. Le luci situate al di sopra del tasto
LAYER indicano quale dei tre strati disponibili è attualmente attivo.
Gli assegnamenti delle manopole possono essere effettuati su ciascuno strato per
un totale di 36 assegnamenti di manopole per ciascun programma predefinito.
6.
Display
– il display mostra le informazioni sullo stato corrente.
7.
Tasti configurazione
– richiamare e salvare le preimpostazioni, impostare
parametri globali e molto più, servendosi dei tasti di configurazione. Vedi sotto
per dettagli aggiuntivi.
8.
Codificatore
– girare il codificatore per selezionare vari parametri e valori.
Premere il codificatore per passare tra un calore ed un poarametro assegnato e
l´altro e per accettare i dati inseriti.

54
Collegamento plug-and-play ad un computer
Sia Windows XP che Mac OS X percepiscono il Photon come un controller MIDI
plug-and play. Limitarsi a collegare il Photon nel computer servendosi di un cavo
USB e lasciare che il sistema operativo lo installi automaticamente.
A seconda del sistema operativo, il Photon 25 può essere identificato dai
dispositivi softwar MIDI come un controller "Photon" oppure come un
dispositivo audio USB ("USB Audio Device"). Non c´è bisogno dipreoccuparsi: il
Photon funzionerà indipendentemente dalla sua designazione.
Il Photon non è compatibile con versioni precedenti di Windows o Mac OS.
Funzionamento:
1. Uso della tastiera con il software MIDI
Una volta inserito ed alimentato, recarsi al modulo sonoro o al software
applicativo ed impostare il canale MIDI in entrata.
Nel caso dell´uso di software, sarà probabilmente necessario configurarlo per
servirsi del Photon o un dispositivo "USB". Cercare il menu d´impostazione dei
dispositivi MIDI dell´applicazione ed assicurarsi che il Photon sia riconosciuto
quale dispositivo MIDI attivo prima di procedere.
Sul Photon, premere MIDI CHANNEL e girare la manopola chiara di codifica
per selezionare il canale MIDI da voi specificato nel modulo sonoro o nel
software.
Suonare la tastiera. Il modulo sonoro o il software dovrebbero rispondere ai dati
MIDI del Photon 25. Se ciò non dovesse accadere, fare riferimento alla guida di
risoluzione dei problemi presente più avanti nel manuale.
Sperimentare i tasti delle OTTAVE del Photon 25 ed il joystick X/Y. Poiché il
joystick è mappato in maniera predefinita come pitch MIDI standard e come
modulazione dei comandi, dovrebbe funzionare come previsto nella maggior parte
dei casi semplicemente appena inserito.
2. Uso delle manopole con i template del controller forniti
Se uno dei template forniti si adatta al software MIDI, sollevare il coperchio in
plastica del template con l´unghia, posizionare i template e riposizionare i
coperchi.
Premere il tasto PRESET e girare la manopola chiara del
cursore fino a raggiungere il numero di programma
indicato sui template. Premere la manopola del cursore
per entrare in questo programma. Dovreste ora essere in
grado di controllare il software in base ai template.
Premere il tasto LAYER come necessario per passare
da una all´altra delle tre file di manopole. Ciascuna fila è
indipendente (anche se una manopola può essere assegnata
allo stesso valore del controller su due o tre file).
Le luci presenti sulle file
superiori e inferiori sono
semplicemente duplicati una
dell´altra. Non è possibile
avere, diciamo, Layer 1 sulla
fila superiore e Layer 2 su
quella inferiore
55
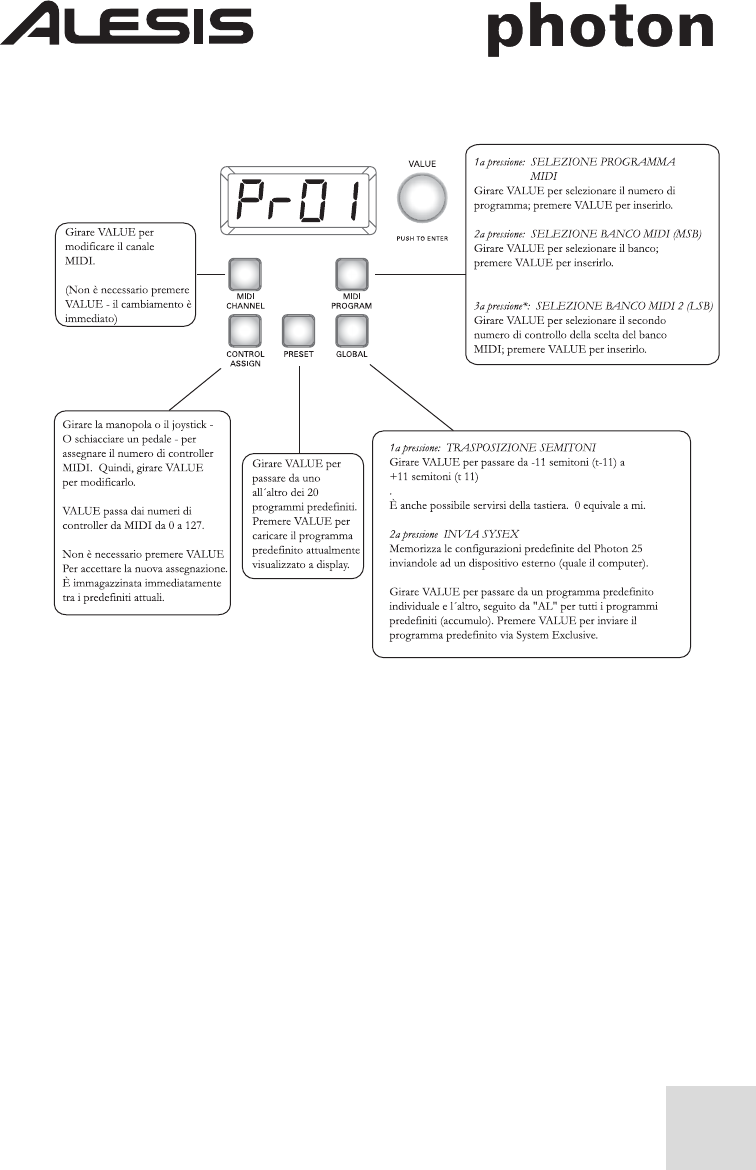
3. Uso dei comandi di configurazione
4. Comando Panic (tutte le note spente)
Premere contemporaneamente MIDI CHANNEL e MIDI PROGRAM per
inviare il comando ALL NOTES OFF ad computer e ai dispositivi esterni.
56
Riferimenti:
Lista di valori comuni del controller MIDI
Controller Descrizione Gamma di valori
1 Rotella di modulazione 0 a 127
2 Controller Breath 0 a 127
4 Controller piede 0 a 127
5 Tempo Portamento 0 a 127
7 Volume Master 0 a 127
8 Balance 0 a 127
10 Pan 0 a 127
11 Volume canale 0 a 127
64 Pedale di sostegno 0-63 = off. 64-127 = on.
65 Pedale di Portamento 0-63 = off. 64-127 = on.
66 Pedale Sostenuto 0-63 = off. 64-127 = on.
67 Pedale morbido 0-63 = off. 64-127 = on.
67 Mantieni 2 Pedali 0-63 = off. 64-127 = on.
91 Effetti esterni 0 a 127
92 Profondità Tremolo 0 a 127
93 Profondità Chorus 0 a 127
94 Profondità Detune 0 a 127
95 Profondità Phaser 0 a 127
123 Tutte le note Off 0
126 Modalità monofonica On 1 = on
127 Modalità polifonica On 0 = on

57
Risoluzione di problemi:
Sintomo Causa Soluzione
Il display non si
accende.
Manca la corrente. Nel caso in cui vi stiate servendo di
alimentazione USB, verificare che l´interruttore
dell´alimentazione USB situato sul retro del
Photon sia su OUT. Nel caso di uso di batterie
o di un adattatore CA, verificare che le batterie
non siano esaurite o che l´adattatore sia
collegato ad una presa di corrente elettrica
funzionante e che l´interruttore di
alimentazione si trovi su IN.
Nessun suono
proveniente dal
dispositivo bersaglio.
Il Photon USB non è
collegato come si
deve.
Il Photon USB non è collegato come si deve.
Verificare la porta USB del computer per
confermare che il Photon sia riconosciuto e
installato. Spegnere e riaccendere il computer se
necessario. (Scegliere "spegni" piuttosto che
"riavvia" per assicurarsi che i dispositivi USB
siano resettati come si deve)
Problemi causati
dall´uso di un hub
USB.
Provare a scollegare il Photon da qualsiasi hub
USB e a collegarlo direttamente al computer.
Software non
impostato per la
ricezione dei dati
MIDI dal controller
Photon.
Assicurarsi che il Photon o il dispositivo "USB"
MIDI sia elencato come sorgente attiva MIDI
nell´applicativo.
Il software non
riceve i dati MIDI.
Numerosi software applicativi presentano luci
d´indicazione MIDI IN ed OUT. Suonare
alcuni tasti e verificare che la luce MIDI IN si
accenda a indicare attività.
Il canale MIDI del
Photon non è lo
stesso del canale
MIDI in entrata
dell´applicativo.
Assicurarsi che il Photon stia inciando dati
MIDI al canale che il dispositivo bersaglio si
aspetta.

58
Sintomo Causa Soluzione
Le note della
sorgente sonora
sono fuori dalla
gamma della tastiera
del Photon.
Provare a servirsi di un suono da pianoforte alla
prima connessione. Le percussioni e i bassi ed
altri strumenti possono presentare una gamma
di note MIDI limitata o altre idiosincrasie.
Servirsi di strumenti "più facili" quali i
pianoforti al momento di impostare il Photon
per la prima volta.
Sorgente sonora non
attiva o volume
impostato a 0.
Provare a utilizzare uno strumento che presenti
una tastiera virtuale incorporata. Lo strumento
suona servendosi della tastiera virtuale? In caso
contrario il problema potrebbe essere il
sintetizzatore del software, non la connessione
del Photon.
MIDI Echo non
abilitato nel software
del sequenziatore.
Se il Photon è collegato a (a) un computer via
USB e (b) ad una sorgente sonora esterna via
MIDI OUT, assicurarsi che un programma
sequenziatore per computer sia attivo e che sia
impostato su "MIDI Echo."
È presente un
dispositivo MIDI IN
esterno.
Nel caso di uso della porta a 5 poli MIDI OUT
per collegare un altro dispsoitivo MIDI e nel
caso in cui un altro dispositivo sia collegato alla
porta MIDI IN del Photon, la porta MIDI
OUT invia unicamente informazioni dal
dispositivo MIDI IN, non dal Photon.
La porta a 5 poli
MIDI OUT del
Photon non è
collegata alla MIDI
IN della sorgente
sonora.
Assicurarsi che tutti i cavi a 5 poli siano
collegati alle giuste entrate e uscite.
59
Sintomo Causa Soluzione
Il pedale di sostegno
è stato inserito dopo
aver acceso
l´alimentazione.
Spegnere l´alimentazione dell´apparecchio,
attendere qualche istante e riaccendere.
Le note sono
continuamente
sostenute.
Note inceppate a
causa di dati MIDI
incompleti.
Provare a inviare il comando Panic premendo
contemporaneamente MIDI CHANNEL e
MIDI PROGRAM. Se questo non risolve il
problema, spegnere l´alimentazione
dell´apparecchio, attendere qualche istante e
riaccendere.
Il pedale di sostegno
dunziona al contrario.
Il pedale di sostegno
è stato inserito dopo
aver acceso
l´alimentazione.
Spegnere l´alimentazione dell´apparecchio,
attendere qualche istante e riaccendere.
Specifiche tecniche
Tastiera: 25 note, dimensione naturale, sensibile alla velocità.
Controller MIDI: Joystick X/Y, tasti Octave Up e Down,
12 manopole a 270º (3 file).
Sezione di controllo Master: Tasti MIDI Channel, MIDI Program, Control
Assign, Preset, e Global (Canale MIDI, Programma
MIDI, Assegnazione comandi, Preimpostazioni e
Globale).
Codificatore a rotazione e pressione a 360º.
Display a 4 posizioni, 7 segmenti.
Opzioni di alimentazione: Alimentazione tramite porta USB, 4 batterie "C",
Adattatore esterno (6VDC, polo negativo,
1000mA).
Dimensioni: 18" x 9.75" x 3.75" / 45.5 cm x 24.75 cm x 9.5 cm
Peso (netto): 4.5 lbs / 2.0 kg
7-51-0192-C
