Alien Technology ALH9001 Industrial PDA User Manual ALH 900x Users Guide
Alien Technology, LLC Industrial PDA ALH 900x Users Guide
UserManual.wiki
>
Alien Technology
>
ALH9001 User Manual
>
User Guide
Contents
1.
Users Manual
2.
Quickstart
3.
User Guide
User Guide
Navigation menu
Upload a User Manual
Namespaces
Wiki Guide
HTML
PDF
Info
Views
User Manual
Discussion / Help
Navigation

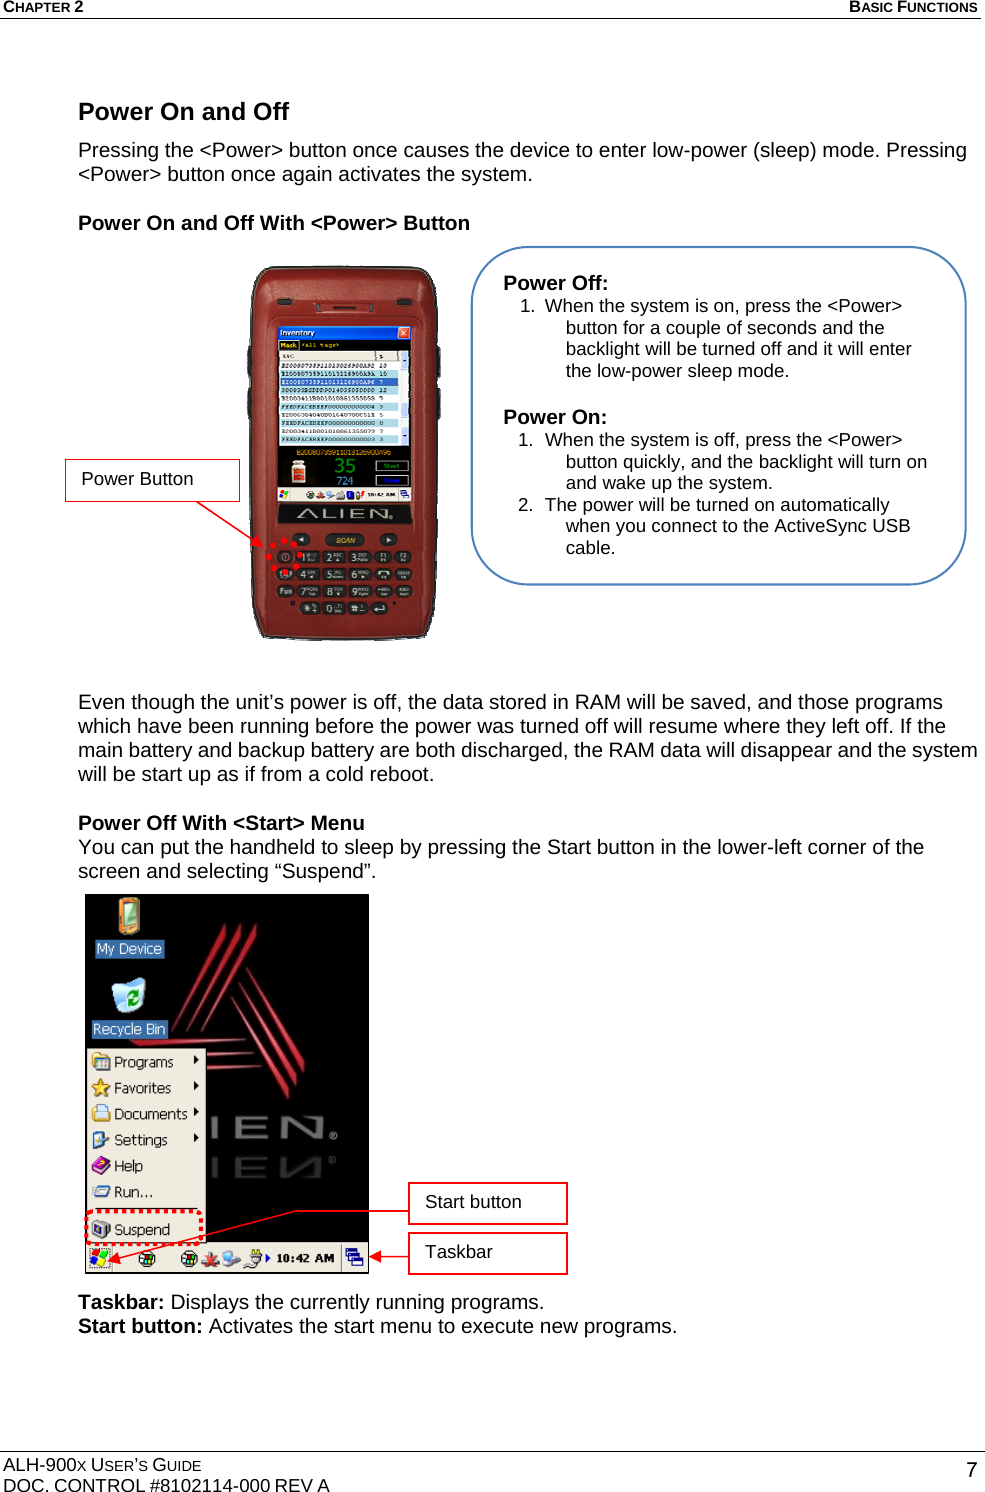
![BASIC FUNCTIONS CHAPTER 2 ALH-900X USER’S GUIDE DOC. CONTROL #8102114-000 REV A 8 Power Off Automatically If the device has not been used for a period of time, the system will enter low-power (sleep) mode automatically. Carefully setting the sleep mode time in the Power Management control panel can save power and prolong the life of the battery. [Start] > [Settings] > [Control Panel] > [Power] > [Timeout] Battery Discharging If the main battery discharges completely while the system is turned on, the device will go into low-power (sleep) mode automatically, and even pressing the <Power> button will not cause the system to turn on. In this case, you should fully charge the main battery and then press the <Power> button to turn on the handheld. Checking the Battery Gauge Battery life is largely affected by the user’s usage habits. The battery may need up to twelve hours to charge completely. Checking Battery Gauge [Start] > [Settings] > [Control Panel] > [Power] > [Battery] z You can also double click <Power> icon on the Taskbar to enter this screen. z To activate the device after it has gone to sleep automatically, press the <Power> button. Power Icon](https://usermanual.wiki/Alien-Technology/ALH9001.User-Guide/User-Guide-2135074-Page-12.png)
![BASIC FUNCTIONS CHAPTER 2 ALH-900X USER’S GUIDE DOC. CONTROL #8102114-000 REV A 12 System Settings Most of the system settings can be changed through the system Control Panel, which is accessed via the Start button, or by double-tapping on My Device on the desktop. Setting Brightness Brightness is set at 80% at the factory, and screen brightness is the biggest part of your power consumption, so you might need to adjust it to suit your actual need. [Start] > [Settings] > [Control Panel] > [Backlight] You can adjust the brightness while on AC or battery power, the idle timeout for when the screen should dim, and the idle timeout for when the keypad lamps should dim. Start button My Device](https://usermanual.wiki/Alien-Technology/ALH9001.User-Guide/User-Guide-2135074-Page-16.png)
![CHAPTER 2 BASIC FUNCTIONS ALH-900X USER’S GUIDE DOC. CONTROL #8102114-000 REV A 13Screen Calibration The first time the device is used, or if you haven’t used the device for a long time, you may find that you cannot accurately select the place where you touch with the stylus. In this case, you need to perform the screen calibration. [Start] > [Settings] > [Control Panel] > [Stylus] > [Calibration] > [Recalibrate] Press and hold the stylus pen briefly on the center of the cross symbol, and repeat five times as it moves around the screen. Finish by pressing the Enter key on the keypad. Setting Volume and Sounds Volume is already set at 80% at the factory, and you can adjust volume as needed at the Volume and Sounds control panel. [Start] > [Settings] > [Control Panel] > [Volume and Sounds]](https://usermanual.wiki/Alien-Technology/ALH9001.User-Guide/User-Guide-2135074-Page-17.png)
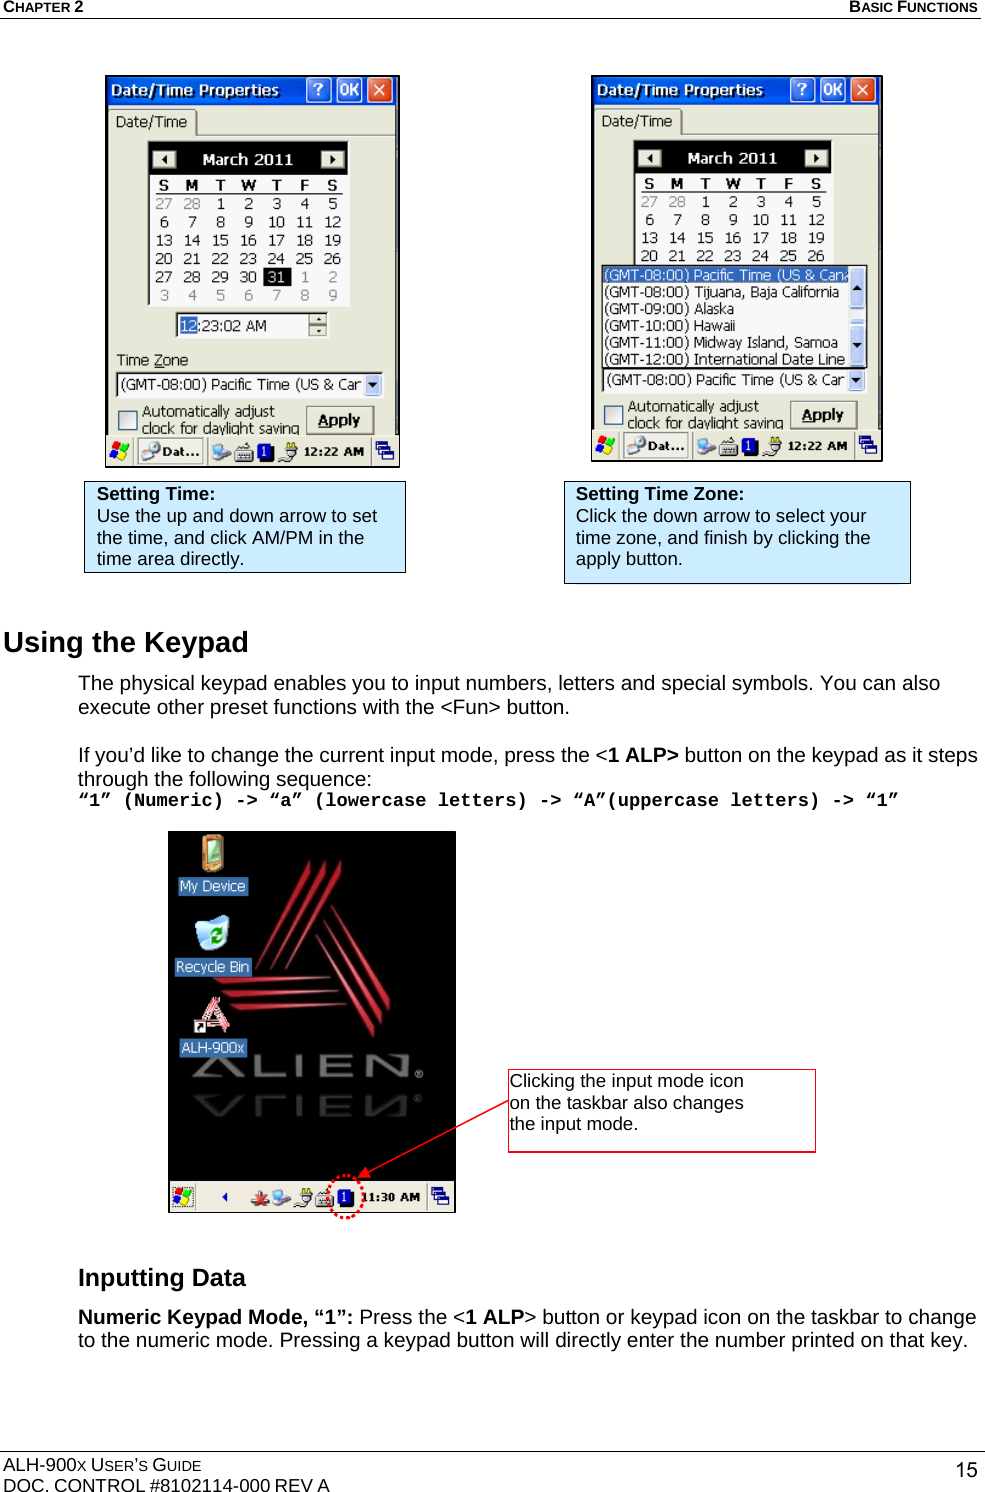
![BASIC FUNCTIONS CHAPTER 2 ALH-900X USER’S GUIDE DOC. CONTROL #8102114-000 REV A 14 Setting the Date and Time [Start] > [Settings] > [Control Panel] > [Date and Time] Setting Year: Double-click the year, and click the up and down arrow button to set it. Setting Month: Double-click the month or click the Left/Right arrows to set the month. Setting Day: Click the day directly to set the day.](https://usermanual.wiki/Alien-Technology/ALH9001.User-Guide/User-Guide-2135074-Page-18.png)
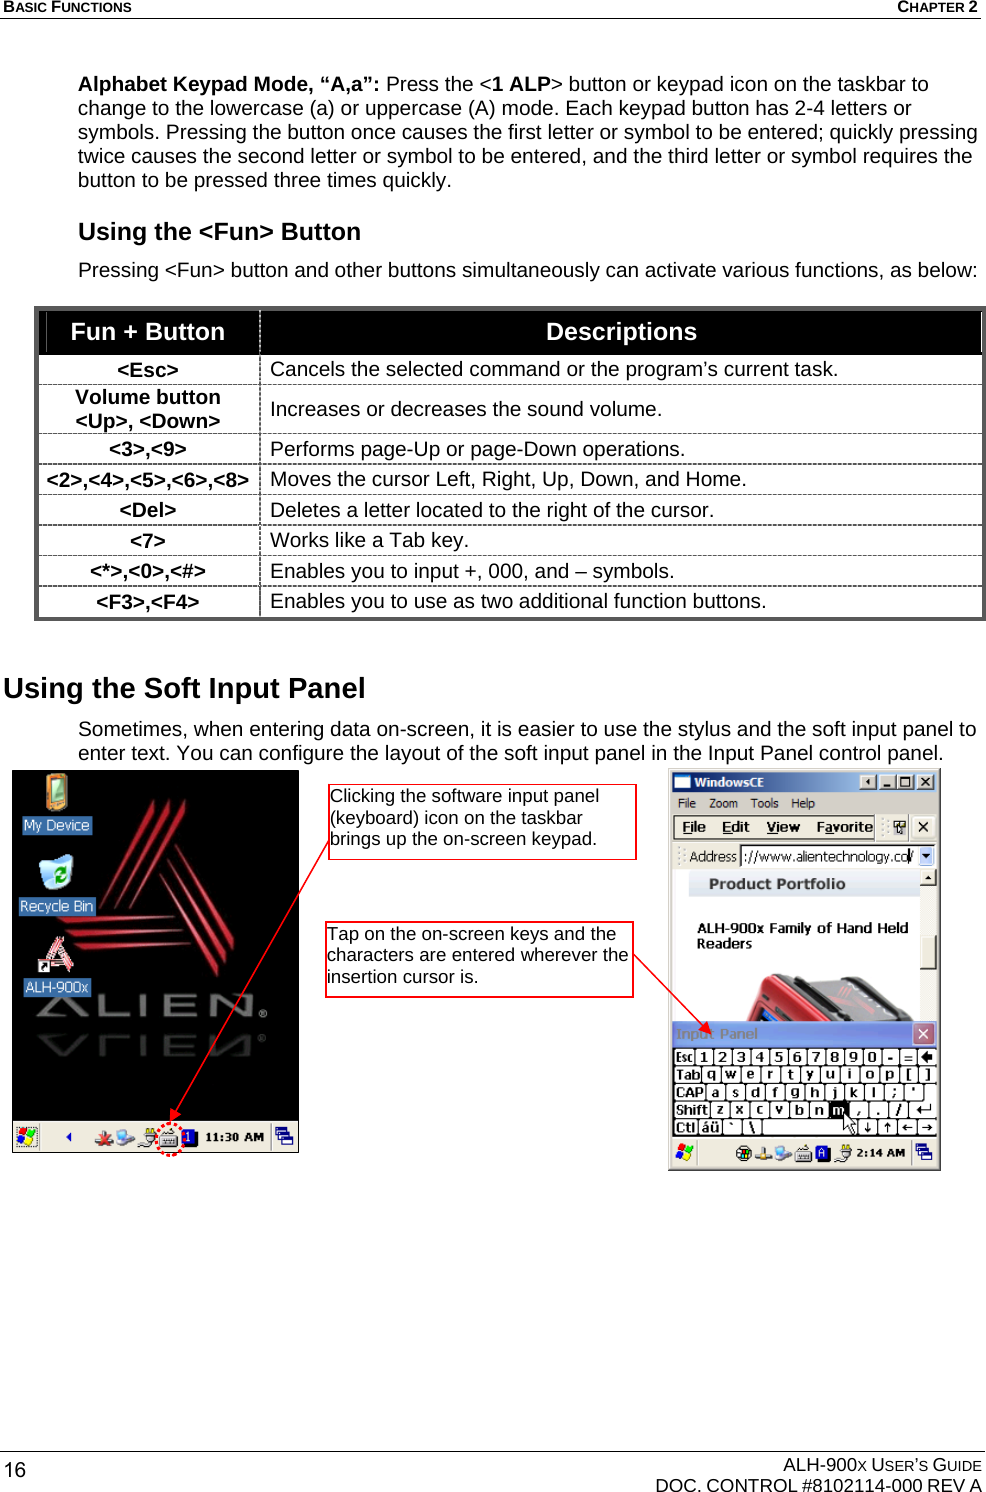
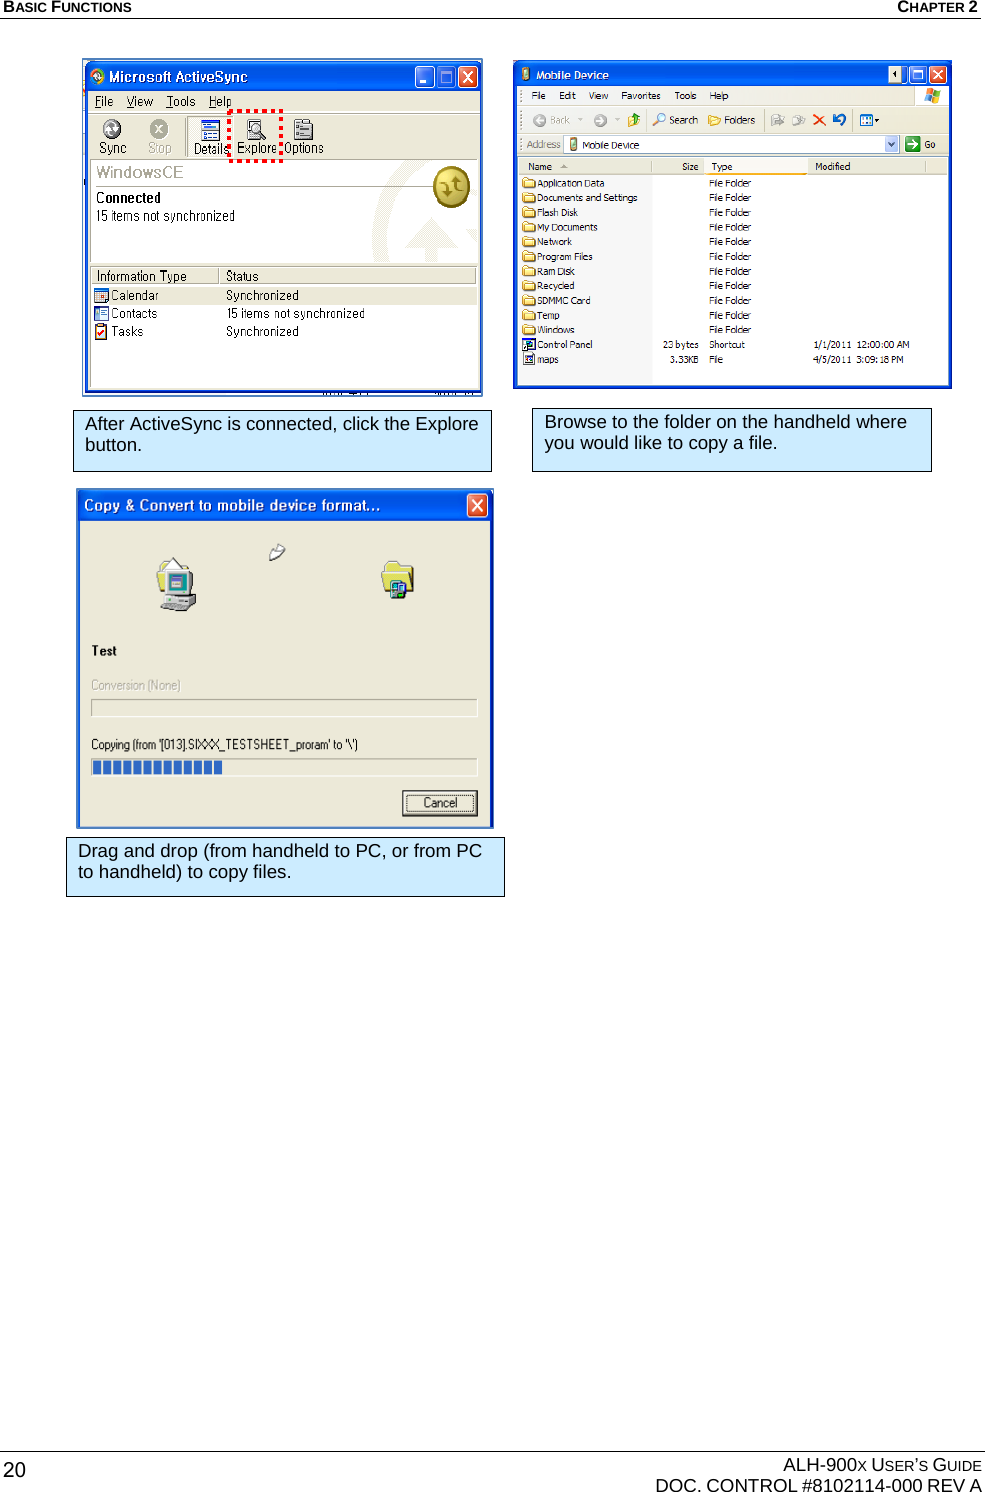
![CHAPTER 2 BASIC FUNCTIONS ALH-900X USER’S GUIDE DOC. CONTROL #8102114-000 REV A 17Using the Stylus You can tie the stylus to the hole in the hand strap connector, to allow you to use the stylus like a mouse on a PC. The hand strap has a small integrated holster for storing the stylus safely. Using ActiveSync The ActiveSync interface synchronizes data between the PC and handheld device, so that you can install programs, copy, transition, and delete data, etc. Installing Microsoft ActiveSync Program Download the latest version of the ActiveSync program from the Microsoft website, and install it to your PC. http://www.microsoft.com/downloads/ Caution: You must use ActiveSync v3.7 version or later. Caution: Please do not use sharp objects on the touch screen. Use only the supplied stylus; otherwise you could seriously damage the touch screen. Use the stylus to: • Select a letter on the onscreen soft keypad. • Select a program on the desktop or taskbar. • Select a button, tab bar, or other control in an application window. Click the [Next] button. Designate the installation folder, and then click the <Next> button.](https://usermanual.wiki/Alien-Technology/ALH9001.User-Guide/User-Guide-2135074-Page-21.png)
![BASIC FUNCTIONS CHAPTER 2 ALH-900X USER’S GUIDE DOC. CONTROL #8102114-000 REV A 18 Connecting PC to PDA On the PC: [Start] > [Programs] > [Microsoft ActiveSync] Windows XP Configuration Executing Microsoft ActiveSync program. Click [File], Click [Get Connected]. The installation was finished. Now when you use the USB cable to connect to the USB port on your computer, ActiveSync will automatically detect the device and make a connection.](https://usermanual.wiki/Alien-Technology/ALH9001.User-Guide/User-Guide-2135074-Page-22.png)
![CHAPTER 2 BASIC FUNCTIONS ALH-900X USER’S GUIDE DOC. CONTROL #8102114-000 REV A 19 Handheld Configuration [Start] > [Settings] > [Control Panel] > [PC Connection] Transmitting Data Use the USB cable to connect the PC and the handheld device. You can check the state of the ActiveSync connection on your PC taskbar. Select <Allow USB connection with this desktop computer>, press OK button. Double click PC Connection icon To check if set to connected to USB Sync cable Connected state Disconnected state ActiveSync connected to PDA.](https://usermanual.wiki/Alien-Technology/ALH9001.User-Guide/User-Guide-2135074-Page-23.png)
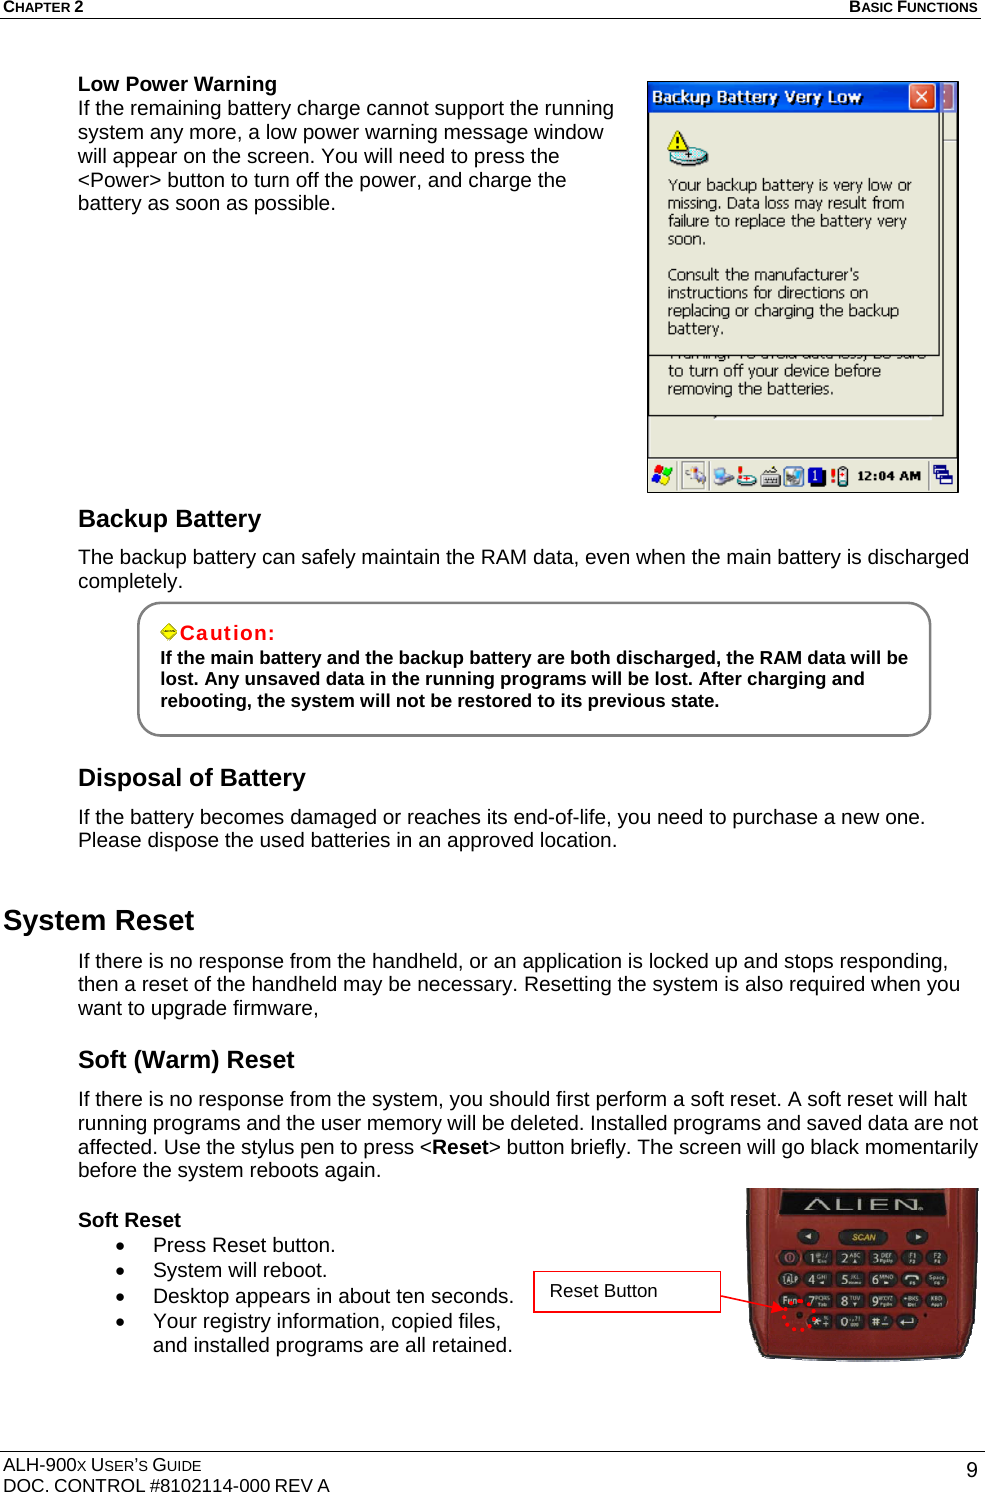
![CHAPTER 2 BASIC FUNCTIONS ALH-900X USER’S GUIDE DOC. CONTROL #8102114-000 REV A 21Firmware Upgrade [Start] > [Settings] > [Control Panel] > [Firmware Update] You can check the handheld’s firmware version in the Firmware Update control panel. It is also possible to load a new firmware image (from either the Flash disk or a MicroSD card) using this utility. Firmware updates require a hard reset to finish the process. New firmware for the handheld is distributed as two separate image files – one for the bootloader, and one for the main OS image. Upgrading the unit’s firmware will reset it to a factory-default state. Any data or programs you may have loaded (except on the Flash Disk) will be removed and you will have to reconfigure the unit afterwards. You have two options for copying the new firmware files to the handheld (both methods are explained earlier in the manual): • Copy them to the top level of a MicroSD card and install the card into the back of the unit. • Use ActiveSync to copy the files to the top level of the unit’s Flash Disk. Once the two firmware files are in the handheld, use the Firmware Upgrade control panel to install them. In the “Select Files to Upgrade” area, pick either Flash Disk or MicroSD from the DISK pulldown, depending on where you loaded the image files. Check both the BOOT and OS checkboxes to indicate that you want to install both, and it will verify the existence of those files and report their version numbers in the “Files Ver. In Storage” area of the window. If everything looks good, click the Upgrade Start button to begin the installation. Go to the Firmware Update control panel to examine the current firmware version, and perform an upgrade. The top area shows the current firmware version (406/405 in this example).](https://usermanual.wiki/Alien-Technology/ALH9001.User-Guide/User-Guide-2135074-Page-25.png)
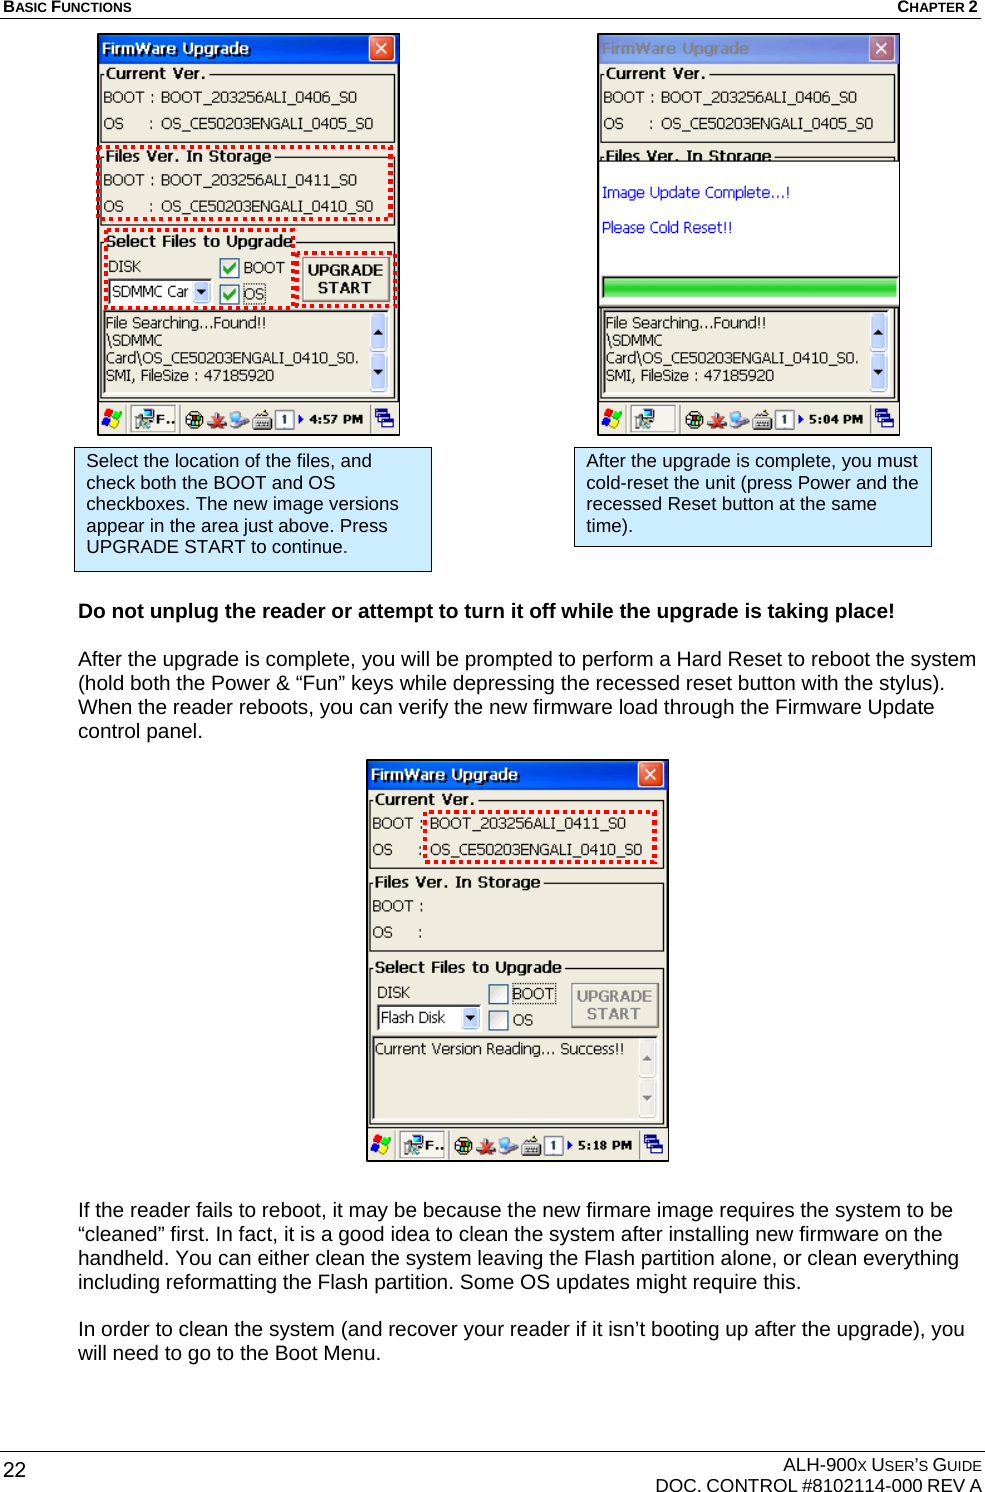
![CHAPTER 2 BASIC FUNCTIONS ALH-900X USER’S GUIDE DOC. CONTROL #8102114-000 REV A 23Boot Menu To perform a Hard Reset and go to the Boot Menu, hold the <Fun> button and the <Reset> button at the same time for a few seconds. The [Boot Menu] window will appear. Enter the [Boot Menu] in any of the following situations: • To upgrade the unit’s firmware. • After an upgrade: • to clean the Windows system • to clean the Windows system and initialize the Flash Disk [Boot Menu] 0. Firmware Upgrade 1. Clean (Without Flash) 2. Clean (With Flash) 3. Exit Menu Select : Enter No. [Boot Menu] **** WARNING **** Your information will be erased ! Preview : <- BKS Erase : Enter [Boot Menu] [Firmware Upgrade] Media Source > SD Memory Upgraded files > OS Image ) Complete Upgrade. Please Cold Reset! Preview : <- BKS Select : Enter The [Boot Menu] start-up screen, with Firmware Upgrade, and two Clean options. Press the 0 key to do a Firmware Upgrade. The image files must be on an installed Micro SD memory card. The upgrade will start automatically if a valid image file is detected. Once it is complete, reset the handheld to reboot it. Press the 1 or 2 keys to clean the system registry. The 2 option also initializes the Flash Disk. Press Backspace to return to the first menu, or Enter to proceed. The unit will automatically reboot. Fun Button Reset Button](https://usermanual.wiki/Alien-Technology/ALH9001.User-Guide/User-Guide-2135074-Page-27.png)
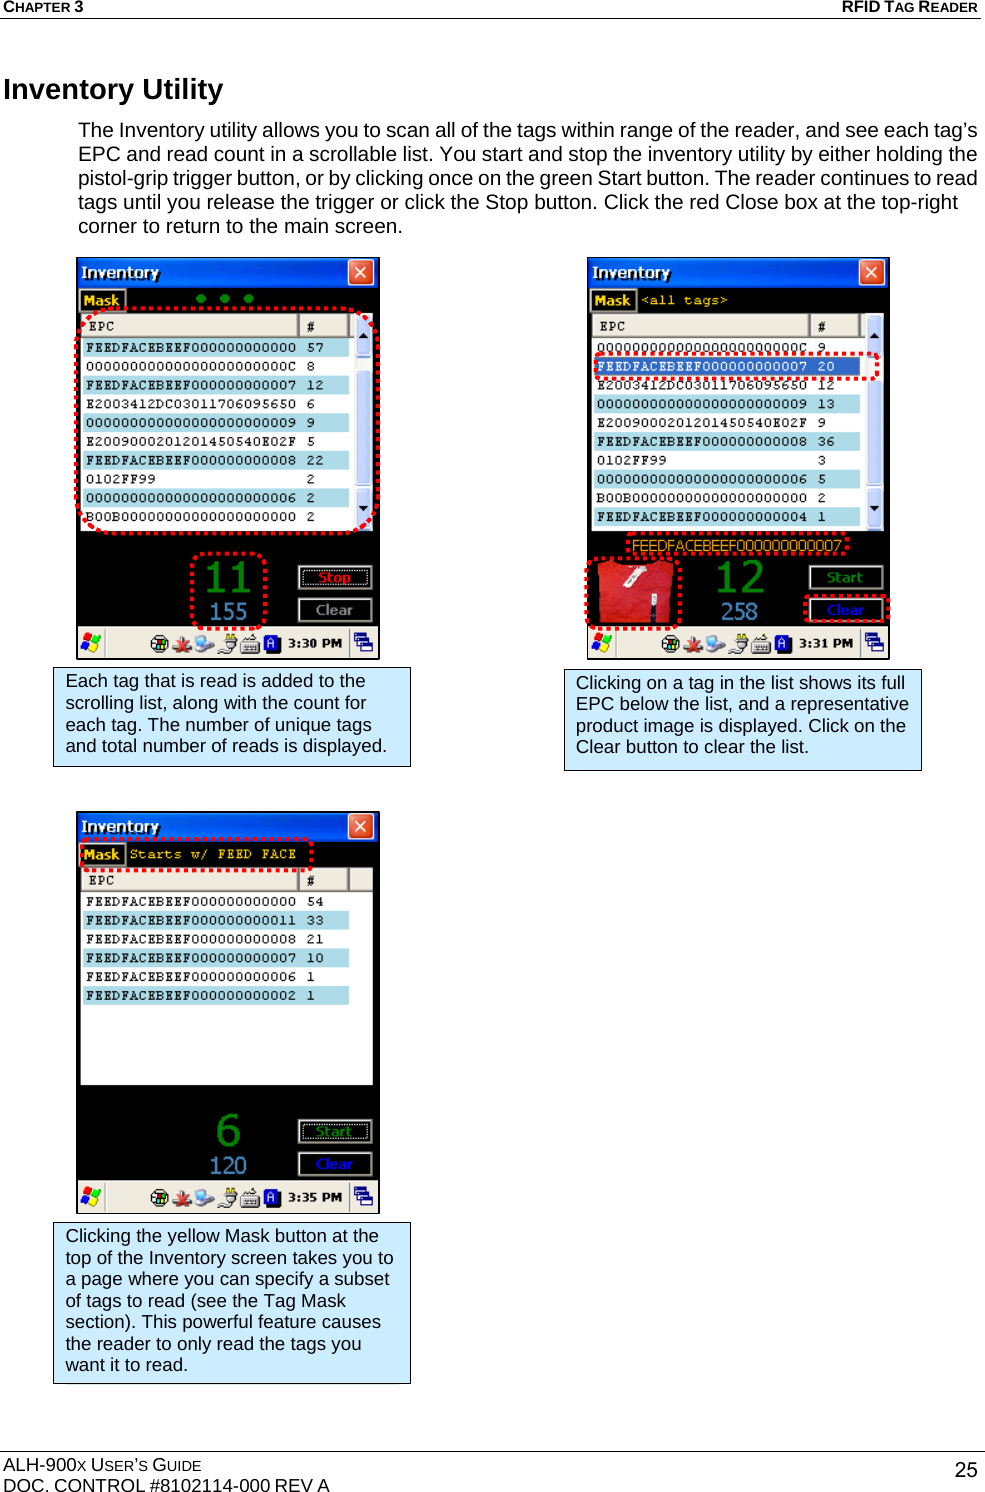
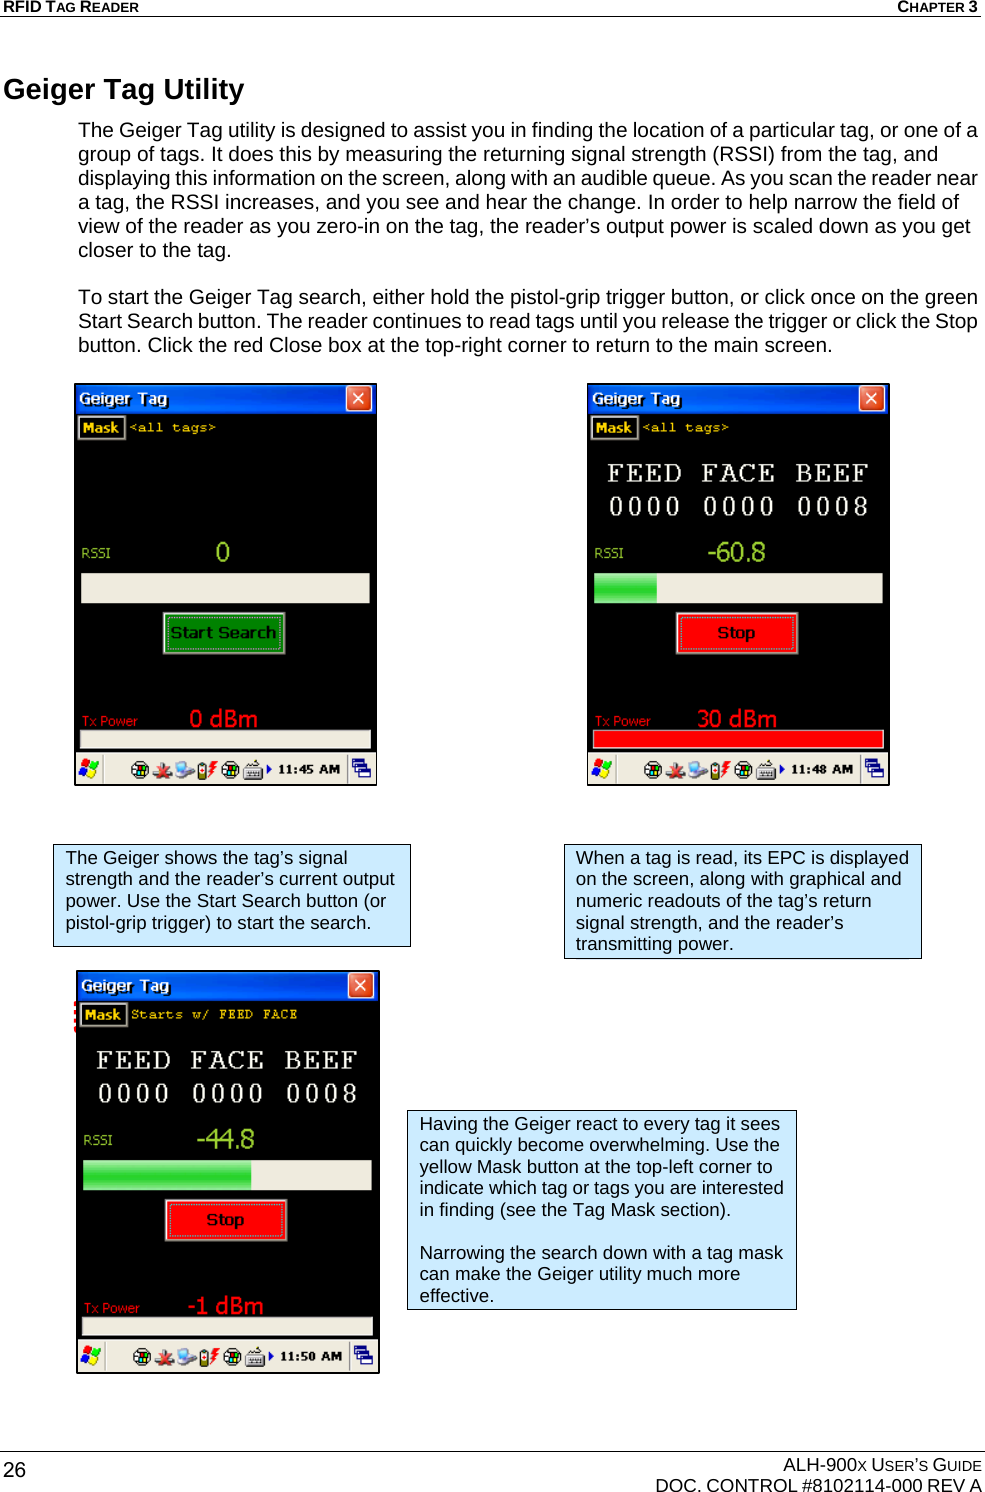
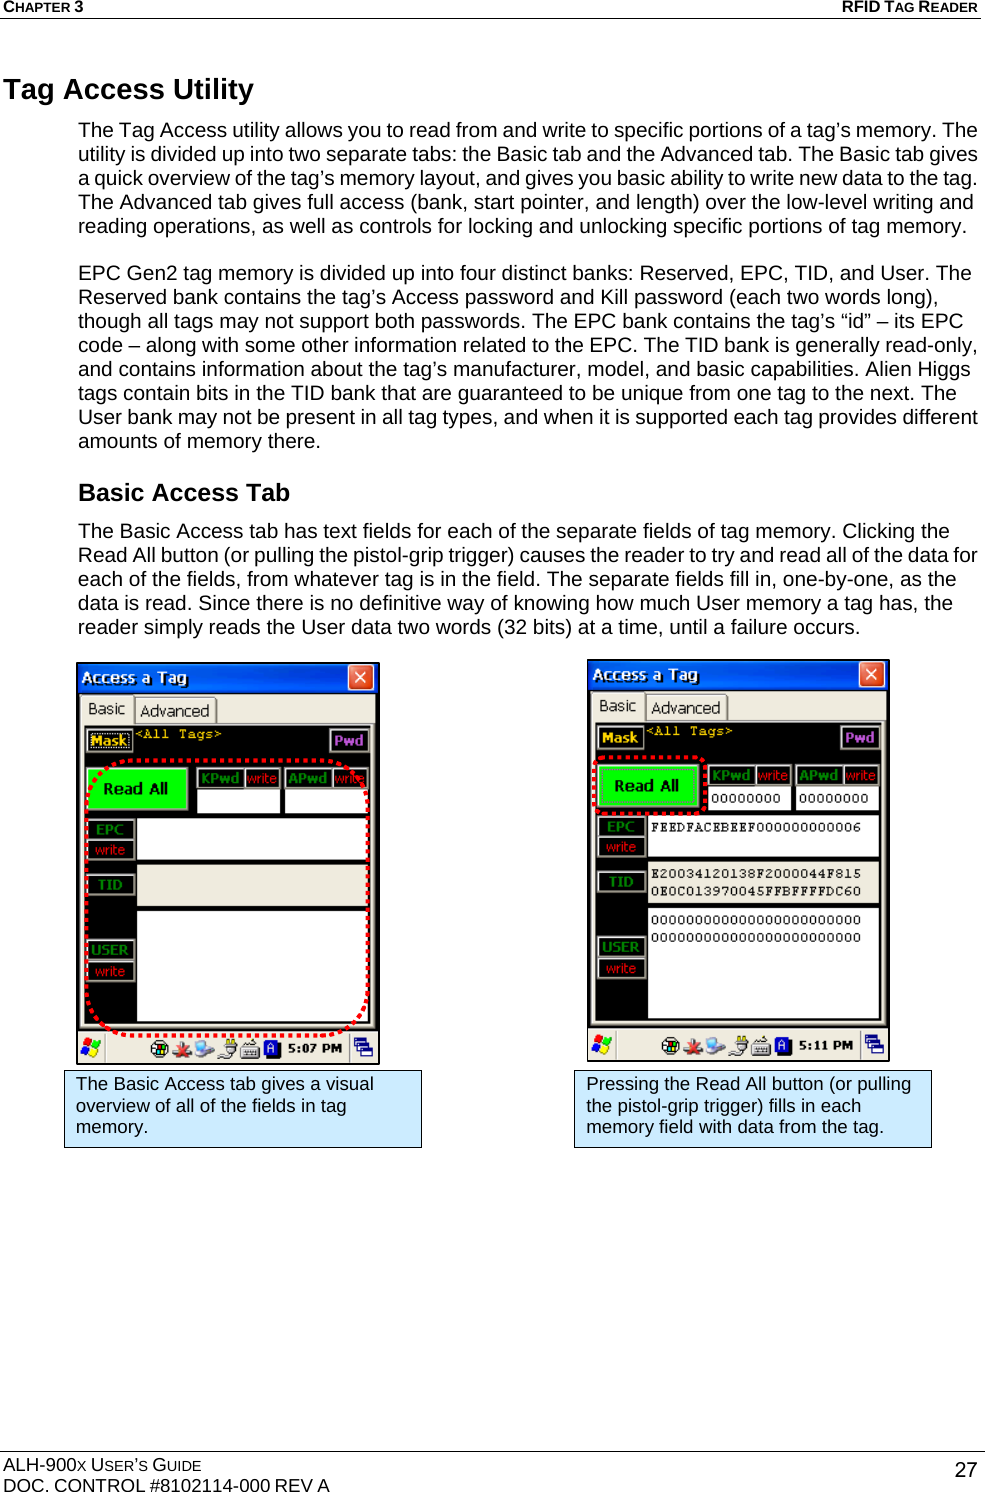
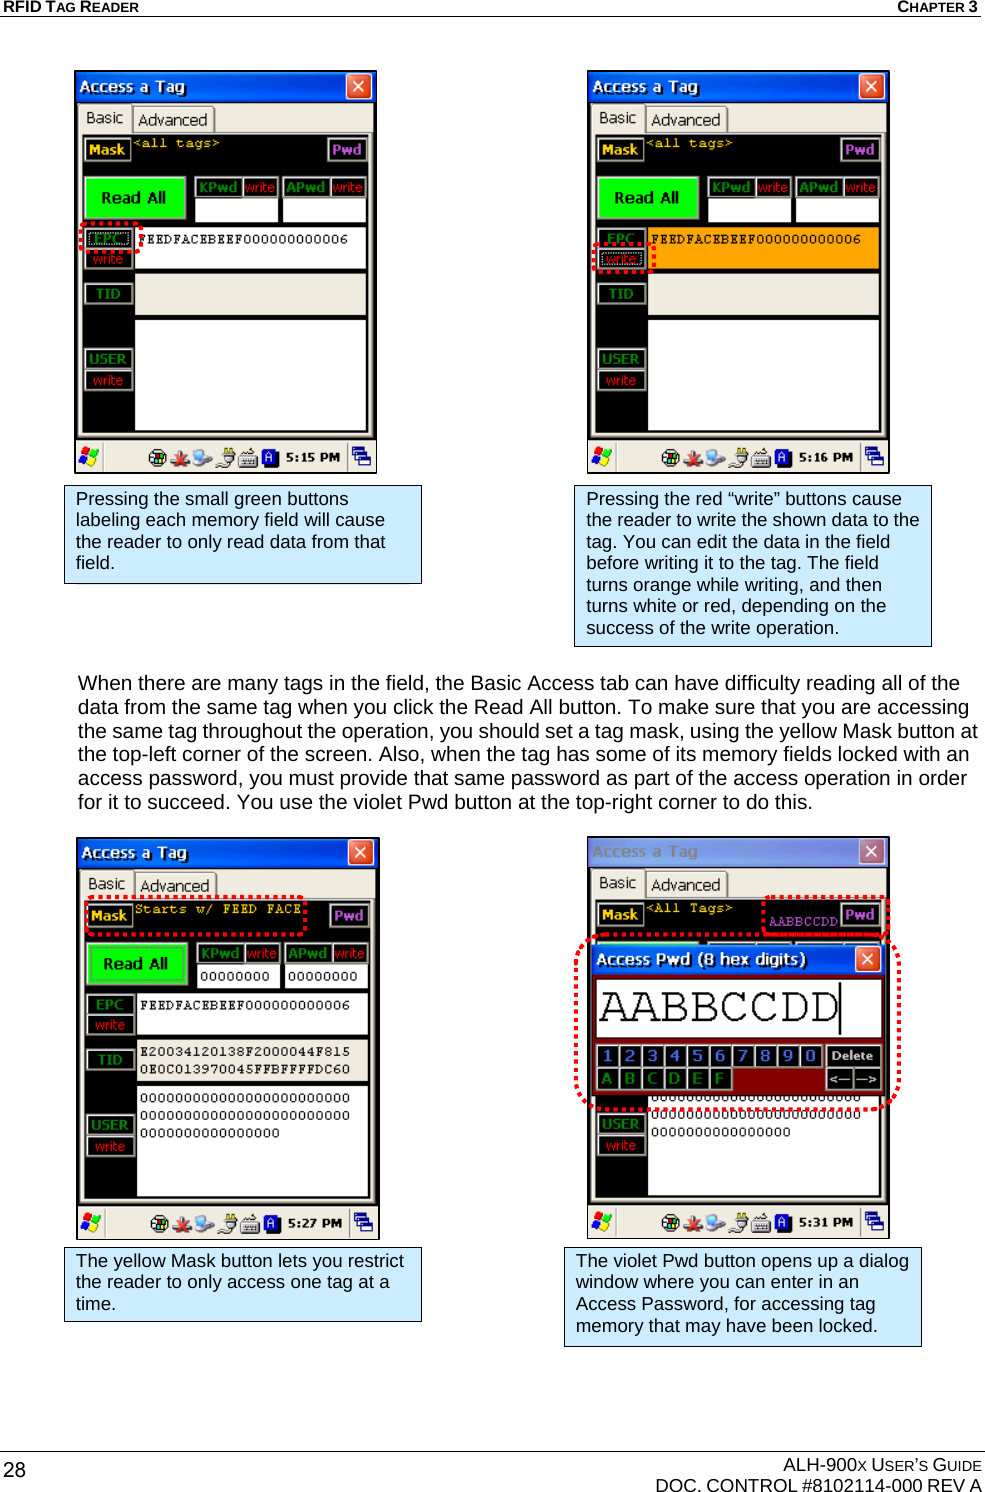
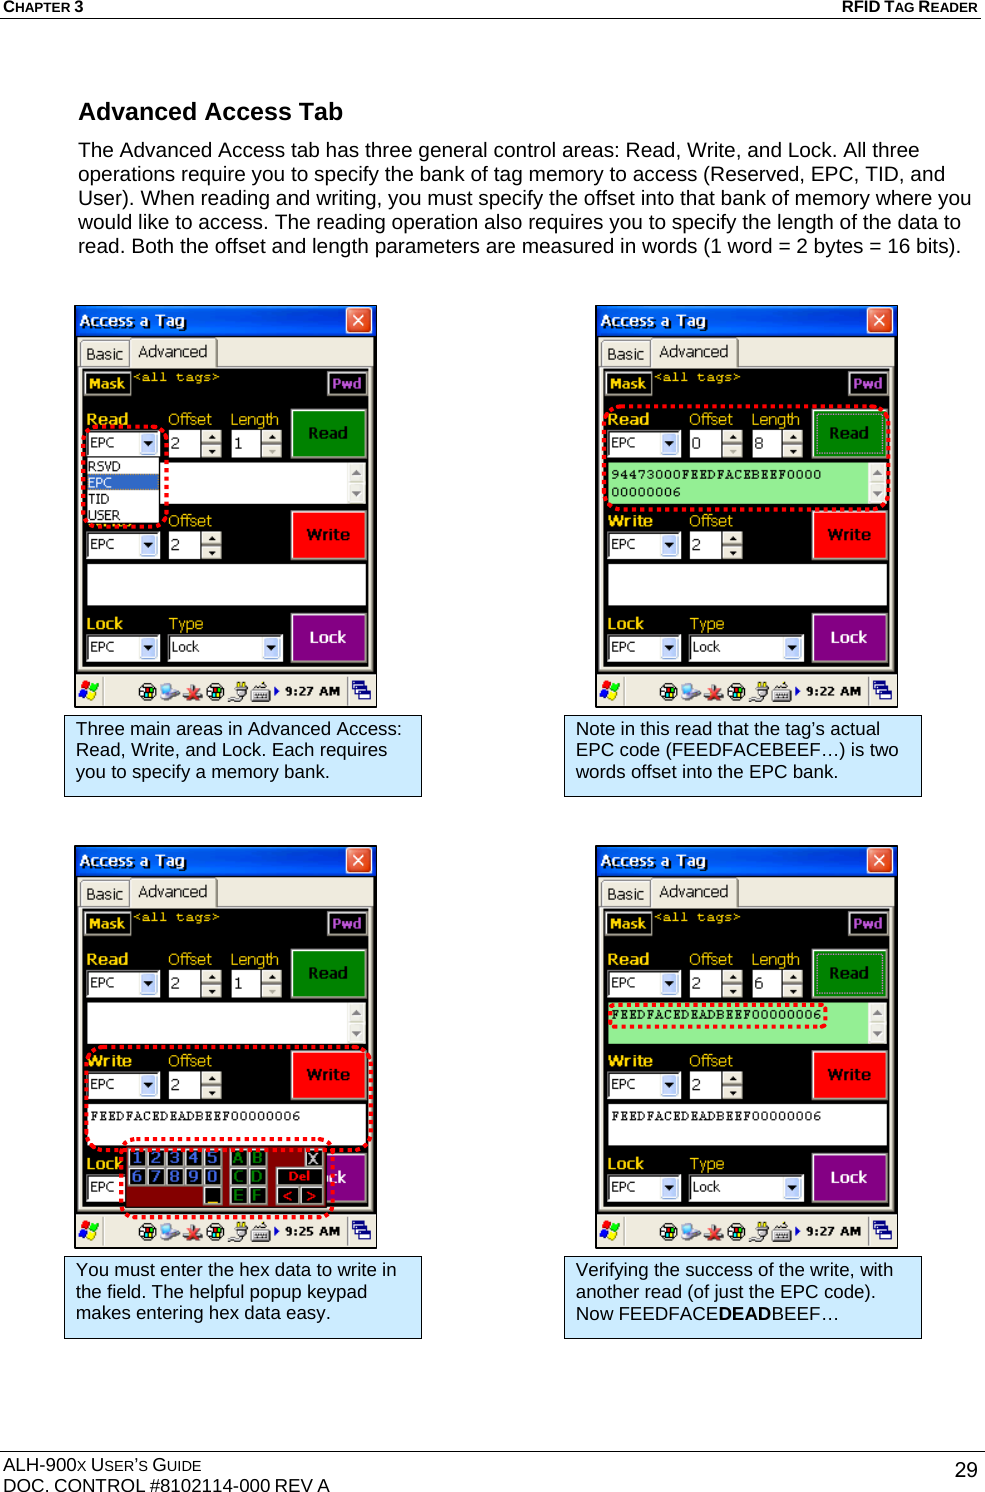
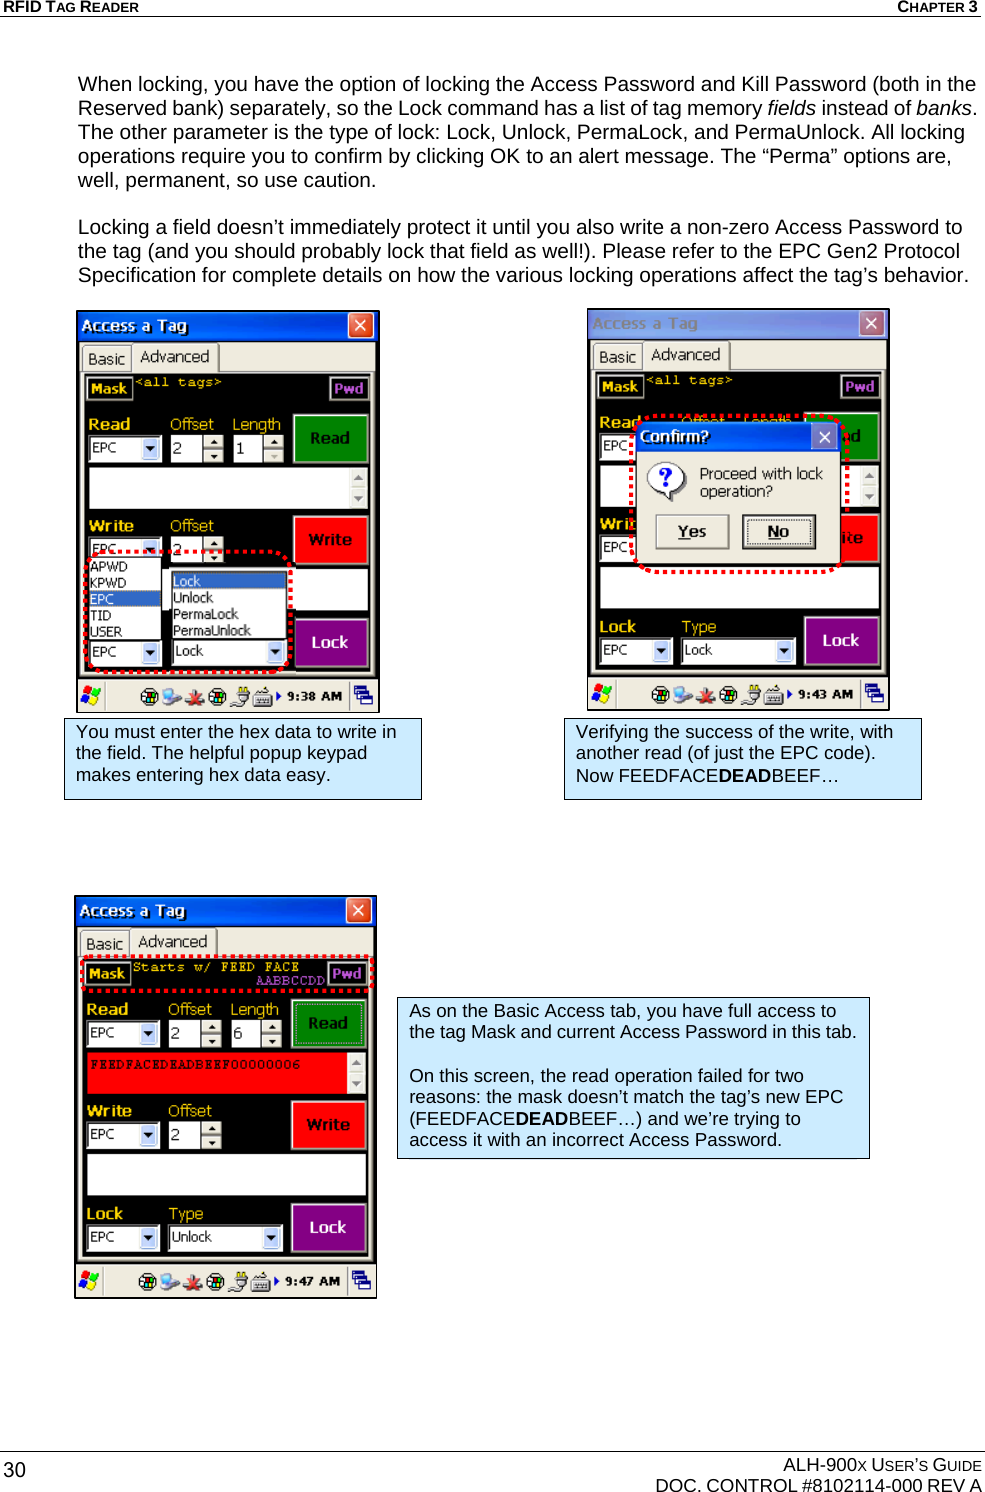
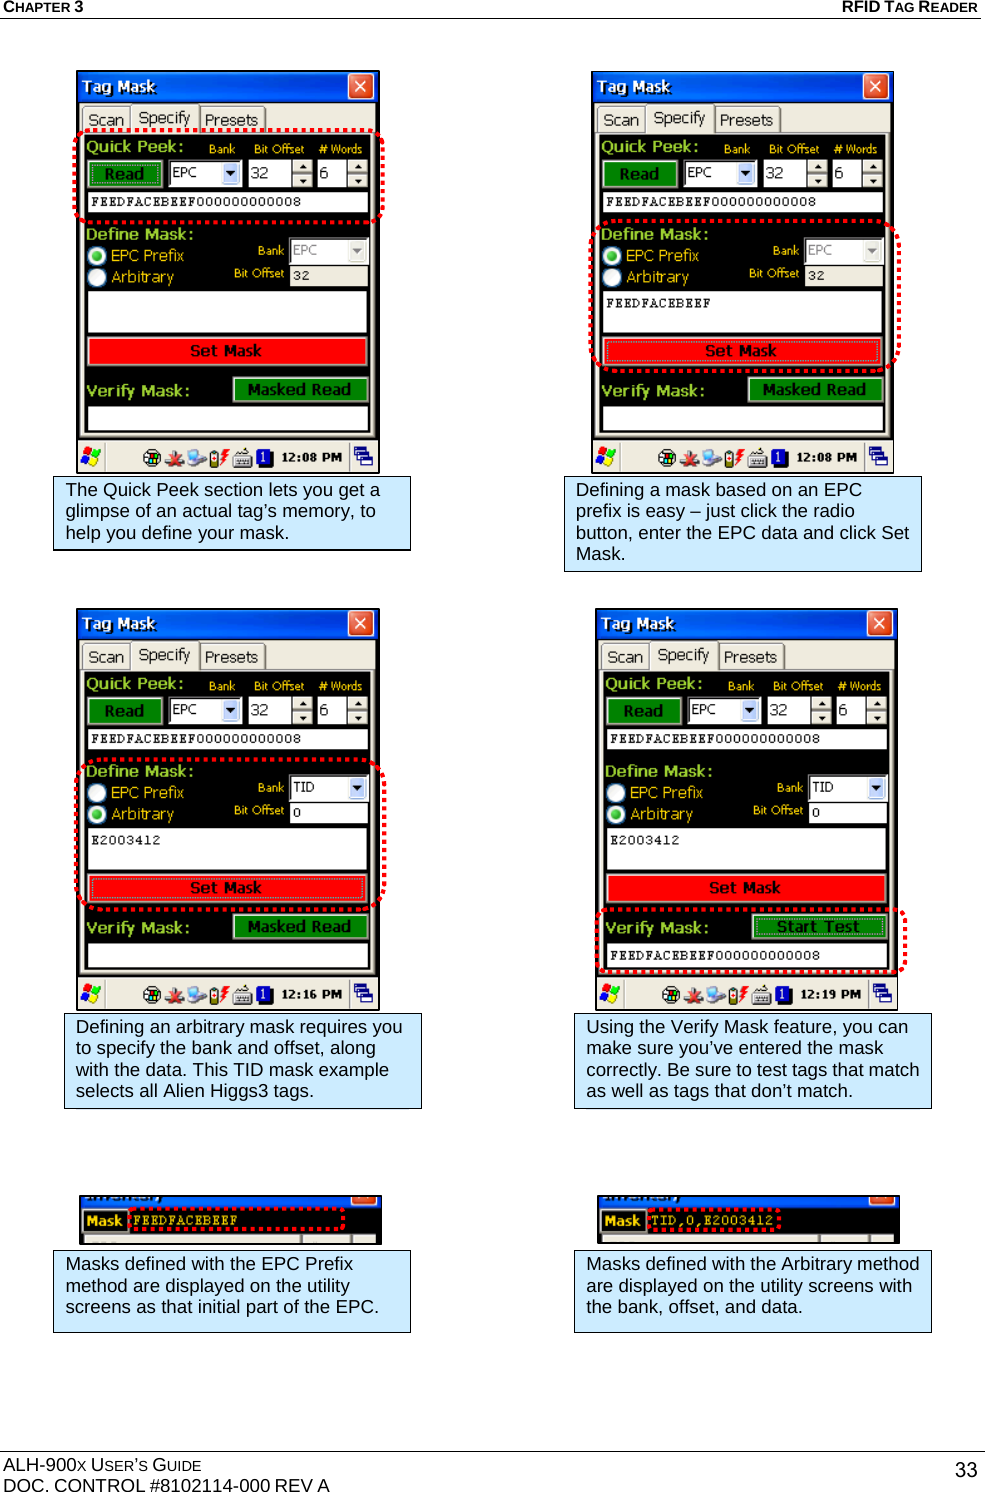
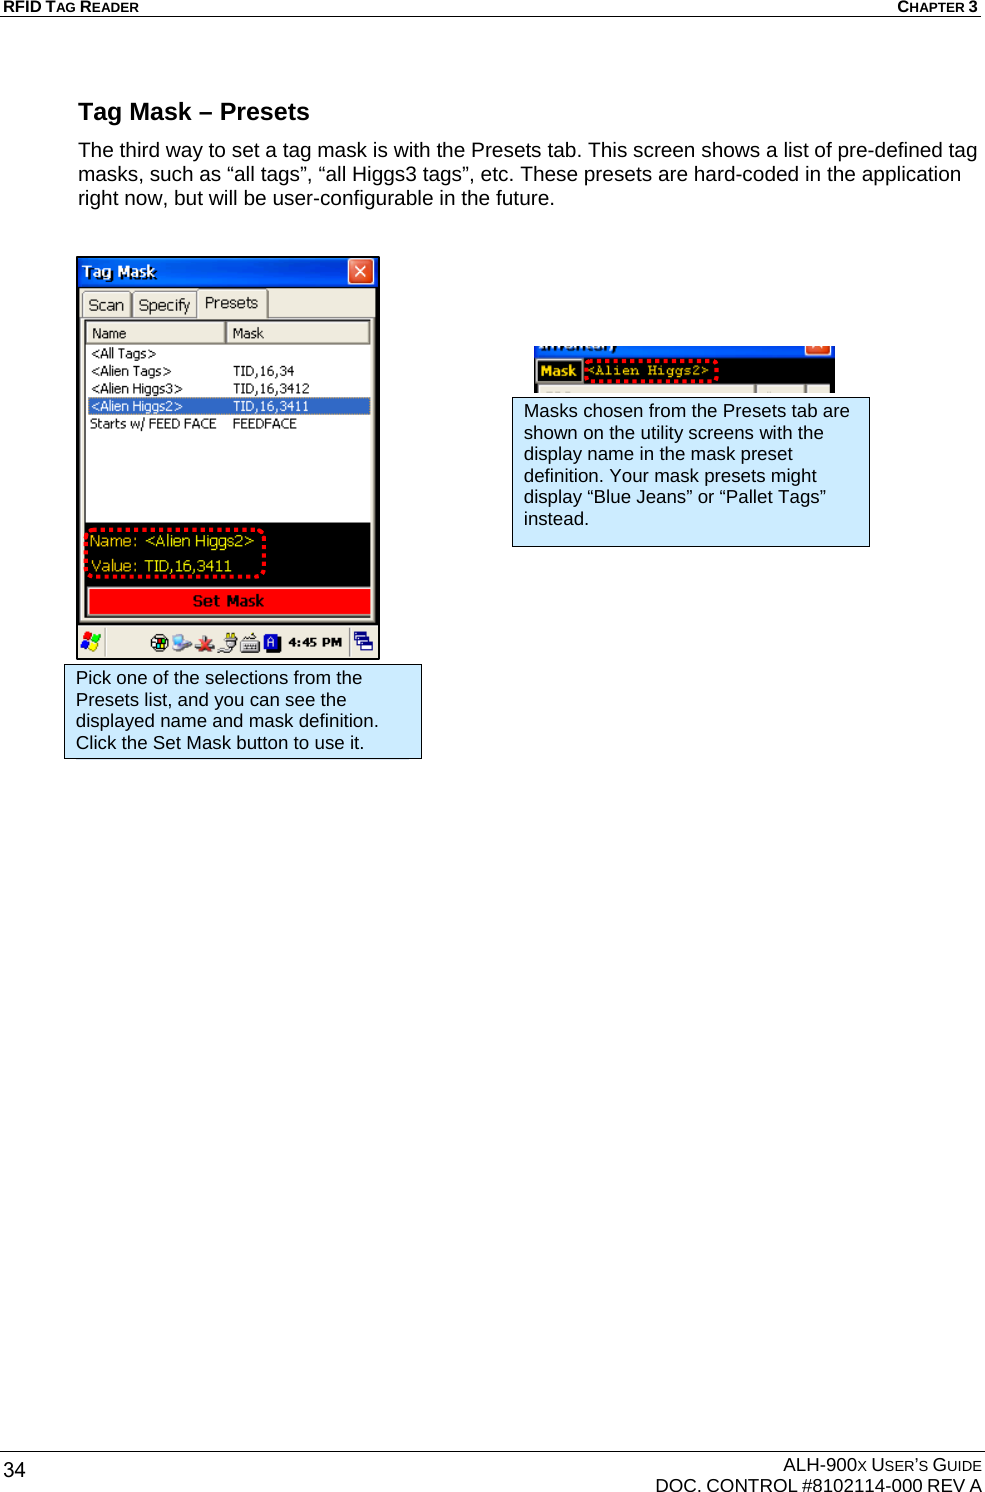
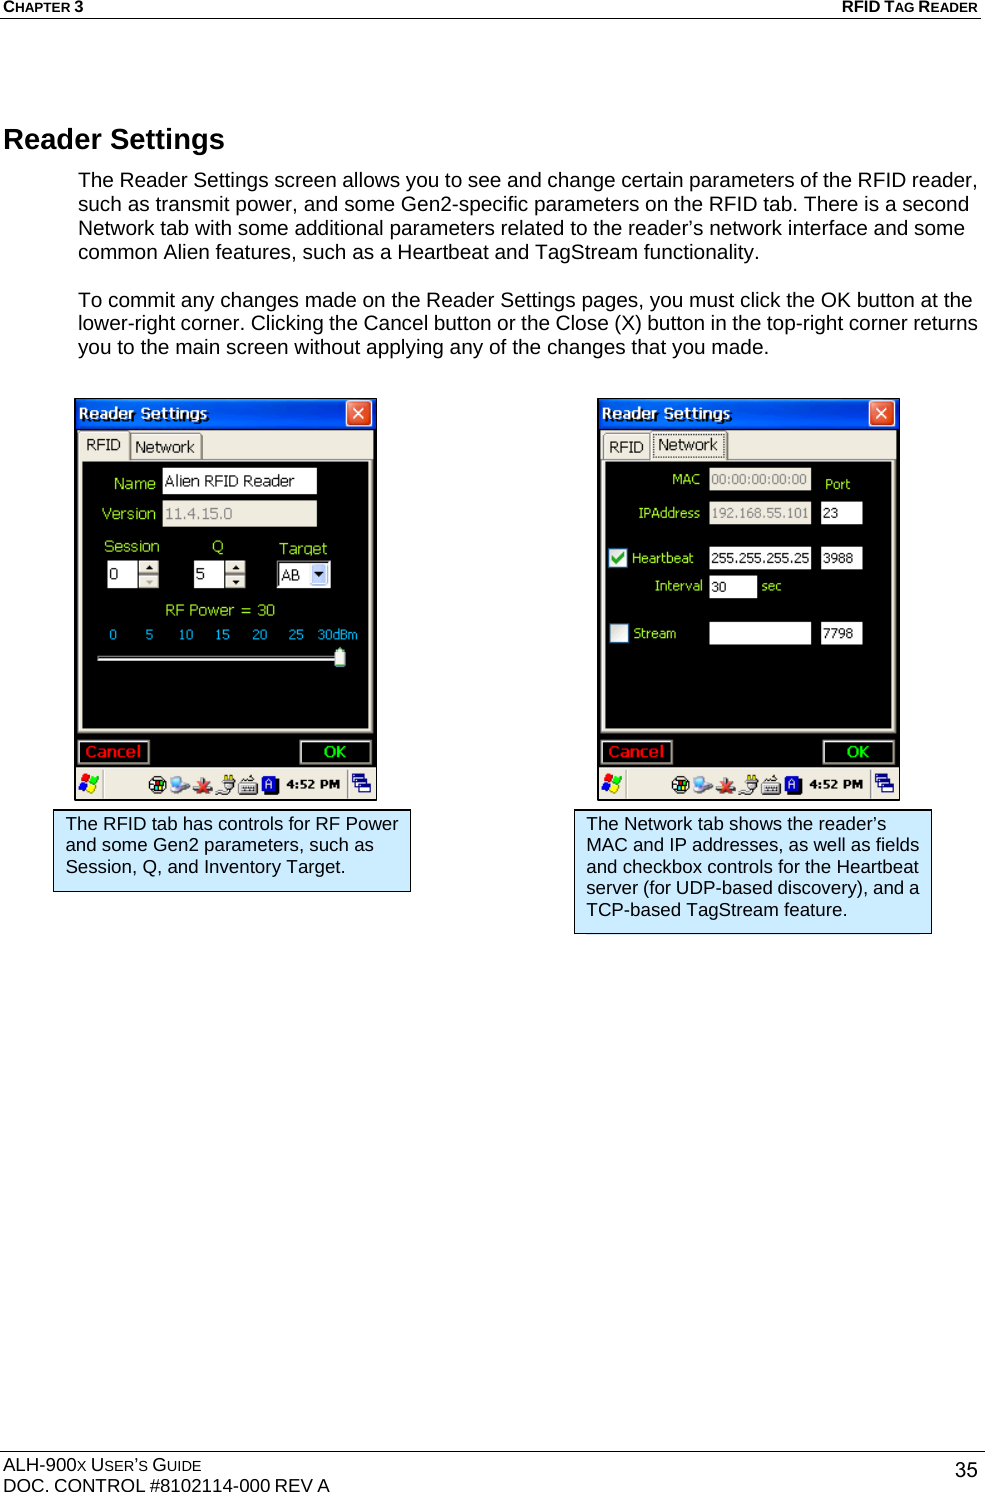
![RFID TAG READER CHAPTER 3 ALH-900X USER’S GUIDE DOC. CONTROL #8102114-000 REV A 24 Chapter 3 RFID Tag Reader The ALH-900x handheld readers contains a full-featured 900 MHz UHF RFID tag reader. It is able to inventory, selectively read from, and write to, RFID tags which support the EPC Gen2 protocol. The Frequency range is 850MHz - 960MHz, and can be adjusted for different regions. Starting the ALH-900x RFID Demo Software The Alien RFID demo software is accessible by the RFID Demo icon on the unit’s desktop, or it can be launched directly from the Start menu. It provides an example of what you can accomplish with a custom application on the reader. [Start] > [Programs] > [Alien Demos] > [RFID] Running the RFID Mobile Gateway demo software. The main screen presents buttons for each of the utilities, and one for general reader settings. UHF Reader](https://usermanual.wiki/Alien-Technology/ALH9001.User-Guide/User-Guide-2135074-Page-28.png)
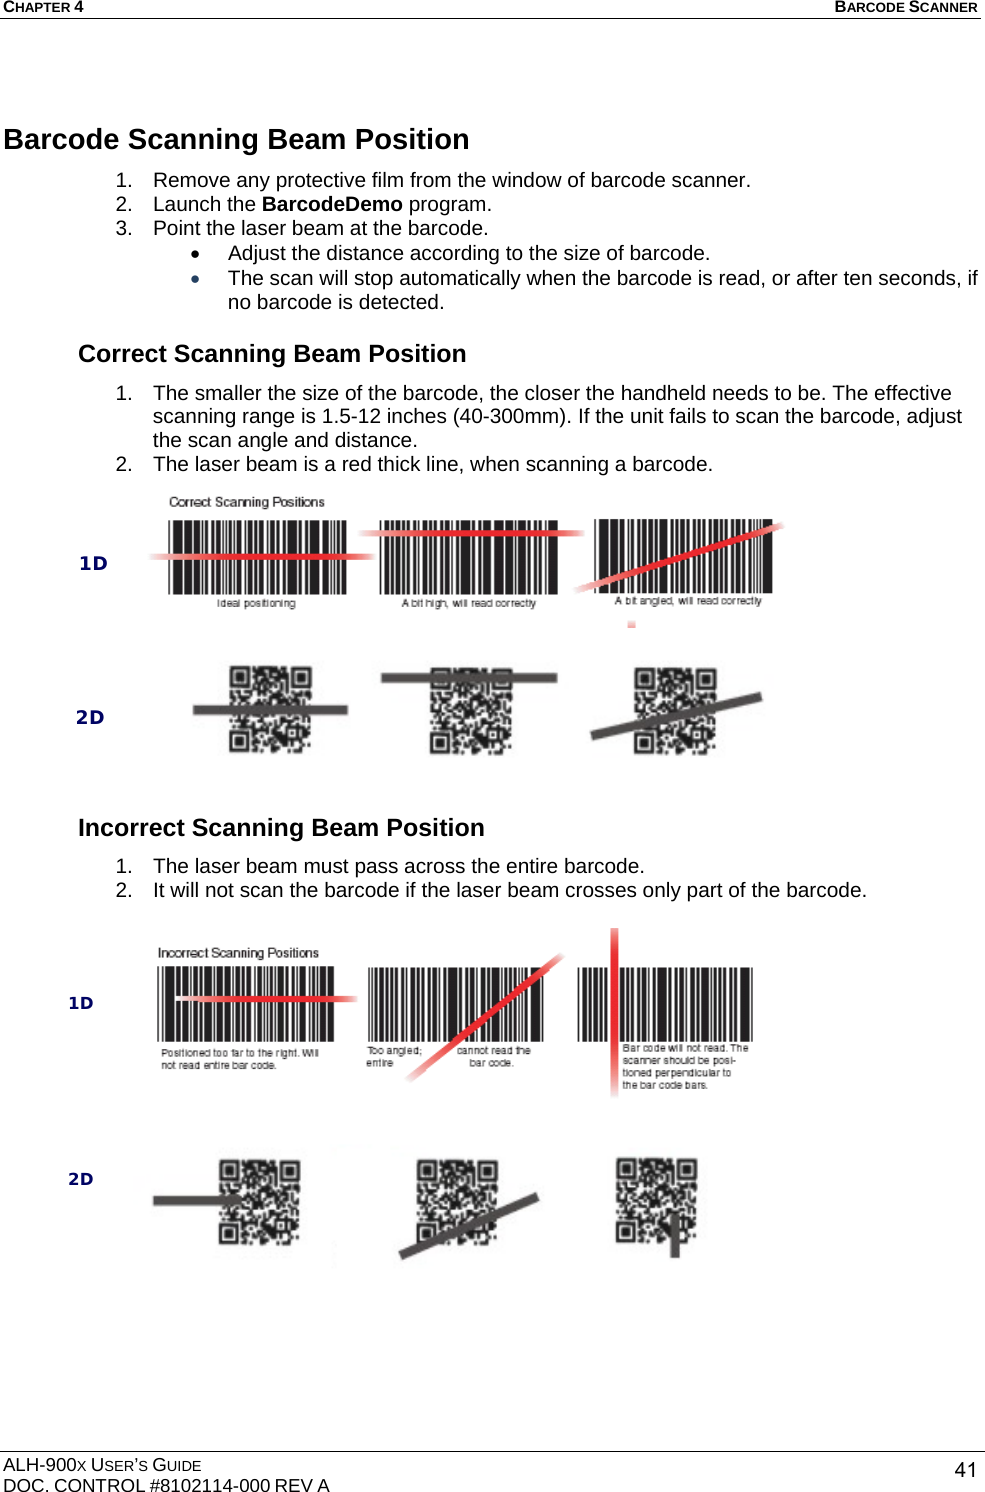
![BARCODE SCANNER CHAPTER 4 ALH-900X USER’S GUIDE DOC. CONTROL #8102114-000 REV A 36 Chapter 4 Barcode Scanner (1D & 2D) The ALH-9000 comes equipped with a 1D barcode scanner, and the ALH-9001 is equipped with a 2D barcode scanner. Both models are designed to recognize all known 1D and 2D barcodes. BarcodeDemo The BarcodeDemo application is accessible from the Start menu. It provides an example of what you can accomplish with a custom application on the handheld. [Start] > [Programs] > [Alien Demos] > [Scanner] > [BarcodeDemo] Starting the BarcodeDemo app. Press the Start button to read a barcode. Barcode Scanner (ALH-9001 shown)](https://usermanual.wiki/Alien-Technology/ALH9001.User-Guide/User-Guide-2135074-Page-40.png)
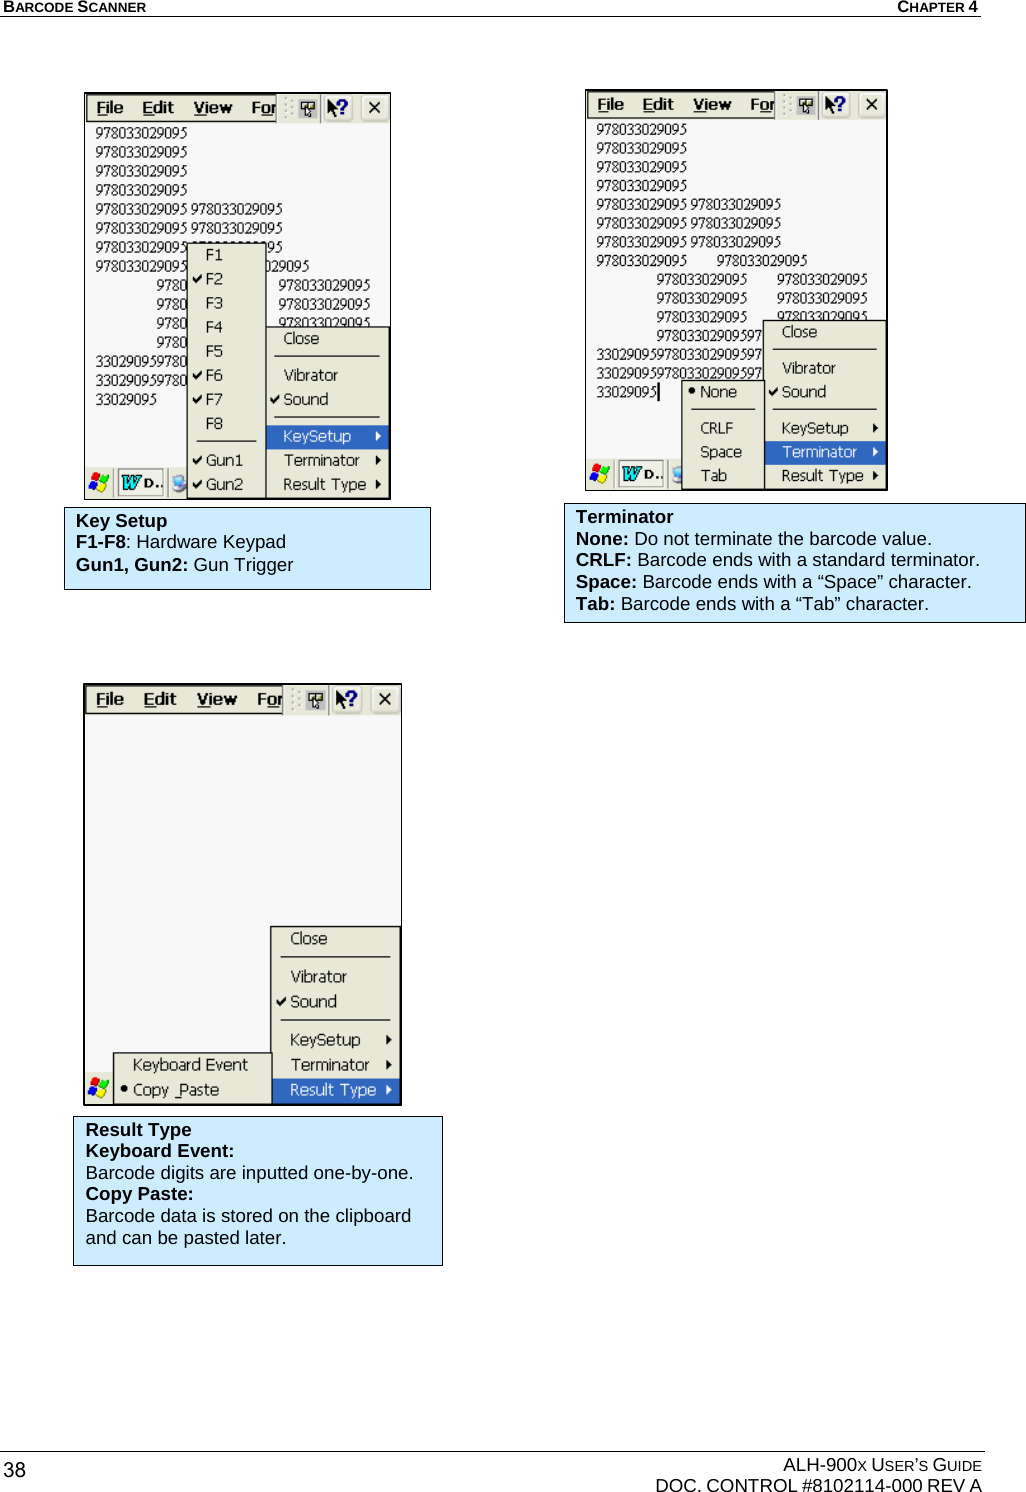
![CHAPTER 4 BARCODE SCANNER ALH-900X USER’S GUIDE DOC. CONTROL #8102114-000 REV A 37Using the BarcodeEmulator The BarcodeEmulator program enables you to input scanned barcode data anywhere you can manually enter text. It runs in the System Tray, and sends keyboard events directly into whatever application is in the foreground. The icon in the System Tray lets you set the barcode value input type, scan button, scan sound, and so on. [Start] > [Programs] > [Scanner] > [BarcodeEmulator] Starting the BarcodeEmulator The BarcodeEmulator icon is shown on the taskbar. Run WordPad Program, then click the BarcodeEmulator Icon Sound: A beep sounds when a barcode is scanned. Vibrator: The unit vibrates when a barcode is scanned. Close: Exits the Emulator Program](https://usermanual.wiki/Alien-Technology/ALH9001.User-Guide/User-Guide-2135074-Page-41.png)
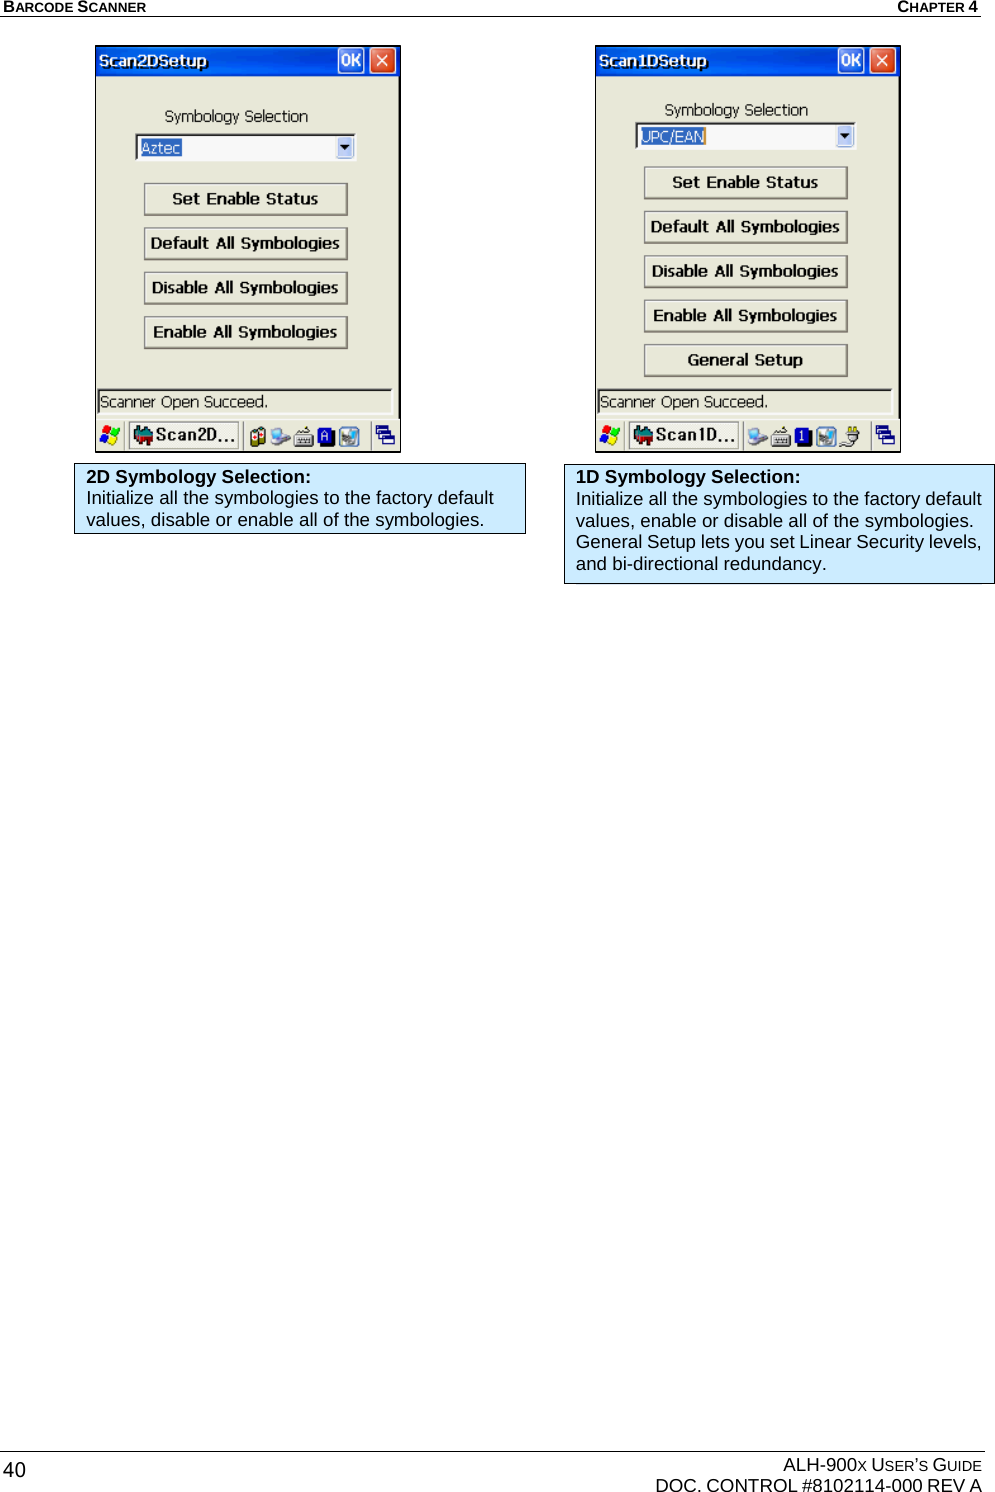
![CHAPTER 4 BARCODE SCANNER ALH-900X USER’S GUIDE DOC. CONTROL #8102114-000 REV A 39Setting Barcode Symbology There are many different barcode encoding standards, depending on the region and industry. You must make sure that the barcode scanner is set to decode the types of barcodes that you expect to encounter. Selecting too many symbologies can increase the time it takes to decode a scanned barcode once it has been scanned. [Start] > [Programs] > [Alien Demos] > [Scanner] > [BarcodeSetup] Click Set Enable Status button. Make a check mark on the barcode which you want to use, and then click the <SET> button. Running the BarcodeSetup program. Set the Barcode type in detail.](https://usermanual.wiki/Alien-Technology/ALH9001.User-Guide/User-Guide-2135074-Page-43.png)
![WIRELESS LAN CHAPTER 5 ALH-900X USER’S GUIDE DOC. CONTROL #8102114-000 REV A 42 Chapter 5 Wireless LAN The ALH-900x handheld readers are equipped with an internal 802.11 radio module to transfer data, and interface the unit with your network using wireless communication. It supports TCP/IP network protocols, and can communicate with a host computer directly. Powering Up the WLAN Radio [Start] > [Programs] > [Alien Demos] > [WirelessLAN] Configuring the WLAN Connection Running the WirelessLAN program. Select <WLAN ON>, and then click the OK button. The network selector appears. Double click a suitable wireless server from the list of access points. Input the encryption and authentication modes, and wireless password, and then click OK button.](https://usermanual.wiki/Alien-Technology/ALH9001.User-Guide/User-Guide-2135074-Page-46.png)
![CHAPTER 5 WIRELESS LAN ALH-900X USER’S GUIDE DOC. CONTROL #8102114-000 REV A 43Checking WLAN Information When connected, the WLAN LED illuminates green and the WLAN icon on the taskbar shows: . If not connected, the WLAN LED and icon will be off: Additional features of the WLAN module can be accessed from the Summit Client Utility: [Start] > [Programs] > [Alien Demos] > [Summit] > [scu] Full documentation for the Summit Client Utility can be found on their website: http://www.summitdatacom.com/Documents/summit_users_guide_3_03.html Double click WLAN icon on the taskbar to check WLAN information. Use the right-arrow button at the top to get back to the Wireless Information tab. Click Start > Programs > Demo Apps > WirelessLAN, and then select <WLAN OFF> to stop WLAN communication. The Summit Client Utility provides five tabs of configuration and diagnostic information. The admin password is “SUMMIT” (all capitals).](https://usermanual.wiki/Alien-Technology/ALH9001.User-Guide/User-Guide-2135074-Page-47.png)
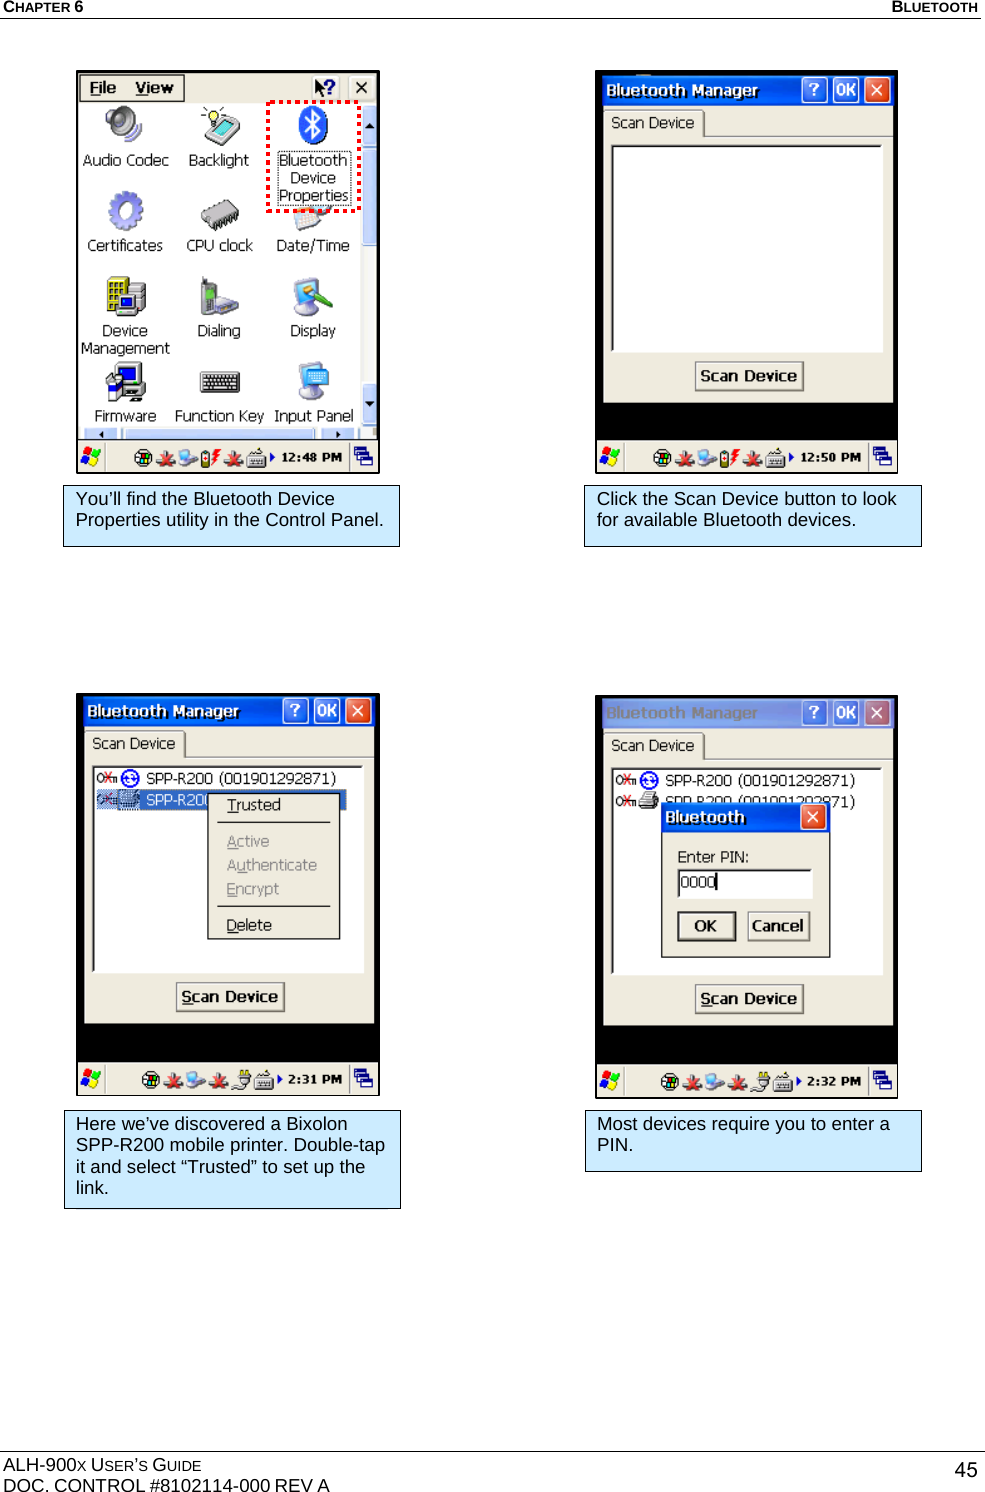
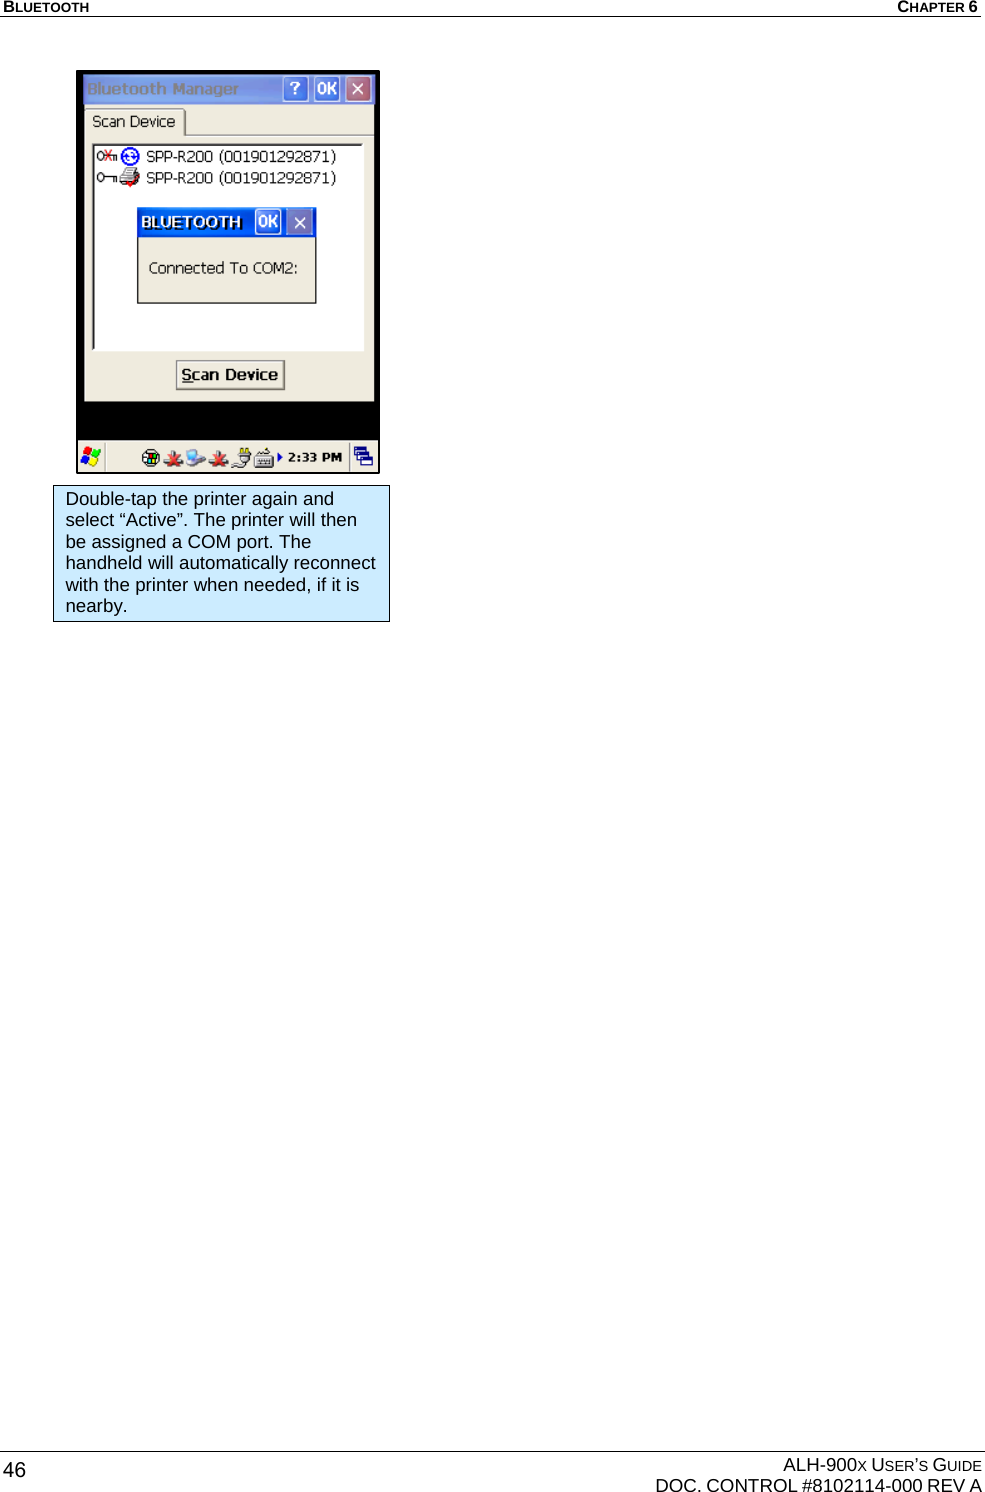
![BLUETOOTH CHAPTER 6 ALH-900X USER’S GUIDE DOC. CONTROL #8102114-000 REV A 44 Chapter 6 Bluetooth The ALH-900x handheld readers feature Bluetooth technology for wireless communication with other devices, such as wireless printers, supporting the Serial Printer Profile (SPP). By default, the Bluetooth service is turned off. Turning on Bluetooth The Bluetooth radio is turned off be default. To use Bluetooth, turn it on first with the Bluetooth application. [Start] > [Programs] > [Alien Demos] > [Bluetooth] Connecting Bluetooth Printers (SPP) The Bluetooth Device Properties control panel connects to a printer through a virtual serial port. The SPP Bluetooth device will appear as a virtual Com port: generally COM3, with a baud rate of 9600 bps. [Start] > [Settings] > [Control Panel] > [Bluetooth Device Properties] Use the Bluetooth program to turn the Bluetooth radio on and off. Select <Bluetooth ON>, and then click the OK button.](https://usermanual.wiki/Alien-Technology/ALH9001.User-Guide/User-Guide-2135074-Page-48.png)
![CHAPTER 7 USING GPS ALH-900X USER’S GUIDE DOC. CONTROL #8102114-000 REV A 47Chapter 7 Using GPS The ALH-9001 handheld reader contains an internal GPS module for finding the geographic location of the handheld reader. The GPS service requires line-of-sight visibility with at least four of the constellation of orbiting GPS satellites, so the speed of the initial fix and the accuracy of all data depend greatly on the quality of the signal from the orbiting satellites. Being inside of or in between buildings, under tree cover, or near heavy electrical machinery can degrade the quality of the GPS data. The GPS receiver appears as a serial Com port, COM6, with a baud rate of 9600. Executing GPS Demo Program Find an open place outdoors to check your GPS signals. Depending on your actual environment, the time to receive a fix and location data is different - about 3-10 minutes is typical. After receiving a GPS fix the first time, it takes less time to receive GPS data on subsequent attempts. The Alien GPS demo software is accessible by the Alien GPS icon on the unit’s desktop, or it can be launched directly from the Start menu. [Start] > [Program] > [Alien Demos] > [GPS] Starting the GPS demo program. Start/stop receiving GPS data with the button. Watch raw NMEA data in the lower window. Wait outside for a satellite fix, and then observe decoded data in the fields at the top of the screen.](https://usermanual.wiki/Alien-Technology/ALH9001.User-Guide/User-Guide-2135074-Page-51.png)
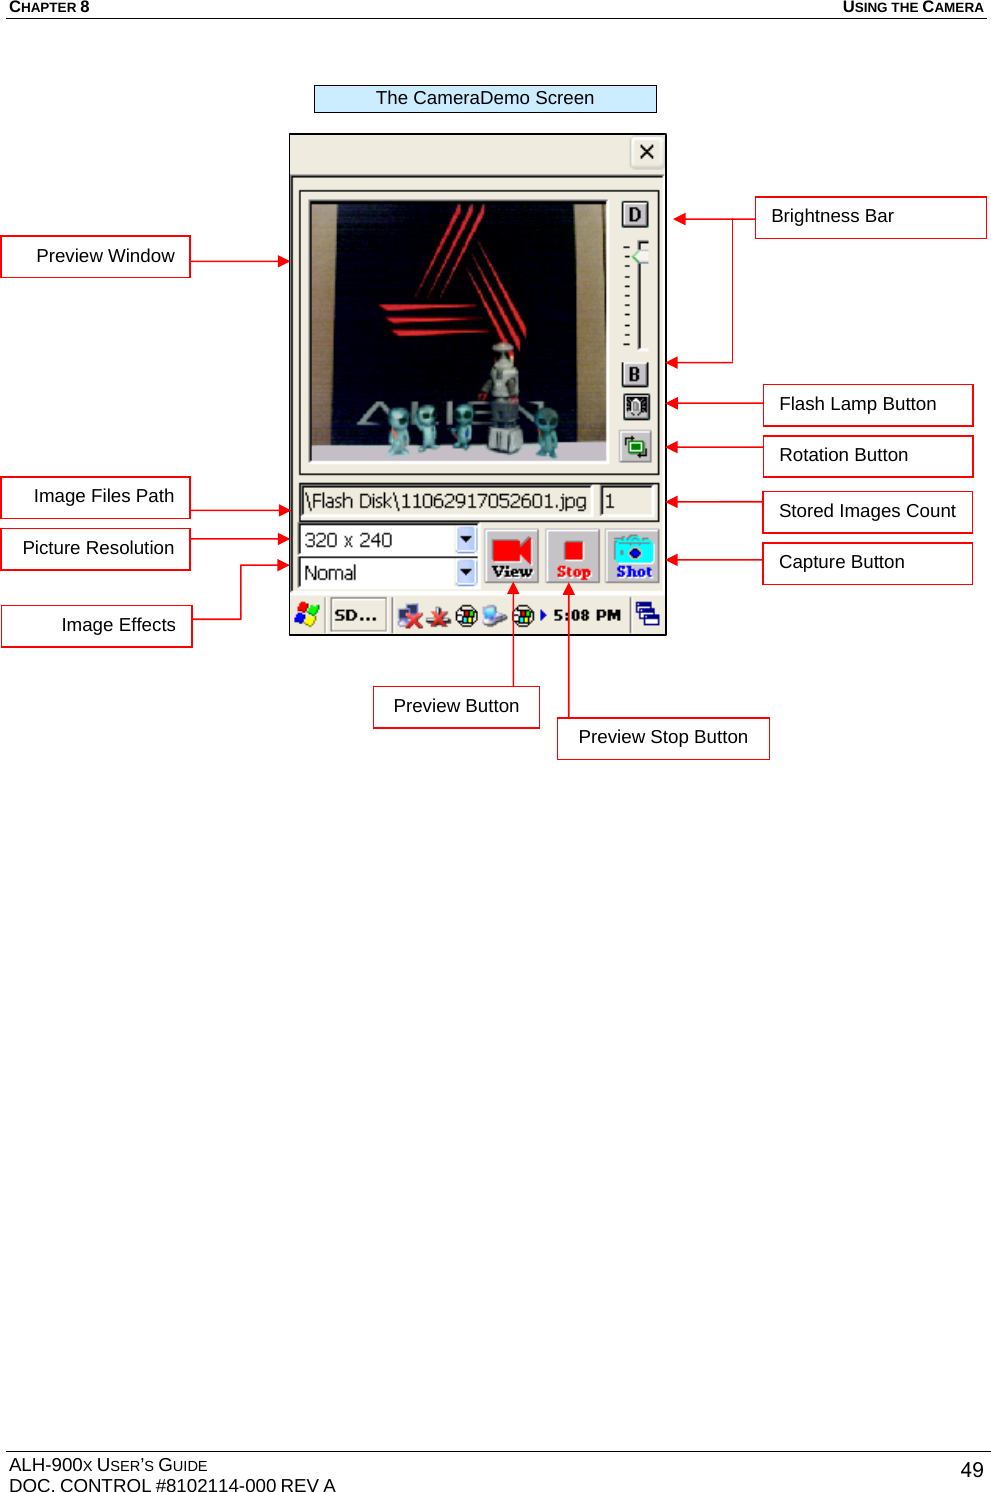
![USING THE CAMERA CHAPTER 8 ALH-900X USER’S GUIDE DOC. CONTROL #8102114-000 REV A 48 Chapter 8 Using the Camera The ALH-9001 is equipped with a 3 megapixel camera which allows for adjustments of brightness, video resolution, picture quality, etc. Using the Camera The CameraDemo software is accessible from the Start menu. It provides an example of what you can accomplish with a custom application on the handheld. [Start] > [Programs] > [Alien Demos] > [CameraDemo] Running the CameraDemo Program CameraDemo Main Screen Camera (ALH-9001 only)](https://usermanual.wiki/Alien-Technology/ALH9001.User-Guide/User-Guide-2135074-Page-52.png)
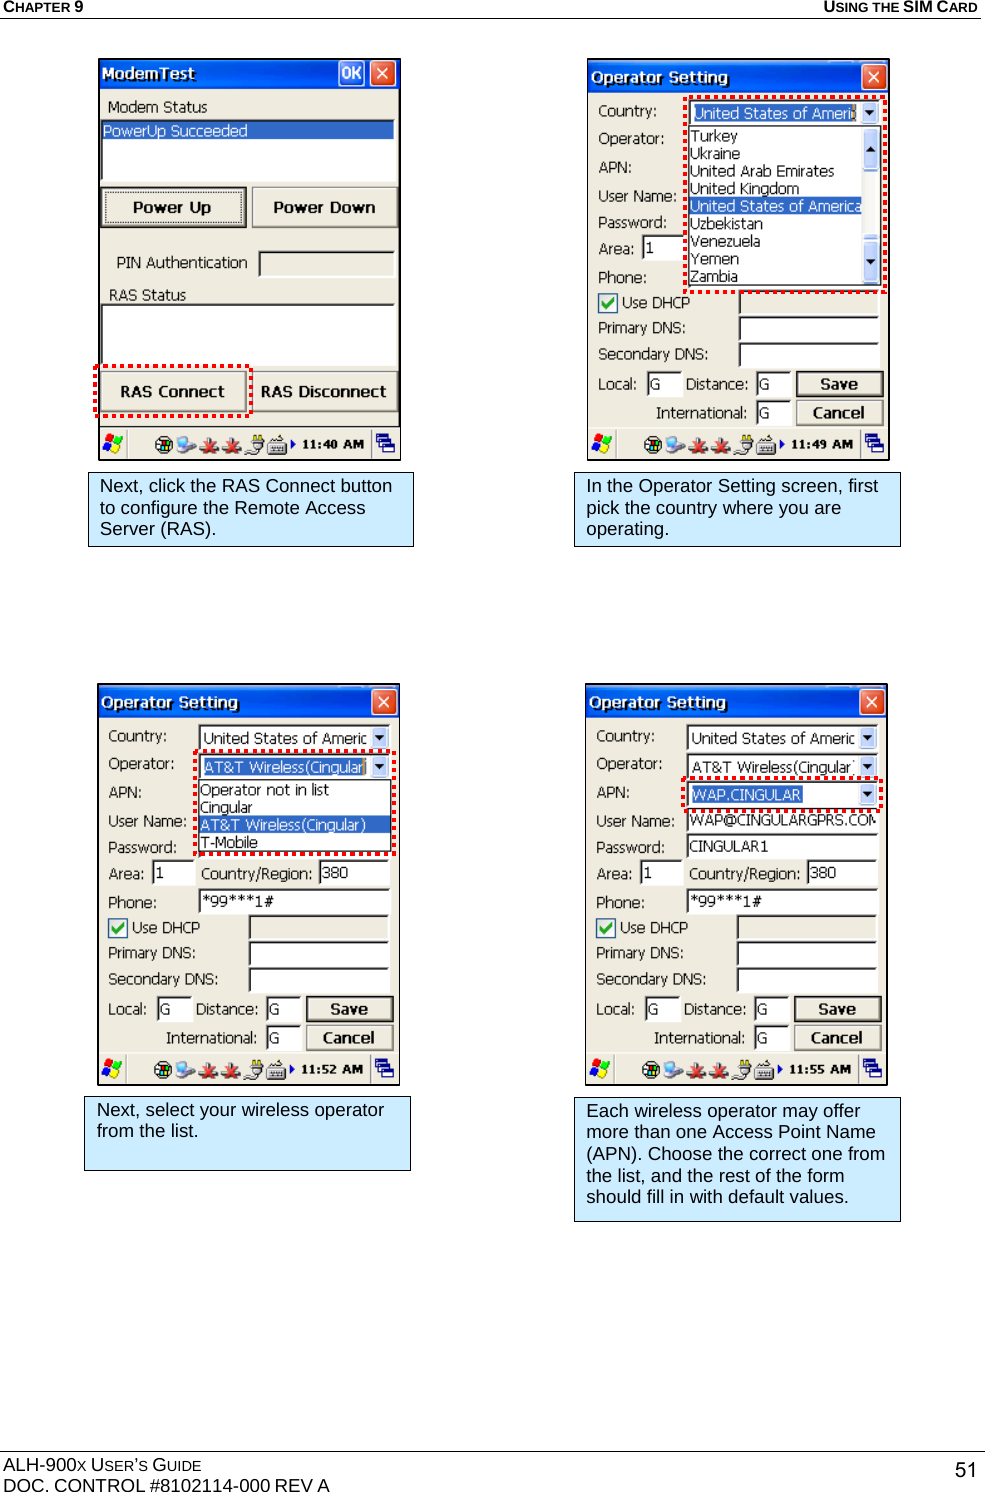
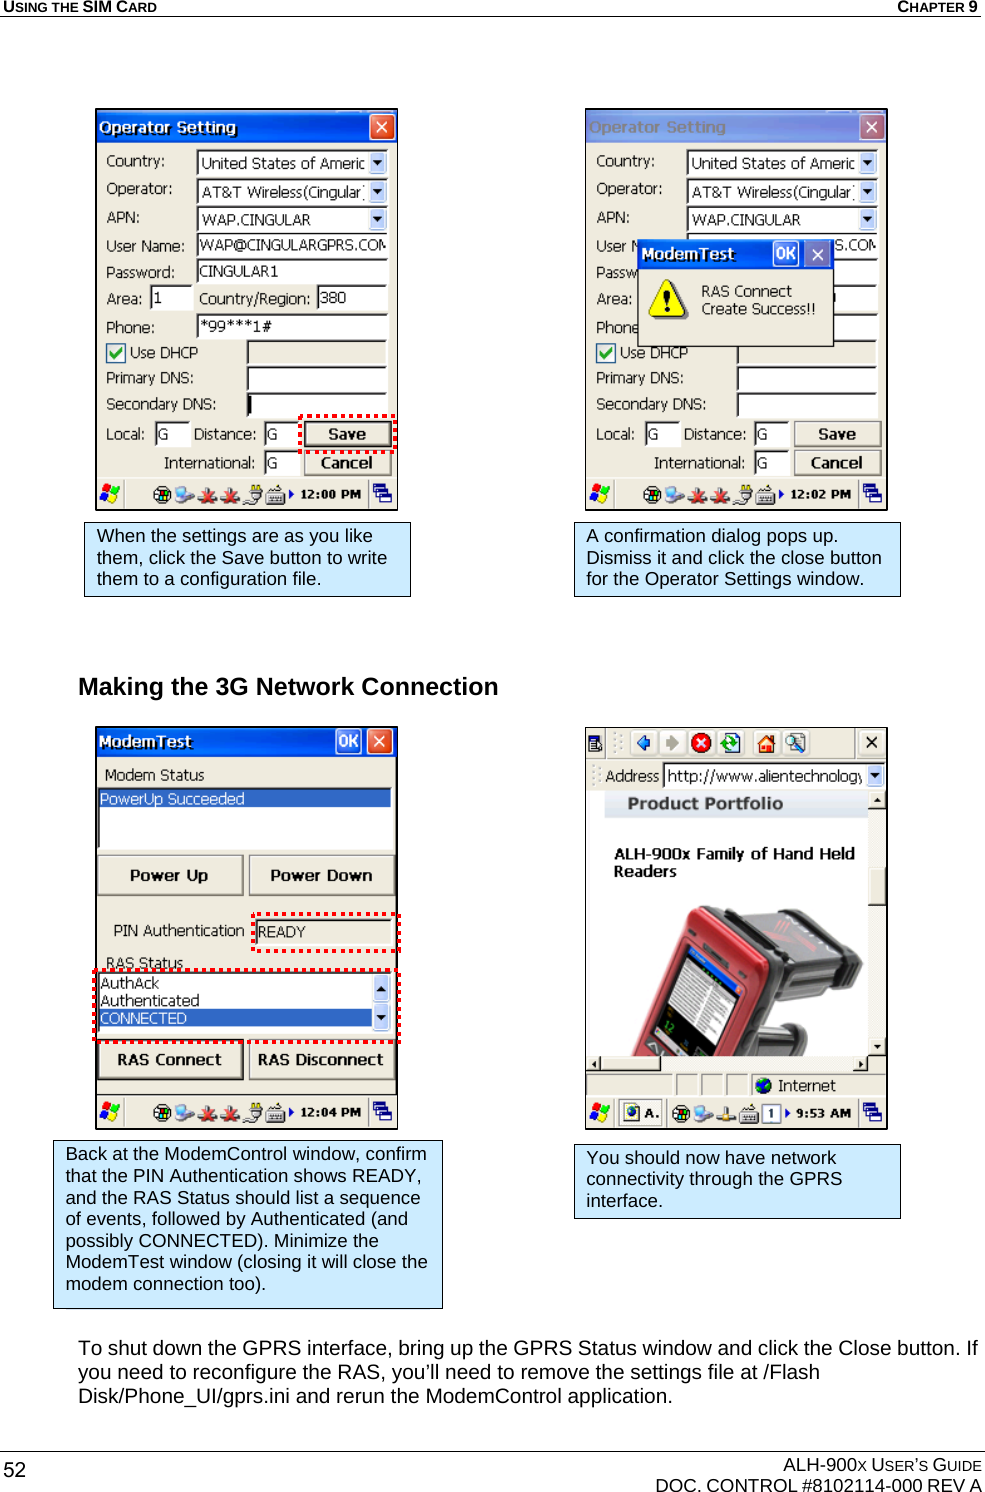
![USING THE SIM CARD CHAPTER 9 ALH-900X USER’S GUIDE DOC. CONTROL #8102114-000 REV A 50 Chapter 9 Using a SIM Card The ALH-9001 is equipped with a SIM card slot and wireless HSDPA radio supporting enhanced 3G connectivity. After inserting the SIM card, you’ll have to do some initial configuration, depending on the wireless carrier you choose. After that, the ALH-9001 can use the 3G network for wireless data communications. Installing SIM Card A SIM card can be easily inserted and pulled out along the arrow direction. Note the location of the dog-eared corner of the SIM card (top-left). Configure the Remote Access Server (RAS) To configure the 3G radio, you need to provide settings for your cellular provider’s Remote Access Server (RAS) in the ModemControl utility. [Start] > [Programs] > [Alien Demos] > [ModemControl] Running the ModemControl Program First, click the Power Up button to energize the HSDPA radio.](https://usermanual.wiki/Alien-Technology/ALH9001.User-Guide/User-Guide-2135074-Page-54.png)