Allflex USA 30001 AFX-100 Reader User Manual EID TS YY XXXX
Allflex SA/Boulder AFX-100 Reader EID TS YY XXXX
UserManual.wiki
>
Allflex USA
>
30001 User Manual
Users manual
Navigation menu
Upload a User Manual
Namespaces
Wiki Guide
HTML
PDF
Info
Views
User Manual
Discussion / Help
Navigation

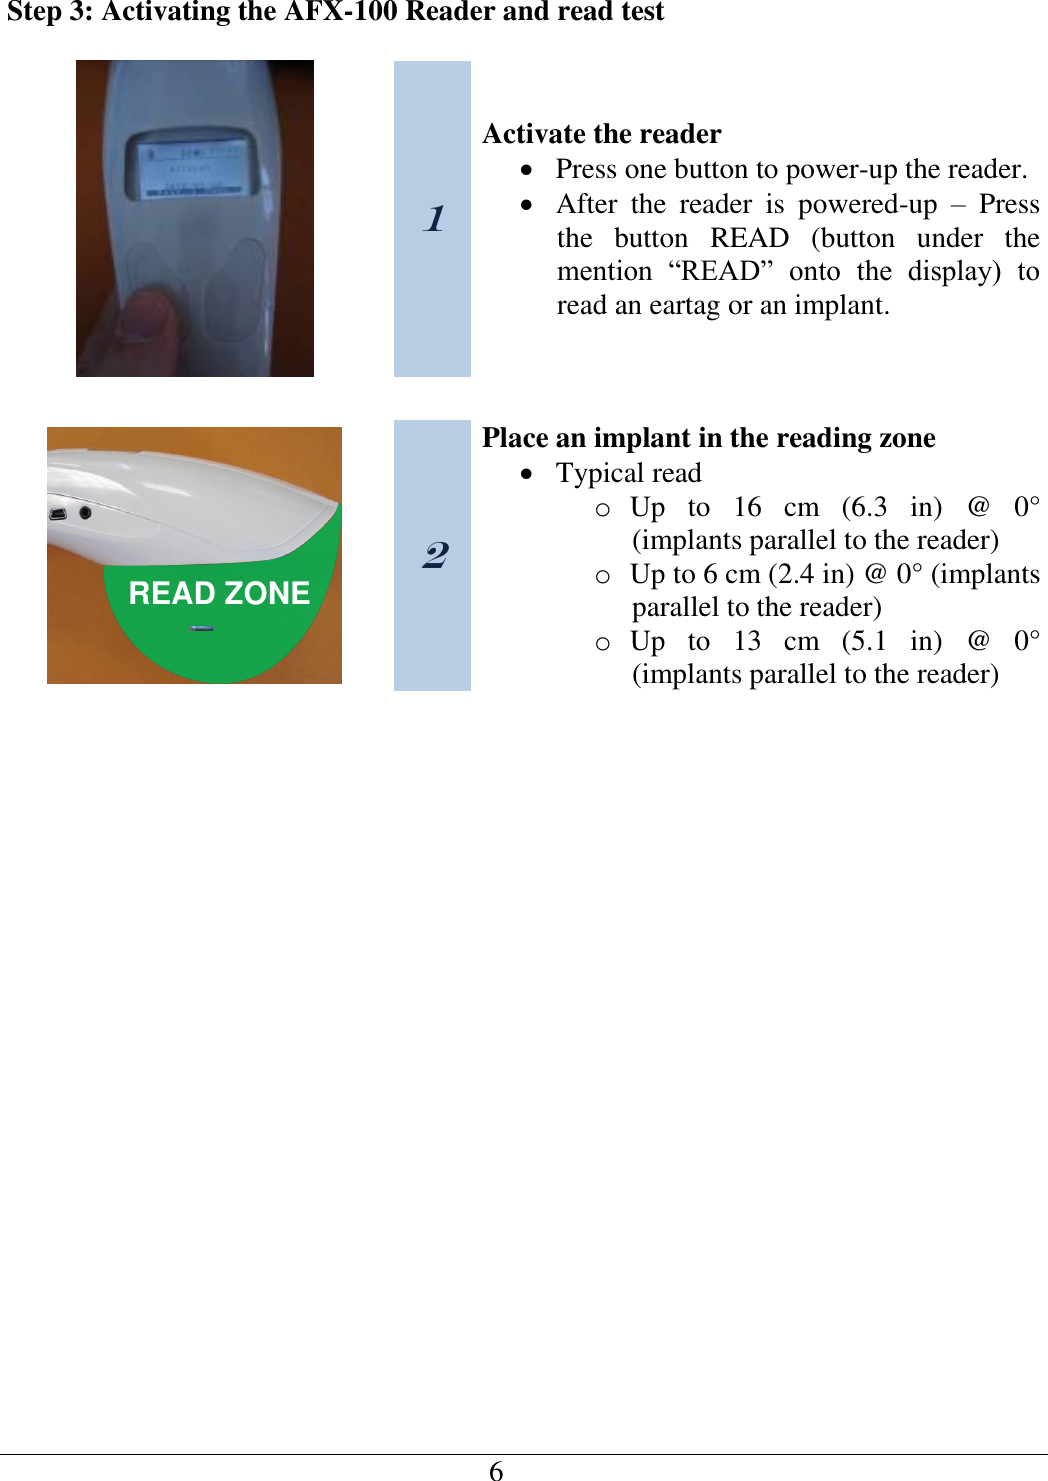
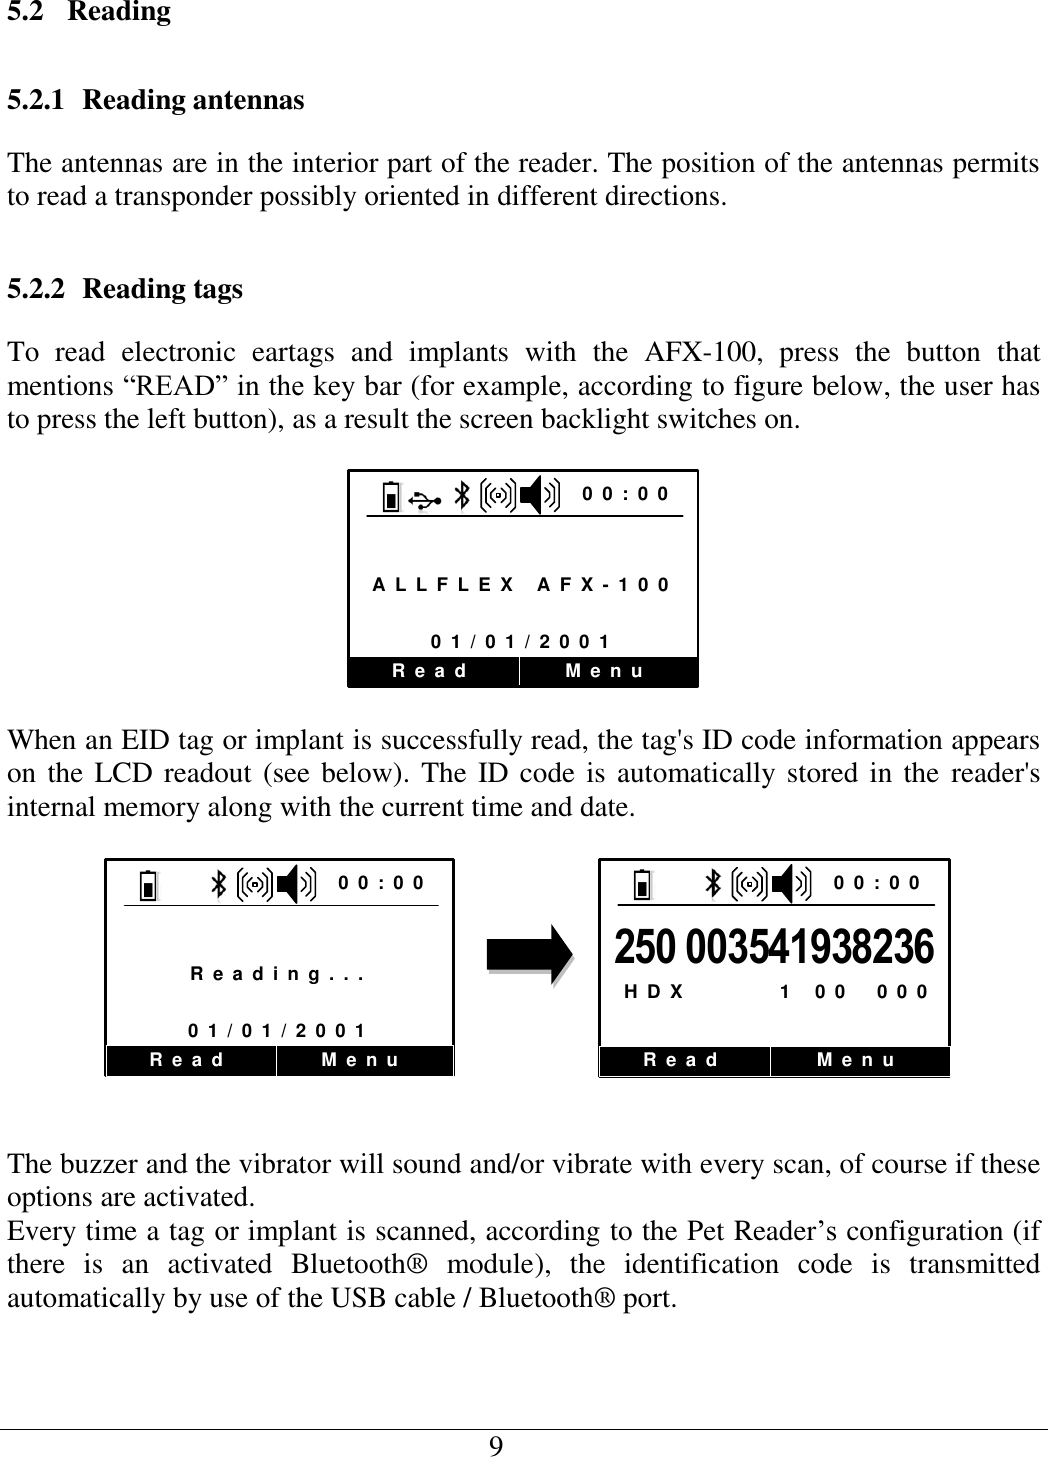
![4 2 SPECIFICATIONS General Norms: Full ISO 11784 and full ISO 11785 including annex C for FDX-A (Destron and Trovan), FDX-B and HDX User interface: Graphical display 128x64 dots 2 keys Buzzer and Vibrator USB port and optional Bluetooth® module USB interface: Serial emulation (CDC class) from 1200bps to 115200bps. Bluetooth® interface: Class 2 (up to 10m) Serial Port Profile (SPP). Memory: 2000 animal IDs Battery: 7.2VDC – 700mAh NiMH rechargeable. Autonomy: 15 hours @ 20°C Date/Time autonomy: 3 months without reader using @ 20°C Battery charge duration: 3 hours Mechanical and physical Dimensions: 280 x 83 x 55 mm (11 x 3.27 x 2.17 in) Weight: 275 g (9.7 oz) Material ABS-PC Color Cool Gray 1 Operating temperature -10°C to +40°C (+14°F to +104°F) Storage temperature -30°C to +70°C (-22°F to +158°F) Humidity: 80% Reading Distance for implants HDX: @ orientation (°) Up to 16 cm (6.3 in) @ 0° [Figure 1] Up to 10 cm (4 in) @ 90° [Figure 2] Distance for implants FDX-A Destron (Fecava version) technology: @ orientation (°) Up to 6 cm (2.4 in) @ 0° [Figure 1] Up to 4 cm (1.6 in) @ 90° [Figure 2] Distance for implants FDX-A Trovan technology: @ orientation (°) Up to 1 cm (0.4 in) @ 0° [Figure 1] Up to 2 cm (0.8 in) @ 90° [Figure 2] Distance for implants FDX-B: @ orientation (°) Up to 13 cm (5.1 in) @ 0° [Figure 1] Up to 8 cm (3.15 in) @ 90° [Figure 2] Figure 1 - implants perpendicular to the reader. Figure 2 - implants parallel to the reader.](https://usermanual.wiki/Allflex-USA/30001/User-Guide-1363242-Page-4.png)

![12 Note 5 - Do not install near any heat sources such as radiators, heat registers, stoves, or other apparatus (including amplifiers) that produce heat. Note 6 - Unplug this apparatus during lightning storms or when unused for long periods of time. Note 7 - Unplug the wall adapter when the reader is connected to a personal computer by its USB cable. AC Adapter - The AFX-100 Reader can be powered using its AC Adapter/Charger regardless of the charge state of the Battery Pack. The AC Adapter can be used as a power source even if the Battery Pack has been removed from the Pet Reader. If the AC Adapter has been connected, the user may proceed with configuration and performance testing while the Battery Pack is charging. This configuration could affect reading performances. Note 8 - The Pet Reader‟s integral Battery Pack is affected by temperature. At 0°C (32°F), the Battery Pack will deliver only about half of its rated energy capacity. At lower temperatures, the Battery Pack may deliver unsatisfactory performance. When the AFX-100 Reader is used in low temperature environments, connection to an external power source is recommended. Note 9 - To ensure proper Battery Pack charging, charging should be conducted only in an environment where the temperature is between 15°C and 30°C (60°F to 85°F). Charging at temperatures outside these boundaries will result in unsatisfactory charge acceptance by the Battery Pack. For more information about the characteristics of rechargeable batteries, please see the white paper at [http://www.national.com/appinfo/power/files/f19.pdf#page=1]. Note 10 – Once the external AC adapter is connected, the reader is powered-up and it will remain on till the AC adapter is disconnected. The reader will be able to read tags.](https://usermanual.wiki/Allflex-USA/30001/User-Guide-1363242-Page-15.png)


![29 Allflex Offices Allflex Europe (UK) Ltd. Unit 6 - 8 Galalaw Business Park HAWICK United Kingdom TD9 8PZ Phone: 44 (0) 1450 364120 Fax: 44 (0) 1450 364121 www.allflex.co.uk Allflex Europe S. A. ZI DE Plague Route des Eaux 35502 Vitre, France Téléphone/Phone: 33 (0)2 99 75 77 00. Télécopieur/Fax: 33 (0)2 99 75 77 64 www.allflex-europe.com Allflex USA, Inc. P.O. Box 612266 2805 East 14th Street Dallas Ft. Worth Airport, Texas 75261-2266 United States of America (800) 989-TAGS [8247] (972) 456-3686 (972) 456-3882/FAX www.allflexusa.com Allflex S.A. Boulder 2820 Wilderness Place, Suite A Boulder, Colorado 80301 United States of America Phone: (303) 449-4509 Fax: (303) 449-4529 Allflex International Do Brasil Ltda. Rua Monte serrat, 1097 CEP 03312-001 Tatuape, SP, Brazil Phone/Fax: (55) 11 6942-7008 www.allflex.com.br Allflex Argentina S.A. Las Heras 1588 1641 Martinez Buenos Aires, Argentina Phone/Fax: 54 11 4792 3488 Allflex Beijing Plastics No. 3 Heng Qu Tiao Dong Tie Jiang Ying Feng Tai District Beijing, China 100078 Phone: 861 762 9541 Fax: 861 762 9514 Allflex Australia 33-35 Neumann Road Capalaba Queensland 4157 Australia Phone: 61 7 3245 9100 Fax: 61 7 3245 9110 www.allflex.com.au Allflex New Zealand Private Bag 11003 17 El Prado Drive Palmerston North Phone: 64 6 3567199 Fax: 64 6 3553421 www.allflex.co.nz Allflex Canada Corporation Allflex Inc. 4135, Bérard St-Hyacinthe, Québec J2S 8Z8 Canada Téléphone/Phone: (450) 261-8008 Télécopieur/Fax: (450) 261-8028](https://usermanual.wiki/Allflex-USA/30001/User-Guide-1363242-Page-32.png)