Alpha Networks 2007050009 IEEE802.11n Wireless Router User Manual WRG N15 961105
Alpha Networks Inc. IEEE802.11n Wireless Router WRG N15 961105
Contents
- 1. Users manual1
- 2. Users manual 2
Users manual 2

LinkTek WL11N Wireless Broadband Router User Guide 43
Configure the PPTP connection and click the Apply button to put the new settings into effect.
See the table below for a description of the parameters configured for the connection.
PPTP Parameters Description
IP Address Type the IP address supplied by your ISP.
Subnet Mask Type the Subnet mask supplied by your ISP.
Gateway The gateway IP address is used provide access to resources outside your IP
Subnet or ISP’s network. Type the gateway IP address given to you by your ISP.
DNS This entry is for the IP address of your primary domain name server, which
should also be provided to you by your ISP.
Server IP/Name Enter the Server IP address for this protocol into this field. This is the IP address
of the server computer that will be used, along with your computer, to create the
Virtual Private Network. This field must be completed for both the Dynamic IP and
Static IP options
PPTP Account Enter the PPTP account name, provided to you by your ISP, here.
PPTP Password Enter your password for this PPTP account here, as stated to you by your ISP.
PPTP Confirm
Password
Retype the password entered in the PPTP Password field.
Maximum Idle Time A value of 0 in this field means that the PPTP connection will remain connected.
If your network account is billed according to the amount of time the router is
actually connected to the Internet, enter an appropriate Idle Time value (in
seconds). This will disconnect the router after the WAN connection has been idle
for the amount of time specified. The default value = 5.
MTU This field refers to the Maximum Transfer Unit, which is the maximum size of a
packet, in bytes, that will be accepted by the router. The default setting is 1500
bytes. This field should not be altered unless instructed by your ISP.
Connect Mode Select This function, with Connect-on-demand selected, will allow the router to connect
any workstation on your LAN to the Internet upon request. If this function is set at
Always-on, no request from the workstation will be needed to connect to the
Internet. If Manual is selected, it will be necessary for the workstation on the LAN
to manually connect to the Internet through this router.
LinkTek WL11N Wireless Broadband Router User Guide
44
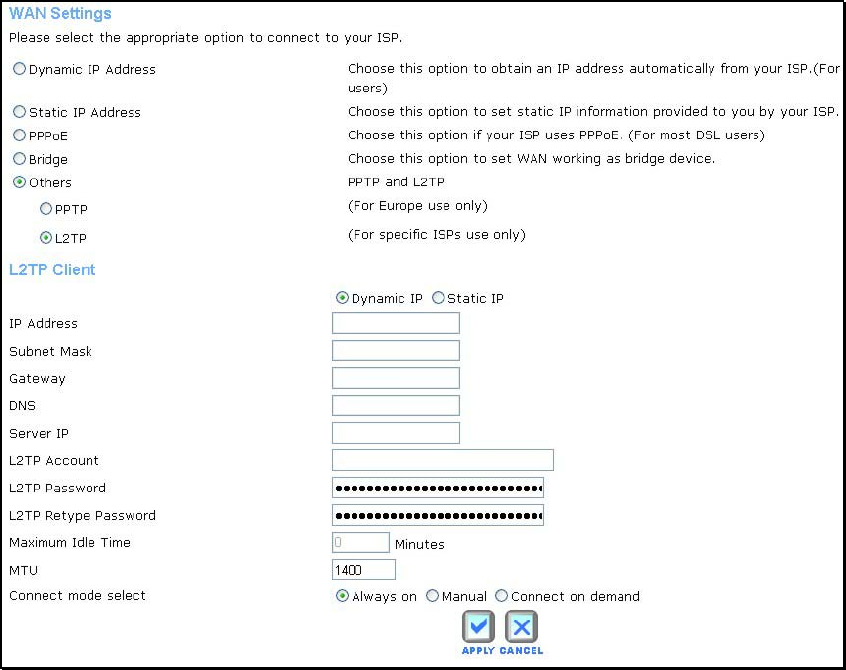
L2TP Connection
If your ISP is using L2TP to provide your Internet connection, the ISP will give you the necessary
information to configure the router.
There are two ways to enable the router to become a L2TP client, one is through assigning the
router an IP address dynamically, which means that the DHCP protocol will be implemented by
the router to automatically configure the IP settings. The user may input the IP settings manually
by choosing the Static IP option above the configuring area.
L2TP Internet Connection configuration menu

LinkTek WL11N Wireless Broadband Router User Guide 45
Configure the L2TP connection and click the Apply button to put the new settings into effect.
See the table below for a description of the parameters configured for the connection.
L2tP Parameters Description
IP Address Type the IP address supplied by your ISP.
Subnet Mask Type the Subnet mask supplied by your ISP.
Gateway The gateway IP address is used provide access to resources outside your IP Subnet or
ISP’s network. Type the gateway IP address given to you by your ISP.
DNS This entry is for the IP address of your primary domain name server, which should also
be provided to you by your ISP.
Server IP/Name Enter the Server IP address for this protocol into this field. This is the IP address of the
server computer that will be used, along with your computer, to create the Virtual
Private Network. This field must be completed for both the Dynamic IP and Static IP
options
L2TP Account Enter the L2TP account name, provided to you by your ISP, here.
L2TP Password Enter your password for this L2TP account here, as stated to you by your ISP.
L2TP Confirm
Password
Retype the password entered in the L2TP Password field.
Maximum Idle
Time
A value of 0 in this field means that the L2TP connection will remain connected. If your
network account is billed according to the amount of time the router is actually
connected to the Internet, enter an appropriate Idle Time value (in seconds). This will
disconnect the router after the WAN connection has been idle for the amount of time
specified. The default value = 5.
MTU This field refers to the Maximum Transfer Unit, which is the maximum size of a packet,
in bytes, that will be accepted by the router. The default setting is 1500 bytes. This
field should not be altered unless instructed by your ISP.
Connect Mode
Select
This function, with Connect-on-demand selected, will allow the router to connect any
workstation on your LAN to the Internet upon request. If this function is set at Always-
on, no request from the workstation will be needed to connect to the Internet. If
Manual is selected, it will be necessary for the workstation on the LAN to manually
connect to the Internet through this router.
LinkTek WL11N Wireless Broadband Router User Guide
46
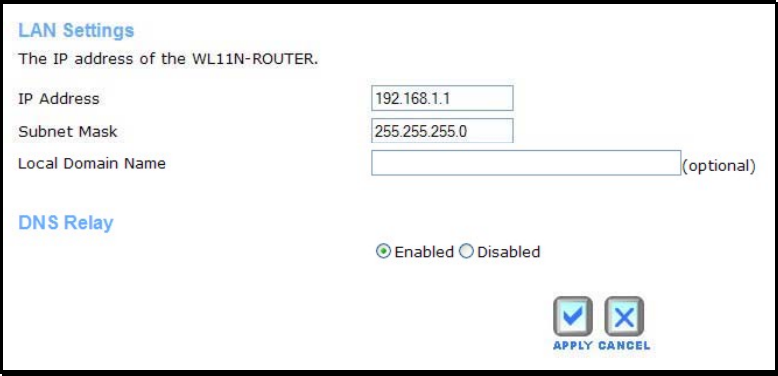
LAN
You can configure the LAN IP address to suit your preference. Many users will find it convenient
to use the default settings together with DHCP service to manage the IP settings for their private
network. The IP address of the router is the base address used for DHCP. In order to use the
router for DHCP on your LAN, the IP address pool used for DHCP must be compatible with the
IP address of the router. The IP addresses available in the DHCP IP address pool will change
automatically if you change the IP address of the router. See the next section for information on
DHCP setup.
To access the LAN IP menu, click the LAN link in the Home directory.
LAN Settings – Router IP address menu
To change the LAN IP Address or Subnet Mask, type in the desired values and click the Apply
button. Your web browser should automatically be redirected to the new IP address. You will
asked to login again to the router’s web manager.
This IP address is private to your internal network and cannot be seen on the Internet. The
default IP Address is 192.168.1.1 and the Subnet Mask is 255.255.255.0.
In addition, the router can be configured to relay DNS from your ISP or another available service
to workstations on your LAN. When DNS Relay is Enabled, the router will accept DNS requests
from hosts on the LAN and forward them to the ISP (or alternative) DNS servers. Alternatively,
you may also disable the DNS relay and configure hosts on your LAN to use DNS servers
directly. Most users who are using the router for DHCP service on the LAN and are using DNS
servers on the ISP’s network, will leave DNS relay enabled.

LinkTek WL11N Wireless Broadband Router User Guide 47
DHCP
The DHCP server is enabled by default for the router’s Ethernet LAN interface. DHCP service
will supply IP settings to workstations configured to automatically obtain IP settings that are
connected to the router though the Ethernet port. When the router is used for DHCP it becomes
the default gateway for DHCP client connected to it. The IP address pool can be up to 253 IP
addresses and must be in the subnet of the router’s IP address. The default IP address pool
uses 100 IP addresses in the 192.168.1.100 – 192.168.1.199 range.
DHCP Server for LAN Settings menu
To display the DHCP Server menu, click the DHCP link in the Home directory. Any active DHCP
clients appear in the DHCP Clients List with their IP address and MAC address listed.
The options for DHCP service are as follows:
Use the router as a DHCP server for your LAN. (DHCP Server Enabled)
Disable DHCP service and manually configure IP settings for workstations.
Select Static IP Addresses in the subnet for specified devices that do not age out - this
can be used in combination with normal DHCP service.
LinkTek WL11N Wireless Broadband Router User Guide
48
Use the Router for DHCP
To use the built-in DHCP server, click to select the DHCP Server Enabled option if it is not
already selected. The IP Address Pool settings can be adjusted. The Start IP address is the
lowest available IP address (default = 192.168.1.100). If you change the IP address of the router
this will change automatically to be 1 more that the IP address of the router.
The End IP address is the highest IP address number in the pool. Type in the Lease Time in the
entry field provided. This is the amount of time in seconds that a workstation is allowed to
reserve an IP address in the pool if the workstation is disconnected from the network or powered
off.
Disable the DHCP Server
To disable DHCP, click to select the Disabled option and click on the Apply button. Choosing
this option requires that workstations on the local network must be configured manually or use
another DHCP server to obtain IP settings.
If you configure IP settings manually, make sure to use IP addresses in the subnet of the router.
You will need to use the router’s IP address as the Default Gateway for the workstation in order
to provide Internet access.
Static IP Address with DHCP
If the router has the DHCP server enabled it is possible to permanently assign IP addresses to
workstations specified by their MAC address. Up to five IP addresses may be assigned to five
different devices. This will take the chosen IP address used out of the available addresses in the
dynamic IP address pool and give a permanent lease time for the IP address to the selected
device.
To assign an IP address that will not age out, type in the MAC Address of the device and its
static IP Address in the spaces provided. Use the format: 00-00-00-00-00-00 for the MAC
address and the standard format: 192.168.1.xxx for the IP address. A Static DHCP Client List
will appear below the DHCP Client list with any clients that have been configured for static IP
address assignment.
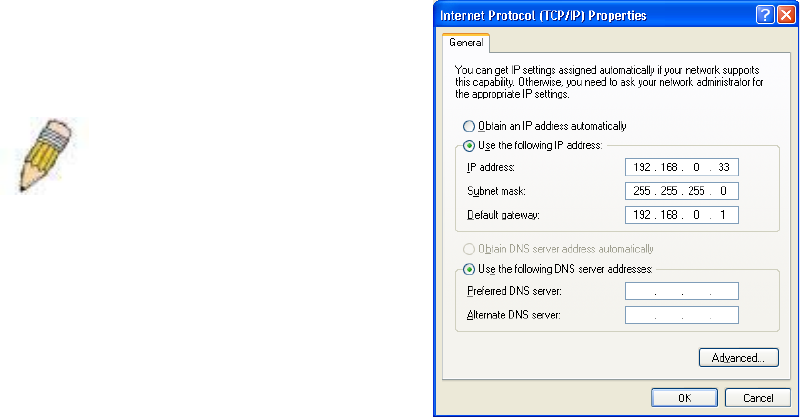
NOTE: To manually configure IP
settings on Windows workstations,
open the TCP/IP Properties menu
and select the “Use the following IP
address” option. You will need to
supply the computer IP address,
Subnet mask and Default gateway
(usually the IP address of router).
LinkTek WL11N Wireless Broadband Router User Guide 49
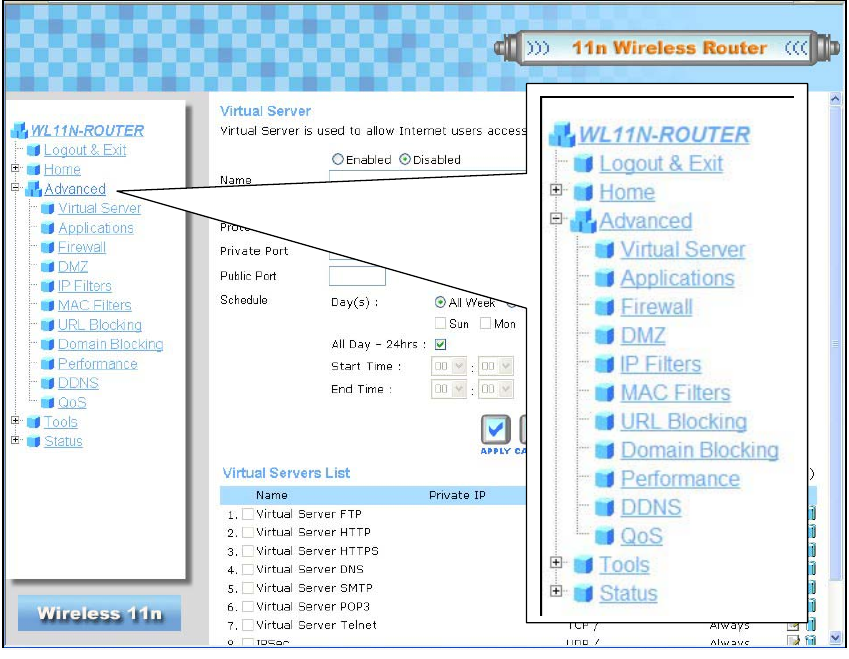
Advanced Directory Menus
This section introduces and describes the management features that have not been presented in
the previous chapter. These include the more advanced features used for network management
and security as well as administrative tools to manage the router, view statistics and other
information used to examine performance and for troubleshooting.
Advanced Directory menus
Use your mouse to click the parent directory links and menu links in order to display the various
configuration and read-only windows discussed below.
LinkTek WL11N Wireless Broadband Router User Guide
50
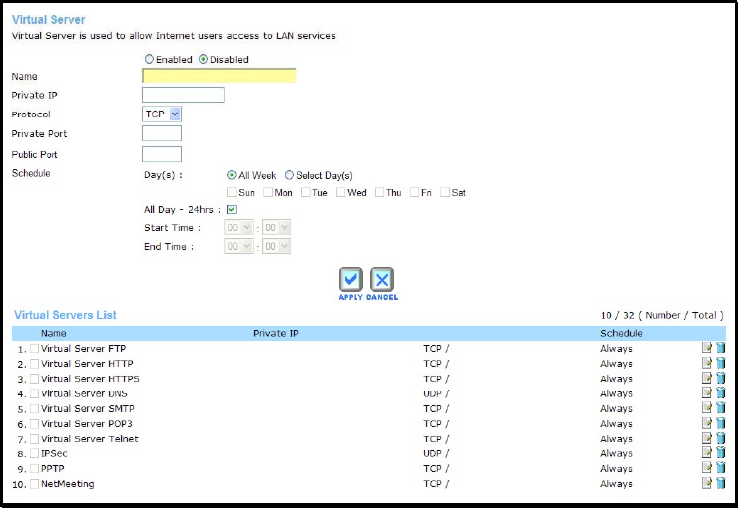
Virtual Server
Use the Virtual Server menu to set up static port forwarding rules applied to inbound (WAN-to-
LAN) traffic. The Virtual Server function allows remote users to access services on your LAN
such as FTP for file transfers or SMTP and POP3 for e-mail. The router will accept remote
requests for these services at your Global IP Address, using the specified TCP or UDP protocol
and port number, and then redirect these requests to the server on your LAN with the LAN IP
address you specify. Remember that the specified Private IP Address must be within the
useable range of the subnet occupied by the router. Port redirection can also be used to direct
potentially hazardous packets to a proxy server outside your firewall. For example, you can
configure the router to direct HTTP packets to a designated HTTP server in the DMZ.
Virtual Server menu
To configure a new port-forwarding rule, follow these steps:
1. Click on the Enabled option for Virtual Server.
2. Type a
Name for the rule being created.
3. Type the
Private IP address of the server or station on the LAN used for the rule.
4. Select the Protocol used for the rule, TCP, UDP or Both.
5. Type the
Private Port number used for the redirection and Public Port number normally
used for the service.
6. Choose an available
Schedule for the rule to be applied. Schedules can be created
using the Schedule menu in the Tools directory.
7. Click the
Apply button to put the rule into effect. The newly created forwarding rule
appears listed in the Virtual Server List.
To modify an existing rule, click on the notepad icon in the last column of the Virtual Server List.
To remove a rule, click the X to delete it.

LinkTek WL11N Wireless Broadband Router User Guide 51
Applications
Use the Applications menu to set up triggered port forwarding rules applied to inbound (WAN-
to-LAN) traffic. Triggered ports are used for applications that require multiple ports. Examples of
multiple port applications are peer-to-peer file sharing, instant messaging or video conferencing.
Applications menu
To configure a new application triggered port forwarding rule, follow these steps:
1. Click on the Enabled option for Special Application.
2. Type a
Name for the rule being created.
3. Type the Trigger Port or port range used for the rule.
4. Select the
Trigger Type used for the rule, TCP, UDP or Both.
5. Type the Public Port number normally used for the application.
6. Select the
Public Type used for the rule, TCP, UDP or Both.
7. Choose an available
Schedule for the rule to be applied. Schedules can be created
using the Schedule menu in the Tools directory.
8. Click the
Apply button to put the rule into effect. The newly created forwarding rule
appears listed in the Special Applications List.
To modify an existing rule, click on the notepad icon in the last column of the Special
Applications List. To remove a rule, click the X to delete it.

LinkTek WL11N Wireless Broadband Router User Guide
52
Firewall
Firewall rules in the router are put in place to allow or block specified traffic. The rules are based
on IP address and TCP/UDP port.
Firewall menu
Configure the filter rules as desired and click the Apply button to create the rule. The newly
created rule appears listed in the Firewall Rule List.
To configure a new application triggered port forwarding rule, follow these steps:
1. Click on the Enabled option for Firewall Rules.
2. Type a
Name for the rule being created.
3. Choose the
Action to be applied, Allow or Deny (block) the traffic to pass through.
4. For the
Source interface of the traffic, choose LAN, WAN or Any and type an IP address
range to which to action specified in the rule.
5. For the Destination interface of the traffic, choose LAN, WAN or Any and type an IP
address range to which to action specified in the rule. There is an option to specify the
protocol, Any, TCP, UDP or ICMP. For TCP and UDP traffic, a port or port range must be
specified.
6. Choose an available
Schedule for the rule to be applied. Schedules can be created
using the Schedule menu in the Tools directory.
7. Click the
Apply button to put the rule into effect. The newly created forwarding rule
appears listed in the Firewall Rules List.
To modify an existing rule, click on the notepad icon in the last column of the Firewall Rules List.
To remove a rule, click the X to delete it.
LinkTek WL11N Wireless Broadband Router User Guide 53
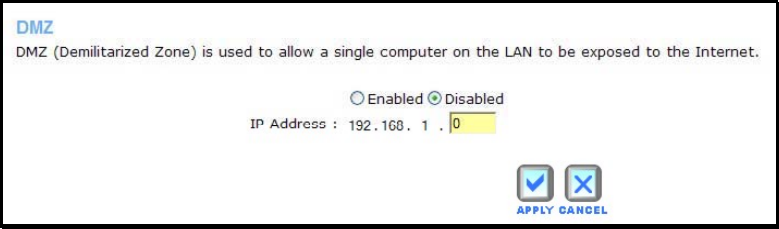
DMZ
Since some applications are not compatible with NAT, the router supports use of a DMZ IP
address for a single host on the LAN. This IP address is not protected by NAT and will therefore
be visible to agents on the Internet with the right type of software. Keep in mind that any client
PC in the DMZ will be exposed to various types of security risks. If you use the DMZ, take
measures (such as client-based virus protection) to protect the remaining client PCs on your
LAN from possible contamination through the DMZ.
DMZ menu
To designate a DMZ IP address, select the Enabled radio button, type in the IP Address of the
server or device on your LAN, and click the Apply button. To remove DMZ status from the
designated IP address, select the Disabled radio button and click Apply. It will be necessary to
save the settings and reboot the router before the DMZ is activated.

LinkTek WL11N Wireless Broadband Router User Guide
54
IP Filters
This menu allows the user to allow or deny LAN IP addresses access to the Internet. Rules are
based on IP address and TCP/UDP port.
IP Filters menu
Configure the filter rules as desired and click the Apply button to create the rule. The newly
created rule appears listed in the IP Filters List.
To configure a new MAC Filter rule, follow these steps:
1. Click on the Enabled option for IP Filters.
2. Type a Name for the rule being created.
3. Type the
IP Range of address to which the rule applies.
4. (Optional) Select the Protocol used for the rule, TCP, UDP or Both, and type the Port or
port range to which the rule is applied.
5. Choose an available
Schedule for the rule to be applied. Schedules can be created
using the Schedule menu in the Tools directory.
6. Click the
Apply button to put the rule into effect. The newly created IP filter rule appears
listed in the IP Filters List.
To modify an existing rule, click on the notepad icon in the last column of the Firewall Rules List.
To remove a rule, click the X to delete it.
LinkTek WL11N Wireless Broadband Router User Guide 55
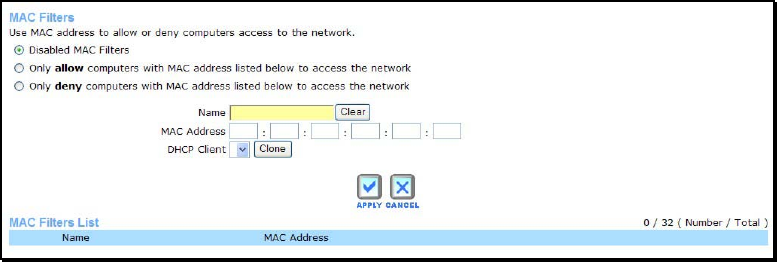
MAC Filters
MAC filters are used to block or allow network access. This is a common method of restricting
access to wireless networks and can be done for security or to improve network efficiency. The
rules are configured for individual devices based on MAC address.
MAC Filters menu
Configure the MAC filter rules as desired and click the Apply button to create the rule. The
newly created rule appears listed in the MAC Filters List.
To configure a new IP Filter rule, follow these steps:
1. Click on the option for Set MAC Filters to allow or deny access to the MAC filters on the
list.
2. Type a
Name for the rule being created.
3. Type the
MAC Address to which the rule applies or select an active client from the
DHCP Client pull-down menu and click on the Clone button to select that client, the
MAC address will appear.
4. Choose an available
Schedule for the rule to be applied. Schedules can be created
using the Schedule menu in the Tools directory.
5. Click the
Apply button to put the rule into effect. The newly created MAC filter rule
appears listed in the MAC Filters List.
To modify an existing rule, click on the notepad icon in the last column of the MAC Rules List. To
remove a rule, click the X to delete it.
LinkTek WL11N Wireless Broadband Router User Guide
56
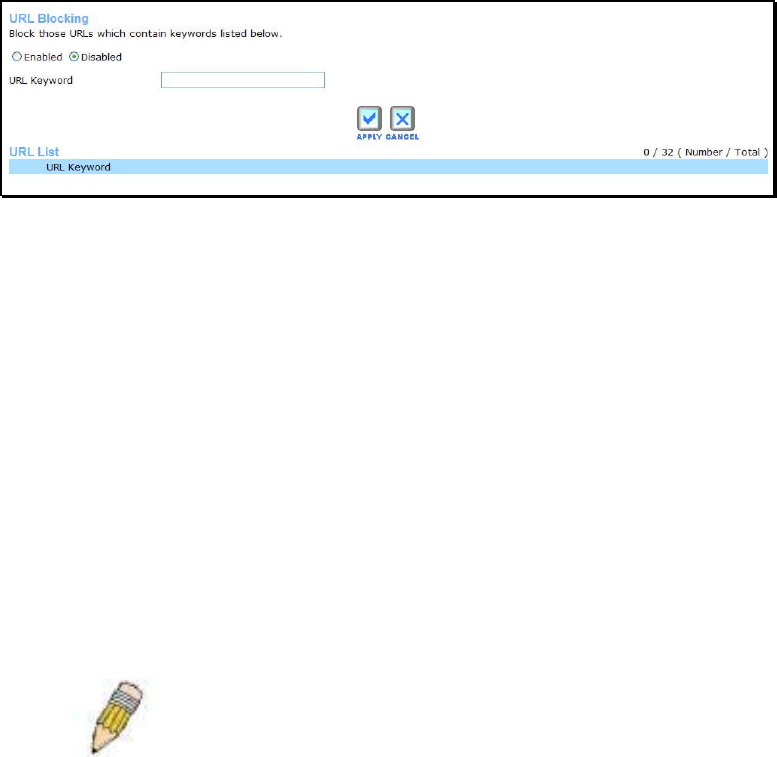
URL Blocking
URL blocks are used to block or allow access to specific websites. Enter the URLs in the URL
Keyword field and click the Apply button to add the URL to the URL Blocking List.
URL Blocking menu
Configure the URL blocking rules as desired and click the Apply button to create the rule. The
newly created rule appears listed in the URL Blocking List.
To configure a new URL blocking rule, follow these steps:
1. Click on the option for Set URL Blocking Action to allow or deny access to the URL
being added to the list.
2. Type a
Name for the rule being created.
3. Type the URL Keyword to which the filter is applied.
4. Choose an available
Schedule for the rule to be applied. Schedules can be created
using the Schedule menu in the Tools directory.
5. Click the
Apply button to put the rule into effect. The newly created URL blocking rule
appears listed in the URL Blocking List.
To modify an existing rule, click on the notepad icon in the last column of the URL Blocking List.
To remove a rule, click the X to delete it.
NOTE: The URL keyword blocking is applied to all forms of the word whether or not it
appears separated in the URL. For example, blocking any URL with the word “sex” would
block a URL with “sex” as part of it, so websites with “essex” or “sextant” in the URL
would be blocked.
LinkTek WL11N Wireless Broadband Router User Guide 57
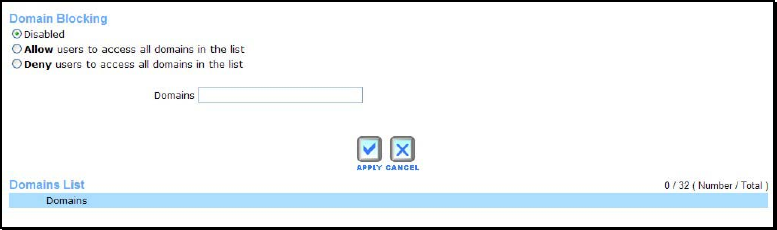
Domain Blocking
Domain blocks are used to block or allow access to specific domains including all web pages
contained in the domain.
Domain Blocking menu
Configure the Domain blocking rules as desired and click the Apply button to create the rule.
The newly created rule appears listed in the Domain Blocking List.
To configure a new Domain blocking rule, follow these steps:
1. Click on the option for Set Domain Blocking Action to allow or deny access to the
Domain being added to the list.
2. Type a
Name for the rule being created.
3. Type the
Domain to which the filter is applied.
4. Choose an available
Schedule for the rule to be applied. Schedules can be created
using the Schedule menu in the Tools directory.
5. Click the Apply button to put the rule into effect. The newly created domain blocking rule
appears listed in the Domain Blocking List.
To modify an existing rule, click on the notepad icon in the last column of the Domain Blocking
List. To remove a rule, click the X to delete it.
LinkTek WL11N Wireless Broadband Router User Guide
58
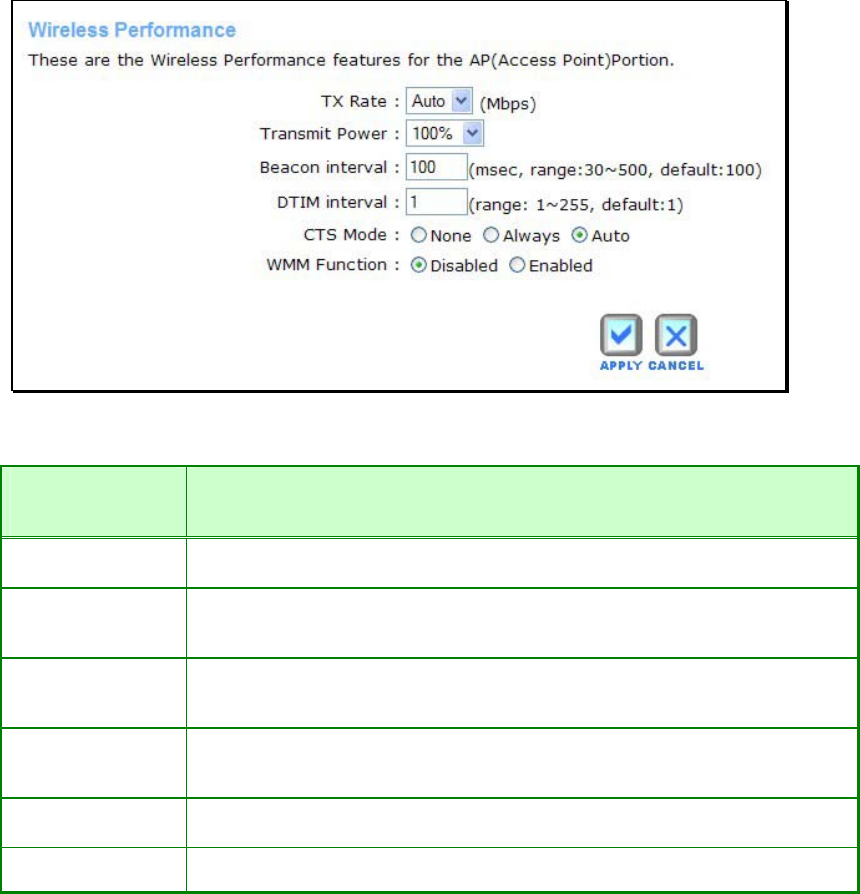
Wireless Performance
The Wireless Performance menu is used to configure settings for the Wireless Broadband
Router’s access point. Configuring these settings may improve the performance but if you are
not familiar with them, leave them at the default settings. Click Apply when you have completed
your changes.
Wireless Performance menu
See the table below for a description of Wireless Performance menu parameters.
Performance
Parameter
Description
Tx Rate A pull-down menu for selecting the transmitting rate: Auto, 1, 2, 5.5, 6, 9, 11, 12, 18,
24, 36, 48, and 54.
Transmit Power
Allows the user to adjust the transmit power of the router. A high transmit power
allows a greater area range of accessibility to the router. When multiple overlapping
access points are present, it may be desirable to reduce transmission power.
Beacon Interval
Beacons are emitted from the router in order to synchronize the wireless network. You
may set the Beacon Interval range between 20-100 microseconds per beacon sent.
The default is 100.
DTIM Interval
DTIM (Delivery Traffic Indication Message) Period is a countdown informing clients of
the next window for listening to broadcast and multicast messages. The default
setting is 3.
CTS Mode The Clear To Send mode is designed to minimize collisions among wireles devices.
Most users will want to keep the default setting of Auto.
WMM Function Enable or disable the Wireless MultiMedia function.
LinkTek WL11N Wireless Broadband Router User Guide 59
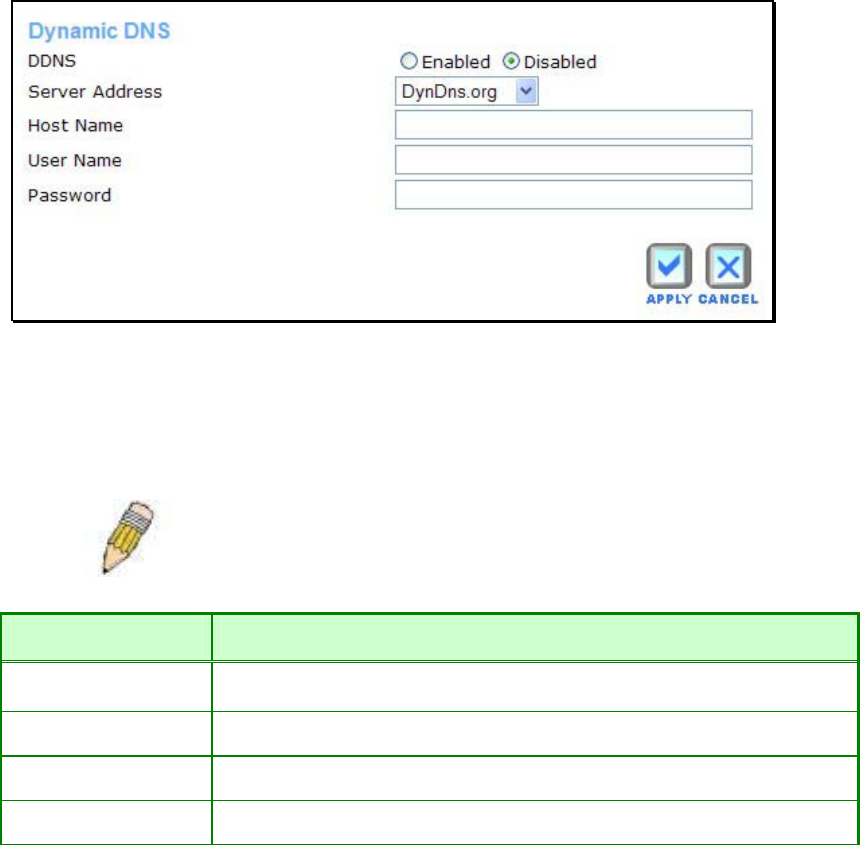
Dynamic DNS
The Wireless Broadband Router supports DDNS (Dynamic Domain Name Service). The
Dynamic DNS service allows a dynamic public IP address to be associated with a static host
name in any of the many domains, allowing access to a specified host from various locations on
the Internet. This is enabled to allow remote access to a host by clicking a hyper linked URL in
the form hostname.dyndns.org, Many ISPs assign public IP addresses using DHCP, and this
can make it difficult to locate a specific host on the LAN using standard DNS. If for example you
are running a public web server or VPN server on your LAN, this ensures that the host can be
located from the Internet if the public IP address changes. DDNS requires that an account be
setup with one of the supported DDNS providers.
Dynamic DNS Configuration menu
Please note that DDNS requires that an account be setup with one of the supported DDNS
servers prior to engaging it on the router. This function will not work without an accepted account
with a DDNS server. Enter the required DDNS information and click Apply to set this information
in the router.
NOTE: DDNS requires that an account be setup with one of the supported DDNS servers
prior to engaging it on the router. This function will not work without an accepted account
with a DDNS server.
DDNS Parameters Description
Server Address Select one of the DDNS registration organizations form those listed in the pull-
down menu. Available servers include DynDns.org and No-IP.com.
Host Name Enter the host name of the DDNS server.
Username Enter the username given to you by your DDNS server.
Password Enter the password or key given to you by your DDNS server
LinkTek WL11N Wireless Broadband Router User Guide
60
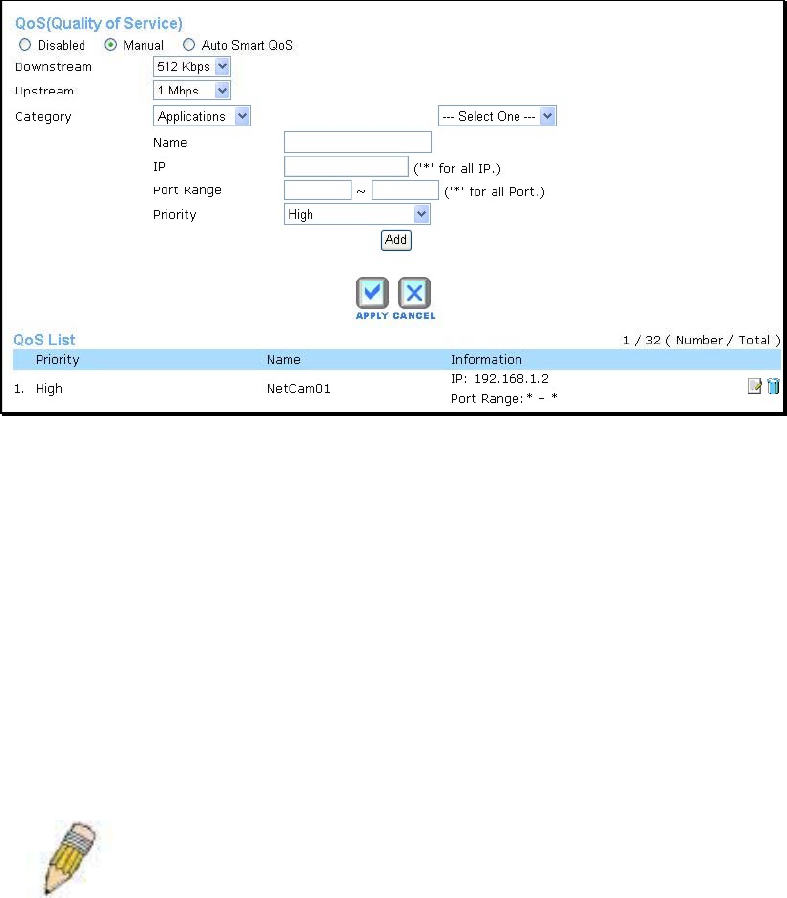
QoS
QoS or Quality of Service is used to assign priority for qualified traffic that passes through the
Router. The QoS menu includes options for applications that optimizing QoS settings for the
ports relevant to common applications such as Skype or online gaming. The QoS menu also
allows customized bandwidth settings (upstream/downstream) for specific devices.
QoS menu
QoS is disabled by default. To use QoS, first enable it by selecting the Manual or Auto Smart
QoS option. Choosing the Auto Smart QoS option does not require any additional configuration.
It will automatically optimize QoS according to the type of data stream. Choose the Auto Smart
QoS option on traffic diverse networks that already support QoS priority in other devices such a
managed switches. You might also try the Auto Smart option and test various applications for
performance, then if necessary enter QoS settings manually. Use the Manual option if you want
to specify bandwidth for a devices or devices on the network. Bandwidth settings can also be
configured using the Auto Smart option, the bandwidth settings will be applied globally and not to
any specific device (IP address).
To configure a individual IP address for a pre-configured (from the list) application QoS, choose
the online game or application first to place the port and priority values in the entry fields, then
change the Category to Customized to specify the IP address.
See the table below for a description of the QoS menu parameters.
NOTE: Be aware that changing QoS settings can enhance the performance of specific
applications at the expense of other applications. Monitoring network performance is a good
idea following changes to QoS settings on networks with high traffic volume or diverse network
applications, to determine if the new QoS settings are affecting other applications.

LinkTek WL11N Wireless Broadband Router User Guide 61
QoS Description
QoS
enable/disable
Disabled by default. To enable QoS, choose the Auto Smart QoS option or the Manual
option to specify QoS settings by application or for specified IP addresses.
Downstream
Downstream bandwidth can be configured with a maximum allowed speed ranging
from 64 Kbps to 80 Mbps. For Manually configured QoS, the bandwidth restriction
applies to the application or IP address being configured. For Auto Smart QoS, the
bandwidth restriction is global.
Upstream
Upstream bandwidth can be configured with a maximum allowed speed ranging from
64 Kbps to 80 Mbps. For Manually configured QoS, the bandwidth restriction applies to
the application or IP address being configured. For Auto Smart QoS, the bandwidth
restriction is global.
Category
For manual QoS configuration, choose Applications,Online Game or Customized
options. Applications or online games can then be selected from the drop-down menu.
The pre-configured QoS applications include: web browser, MSN Messenger, Skype
and Yahoo Message. The online games include: Counter Strike, Half Life, World of
Warcraft, Quake I & II and Diablo. You can choose an application first to enter the
parameters automatically, then choose the Customized option to specify an IP
address.
Name For Customized QoS configuration enter, the name of the device for which the QoS
settings will apply.
IP For Customized QoS configuration enter, the IP address of the device for which the
QoS settings will apply. Enter an asterisk (*) to apply to all IP addresses.
Port For Customized QoS configuration enter, the port or port range used for the
application. Enter an asterisk (*) to apply to all ports.
Priority Select the QoS priority used for the application being configured. The options in order
from lowest priority to highest are Low, Normal, Medium and High.
LinkTek WL11N Wireless Broadband Router User Guide
62

LinkTek WL11N Wireless Broadband Router User Guide 63
Tools
Click the Tools directory link to reveal the menu links for various functions located in this
directory. The Administrator Settings window is the first item in the Tools directory. This
window is used to change the system password used to access the web manager, to save or
load router configuration settings and to restore default settings. The functions in this and the
other Tools menus are described below.
Tools Directory menus
Change System Password
Under the Administrator heading, type the New Password and Confirm Password to be certain
you have typed it correctly. Click the Apply button to activate the new password. The System
User Name remains “admin”, this cannot be changed using the web manager interface. Be sure
to save the new setting.
Remote Web Access
The Administrator Settings window is also used to enable remote management access to the
router. To enable remote management of the router, select the Enabled radio button and type
the IP Address of the remote network used for management. Click the Apply button to activate
remote management from the chosen IP address.
LinkTek WL11N Wireless Broadband Router User Guide
64
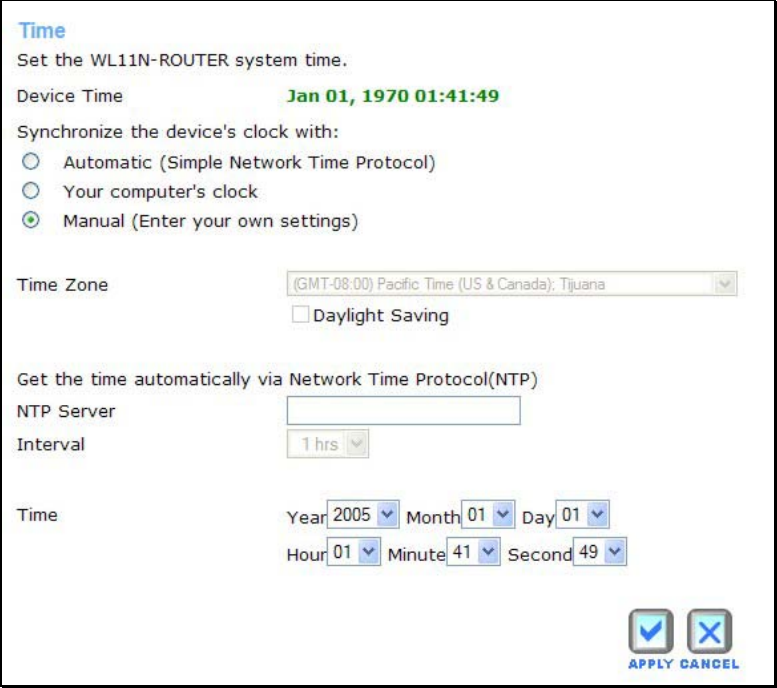
Time
The router provides a number of options to maintain current date and time including SNTP.
Time settings menu
To configure system time on the router, select the method used to maintain time. The options
available include SNTP, using your computer’s system clock or set the time and date manually.
If you opt to use SNTP, you must enter the SNTP server URL or IP address. Click the Apply
button to set the system time.
LinkTek WL11N Wireless Broadband Router User Guide 65
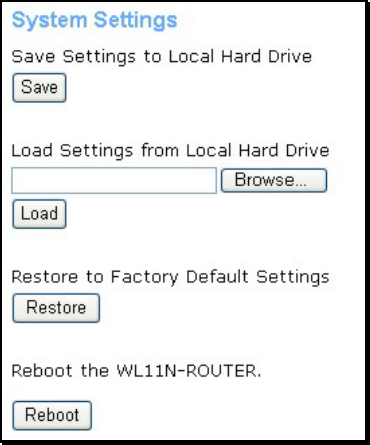
System
Once you have configured the router to your satisfaction, it is a good idea to back up the
configuration file to your computer. To save the current configuration settings to your computer,
click the System button in the Tools directory to display the System Management menu. Click
the Save button to Save Settings to Local Hard Drive. You will be prompted to select a location
on your computer to put the file. The file type is .xml (HTML) and may be named anything you
wish.
System Settings menu
Save or Load Configuration File
To load a previously saved configuration file, click the Browse button and locate the file on your
computer. Click the Restore button to Load Settings From Local Hard Drive. Confirm that you
want to load the file when prompted and the process is completed automatically. The router will
reboot and begin operating with the configuration settings that have just been loaded.
Reset to Factory Default Settings
To reset the router to its factory default settings, click the Reset button. You will be prompted to
confirm your decision to reset the router. The router will reboot with the factory default settings
including IP settings (192.168.1.1) and Administrator password (admin).
To simply restart the router, click the Reboot button.
LinkTek WL11N Wireless Broadband Router User Guide
66
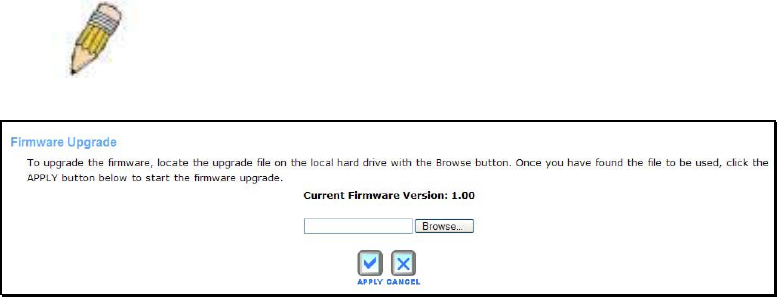
Firmware
Use the Firmware Upload menu to load the latest firmware for the device. Note that the device
configuration settings may return to the factory default settings, so make sure you save the
configuration settings with the System Settings menu described above.
NOTE: Performing a Firmware Upgrade can sometimes change the configuration settings.
Be sure to back-up the router’s configuration settings before upgrading the firmware.
Firmware Upgrade
To upgrade firmware, type in the name and path of the file or click on the Browse button to
search for the file. Click the Apply button to begin copying the file. The file will load and restart
the router automatically. Do not turn off the power while the router is upgrading the firmware.
LinkTek WL11N Wireless Broadband Router User Guide 67
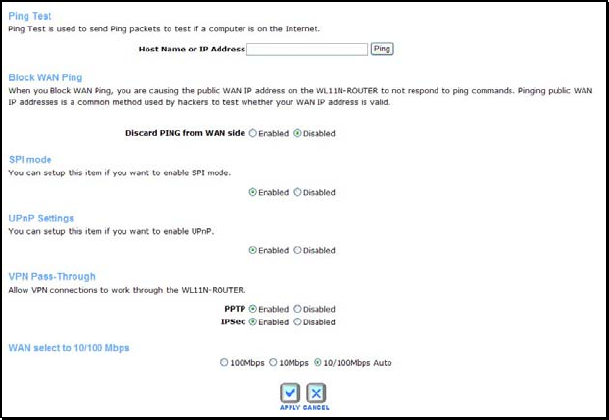
Miscellaneous
To perform a statndard Ping test for network connectivity, click the Misc. window button in the
Tools directory to view the Miscellaneous Configuration window.
Miscellaneous Configuration menu
Ping Test
The Ping test functions on the WAN and LAN interfaces. Type the Host Name or IPAddress
you want to check in the space provided and click the Ping button. Read the Ping test result in
the space immediately below
Block WAN Ping
The Block WAN Ping feature allows the user to block hackers who may be trying to test whether
your WAN IP address is valid.
SPI mode
Stateful Packet Inspection mode is an active firewall the user can enable to keep track of the
state of network connections.
UPnP Settings
UPnP supports zero-configuration networking and automatic discovery for many types of
networked devices. When enabled, it allows other devices that support UPnP to dynamically join
a network, obtain an IP address, convey its capabilities, and learn about the presence and
capabilities of other devices. DHCP and DNS service can also be used if available on the
network. UPnP also allows supported devices to leave a network automatically without adverse
effects to the device or other devices on the network. UPnP is a protocol supported by diverse
networking media including Ethernet, Firewire, phone line, and power line networking.
VPN Pass-Through
This feature allows VPN connections to pass through the router. It is enabled by default.
LinkTek WL11N Wireless Broadband Router User Guide
68
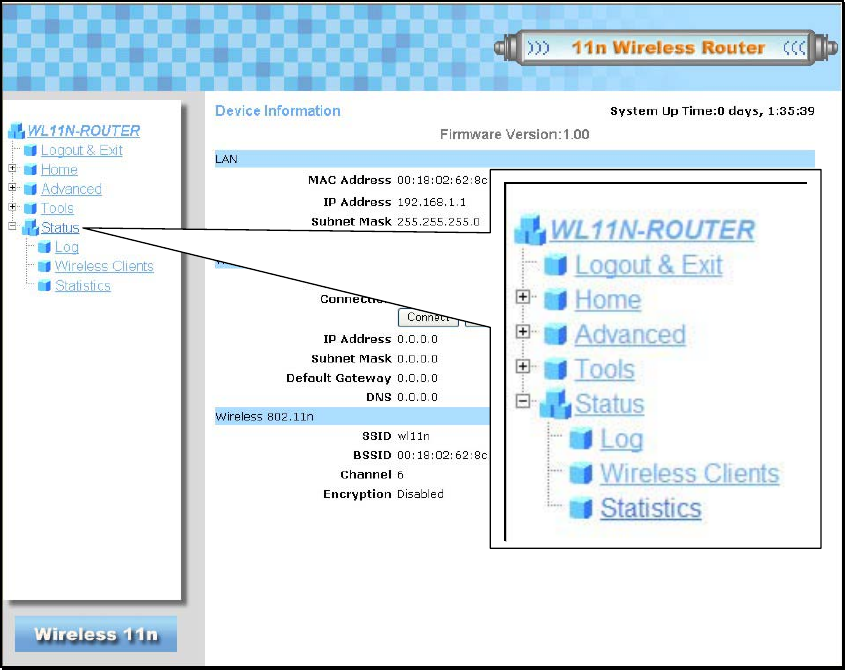
Status
Use these display menus to view system information and monitor performance. Click the Status
directory link to reveal the menu links for various functions located in this directory. The Device
Information display is the first item in the Status directory.
Status Directory menus
LinkTek WL11N Wireless Broadband Router User Guide 69
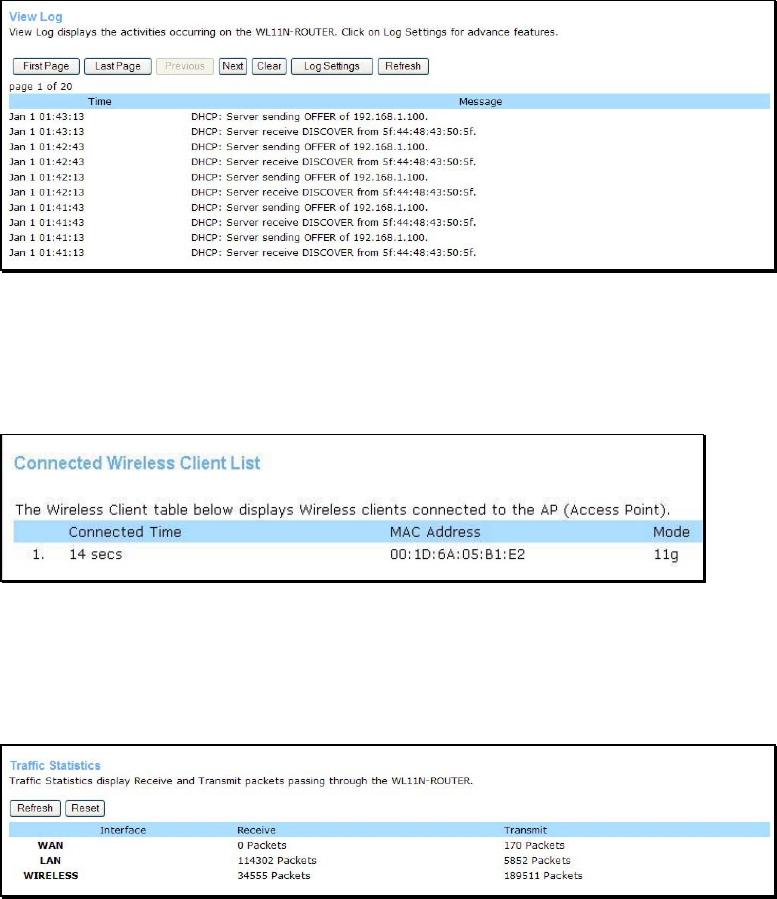
Log
The system log displays chronological event log data. Use the navigation buttons to view or
scroll log pages.
View Log menu
Use the Set Log Options menu arrange for email alerts from the log.
Wireless Clients
This window displays all the wireless clients currently connected to the acess point.
Wireless Client List display menu
Statistics
Use this window to monitor traffic on the WAN, LAN, and Wireless connections.
Traffic Statistics
Click Refresh to view updated traffic information. Click Reset to return packets counts to zero.

LinkTek WL11N Wireless Broadband Router User Guide
70
Technical Specifications
Power Adapter: Output: 5V DC, 3A
Standards: IEEE 802.11b
IEEE 802.11g
IEEE 802.11n
IEEE 802.3
IEEE 802.3u
Management Web-based
LED WPS
Blinks blue for 120 seconds while searching for WPS enabled station.
LAN
Steady green light for valid link, blinks when for activity.
WLAN
Steady green light for valid link, blinks when for activity.
WAN
Steady green light for valid link, blinks when for activity.
Status
Blinks green when system function is normal.
Power
Steady green when powered on.
Operating
Temperature 0ºC to 40ºC (32ºF to 104ºF)
Humidity 10% to 95% non-condensing
Dimensions 200 mm x 120 mm x 34 mm
Weight 320 gm
Certifications EMI: FCC Class B, CE Class B

LinkTek WL11N Wireless Broadband Router User Guide 71
Modulation IEEE 802.11b: DQPSK, DBPSK, DSSS, and CCK
IEEE 802.11g: BPSK, QPSK, 16QAM, 64QAM, OFDM
IEEE 802.11n: BPSK, QPSK, 16QAM, 64QAM with OFDM
Frequency 2400 ~ 2484.5MHz ISM band
Channels 11 channels for United States
13 channels for European Countries
13 channels for Japan
Operating Range Indoors – up to 328 feet (100 meters)
Outdoors – up to 1312 feet (400 meters)
Transmit Power 11g: 14dBm Typical
11b: 17dBm Typical
Media Access Protocol CSMA/CA with ACK
WEP 64/128 bits
Wireless Certification Wi-Fi WPA
Antenna type 2.0 dpi external dipole

LinkTek WL11N Wireless Broadband Router User Guide
72
Configuring IP Settings on Your Computer
In order to configure your system to receive IP settings from the router it must first have the
TCP/IP protocol installed. If you have an Ethernet port on your computer, it probably already has
TCP/IP protocol installed. If you are using Windows XP the TCP/IP is enabled by default for
standard installations. Below is an illustrated example of how to configure a Windows XP system
to automatically obtain IP settings from the router. Following this example is a step-by-step
description of the procedures used on the other Windows operating systems to first check if the
TCP/IP protocol has been installed; if it is not, instructions are provided for installing it. Once the
protocol has been installed you can configure the system to receive IP settings from the router.
For computers running non-Windows operating systems, follow the instructions for your OS that
configure the system to receive an IP address from the router, that is, configure the system to be
a DHCP client.
NOTE: If you are using this router to provide Internet access for more than one computer, you can
use these instructions later to change the IP settings for the other computers. However, you
cannot use the same IP address since every computer must have its own IP address that is
unique on the local network.

LinkTek WL11N Wireless Broadband Router User Guide 73
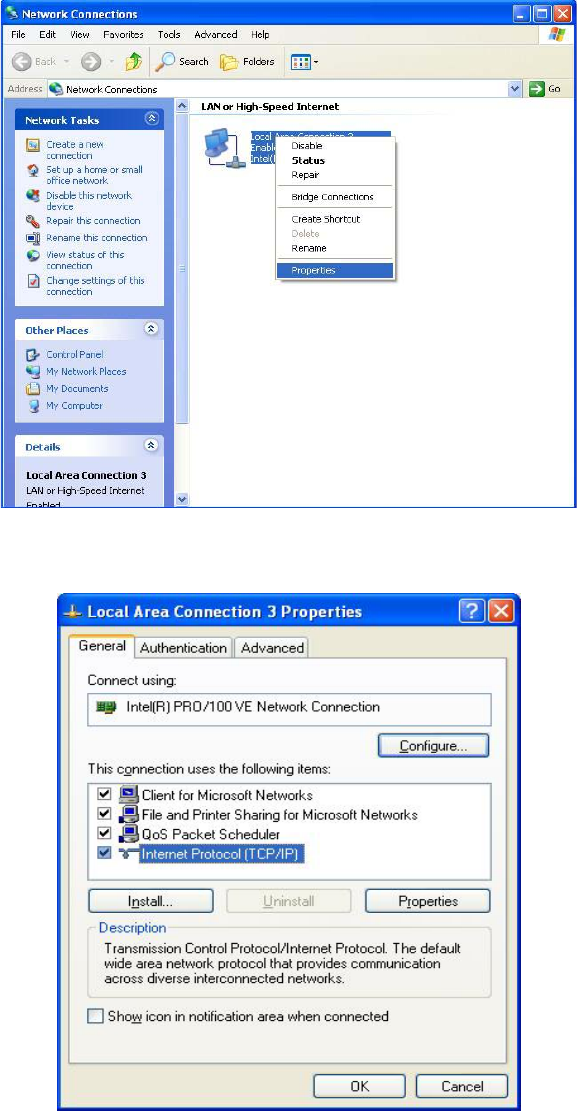
Configure Windows XP for DHCP
Use the following steps to configure a computer running Windows XP to be a DHCP client.
1. From the
Start menu on your desktop, go to Settings, then click on Network
Connections.
2. In the
Network Connections window, right-click on LAN (Local Area Connection), then
click Properties.
LinkTek WL11N Wireless Broadband Router User Guide
74
3. In the
General tab of the Local Area Connection Properties menu, highlight Internet
Protocol (TCP/IP) under “This connection uses the following items:” by clicking on it
once. Click on the Properties button.
4. Select “Obtain an IP address automatically” by clicking once in the circle. Click the OK
button.
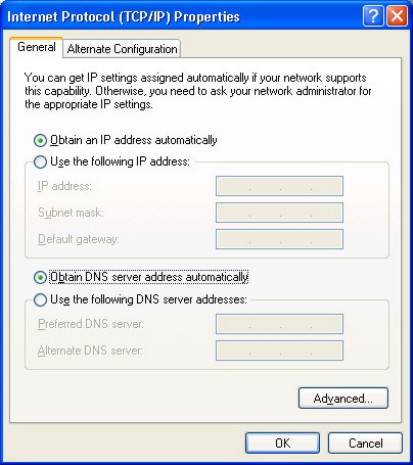
LinkTek WL11N Wireless Broadband Router User Guide 75
Your computer is now ready to use the router’s DHCP server.
LinkTek WL11N Wireless Broadband Router User Guide
76
Windows 2000
First, check for the IP protocol and, if necessary, install it:
1. In the
Windows task bar, click the Start button, point to Settings, and then click Control
Panel.
2. Double-click the
Network and Dial-up Connections icon.
3. In the
Network and Dial-up Connections window, right-click the Local Area
Connection icon, and then select Properties.
4. The
Local Area Connection Properties dialog box displays with a list of currently
installed network components. If the list includes Internet Protocol (TCP/IP), then the
protocol has already been enabled, skip ahead to Configure Windows 2000 for DHCP.
5. If Internet Protocol (TCP/IP) does not display as an installed component, click Install.
6. In the
Select Network Component Type dialog box, select Protocol, and then click
Add.
7. Select
Internet Protocol (TCP/IP) in the Network Protocols list, and then click OK.
8. You may be prompted to install files from your Windows 2000 installation CD or other
media. Follow the instructions to install the files.
9. If prompted, click OK to restart your computer with the new settings.
Configure Windows 2000 for DHCP
1. In the Control Panel, double-click the Network and Dial-up Connections icon.
2. In Network and Dial-up Connections window, right-click the Local Area Connection
icon, and then select Properties.
3. In the
Local Area Connection Properties dialog box, select Internet Protocol (TCP/IP),
and then click Properties.
4. In the
Internet Protocol (TCP/IP) Properties dialog box, click the button labeled Obtain
an IP address automatically.
5. Double-click
OK to confirm and save your changes, and then close the Control Panel.
Your computer is now ready to use the router’s DHCP server.
LinkTek WL11N Wireless Broadband Router User Guide 77
Windows 95 and Windows 98
First, check for the IP protocol and, if necessary, install it:
1. In the
Windows task bar, click the Start button, point to Settings, and then click Control
Panel. Double-click the Network icon.
2. The
Network dialog box displays with a list of currently installed network components. If
the list includes TCP/IP, and then the protocol has already been enabled, skip to
Configure IP Information Windows 95, 98.
3. If TCP/IP does not display as an installed component, click Add. The Select Network
Component Type dialog box displays.
4. Select
Protocol, and then click Add. The Select Network Protocol dialog box displays.
5. Click on
Microsoft in the Manufacturers list box, and then click TCP/IP in the Network
Protocols list box.
6. Click
OK to return to the Network dialog box, and then click OK again. You may be
prompted to install files from your Windows 95/98 installation CD. Follow the instructions
to install the files.
7. Click OK to restart the PC and complete the TCP/IP installation.
Configure Windows 95 and Windows 98 for DHCP
1. Open the
Control Panel window, and then click the Network icon.
2. Select the network component labeled TCP/IP, and then click Properties.
3. If you have multiple TCP/IP listings, select the listing associated with your network card
or adapter.
4. In the TCP/IP Properties dialog box, click the IP Address tab.
5. Click the
Obtain an IP address automatically option.
6. Double-click
OK to confirm and save your changes. You will be prompted to restart
Windows.
7. Click
Yes.
When it has restarted, your computer is ready to use the router’s DHCP server.
Windows ME
First, check for the IP protocol and, if necessary, install it:
1. In the
Windows task bar, click the Start button, point to Settings, and then click Control
Panel.
2. Double-click the
Network and Dial-up Connections icon.
3. In the
Network and Dial-up Connections window, right-click the Network icon, and
then select Properties.
4. The
Network Properties dialog box displays with a list of currently installed network
components. If the list includes Internet Protocol (TCP/IP), then the protocol has already
been enabled. Skip ahead to Configure Windows ME for DHCP.
5. If Internet Protocol (TCP/IP) does not display as an installed component, click Add.
6. In the
Select Network Component Type dialog box, select Protocol, and then click
Add.
7. Select
Microsoft in the Manufacturers box.
8. Select
Internet Protocol (TCP/IP) in the Network Protocols list, and then click OK.
LinkTek WL11N Wireless Broadband Router User Guide
78
9. You may be prompted to install files from your Windows Me installation CD or other
media. Follow the instructions to install the files.
10. If prompted, click OK to restart your computer with the new settings.
Configure Windows ME for DHCP
1. In the
Control Panel, double-click the Network and Dial-up Connections icon.
2. In the
Network and Dial-up Connections window, right-click the Network icon, and
then select Properties.
3. In the
Network Properties dialog box, select TCP/IP, and then click Properties.
4. In the
TCP/IP Settings dialog box, click the Obtain and IP address automatically
option.
5. Double-click
OK twice to confirm and save your changes, and then close the Control
Panel.
Your computer is now ready to use the router’s DHCP server.
Windows NT 4.0 Workstations
First, check for the IP protocol and, if necessary, install it:
1. In the
Windows NT task bar, click the Start button, point to Settings, and then click
Control Panel.
2. In the
Control Panel window, double-click the Network icon.
3. In the
Network dialog box, click the Protocols tab.
4. The
Protocols tab displays a list of currently installed network protocols. If the list
includes TCP/IP, then the protocol has already been enabled. Skip to “Configure IP
Information”
5. If TCP/IP does not display as an installed component, click Add.
6. In the
Select Network Protocol dialog box, select TCP/IP, and then click OK. You may
be prompted to install files from your Windows NT installation CD or other media. Follow
the instructions to install the files.
7. After all files are installed, a window displays to inform you that a TCP/IP service called
DHCP can be set up to dynamically assign IP information.
8. Click
Yes to continue, and then click OK if prompted to restart your computer.
Configure Windows NT 4.0 for DHCP
1. Open the
Control Panel window, and then double-click the Network icon.
2. In the
Network dialog box, click the Protocols tab.
3. In the
Protocols tab, select TCP/IP, and then click Properties.
4. In the
Microsoft TCP/IP Properties dialog box, click the Obtain an IP address
automatically option.
5. Click OK twice to confirm and save your changes, and then close the Control Panel.
Your computer is now ready to use the router’s DHCP server.
FCC Warning statement:
LinkTek WL11N Wireless Broadband Router User Guide 79
This equipment has been tested and found to comply with the limits for a Class B digital device, pursuant to part
15 of the FCC rules. These limits are designed to provide reasonable protection against harmful interference in a
residential installation. This equipment generates, uses and can radiate radio frequency energy and, if not
installed and used in accordance with the instructions, may cause harmful interference to radio communications.
However, there is no guarantee that interference will not occur in a particular installation. If this equipment does
cause harmful interference to radio or television reception, which can be determined by turning the equipment
off and on, the user is encouraged to try to correct the interference by one or more of the following measures:
-Reorient or relocate the receiving antenna.
-Increase the separation between the equipment and receiver.
-Connect the equipment into an outlet on a circuit different from that to which the receiver is
connected.
-Consult the dealer or an experienced radio/TV technician for help.
1. This Transmitter must not be co-located or operating in conjunction with any other
antenna or transmitter.
2. This equipment complies with FCC RF radiation exposure limits set forth for an
uncontrolled environment. This equipment should be installed and operated with a
minimum distance of 20 centimeters between the radiator and your body.
3. Any changes or modifications (including the antennas) made to this device that are not
expressly approved by the manufacturer may void the user’s authority to operate the
equipment.